Delivery Chains Module
The Delivery Chains module in BINU ERP is dedicated to managing the delivery process of customer-ordered products. It serves as a bridge between the Sales module (where offers and orders are created) and downstream logistics operations (e.g., invoicing, payments, warehouse dispatch, and quality control). All delivery chains originate from confirmed offers and planning confirmations and include structured steps to ensure smooth product dispatch, tracking, and closure.

BINU ERP Guide
BINU ERP Guide
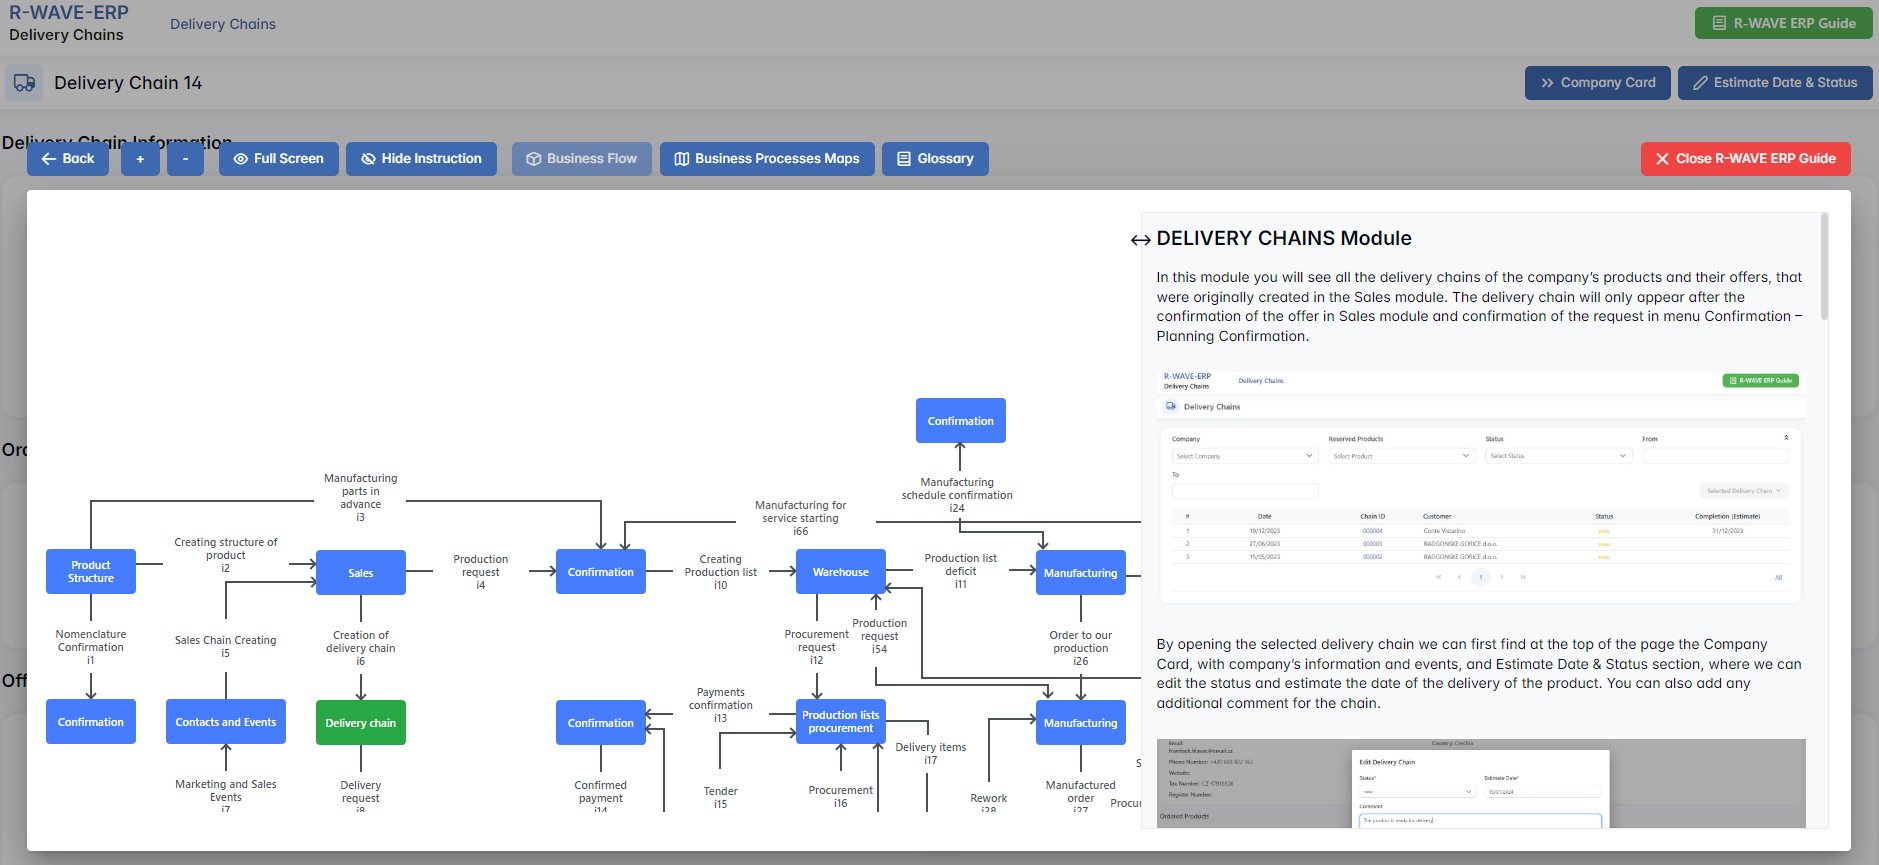
To support user navigation and clarity, BINU ERP includes a built-in contextual help system in the form of a pop-up guide window. This feature is available across different modules, including Delivery Chains, and is designed to help users understand where they are in the system and how to use the current section effectively.

Purpose
The ERP Guide window helps users by:
- Showing where you are within the system (module context).
- Providing a visual schema of your company’s business flow, helping you understand how the current module fits into the larger operational structure.
- Offering a quick-reference instruction panel with the main actions and functions available in the current tab (e.g., creating companies, filtering, scheduling events).
Layout and Content
When opened, the ERP Guide window is divided into two main areas:
- Left Side - Business Flow Map
This section displays a structured diagram of your company's processes and how the current module connects to others (e.g., CRM, Procurement, Sales, HR). It visually highlights your current position in the overall ERP environment. - Right Side - Functional Overview
Provides a concise, bullet-style instruction list describing the key operations available in the current module/tab.
Top Bar Options
At the top of the ERP Guide window, you’ll find two optional tools for deeper understanding:
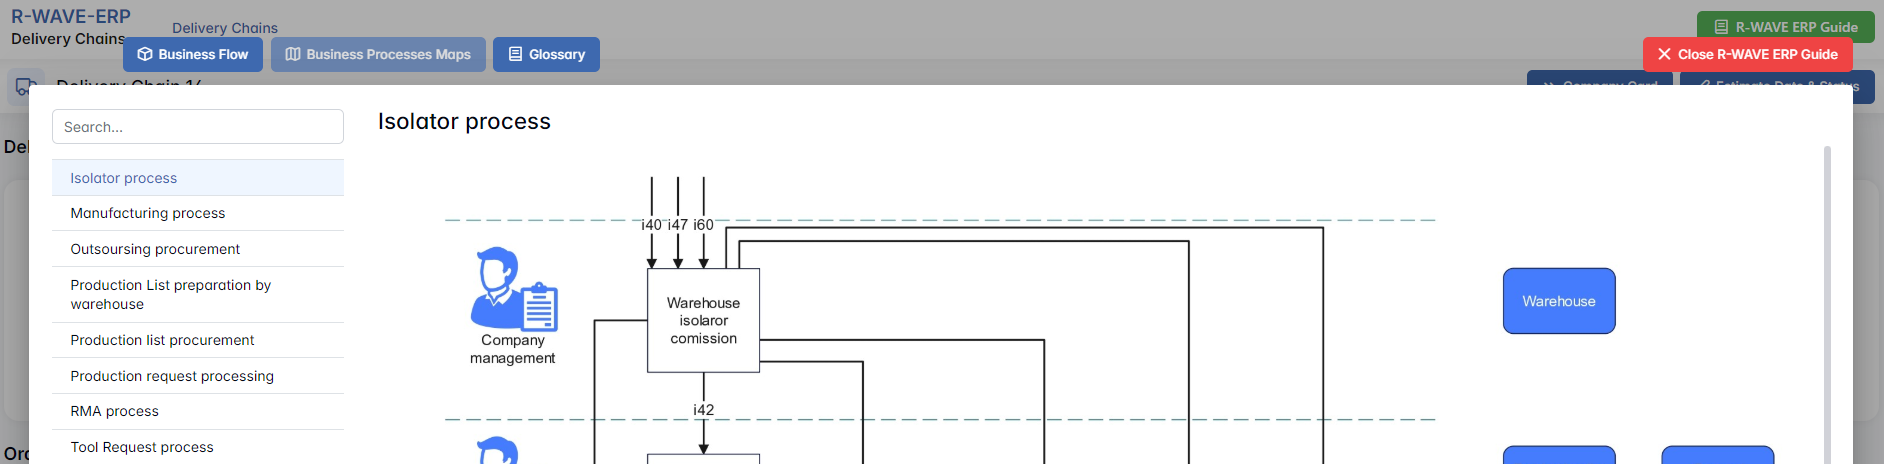
- Business Processes Maps - Opens a full interactive view of your organization’s process structure.

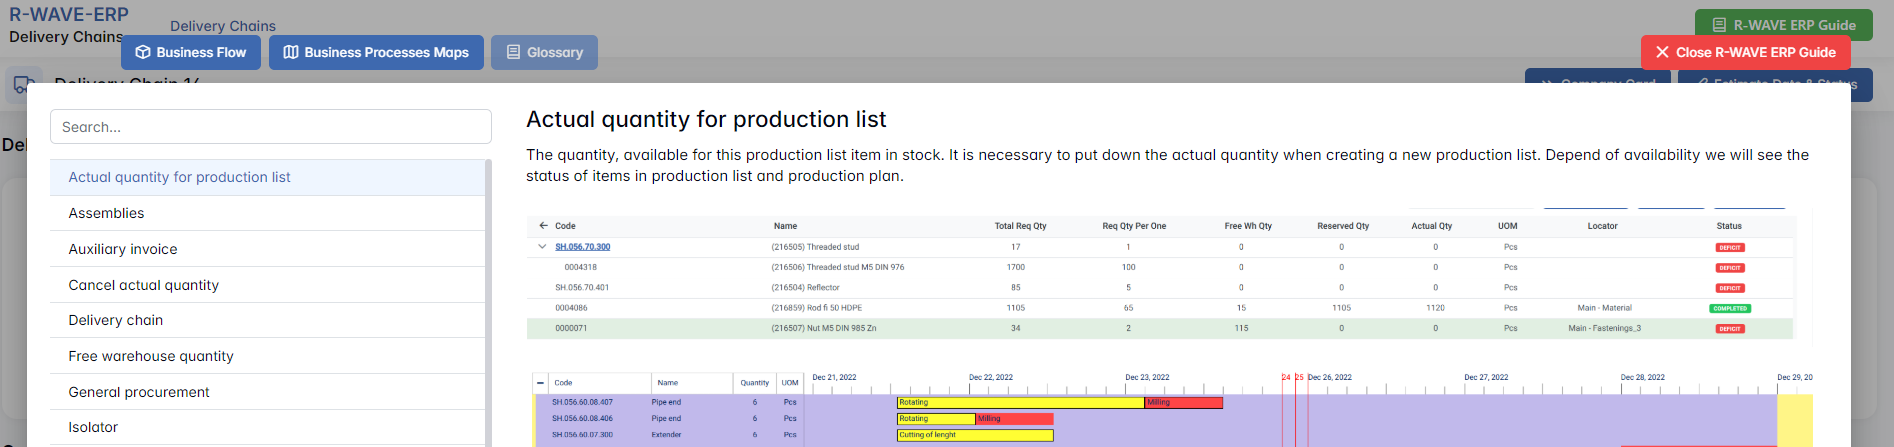
- Glossary - Provides definitions and descriptions of key terms and field labels used in the ERP interface.

The ERP Guide window can usually be opened via a dedicated icon or help button (often located in the upper right corner of the screen). It is non-intrusive and can be closed or reopened as needed, allowing users to stay focused without losing their place.
Delivery Chains Module Overview
Delivery Chains Module Overview
The Delivery Chains module in BINU ERP manages and tracks all outbound product deliveries that originate from the Sales module. It provides a centralized interface where logistics, invoicing, quality control, and payment statuses come together to support the successful fulfillment of customer orders.
The delivery chain will only appear after the confirmation of the offer in Sales module.
Each delivery chain serves as the operational and financial hub for a specific customer delivery, ensuring smooth communication between departments (Sales, Warehouse, QC, Accounting).
Filter Panel
Filter Panel
Allows narrowing down the list of delivery chains using:

- Company (select from existing customers)
- Reserved Products (select a specific product)
- Status (multi-select: e.g., New, In Progress, Delivered)
- From / To (date range filter)
Table Columns:

- Chain ID is clickable — opens the detailed Delivery Chain Page.
- Selecting a row activates the Selected Delivery Chain button with two options:
- Chain Page – Opens the detailed chain overview
- Remove – Deletes the chain (if no dependencies)
Delivery Chain Page
Delivery Chain Page
This is the central workspace where users manage every step of product delivery.
Delivery Chain Information
Displays key customer data, including:
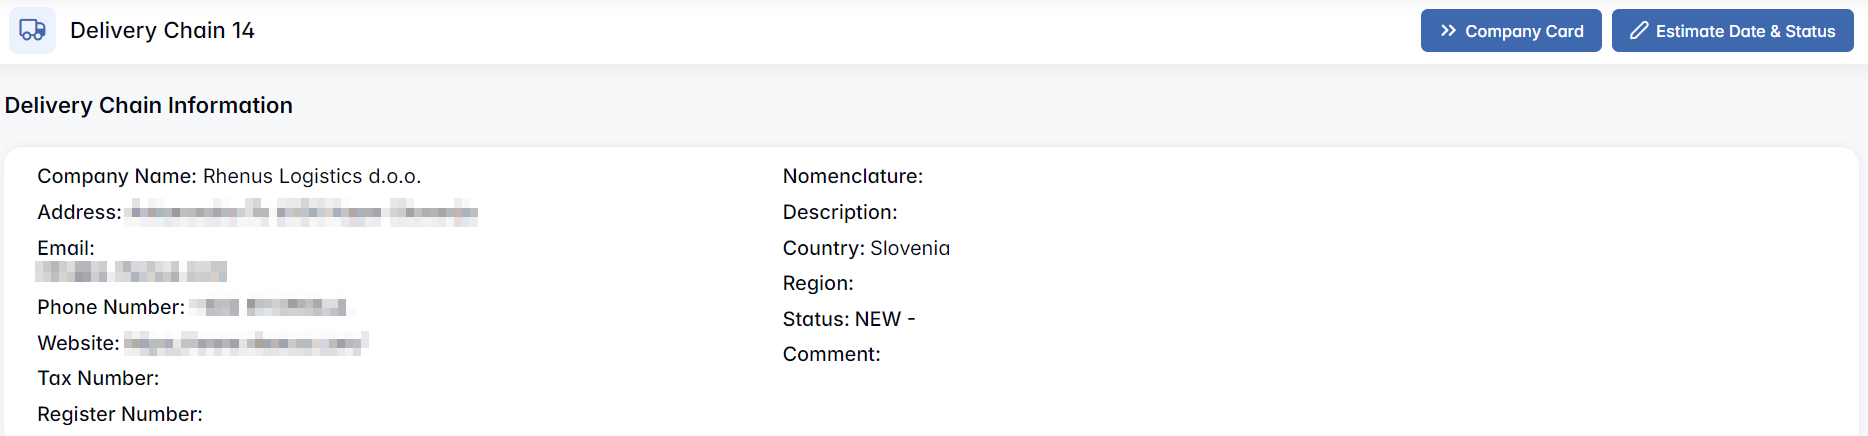
This information gives users a quick overview of the delivery context, including who the customer is, their location, and how to contact them. The status and comment fields provide insight into the progress and notes related to the delivery chain.
Additional Buttons
Company Card
Opens the full profile of the customer in the Contacts & Events module. This includes all company data and the complete history of interactions (e.g., emails, meetings, and previous orders). Use this if you need more details or to follow up on past communications.
Estimate Date & Status
Opens a pop-up window that allows users to update the status of the delivery chain and set or change the estimated delivery date.
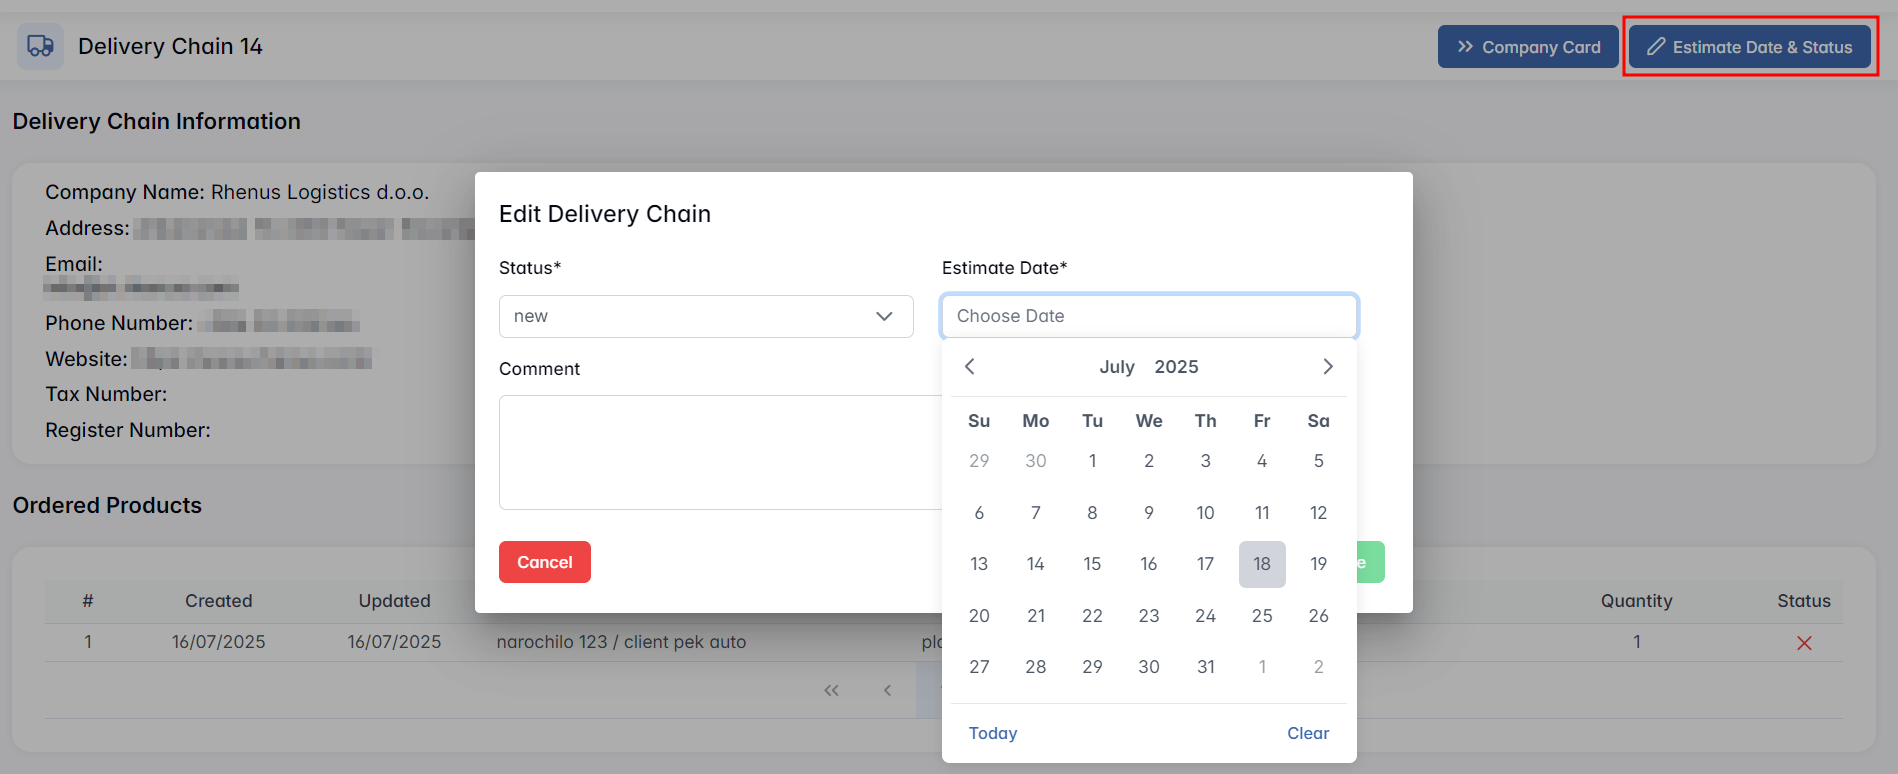
Use this feature to regularly update the expected delivery schedule and communicate delivery status across departments.
Ordered Products
List of all items included in the delivery:

Purpose: Overview of what is to be delivered and tracking its state. Each row includes basic product identifiers and quantity.
Offers
Shows the confirmed offer that originated this delivery:

Invoices
A dedicated section for creating and managing sales invoices.
Create Invoice

Clicking the button opens a confirmation modal: "Are you sure?". Upon confirmation, the system auto-generates an invoice based on the ordered products and their prices.

The invoice will appear in the table:

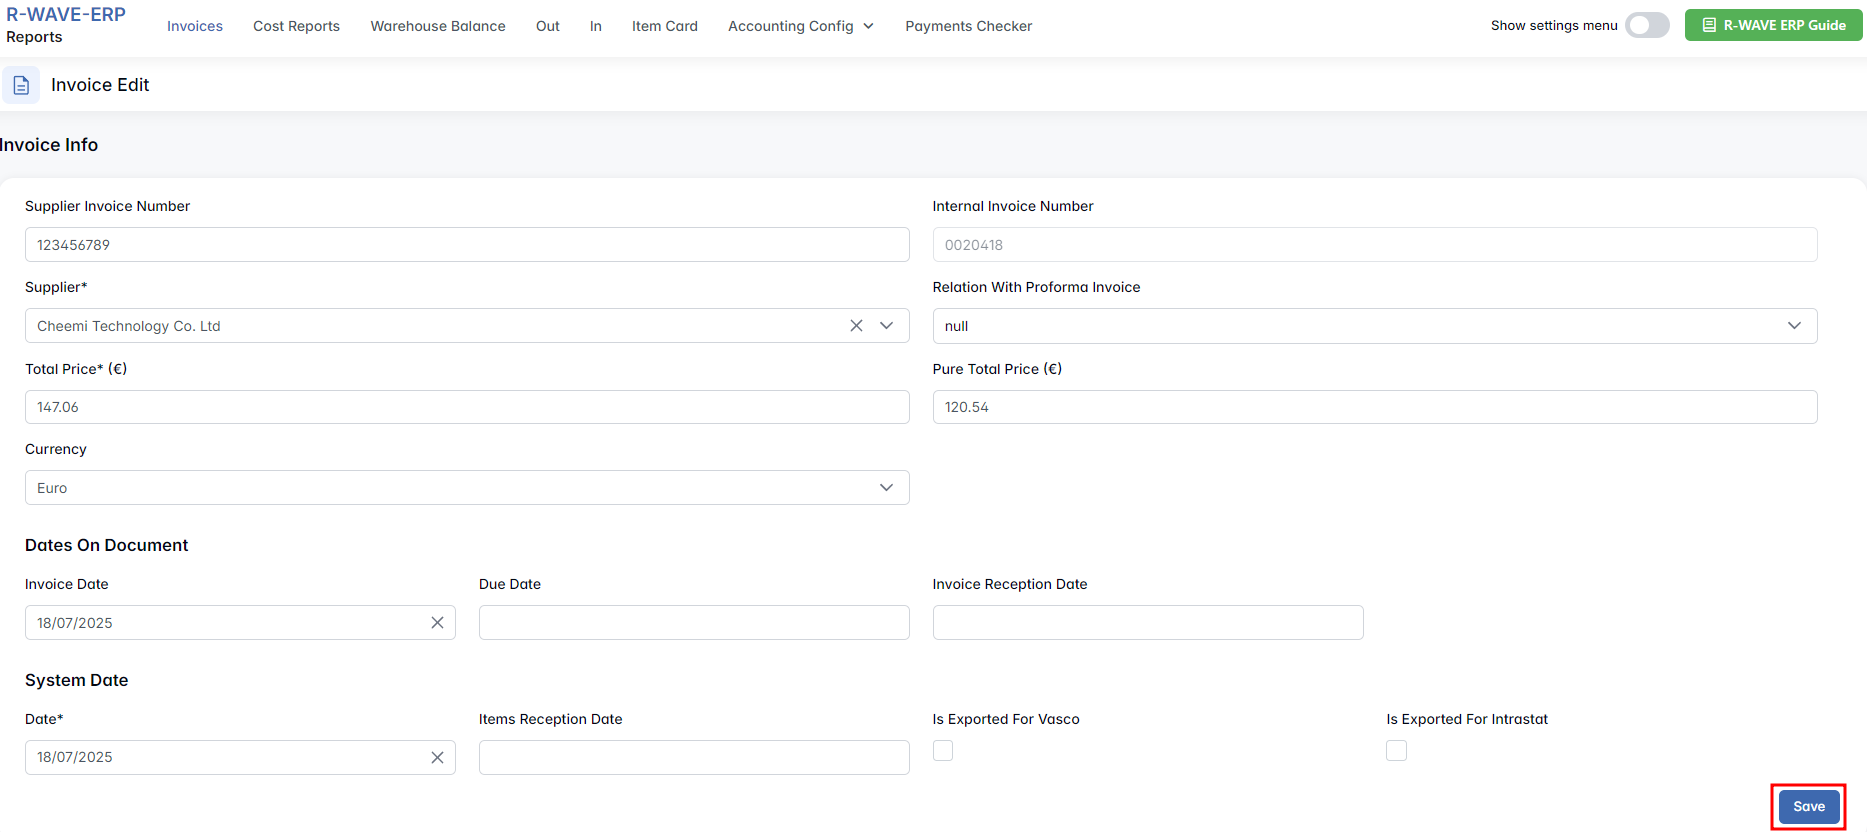
Selected Invoice Options
- Edit – Opens the invoice in the Reports module for further input (dates, additional services, files).
Note: Total Price (EUR), Pure Total Price (EUR), and Internal Invoice Number are not editable.
- Download PDF – Generates a PDF of the invoice.
- Files – Opens the file upload interface.
- Remove – Deletes the invoice if no dependent records exist.
Payments
Once an invoice exists, users can proceed to record a payment using the Create Payment button.

Create Payment Modal
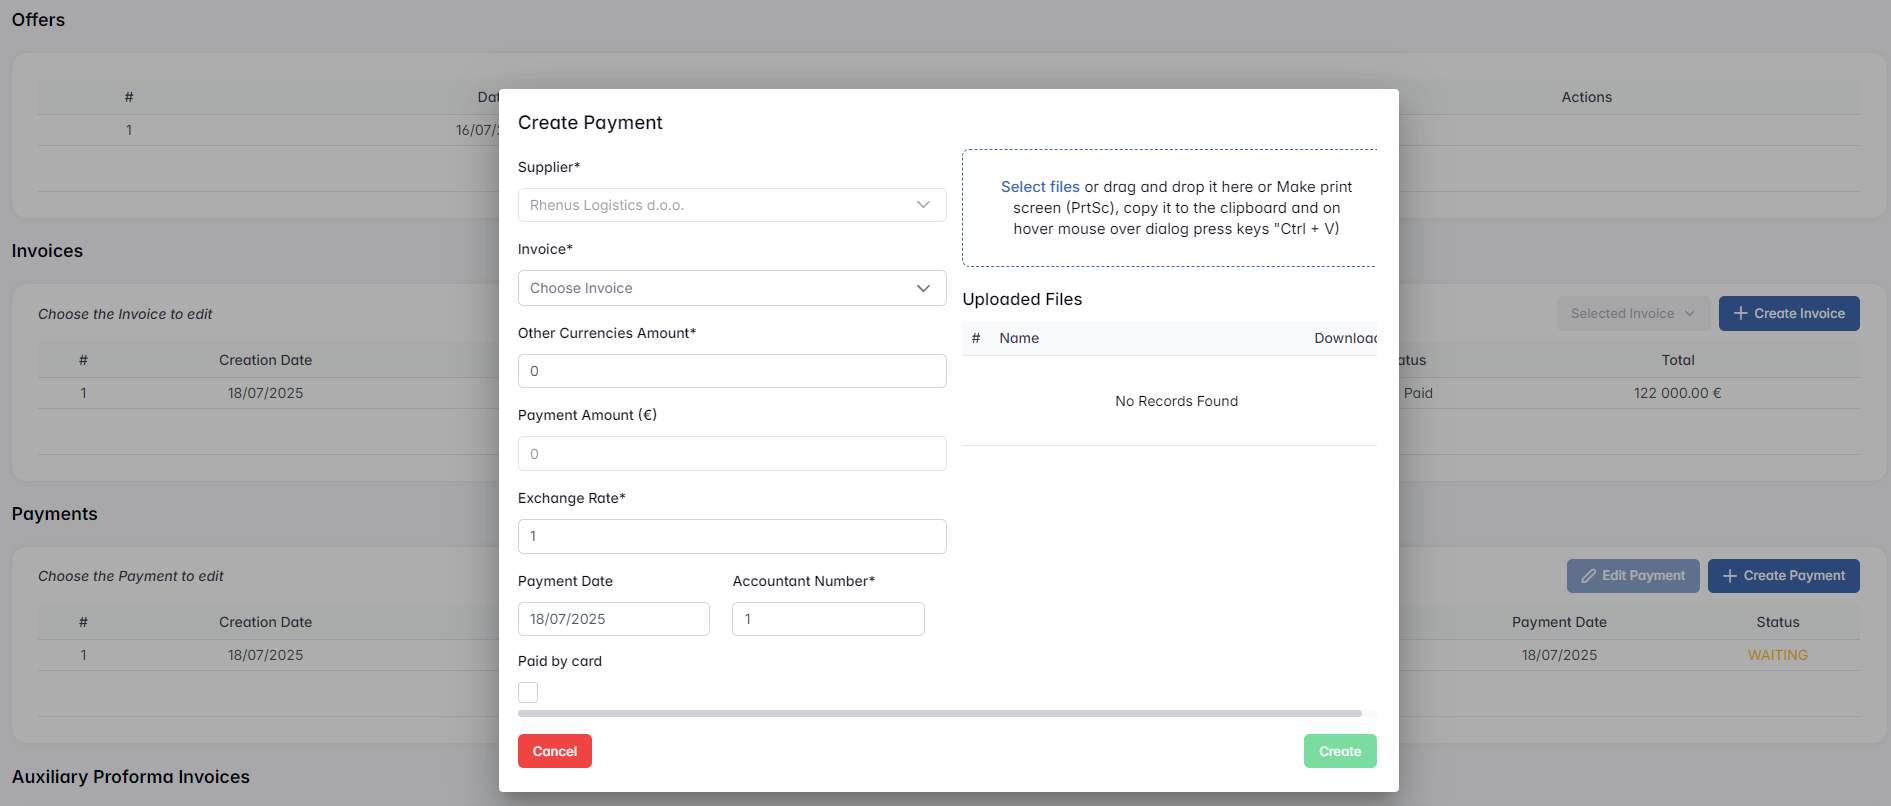
- Supplier* (auto-filled)
- Invoice* (dropdown – multiple selection possible)
- Other Currencies Amount* (editable)
- Payment Amount (€) (auto-filled and not editable)
- Exchange Rate* (editable)
- Payment Date
- Accountant Number* (manual input)
- Paid by card (checkbox)
- File Upload Area – Paste screenshot or drag-and-drop proof
Upon creation, the payment record appears in the table:

- Tracks payment records for the delivery invoice.
- The chain status changes to "Paid" once payments reach 100%.
Auxiliary Proforma Invoices
To document and invoice additional services linked to the delivery, separately from product orders.
Create Auxiliary Proforma Invoice

- Opens a new section in the Reports module with the Proforma Invoice Edit page.
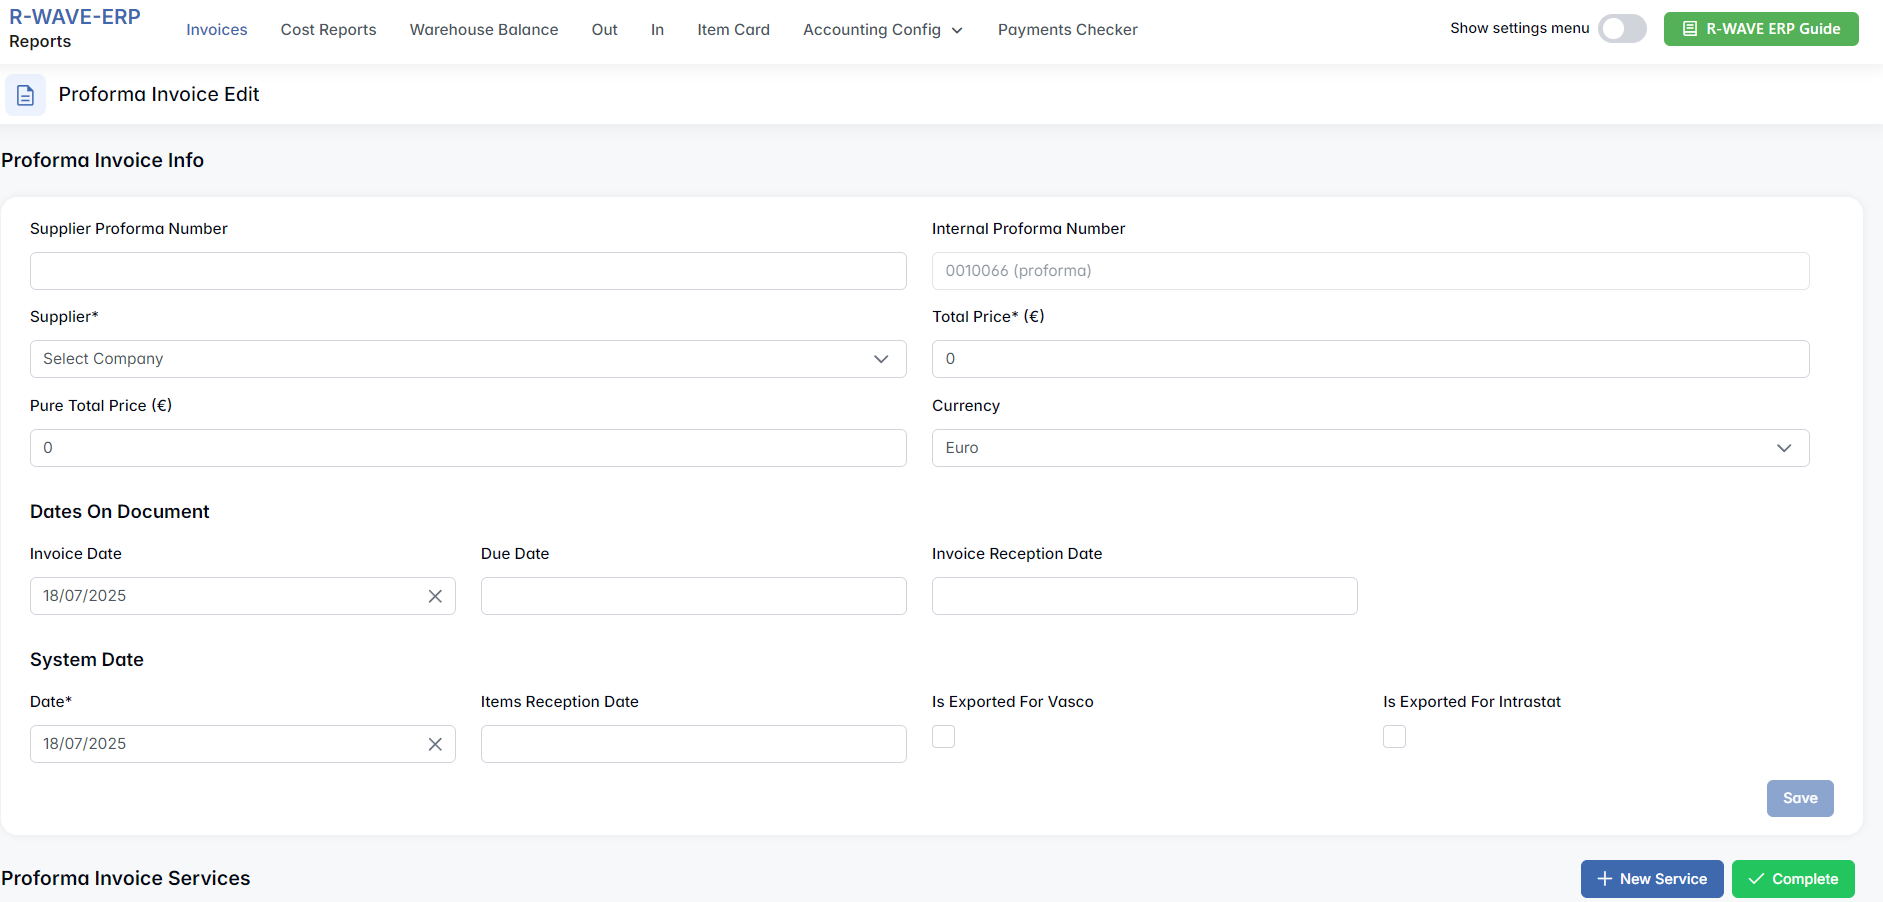
- Users can manually add the services and details.
After saving, it appears in the list:

Selected Auxiliary Invoice Options
- Edit – Opens the invoice in the Reports module for further input (dates, additional Proforma Invoice Services, files).
- Files – Opens the file upload interface.
- Remove – Deletes the invoice if no dependent records exist.
Auxiliary Invoices
Registers finalized financial documents for delivery-related services.
Create Auxiliary Invoice

- Used to create real invoices for auxiliary services (after a proforma).
- Created through Reports module as a continuation of the Proforma flow.
After saving, it appears in the list:

Selected Auxiliary Invoice Options
- Edit – Opens the invoice in the Reports module for further input (dates, additional Invoice Services, files).
- Files – Opens the file upload interface.
- Remove – Deletes the invoice if no dependent records exist.
Auxiliary Invoice Payments
To document financial settlements for non-product services in the delivery process.
To record payments for the auxiliary proforma invoices, users must first select an invoice from the list above (Auxiliary Invoices). This activates the Create Auxiliary Invoice Payments button.
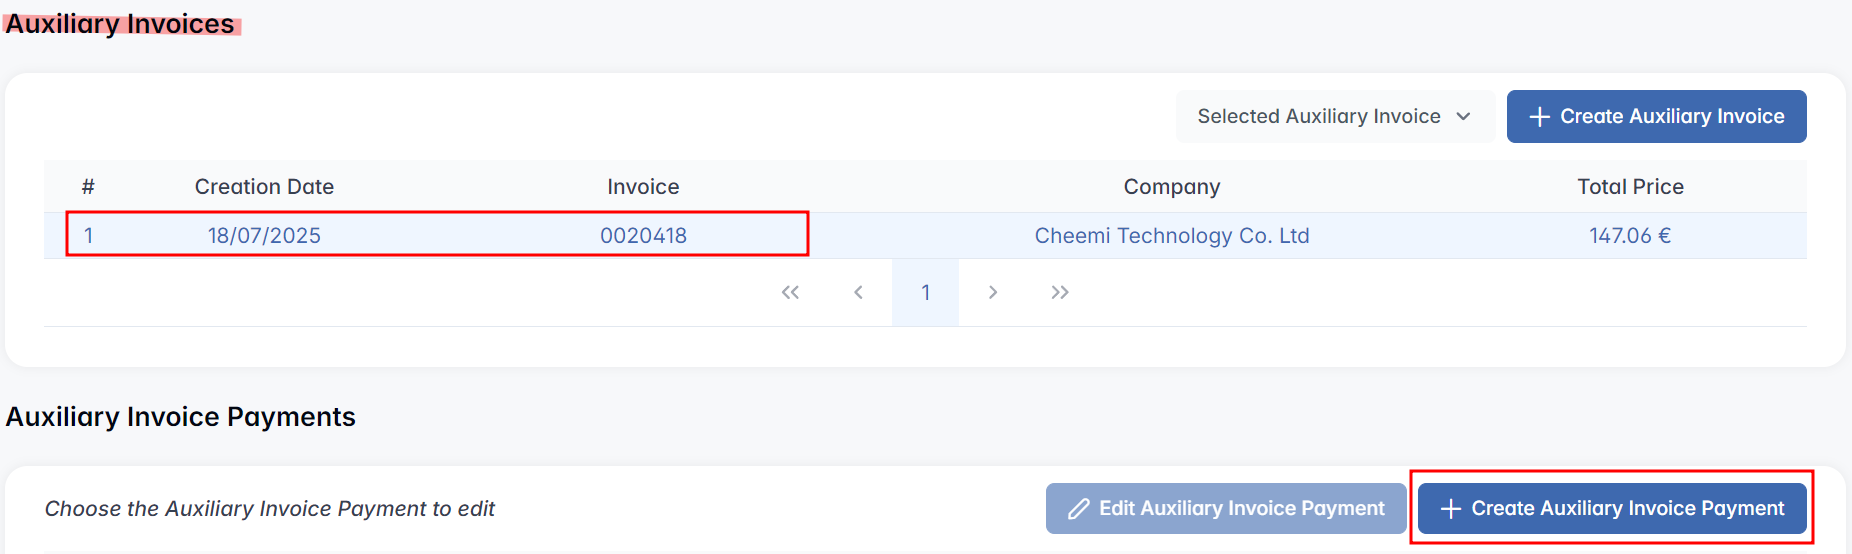
Create Auxiliary Payment
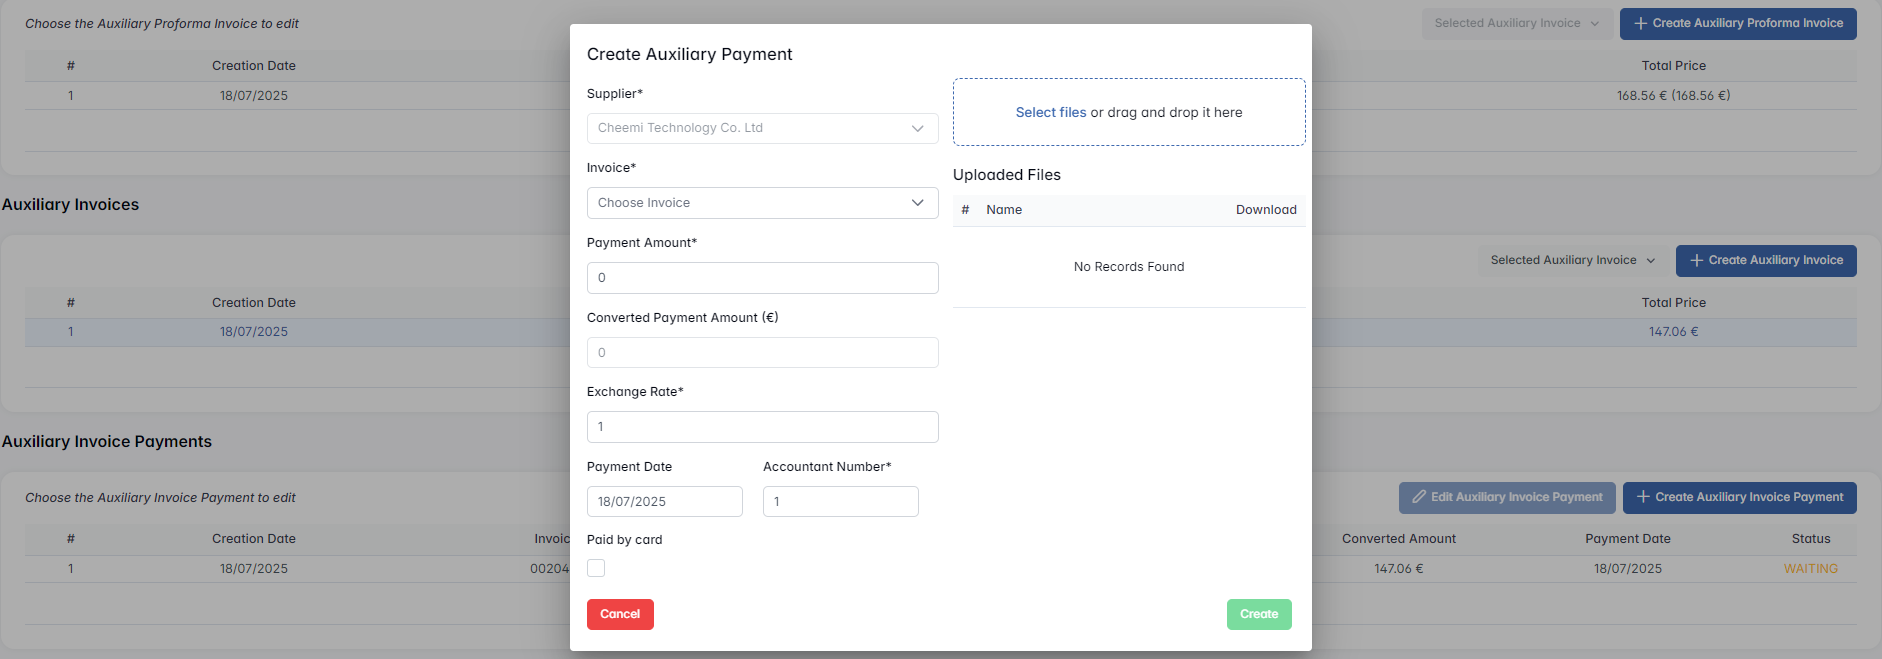
- Supplier* (auto-filled)
- Invoice* (select from dropdown)
- Payment Amount* (editable)
- Converted Amount (€) (editable)
- Exchange Rate* (editable)
- Payment Date
- Accountant Number* (manual input)
- Paid by card (checkbox)
- File Upload Area
The recorded payment appears below:

Status will change once the payment is fully processed or marked complete.
The Edit Auxiliary Invoice Payment button becomes available (activated upon row selection).
Files
Users can upload any relevant documents (PDFs, receipts, delivery instructions, etc.)

+ Add File: Drag and drop or browse manually.