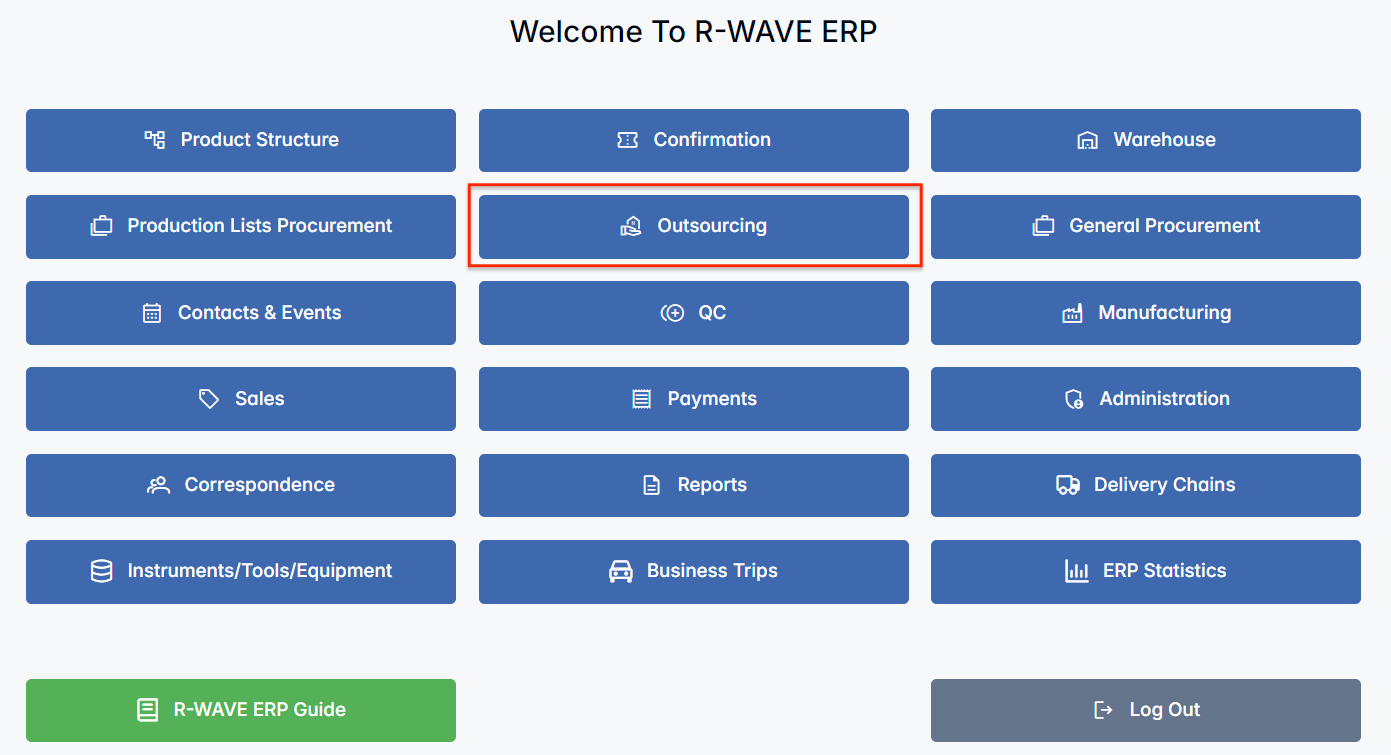
Outsourcing Module
The Outsourcing module in BINU ERP enables companies to efficiently manage subcontracted manufacturing and assembly operations. Whether driven by automated requests from the production plan or manual inputs by employees, this module supports the full outsourcing lifecycle — from initial request to delivery and payment.
By centralizing all outsourcing activities, the system helps procurement teams form structured supplier chains, handle documentation, track invoice payments, and ensure timely deliveries. It’s particularly valuable for production environments where external suppliers are engaged for machining, welding, painting, or other technical processes that complement internal manufacturing capacity.
BINU ERP Guide
To support user navigation and clarity, BINU ERP includes a built-in contextual help system in the form of a pop-up guide window. This feature is available across different modules, including Outsourcing, and is designed to help users understand where they are in the system and how to use the current section effectively.

Purpose
The ERP Guide window helps users by:
- Showing where you are within the system (module context).
- Providing a visual schema of your company’s business flow, helping you understand how the current module fits into the larger operational structure.
- Offering a quick-reference instruction panel with the main actions and functions available in the current tab (e.g., creating companies, filtering, scheduling events).
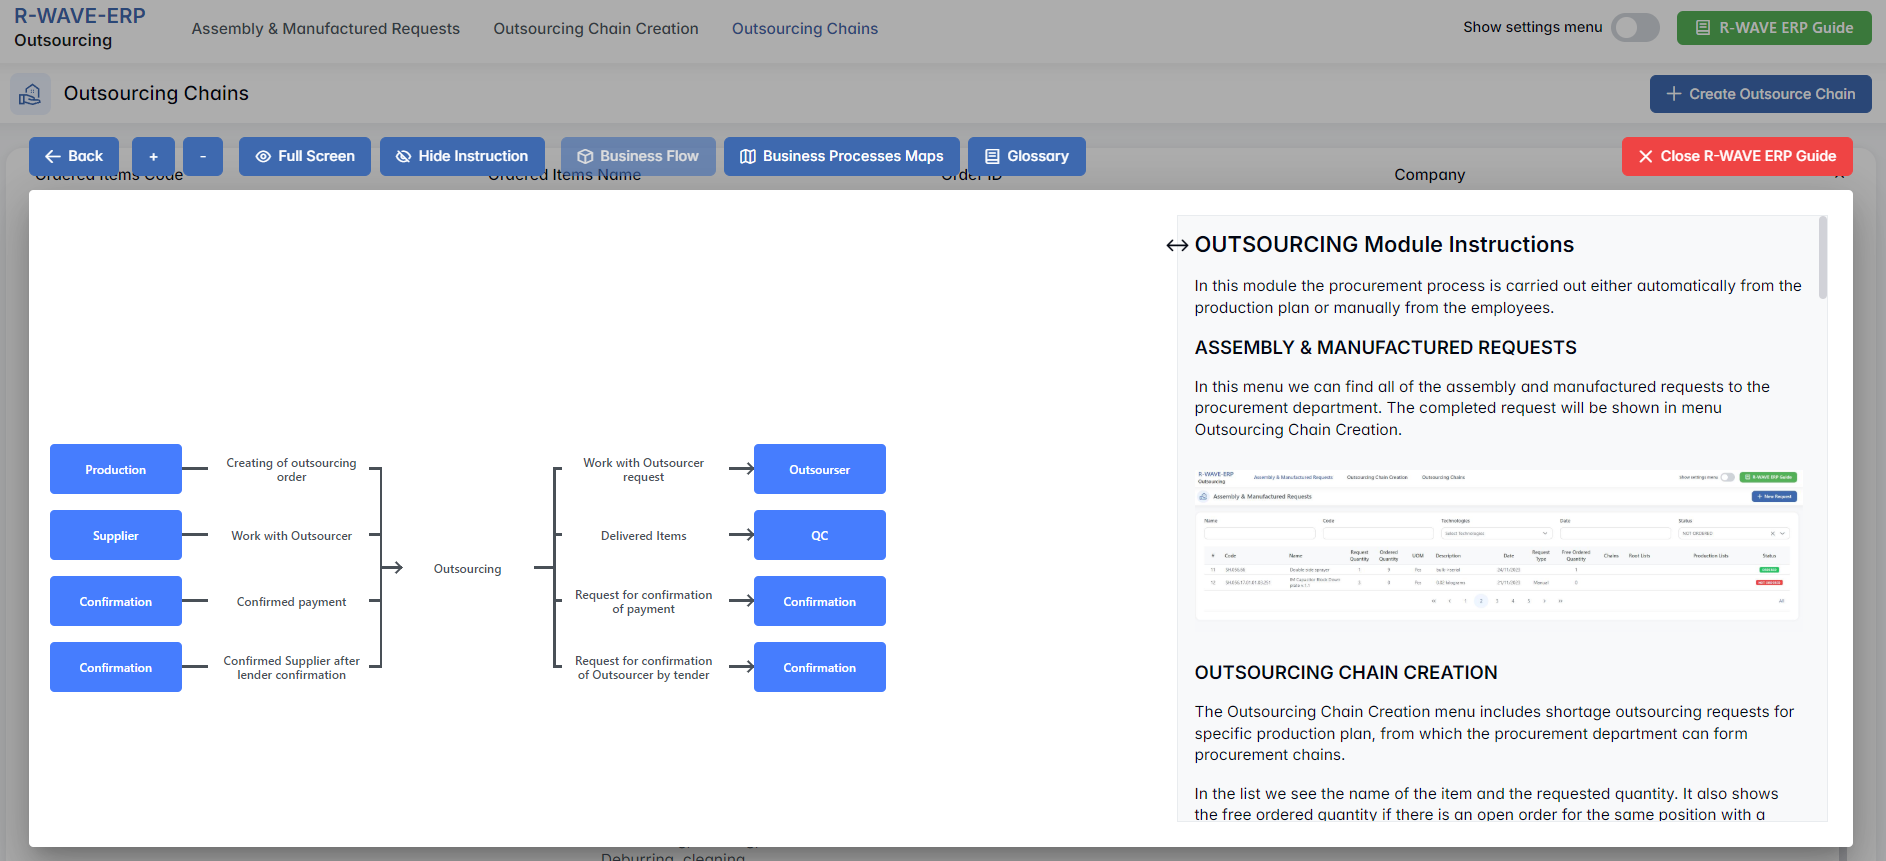
Layout and Content
When opened, the ERP Guide window is divided into two main areas:
- Left Side — Business Flow Map
This section displays a structured diagram of your company's processes and how the current module connects to others (e.g., CRM, Procurement, Sales, HR). It visually highlights your current position in the overall ERP environment. - Right Side — Functional Overview
Provides a concise, bullet-style instruction list describing the key operations available in the current module/tab.
Top Bar Options
At the top of the ERP Guide window, you’ll find two optional tools for deeper understanding:
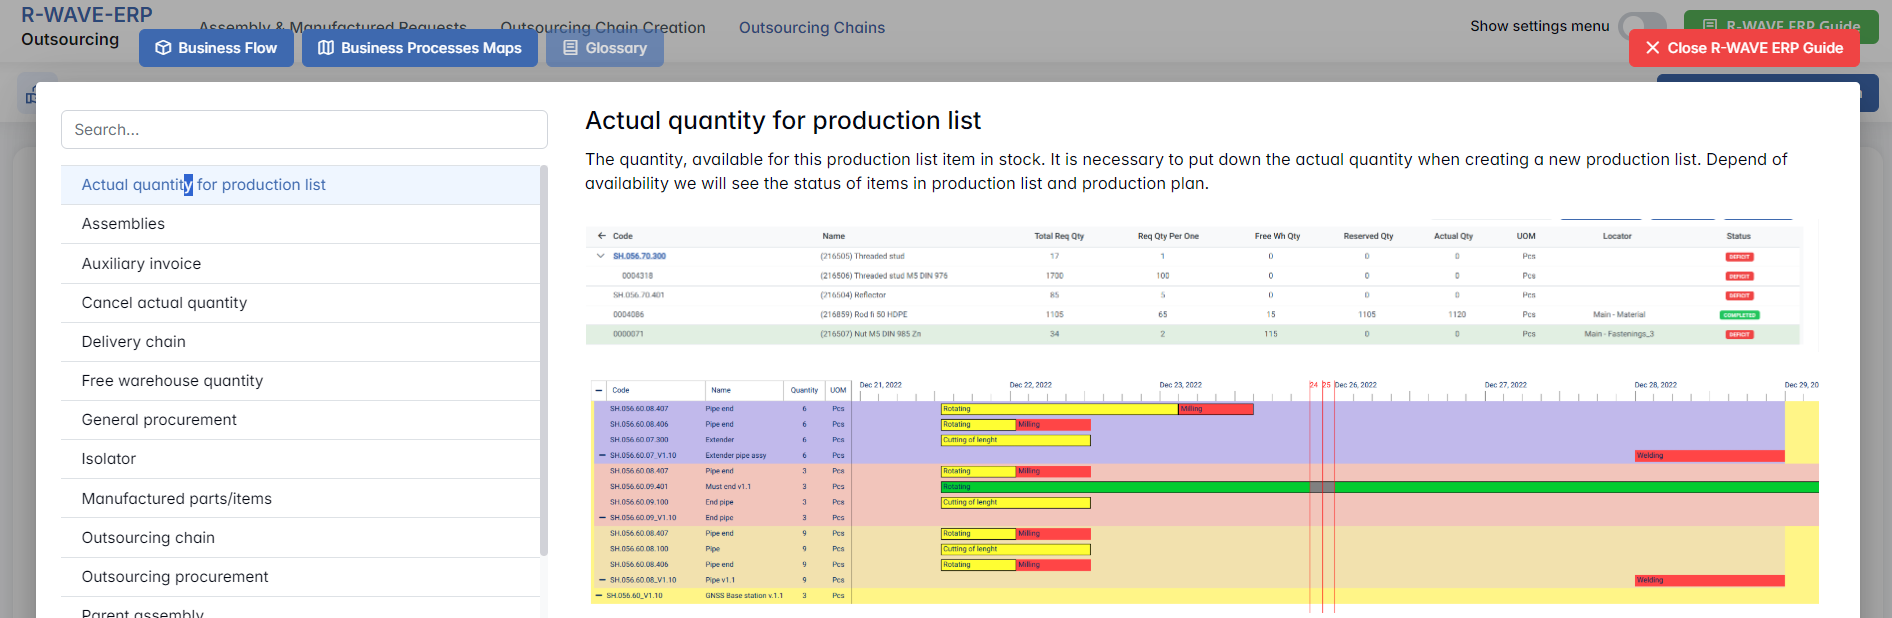
- Business Processes Maps – Opens a full interactive view of your organization’s process structure.

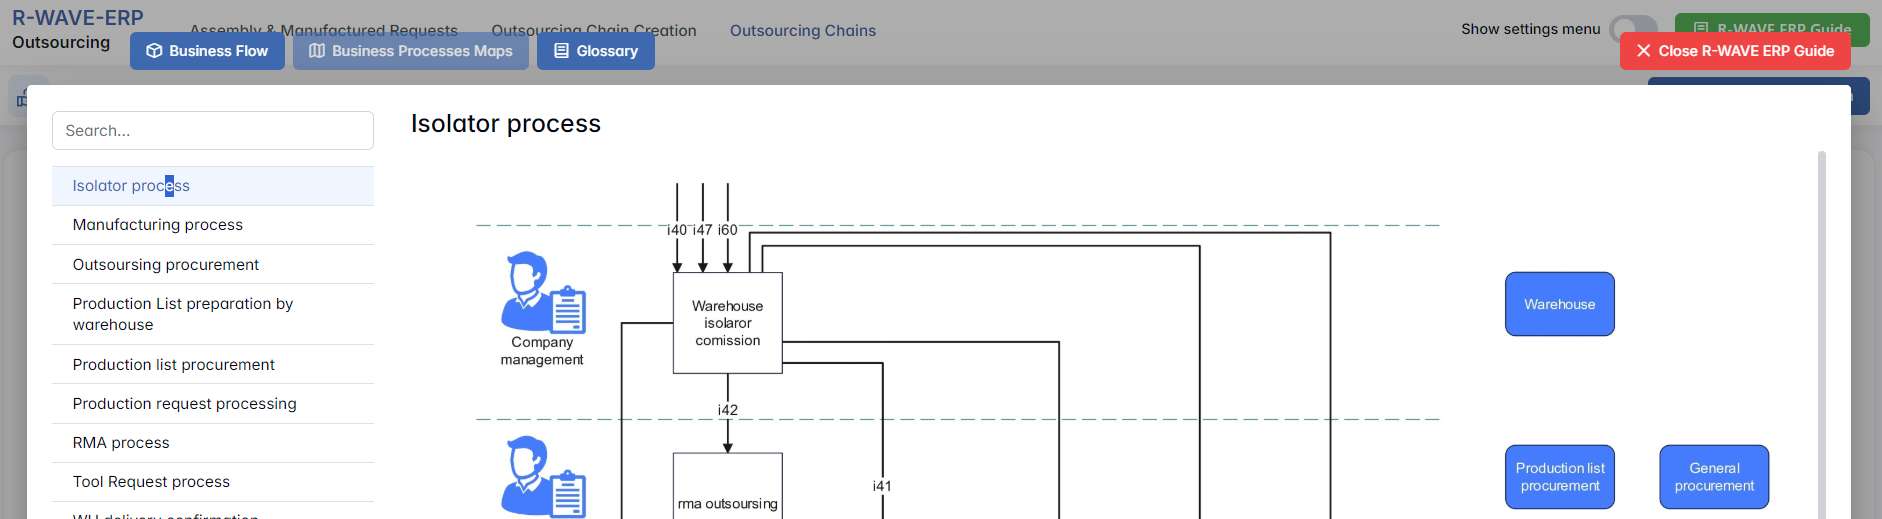
- Glossary – Provides definitions and descriptions of key terms and field labels used in the ERP interface.

The ERP Guide window can usually be opened via a dedicated icon or help button (often located in the upper right corner of the screen). It is non-intrusive and can be closed or reopened as needed, allowing users to stay focused without losing their place.
Outsourcing Overview
The Outsourcing module in BINU ERP streamlines the procurement of assemblies and manufactured parts from third-party suppliers. It supports both automatic generation of requests from production plans and manual submissions, offering flexible control over outsourced production steps.
This module is especially useful for companies working with complex product structures or multi-stage external processes (e.g., coating, mechanical treatment, assembly). It ensures traceability and discipline at every step — from request creation to chain setup, invoice handling, and delivery confirmation.

The module is structured into three key tabs, reflecting the natural outsourcing workflow:
- Assembly & Manufactured Requests – collection point for all internal outsourcing demands.
- Outsourcing Chain Creation – where procurement specialists group items, assign suppliers, and initiate sourcing chains.
- Outsourcing Chains – the full management space for each chain: item tracking, documentation, invoices, payments, and delivery statuses.
Assembly & Manufactured Requests
Assembly & Manufactured Requests
The Assembly & Manufactured Requests tab is the entry point of the Outsourcing module. It displays all internal requests for outsourcing manufacturing or assembly tasks, generated either automatically from the production plan or manually by employees.

This interface is designed for review, filtering, and submission of items that need to be ordered from external suppliers.
Filter Panel
Located at the top of the Assembly & Manufactured Requests interface, this tab allows users to narrow down visible requests using basic and advanced filters:

- Name / Code – Text fields to search by full or partial item name or internal code. Useful for quickly locating known items.
- Technologies – Multi-select dropdown to filter items based on associated materials or processing types (e.g., Stainless Steel, RAL coating, CNC).
- Date – Filter requests by creation date to focus on recent or backlogged items.
- Status – Dropdown with three request statuses:
- NOT ORDERED – no chain created yet
- PARTLY ORDERED – request is partially covered
- ORDERED – fully included in a sourcing chain
These filters can be used individually or in combination for fast and targeted list navigation.
Table View
The main table provides a detailed list of current outsourcing requests. Each row represents a specific component or assembly needed for production.
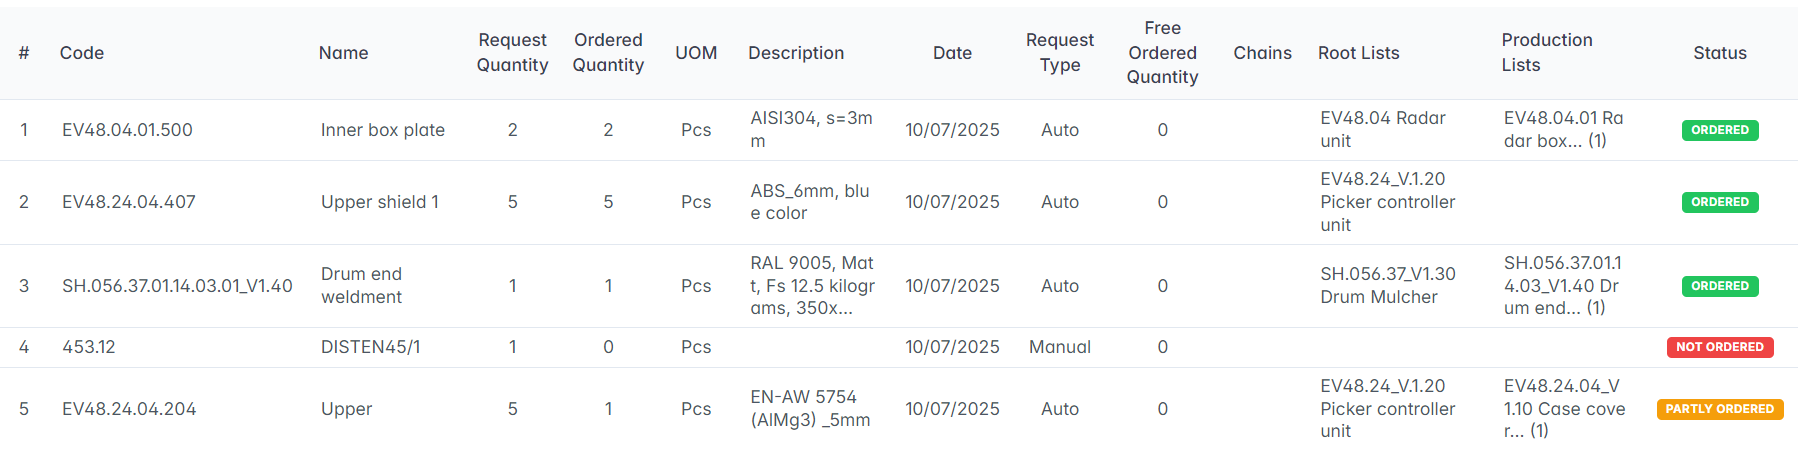
| Column | Description |
|---|---|
| Code | Internal code of the requested item (linked to the nomenclature) |
| Name | Item name (e.g., Support assembly, Bus PH) |
| Request Quantity | Total quantity required for outsourcing |
| Ordered Quantity | Quantity already included in active outsourcing chains |
| UOM | Unit of measure (e.g., Pcs) |
| Technologies | Materials or technological process involved (e.g., ALMg5, Fe, Stainless Steel) |
| Date | Date of request creation |
| Request Type | Indicates whether the request was generated automatically (Auto) or manually (Manual) |
| Free Ordered Quantity | If an existing chain has a higher ordered quantity than required, this field shows available surplus |
| Chains | Number of chains the request is already part of |
| Root Lists | Product or component group from which the request originates |
| Production Lists | Specific product structures linked to this request |
| Status | Indicates whether the request is NOT ORDERED, PARTLY ORDERED, or ORDERED |
Status Logic
Each request can have one of the following statuses:
- NOT ORDERED (red) – No outsourcing chain has been created for this request.
- PARTLY ORDERED (orange) – Some of the requested quantity is already included in chains, but not fully.
- ORDERED (green) – The entire request has been fulfilled through outsourcing chains.
Creating a New Request
To manually add a new item to the outsourcing request list, click the “+ New Request” button at the top-right of the screen.

This opens the Add a New Item to Request modal window, where users can search and select items from the warehouse catalog.
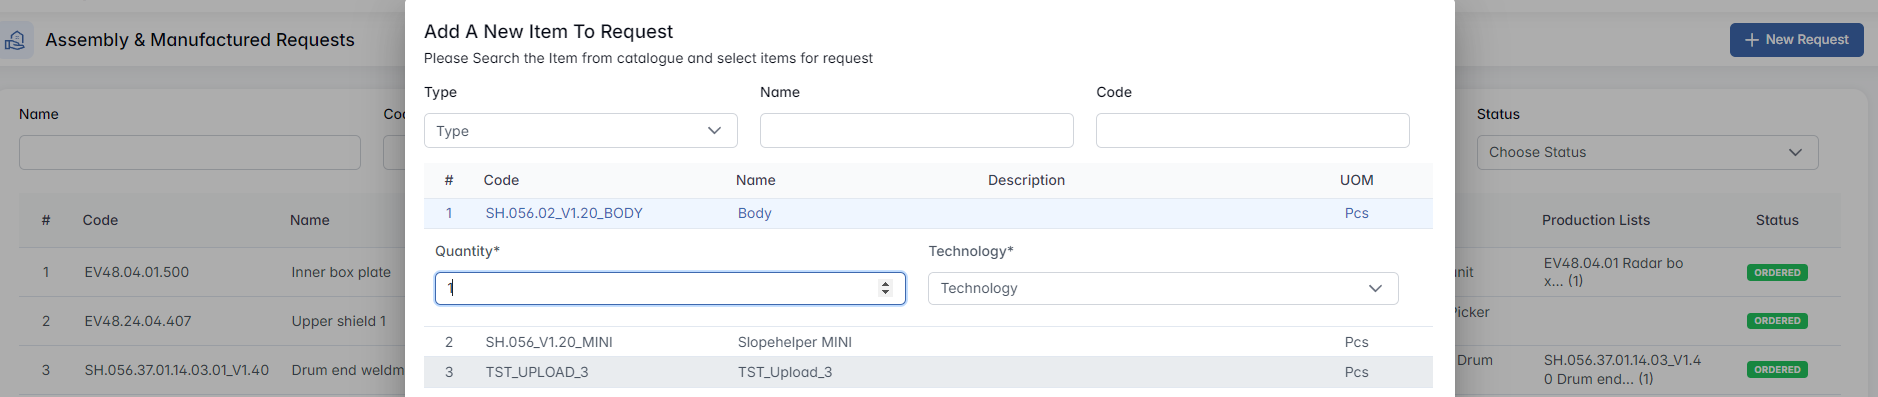
At the top of the modal, a filter panel allows users to narrow the item list by:
- Type – Choose between Assembly and Manufactured items.
- Name / Code – Text fields to search by full or partial item name or internal code.
Below the filters, a table displays available catalogue items. Each row represents a manufactured or assembled item available for outsourcing. To include an item in the request:
- Click on the desired row.
- A selection form will appear prompting the user to define:
- Quantity (required)
- Technology (required) — must be one of the confirmed technologies linked to the item.
- Click Add to confirm the selection.
If the item has no technologies defined, the system will display the message: “No technology to select from” — and the row cannot be added.

Items marked as NEW (Not Confirmed) in the system cannot be selected either. Only confirmed catalogue items are eligible for outsourcing requests.

Once successfully added, the item appears in the Assembly & Manufactured Requests table and is ready to be included in an outsourcing chain.
Outsourcing Chain Creation
Outsourcing Chain Creation
The Outsourcing Chain Creation tab allows procurement teams to group open manufacturing or assembly requests and assign them to specific suppliers. This is the core control point where outsourcing chains are initiated or extended, based on production demand and supplier availability.

It supports:
- Creating new outsourcing chains
- Adding requests to existing chains with available capacity
- Managing unfulfilled or outdated requests
Filter Panel
Located at the top of the screen, the filter panel helps narrow down the list of pending requests using key criteria:

- Name / Code – Text fields to search by partial or full item identifiers.
- Technologies – Multi-select dropdown to filter by associated material or processing technologies.
- Date – Filter requests by creation date.
- Creators – Filter by the user who submitted the request.
- Statuses – Multi-select dropdown with the following options:
- NOT ORDERED
- PARTLY ORDERED
- ORDERED
These filters can be combined to focus on specific outsourcing needs, user activity, or items by status.
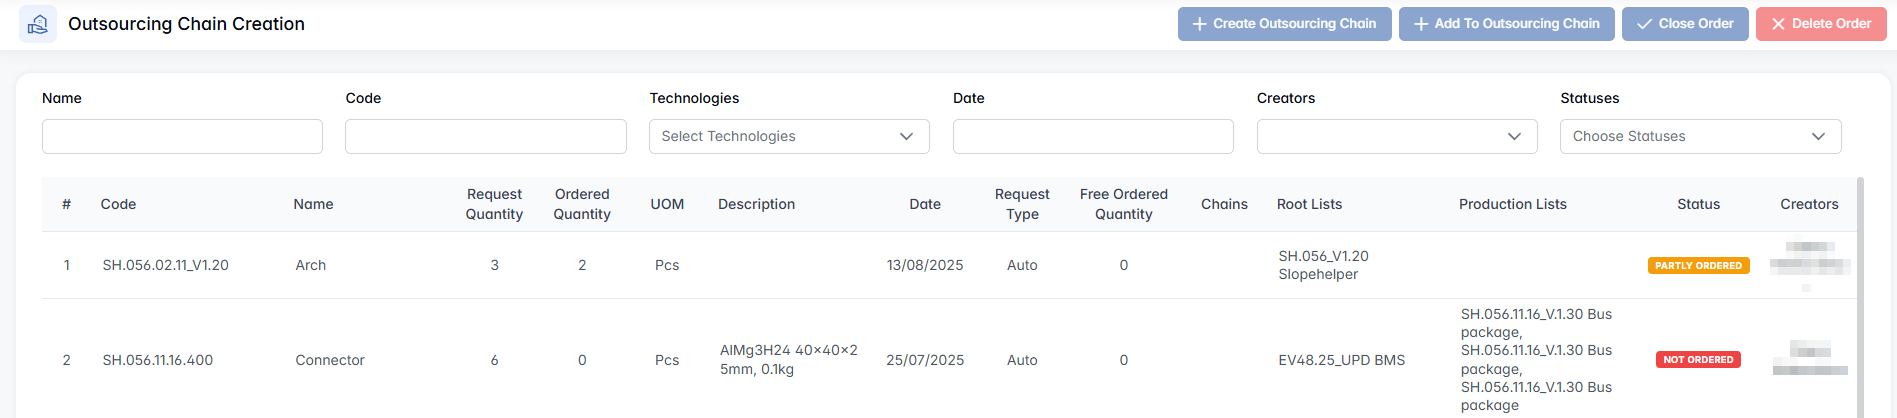
Request Table
Below the filters, a sortable table displays all relevant outsourcing requests.
| Column | Description |
|---|---|
| Code / Name | Item identifiers (sortable by name) |
| Request Quantity | Total quantity needed |
| Ordered Quantity | Quantity already assigned to chains |
| UOM | Unit of measure |
| Description | Item details or specifications |
| Date | Request creation date |
| Request Type | Auto (system-generated) or Manual |
| Free Ordered Quantity | Surplus quantity available in an existing chain |
| Chains | Indicates chain associations |
| Root Lists | Linked parent assemblies |
| Production Lists | Specific production structures |
| Status | Ordering status: NOT ORDERED, PARTLY ORDERED, ORDERED |
| Creators | Request initiator name |
Action Buttons
Located above the table, four buttons allow users to take action on selected rows: Create Outsourcing Chain, Add to Outsourcing Chain, Close Order and Delete Order.

These buttons become active only when one or more rows are selected. Their availability depends on the status of the selected records:
| Selected Status | Active Buttons |
|---|---|
| ORDERED | None – all buttons disabled |
| PARTLY ORDERED | All except Delete Order |
| NOT ORDERED | All except Close Order |
| Mixed (NOT + PARTLY) | All except Close Order and Delete Order |
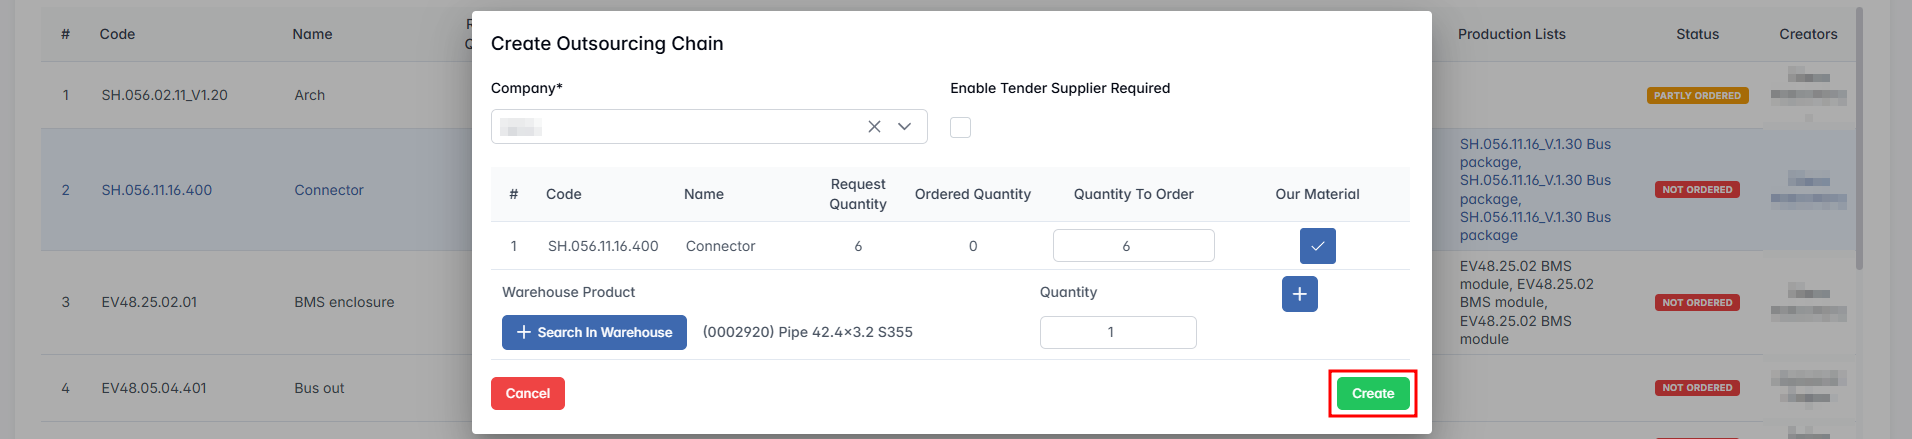
Create Outsourcing Chain
When this option is selected, a modal window opens allowing you to form a new chain.

- Company* – Select the supplier to assign this order to.
- Enable Tender Supplier – Optional toggle to activate supplier selection via tender.
- Item Table – Displays selected request(s) with editable fields:
| Field | Description |
|---|---|
| Code / Name | From the selected request |
| Request Quantity | Required from production |
| Ordered Quantity | Already assigned (if any) |
| Quantity To Order | Editable field to define the actual amount ordered from the supplier |
- Our Material (Checkbox)

If checked, this indicates that the company will supply the material for outsourcing from its own warehouse stock. Upon selecting Our Material, an additional section appears for each row: Warehouse Product / Quantity
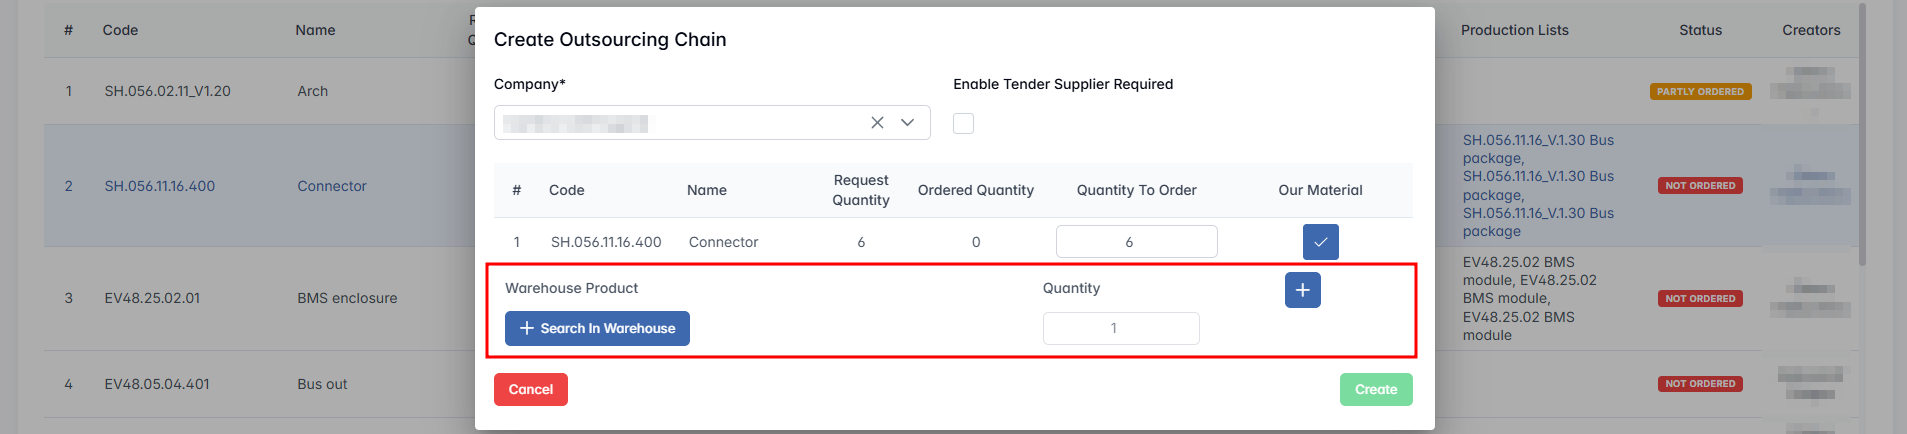
- Search in Warehouse – opens material selection modal.
Search in Warehouse
This modal window allows users to select suitable warehouse items to provide for outsourcing.
- Categories – Filter by item group or classification
- Name / Code – Search fields for material identification
- Warehouses – Filter by warehouse location
- Locator – Physical storage coordinates (e.g., R:2 Col:3 Sh:2 Pl:3)
- Type – Filter by inventory type (e.g., Raw Material, Component)
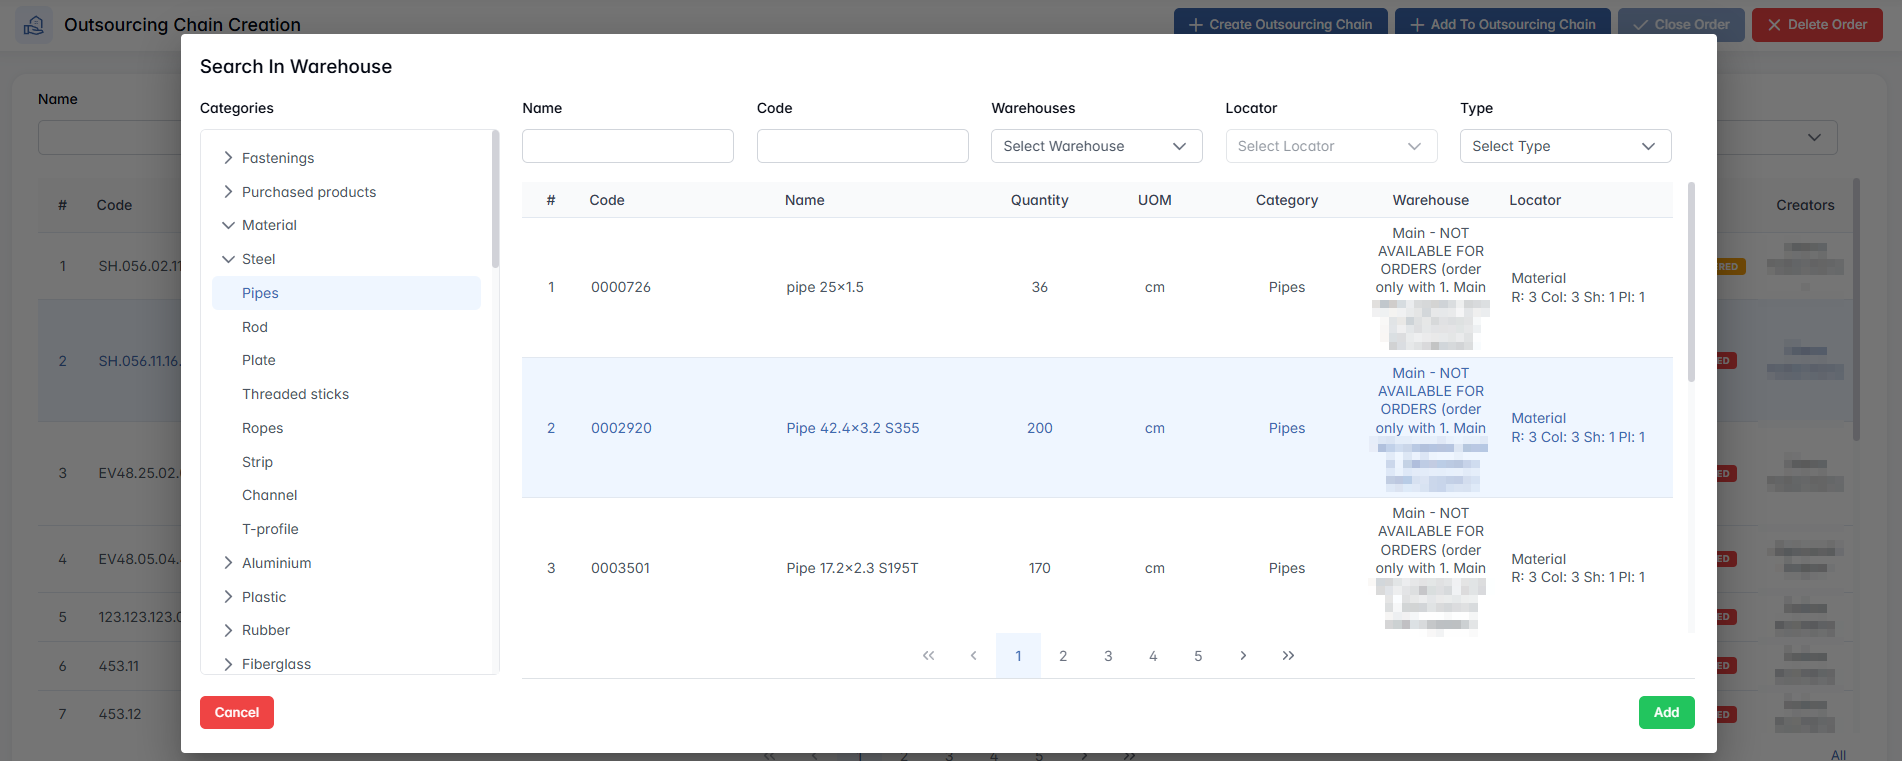
The user selects a material and clicks Add. The system returns to the previous view, now displaying:
Additional materials can be added by repeating the process. Each outsourcing line can have multiple warehouse items linked to it.
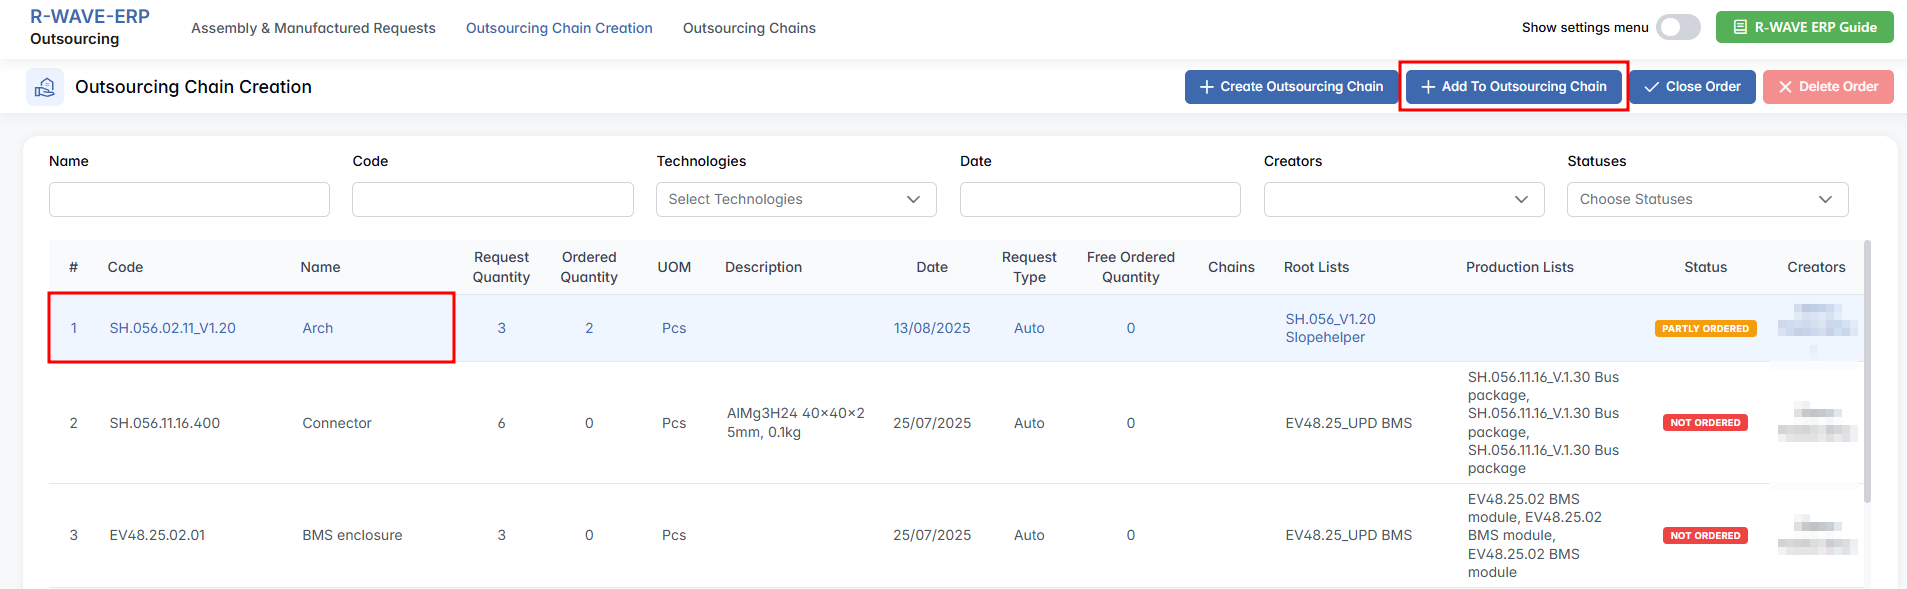
Add to Outsourcing Chain
The Add to Outsourcing Chain function allows users to include existing outsourcing requests into an already created sourcing chain, provided there is available capacity and matching supplier context.
This option is available from the Outsourcing Chain Creation menu when one or more eligible requests are selected.
Once selected, a modal window opens where the user configures the addition of the selected request to an existing chain.
- Order ID – Direct search by order identifier.
- With Free Items – Optional checkbox to allow the use of surplus quantities from open chains.
Enter Quantities to Add
A summary table appears with editable fields for the selected request:

The Quantity To Order field is editable and should reflect how much of the remaining request will be added to the chain.
Our Material
If the Our Material checkbox is enabled:
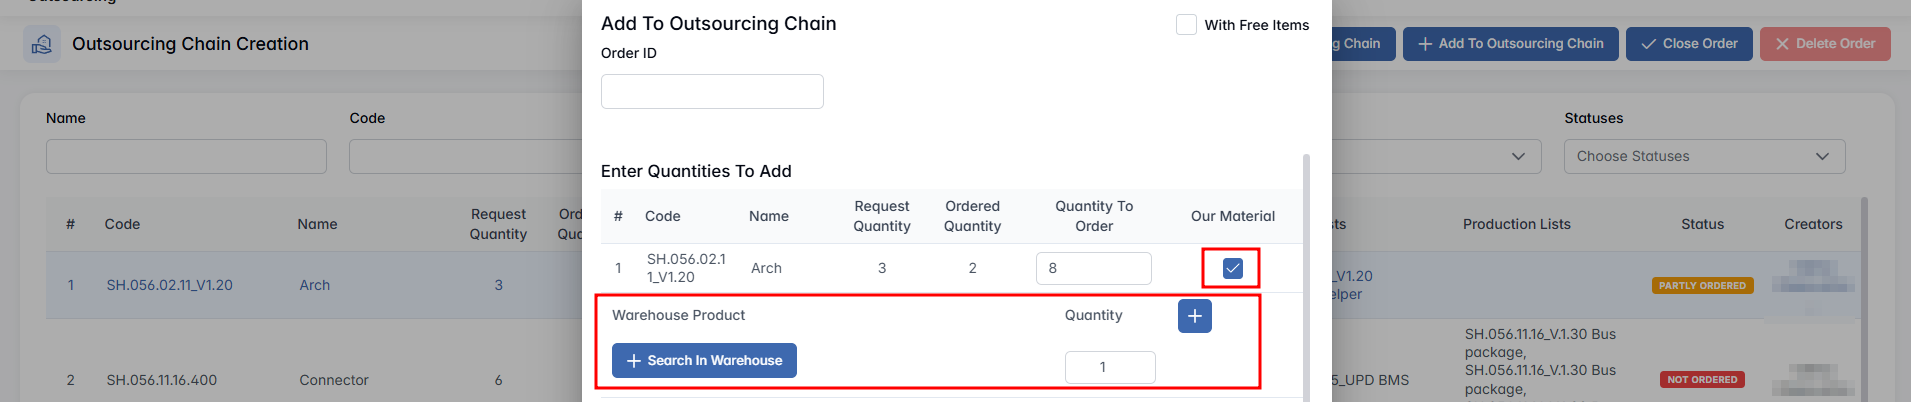
An additional row appears under the item with:
- Warehouse Product – dropdown showing selected warehouse item
- Quantity – field to enter the amount to be provided
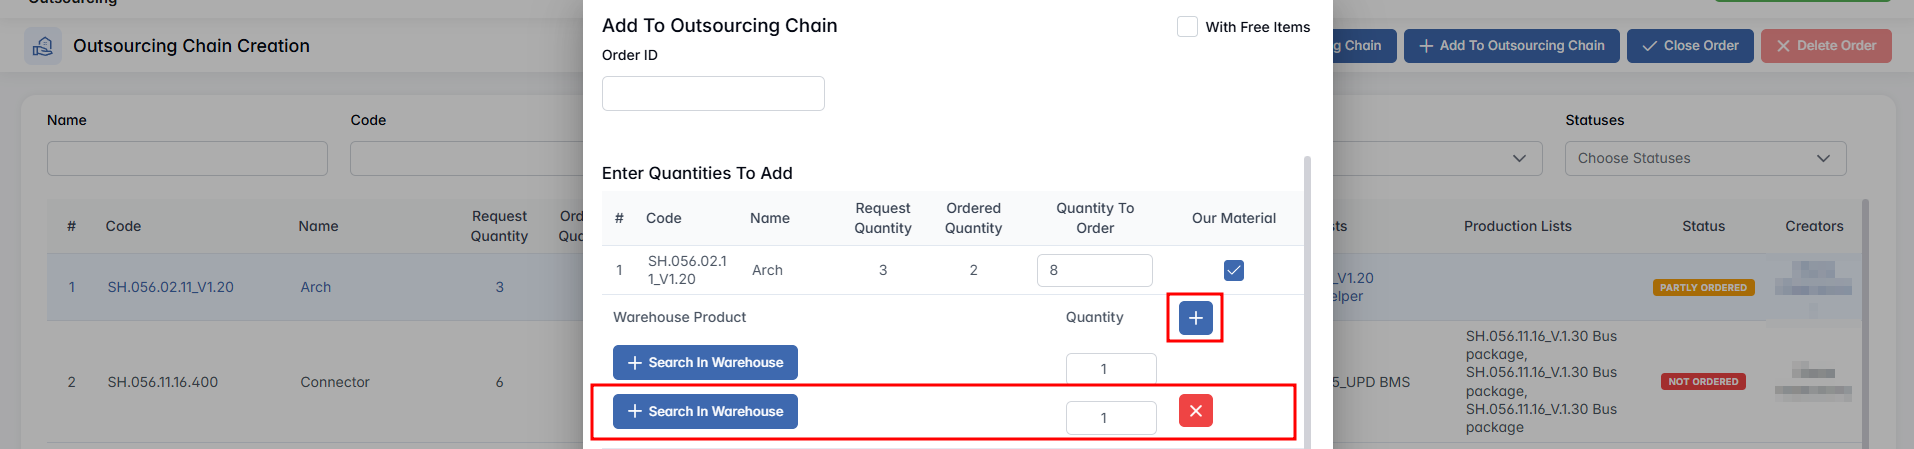
+ Search in Warehouse – button to open material selector
This enables the user to define which internal material will be delivered to the supplier.
Search in Warehouse
Clicking + Search in Warehouse opens a catalog selection window, where the user can filter and select an internal stock item for outsourcing purposes. After adding a material, it appears in the main window and can be adjusted or extended.
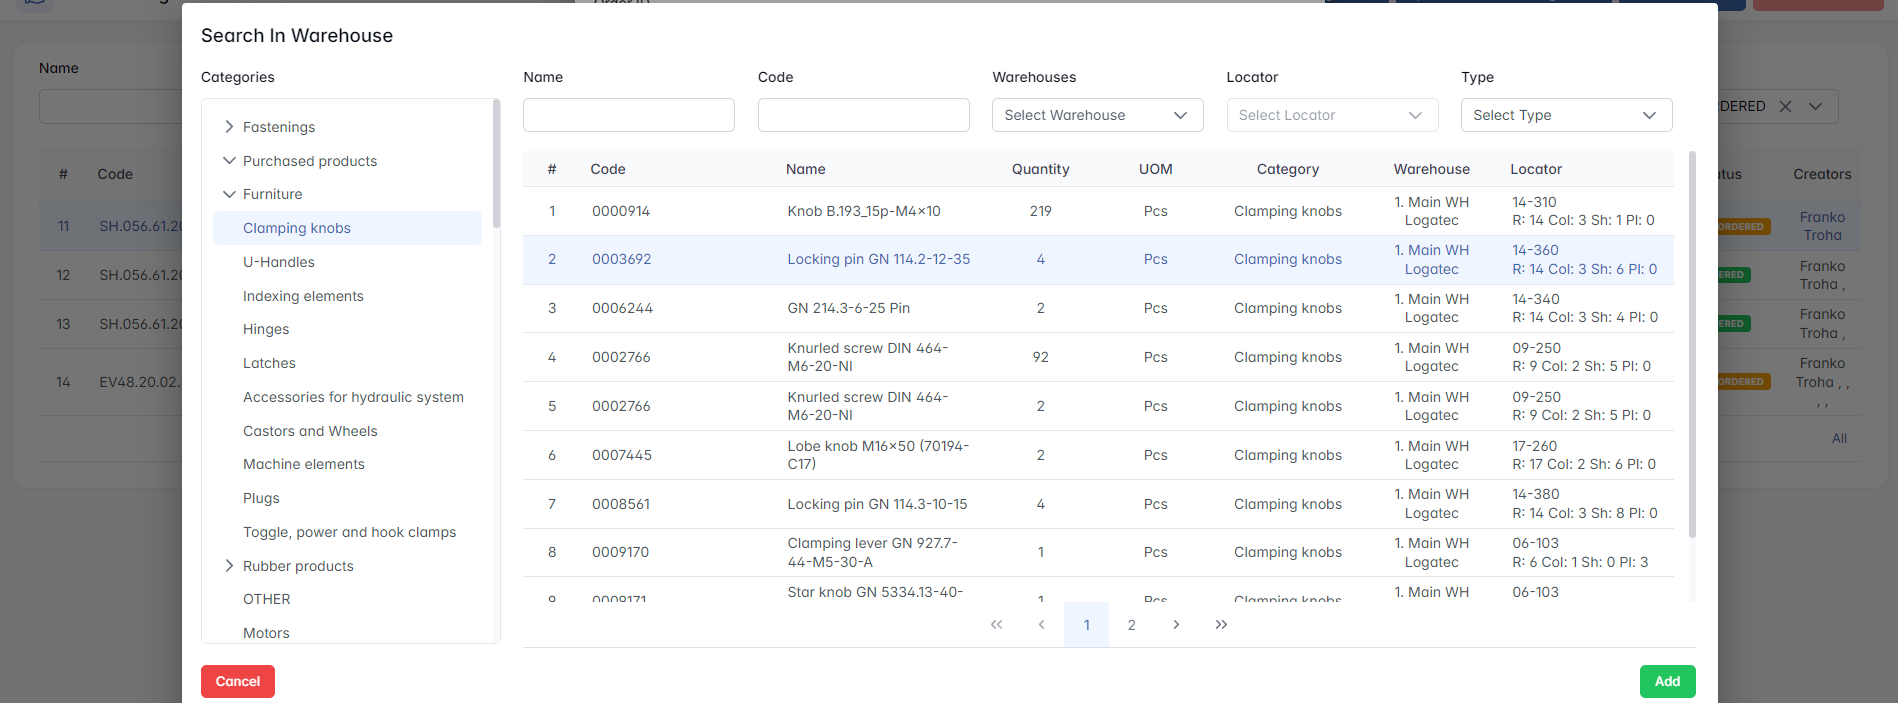
The system allows multiple materials to be linked to a single outsourcing position if necessary.
Select Order to Add To
At the bottom of the modal is a list of available outsourcing chains to which the request can be added.
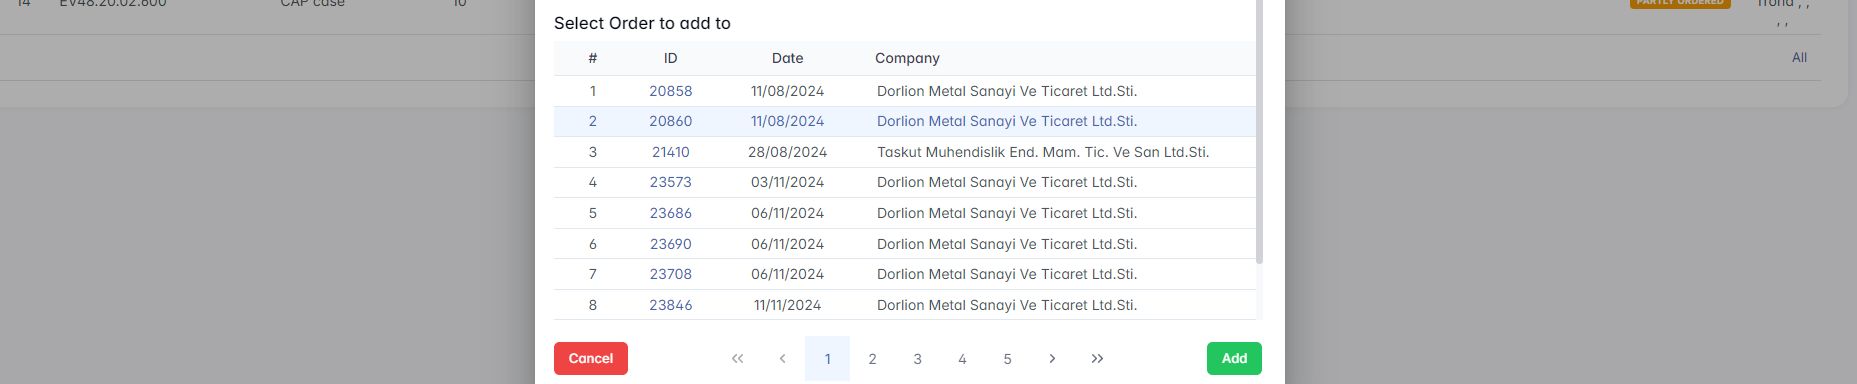
- Select one of the chains by clicking on the row.
- Click Add to confirm and include the request in the selected outsourcing chain.
The request will now be part of the selected chain and updated accordingly in the system.
Delete Order
Deletes the selected request permanently. Available only for items with NOT ORDERED status.
Close Order
Marks the request as obsolete or no longer relevant. Cannot be reopened. Confirmation required. This action is only available for requests with NOT ORDERED or PARTLY ORDERED status.
The Outsourcing Chain Creation interface provides structured, filterable access to outsourcing needs, enabling the procurement team to group requests intelligently, manage supplier assignments, and coordinate material flow from internal stock where needed.
Outsourcing Chains
Outsourcing Chains
The Outsourcing Chains tab is the final and most comprehensive stage of the outsourcing workflow. It provides full visibility and control over all active and historical outsourcing chains — from initial order creation to final delivery and payment tracking.
This tab consolidates data on suppliers, items, production links, invoice status, payment confirmations, and logistical milestones — ensuring transparency and traceability throughout the outsourcing process.

Filter Panel
The top section contains a robust filter panel for narrowing down chains based on various operational and financial attributes.

- Ordered Items Code / Name – Search by internal code or full/partial item name.
- Order ID – Filter by outsourcing chain number.
- Company – Filter by supplier.
- From / To – Date range fields for filtering by order date.
- Technologies – Multi-select dropdown to filter by manufacturing processes or materials.
- Parts / Materials Code / Name – Useful when searching chains by included warehouse materials.
- Status – Dropdown list of chain statuses (e.g., Empty, In Progress, Delivered, Sent to QC). Helps identify where chains are in the delivery pipeline.
| Checkbox | Function |
|---|---|
| Declined | Filter based on whether the chain was declined or rejected |
| Show RMA Chains | Include or exclude Return Merchandise Authorization chains |
| Show Unpaid | Show only chains with unpaid invoices |
| Documentation | Filter based on whether supporting documents are attached |
| Purpose | Filter based on assigned chain purpose (if applicable) |
Each checkbox functions as a three-state filter:
✔ (Include) – Show only chains that match this attribute
✖ (Exclude) – Exclude chains with this attribute
Empty – No filtering applied
This flexible system allows users to refine their views based on financial, technical, and administrative criteria.
Outsourcing Chains Table
The main table lists all outsourcing chains that match the applied filters. Each row represents a full outsourcing order with its lifecycle data.
| Column | Description |
|---|---|
| Date | Chain creation date |
| Order ID | Internal chain number (clickable, opens full order details page) |
| Supplier | Assigned external company |
| Technologies / Comment | Processing type and internal comment |
| Root Lists | Linked production structures (clickable). Alternatively, use Go To Production Plans button if a row is selected |
| Status | Current status of the chain (e.g., Empty, Sent to QC, Delivered) |
| Completion | Date of delivery or processing completion |
| Expected Delivery Date | Target delivery date (sortable ascending or descending order) |
Chain Selection and Actions
When one or more rows are selected, additional buttons become available:

Selected Chain dropdown:

Go To Production Plans – Opens the relevant production plan associated with the selected chain

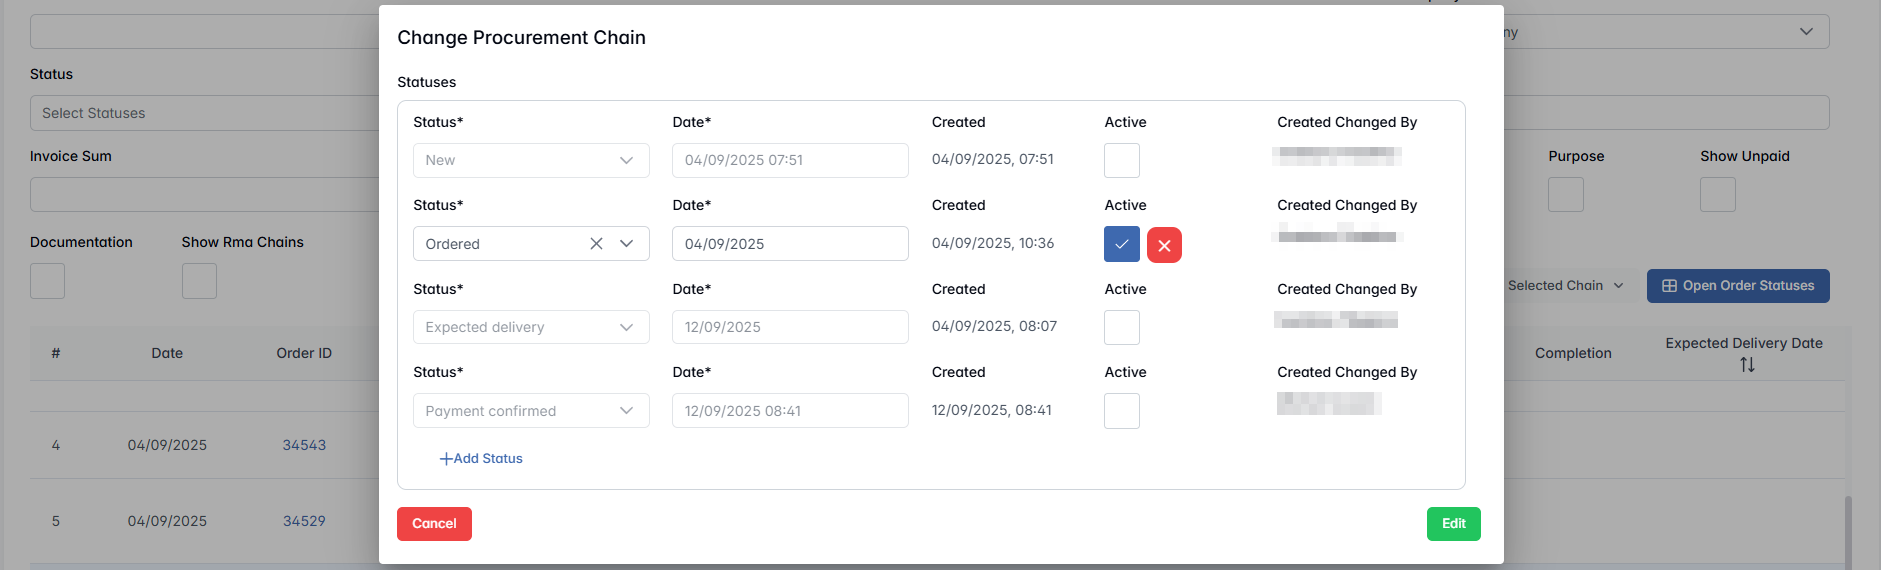
Open Order Statuses – Quick overview of chain state across production/invoice/payment

Creating an Outsourcing Chain
When the user clicks Create Outsourcing Chain, the system immediately generates a new order and redirects the user to the corresponding Outsourcing Chain Order Page. The newly created order is marked with status New and appears in the table with a unique order ID.
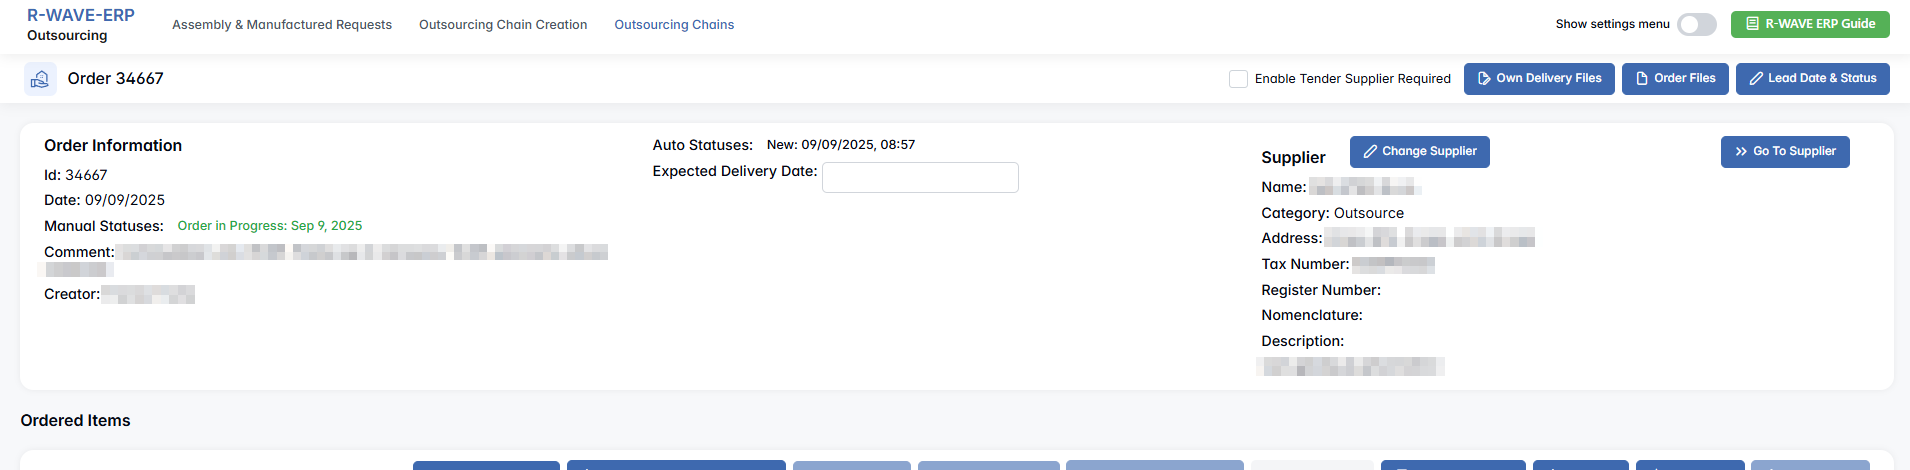
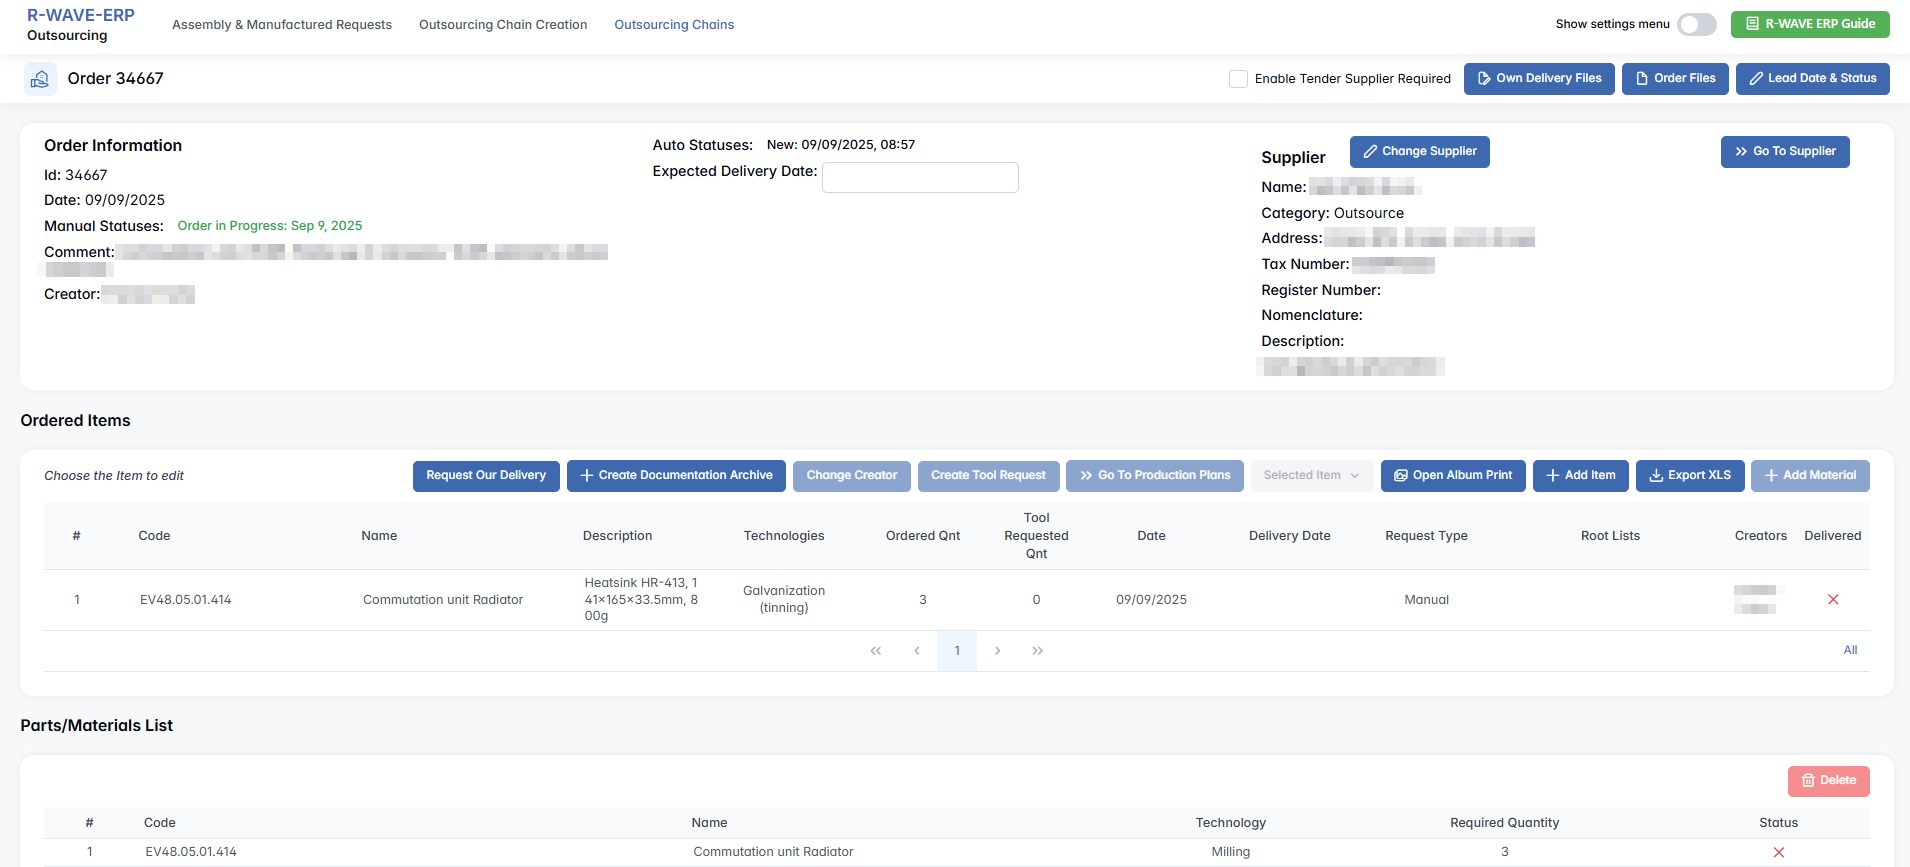
Order Information
This section includes basic metadata and control elements:
- Order ID – unique identifier for the order (auto-generated).
- Date – automatically set based on creation time.
- Manual Status – dropdown for manual status input if needed.
- Comment – optional user-defined notes.
- Creator – auto-filled with the user who created the order.
- Auto Statuses – system-defined events with timestamps (e.g., New: 11/07/2025, 08:22).
- Expected Delivery Date – manually defined field; can be edited or cleared later.
Supplier
This section contains general supplier information assigned to the outsourcing chain. Initially, it may be empty if the supplier has not yet been confirmed.
Once a supplier is proposed in the Suppliers section and confirmed via the Confirmation Module, this block is automatically populated with all relevant data: Name, Category, Address, Tax Number, Register Number, Nomenclature, Description.
Once a supplier is confirmed and linked, a Go to Supplier button appears near the supplier information panel.
Clicking this button redirects the user to the Company Card, which includes:
- Full supplier profile
- Contact details
- Company addresses
- VAT / registration numbers
- Previous orders and associated records
Ordered Items
Users populate this section by clicking + Add Item, which opens a modal window:
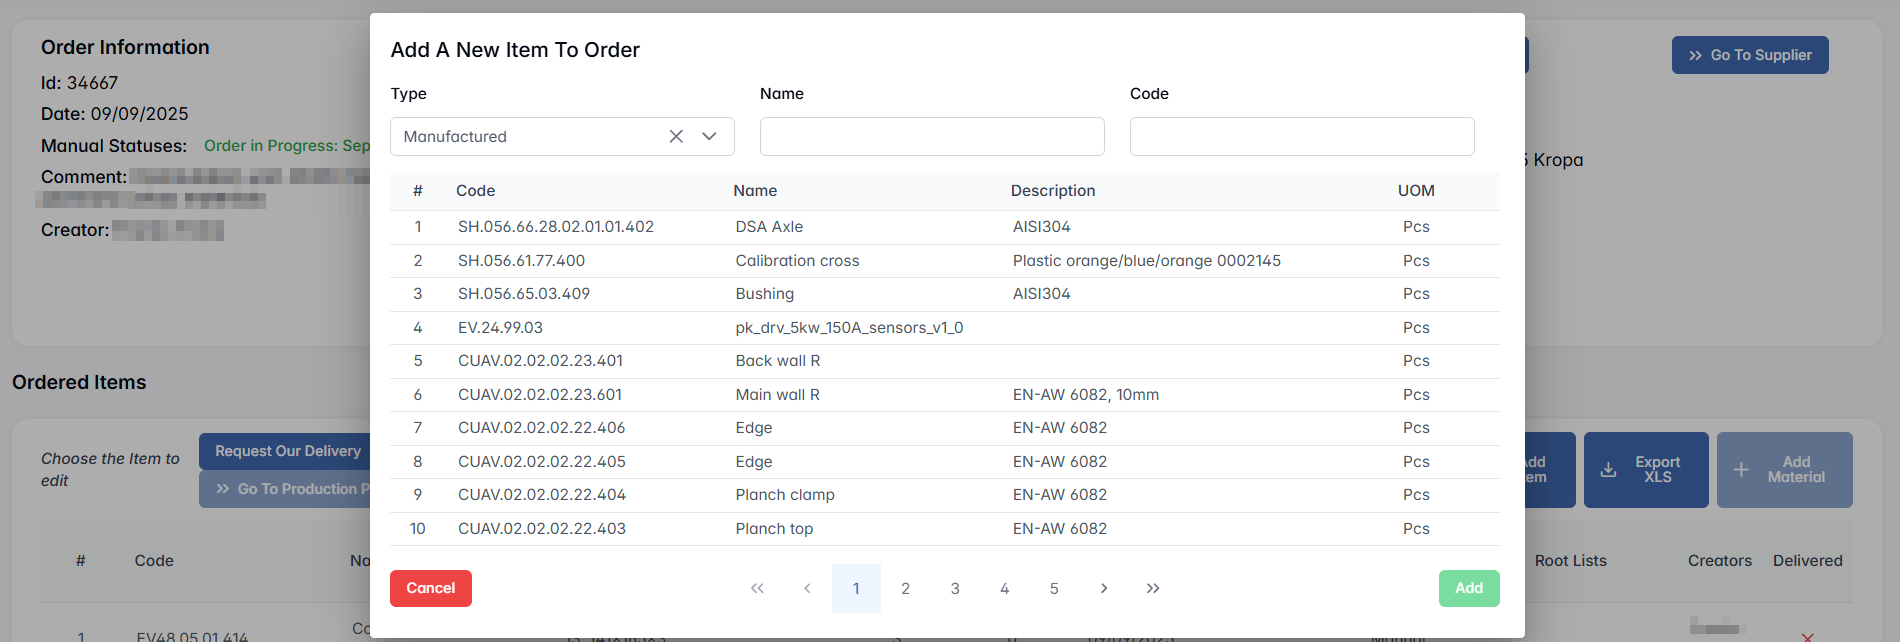
- Type – Assembly or Manufactured.
- Use the table to search and select:
- Code, Name, Description, UOM
Press Add to include the item in the order.
Once items are added, they appear in the table with the following fields:

For each selected item, the following actions become available:
- Change Creator – opens modal with user dropdown.
- Create Tool Request
- Request Our Delivery – activates + Create Delivery Request button.
- Print Album – appears after item is selected.
- Export XLS
- Selected Item (dropdown):
- Edit – change quantity
- Date of Delivery – open modal to change or clear the delivery date
- Remove
Add Material To Order Product Item
This feature allows users to link warehouse materials to specific ordered items, indicating what internal components or parts will be supplied by the company rather than sourced externally.
Clicking + Add Material opens a modal window:

- Add a specific amount – This checkbox allows the user to assign a fixed amount of material, regardless of the quantity of ordered items. If left unchecked, the entered quantity will be multiplied by the number of ordered items.
Search the item from catalog (filters: Category, Type, Root Category, Name, Code). If a material is available:

- Locator* field appears if Take from Warehouse is selected.
- Quantity* field is always required.
Important: Items with NEW status cannot be selected.
Take from Warehouse / To Order – This toggle lets the user choose whether to take the material directly from the warehouse (if it is currently in stock) or to request it through procurement (if it is not available). When set to To Order, the request will be forwarded to the procurement department to initiate the purchase of the material. Once the material is delivered to the warehouse, it will be automatically assigned to the corresponding outsourcing chain.

Parts/Materials List
The Parts/Materials List section displays all warehouse materials that have been linked to specific ordered items in the outsourcing chain.

Each material appears here only after being manually added via the + Add Material action in the Ordered Items section.
The quantity shown here represents the total amount required for the selected outsourced item. If you use the multiplier option, it is automatically calculated based on ordered quantity.
This section ensures the supplier will receive accurate information on what internal materials will be shipped with the order, helping coordinate production and inventory.
Technical Equipments
This block allows users to associate necessary equipment, tools, or fixtures with the order. It is useful when production requires reusable or special-purpose technical assets.
Suppliers
This section is used to collect and manage supplier proposals when a competitive selection or tender process is involved.
Users can:
- Click + Add Supplier to propose a candidate
- Define Price, Delivery Date, and Comments
- Submit proposals for approval via Send to Confirm

Supplier confirmation is performed in the Confirmation Module, and the selected supplier is automatically linked to the chain.

Proforma Invoices
This section contains all proforma invoices, which serve as initial cost estimates for the order.

Key features:
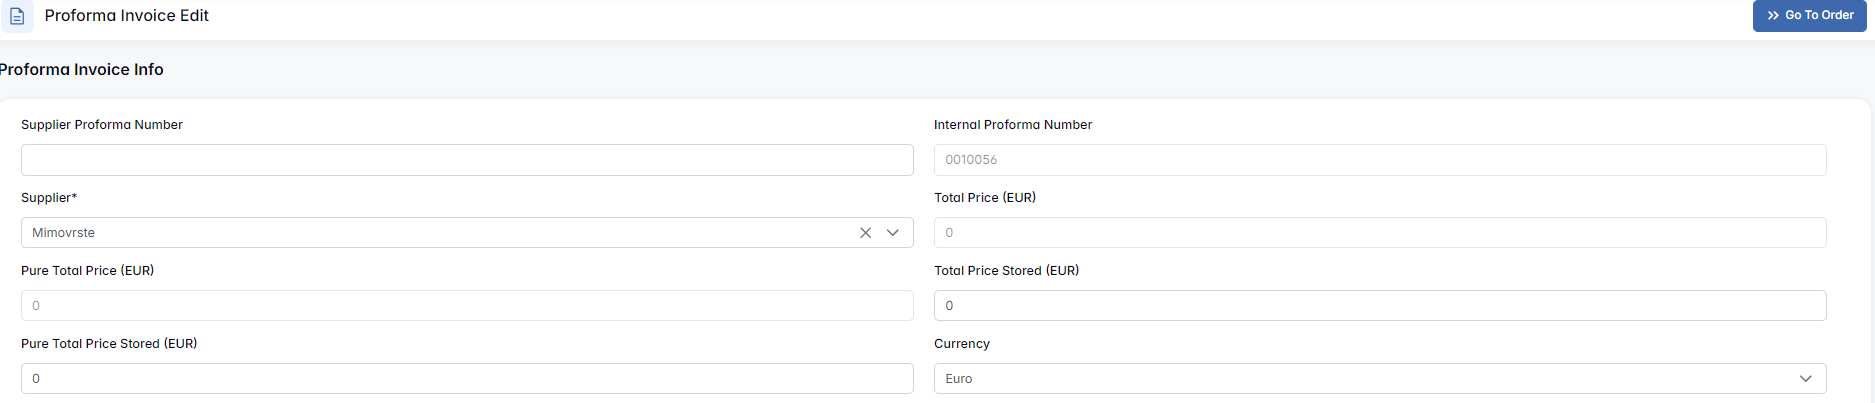
- All ordered items are auto-included
- Users can edit quantities, remove items, or add new ones
- Materials and services can also be included
- Total price and net price are automatically calculated
- A proforma number, supplier, and date must be filled in
- Files (e.g., quotations) can be attached
- Once completed, the proforma is routed to Quality Control

Invoices
This section contains actual invoices generated after items or services are delivered.
- Click + Create Invoice to open the invoice editor
- Invoice can include selected or remaining items
- Invoice table displays:
- Creation Date, Invoice Number, Supplier, Total Price, Status

Payments
Once the invoice has been created and confirmed, the next essential step is to register the payment for this invoice. Recording payments ensures that financial operations stay transparent and trackable within the ERP system, allowing the company to monitor which orders have been settled and which are still pending.
To proceed with the payment:
- Navigate to the Order Page of the corresponding Procurement Chain.
After the Proforma Invoices and Invoices sections, locate the Payments section. - Click the + Create Payment button to begin the payment registration process.

- A pop-up window titled Create Payment will appear. Fill in the form with the required details:
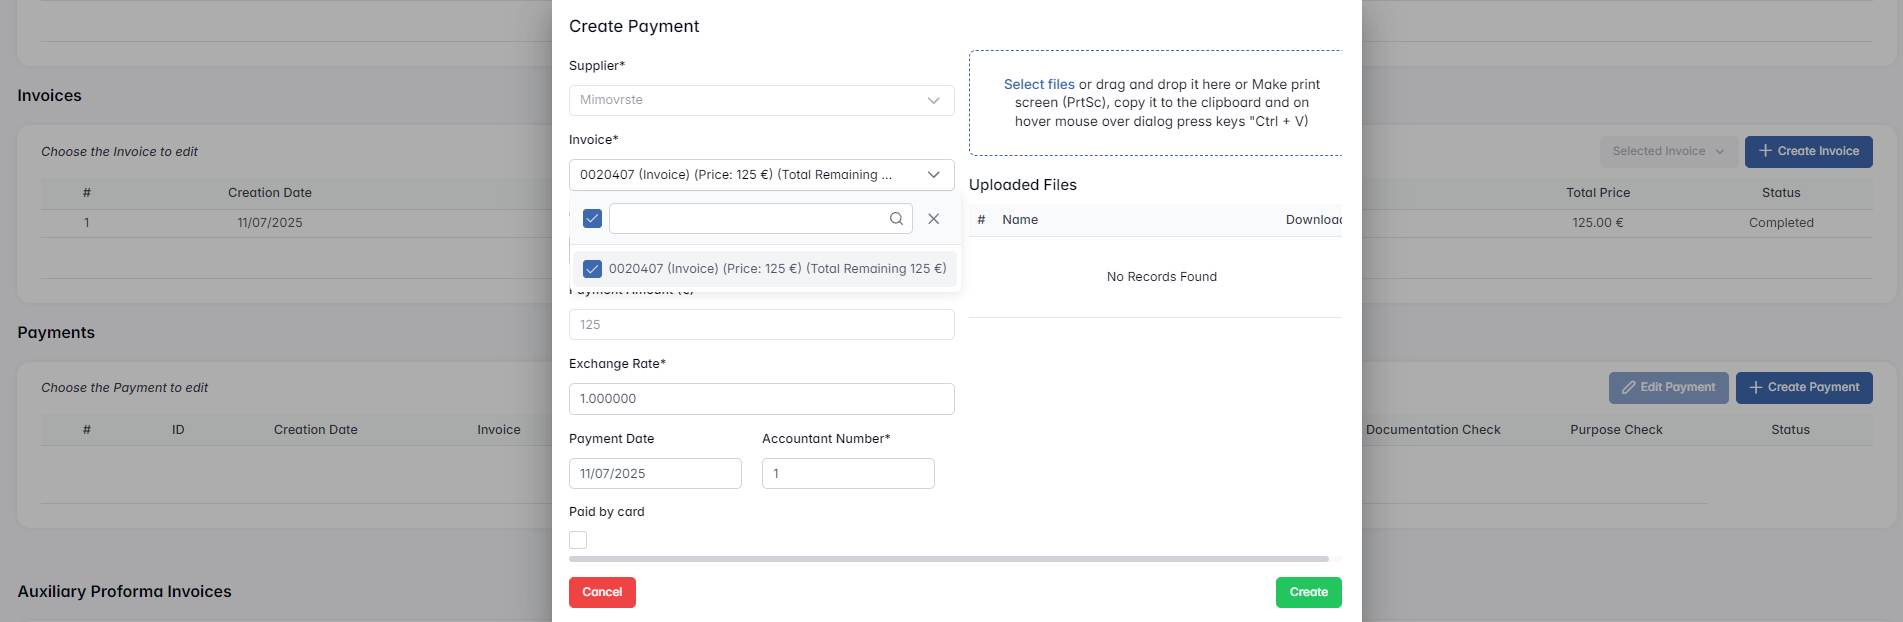
- Supplier – This field is auto-filled based on the chain’s data and indicates who the payment is being made to.
- Invoice – Select the corresponding invoice(s) from the dropdown list. These invoices must have been created and listed in the invoice section above. You may select multiple if applicable.
- Actual Amount – This field may auto-fill based on the invoice but can also be manually edited. Use it to enter the actual amount being paid to the supplier, in their currency. It also supports partial payments.
- Payment Amount (€) – This field reflects the amount converted into Euros. It is not editable and duplicates the value from the previous field, converted using the exchange rate.
- Exchange Rate – Enter the conversion rate used for this transaction.
- Payment Date – Define the date when the payment was or will be made.
- Accountant Number – Enter the bank account number of your company.
- Paid by Card – Tick this box if the payment was done by credit/debit card instead of a bank transfer.
- Uploaded Files – You can attach documents that prove the payment, such as bank confirmations or screenshots. Files can be uploaded via drag-and-drop, the file picker, or pasted directly from your clipboard.
- Click the Create button to save the payment.
A new payment record will appear both in the Payments section of the procurement chain and in the Payments module. Initially, the status will be set to WAITING, as the payment must be confirmed through the Confirmation module under the Payments Confirmation tab.

Once confirmed, the status will change to CONFIRMED.

And when the payment is actually completed, it will be updated to PAID.

Users can create multiple payment records if partial payments are required. However, the total sum of all payments for the same invoice must not exceed the invoice amount.
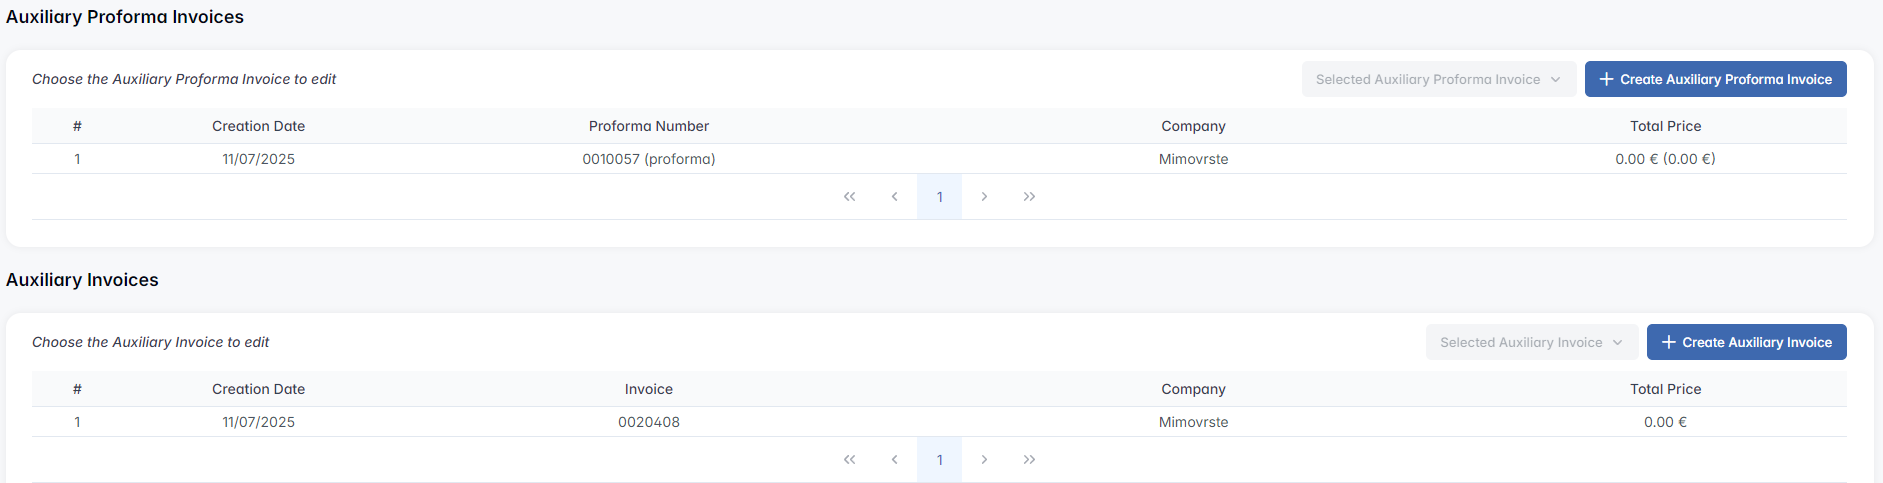
Auxiliary Proforma Invoices & Invoices
These sections are used for documenting additional services related to the main order — such as: Logistics, packaging, customs clearance.
Functionality mirrors standard invoices:
- + Create Auxiliary Proforma Invoice
- + Create Auxiliary Invoice
- Enter price, supplier, and dates
- Track and confirm payments separately
Auxiliary Invoice Payments
All payments related to auxiliary invoices are displayed here.
- Payment Amount and Converted Amount
- Payment Date
- Documentation Check / Purpose Check
- Payment Status

Manufactured Documentation
This section is used to store technical or production-related documentation linked to ordered items or assemblies. Click + Create Documentation Archive to generate a document pack.
The system will prompt: “Do you want to include descendants in the archive?” After confirming, a list will appear showing nomenclatures missing documentation — helping to identify gaps.

Files
The Files section is a general-purpose area for attaching any supporting documents:
- CAD drawings
- Certifications
- Incoming invoices
Click + Add File to upload and store files directly within the order.

Hidden Settings in Outsourcing
Hidden Settings in Outsourcing
These settings become available when the “Hide settings menu” toggle (top-right corner) is enabled. It reveals two additional configuration tabs:

Order Statuses
The Order Statuses tab in the Outsourcing module allows users to define and manage manual status labels that reflect the current progress or condition of an outsourcing chain. These statuses serve as internal checkpoints or workflow signals.
Functionality:
The main table displays all available manual statuses with the following columns:
- Name
- Description
- Chain Finish Step (✓ checkbox)
Each status can be:
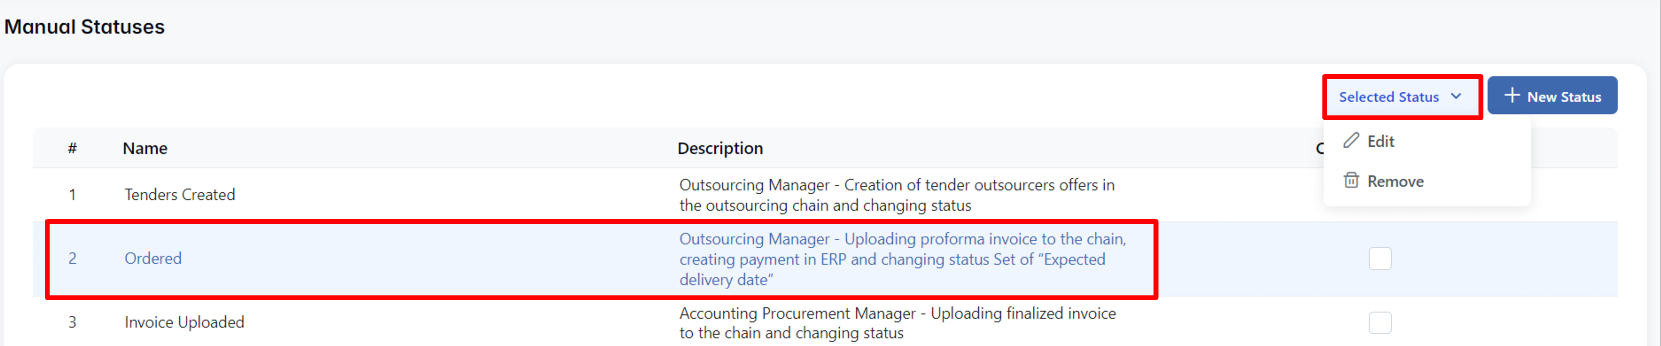
- Edit — update its name or description
- Remove — deleted if no longer needed
The Chain Finish Step checkbox allows you to mark a status as the final stage of the chain. This can help visually indicate completion or readiness for closure.

Creating a New Manual Status
Click + New Status to open the creation form. Enter the following:
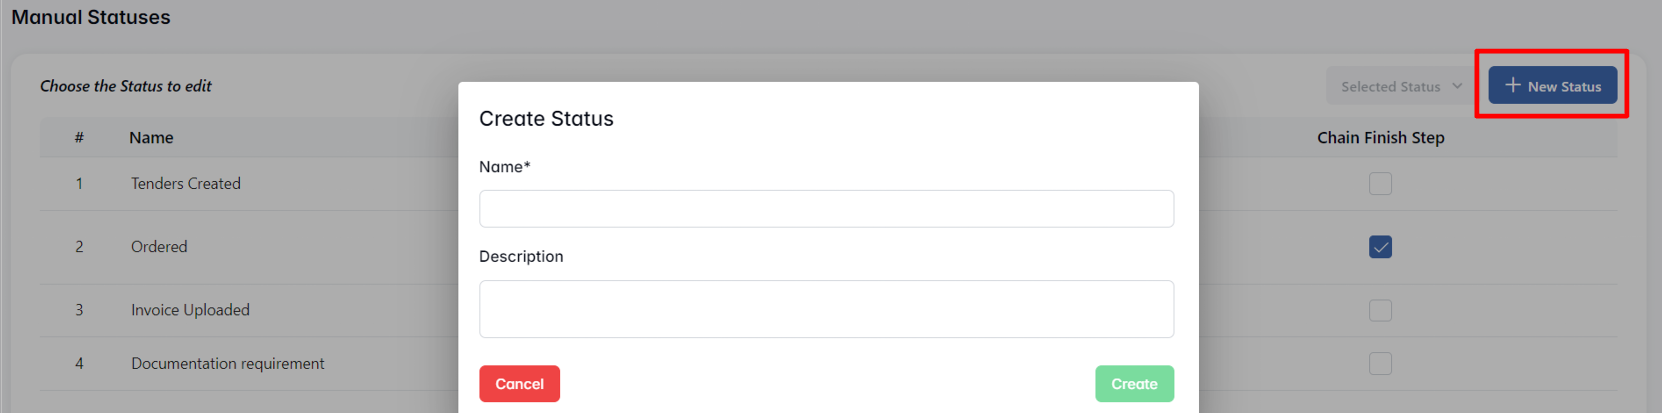
- Name* — required name of the status (e.g., Ordered, Documentation Added)
- Description — optional field to clarify the purpose of the status (e.g., Used when proforma invoice is uploaded and payment created)
Click Create to save. The new status will now appear in the list and become available for selection in outsourcing chains.
This feature allows departments to maintain transparency and coordination across long outsourcing processes, especially where multiple people or phases are involved (tendering, invoicing, documentation, delivery).