Quality Control (QC) Module
The Confirmation module in BINU ERP is a central checkpoint system designed to maintain control, accuracy, and compliance across all major business processes. From verifying new items and approving suppliers to confirming payments and production actions — this module ensures that nothing proceeds without proper validation from responsible parties. It plays a key role in quality control, financial transparency, procurement discipline, and production integrity.
Whether you're launching a new product structure, validating payment approvals, or confirming reservations and supplier tenders — all these actions require passing through this module. The confirmation system is fully integrated with Warehouse, Procurement, Production, and Nomenclature workflows to ensure company-wide consistency and decision traceability.
BINU ERP Guide
To support user navigation and clarity, BINU ERP includes a built-in contextual help system in the form of a pop-up guide window. This feature is available across different modules, including Quality Control, and is designed to help users understand where they are in the system and how to use the current section effectively.

Purpose
The ERP Guide window helps users by:
- Showing where you are within the system (module context and current section).
- Providing a visual schema of your company’s business flow, helping you understand how the current module fits into the larger operational structure.
- Offering a quick-reference instruction panel with the main actions and functions available in the current tab (e.g., creating companies, filtering, scheduling events).

Layout and Content
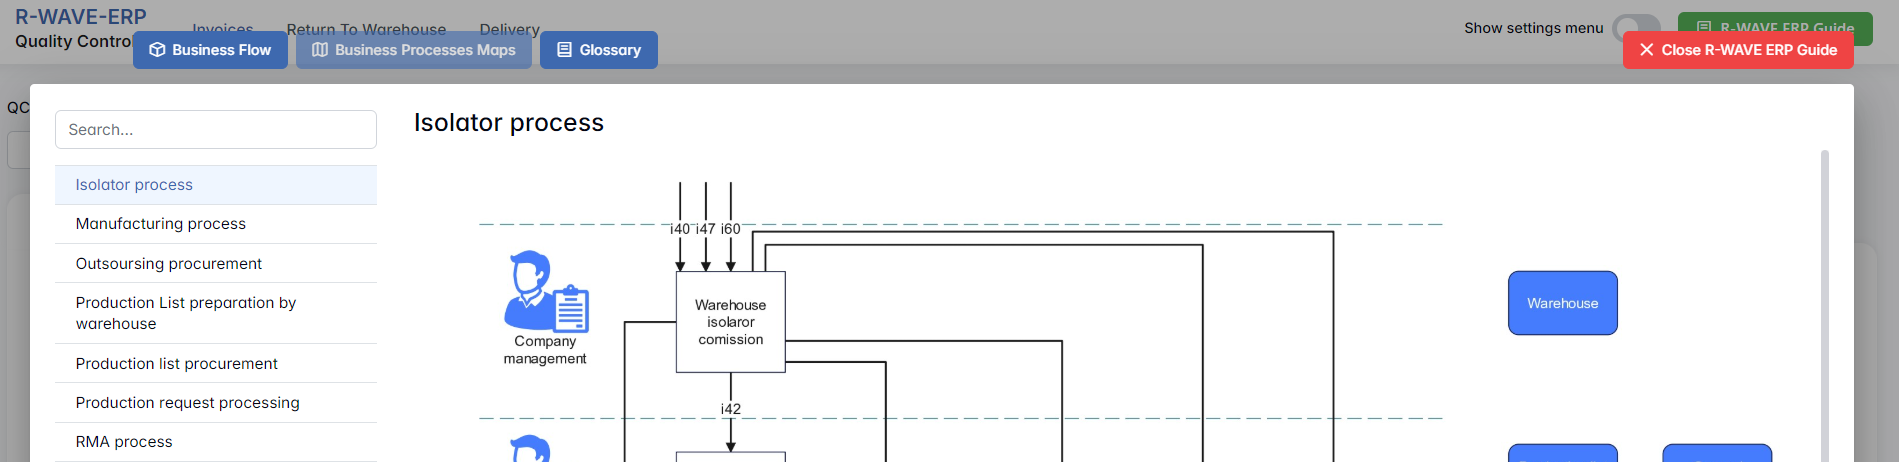
When opened, the ERP Guide window is divided into two main areas:
- Left Side — Business Flow Map
This section displays a structured diagram of your company's processes and how the current module connects to others (e.g., CRM, Procurement, Sales, HR). It visually highlights your current position in the overall ERP environment. - Right Side — Functional Overview
Provides a concise, bullet-style instruction list describing the key operations available in the current module/tab.
Top Bar Options
At the top of the ERP Guide window, you’ll find two optional tools for deeper understanding:
- Business Processes Maps – Opens a full interactive view of your organization’s process structure.

- Glossary – Provides definitions and descriptions of key terms and field labels used in the ERP interface.

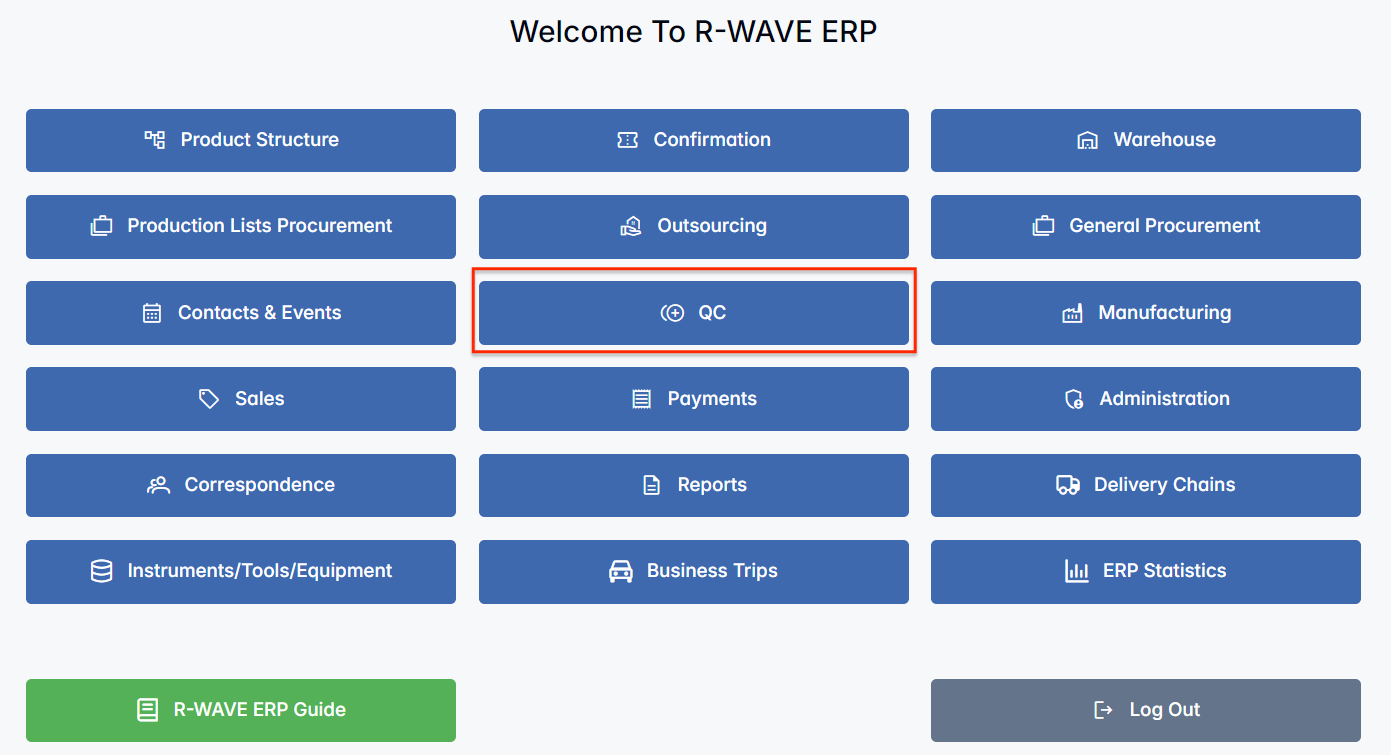
The ERP Guide window can usually be opened via a dedicated icon or help button (often located in the upper right corner of the screen). It is non-intrusive and can be closed or reopened as needed, allowing users to stay focused without losing their place.
Quality Control Overview
The Quality Control module in BINU ERP is designed to handle quality inspection procedures for all incoming items — both from external procurement (via invoices) and from the company’s own production orders. This module ensures that no items enter the warehouse or proceed to the next step in the workflow without first passing a validation check. It provides an organized, transparent process for confirming what passes, what fails, and where each item should be stored afterward.
When a procurement invoice is completed in the chain, or when finished products are dispatched from internal production, they automatically appear in the QC module. Here, the responsible person can check the physical goods, record which items passed or failed quality control, and then decide how the system should handle them — either send them to the QC warehouse, isolate them, or return them for revision.
The QC module is divided into three main sections: Items, Return to Warehouse, and Delivery.

Items
Items
Navigating the QC Interface
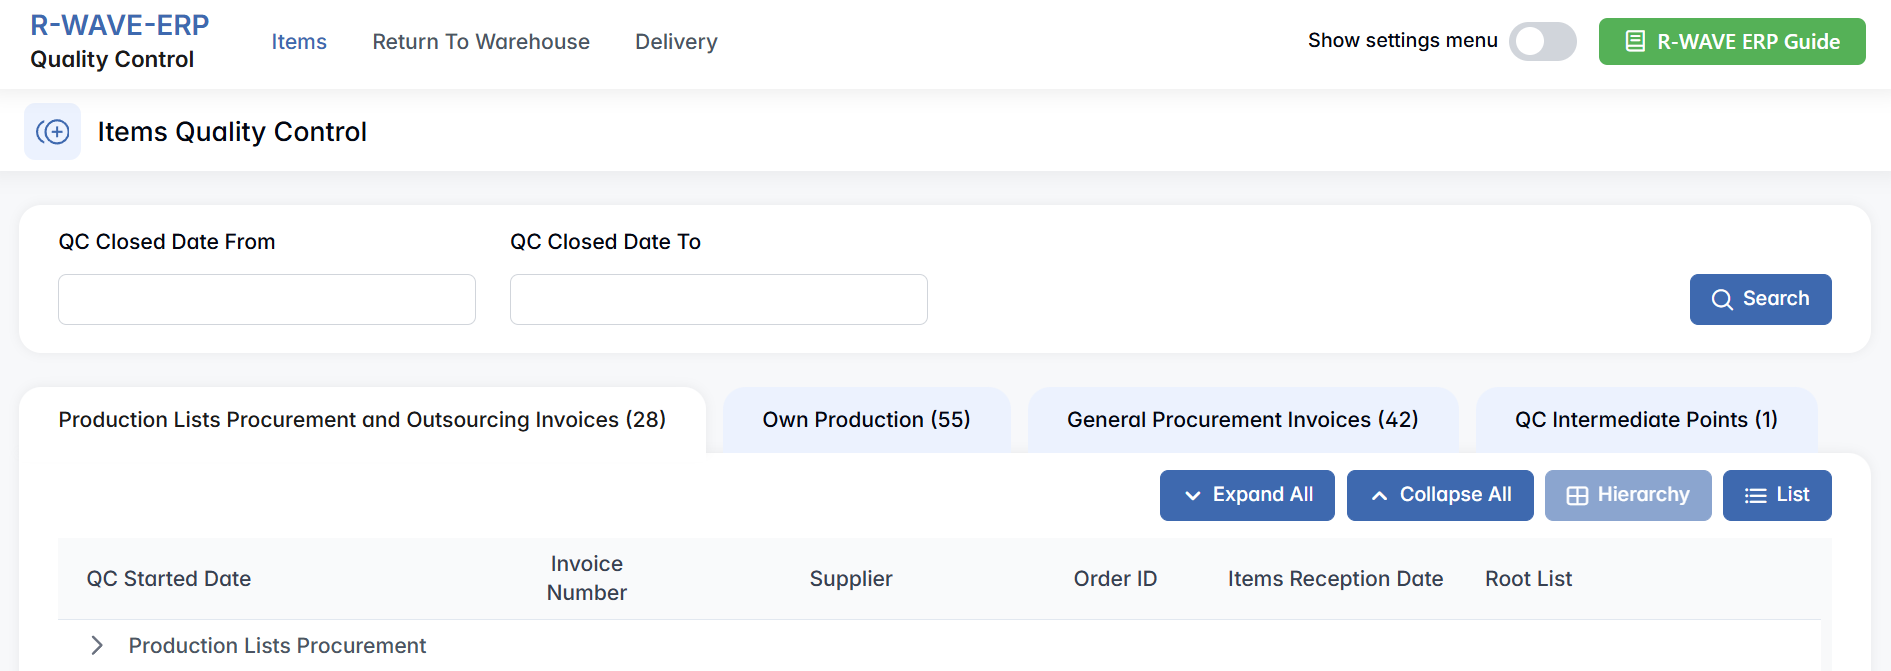
By default, when you open the module, you will land on the Invoices section. At the top of the screen, there are two filter fields labeled QC Closed Date From and QC Closed Date To, allowing users to narrow down records based on when the QC was finalized.

Below this, a row of tabs separates the invoices by their origin:
- Production Lists Procurement and Outsourcing Invoices — for purchases tied to production or external outsourcing,
- Own Production — for items manufactured internally,
- General Procurement Invoices — for other types of purchases not linked to production,
- QC Intermediate Points — for cases where items pass through several control steps before approval.
Production Lists Procurement and Outsourcing Invoices
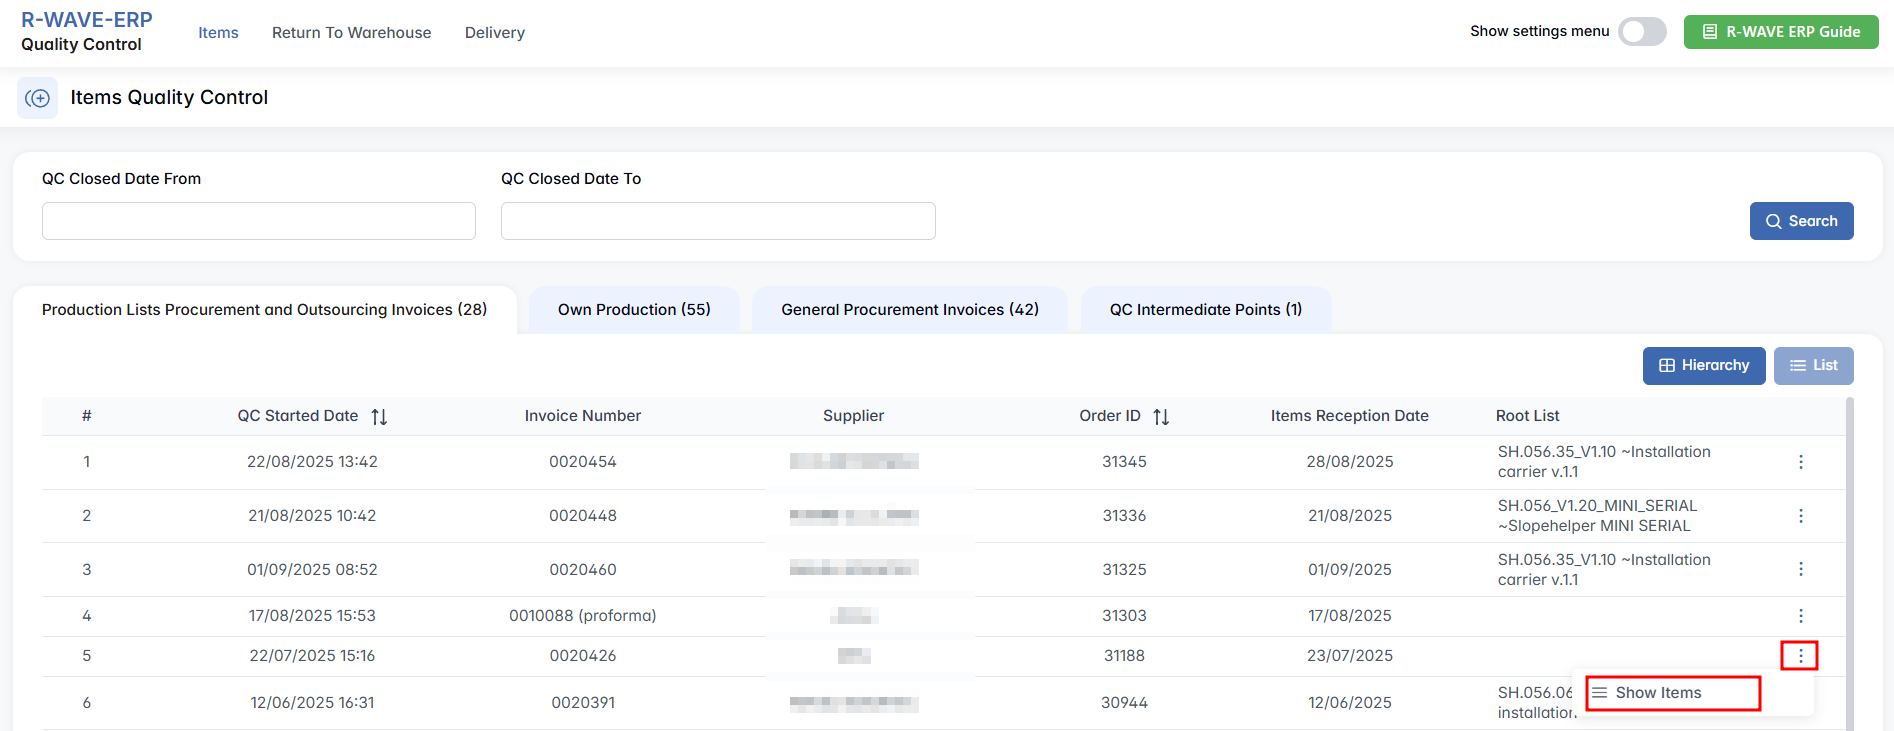
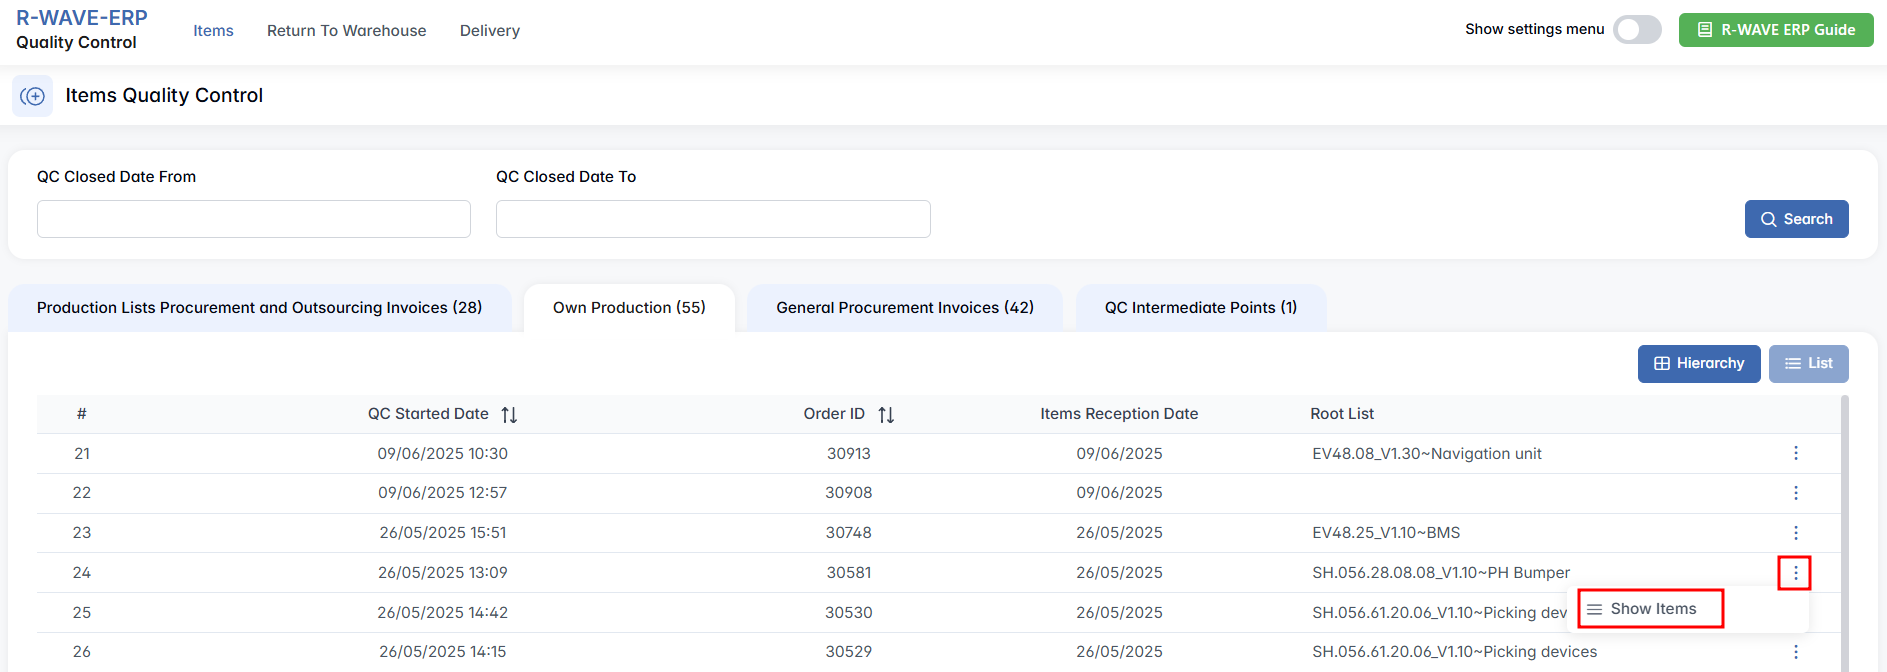
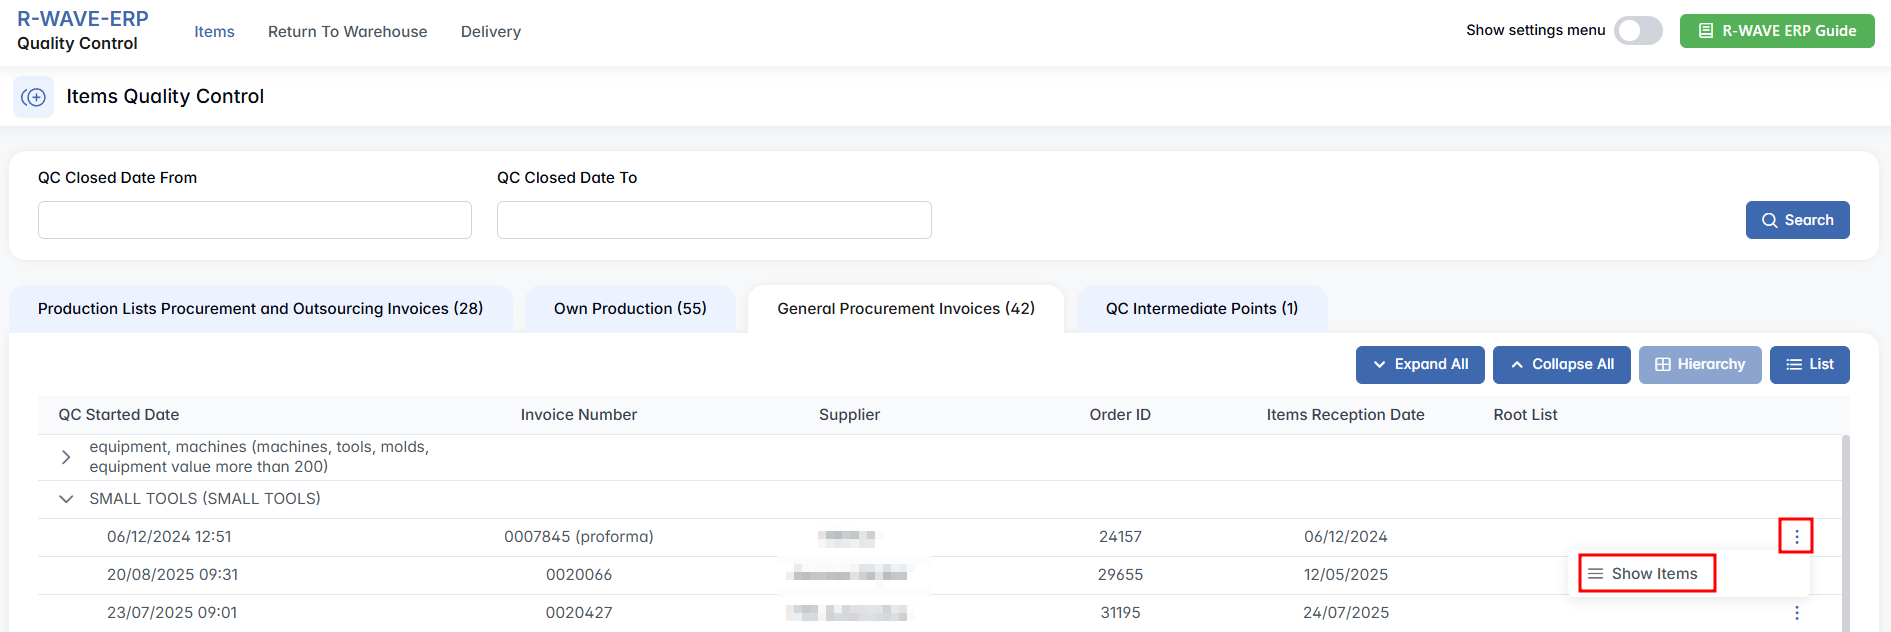
Production Lists Procurement and Outsourcing Invoices — covers quality control for externally sourced materials and outsourced production. This tab handles quality control of items purchased externally for production needs or acquired through outsourcing agreements. This includes materials, components, or assemblies that are not produced in-house but are essential for manufacturing processes. These items enter the QC workflow once the corresponding procurement invoice has been completed in the system. This tab displays QC tasks related to external procurement in a structured format. You can view the list in Hierarchy mode (for category-based grouping) or List mode (for a flat overview) using the buttons on the top right. Regardless of view, each entry includes key details such as the QC start date, invoice number, supplier, order ID, reception date, and the related root list (i.e., the parent product or structure).
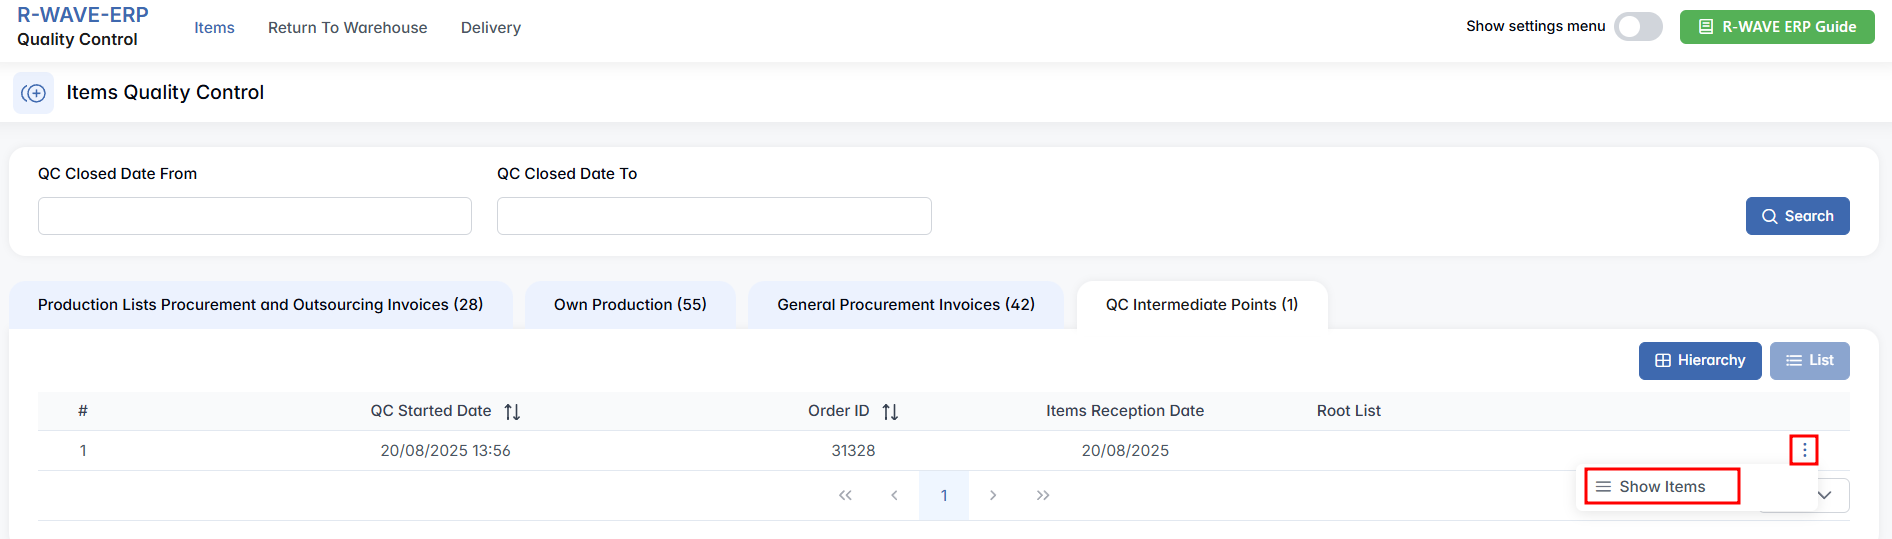
To inspect the items in an invoice, first select a row by clicking on it, then press three-dots menu and click Show Items. This opens a detailed page showing all individual components or products associated with the selected invoice.
Performing Quality Control
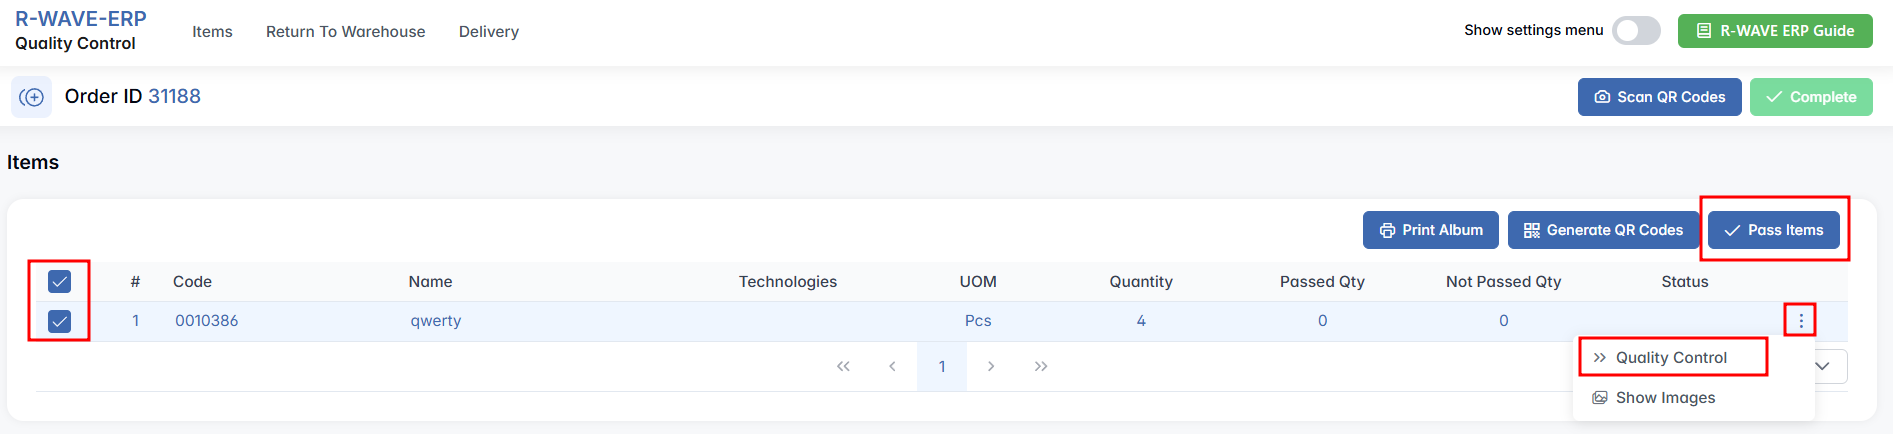
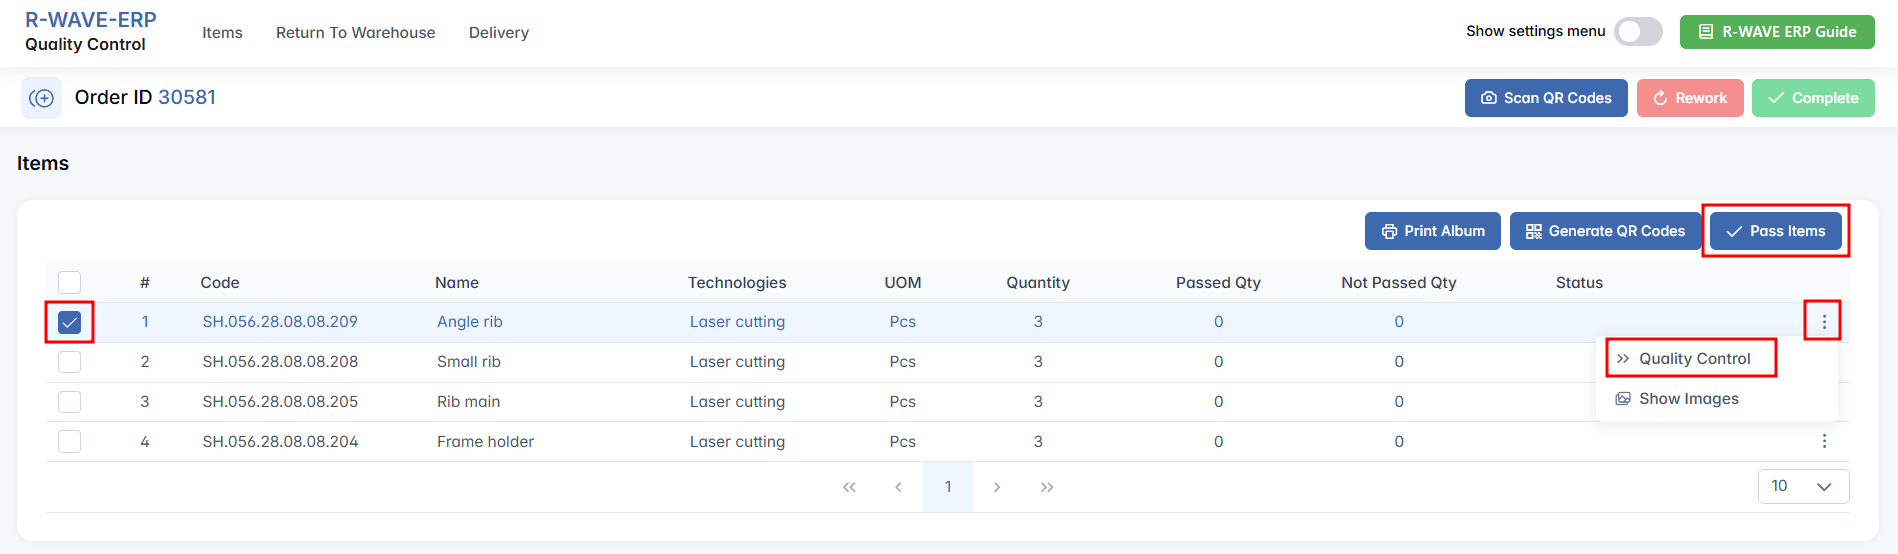
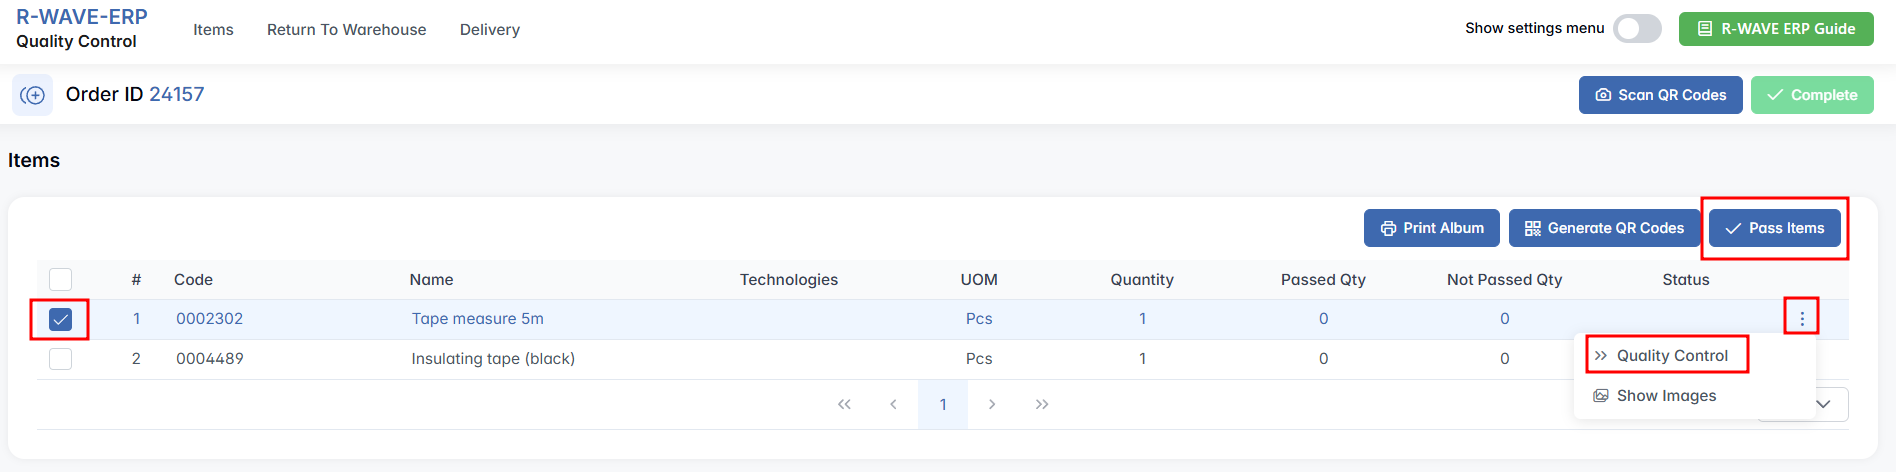
On the item detail page, there is a table listing every item that needs to go through quality control. For each one, the following fields are shown: the product code, name, technology (if applicable), unit of measure (UOM), quantity, passed quantity, not passed quantity, and the current QC Status.
To perform a quality check, begin by ticking the checkbox next to the item(s) you want to evaluate. Then click on the Quality Control button. If all selected items have passed quality control, click the Pass Items button to mark them as passed. This allows you to skip logging each item manually.
A pop-up will appear where you must enter how many units passed and how many did not.

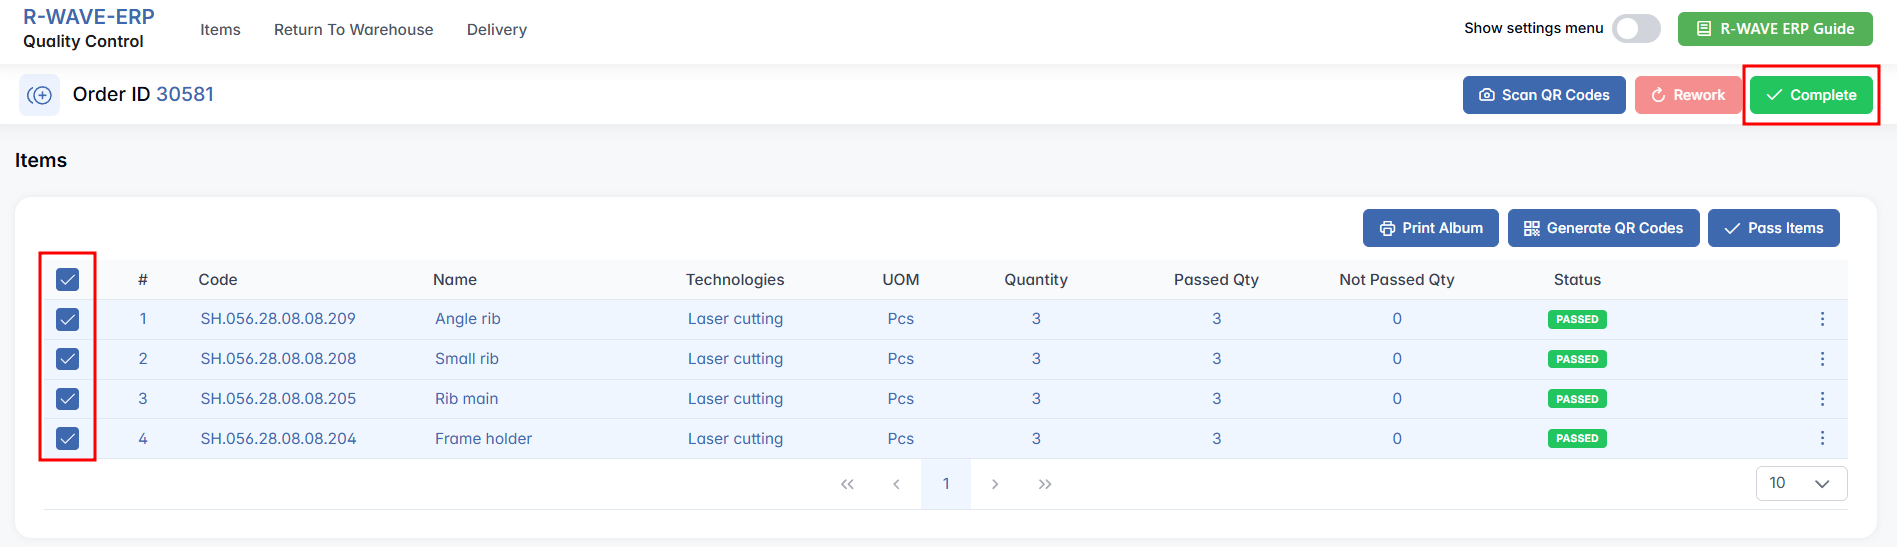
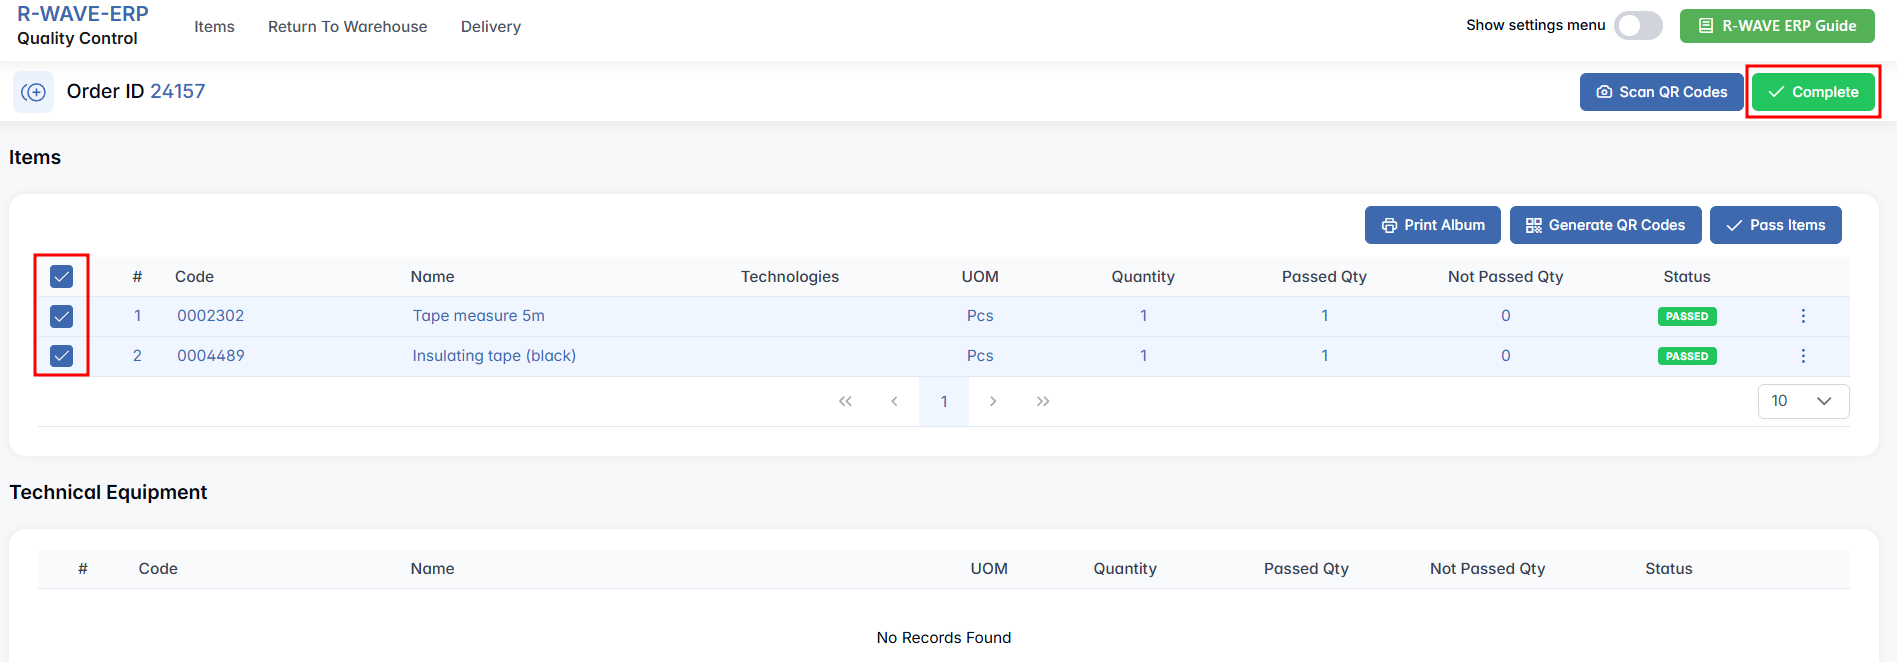
Once you have filled out the results, press Save — this action marks the items internally as having undergone QC. However, these changes are not yet finalized. To officially apply them and move the items into the appropriate warehouse locations, you must also click the green Complete button.
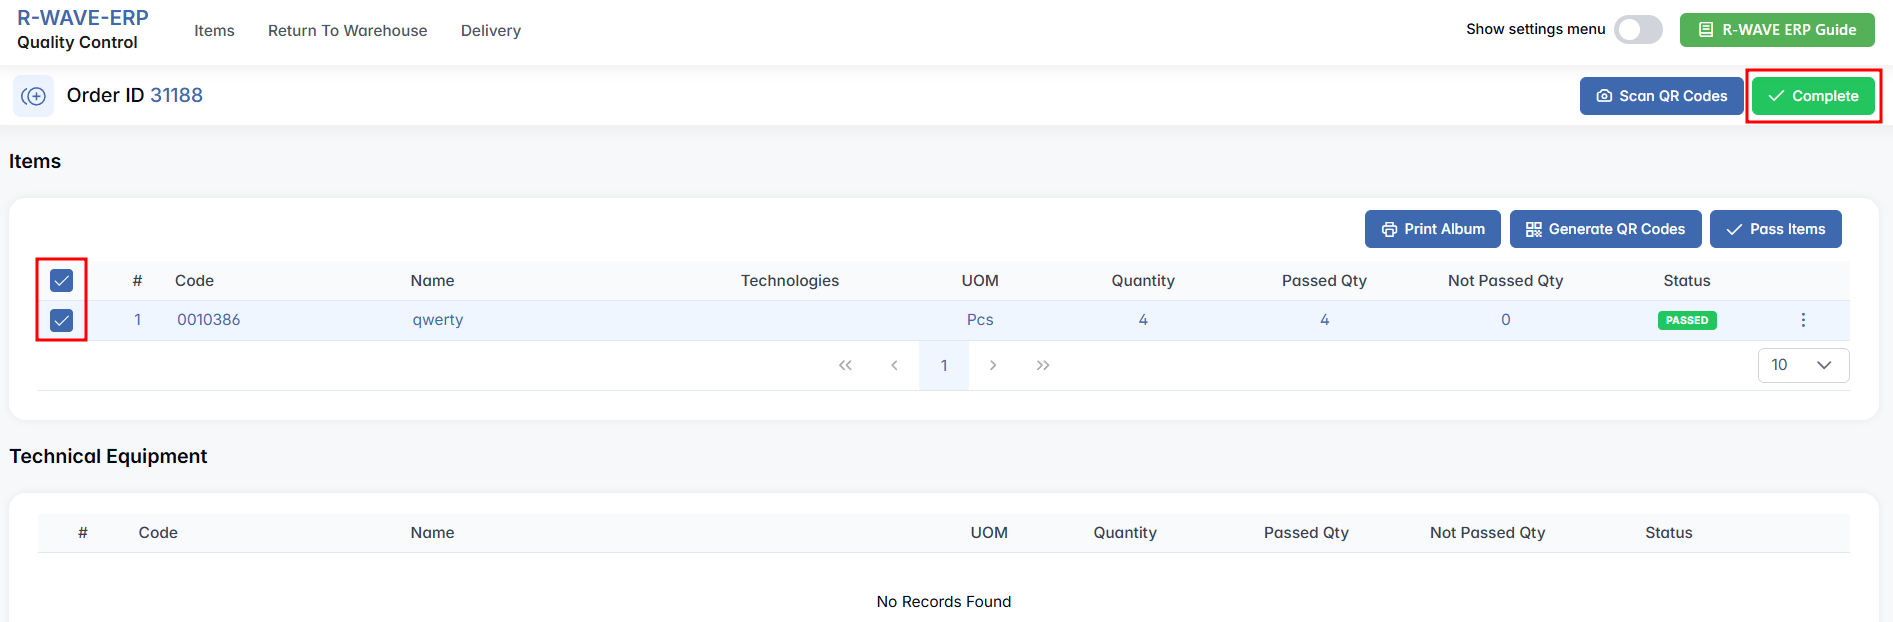
The system will then send passed items to the Warehouse > QC Warehouse, making them ready for use in production or further logistics. Items that failed the check will automatically be redirected to the Warehouse > Isolator, where they can be reviewed or handled separately, ensuring that only verified and reliable components move forward in the production workflow.
Additionally, in this tab, you may see entries related to Technical Equipment. If such items are present, they will appear in a dedicated section below the list. You can perform quality control on these items using the same logic and buttons as described above.
Own Production
Own Production — is dedicated to quality control of items manufactured internally within your organization. These are products or components completed through internal production orders and, just like purchased goods, must undergo inspection before they can be accepted into the warehouse or used in subsequent operations.
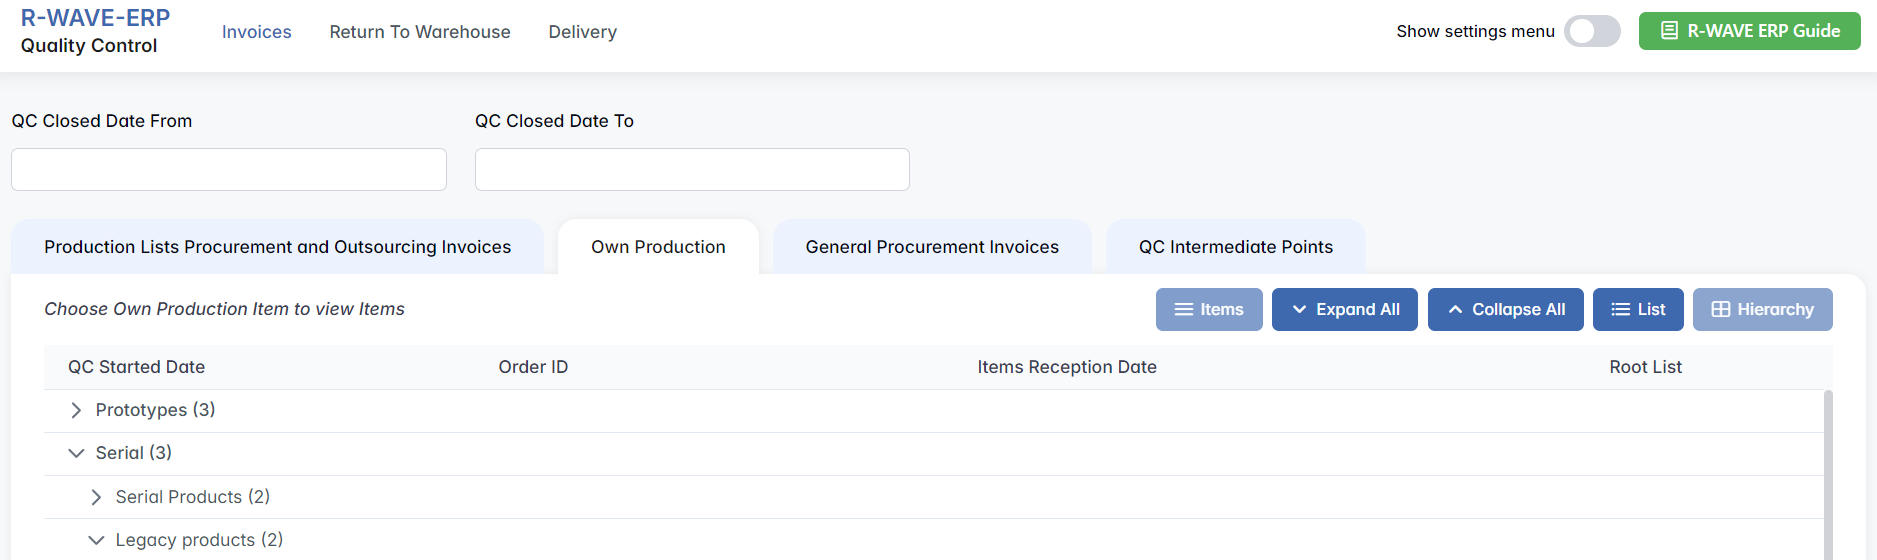
The interface layout and workflow are consistent with the previous tab. Each entry in the list displays the QC start date, order ID, reception date, and the associated root list. You can view the data in Hierarchy or List mode and expand categories using the available controls (Items, Expand All, Collapse All).
To review and control the quality of a specific internal production order, select a row and click three dot menu and press Show Items button. This opens a detailed page for the selected order where you can see all the individual products included.
Just like in the previous section, each item is shown with its product code, name, manufacturing technology, unit of measure, total quantity, as well as the fields for passed and not passed quantities. Use the checkboxes to select items, click three-dot menu and press Quality Control, input the inspection results, and press Save. If all selected items have passed quality control, click the Pass Items button to mark them as passed. This allows you to skip logging each item manually.

After that, press the Complete button to finalize the QC process. Passed items will be sent to Warehouse > QC Warehouse, while items that failed inspection will go to Warehouse > Isolator for further handling.
Additionally, in this tab, you may see entries related to Technical Equipment. If such items are present, they will appear in a dedicated section below the list. You can perform quality control on these items using the same logic and buttons as described above.
General Procurement Invoices
The General Procurement Invoices tab is intended for items that were acquired through procurement channels but are not directly tied to production or outsourcing activities. These may include high-value assets such as computer equipment (e.g., laptops, tablets, servers, mobile phones), cameras, technical tools, or machinery — essentially any goods valued above a certain threshold (e.g., 200 EUR) that require formal quality inspection before acceptance.
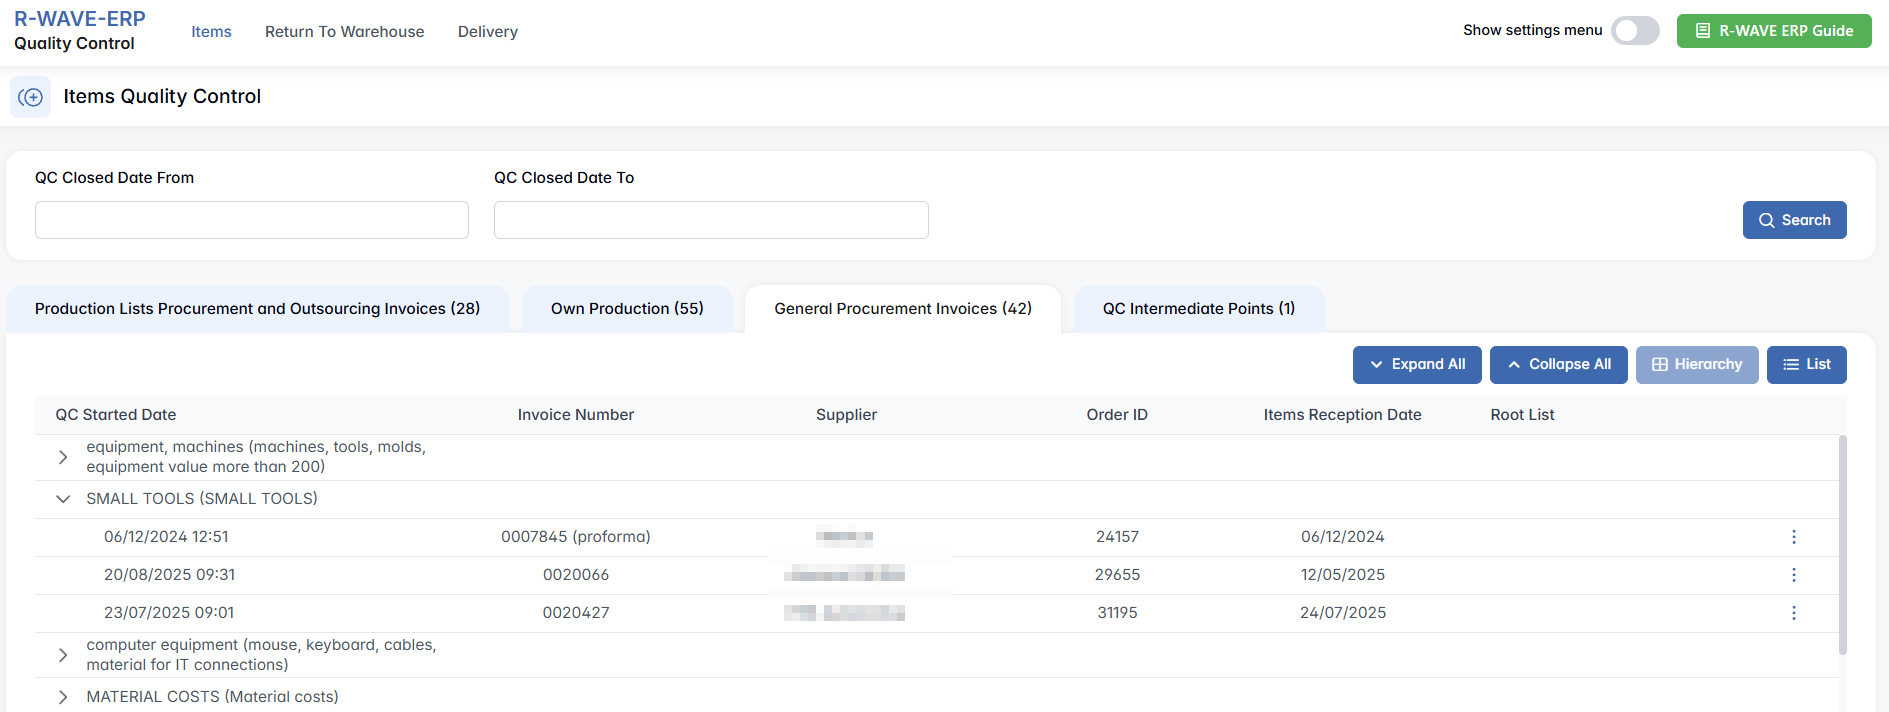
As with other sections of the QC module, the interface provides structured access to incoming records. Each row in the list includes key details such as the QC start date, invoice number, order ID, supplier, reception date, and the associated root list. You can use the toggle buttons on the right side — Items, Expand All, Collapse All, Hierarchy/List View — to adjust how the information is displayed.
To start the inspection process, select the relevant row and press the Items button. This action opens the Order ID detail page, where all individual items associated with the selected invoice are displayed.
The logic of the quality control procedure here remains the same as in previous sections. Each item in the list includes fields for product code, name, technology (if applicable), unit of measure, total quantity, passed quantity, not passed quantity, and QC status.
Begin by selecting the item(s) via checkboxes, click three-dot menu and press Quality Control, input the results in the pop-up window (number of passed and not passed units), and press Save. If all selected items have passed quality control, click the Pass Items button to mark them as passed. This allows you to skip logging each item manually.

Once you have entered all necessary information, complete the process by pressing the green Complete button. Approved items will be moved to Warehouse > QC Warehouse, while failed ones will be redirected to Warehouse > Isolator for further action.
Additionally, in this tab, you may see entries related to Technical Equipment. If such items are present, they will appear in a dedicated section below the list. You can perform quality control on these items using the same logic and buttons as described above.
QC Intermediate Points
The QC Intermediate Points tab is intended for validating specific production steps that require intermediate quality checks before final assembly or completion. These control points are typically used in complex manufacturing workflows where individual operations or subcomponents must be reviewed before the final product proceeds to the next phase.
Unlike traditional invoice-based quality control, this tab focuses on partially completed products and subassemblies that are undergoing internal processing. The goal here is to verify whether a particular technological stage (such as milling, painting, or welding) was performed correctly — and to document this with a corresponding protocol file.
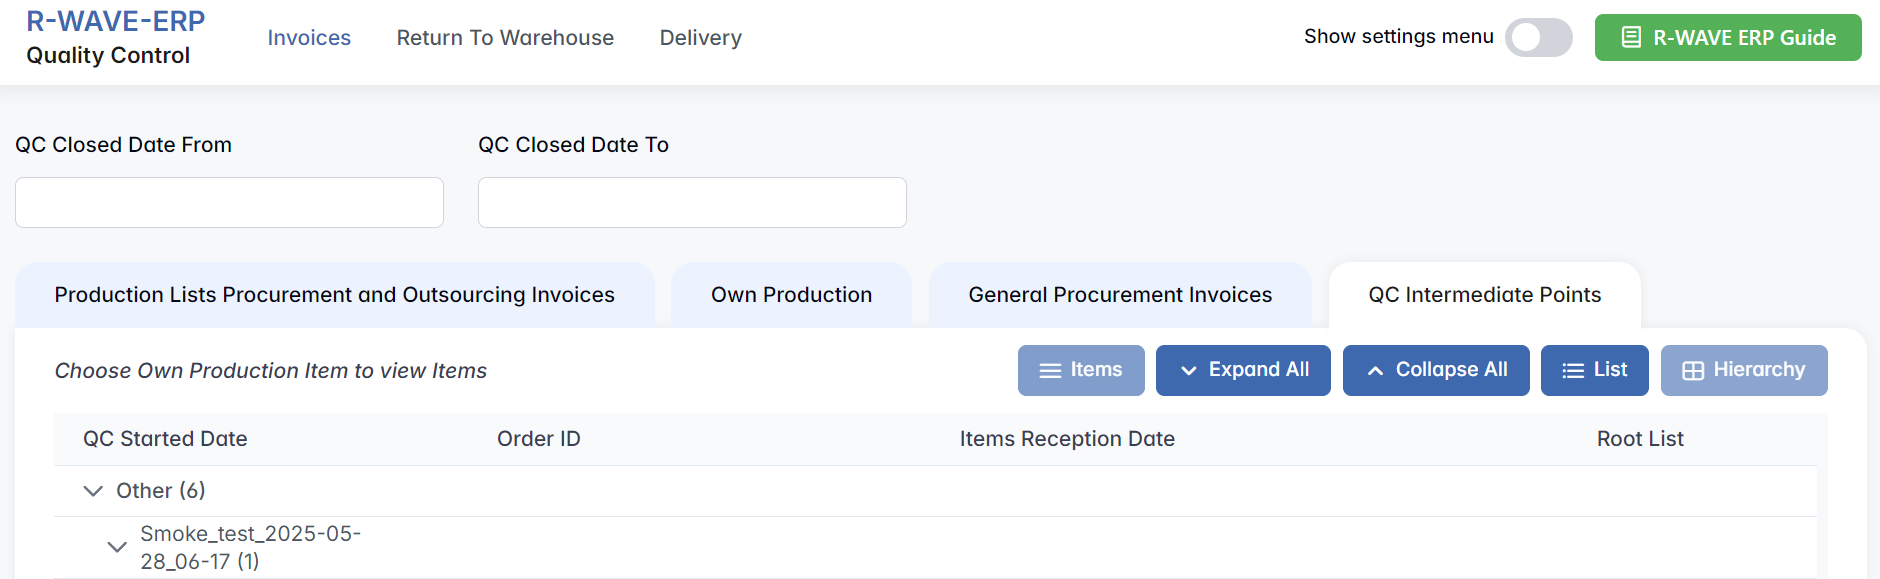
Just like in other sections, the interface allows users to navigate incoming QC records in either Hierarchy or List view. The table contains columns for QC Started Date, Order ID, Items Reception Date, and Root List, offering clarity about when the process began and what it refers to.
To initiate a check, find the relevant row in the list and click the Items button. This opens the detail view for the selected Order ID, showing all intermediate points within that order.
Each row in this view represents a specific quality checkpoint. The table includes the following columns:
Name (name of the intermediate check), Description, For Product (the final product it belongs to), Technology (e.g., milling), Quantity, and Intermediate Point File (if already uploaded).

To start the verification, click three-dot menu next to desired row, press Quality Control to open a pop-up window titled with the name of the selected checkpoint. Inside the window, you will see:

A QC Protocol File upload field, where the responsible person should attach documentation confirming the quality of this intermediate step.
Once the protocol file is uploaded and the proper status selected (PASS or NOT PASS), the system logs the result. This ensures traceability and compliance across multiple phases of production.
Return To Warehouse
Return To Warehouse
The Return to Warehouse tab of the Quality Control module is designed for handling items that are being returned to stock after a previous withdrawal — for example, unused materials from production, components returned from departments, or tools that were checked out temporarily. These items require a quality check before they can re-enter the warehouse system, ensuring that only functional and intact goods are stored and made available for reuse.
At the top of the screen, you’ll find four filter fields to help narrow down the list of records:

- QC Started Date From / To — filters based on when the quality control process began,
- QC Closed Date From / To — filters based on when the process was completed.
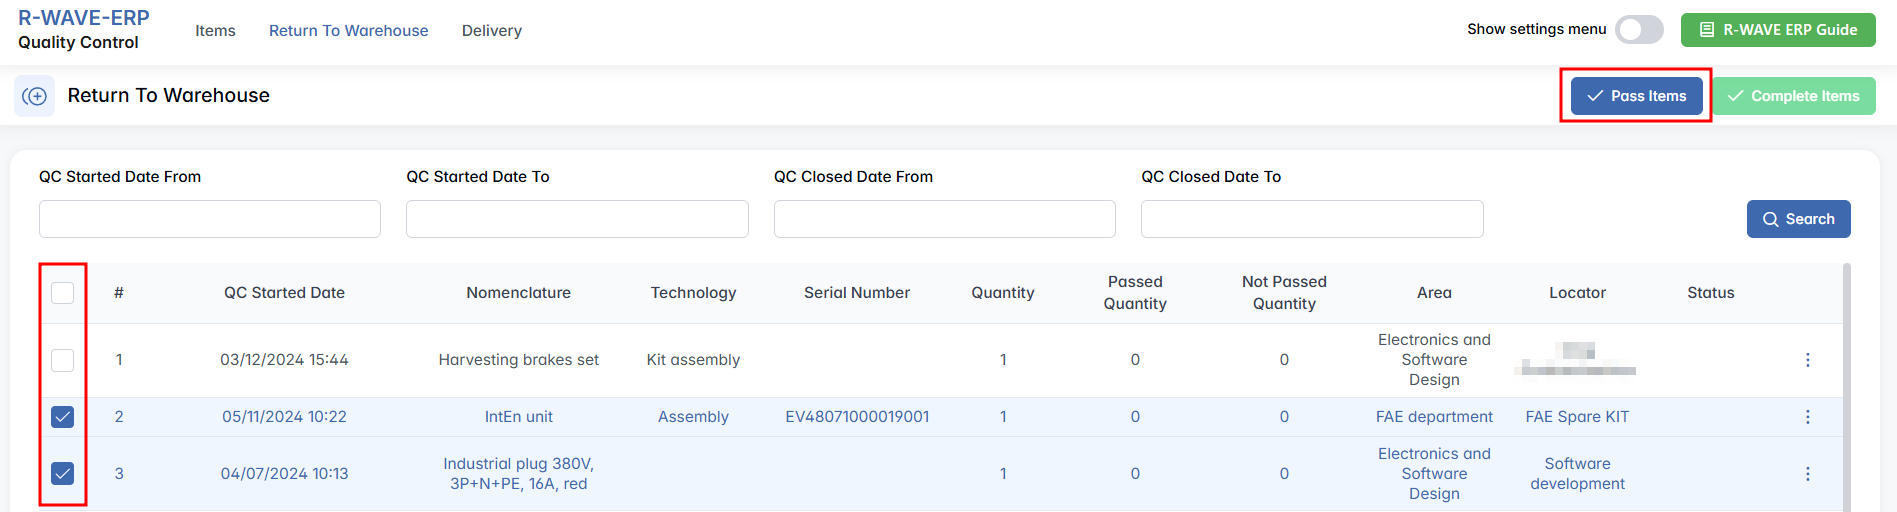
Below the filters, a table lists all pending return-to-warehouse items. Each row contains the following fields:

- QC Started Date — when the return process initiated,
- Nomenclature — the product name or item reference,
- Technology — if applicable, the type of processing linked to the item,
- Serial Number — identifying number if the item is serialized,
- Quantity, Passed Quantity, Not Passed Quantity — showing how many units are pending and how many already processed,
- Area / Locator — physical storage zones linked to the item’s original department,
- Status — current stage in the QC process.
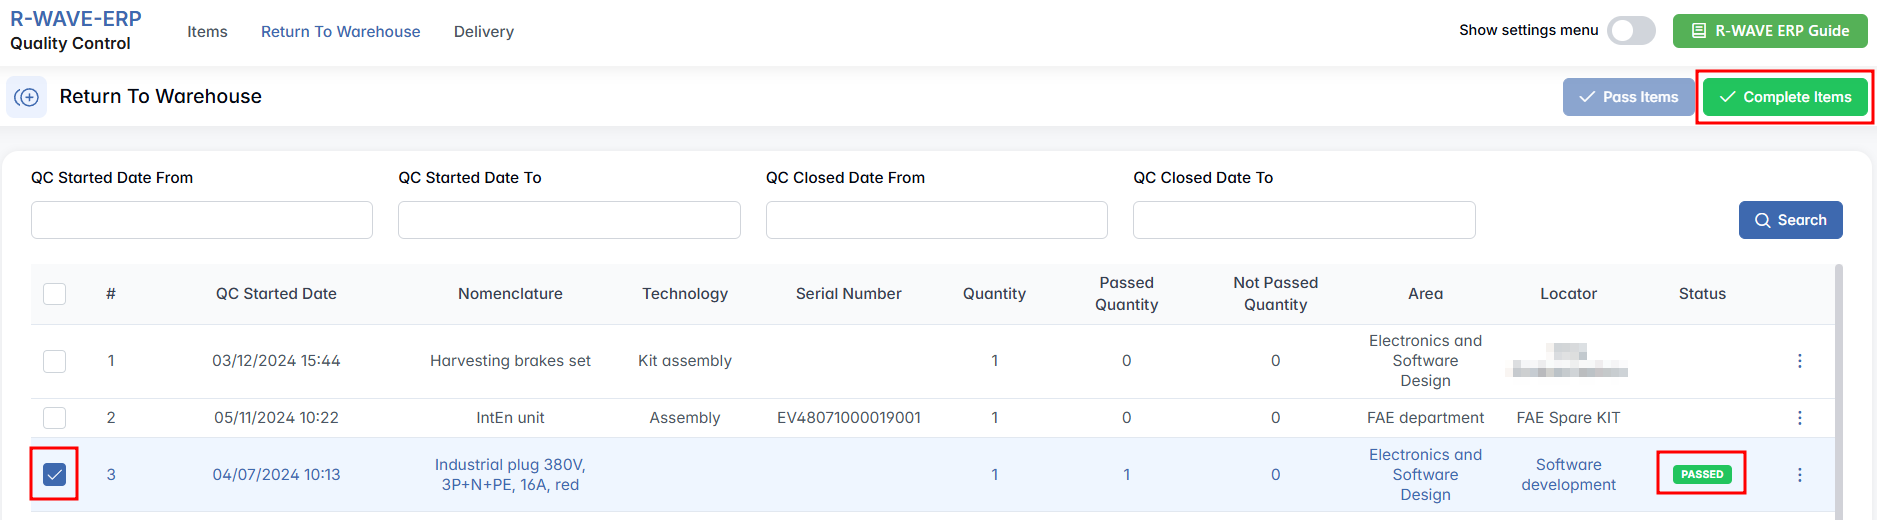
To perform actions on items, start by selecting the checkbox next to a row. You can select multiple rows at once to prepare them for the final return using the Pass Items button (this marks them as acceptable without rechecking).
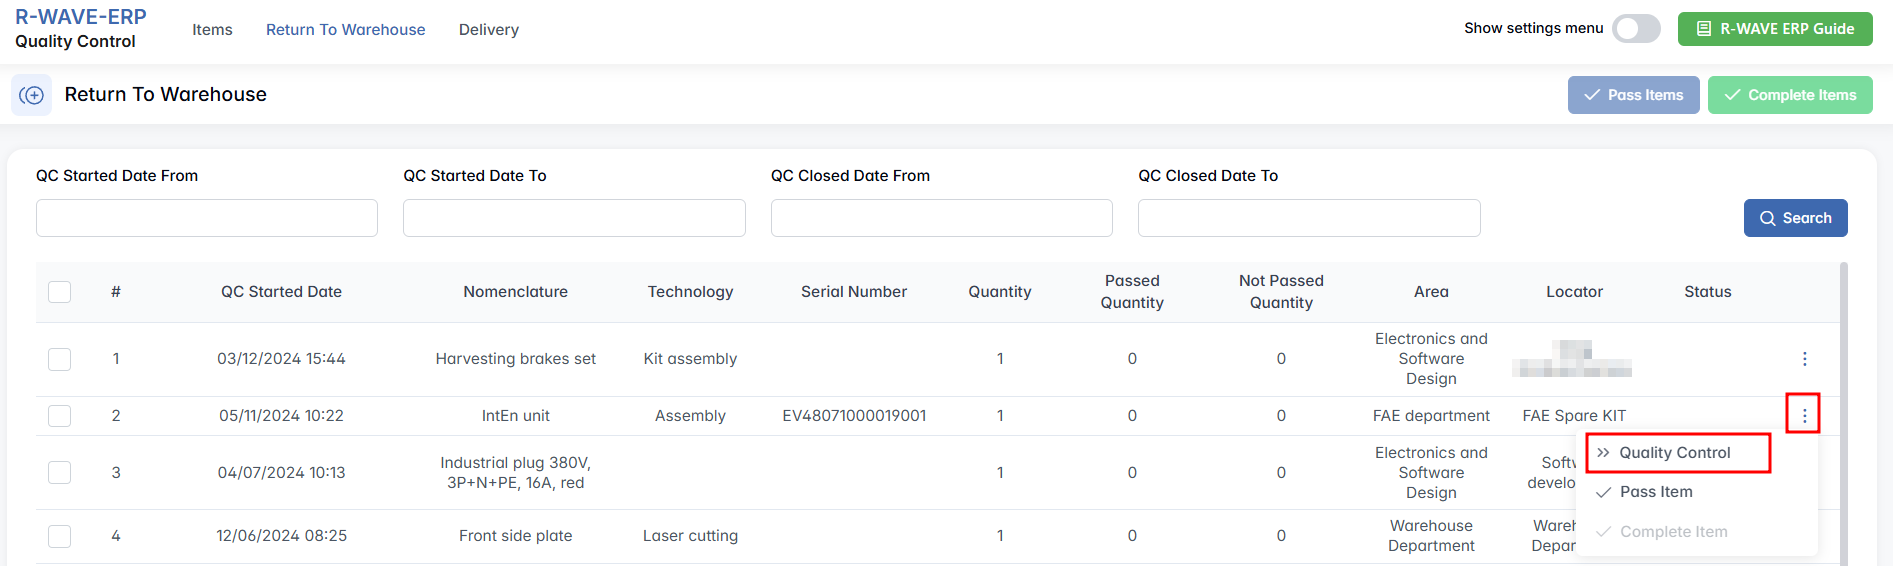
However, if you wish to perform full quality control — especially for items that are critical or show signs of use — select a single row, click three-dot menu next to it and press Quality Control.
This opens a pop-up window labeled Quality Control, which includes: Name, Quantity — total number of units in the selected return, input fields for Passed and Not Passed quantities — both of which are required before proceeding. Enter the inspection results and press Complete.
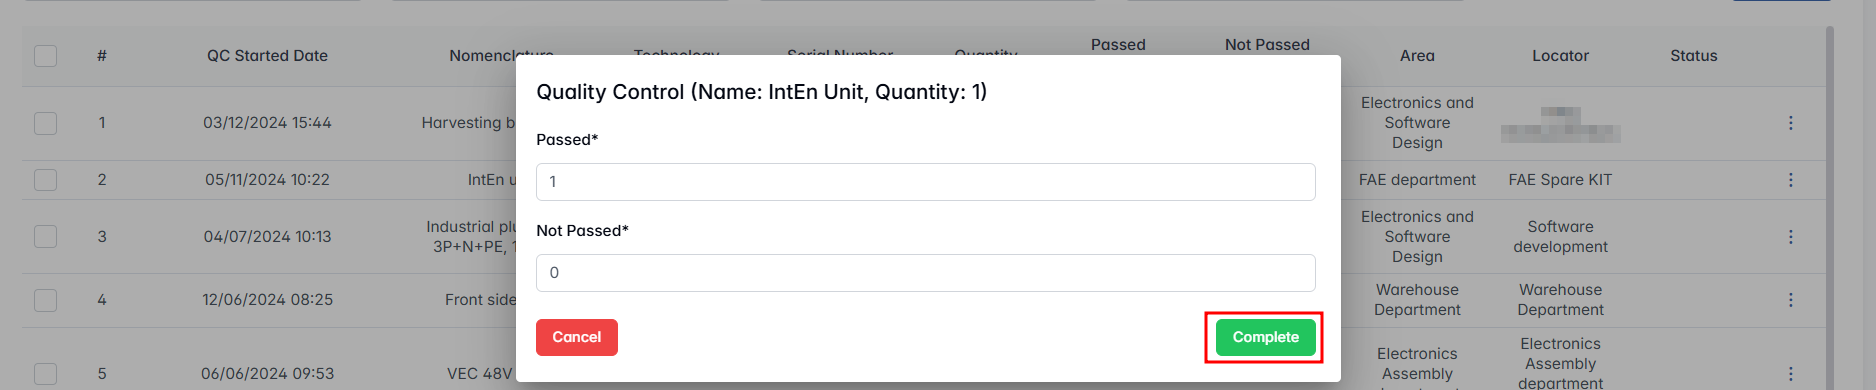
The final step in the process is to press the Complete Items button, which finalizes the return and either sends the passed items for allocation by the warehouse or routes them to the isolator if they did not pass quality control.
Delivery
Delivery
The Delivery tab of the Quality Control (QC) module is dedicated to handling items that are being delivered out of the organization — whether to a customer, a subcontractor, or for return via RMA (Return Merchandise Authorization). This part of the module ensures that all outgoing shipments are reviewed for completeness, accuracy, and packing compliance before they leave the warehouse.

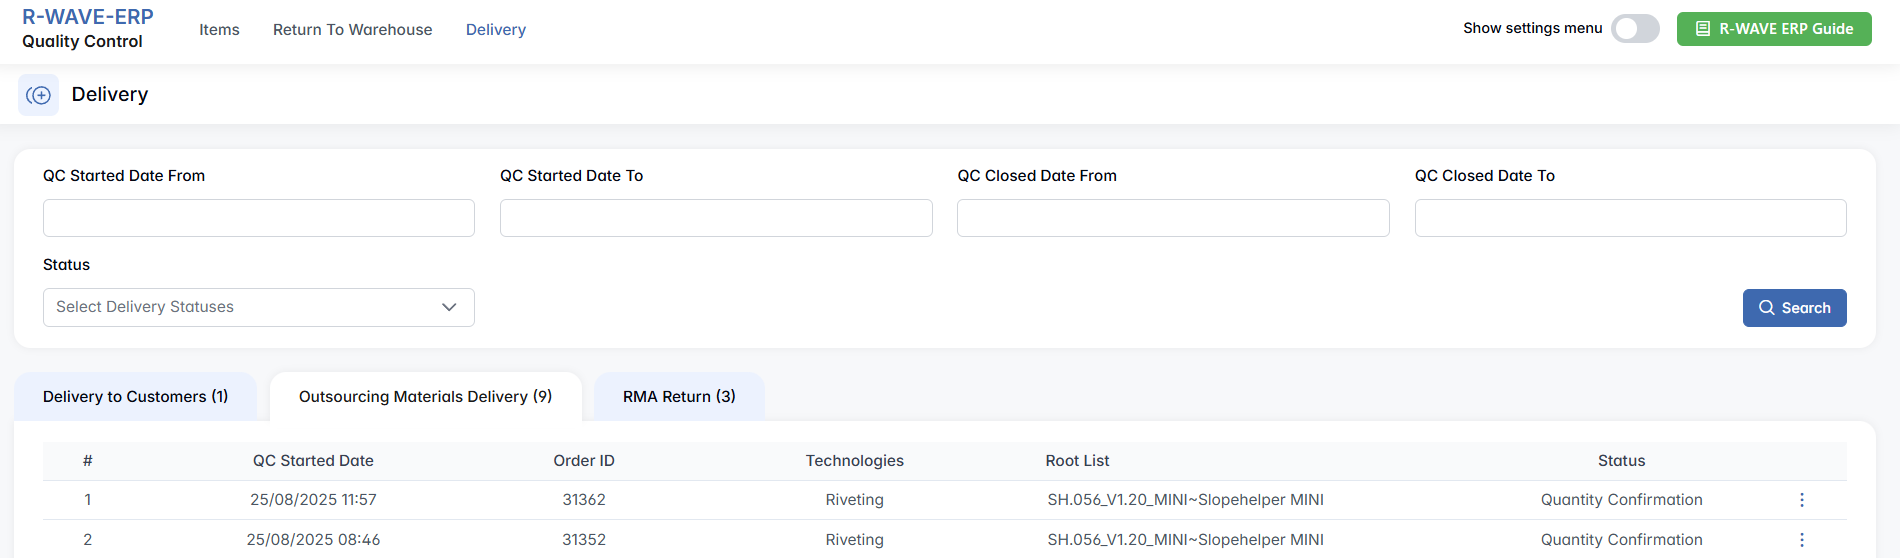
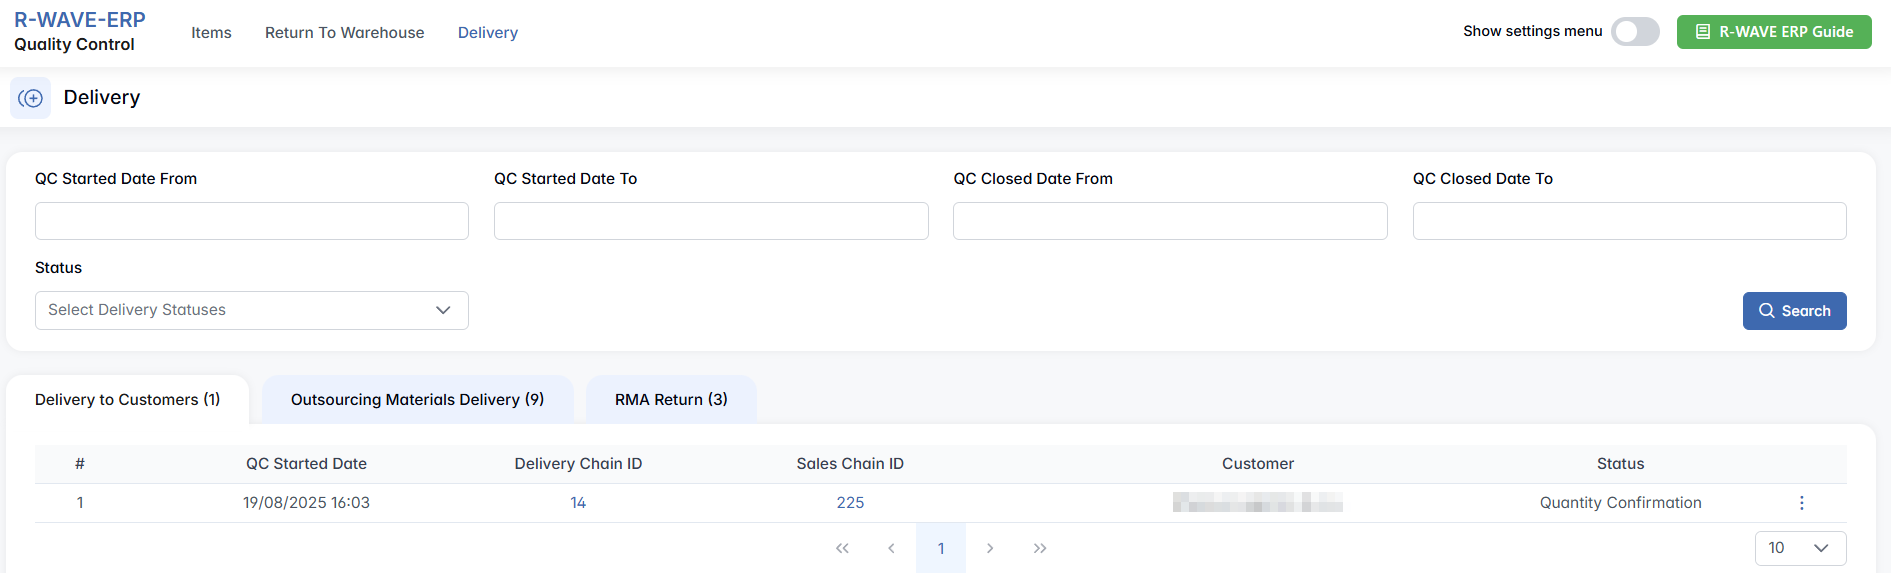
The interface includes several filtering fields at the top of the screen to help narrow down the displayed records:
- QC Started Date From / To — to filter deliveries by the date the QC process started,
- QC Closed Date From / To — to filter by completion date,
- Status — lets you search by current QC status,
- QC Delivery Statuses — a dropdown of delivery workflow stages, such as New, Quantity Confirmation, Wrong Quantity, Packing Confirmed, and Done.
This section of the QC module is organized into three separate tabs:
- Outsourcing Materials Delivery — for items sent to external subcontractors for processing,
- Delivery to Customer — for final deliveries of products to end customers,
- RMA Return — for returned merchandise that must be checked before reintegration or disposal.
By default, the system opens the Outsourcing Materials Delivery subtab, which we will review first.
Outsourcing Materials Delivery
This subtab of the Delivery tab is used when sending materials out to subcontractors (outsourcers) for further processing, such as painting, milling, or assembly. Before these goods leave the company’s facilities, they must go through quality checks to confirm that the right items and quantities are being shipped and that everything is properly packed.
The main table shows a list of outsourcing delivery orders, each containing the following fields:
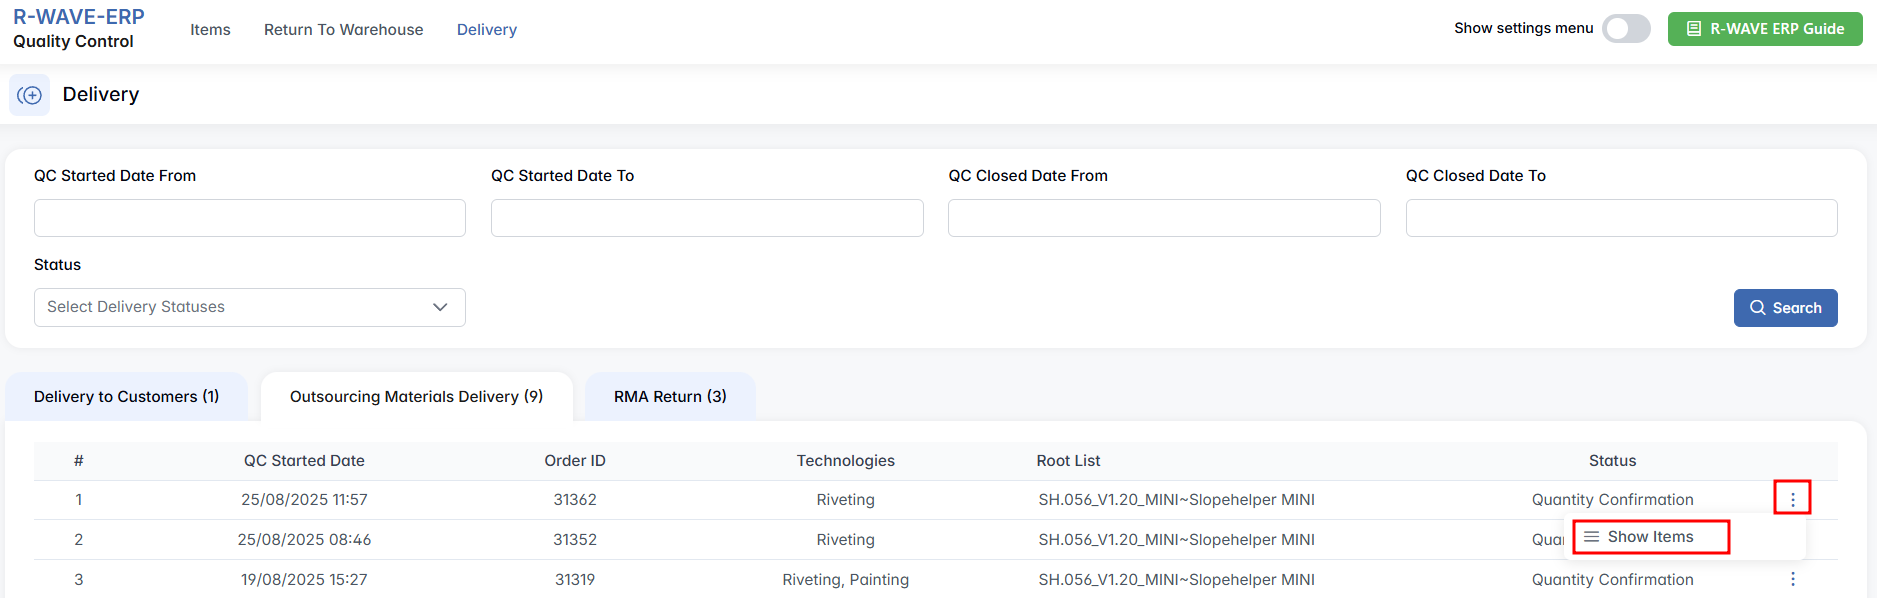
QC Started Date — when the delivery QC process began,
Order ID — unique identifier of the outsourcing order,
Root List — name of the product or system associated with the delivery,
Technologies — production processes the items are intended for (e.g., milling, painting),
Status — current QC stage of the delivery.
To begin reviewing an order, click three-dot menu next to the desired row and press Show Items. Pressing this button opens the Order ID page, where detailed delivery information becomes available.
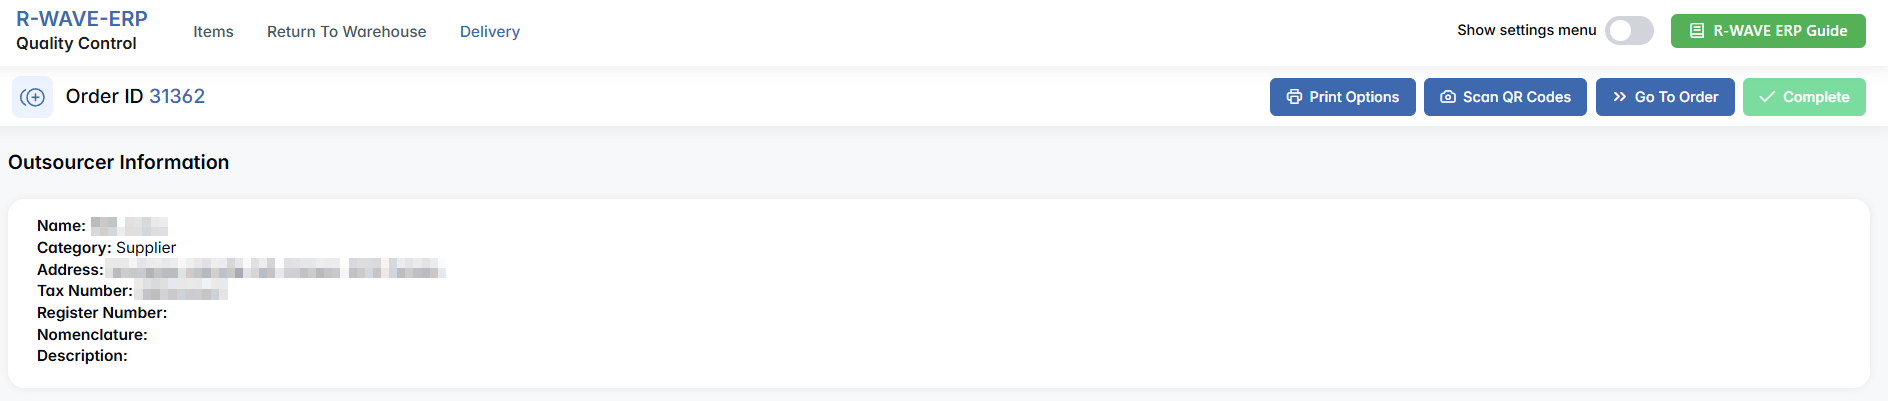
Reviewing Items for Outsourcing Delivery
The order detail page displays key information about the outsourcer: Name, Address, Tax Number, and Register Number if available.
Below that, a table lists all items in the delivery with columns for:
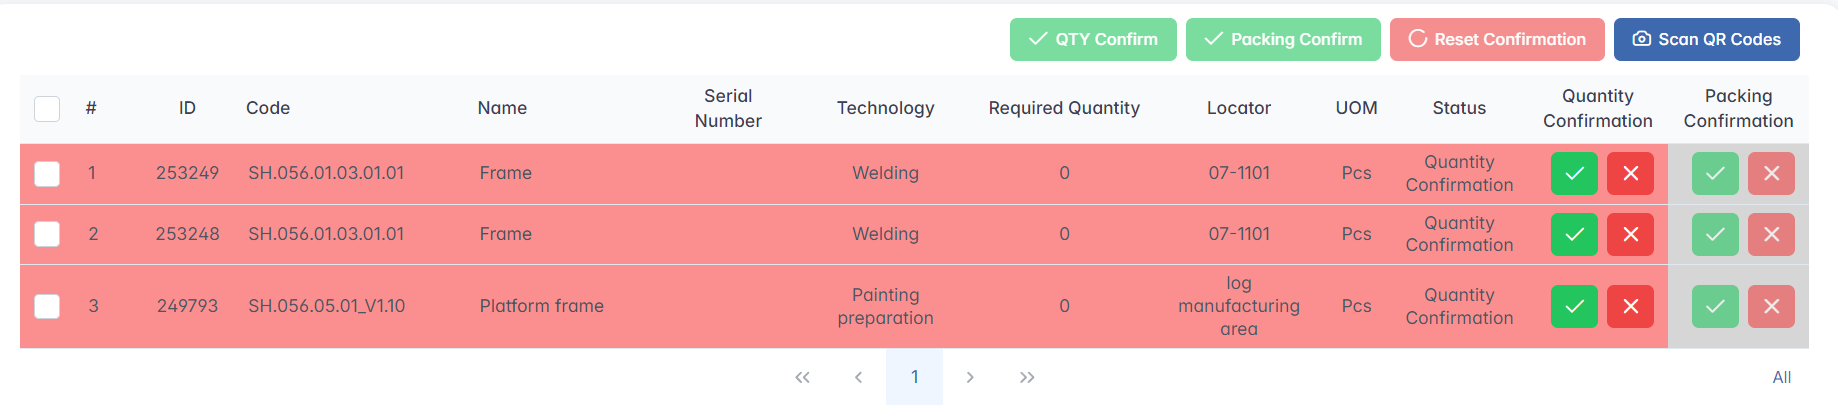
- ID, Code, Name,
- Serial Number (if any),
- Technology (e.g., Laser cutting, Milling),
- Required Quantity,
- Locator — location where the item is stored in your system,
- UOM (Unit of Measure),
- Status,
- Quantity Confirmation and Packing Confirmation — where both confirmations must be completed before proceeding.
- A ✅ green check mark to approve,
- A ❌ red cross to reject.
Once at least one row is selected using the checkbox on the left, the buttons above the table become available:

- QTY Confirm — confirms the quantity of the selected items,
- Packing Confirm — confirms that the packing is correct,
- Reset Confirmation — clears previous confirmations,
- Scan QR Codes — opens a scanner tool for verifying codes on packaging or labels.
In the upper-right corner of the item list, you’ll also see several output and navigation options:
Print Options — including Print Default, Print Grouped by Order Product, and Print Album (the last becomes active when multiple rows are selected),
Complete — finalizes the delivery; this becomes active only once all items have both quantity and packing confirmed,
Go to Order — navigates to the linked order form in the ERP system.
Below the table, there’s an optional section for Technical Equipment, though in many deliveries this section may be empty. If items appear here, they follow the same confirmation logic described above.

Delivery to Customers
This subtab of the Delivery tab handles all items that are being shipped directly to end customers. Before these items leave the company, they must pass a final quality check to ensure that the correct products, in the right quantities, are dispatched — and that they are packed properly. This helps maintain a reliable delivery process and prevents customer complaints.
At this stage, the system ensures that outgoing goods are fully validated, confirmed, and documented. As with other delivery types, the goal is to reduce errors, enforce consistency, and ensure full traceability of all shipments.
The main table displays a list of delivery records, each with the following columns:
QC Started Date — when the delivery QC process began;
Delivery Chain ID — unique identifier of the delivery process;
Sales Chain ID — the associated sales chain (if applicable);
Customer — recipient of the shipment;
Status — current stage of the QC workflow for this delivery.
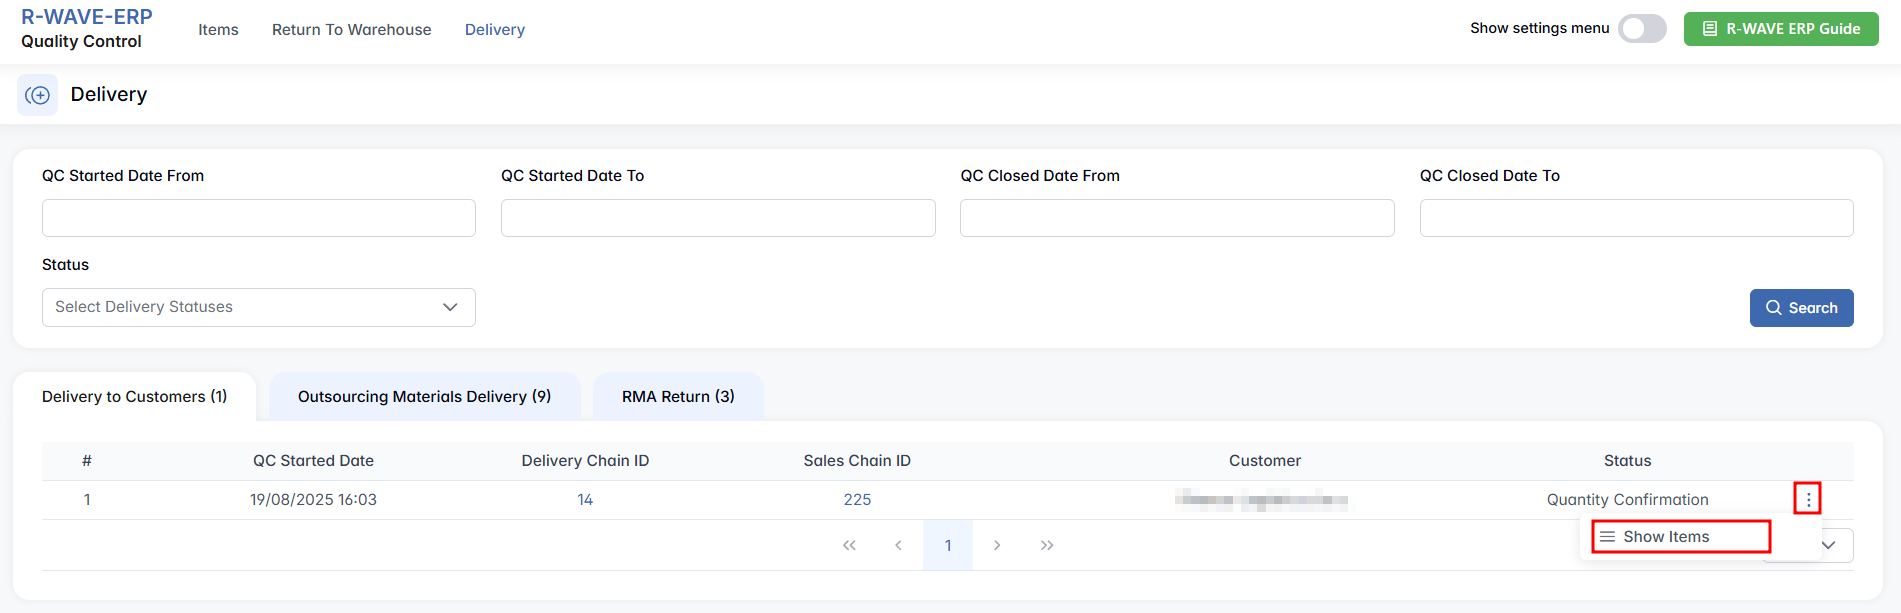
To begin reviewing an order, click three-dot menu next to the desired row and press Show Items. Pressing this button opens the Products for Delivery Chain ID, where detailed delivery information becomes available.
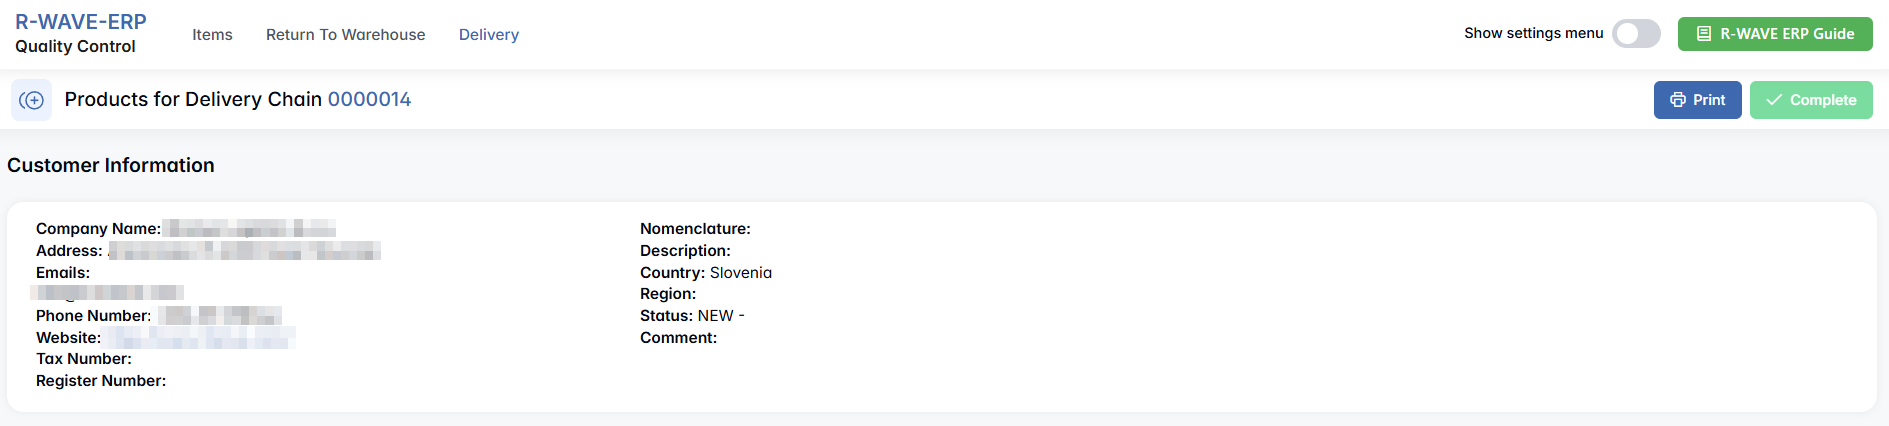
Reviewing Items for Delivery to Customers
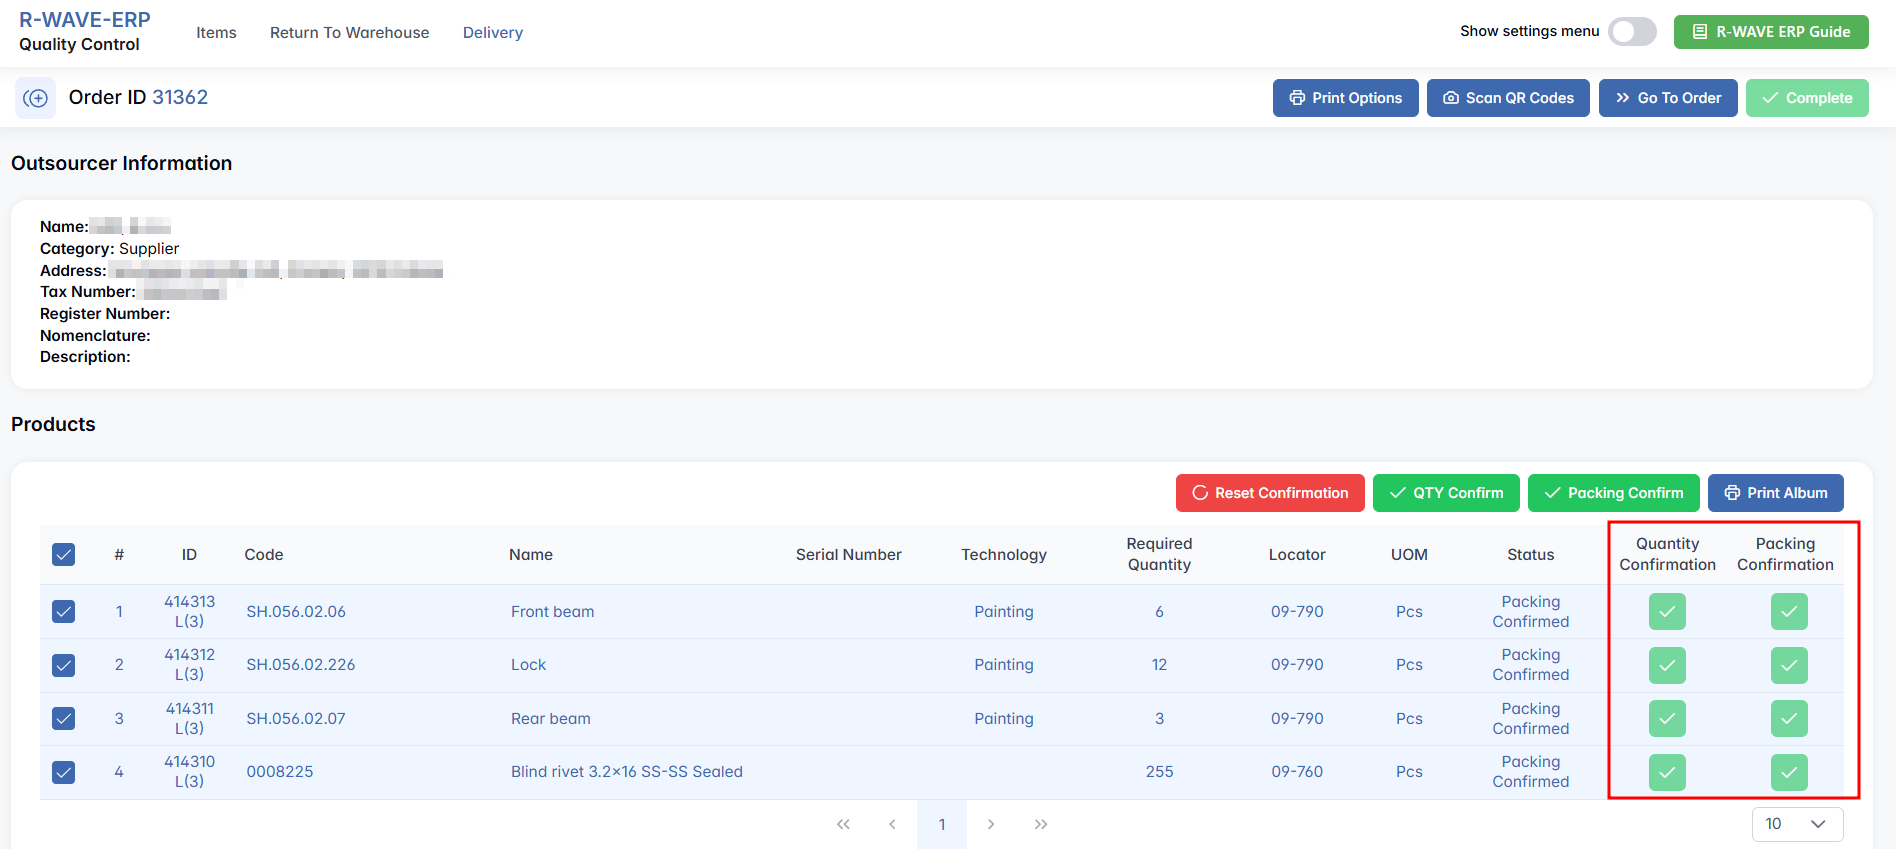
The order detail page displays key information about the customer: Name, Address, Tax Number, and Register Number if available.

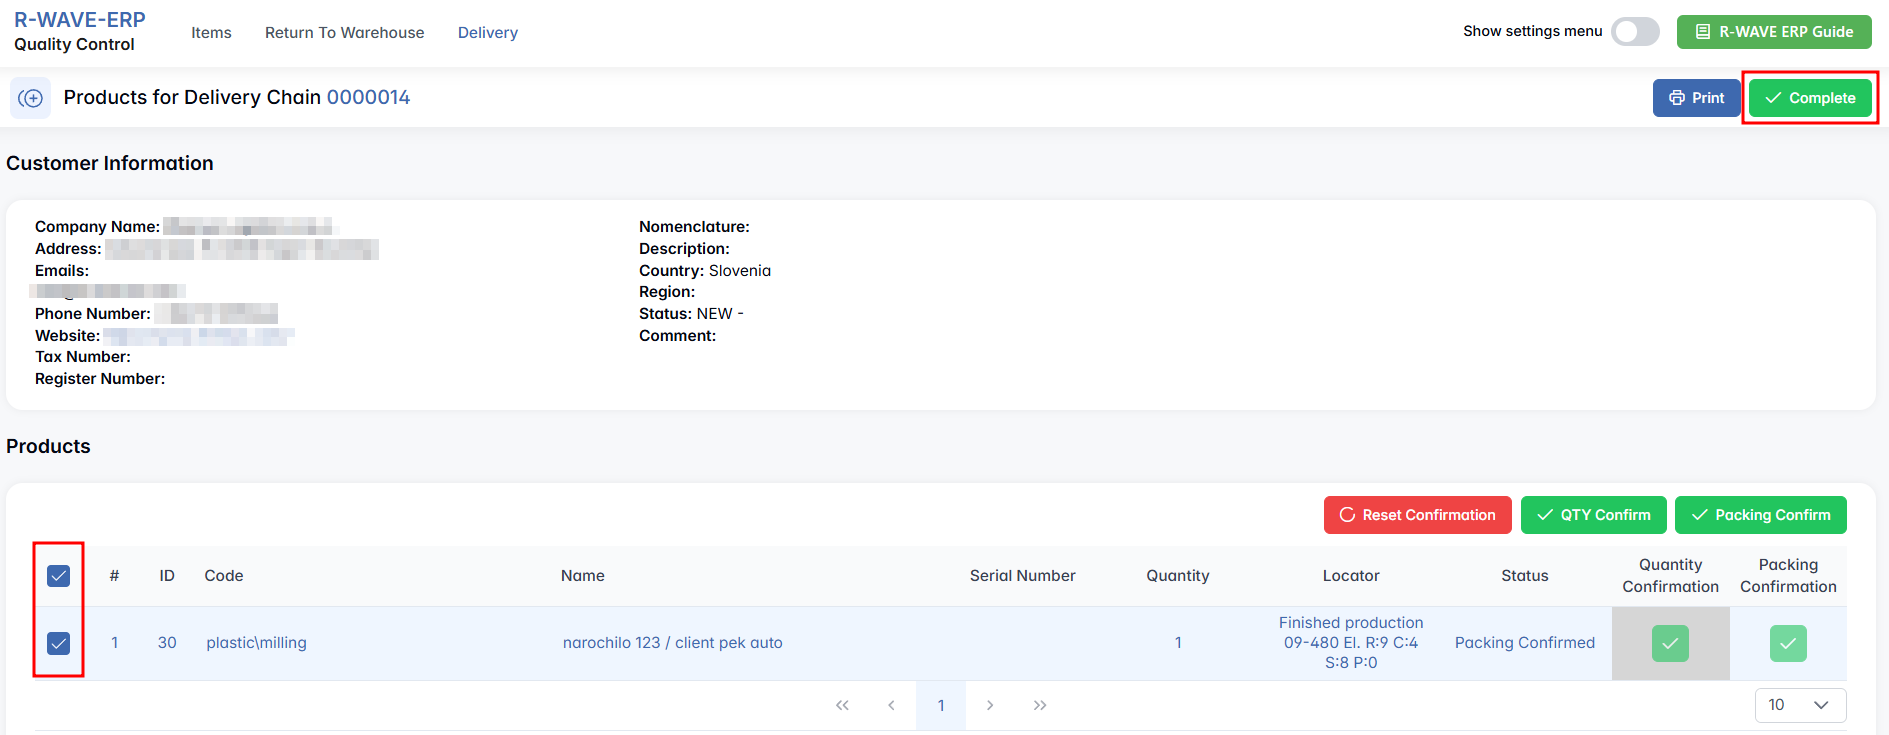
Below that, a table lists all items in the delivery with columns for:

- ID, Code, Name,
- Serial Number (if any),
- Quantity,
- Locator — location where the item is stored in your system,
- Status,
- Quantity Confirmation and Packing Confirmation — where both confirmations must be completed before proceeding.
- A ✅ green check mark to approve,
- A ❌ red cross to reject.
Once at least one row is selected using the checkbox on the left, the buttons above the table become available:

- Reset Confirmation — clears previous confirmations,
- QTY Confirm — confirms the quantity of the selected items,
- Packing Confirm — confirms that the packing is correct.
In the upper-right corner of the item list, you’ll also see several output and navigation options: Print and Complete — finalizes the delivery; this becomes active only once all items have both quantity and packing confirmed.
Note: Records in this section will appear only once a delivery for a customer order has been created and passed into the QC workflow. These deliveries usually originate from the sales or shipping departments and must follow internal logistics procedures to reach this step.
RMA Return
This subtab of the Delivery tab manages all quality-controlled returns under the Return Merchandise Authorization (RMA) process. It includes products that were received from suppliers but did not pass quality control, and are now being returned for refund, redelivery, or other resolution actions.
Before an item appears in this tab, it must first be rejected by the QC department during initial inspection. These rejected items are stored in the Isolator area and are then linked to an RMA request created by the QC Manager. The goal of this process is to maintain clear traceability, communicate the reason for rejection, and manage supplier-side resolutions.
The main table in this section displays the following columns:
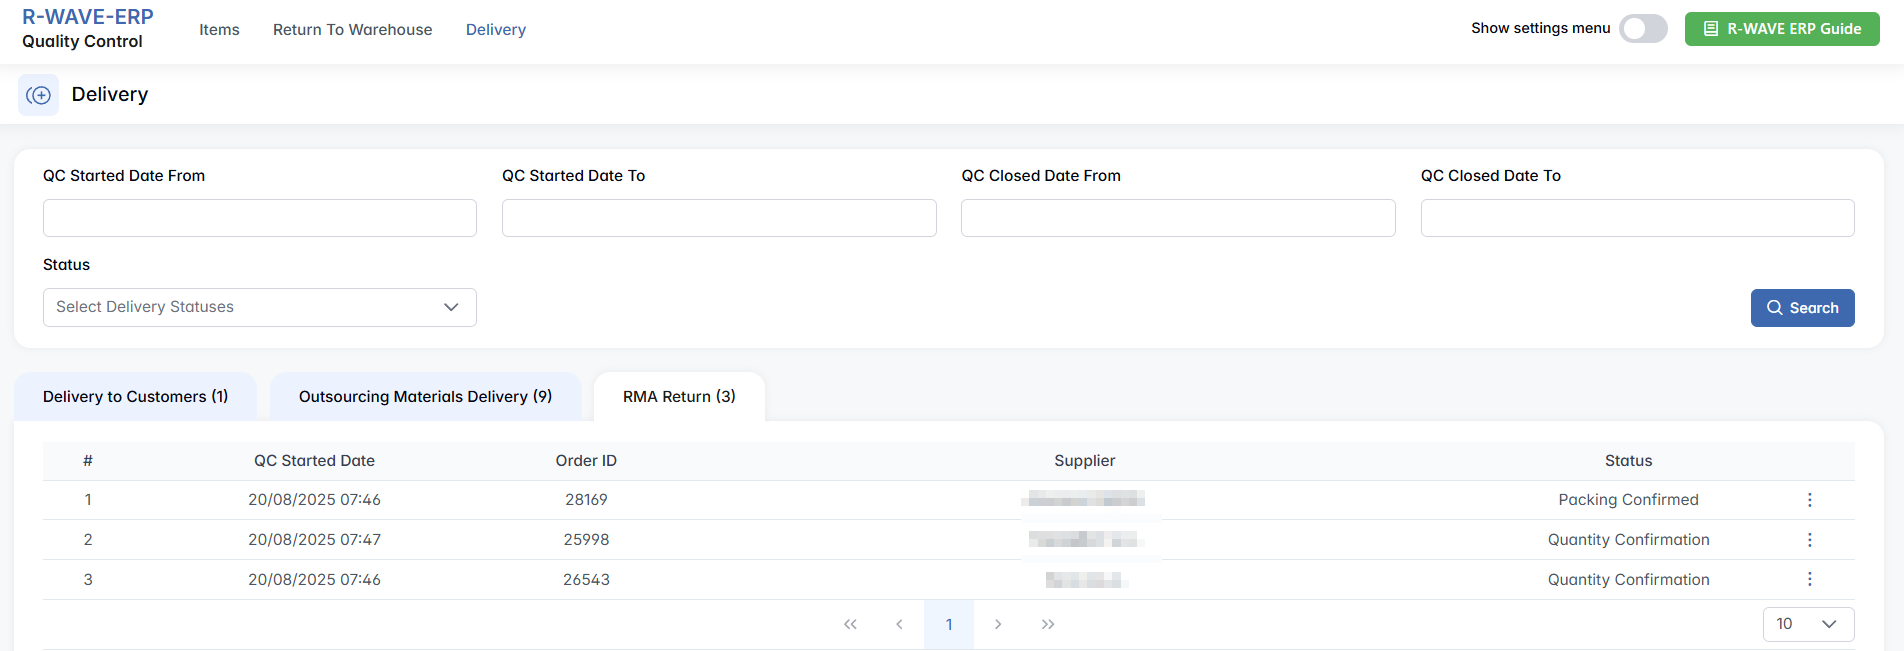
QC Started Date — when the RMA inspection process was initiated;
Order ID — the original order that brought in the rejected item;
Supplier — the vendor who delivered the product;
Status — the current progress of the RMA workflow.
Note: To populate this section, a rejected item must be marked for RMA return directly from the Warehouse > Isolator > Invoices Isolator menu. The QC Manager clicks the RMA button on a failed item, adds a comment and attaches a report file, then submits the request. The system automatically links it to the procurement chain, and the item becomes visible in this RMA Return tab for further handling.
To begin reviewing an order, click three-dot menu next to the desired row and press Show Items. Pressing this button opens the Order ID, where detailed information becomes available.

Reviewing Items
The order detail page displays key information about the supplier: Name, Address, Tax Number, and Register Number if available.

Below that, a table lists all items in the delivery with columns for:

- ID, Code, Name,
- RMA Comment,
- Quantity,
- UOM (Units of Measure),
- Status,
- Quantity Confirmation and Packing Confirmation — where both confirmations must be completed before proceeding.
- A ✅ green check mark to approve,
- A ❌ red cross to reject.
Once at least one row is selected using the checkbox on the left, the buttons above the table become available:
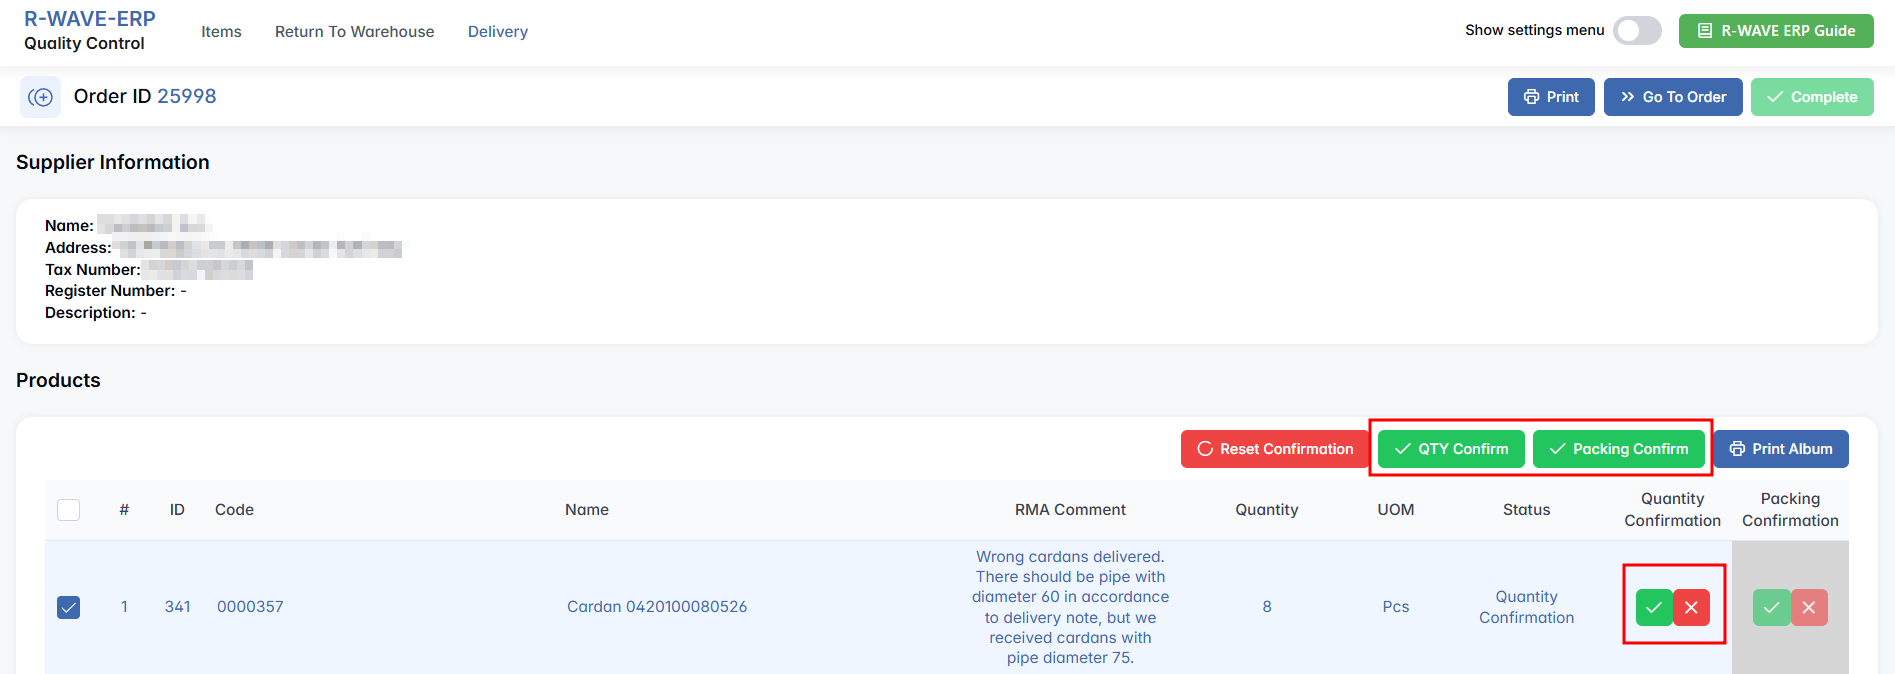
- Reset Confirmation — clears previous confirmations,
- QTY Confirm — confirms the quantity of the selected items,
- Packing Confirm — confirms that the packing is correct
- Print Album of selected items.
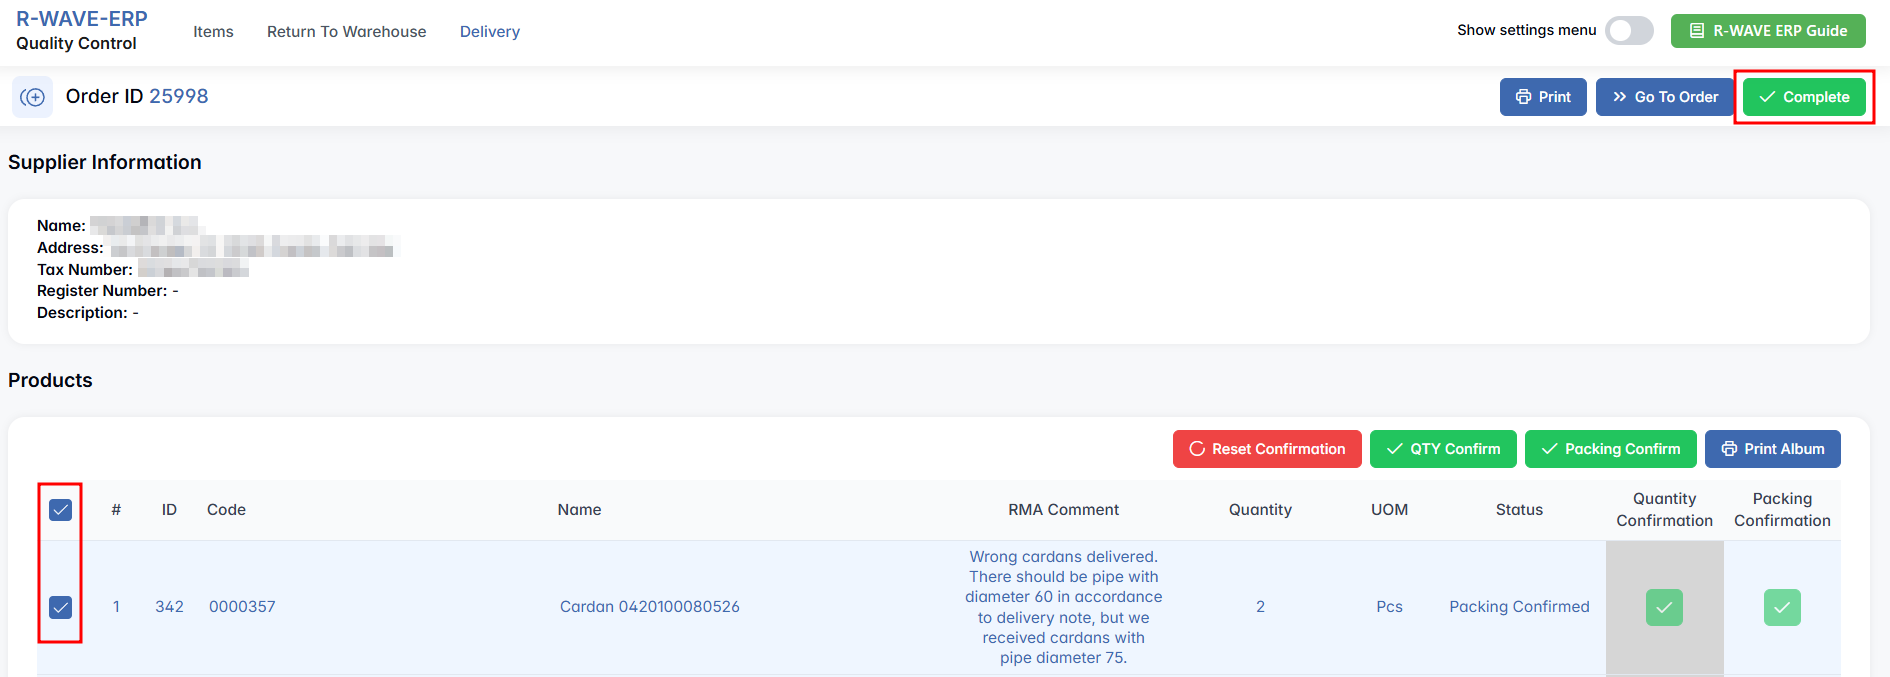
In the upper-right corner of the item list, you’ll also see several output and navigation options: Print and Complete — finalizes the process; this becomes active only once all items have both quantity and packing confirmed.
Hidden Settings in the Quality Control Module
Hidden Settings in the Quality Control Module
Protocols
To support structured documentation and enforce standardized quality procedures, the Quality Control module in BINU ERP includes a hidden Protocols section. This additional tab becomes visible after activating Hidden Settings, and allows users to define reusable protocol templates — formal documents or checklists applied during the inspection of items.


Each Protocol can include structured text (paragraphs), linked nomenclatures (products or components it applies to), and file attachments such as QC checklists, technical instructions, or validation reports. This feature is especially useful in industries where repeatable inspection standards must be documented and tracked over time.
Navigating the Protocols Tab
When you open the Protocols section, you will see a table with all existing entries:
- Name — the internal title of the protocol,
- Comment — optional notes describing the use or context of the protocol.
You can edit existing protocols by clicking on a row, or create a new one by pressing the + New Protocol button at the top right.
Creating a New Protocol

- Click the + New Protocol button to open the creation form. It includes the following fields:
- Name* — required title of the protocol (e.g., Incoming Electrical Parts QC),
- Comment* — required note for internal reference.
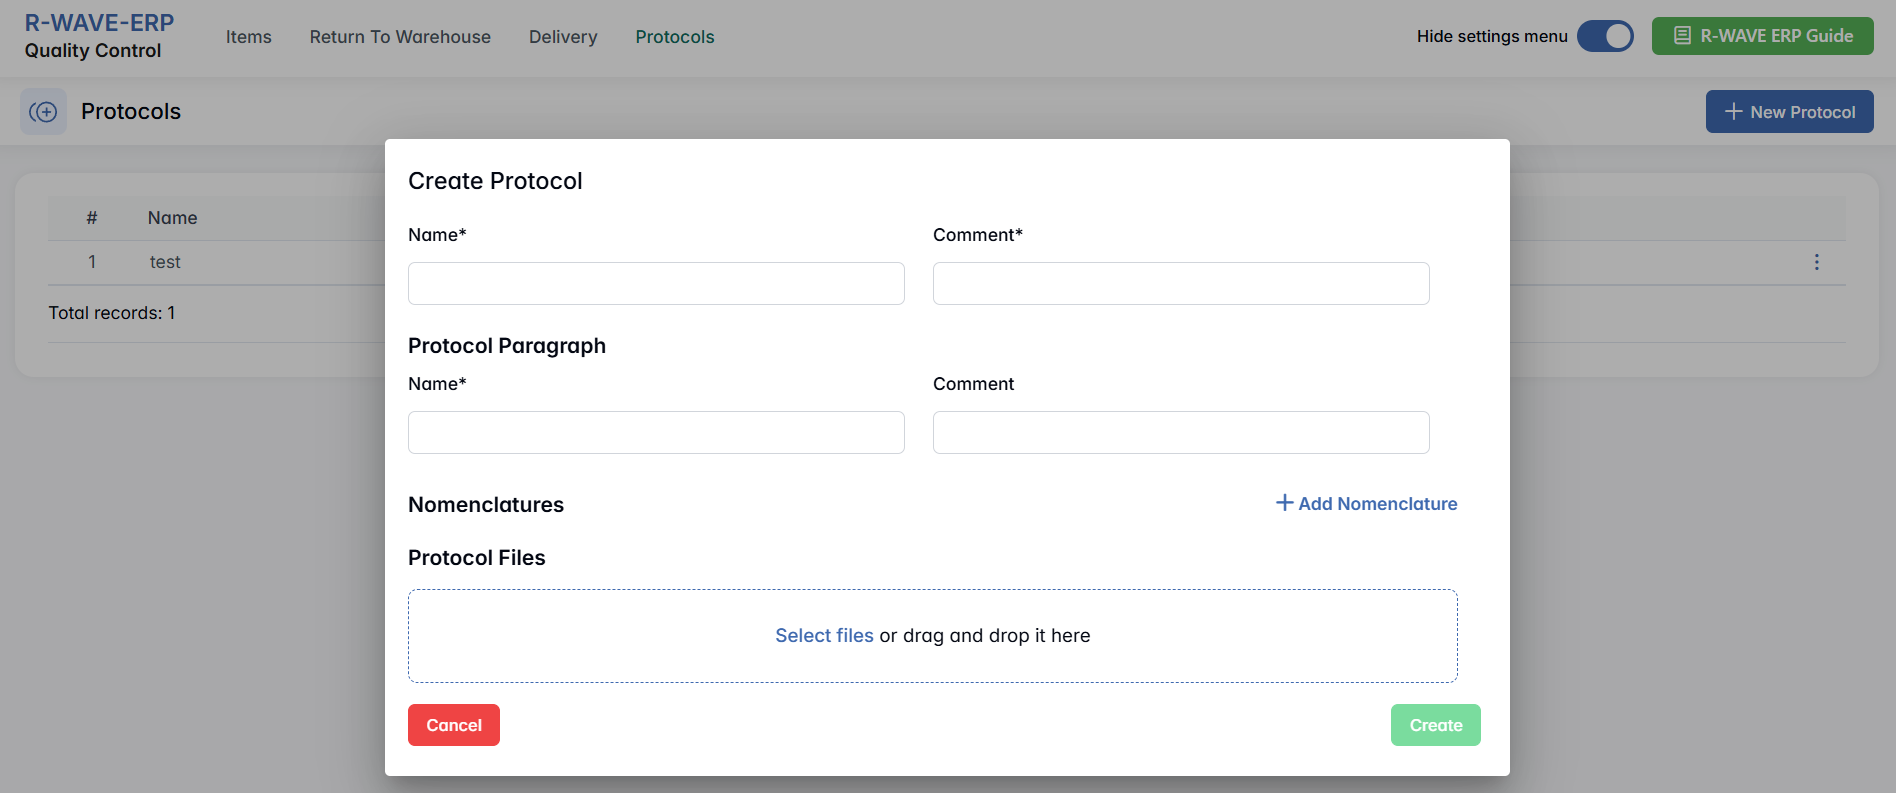
Below that, you can add the core elements of the protocol:
Protocol Paragraph
- Use this section to define individual steps or logical blocks of the protocol:
- Name* — short label (e.g., Visual Inspection),
- Comment — instructions or checklist items related to this paragraph.
You can add multiple paragraphs to describe the full inspection process.
Nomenclatures
This section allows you to link specific products or parts (nomenclatures) to the protocol. Click Add Nomenclature, then search for and select the appropriate items. This helps ensure that protocols are only applied to relevant components.
Protocol Files
You can upload supplementary documents, such as PDFs or Excel sheets with detailed checklists. Either drag and drop files into the field or use the file selector. These files will be saved with the protocol and accessible when the protocol is applied during QC.
Managing Existing Protocols
In the main table of the Protocols section, you can view all previously created protocol templates. To work with an existing protocol:
- Click on a row to select it.
- This activates the Selected Protocol button at the top.
- Pressing this button will give you two options:

- Edit — opens the protocol in edit mode, allowing you to change its name, comment, paragraphs, linked nomenclatures, or attached files.
- Remove — deletes the selected protocol from the system (after confirmation). Use this option with caution, as deleted protocols cannot be restored.
This functionality helps maintain an up-to-date list of active QC protocols, making it easier to standardize inspections across departments or product categories.