Sales Module
The Sales Module in BINU ERP acts as a strategic bridge between customer relationships and operational execution. It allows sales managers and client-facing teams to track the full lifecycle of commercial interactions — from initial contact, through product offering, and into delivery. Seamlessly integrating with modules like Contacts & Events, Manufacturing, and Delivery Chains, the Sales module consolidates all relevant client data, internal communications, and product management tools in one workflow-centric space. It is especially valuable for keeping sales, production, and logistics aligned in real-time.

BINU ERP Guide
To support user navigation and clarity, BINU ERP includes a built-in contextual help system in the form of a pop-up guide window. This feature is available across different modules, including Sales, and is designed to help users understand where they are in the system and how to use the current section effectively.

Purpose
The ERP Guide window helps users by:
- Showing where you are within the system (module context).
- Providing a visual schema of your company’s business flow, helping you understand how the current module fits into the larger operational structure.
- Offering a quick-reference instruction panel with the main actions and functions available in the current tab (e.g., creating companies, filtering, scheduling events).
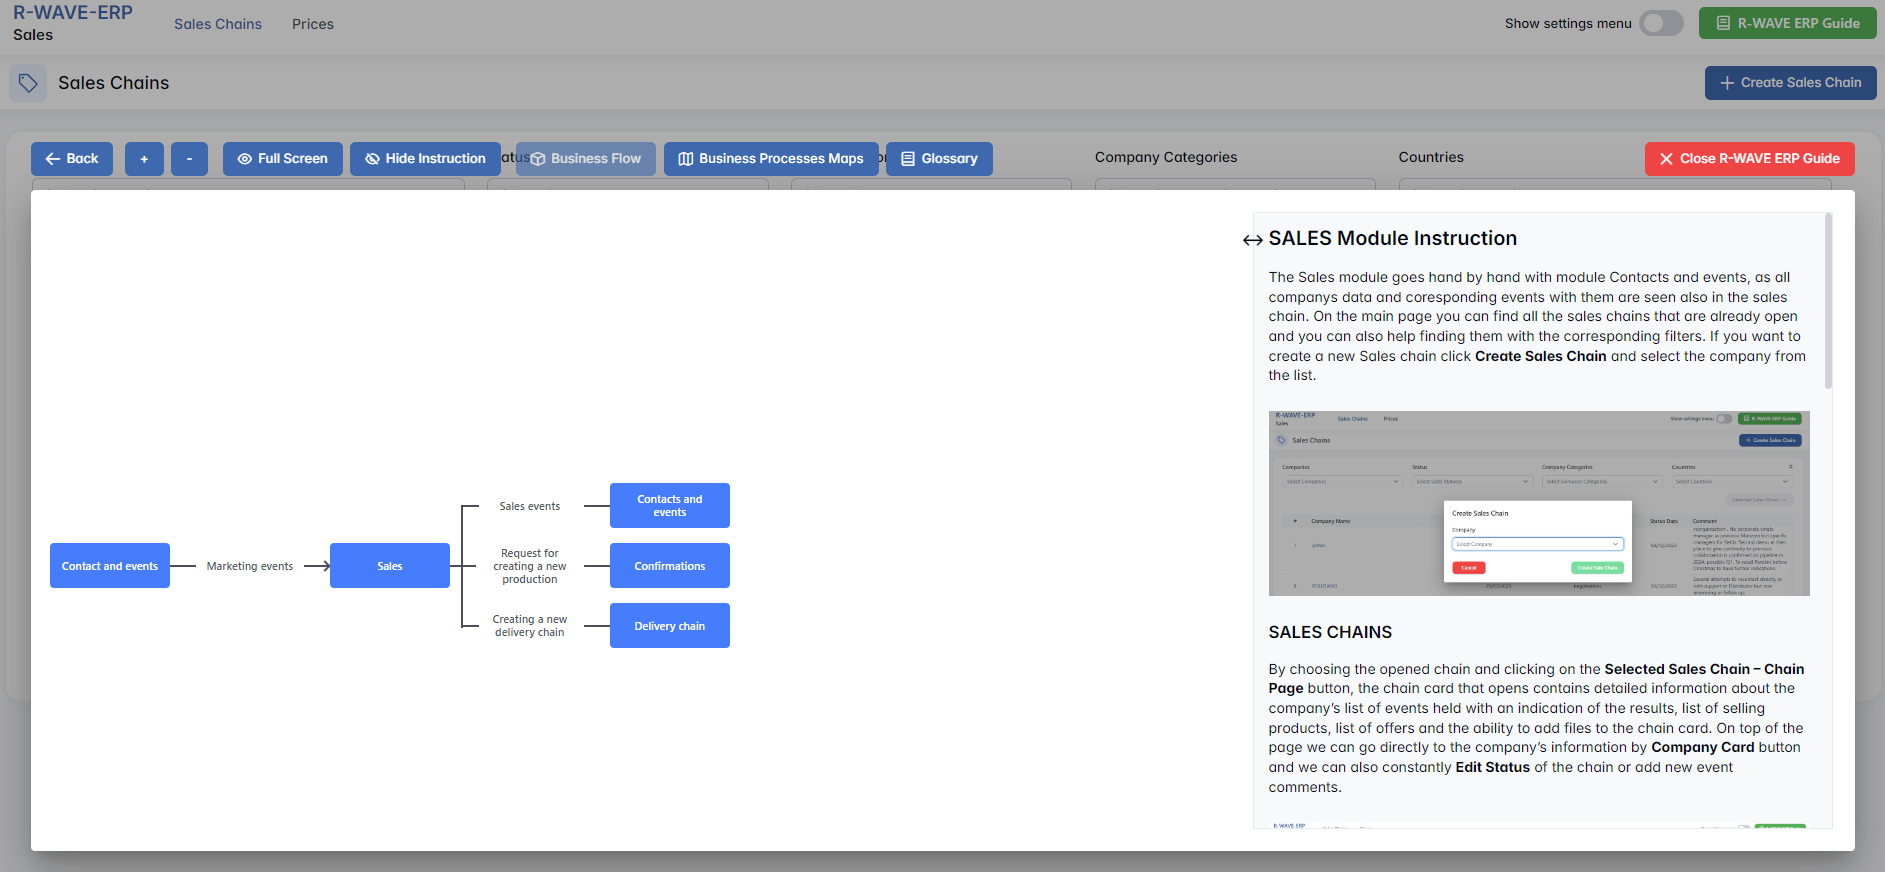
Layout and Content
When opened, the ERP Guide window is divided into two main areas:
- Left Side — Business Flow Map
This section displays a structured diagram of your company's processes and how the current module connects to others (e.g., CRM, Procurement, Sales, HR). It visually highlights your current position in the overall ERP environment. - Right Side — Functional Overview
Provides a concise, bullet-style instruction list describing the key operations available in the current module/tab.
Top Bar Options
At the top of the ERP Guide window, you’ll find two optional tools for deeper understanding:
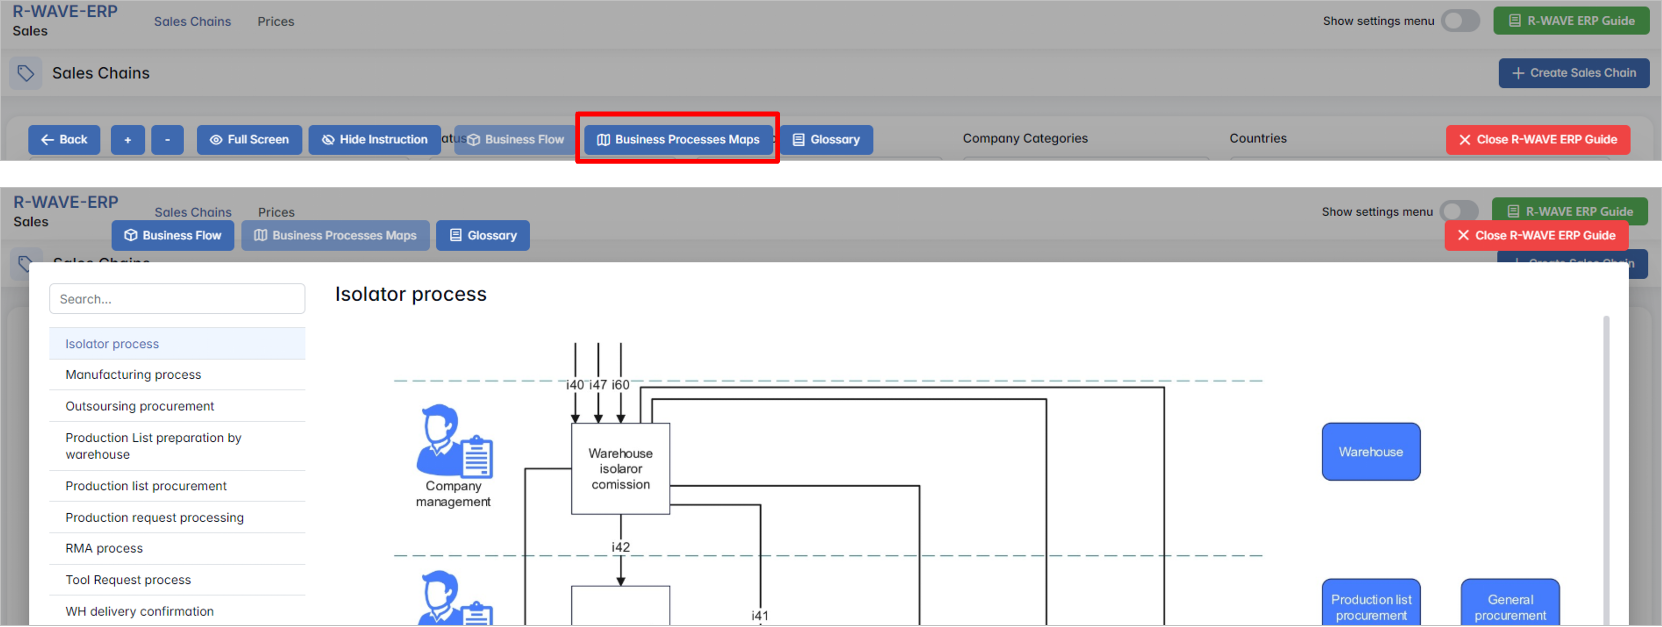
- Business Processes Maps – Opens a full interactive view of your organization’s process structure.
- Glossary – Provides definitions and descriptions of key terms and field labels used in the ERP interface.
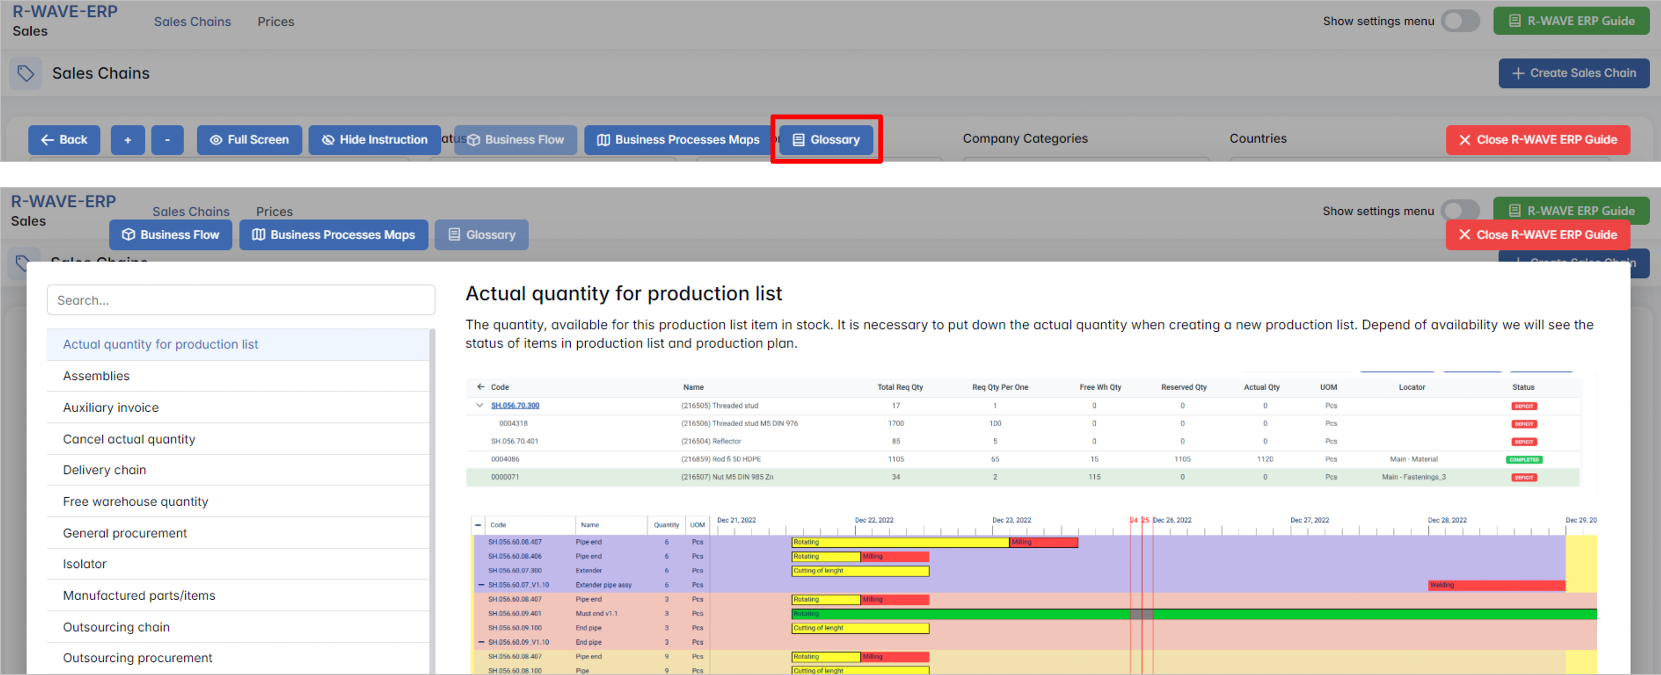
The ERP Guide window can usually be opened via a dedicated icon or help button (often located in the upper right corner of the screen). It is non-intrusive and can be closed or reopened as needed, allowing users to stay focused without losing their place.
Sales Overview
The Sales module is designed to manage and track the lifecycle of client interactions — from initial contact to product offers and delivery preparation. It works in close integration with the Contacts & Events module, ensuring that all interactions, statuses, and activities related to a company are visible within the sales chain.
The module consists of two main tabs:

- Sales Chains (default view)
- Prices
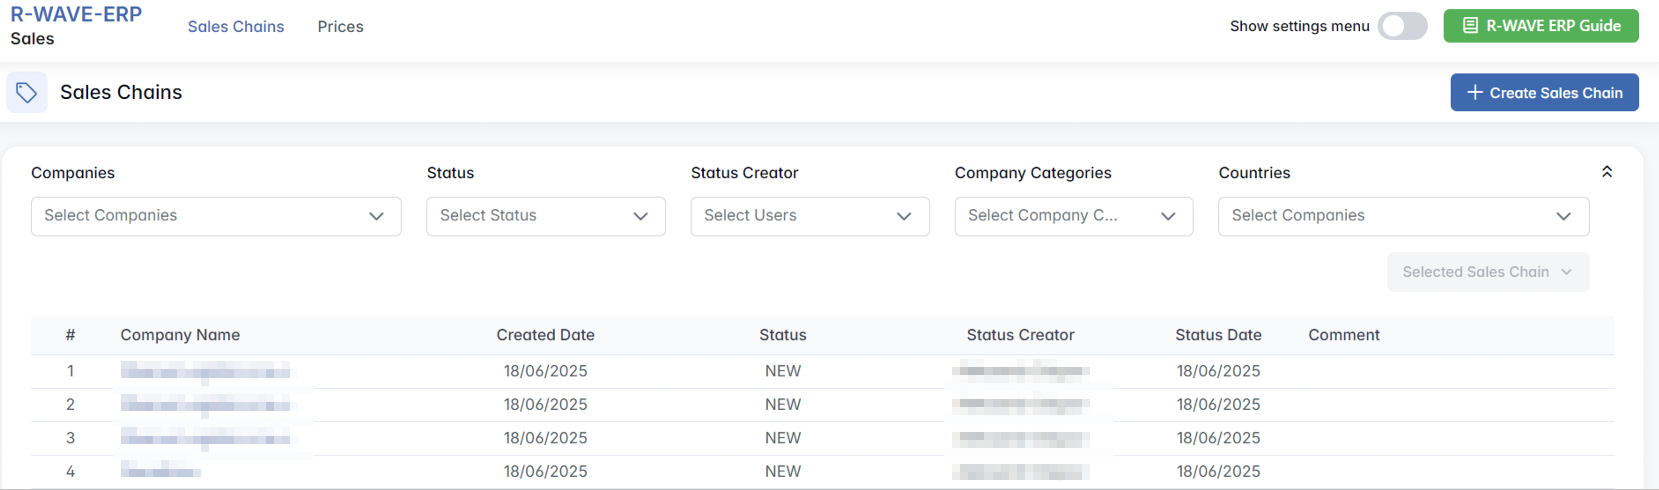
Sales Chains
Sales Chains
This tab displays all existing sales chains and allows the user to create new ones, monitor interactions, manage offers, add products for manufacturing, and prepare deliveries.
Creating a Sales Chain
To initiate a new sales process:
- Click + Create Sales Chain.

- In the modal window titled Create Sales Chain, select the company from the dropdown list.

- Click Create Sales Chain.
Filters
Users can filter existing sales chains by the following parameters:

- Companies – select one or multiple companies from the list.
- Status – filter by sales chain status (e.g., NEW, IN PROGRESS, CLOSED).
- Status Creator – filter by the user who set the chain status.
- Company Categories – filter by categories assigned in Contacts & Events.
- Countries – filter by country linked to the company.
These filters can be combined, but not all combinations yield results.
Sales Chain Table
The filtered results appear in a table with the following columns:

- Company Name is clickable — it opens the Company Card in a new page (from Contacts & Events module).

- Selecting a row activates the Selected Sales Chain button with two options:

Sales Chain Page
Clicking Chain Page opens a detailed view of the selected chain. It includes multiple sections:
1. Chain Information
Displays general company details:
- Name, Address, Email, Phone, Tax Number, etc.
- Button Company Card opens the full company profile from Contacts & Events.
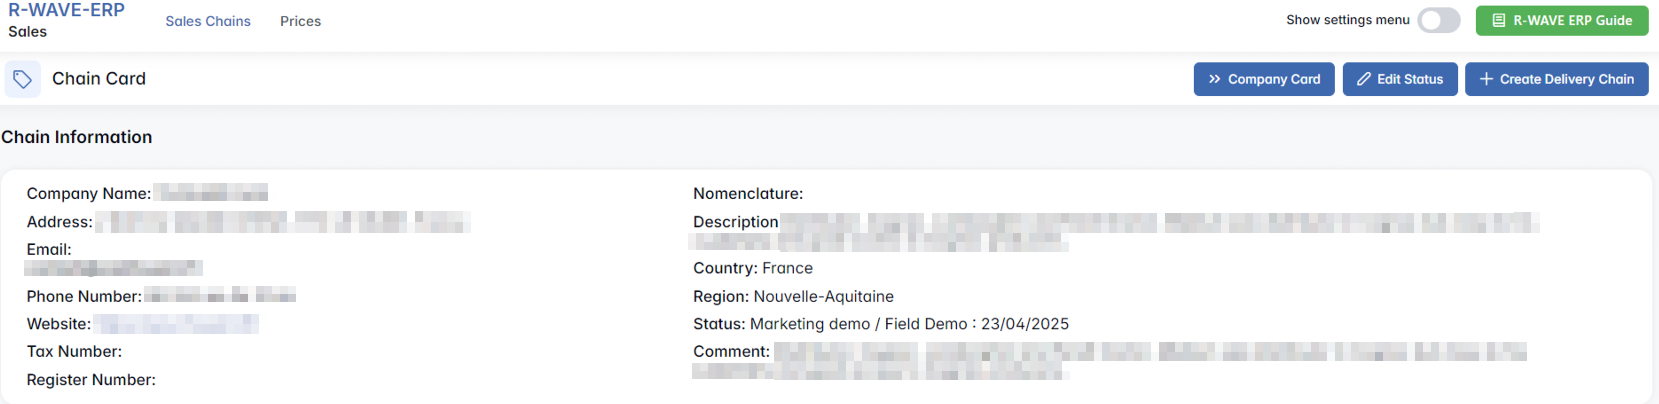
At the top of the page, users can view and manage the current statuses of the sales chain using the Edit Status function.
Clicking the Edit Status button opens a modal window with the following fields:
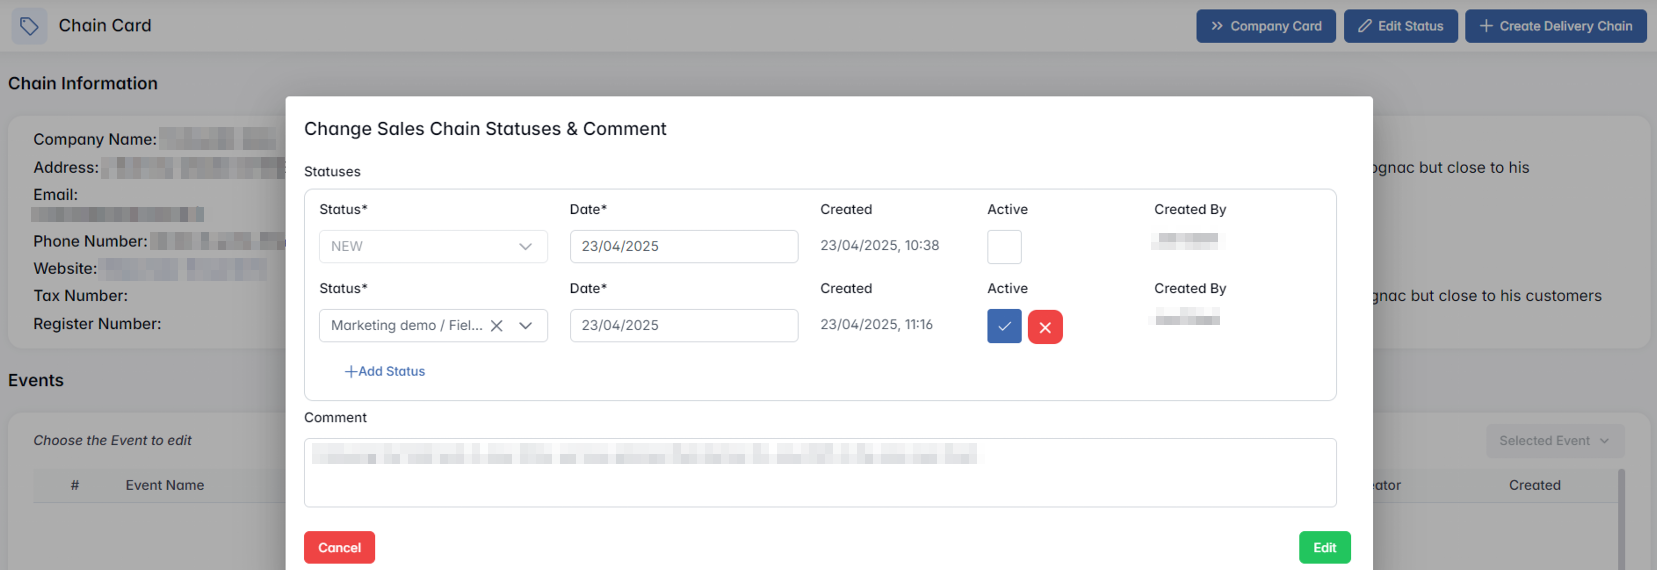
- Status* — required field selected from predefined status options.
- Date* — defaults to the current date but can be adjusted.
- Active — a checkbox indicating whether this status is currently active (only one status can be marked active at a time).
- Created — shows the timestamp when the status was added.
- Created By — name of the employee who created the entry.
- + Add Status — adds a new status to the list.
Users can add multiple status records for history and tracking purposes. However, only one status can be active at a time — the one with the checkmark in the Active field. Setting a new status as active will not automatically deactivate the previous one; users must manually uncheck the currently active status if they want to change it.
+ Create Delivery Chain button becomes available after the offer is confirmed. Clicking this button opens a confirmation modal: “Are you sure?”
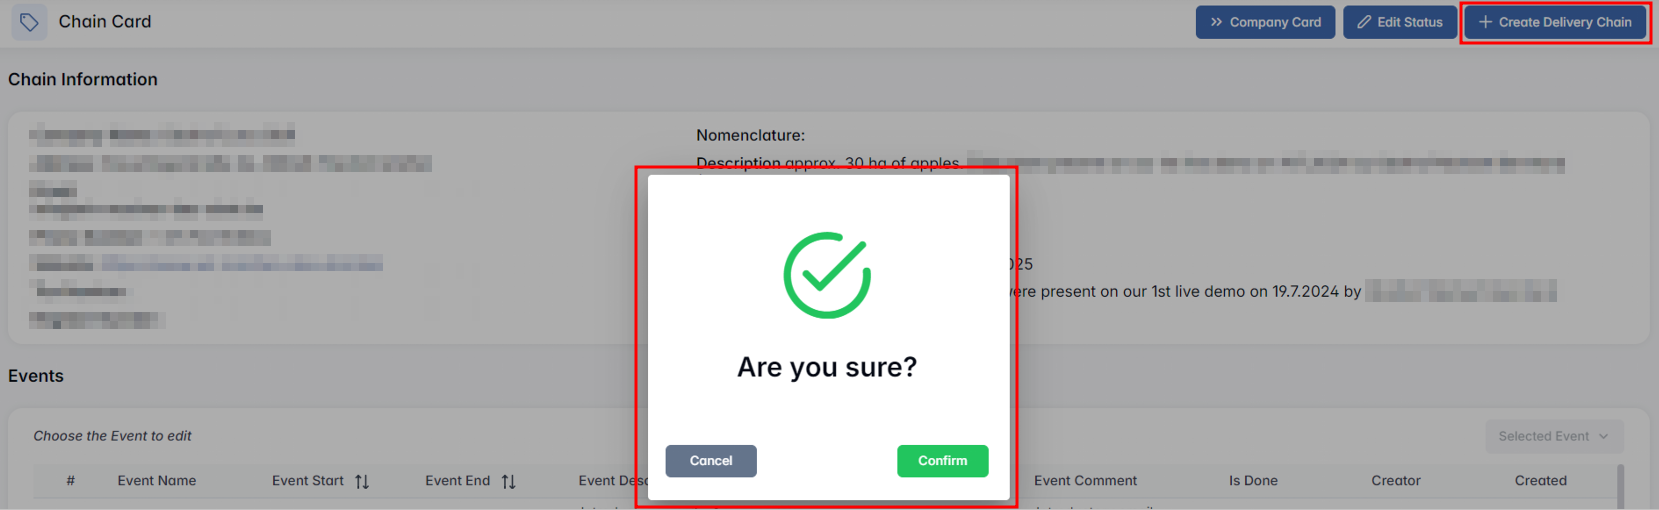
Upon confirmation, a new delivery chain is initiated, and the corresponding data is sent to the Delivery Chains module for execution and tracking.
2. Events
Displays a log of all events from Contacts & Events related to this company.

- Event Start / End – sortable columns showing scheduled timeframes.
- Is Done – shows either a check mark (✔) if the event is confirmed or a cross (✖) if it’s still pending.
When a row is selected, the Selected Event button becomes active and offers the following options:

- Confirm – marks the event as completed (check mark appears in the Is Done column).
- Edit – opens a modal window allowing the user to add or modify the Event Comment.

- Delete – removes the selected event from the sales chain (from this view and from the global Contacts & Events history).
This section ensures traceability of all communication and interactions with the client, including internal updates and sales follow-ups.
3. Products
This section shows products added to the sales chain:

To add a product: click + Add Product

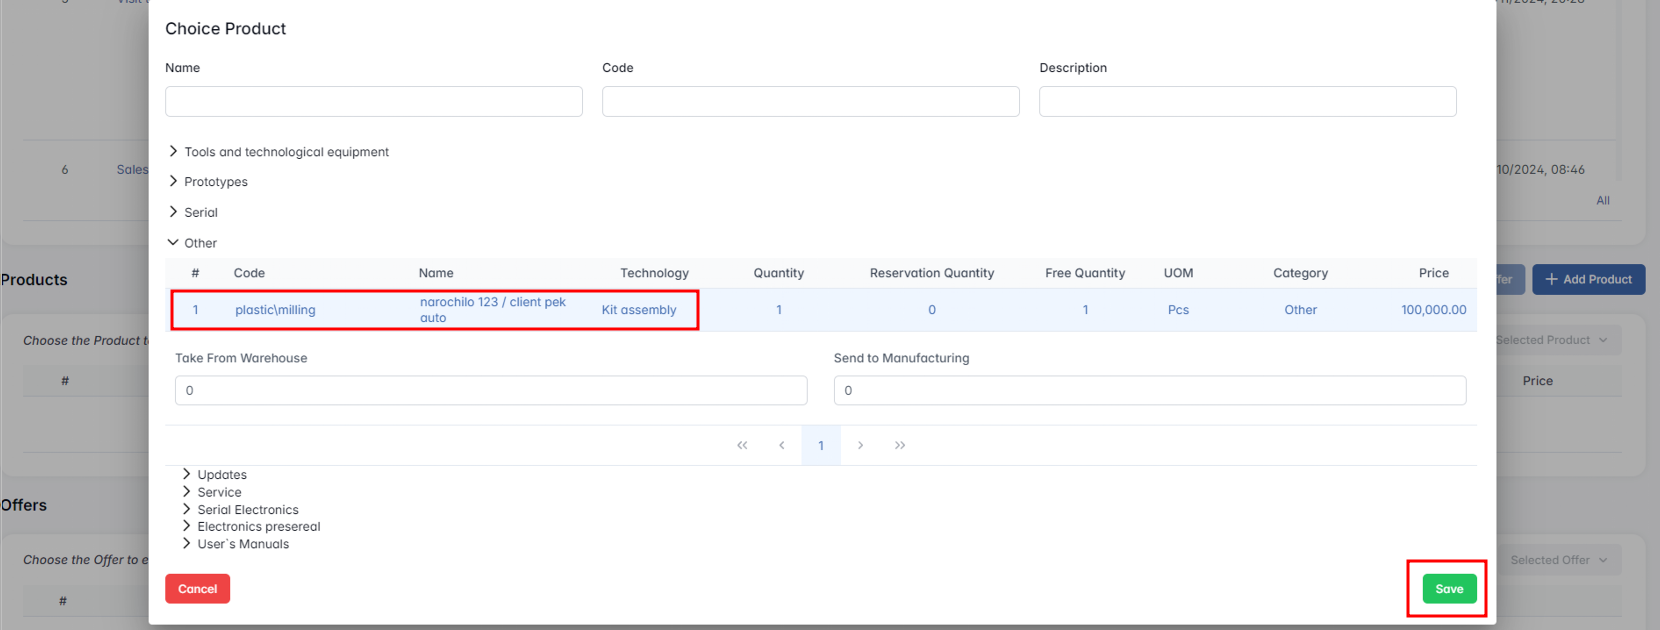
Two input fields:
- Take From Warehouse – quantity taken directly from stock
- Send to Manufacturing – quantity to be sent to production
Press Save to add the item to the chain.
Selecting a product activates Selected Product with option:

If at least one product is added, the + Create Offer button becomes active.

4. Offers
Displays the list of commercial offers made to the client:

Selecting a row activates the Selected Offer menu:

- Generate PDF (only active after confirming the offer)
- Confirm Offer – marks the offer as valid
- Edit Prices – opens price editor:

- Delete
5. Files
Displays files uploaded to the chain (e.g., contracts, offer PDFs):

Actions:
- Download (icon)
- Delete (icon)
+ Add File button: Drag & drop or click to select files

Click Upload to save them in the chain.
Prices
Prices
The Prices tab in the Sales module allows users to define and manage the sale prices for all products listed in the system. These prices are used when preparing offers, sales chains, and during interactions with clients.
This tab helps ensure price consistency across products and supports dynamic pricing management.
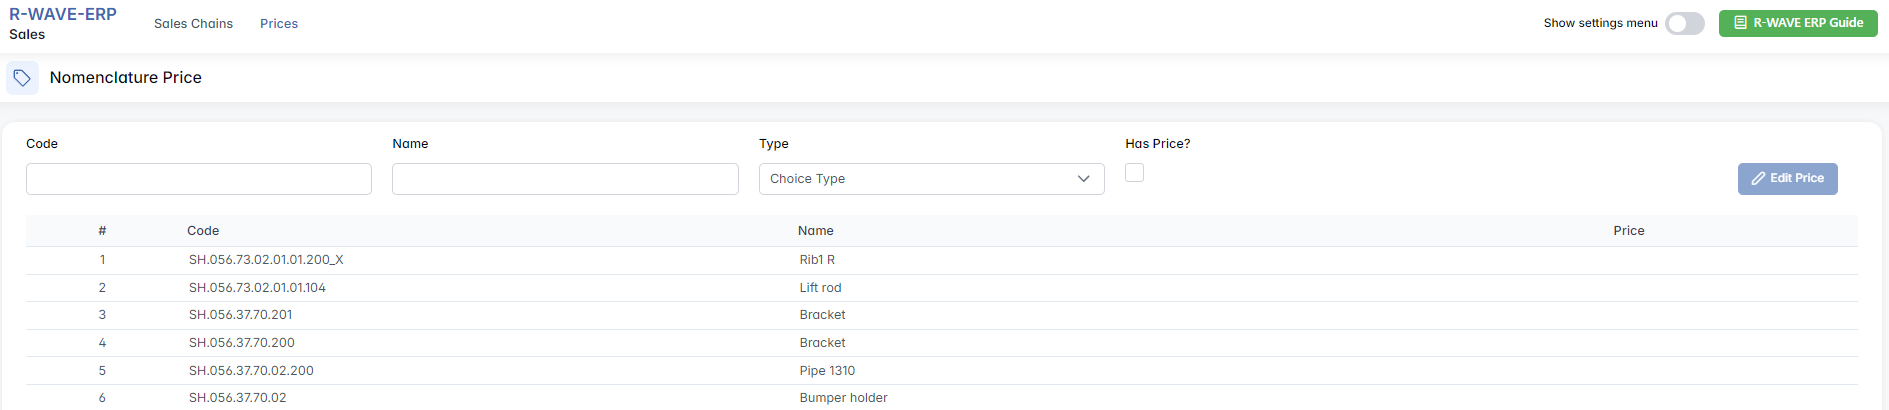
Nomenclature Price Management
Filter Panel
At the top of the page, a filter panel enables users to search and narrow down the product list:

- Code – search field to find a specific product by its internal code.
- Name – search field to filter by product name.
- Type – dropdown menu for selecting the nomenclature type: Assembly, Manufactured
- Has Price? – a three-state checkbox that allows users to filter products based on whether they already have a defined price:
- ✔️ (checkmark): Show only items with a price set
- ❌ (cross): Show only items without a price
- ⬜ (empty): Show all items regardless of price
Table of Products
Below the filters, a table displays all products matching the selected criteria:

This table reflects all current nomenclature items eligible for sales pricing
Editing a Price
To set or edit the price of a product:
Select a row from the table – this activates the Edit Price button.

- Click Edit Price – this opens the Edit Nomenclature Price modal window.

- Enter or adjust the desired unit price.
- Click Save to apply the changes.
The set price will be automatically applied in any future Offers created from this product in the Sales Chain.
Hidden Settings in Sales
Hidden Settings in Sales
These settings become available when the “Hide settings menu” toggle (top-right corner) is enabled. It reveals two additional configuration tabs:
- Statuses
- Countries & Regions

Statuses
This tab lets you define and manage custom statuses used in the Sales Chains. These statuses help represent the current state or stage of a sales process.
Table Overview
The main table displays all user-defined statuses with the following columns:
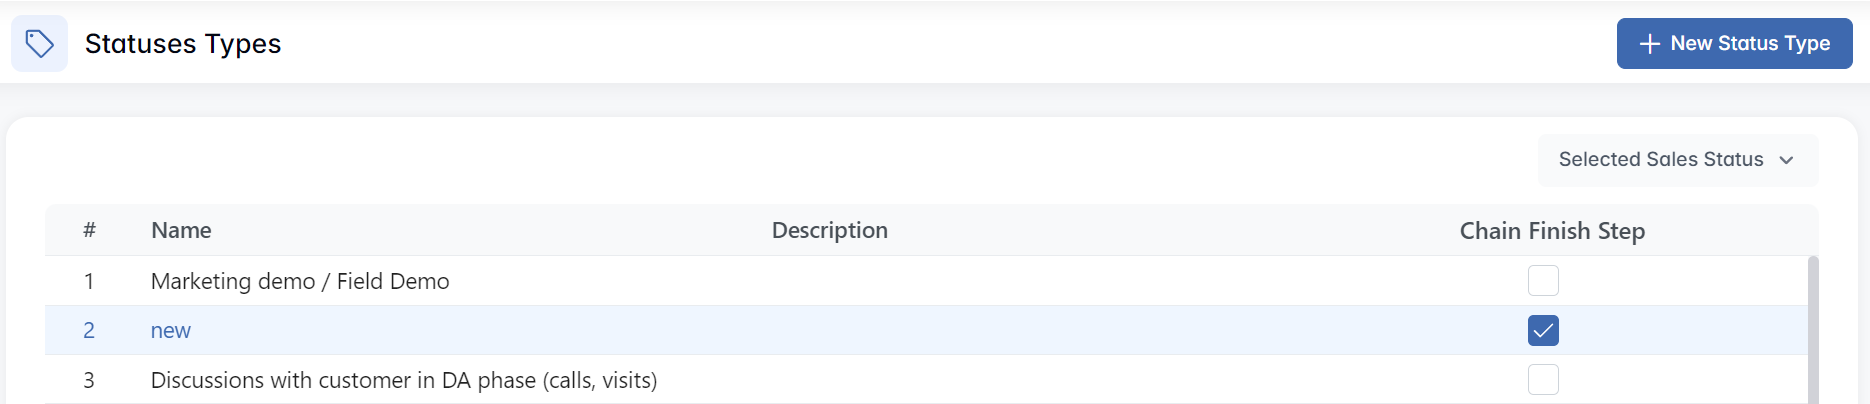
- Name – The label of the status.
- Description – Optional explanatory text to clarify the use of the status.
- Chain Finish Step – Checkbox indicating whether this status is a final step in the sales chain. Only one or several statuses can be marked this way to signal closure or near-closure.
Available Actions
- + New Status Type
- Opens a modal window:
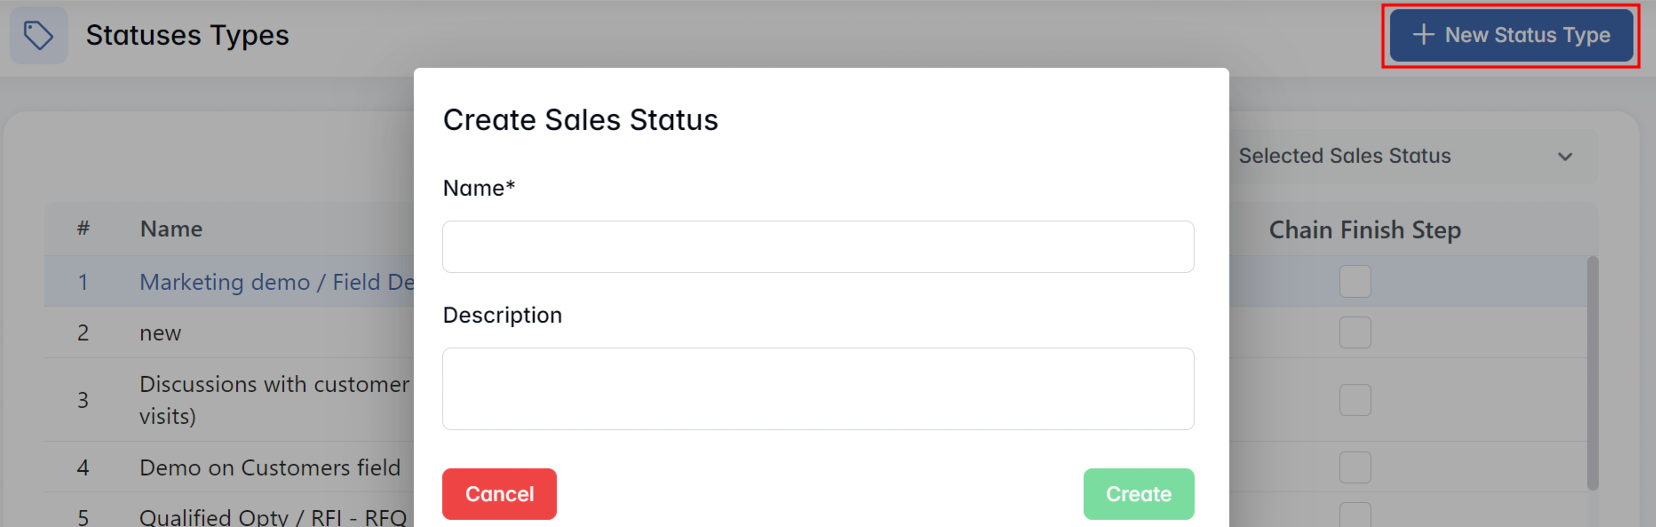
- Name* – Required field
- Description – Optional field
- Click Create to save
- Opens a modal window:
- Edit Sales Status
- Opens the same modal pre-filled with the selected values:

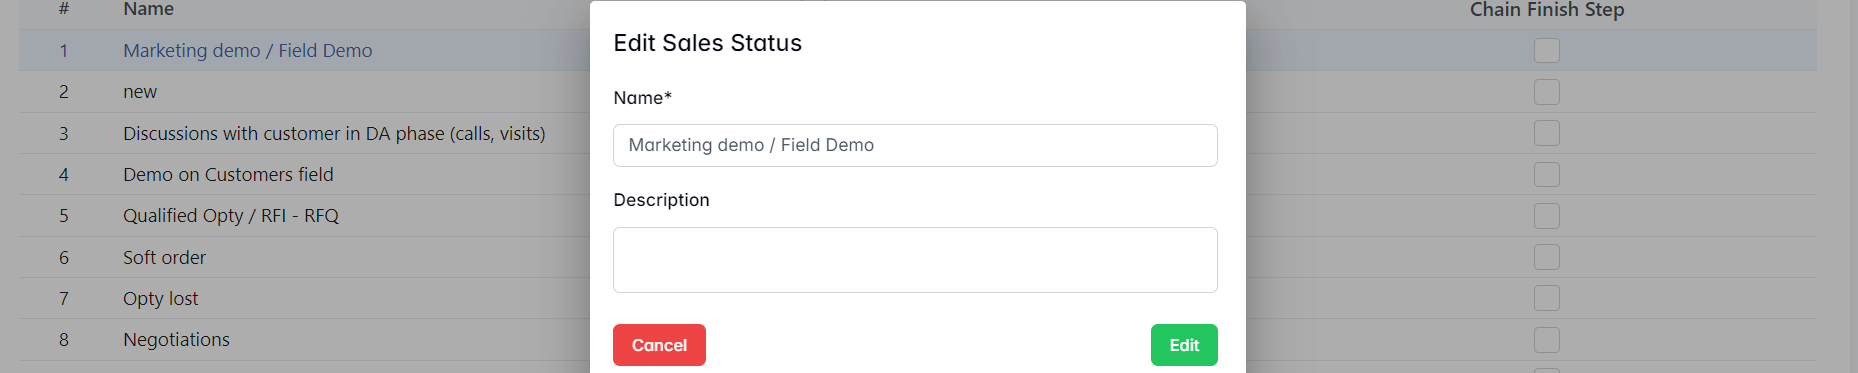
- Update the Name* and Description
- Edit to apply changes
- Opens the same modal pre-filled with the selected values:
- Remove
- Deletes the sales status
Countries & Regions
This tab manages the geographic structure used across the Sales and Contacts & Events modules.
Countries Table
Displays a full list of countries with two columns:
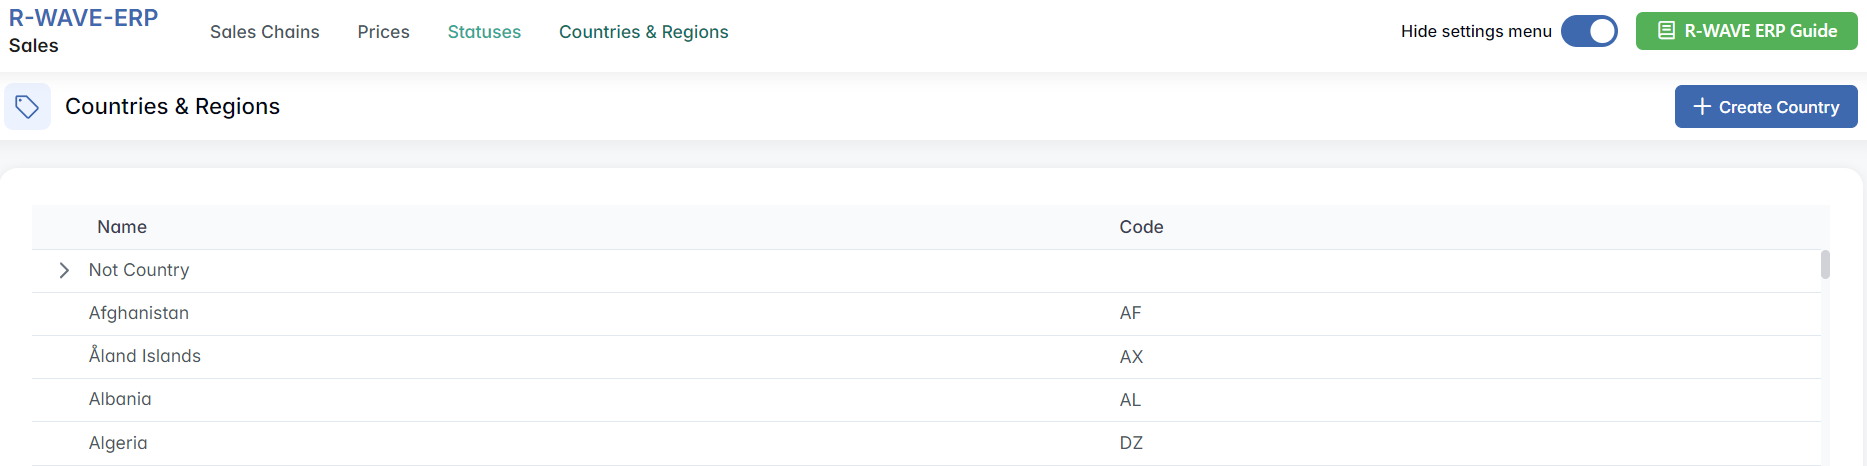
Actions:
- Create Country


- Click Create to add
- Edit Country


Regions and Sub-Regions
Regions are subdivisions within a selected country (e.g. provinces, states, or regions). Each country can have multiple associated regions, and each region may optionally include sub-regions.
Available Actions for a Selected Country:

- Add Sub Region

Useful for representing administrative layers (e.g., province > district)
- Remove Country
- Deletes the selected country
These Hidden Settings are essential for tailoring the Sales workflow and geographic data to match company-specific processes, customer segmentation, or regional sales strategies.