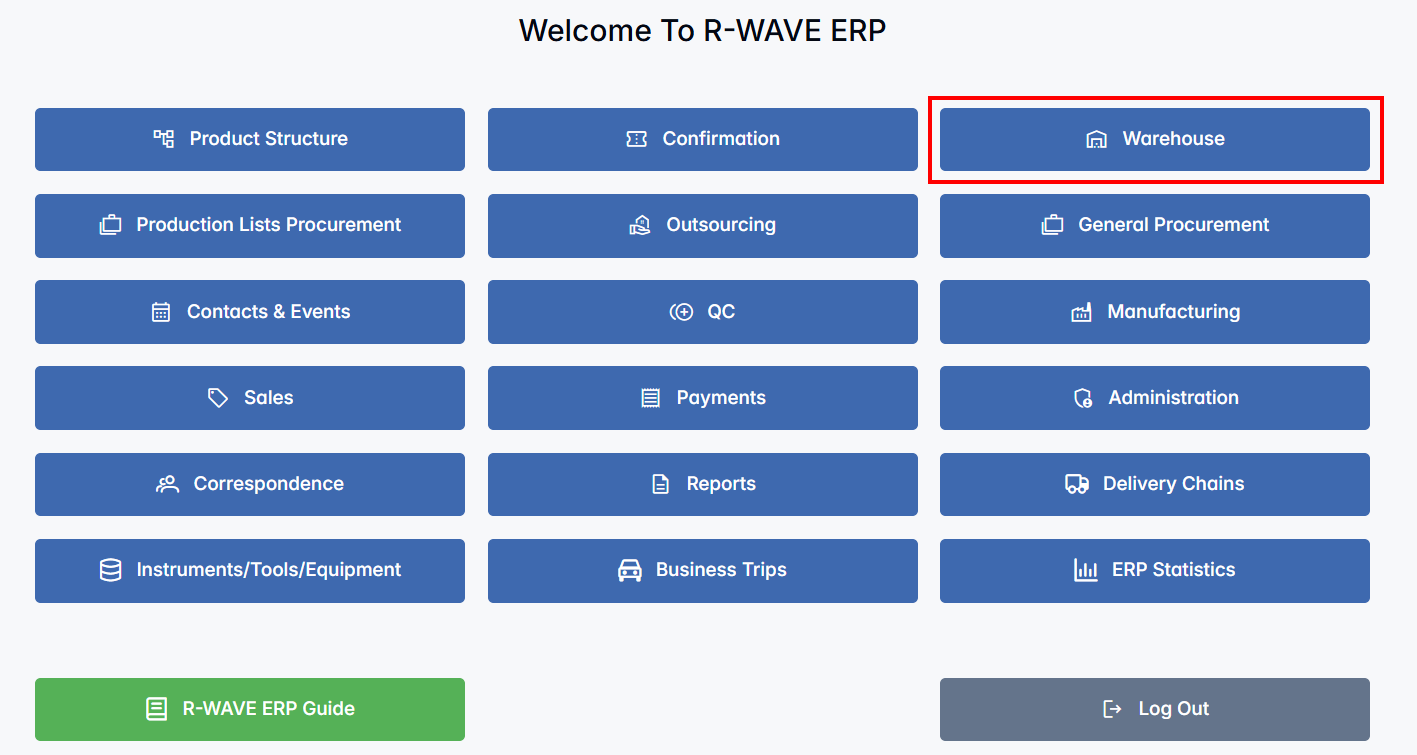
Warehouse Module
The Warehouse module in the BINU ERP system is designed for managing and organizing all items stored in the warehouse. It provides structured access to all item-related operations - from tracking stock and monitoring availability to preparing materials for production and handling warehouse workflows.
This module supports warehouse staff by offering visibility into item status, location, and movement history. It also ensures that item flows - whether incoming, outgoing, reserved, or defective - are traceable and efficiently managed.
In the following sections, you will find a detailed overview of the module's main functions and user interface elements.
BINU ERP Guide
BINU ERP Guide
To support user navigation and clarity, BINU ERP includes a built-in contextual help system in the form of a pop-up guide window. This feature is available across different modules, including Warehouse, and is designed to help users understand where they are in the system and how to use the current section effectively.

Purpose
The ERP Guide window helps users by:
- Showing where you are within the system (module context).
- Providing a visual schema of your company’s business flow, helping you understand how the current module fits into the larger operational structure.
- Offering a quick-reference instruction panel with the main actions and functions available in the current tab (e.g., creating companies, filtering, scheduling events).
Layout and Content
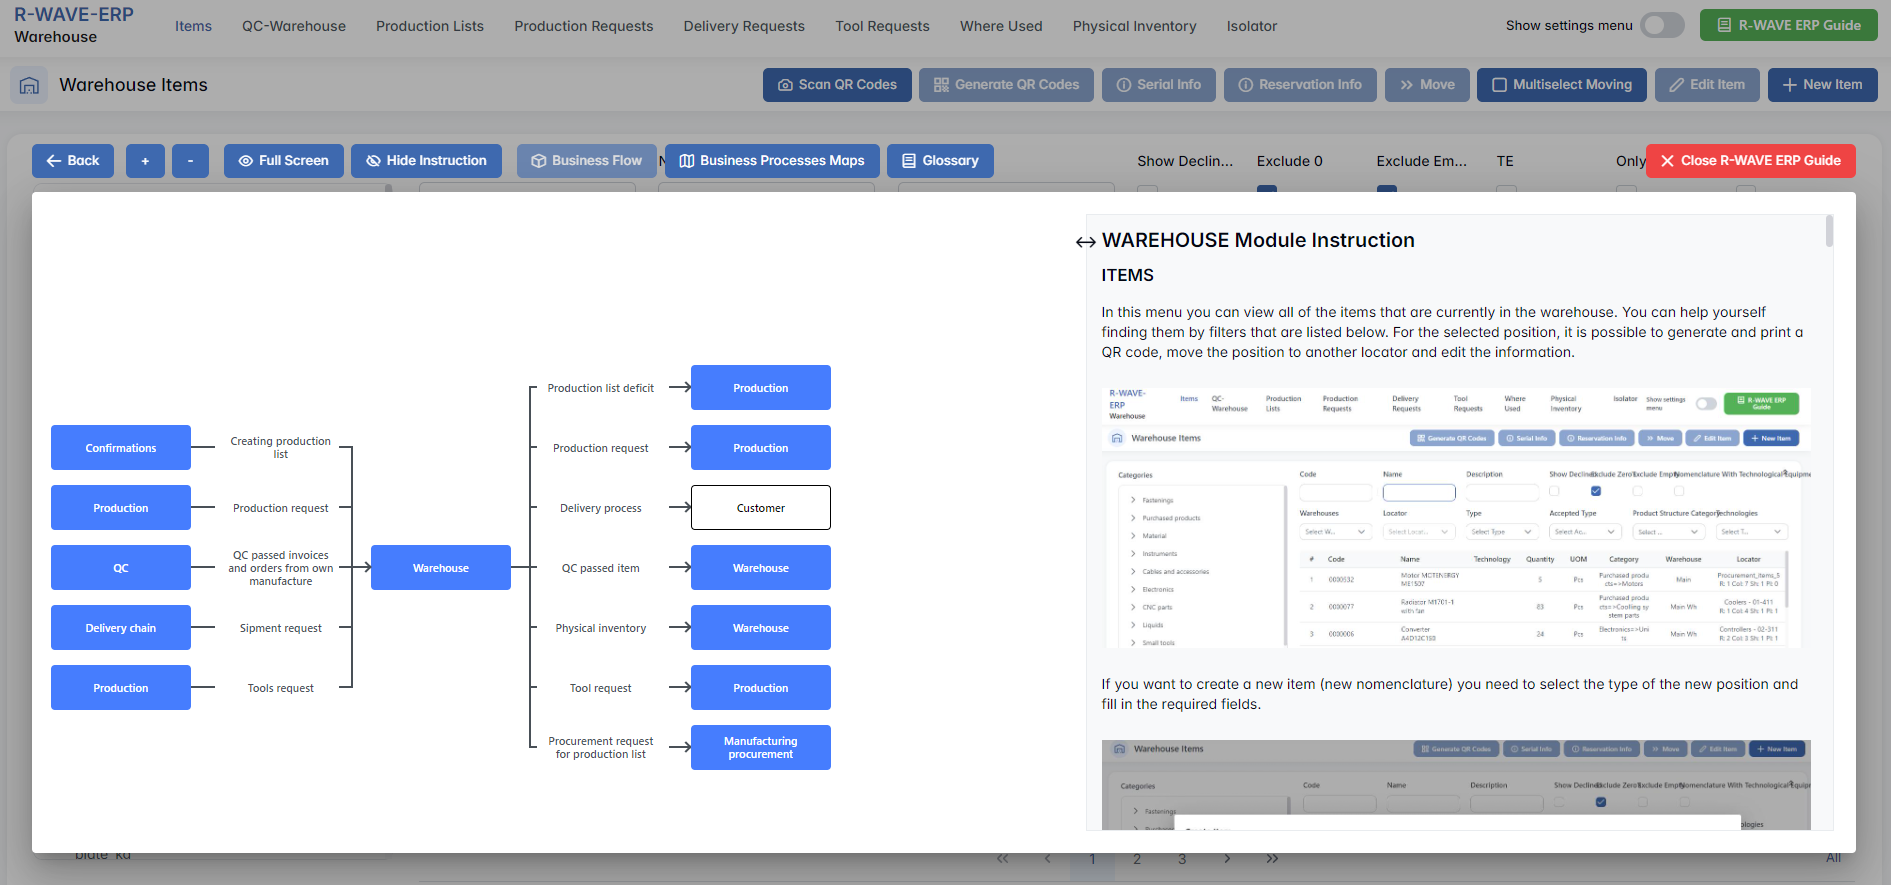
When opened, the ERP Guide window is divided into two main areas:
- Left Side - Business Flow Map
This section displays a structured diagram of your company's processes and how the current module connects to others (e.g., CRM, Procurement, Sales, HR). It visually highlights your current position in the overall ERP environment. - Right Side - Functional Overview
Provides a concise, bullet-style instruction list describing the key operations available in the current module/tab.
Top Bar Options
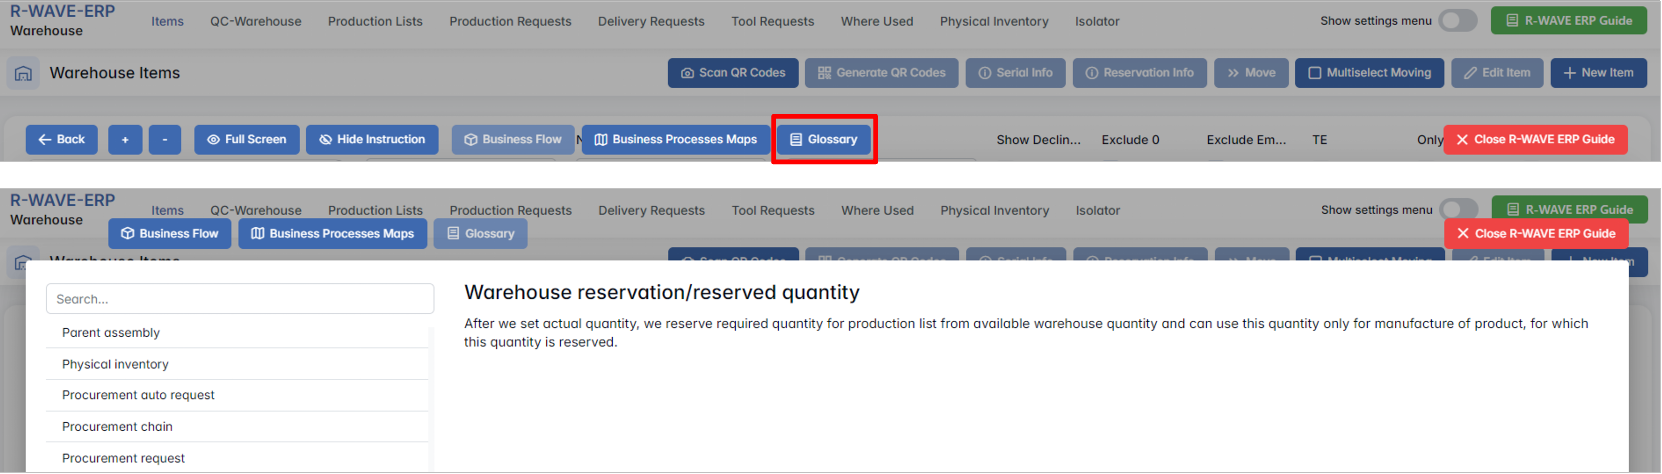
At the top of the ERP Guide window, you’ll find two optional tools for deeper understanding:
- Business Processes Maps - Opens a full interactive view of your organization’s process structure.
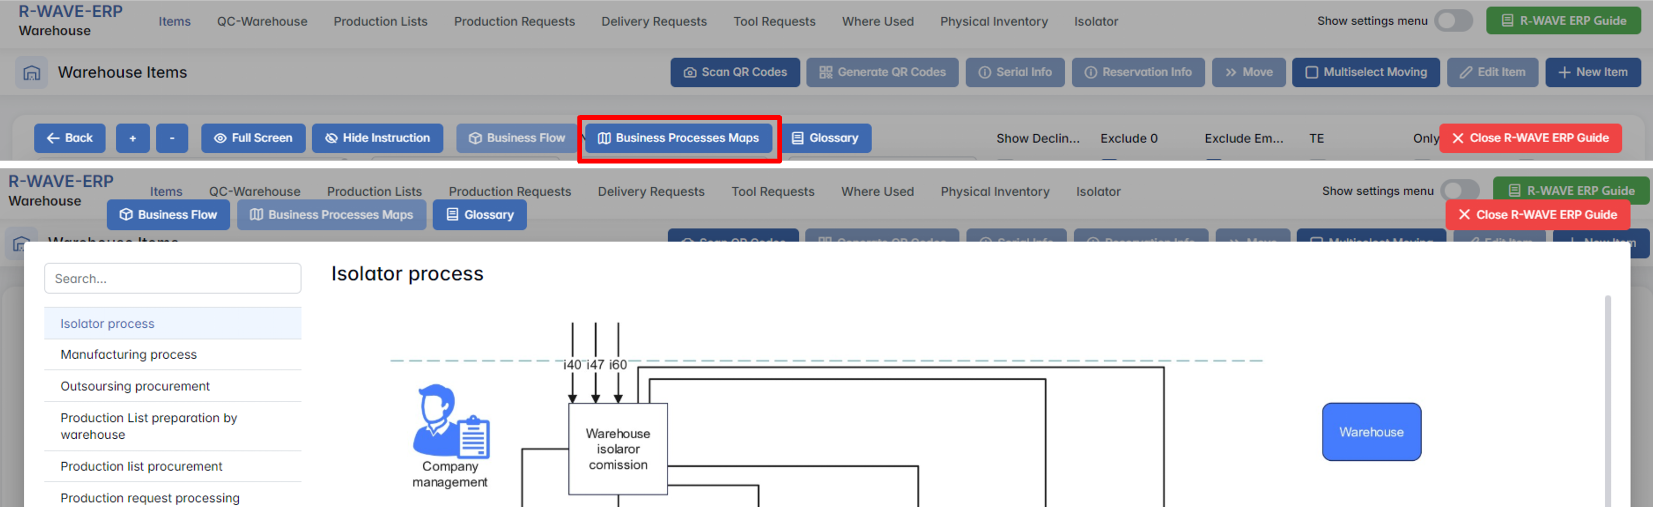
- Glossary - Provides definitions and descriptions of key terms and field labels used in the ERP interface.
The ERP Guide window can usually be opened via a dedicated icon or help button (often located in the upper right corner of the screen). It is non-intrusive and can be closed or reopened as needed, allowing users to stay focused without losing their place.
Warehouse Module Overview
Warehouse Module Overview
The Warehouse module in BINU ERP provides a centralized workspace for managing all warehouse-related operations. It helps ensure that materials and components are properly received, stored, tracked, and prepared for production or delivery.
At the top of the module interface, you will find the main navigation bar with the following core sections:

- Items - displays the full inventory currently available in the warehouse, including detailed information such as quantity, location, item type, and status.
- QC - Warehouse - used for receiving and distributing goods that have passed quality control.
- Production List - represents an assembly sent to production, for which item availability is checked, missing items are ordered, and available stock is reserved and collected at a single location.
- Production Request - used to fulfill requests from production for specific components or sub-assemblies.
- Delivery Requests - manages shipments of goods to customers or outsourcing partners.
- Tool Request - used to track internal requests for tools and supplies.
- Where Used - helps identify which assemblies or builds use a particular item.
- Physical Inventory - supports inventory counts and alignment between actual and system stock levels.
- Isolator - manages items that failed quality control and are either under reclamation or marked for write-off.
This structured layout allows users to quickly navigate between item management, production supply, and inventory oversight processes - making the Warehouse module an essential component for operational efficiency.
Items
Items
The Warehouse Items module in the BINU ERP system provides a centralized overview of all stock items currently registered in the warehouse. It enables users to search, filter, view, and manage items across different warehouse locations, categories, and item types. This section plays a key role in production preparation and stock monitoring.
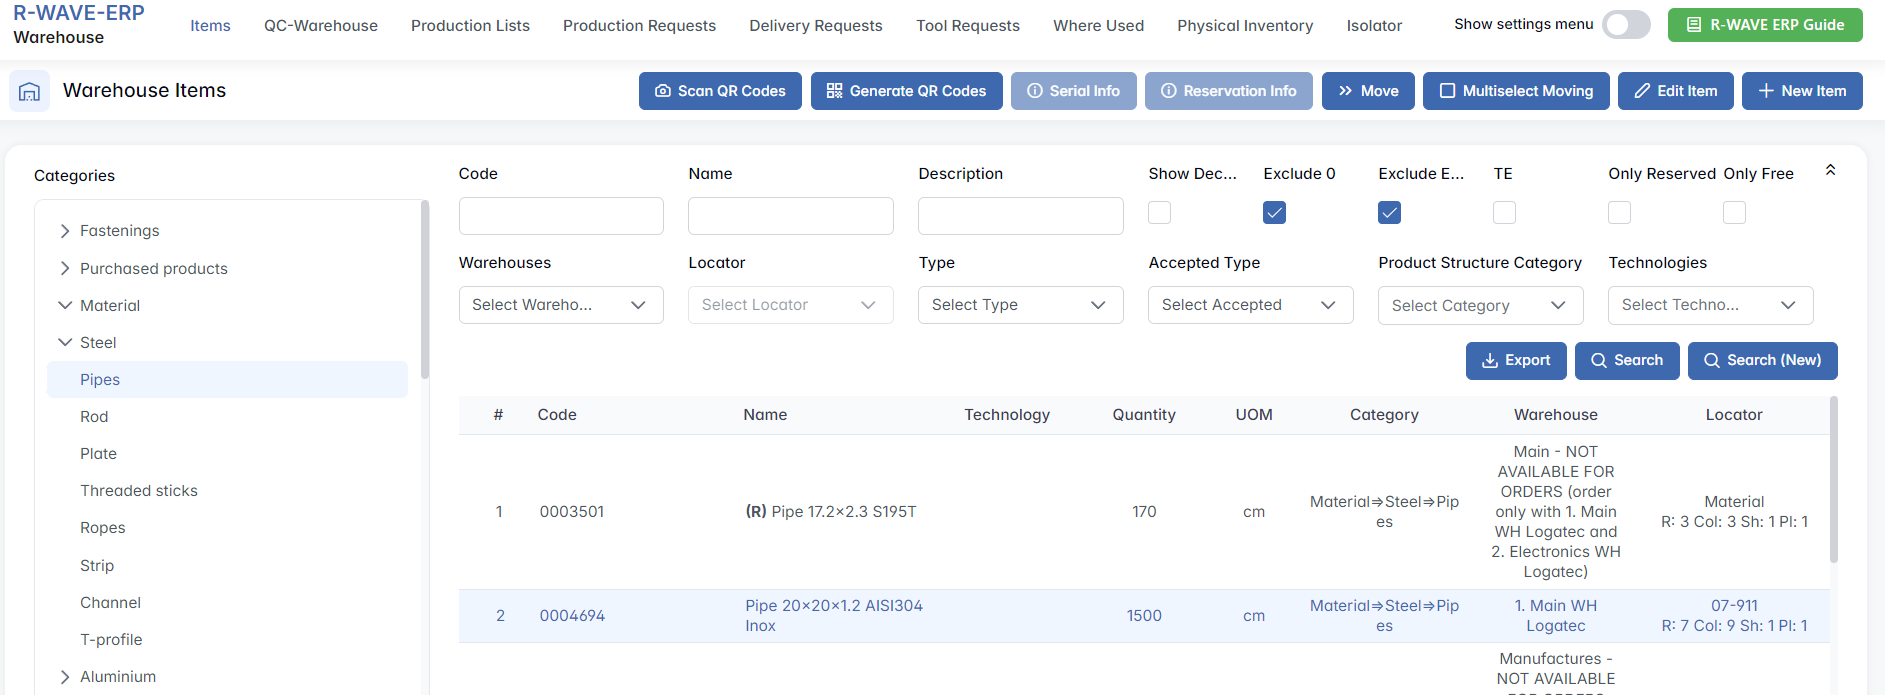
Overview of the Interface
Upon entering the module, you are presented with a two-pane layout:
Left Panel - Category Tree: This panel allows you to navigate through the item categories such as Fastenings, Material, Electronics, etc. Subcategories help refine the view.
Main Panel - Item Search and Table: This area is used to perform advanced searches and review the results in tabular format.
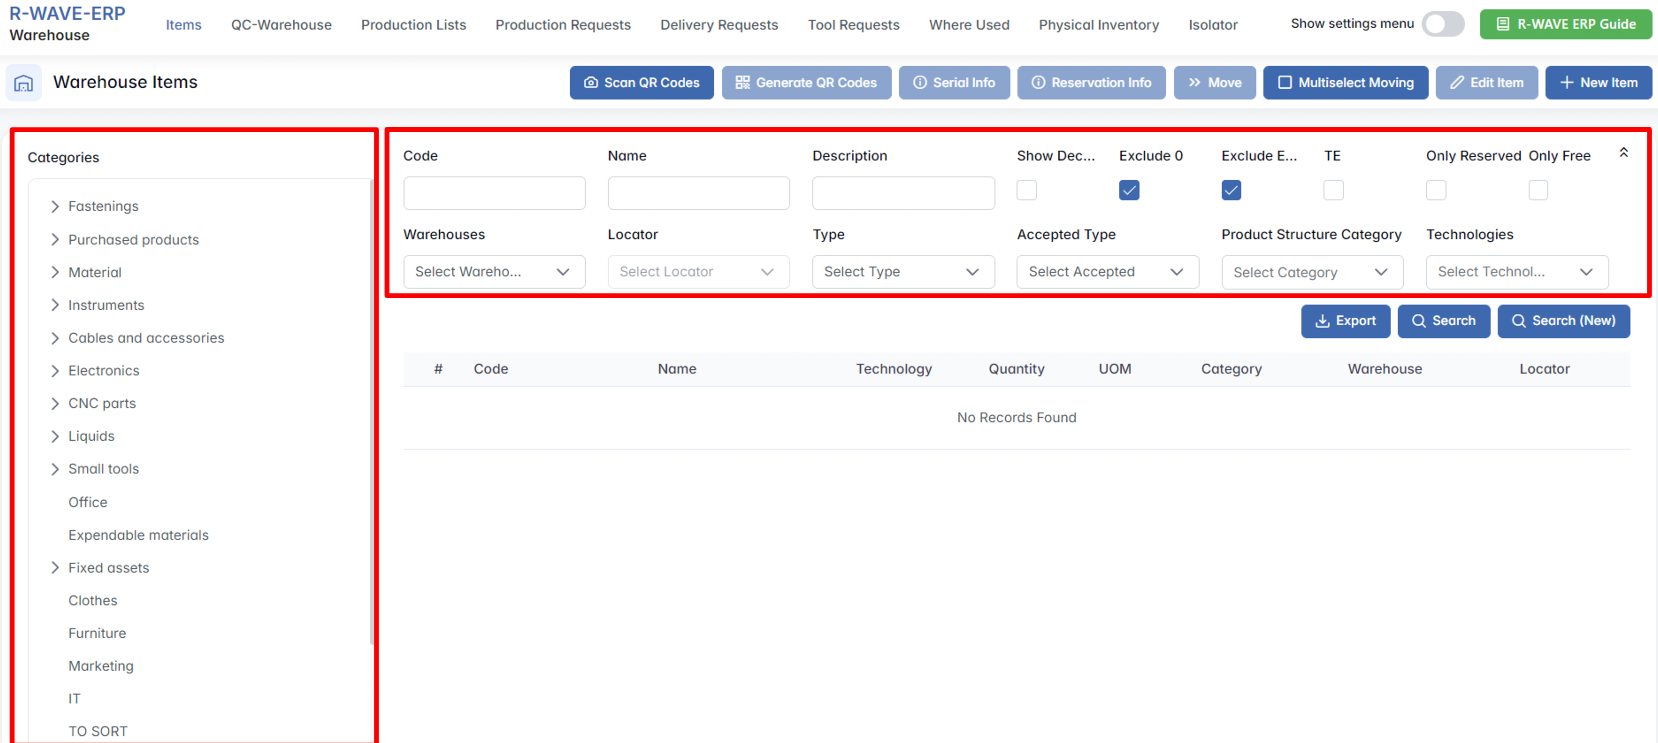
The top bar contains additional tools for operations such as scanning QR codes, moving items, and creating or editing records.

Search and Filtering
To locate a specific item or group of items, use the filtering panel located above the table. You can filter by:
- Code / Name / Description - Text fields to enter known item identifiers or descriptions.
- Warehouse / Locator - Use these dropdowns to select the specific warehouse and its internal locator (shelf or zone) to narrow the results.
- Type - Choose between Purchased, Assembly, or Manufactured items.
- Accepted Type - Allows users to specify the source of incoming items.
- Category - Filters items by their structural classification.
- Technologies - Enables filtering by associated technologies if relevant (e.g., tools, prototypes).
- Checkboxes:
- Show Declined - Displays purchased items that were sent for confirmation (e.g., for a production list) but did not receive confirmation.
- Exclude 0 - Hide items with quantity = 0.
- Exclude Empty - Hides items that have never been used before (i.e., newly purchased and not yet consumed).
- TE - Required Technical Equipment.
- Only Reserved / Only Free- Stock reservation status.
Once you define your search, click Search to update the table. You can also click Search (New) to reset the filters and perform a fresh query.
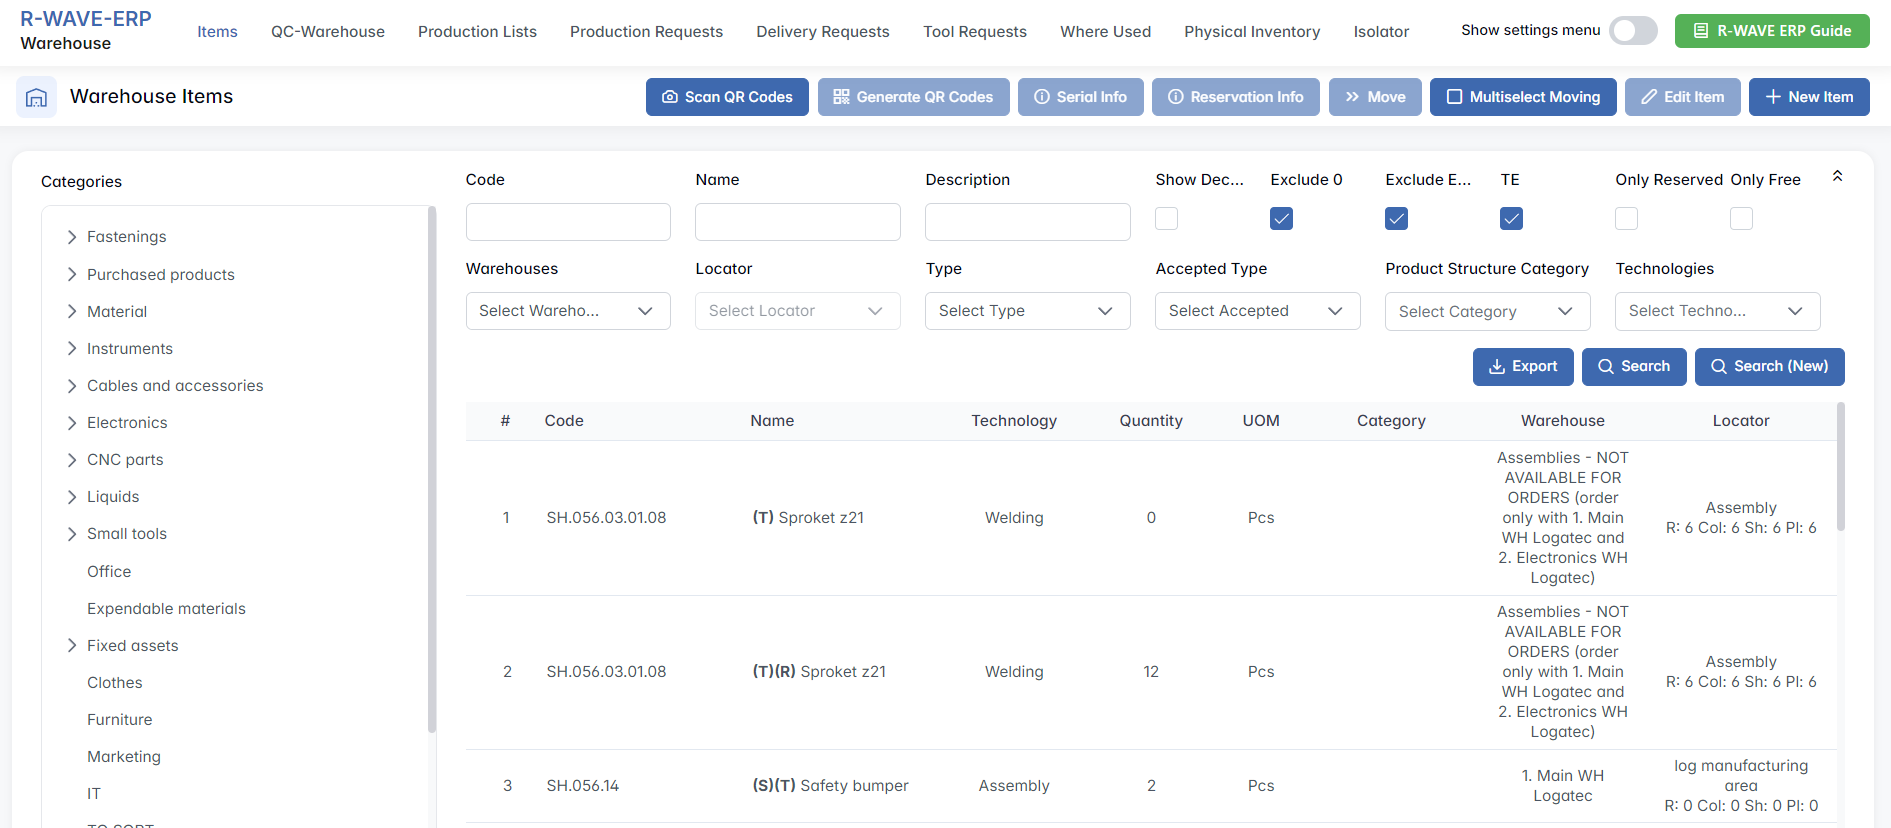
Working with the Table
The table below the filters shows results based on your criteria. Each row represents one unique warehouse item and includes the following fields:
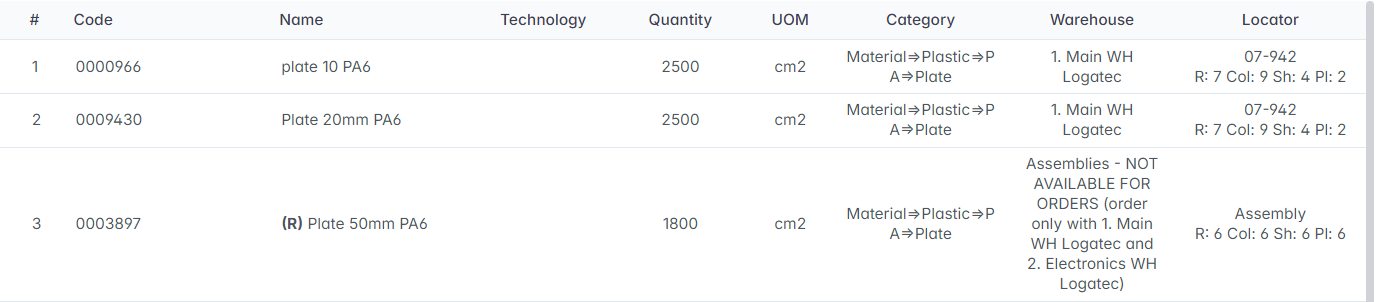
- Code - Unique item code.
- Name - Descriptive item name.
- Technology - Associated technological category (if any).
- Quantity/UOM - Available quantity and unit of measure (e.g., pcs, cm2).
- Category - Item’s logical category from the left-side panel.
- Warehouse/Locator - Location of the item within a specific warehouse.
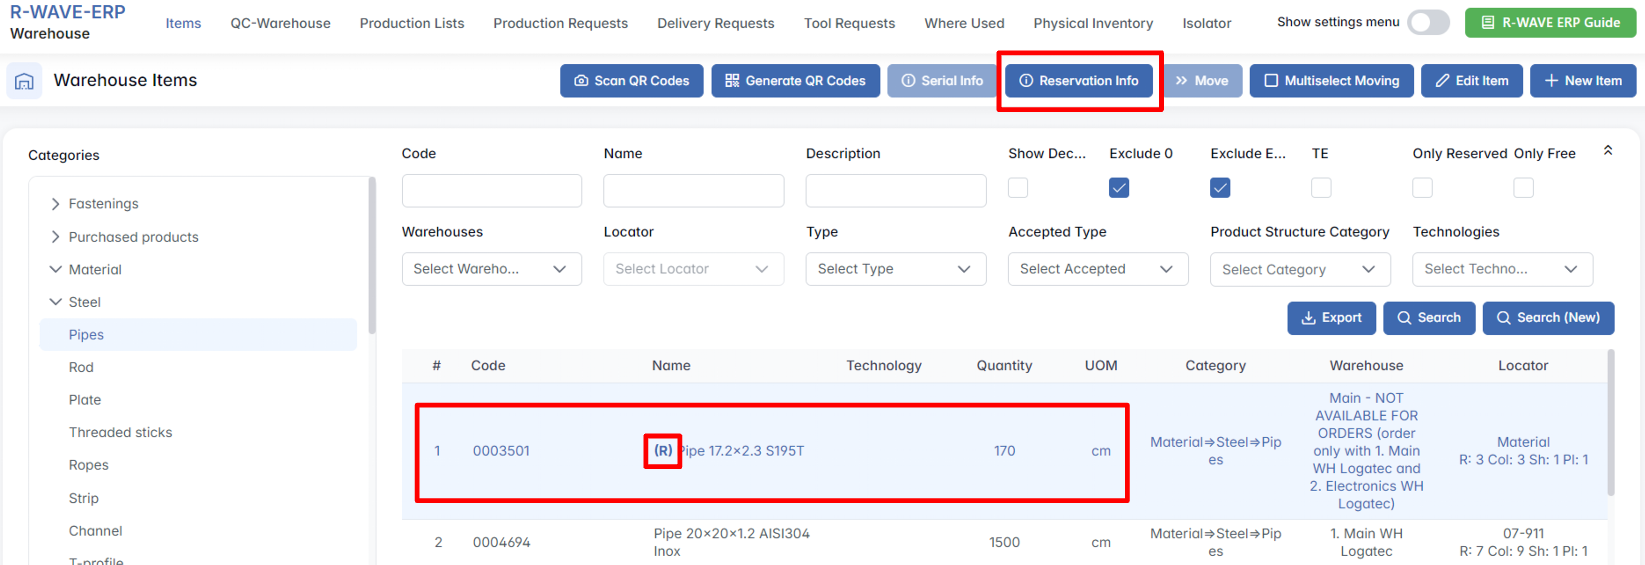
- If the name of an item is preceded by (R), it means that it is reserved for a particular production list. To view for which production list the item is reserved, click on it and use the Reservation Info option.
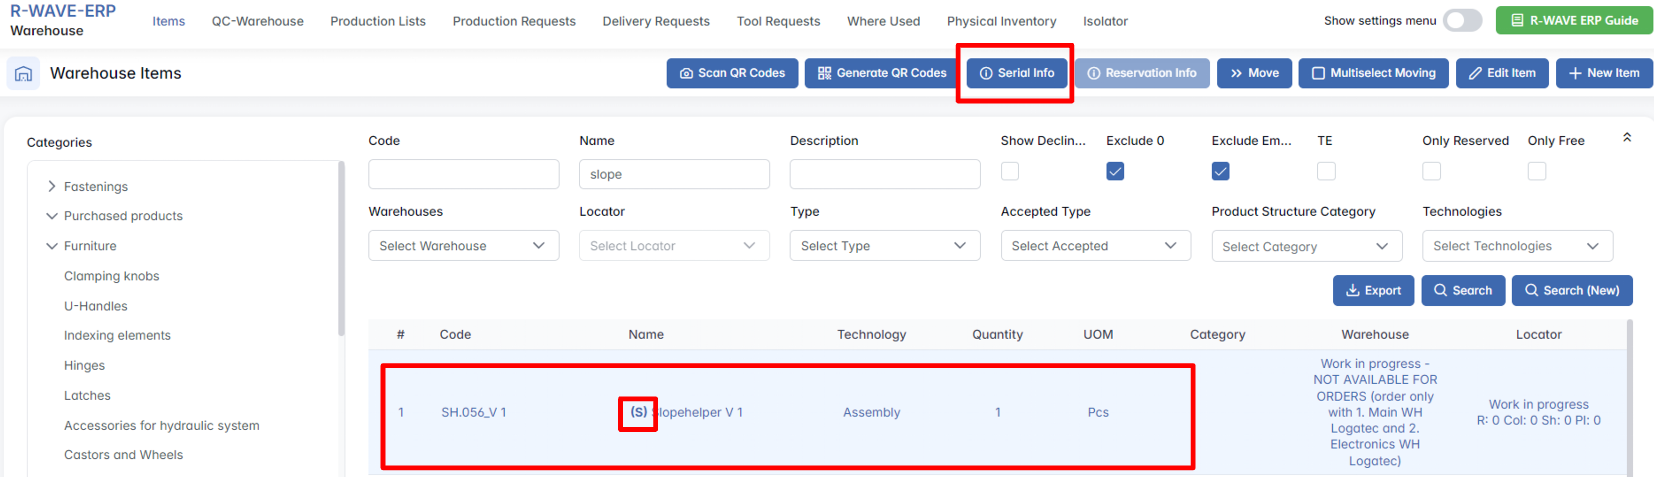
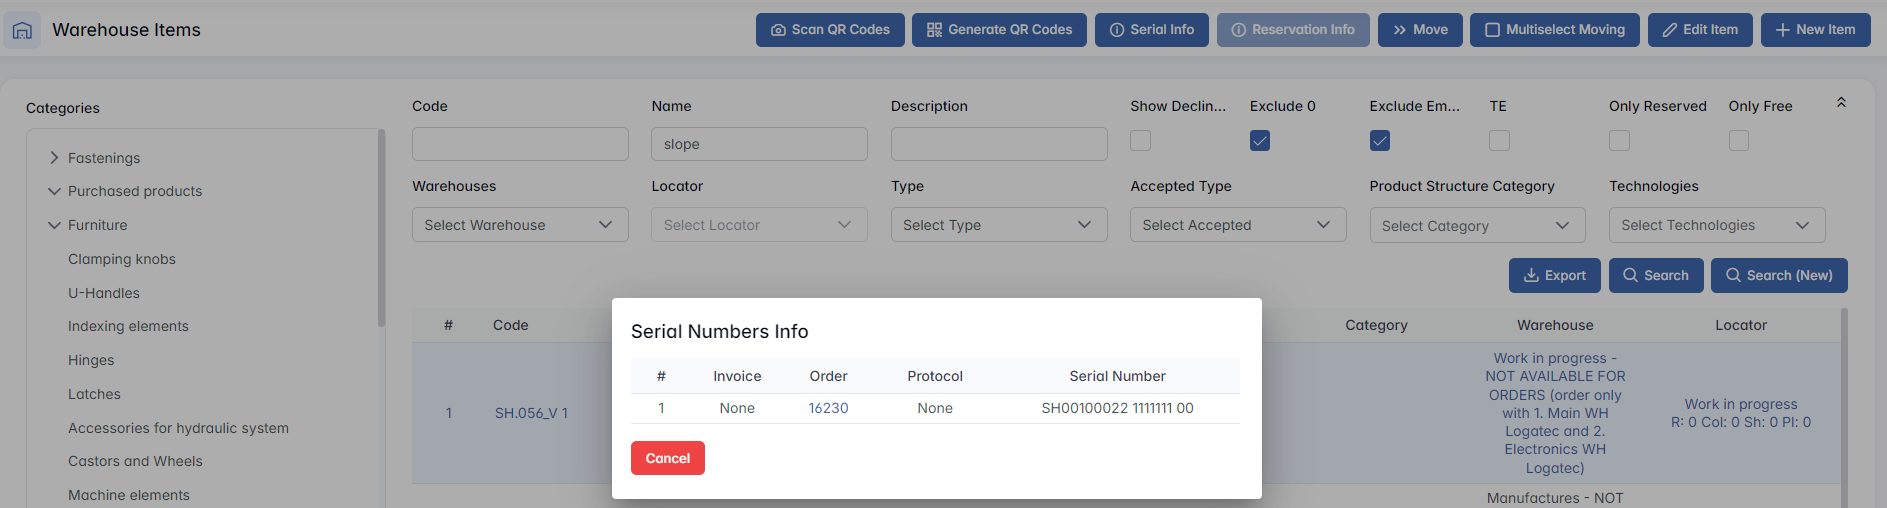
- (S) means that the item has a serial number. The list of valid serial numbers for the selected item can be viewed using the Serial Info option.
- If the nomenclature name includes "(T)", it means that specific technological equipment is assigned to the item. This equipment is required for production and must be issued when the item is ordered. The assigned equipment can be configured in the item's detail card.
You can navigate between pages using the pagination controls at the bottom of the table.
To export the current table view into Excel format, use the Export button.
Creating a New Item
To add a new record to the system, click New Item in the top right corner.

A dialog window will appear asking you to choose the item type:

Purchased - Items bought externally and received into the warehouse.
Assembly - Structured items that may contain sub-components.
Manufactured - Items produced through manufacturing processes.
After selecting the item type, a detailed creation form will open where you can fill in all necessary fields, such as name, category, quantity, and storage location.
Multiselect
Multiselect Moving: If you need to move several items between locations or warehouses, click the MultiselectMoving to be able to select multiple records by checking the related checkboxes and click Move to perform a batch transfer.
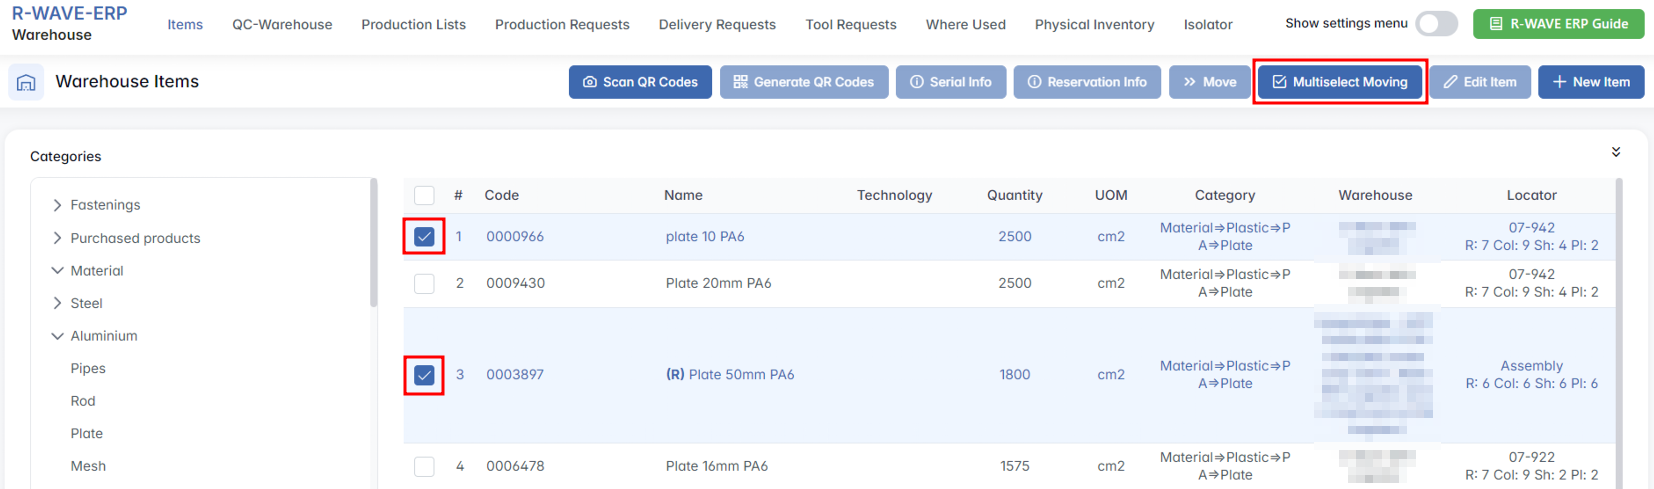
Editing
Editing Existing Items: To edit an existing item in the warehouse table, you need to make sure that Multiselect Moving is not active.
To proceed with editing:
- Deactivate Multiselect Moving, if it is currently active.
- Click on the row of the item you want to edit - this will highlight the row and activate the Edit Item button.
- Click Edit Item to open the item form, pre-filled with the current values.
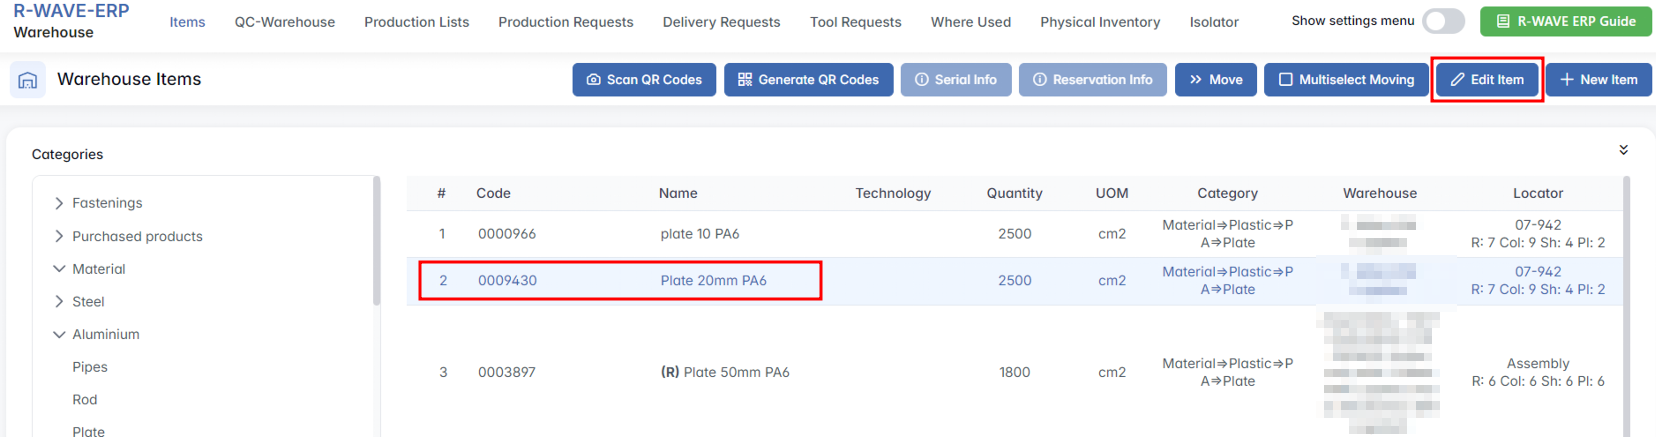
The editing form allows you to update all key attributes of the item, including quantity, location, category, and technical details. Changes are saved directly to the warehouse database and reflected in the item list upon update.
Manufactured/Assembly Item Card
The Edit Item popup provides a detailed form for modifying the attributes of a specific warehouse item. This form opens after clicking the Edit Item button on a selected row of items filtered by Manufactured or Assembly type in the warehouse table.
The popup is divided into several logical sections that represent all key aspects of the item’s structure, technical details, and production-related data.
1. General Information
Technologies: A multi-select field where you can assign one or more technologies (e.g., Laser Cutting) associated with the production of this item.
Order of Technologies: Displays the defined order in which selected technologies are applied.
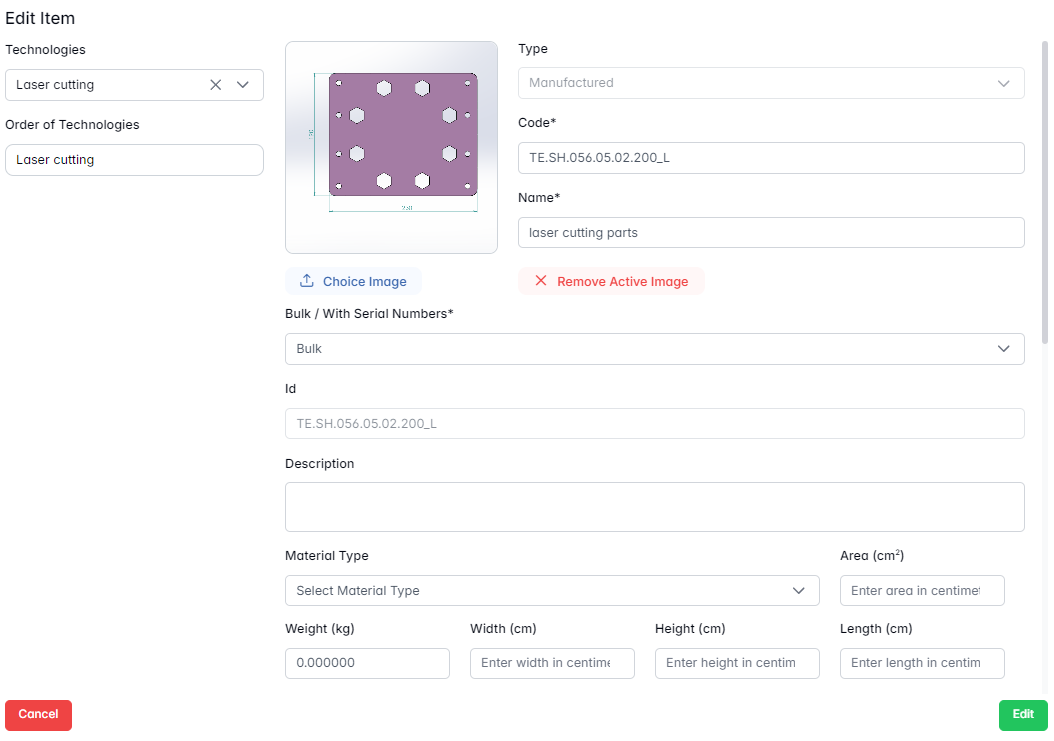
| Field | Description |
|---|---|
| Image | Upload or view a reference image for the item. You can also remove the current image if needed. |
| Type | Automatically displays Manufactured, Purchased or Assembly. This field is read-only. |
| Code* | A mandatory, unique identifier assigned to the item manually. |
| Name* | A required name describing the item. |
| Bulk / With Serial Numbers* | Indicates whether the item is tracked in bulk or by serial numbers. |
| ID | Internal system identifier, read-only. |
2. Physical and Material Details
Description: Optional free-text field for additional notes or explanations.
Material Type: Select the material from a predefined list.
Area (cm²): Enter the surface area in square centimeters.
Weight (kg): Enter the item's weight in kilograms.
Width / Height / Length (cm): Enter the item's dimensions in centimeters.
Required Technical Equipment: Checkbox to mark whether specific equipment is needed for production.
3. Files
Files: Upload general attachments relevant to this item (e.g., drawings, specs).
Production Documentation: Upload documents specifically related to production processes. Files are shown with creator name and upload date.

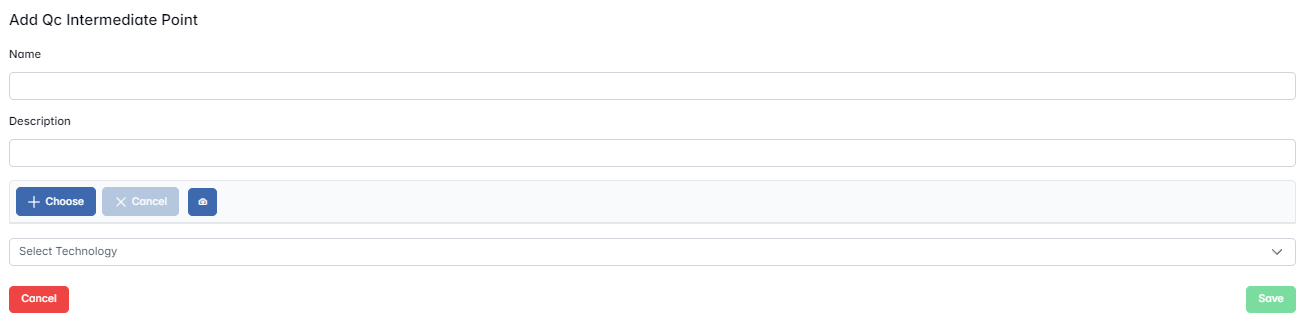
4. QC Intermediate Points
You can define quality control checkpoints that must occur at specific stages.
Use the + button (Add QC Intermediate Point) to define a new point with: Name, Description.
All defined QC points will appear in a table with columns for name, description, technology, associated file, and available actions.
5. Production Durations
Use the + button Add Production Duration to specify time estimates for production stages: Preparation Duration, Production Duration, Check Duration
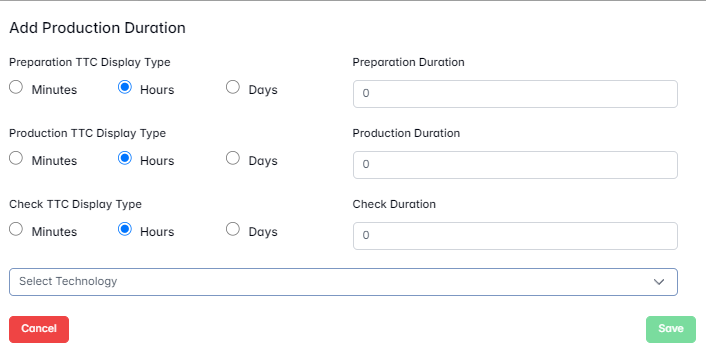
Each duration can be measured in minutes, hours, or days using the display type selector. Added durations are shown in a table with respective values and linked technologies.
Once all changes are complete, press the Edit button at the bottom of the popup to save and apply updates. All modifications are immediately reflected in the warehouse system and associated modules.
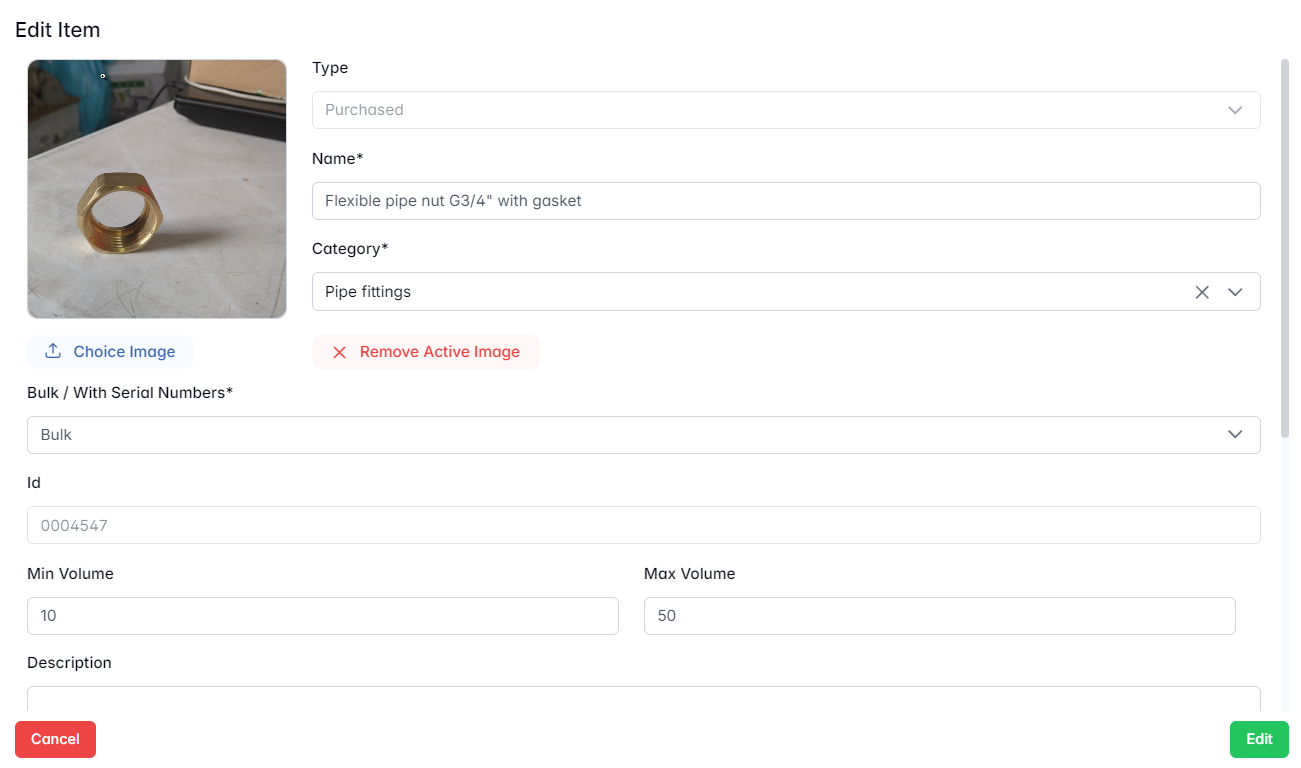
Purchased Item Card
The Edit Item popup opens when a user selects a row in the warehouse table of items filtered by Purchased type (with Multiselect Moving deactivated) and clicks the Edit Item button. The form includes all relevant fields for describing the physical and logistical properties of a purchased item.
1. General Information
| Field | Description |
|---|---|
| Type | Automatically shows item type - Purchased (not editable). |
| Name* | A required name used to describe the purchased item. |
| Category* | Classification group, selected from a predefined list. |
| Bulk / With Serial Numbers* | Indicates whether the item is tracked in bulk or by individual serial numbers. |
| ID | Internal system-generated identifier - not editable, assigned automatically upon item creation. |
2. Volume Thresholds (Min / Max Volume)
These fields are unique to purchased items and support automated procurement workflows.
- Min Volume - The minimum stock threshold. When the current quantity drops to or below this value, the system automatically creates a procurement request.
- Max Volume - The target quantity that the system aims to replenish up to during automatic procurement.
Example: If Min Volume = 10 and Max Volume = 100, and the current stock is 8, the system will automatically generate a purchase request for 92 units.
This feature supports lean inventory control, reduces manual monitoring, and ensures supply continuity.
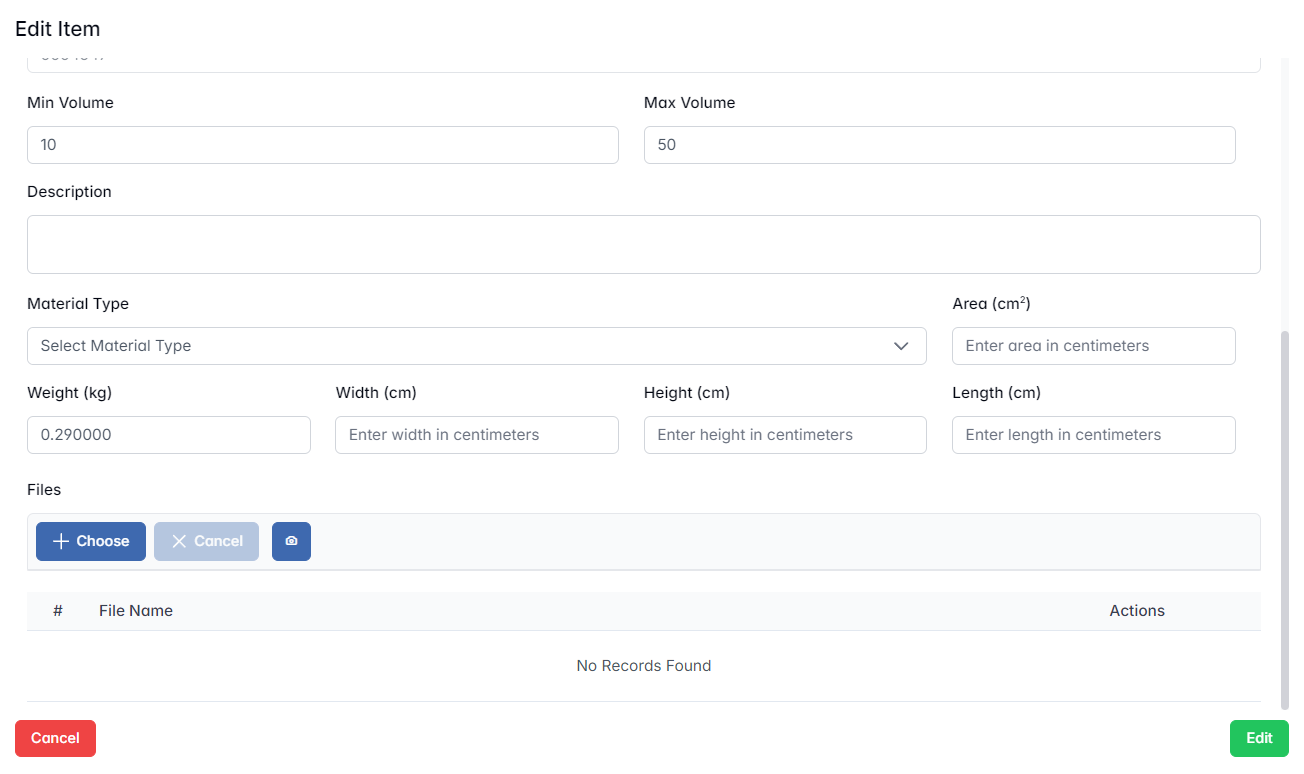
3. Physical and Material Details
Same as in the manufactured item form, this section defines the physical characteristics and material of the item:
Description - Optional field for notes or additional details
Material Type - Select from predefined material types
Area (cm²) - Surface area (if applicable)
Weight (kg) - Weight of the item
Width / Height / Length (cm) - Physical dimensions of the item
4. Image and Files
Image Upload - You can attach or replace a reference image for the item (e.g., technical drawing, product photo)
Files - General-purpose file uploads (e.g., datasheets, supplier certificates).
Each file, once uploaded, will be listed in a table with options for viewing or removal.
There is no Production Documentation, QC points, or Production Durations section for purchased items, since they are not manufactured in-house.
Saving Changes
After editing the item card, click the Edit button at the bottom of the form to save changes. The updates are immediately reflected across the warehouse system and connected modules (e.g., procurement, inventory planning).
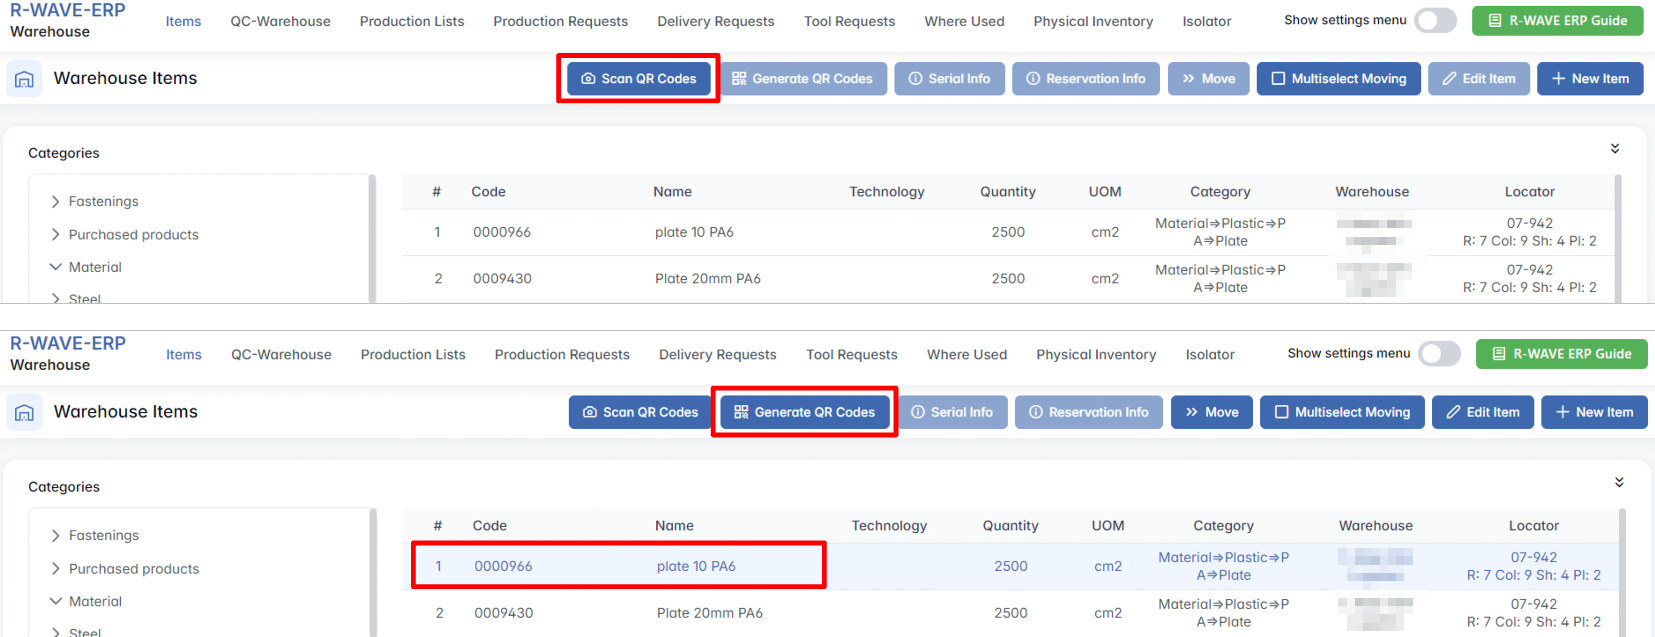
Additional Actions
In addition to standard item management, the warehouse module provides several specialized functions to manage, track, and relocate items efficiently. These options give users more control over inventory handling, identification, and reservations.
- Scan QR Codes / Generate QR Codes - These buttons allow users to scan or generate unique item identifiers. QR codes can be used for quick access, identification, and movement of items within the warehouse.
- Serial Info
The Serial Info button is intended to display the list of serial numbers (S) assigned to a particular item. However, this function is only available for items that are configured to use serial number tracking. In most typical cases, this button remains inactive - especially if no such serial-managed items currently exist in the warehouse.
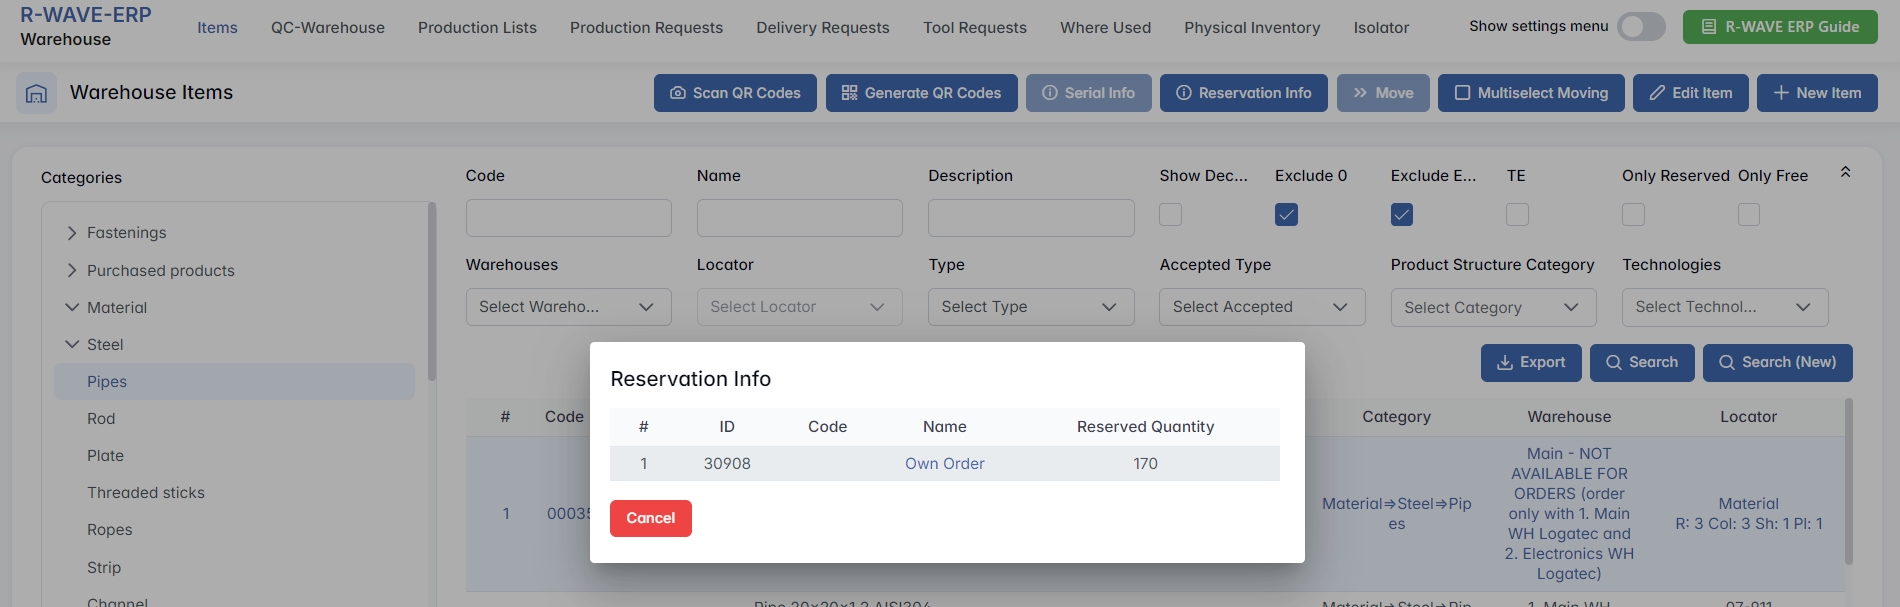
- Reservation Info
The Reservation Info button becomes active only for items that are currently reserved. Reserved items are marked with (R) in their name. Clicking the button opens a detailed view showing which production list the item is reserved for, including quantity reserved.
- Move
The Move button is used to transfer an item to another locator within the same warehouse. It becomes active for all items that are not currently reserved. If the item is free (i.e., not tied to a production list), users can open the Move dialog and assign the item to a new location manually.
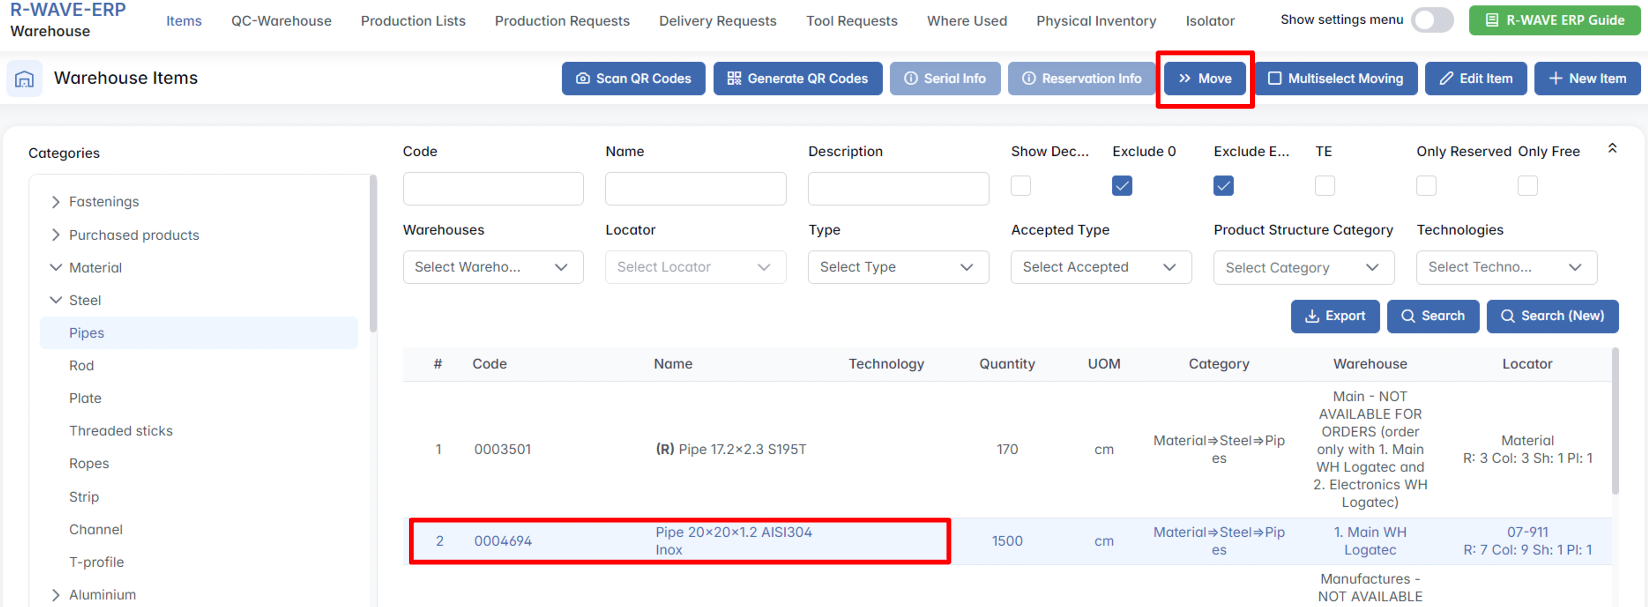
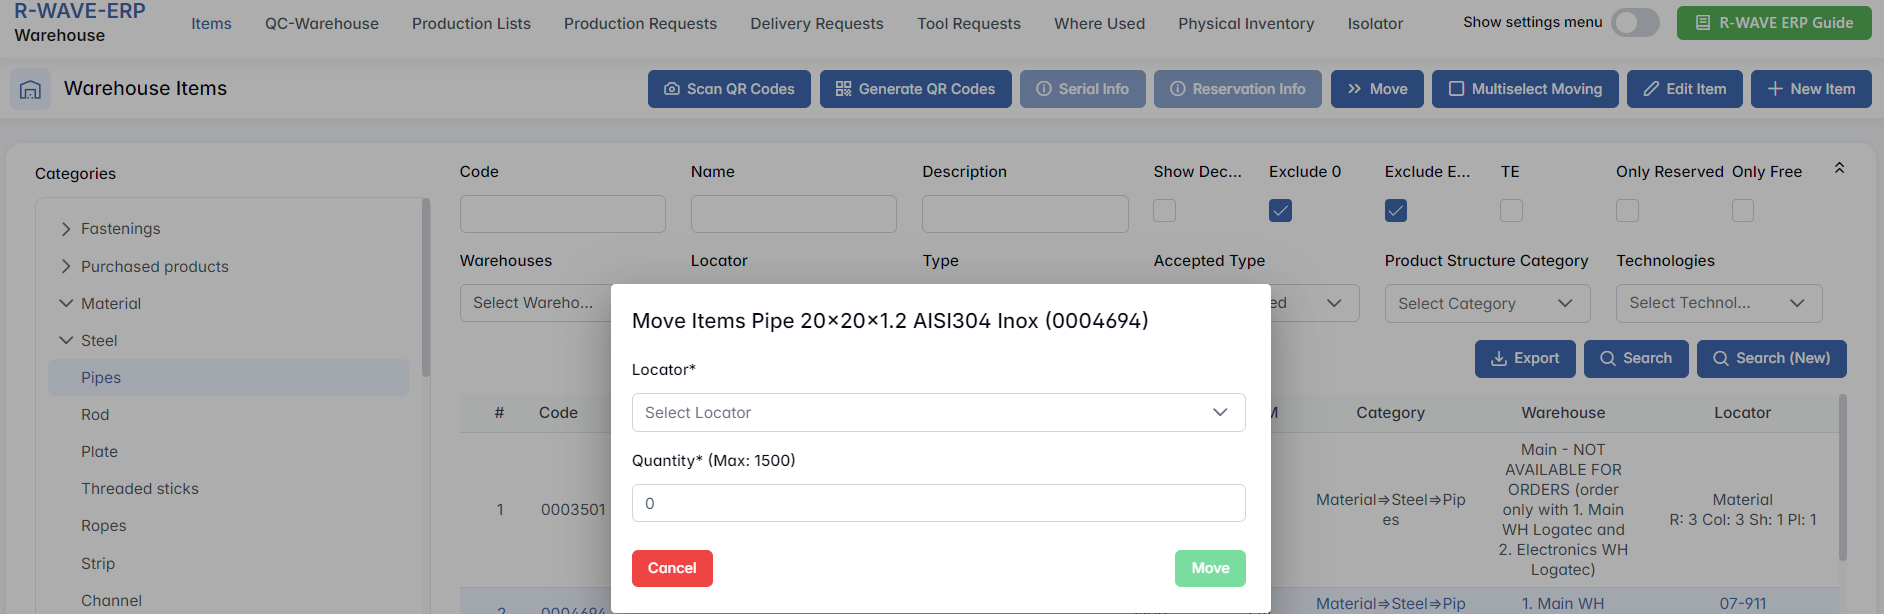
This function is especially useful for reorganizing inventory or grouping stock by type, project, or production phase.
QC-Warehouse
QC-Warehouse
The QC-Warehouse section in the BINU ERP system is designed to manage the flow of items that have successfully passed Quality Control (QC) into the warehouse. This process ensures that only verified and approved materials or equipment are accepted into warehouse storage and are properly tracked by location. The QC-Warehouse acts as a transitional space where received goods await final allocation to their correct locators, or distribution directly to production if needed.
This module is essential for:
- Ensuring inventory integrity by accepting only QC-approved goods
- Organizing materials by their appropriate warehouse locator
- Supporting traceability between procurement, production, and warehouse operations
Overview of the Interface
Upon entering the QC-Warehouse module, users are presented with a tab-based interface separating different sources of incoming materials. Each tab leads to a structured list of invoices or requests, depending on the category. The available tabs are:

Production List Procurement and Outsourcing: Items ordered for specific production lists or outsourced manufacturing
Own Production Invoices: Items returned to the warehouse after internal production
General Procurement Invoices: Items procured outside the production plan (general usage, admin, support tools)
Tools: Instruments or equipment that have been allocated for use in departments and these tools are returned after use, undergo quality control.
Each section displays a list of documents (invoices or requests) that have items pending warehouse placement.
Production List Procurement and Outsourcing
This subsection within the QC-Warehouse module is dedicated to managing goods that have been procured either specifically for a production list or through an outsourcing process. It ensures traceability between incoming materials and their intended production destinations, while allowing warehouse personnel to confirm receipt and allocate the materials to the appropriate storage locators.
Table View and Controls
When entering this subsection, users are greeted with a hierarchical table view displaying grouped invoices. Each group represents a distinct invoice or order. The hierarchical structure provides a clear overview of which items belong to which order or supplier.
The following columns are shown in this default (hierarchical) view:
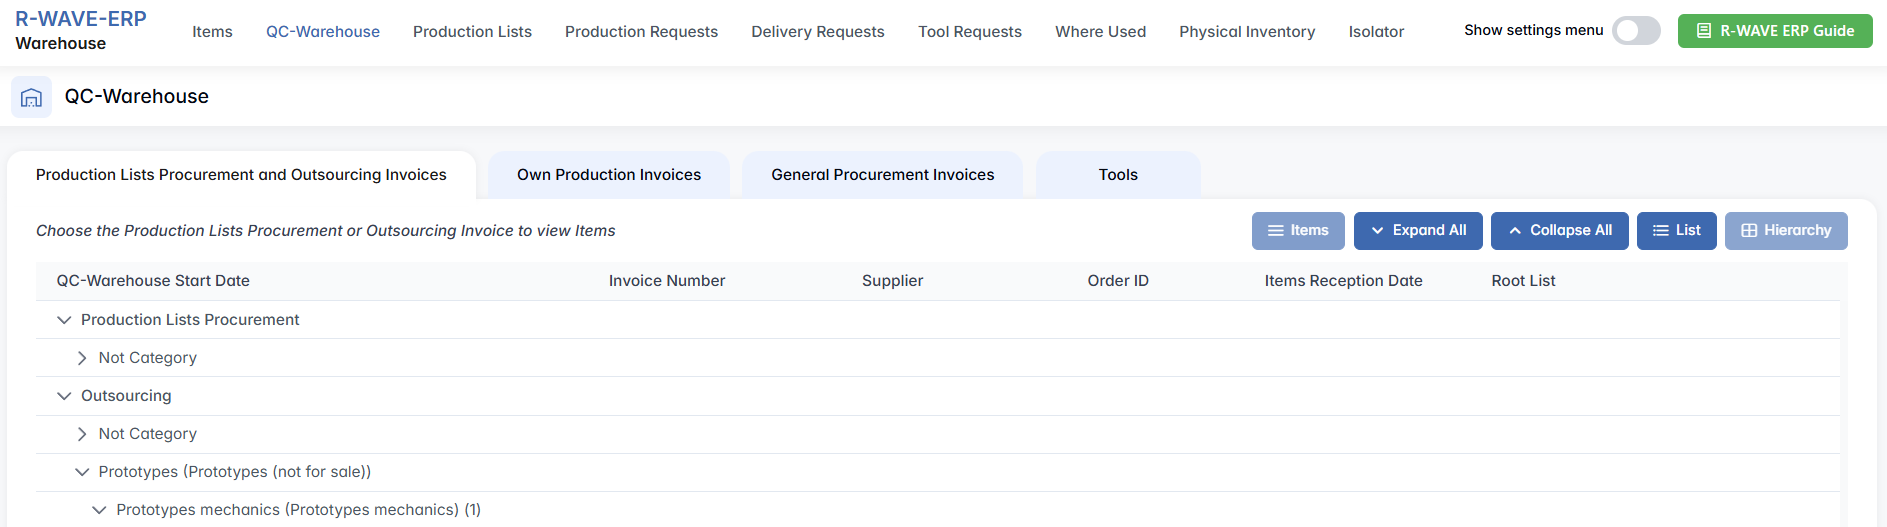
- QC-Warehouse Start Date - The date when the warehouse QC process began for this record.
- Invoice Number - The invoice associated with the delivery of the items.
- Supplier - The vendor or outsourcing provider.
- Order ID - A unique internal identifier for the associated purchase order.
- Items Reception Date - Date when the items physically arrived.
- Root List - The overarching production list or procurement group to which this record belongs.
To adjust the view style, users can switch between two modes:
Hierarchy - This is the default view. Invoices are grouped by their root logic (e.g., order, supplier).
List - This flattens all records into a single linear table. It’s useful for scanning many individual entries quickly.
These view modes are toggled using the buttons Hierarchy and List, located at the top right corner of the table interface.
To assist with large records, two navigation buttons are available:
Expand All - Unfolds all invoice groups to display every nested item.
Collapse All - Folds all entries, showing only top-level records.
Navigating and Working with Invoice Items
Once you click on any row in the Production List Procurement and Outsourcing table, the Items button becomes active. Clicking it opens the Invoice Items Order ID [xxxx] page - a detailed view showing all items associated with the selected procurement or production document.
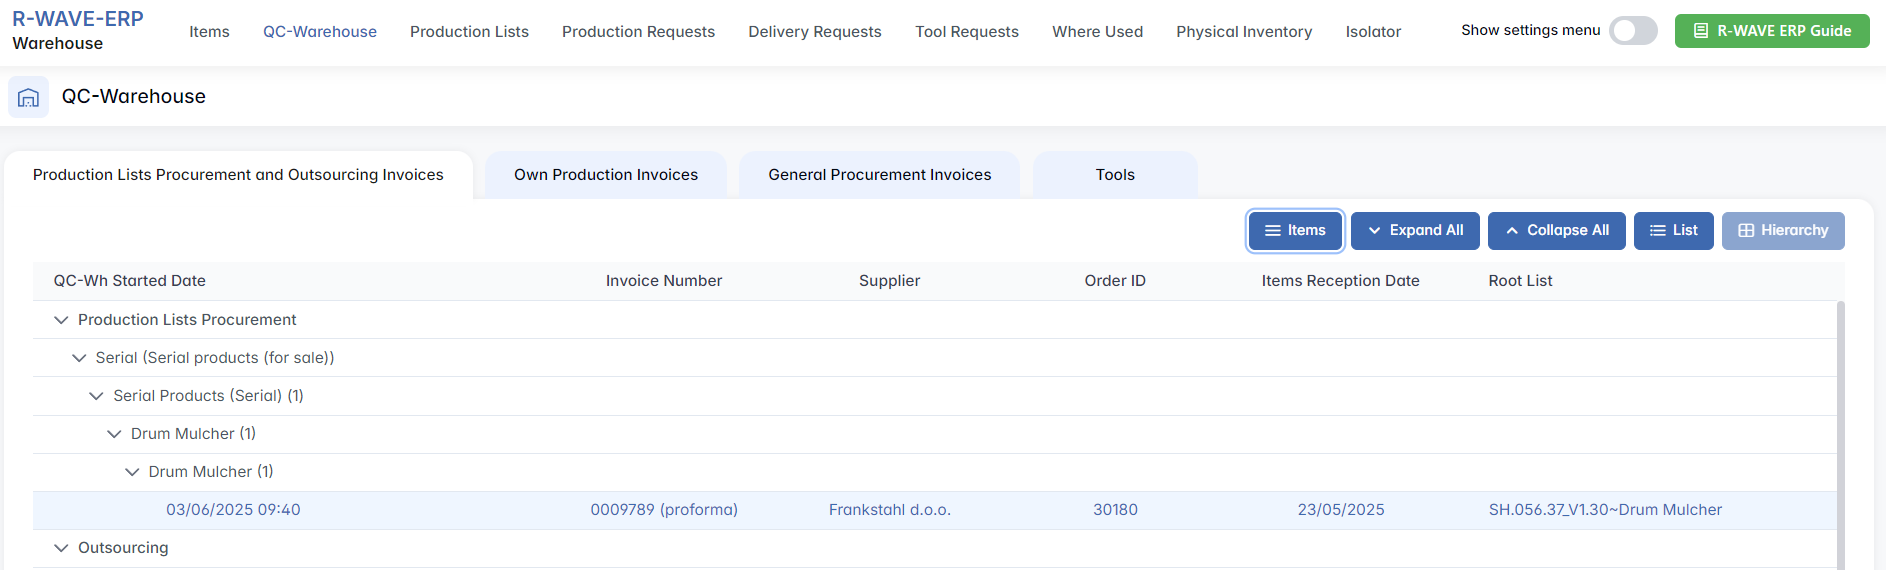
This page allows warehouse staff to:
- Review the Item list, including code, name, technology, quantity, and number of items that have passed QC.
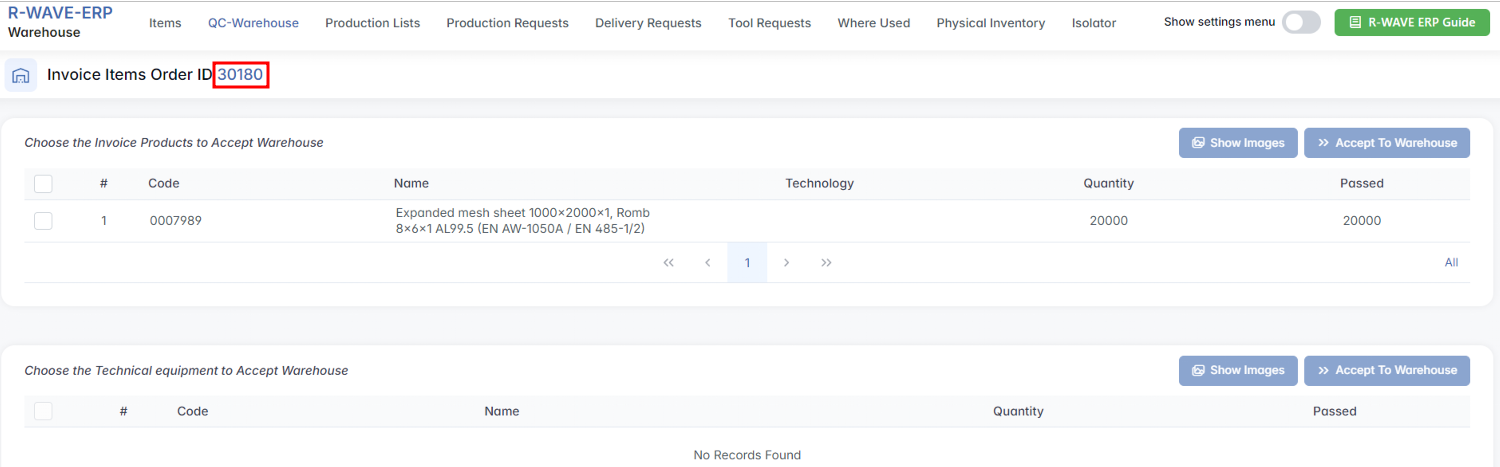
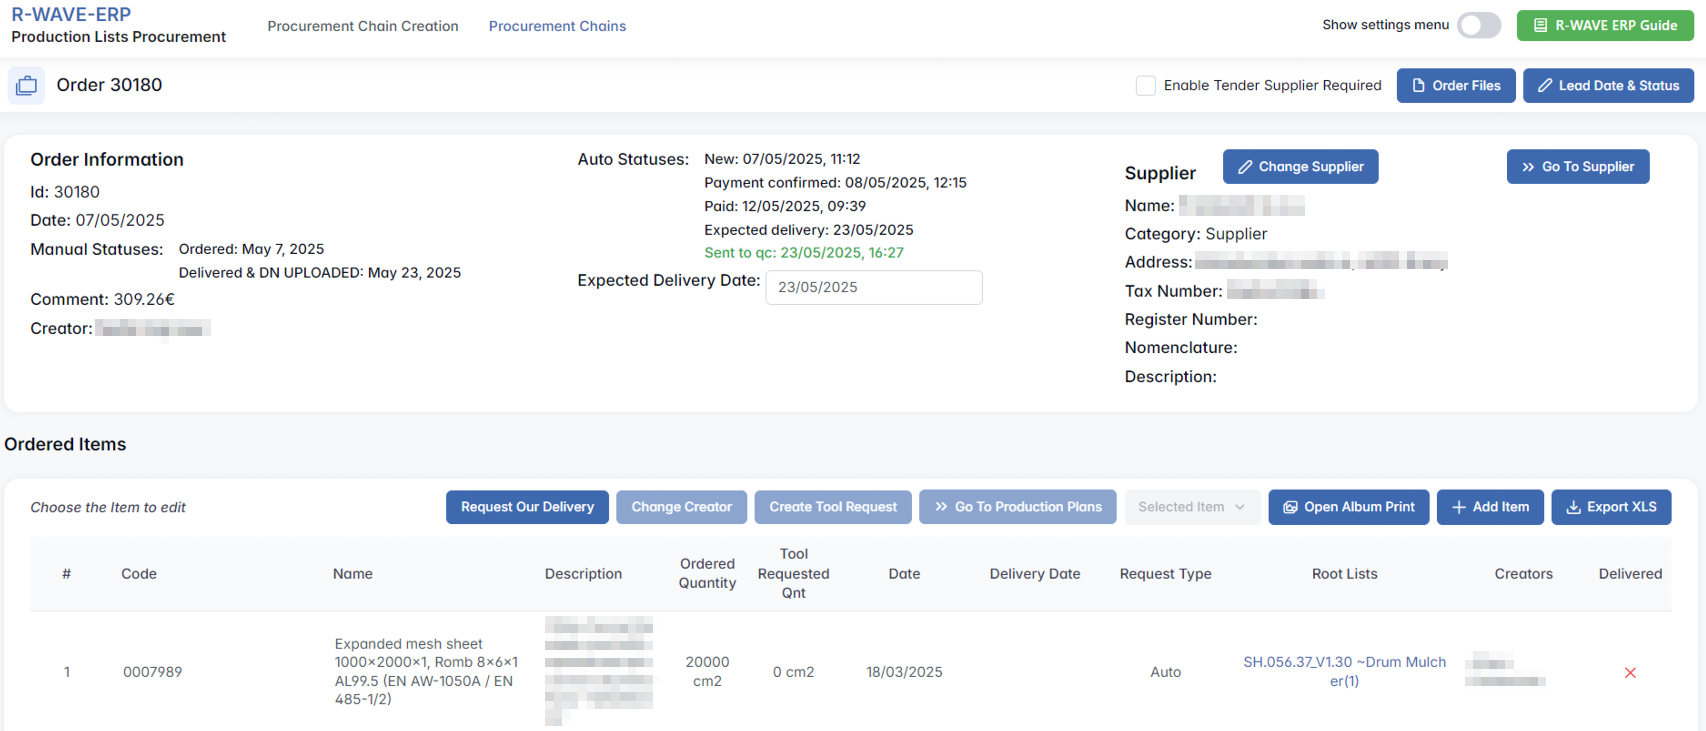
- Access the Order Details page by clicking the Order ID in the header. This page includes: General order information, List of ordered items, Related invoices
This level of detail ensures that goods received are not only physically checked, but also accurately matched against their originating procurement source.
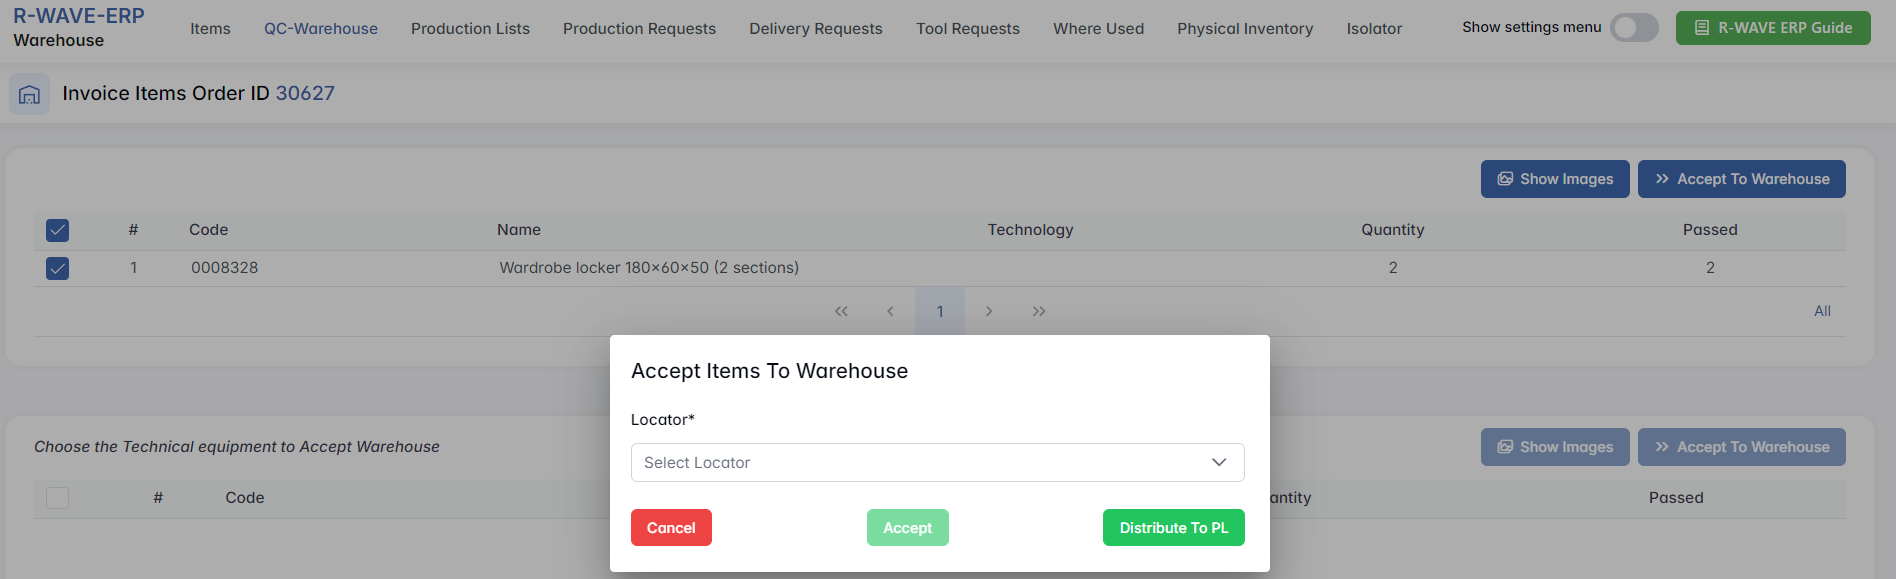
Accepting Items into the Warehouse
After reviewing the list of items, you can proceed to accept them into the warehouse:
- Select one or more rows using the checkboxes on the left.
- Click the Accept to Warehouse button above the table.

- A modal window titled Accept Items to Warehouse will appear.
- Use the Locator dropdown to choose the destination location within the warehouse
- If the locator already contains the selected item, it will be marked in green.
- Items can be placed on locators that are configured to accept that type of material, based on warehouse settings and locator compatibility.
- Choose your action:
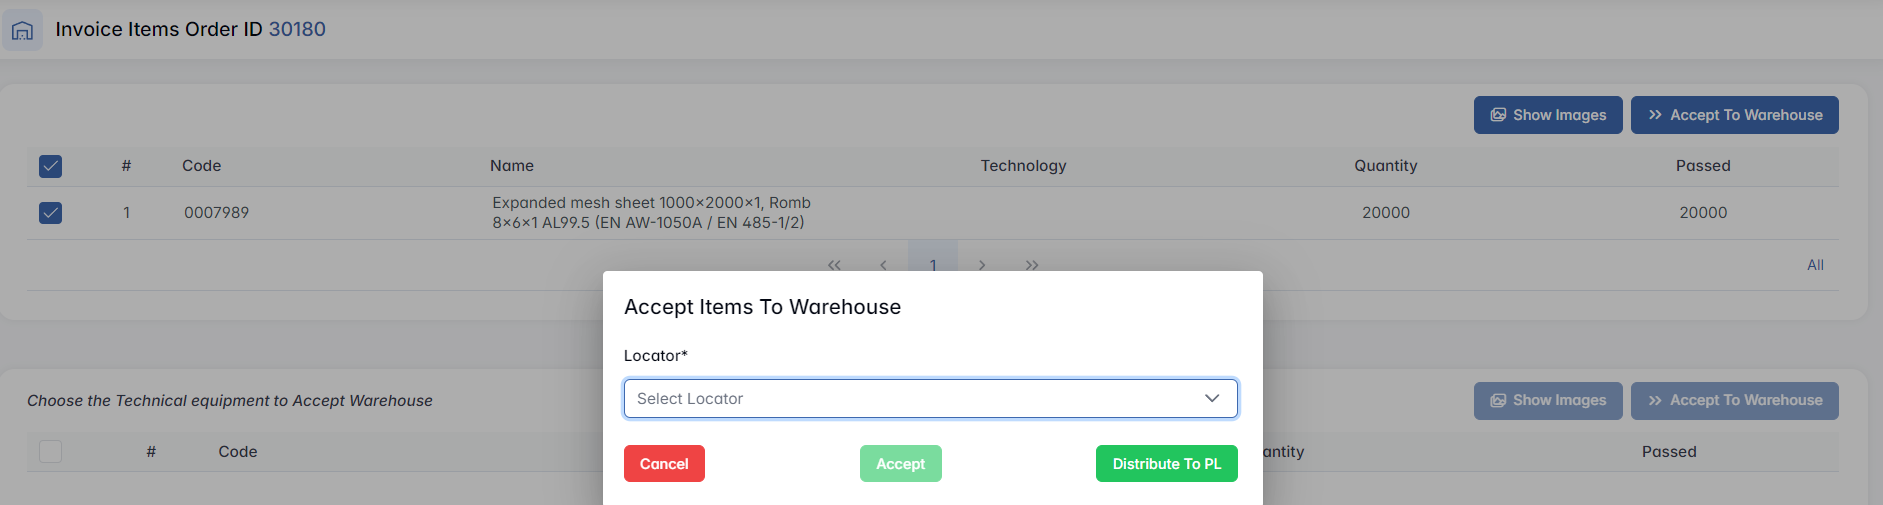
- Accept - sends the item to the selected warehouse locator.
- Distribute to PL - redirects the reservation to the production list.
- Cancel - closes the window without changes.
This process ensures traceable movement from QC into stock or production, keeping inventory reliable and linked to production needs.
Distribute to PL

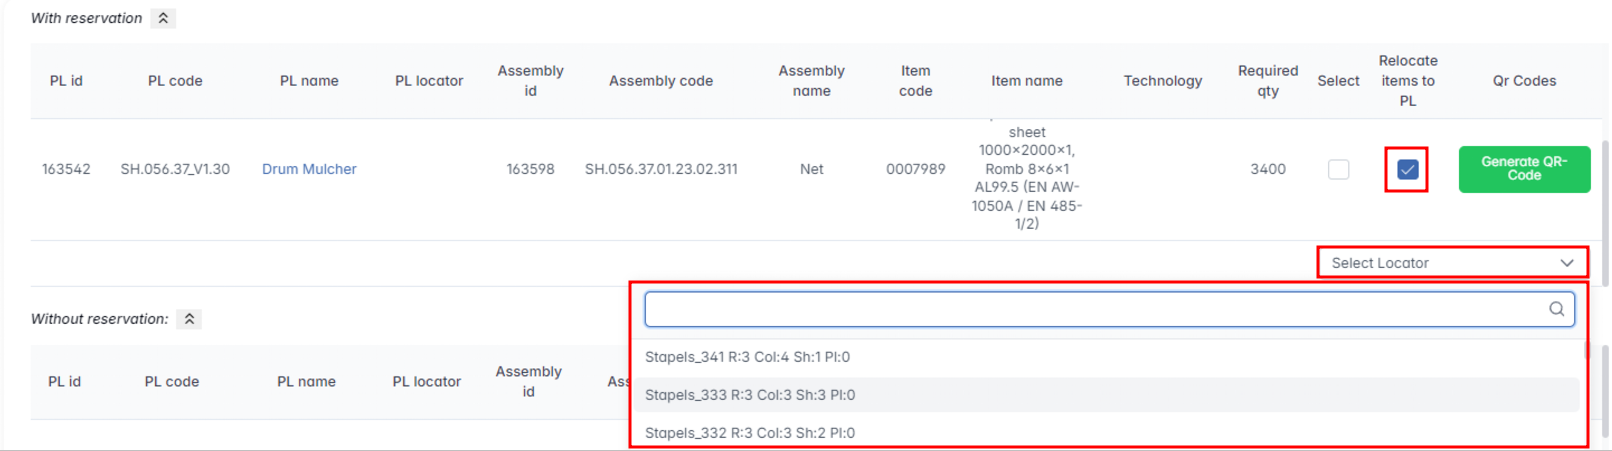
When you click Distribute to PL, a pop-up window appears, allowing you to allocate the selected item directly to active production lists (PLs). The interface is divided into two sections:
- With Reservation
This section includes production lists where the selected item has already been reserved in advance. These are top-priority targets, as the item is expected for specific assemblies.
- Without Reservation
This section shows production lists where the item is needed but hasn’t been formally reserved. These are useful for fulfilling demand opportunistically, based on availability.
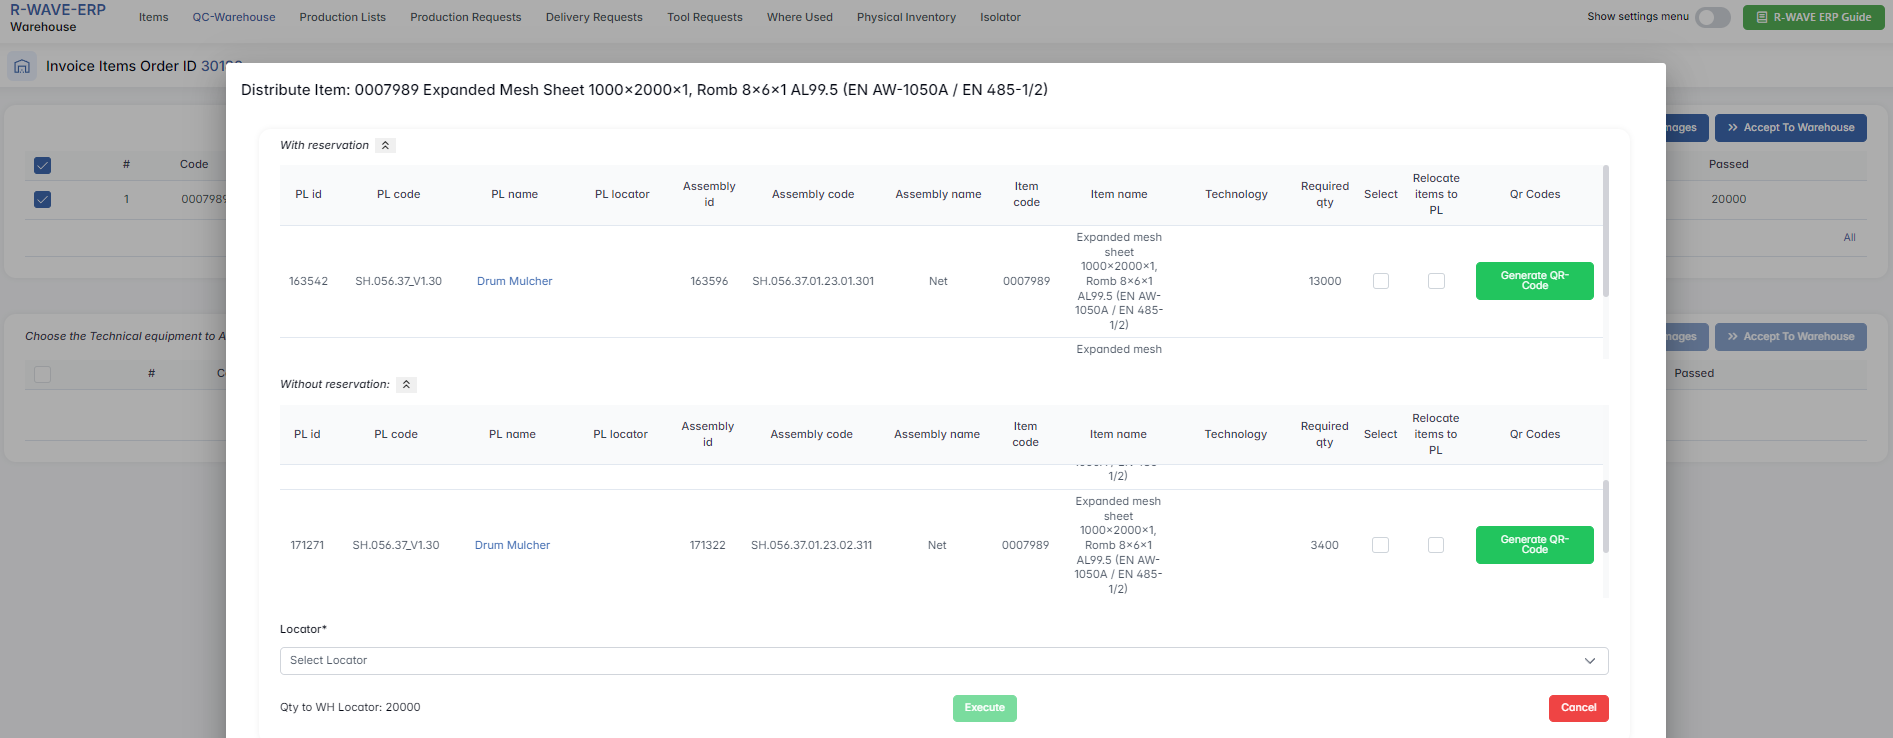
Each table contains the following columns:
| Column | Description |
|---|---|
| PL id / PL code / PL name | Id of the production list. PL name is clickable, leading to more details. |
| PL locator | The current warehouse location associated with the production list. |
| Assembly id / code / name | Identifiers for the assembly within the PL where the item is needed. |
| Item code / name | Information about the selected item you’re allocating. |
| Technology | Production technology step the item is related to. |
| Required qty | The quantity needed for this assembly. |
| Select | Checkbox to choose this PL for item distribution. |
| Relocate items to PL | Checkbox that, when checked, allows you to relocate the item directly to the PL locator. |
| QR Codes | Generate or view a QR code for the item in this context. |
- Generate QR-Code: A button at the bottom that allows generating QR codes for selected items or destinations.
- Locator: Select a warehouse locator for the distribution.
- Execute: Once selections are made, press Execute to complete the item distribution.
Dynamic Locator Field:
If the Relocate items to PL checkbox is ticked, an additional “Select Locator” dropdown appears below the selected record, allowing the user to choose the specific locator for relocation.
Own Production Invoices
The Own Production Invoices tab lists all records of internally manufactured items that have passed quality control and are ready to be accepted into the warehouse.
The interface presents a hierarchical view with the following columns:
- QC-Wh Started Date - Timestamp when the quality control process was initiated
- Order ID - Unique identifier for the internal production order
- Items Reception Date - Date when the goods became available for warehousing
- Root List - Reference to the internal project or batch name
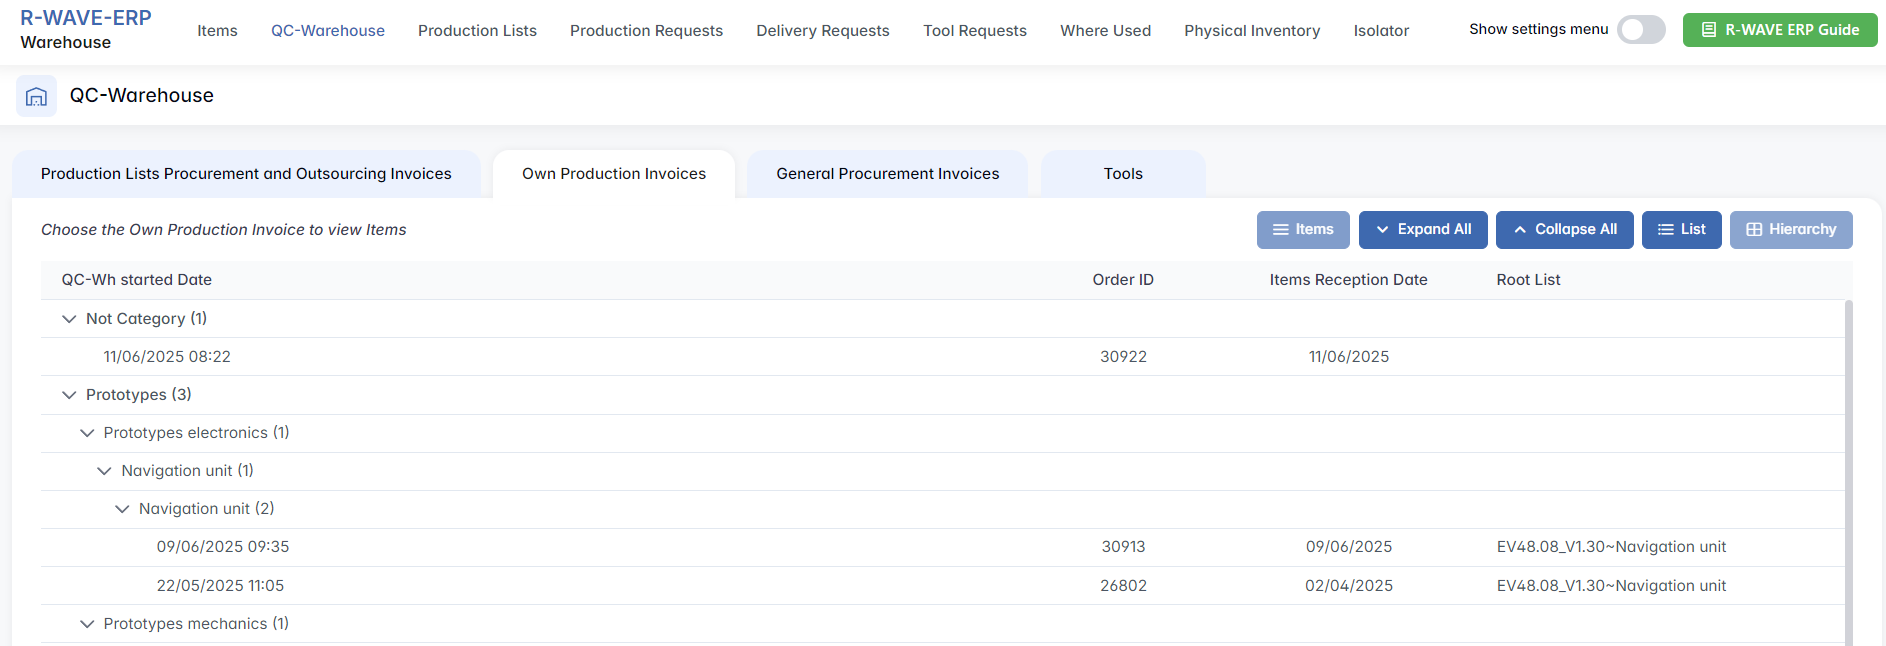
You can switch between the hierarchical and flat list views using the buttons Hierarchy and List, and use Expand All / Collapse All to manage the visibility of subgroups.
Navigating to and Accepting Items
The process for viewing and accepting items from an internal production invoice follows the same flow as described in the Navigating and Working with Invoice Items section.
- Click on any row to activate the Items button

- Open the Invoice Items page for Order ID [xxxx] to view all items. Then, select the item(s) and click the Accept to Warehouse button above the table.

- Use Accept to Warehouse or Distribute to PL to move items into storage or directly to production

This streamlined flow allows warehouse teams to manage internally produced items with the same traceability and control as externally procured goods.
General Procurement Invoices
The General Procurement Invoices tab covers all materials and equipment purchased outside the production plan - such as administrative furniture, general-purpose materials, and technical equipment (TE) used across various departments.
This view displays a structured table with the following columns:
- QC-Wh Started Date - The date when the item was passed from Quality Control.
- Invoice Number - Supplier invoice or proforma reference.
- Supplier - Vendor name or company.
- Order ID - Internal procurement order identifier.
- Items Reception Date - Date goods were registered as ready.
- Root List - Logical grouping or internal reference for the purchase.
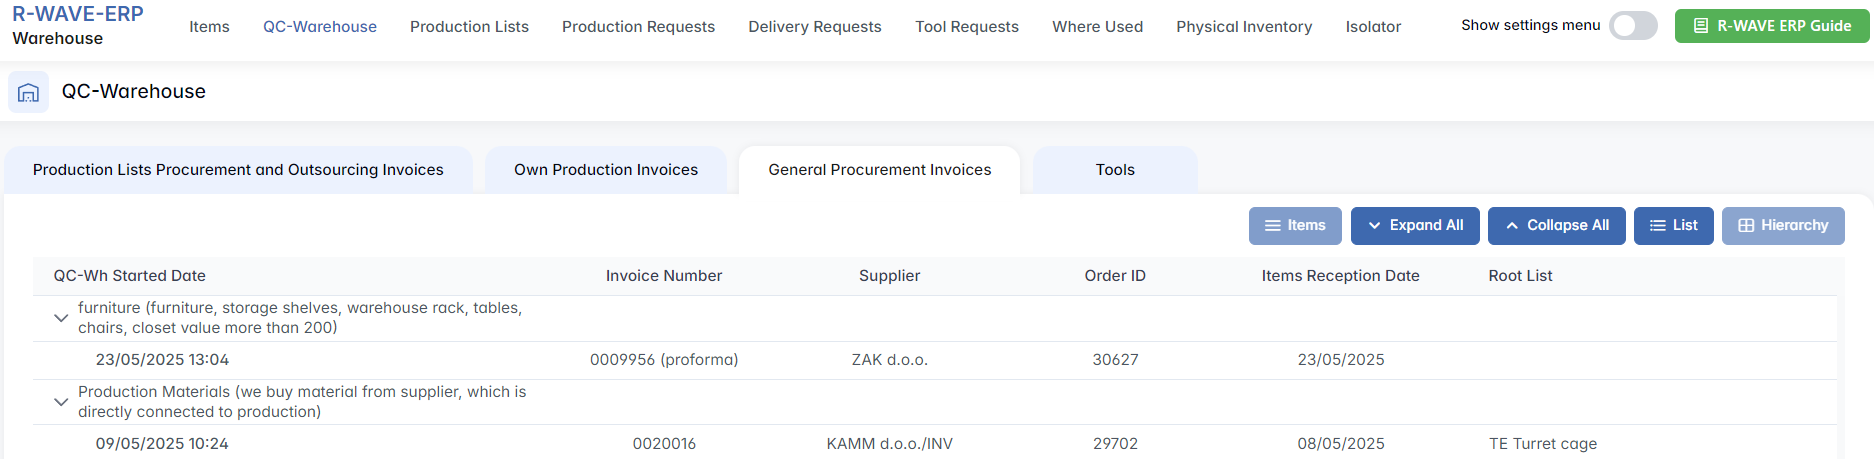
You can switch between the hierarchical and flat list view using the Hierarchy and List buttons in the upper right. The Expand All and Collapse All options help you navigate grouped invoice data more efficiently.
Working with Invoice Items
To review the items listed in a procurement invoice:
- Click on the invoice row in the table - this will activate the Items button.

- Click Items to open the page Invoice Items Order ID [xxxx].
- On this page, you’ll see a breakdown of all items from the selected document.

If you need to review the full procurement context of the order, the Order ID displayed in the page title is clickable. This takes you directly to the full Order Details view.
Accepting Items into the Warehouse
The process for placing items into the warehouse or sending them to production is identical to other invoice types:
- Select one or multiple items using the checkboxes.

- Click Accept to Warehouse.
- In the dialog box, choose the appropriate Locator - if the item already exists in a location, it will be highlighted.
- Choose one of two actions:
- Accept - Place the items into warehouse storage.
- Distribute to PL - Send the items directly to the production list, if needed.
This step ensures traceable movement of all general goods into your warehouse system while respecting QC verification.
Tools
These tools have been used in departments and are now being returned after use and successfully passed Quality Control (QC) appear in this section. These are ready for final placement - back into the warehouse for future use.
Upon opening the tab, you are presented with a flat table listing all tool-related items that have passed quality control and are awaiting placement. Each row represents a unique item and includes attributes such as:
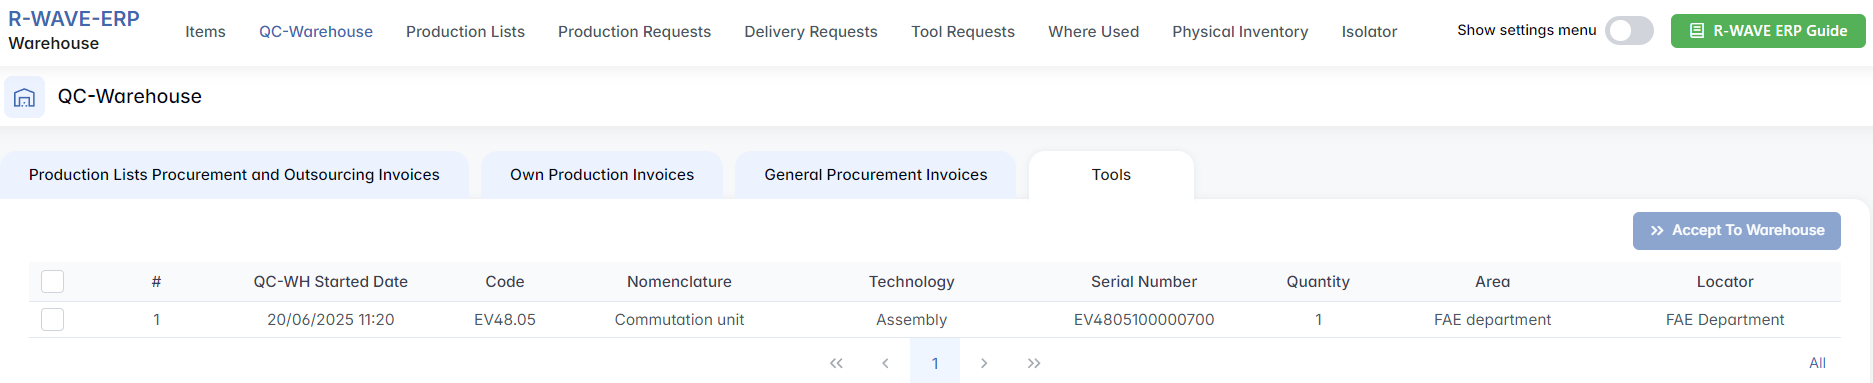
This view supports multi-selection, allowing users to select one or multiple tools at once. Once at least one row is selected, the Accept to Warehouse button becomes active.
Accepting Tools to Warehouse
To move tools into warehouse storage:
- Select the desired rows using the checkboxes on the left.

- Click Accept to Warehouse.
- A modal window opens, prompting you to choose a specific locator within the warehouse.
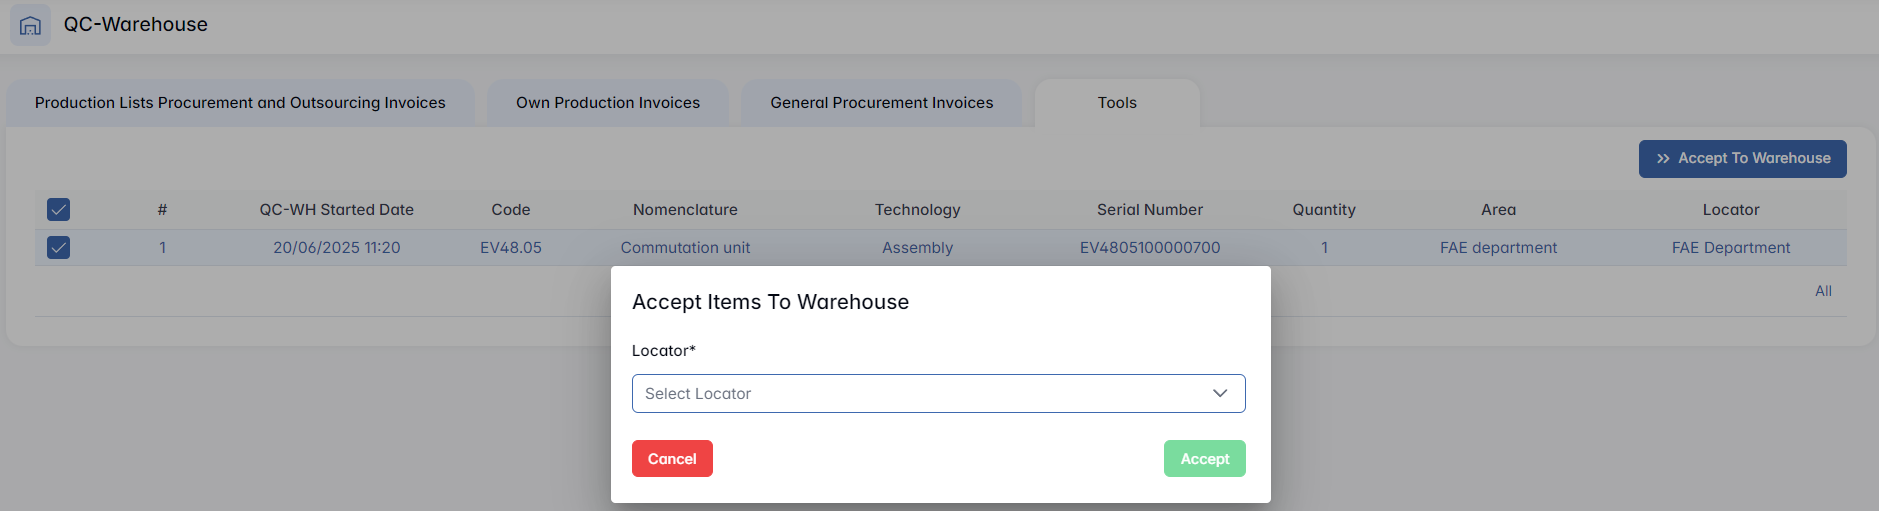
- Confirm the action by clicking Accept.
This functionality ensures a fast and flexible way to register approved tools into stock, without the need to navigate through invoices or linked orders.
Unlike other sub-tabs, there is no need to drill down into a separate Invoice Items view - the interface in Tools is streamlined for quick allocation and inventory update.
Production Lists
Production Lists
The Production List tab in Warehouse module is used to manage and prepare assemblies for production by organizing all necessary components in advance. This module serves as a bridge between warehouse inventory, procurement, and the manufacturing process. It ensures that all required parts and materials are available, properly located, and ready for use in assembling finished products.
This section is critical for:
- Monitoring material availability for each assembly
- Identifying stock deficits and automatically generating procurement requests
- Coordinating item placement into the correct locator before production begins
- Ensuring that manufacturing receives well-organized, traceable component sets
- Reserving required items for specific assemblies
The reservation feature enables users to assign required items directly for a specific production list. This helps ensure that once production starts, reserved components are pre-allocated and no longer available for other operations, minimizing delays and inventory errors.
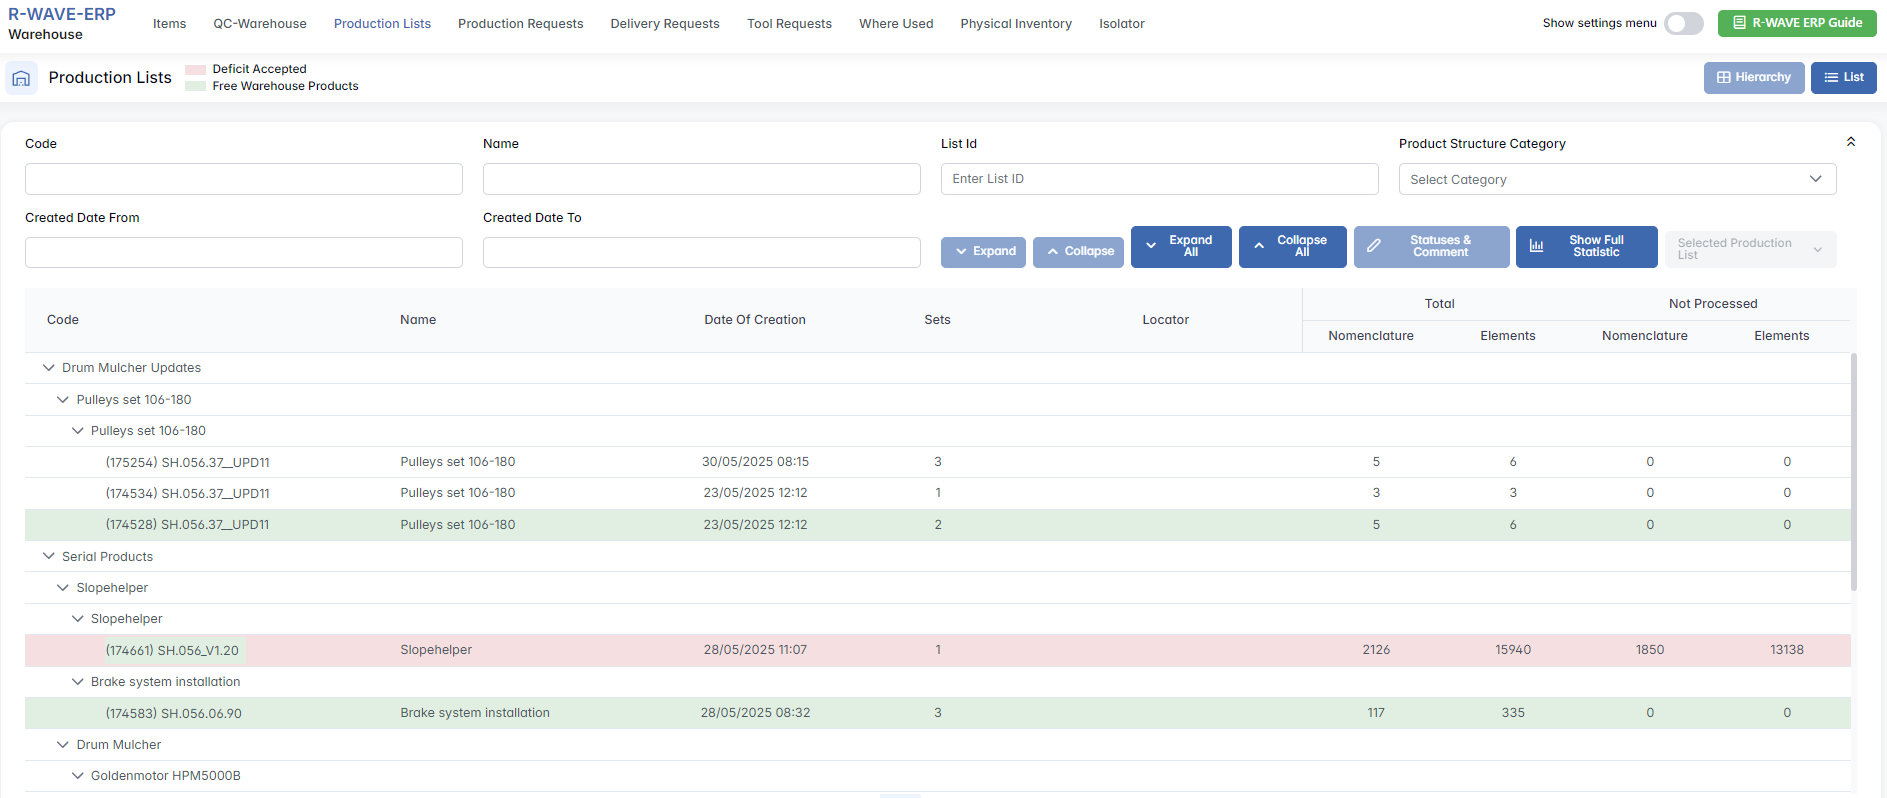
Overview of the Interface
Upon opening the Production Lists section, you are presented with a clean and structured workspace that allows you to manage all active production lists and monitor their status.
Top Bar Filters and Buttons
At the top of the interface, you will find several filters and tools to manage your view:
Search Filters:
- Code, Name, List ID - Search for specific production lists by identifying fields
- Created Date From / To - Filter lists by their creation date
- Product Structure Category - Narrow the results by selecting a structural category

View Controls:
- Hierarchy / List - Toggle between a collapsible hierarchical tree and a flat list view
- Expand / Collapse - Expand or collapse individual branches in the hierarchy
- Expand All / Collapse All - Quickly open or close all groups
- Statuses & Comments - Review quick notes or annotations related to the production list
- Show Full Statistic - Opens a detailed analytical view of the selected production list
- Selected Production List - Highlighted area showing which production list is currently active
Table Structure
Each category of the table can be expanded to show individual production list records.

| Column | Description |
|---|---|
| Code | Internal code of the production list. |
| Name | Name of the production batch. |
| Date of Creation | When the list was created. |
| Sets | Number of sets or assemblies within the list. |
| Locator | A specific warehouse location where reserved materials are stored or relocated. |
| Total | Shows the overall count of: Nomenclature (types of items) and Elements (individual parts). |
| Not Processed | Indicates the number of items that have not yet gone through the processing or assignment steps in the warehouse system. |
Color Indicators in the Header
At the top of the Production List detail page, two colored tags help the user quickly understand the status of item sources:
🟥 Deficit Accepted - indicates that previously existing deficits in the production list have been acknowledged, allowing production preparation to proceed as if those deficits no longer block the process.
🟩 Free Warehouse Products - shows that some items required for this list are already available in the warehouse, not yet reserved, and can be immediately allocated.
These labels summarize the general readiness of the list and help warehouse and planning teams prioritize their actions.
These labels reflect the overall status of the list, not individual item statuses. For item-specific availability, refer to the "Status" column in the item table (e.g., Completed / Deficit).
To proceed with managing a specific production list, click on the corresponding row. This will activate further buttons such as:
- Show Full Statistic - Opens a statistical summary, including counts of processed, missing, and outsourced items
- Statuses & Comment - Allows users to attach notes, images, or references to the list
Accessing the Detailed View of a Production List
From the main Production Lists page, users can interact with any existing production list by following these steps:
- Click on a row to select a production list.
Once selected, the row is highlighted in blue, and additional actions become available. - In the top-right corner, the dropdown button labeled Selected Production List becomes active.
Clicking it opens a list of actions related to the selected list:- Production List - opens the detailed view of the selected list, showing all required items, stock status, and locator assignments.
- Set Warehouses - allows the user to define which specific warehouse(s) will be used to process items for the selected Production List. Even if multiple warehouses exist in the system, only the assigned ones will be considered for this particular list. If an assigned warehouse lacks the required quantity of an item, a purchase request will be initiated for the missing amount.
- Set List Locator - allows the user to assign a default storage locator where reserved items for this Production List will be placed. This locator acts as a recommended option during the reservation process. It does not have to belong to the same warehouse selected in Set Warehouses, giving flexibility in how and where the stock is organized. The assigned locator helps maintain consistency and clarity in material handling across production steps.
- Go to Plan - redirects to the associated production plan.
These options provide flexibility in managing and reviewing each production list, aligning warehouse operations with production planning workflows.
This dropdown is only enabled when exactly one production list is selected.
Detailed View of a Production List
When the user selects a row in the Production Lists table and clicks on Selected Production List → Production List, the system opens the detailed page for that specific list. This view shows the full breakdown of items required for production, their availability, and warehouse assignment status.
Table of Items
The central part of the page is a table listing all the items required to fulfill this production list. For each item, the following columns are available:

- Code - unique item code
- Name - full item name
- Technologies - associated production technologies
- Current Technology - actual technology selected for this order
- Total Req Qty - total quantity required across all production sets
- Req Qty per One - quantity needed per single production set
- Free Wh Qty - currently available quantity in warehouse
- Reserved Qty - quantity already reserved
- Actual Qty - quantity to be used in this production list
- UOM - unit of measure
- Locator - the specific warehouse location where reserved materials are stored or relocated
- Status - item readiness status:
- Completed - item is available in required quantity
- Deficit - item is missing and needs to be procured or produced
Additional Options
In the top-right corner of the table, the user can:

Scan QR Codes - scan item QR codes for inventory tracking
Search - filter items by code or name
Open Filter - open the advanced filter panel

Open Album Print - print visual album of items
Open Generate QR Codes - print QR codes for each item

Print → Print Separated By Assembly - print the production list grouped by assemblies
Make Request for All - automatically generate procurement requests for all deficit items
Go to Plan - navigate to the related production plan

Item-Level Actions in the Production List
When viewing the detailed Production List, each item in the table has a set of action buttons that appear when the user hovers the mouse over the row. These buttons allow direct interaction with the item’s status and stock management:
Show Image
Opens a popup with the attached image(s) of the item, if any. This helps visually identify parts or verify technical specifications.

Set Actual Quantity
Opens a dialog where the user reserves the required quantity of an item from a specific locator within the warehouse for the selected Production List. This action confirms that the chosen stock will be used for production and triggers a relocation of the reserved items to the production list locator. If the full required amount is reserved, the item status changes to Completed.

Additional Rules:
If the item already has an existing reservation or is part of a confirmed procurement or manufacturing order, the system displays a confirmation modal: “This item already has an active reservation or order link. Do you want to override the existing one?”
If confirmed, the new selection replaces the previous one. If canceled, the existing setup remains unchanged.
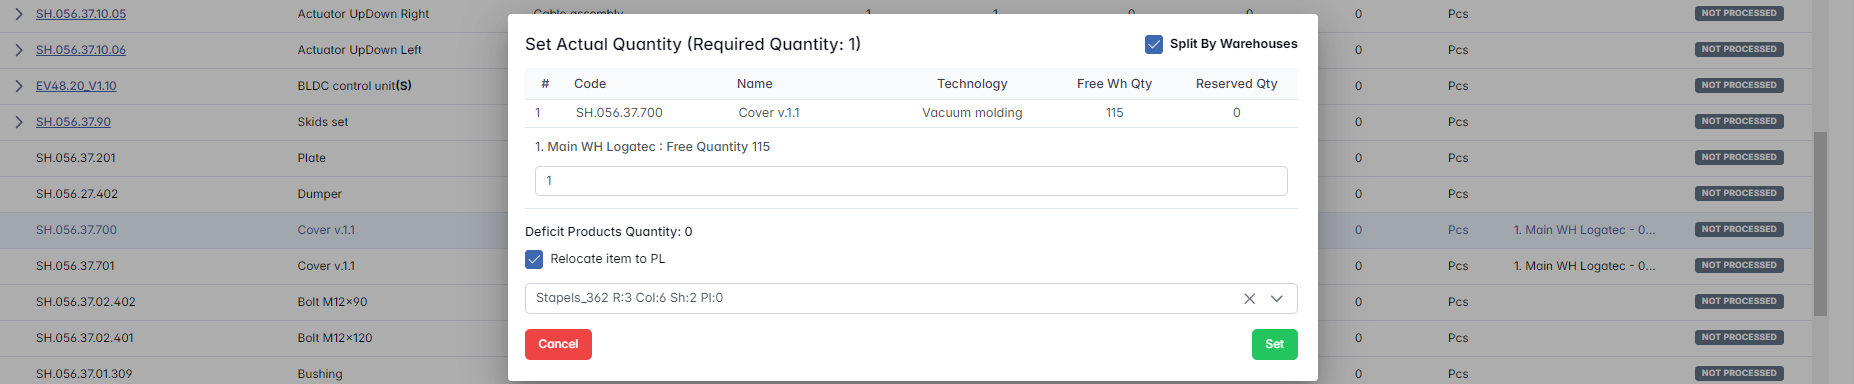
Split by warehouses - Enables the user to manually select from which locator(s) or warehouse(s) the reserved item will be sourced. This is helpful when the total quantity is spread across multiple locations. If this option is disabled, the system will automatically allocate items using the FIFO (First In, First Out) method - prioritizing the oldest available stock first, regardless of the locator.
Relocate item to PL - allows the user to manually choose the warehouse locator where the already reserved item will be physically moved to prepare for production.
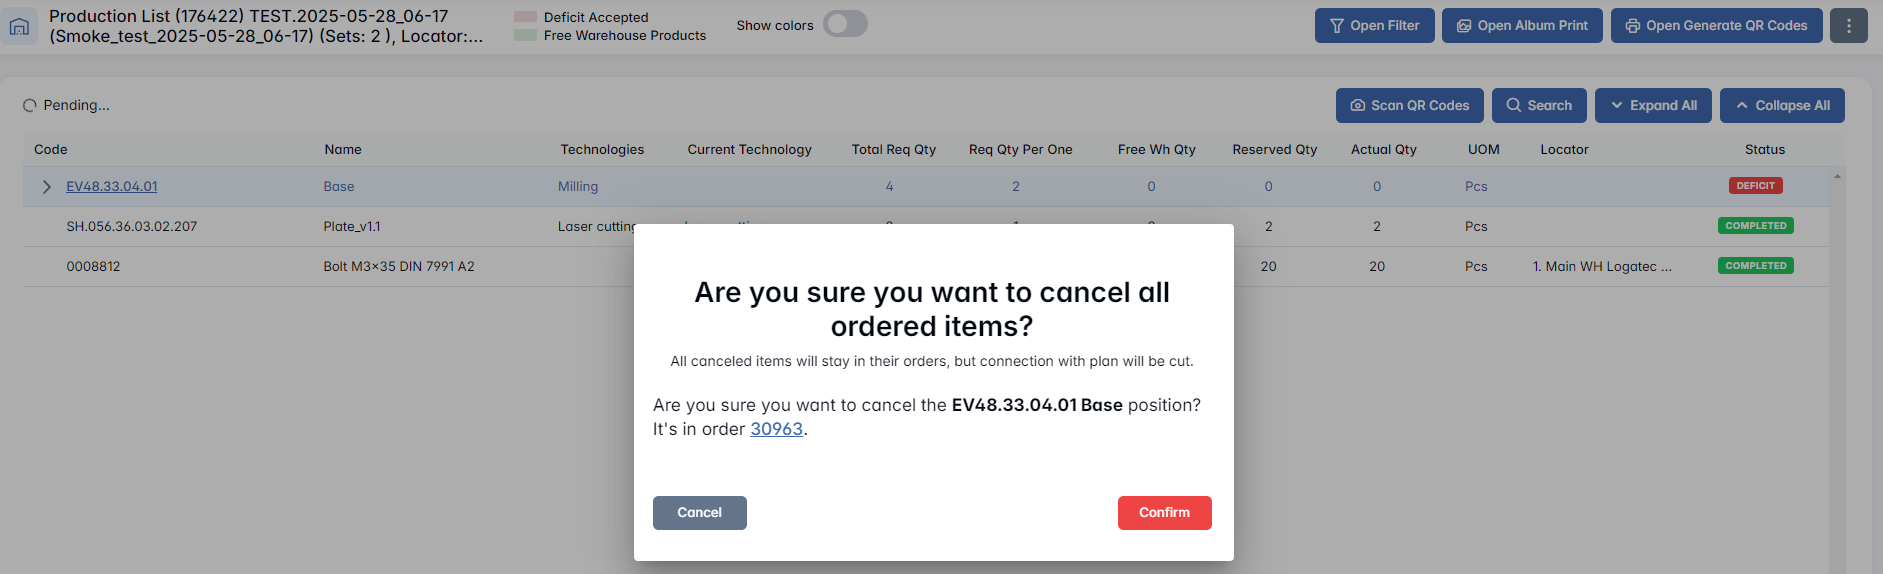
Cancel Actual Quantity
Removes the previously reserved quantity from the item, effectively canceling the material reservation. The system updates the item status back to Not Processed, and the stock becomes available again for other use or plans.

With Linked Orders:
If the item is already associated with a procurement or manufacturing order, the system displays a confirmation dialog before proceeding. Upon confirmation:
- The link between the item and the related order is removed
- The reserved quantity is released
This prevents accidental unlinking from ongoing workflows.
Make Request
After setting the actual quantity, this action is used to generate procurement requests for purchased items that are still in Deficit status. Depending on the sourcing type, the system creates the appropriate requests and automatically links them to the selected Production List.

These inline controls streamline the preparation of a production list by enabling quick adjustments without leaving the page.
Filters Panel and Auto Set Quantities
In the upper part of the page, there's an Open Filters button. Clicking it opens a panel with the following filter fields:
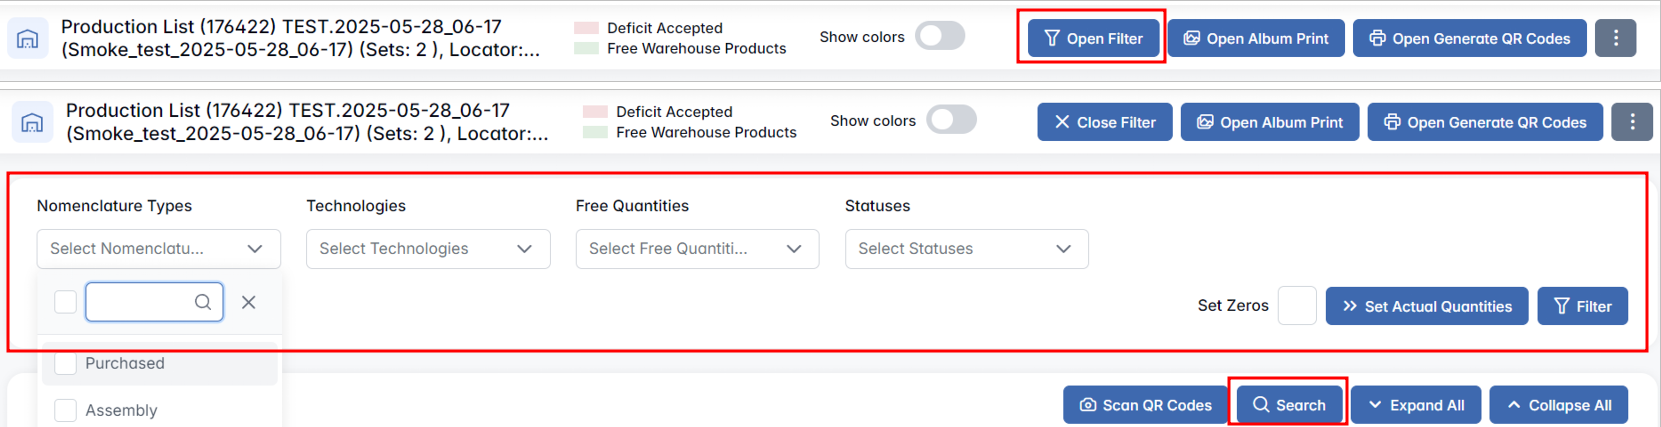
- Nomenclature Types - Select specific types of items
- Technologies - Filter by assigned technologies
- Free Quantities - Choose based on the available free stock
- Statuses - Filter by current item status (e.g. Not Processed, Deficit, Completed)
Press "Filter" to update the visible list accordingly.
Set Actual Quantities (Auto Mode)
This button is used to automatically assign available stock to the production list for all currently filtered items or sets. It helps speed up the reservation process based on current availability in the warehouse.
When clicked, the system will prompt the user with the message: "Relocate item to Production List?", offering options:
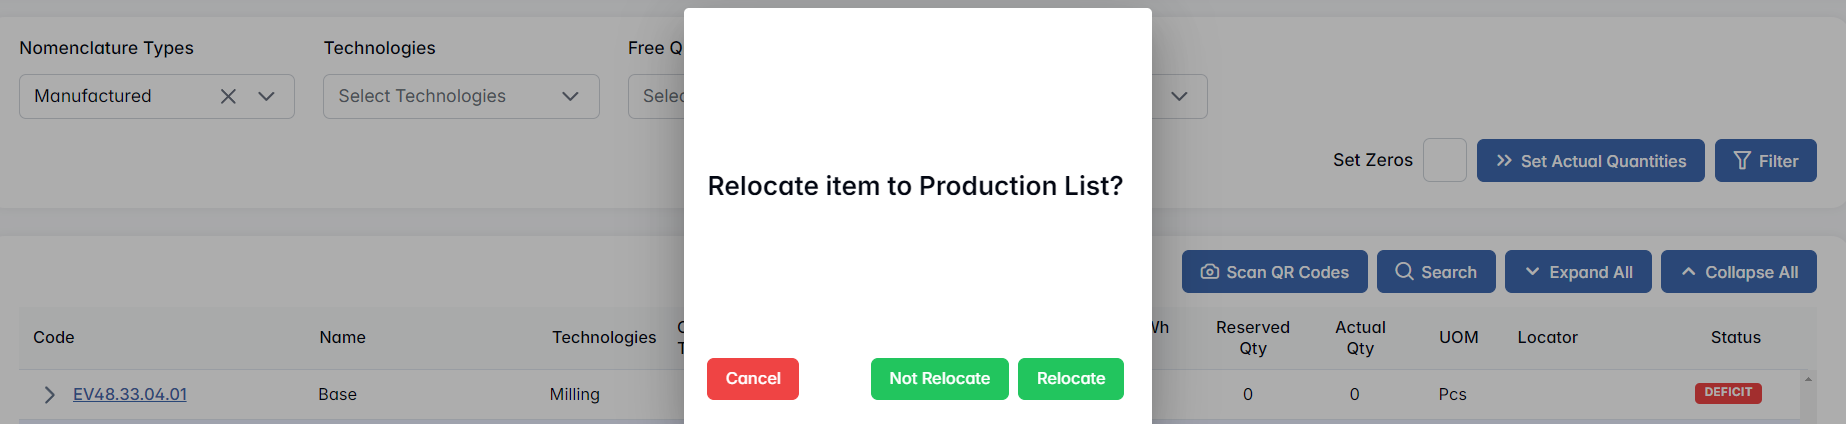
- Not relocate - registers the quantity without moving it physically (reservation only)
- Relocate - reserves and assigns the quantity to a specific locator, preparing it for production
Applies only to filtered (visible) items.
Hierarchy Handling in Batch Actions
When applying auto-assignment in bulk, the system considers parent-child relationships between assemblies and components.
If a parent assembly is marked as Completed, then:
- Its child items are skipped from processing
- If a child item was already reserved, its reservation is canceled
- If a child item was linked to an order, the order is preserved, but disconnected from the production list and plan
Multi-Technology Selection Logic
If a manufactured item supports multiple production technologies, the system checks them in reverse order (latest first). If any technology has enough stock, it is selected, and the item is marked as Completed with that technology. The chosen technology is displayed in the Current Technology column.
Set Zeros
Below the filters, there is a Set Zeros checkbox. Enabling this option tells the system to consider even non-zero stock items as needing to be re-ordered. This is used when you intentionally want to request new items for this production list, regardless of existing available quantities.
Additional Behaviors for Items with Linked Orders
Some actions require user confirmation when the item is already associated with a procurement or manufacturing order. This ensures the integrity of links between warehouse stock and planning modules.
Cancel Actual Quantity (with linked orders)
If the item you are trying to cancel is already linked to an ongoing order, the system will display a confirmation dialog before proceeding.
Upon confirmation, the link between the item and the related order will be removed, and the reserved quantity will be released.
This prevents accidental unlinking of items from ongoing procurement or production workflows and ensures the user is aware of the implications.
Set Actual Quantity (with existing reservation/order)
If the item already has an existing reservation or is part of a confirmed procurement order, performing a new reservation will also prompt the user with a confirmation modal.
Modal Prompt: "This item already has an active reservation or order link. Do you want to override the existing one?"
If confirmed, the previous reservation or link will be overwritten with the new selection. If canceled, the existing setup remains unchanged.
Production Requests
Production Requests
The Production Requests section in the BINU ERP system is designed to manage the internal flow of warehouse items requested by the production department. This module ensures that the right components, sub-assemblies, or raw materials are prepared and delivered to the production in a timely and organized manner. Each request reflects a formal material need generated after an order is created within a production list or manual (service) order. Warehouse staff use this module to identify the required goods, locate them within the warehouse, and prepare them for release. Once collected, items are physically transferred to production and marked as completed in the system, ensuring full traceability of the process.
This module is essential for:
- Coordinating the release of components from warehouse to production
- Tracking item quantities and their physical locations
- Ensuring accountability through user confirmation and digital sign-off
- Supporting QR-based workflows for faster item identification and tracking
Interface Overview
Upon entering the Production Request section, users are presented with a structured interface that includes a filtering panel and a dynamic data table. This layout helps users quickly locate and review production-related item requests that need to be fulfilled by the warehouse.
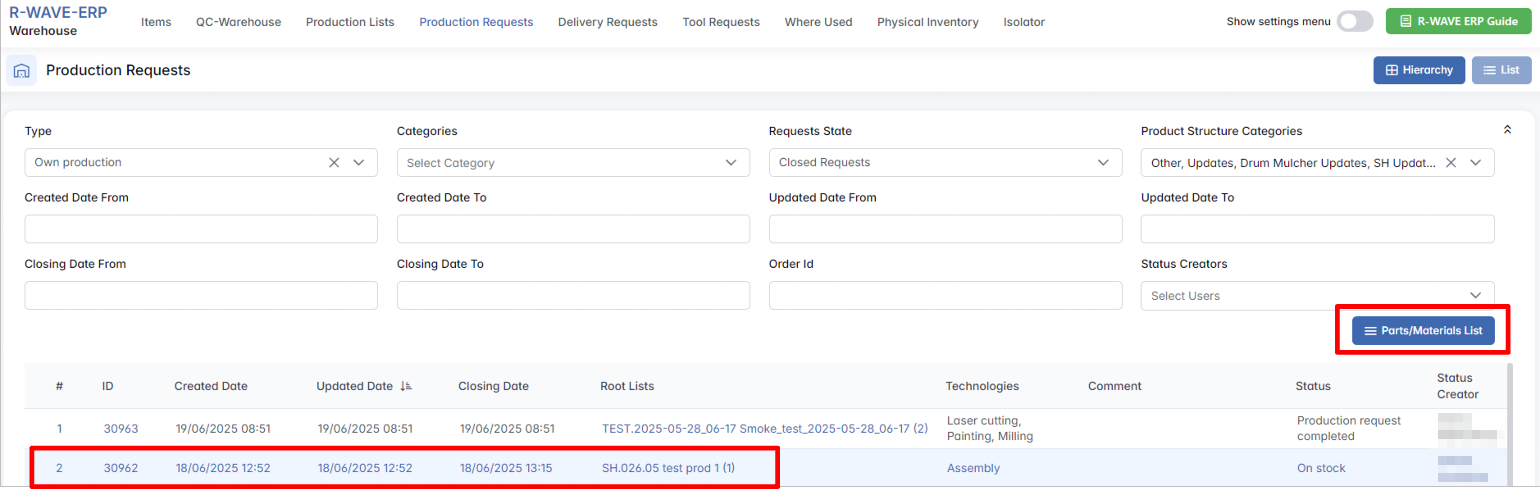
Filtering Panel
At the top of the screen, a filter tab allows users to narrow down the list of production requests using the following fields:
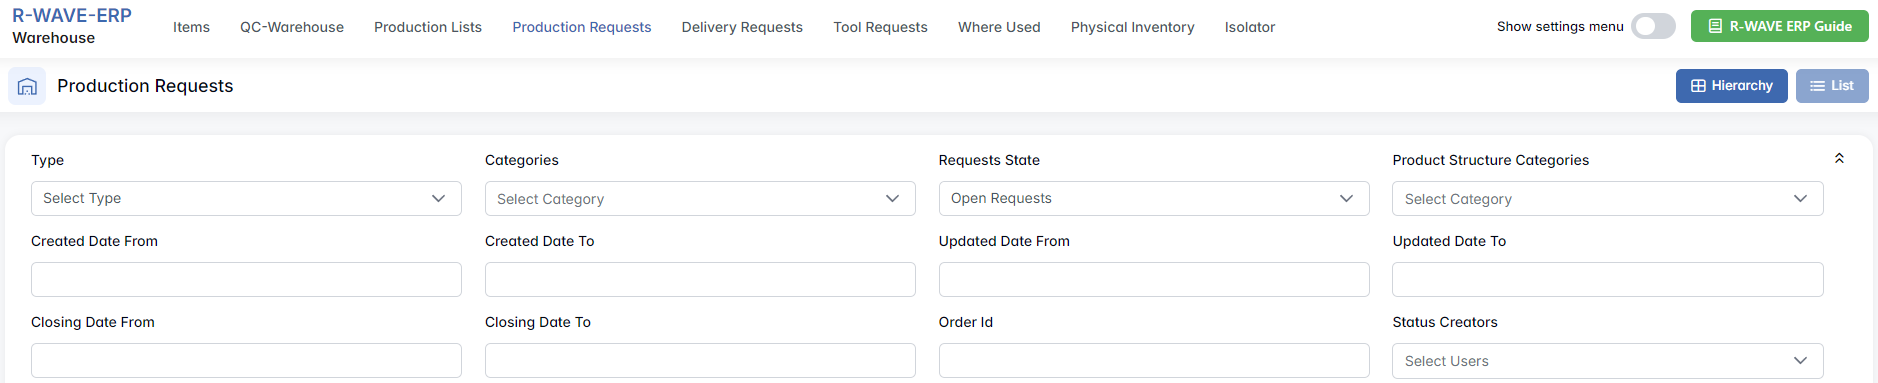
- Type - Specify the type of production (e.g., own or outsource).
- Categories - Narrow the results by selecting a structural category.
- Requests State - Define whether to show open, closed requests.
- Product Structure Categories - Refine results based on product structure classification.
- Created Date From / To - Set a time range for when the request was created.
- Updated Date From / To - Filter based on the last update date.
- Closing Date From / To - Filter based on when the request was officially closed.
- Order ID - Search for a specific request tied to a particular production order.
- Status Creators - filter by the user who currently holds the active status of the request.
This panel is especially useful for production planners and warehouse teams to quickly identify pending requests based on urgency, date, or item category.
Request Table
Beneath the filter tab, a table of records displays all production requests matching the defined filters. Each row represents one unique production request and includes the following columns:

- ID - Internal ID of the production request (sortable)
- Created Date - Date when the request was initially made (sortable)
- Updated Date - Date of the most recent change to the request (sortable)
- Closing Date - The date when the request was officially completed or closed
- Root Lists - Associated production list
- Technologies - Related technology or production group (if defined)
- Comment - Internal notes or comments tied to the request
- Status - Current active status
- Status Creator - The user who currently holds the active status of the request
Sorting functionality is available on selected columns (e.g., ID, Created Date), allowing users to reorganize the list based on chronological or numerical order.
The Root List is clickable and redirects the user to the Manufacturing module, displaying the corresponding Production Plan and its related steps and status.

Navigating to Request Details
Once a user selects a row from the table, the Parts/Materials List button becomes active. Clicking this button leads to the detailed view of the selected request, where the warehouse staff can review required items, their warehouse locations, and prepare them for transfer to production.
Parts/Materials List
When the user selects a row from the main request table and clicks the Parts/Materials List button, they are redirected to a detailed view of the selected production request. This page provides both high-level metadata and a breakdown of all requested components, sub-assemblies, or materials that need to be delivered from the warehouse to production.
Header Section
At the top of the screen, users will find request metadata and action buttons:

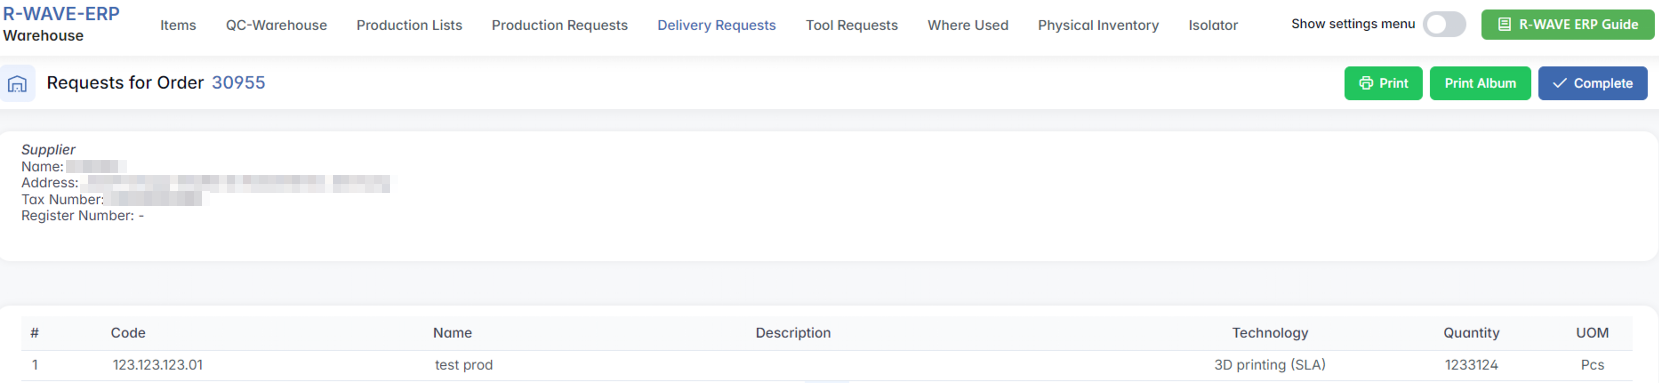
- Requests for Order [Order ID] - Indicates the associated order (e.g., 30962).
The Order ID is clickable: clicking it redirects the user to the corresponding Order page, where full order details can be reviewed (e.g., general info, associated PLs, linked invoices, etc.)
- Production Plan / Production List Reference - Shows connected Plan and PL codes
- Request Creation Date - Date and time when the request was created
- Creator - The name of the user who initiated the request
- Color coding provides quick visual feedback:
- Green: Scanned - Item has already been scanned and processed
- Red: Item was added to the request after its initial creation and hasn’t been scanned yet.
Print and Utility Actions
To the right of the header, several functional buttons are available:
- Lead Date & Status - Opens/modifies deadline and request status
- Open Album Print - Opens images and allows printing associated visual materials
- Open QR Generation - Generates QR codes for the items in the request (used for scanning during picking)
- Complete - Marks the entire request as fulfilled and officially sent out from the warehouse (after items have been picked, confirmed, and signed)
- Cancellation - Used when items are being returned to the warehouse after partial or full withdrawal from production.
This removes the request’s active signature(s) and cancellation indicators from the UI, but the historical data remains stored in the system - including signed items and their list.
- Go to Order - Direct link to the parent production order
- Signature - Opens a dialog for user confirmation (signature) once the request is processed
Table of Requested Items
Below the header section, users will find a dynamic table listing all requested materials or parts. Above the table, several operational buttons enhance usability:
- Enable Status of Scan - A checkbox that activates scan status tracking
- Selected Request - This dropdown appears only when one or more rows are selected and includes:
- Show Image - View the visual of the requested item
- Mark as Scanned - Tag the item as successfully picked
- Cancel - Removes the visual signature marks and returns the item back to the warehouse.
- Scan QR Codes - Launches QR scanning interface to streamline picking
- List / Hierarchy / Detailed Hierarchy - Toggle between flat list, grouped view, or tree-structured breakdown
Columns in the Table:

| Column_(* - sortable fields)_ | Description |
|---|---|
| ID* | Unique system ID of the request item. |
| Created Date* | Date the item was added to the request. |
| Code* | Unique item code. |
| Name* | Item name. |
| Serial Number | Shows serial icon if the item requires tracking. |
| Technology | Associated production technology (if applicable). |
| Required Quantity* | Needed quantity. If shown as 0 (1) - it means that 0 units are still needed, while 1 unit was originally required. |
| Locator* | Assigned warehouse location (e.g., Main WH Logatec). |
| UOM | Unit of Measure (e.g., pcs). |
| Reserved Quantity | Quantity that has already been reserved in stock. |
Technical Equipment Table
If the request includes technological equipment (tools or machinery required during production), a separate section below the main item table will display them.
However, if no such items exist, the section displays: No Records Found
This ensures separation of materials and reusable tools within the same request.
Delivery Requests
Delivery Requests
The Delivery Requests section in the BINU ERP system manages the outbound flow of items from the warehouse to external recipients, such as customers or outsourcing partners. It ensures that all materials designated for delivery are properly prepared, verified through Quality Control, and released according to procedure.
This module supports multiple delivery workflows, including:
- Delivery to customers (based on sales chains)
- Outsourcing materials delivery
- RMA Return (Return Merchandise Authorization)
- Ordered Items Delivery
Once a delivery request is prepared, it must be confirmed through Quality Control. After the QC process is complete and the request is signed off, the actual delivery can proceed.
Interface Overview
Upon entering the Delivery Requests module, users are presented with a filter panel to narrow down the visible requests. The following filters are available:
- Requests State - Filter between Open and Closed delivery requests
- Created Date From / To - Define a creation date range
- Closing Date From / To - Define a closing date range
Beneath the filters, the interface is divided into four tabbed subpages, each representing a different type of delivery flow. Each tab contains a structured table of delivery requests relevant to that category.
Subsections & Tables
1. Delivery to Customers
The Delivery to Customers tab manages the shipment of finished sold goods to external clients as part of sales agreements. This subsection plays a crucial role in ensuring timely, accurate, and traceable order fulfillment.
Each row in the table corresponds to a delivery request linked to a Sales Chain and a specific customer. The table includes columns such as:

Once a user selects a row in the table, the Parts/Materials List button becomes active, allowing access to item-level operations for that specific delivery.
When accessing the Parts/Materials List, the user is taken to the Requests for Delivery Chain #[number] page. This screen provides comprehensive delivery details.
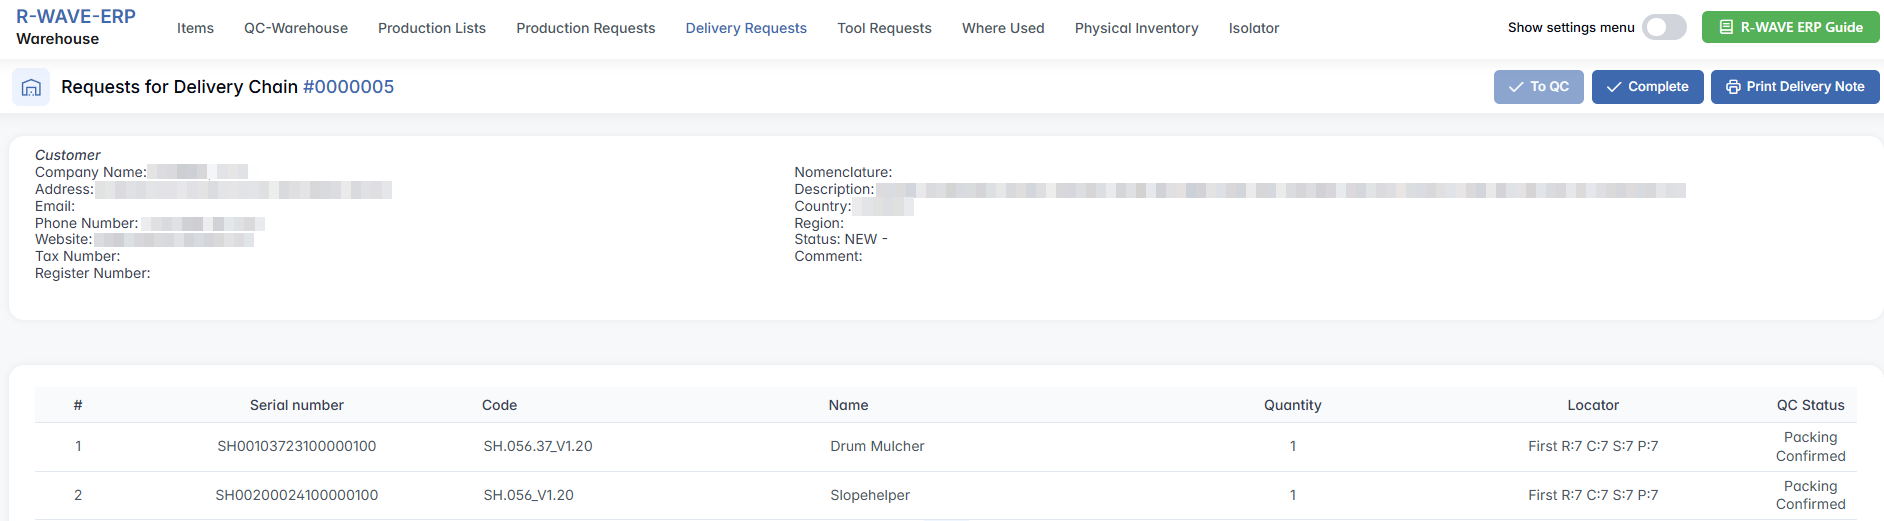
The QC Status column reflects the current condition of the item before final shipment.
In the top-right corner of the screen, the following action buttons are available:
- To QC - Sends the prepared items for final quality control approval before dispatch.
- Complete - Finalizes the request and marks it as closed. Upon completion, the listed items are officially written off from the warehouse and considered transferred to the production process.
- Print Delivery Note - Generates a printable delivery document for physical or digital shipment processing.
This interface ensures that all necessary steps - from preparing the shipment to validating item status and printing documents - are executed efficiently and traceably.
2. Outsourcing Materials Delivery
The Outsourcing Materials Delivery tab is dedicated to managing the shipment of components or raw materials to external subcontractors. These deliveries are typically part of an outsourcing workflow, where certain production steps (e.g., galvanization, surface treatment, or part machining) are delegated to third-party partners. Each row in the table represents a delivery request tied to a specific production order and outsourcing partner.

As with other delivery types, selecting a row activates the Parts/Materials List button. Clicking this button opens the detailed page titled Requests for Order #[number], where the outsourcer’s details (address, email, tax number) are displayed in the header section.
At the top of the page, the status labels appear in color:
- Green - Scanned (items confirmed for delivery)
- Red - Item was added to the request after its initial creation and hasn’t been scanned yet.

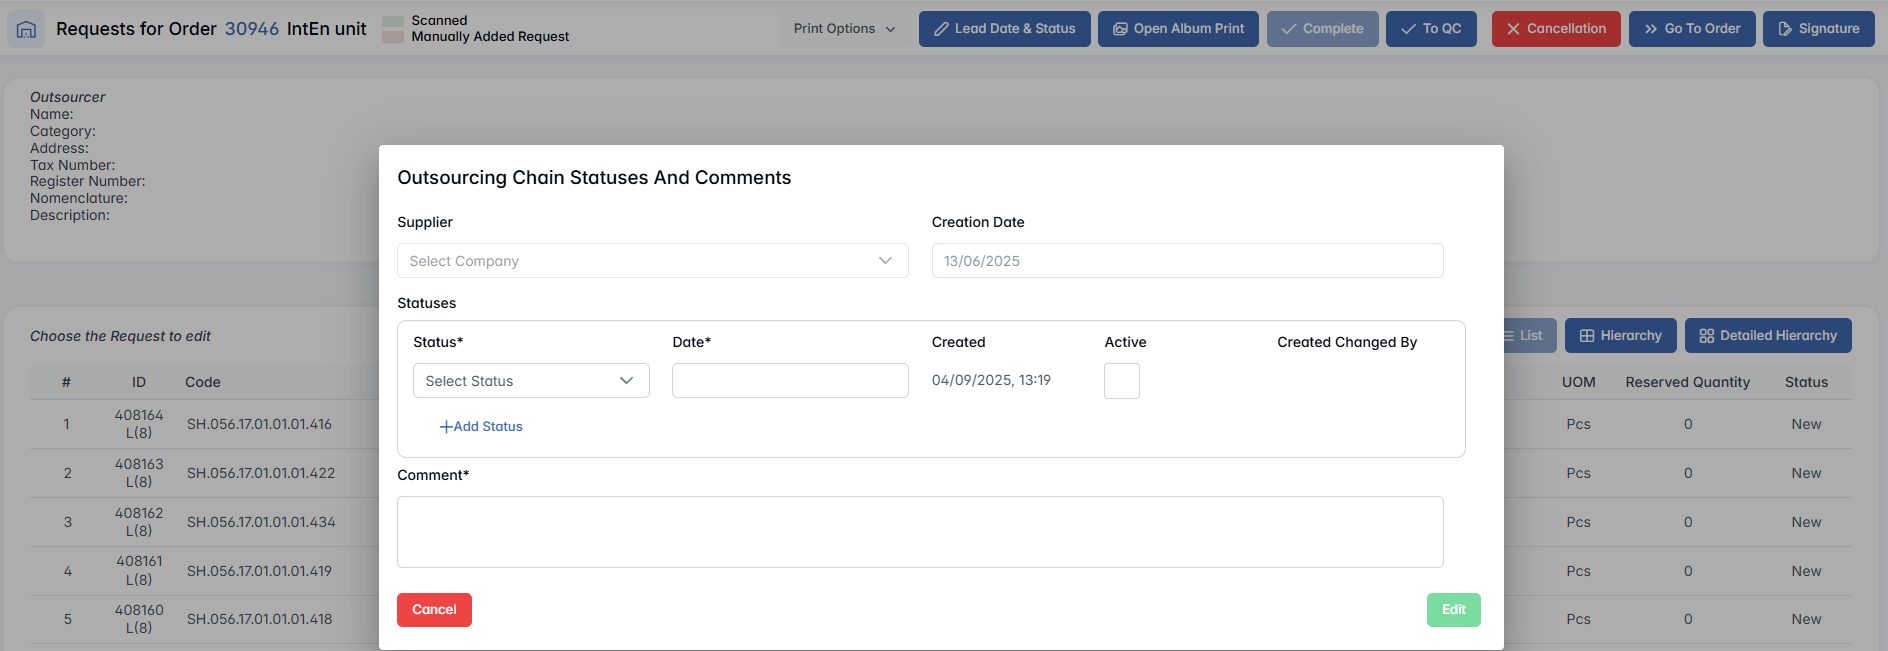
Next to the header, several action buttons are available:
- Print Options - Includes multiple formats: Print (default), Print Grouped by Order Product, Print List of Ordered Items
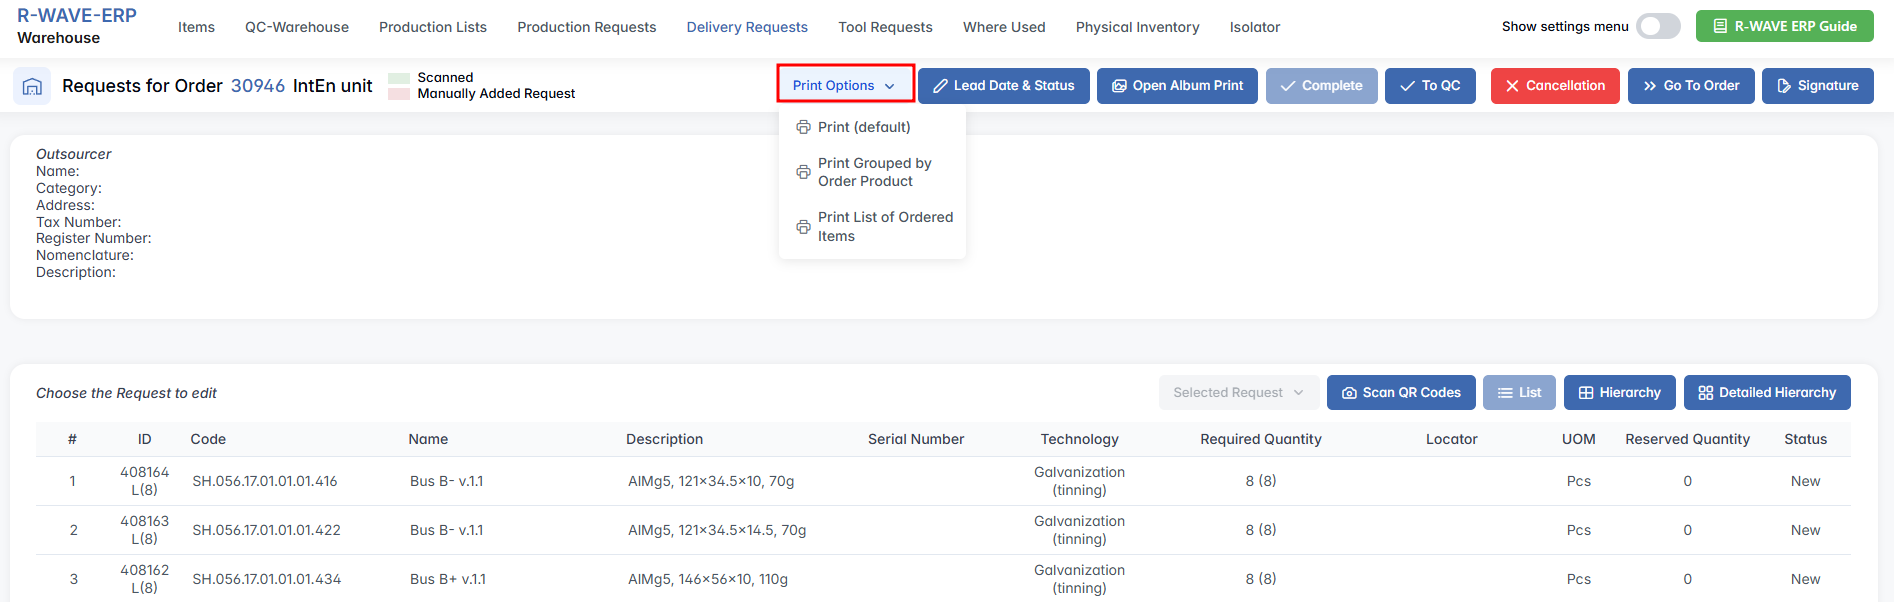
- Lead Date & Status - Define expected delivery timing and status updates
- Open Album Print - Preview or print attached images
- Complete - Finalizes the delivery request and marks it as closed. Items included in the request are written off from the warehouse as part of the outsourcing shipment to the subcontractor
- To QC - Send items for quality verification before shipment
- Cancellation - Cancels the request and rolls back the delivery. Any items that were marked as sent are returned to the warehouse digitally; digital signatures and item history remain preserved in the system for reference
- Go to Order - Redirect to the full outsourcing order page
- Signature - Record delivery signature confirmation

Additional tools are available:
- Selected Request - Activated when at least one item is selected; allows actions such as Show Image and Cancel
- Scan QR Codes - For tracking items via QR during physical processing
- List/Hierarchy/Detailed Hierarchy - Toggle between different views for better item navigation
3. RMA Return
The RMA Return tab manages the process of returning goods to suppliers, typically due to defects, quality issues, incorrect deliveries. This function supports the Return Merchandise Authorization (RMA) workflow, enabling returns to be properly documented, traceable, and compliant with supplier agreements.

Once a record is selected, the Parts/Materials List button becomes active. Clicking it opens a detailed return overview titled Requests for Order #[number], where the order ID itself is clickable and redirects to the full order page for reference.

The following action buttons are available:
- Print - Print the current RMA request
- Print Album - View or print any attached images related to the return
- Complete - Finalizes the RMA request. The returned items are removed from the Isolator and considered processed for return to the supplier. This action also closes the return workflow for this request
- To QC - Optionally forward the items to quality control for inspection prior to return
- Go to Order - Direct link to the original order page, enabling full traceability
The system displays a list of returned items in a table:

This view ensures a structured and controlled return process, supporting both operational efficiency and supplier accountability.
4. Ordered Items Delivery
The Ordered Items Delivery tab displays items that are expected to be delivered from external suppliers as part of a procurement process.

Each record in the table corresponds to a delivery request tied to a procurement or outsource order. Selecting a row activates the Parts/Materials List button, which opens the item-level overview for that particular order.
Upon clicking Parts/Materials List, the page titled Requests for Order #[number] is displayed. The order ID is shown as a clickable link, allowing the user to view the full order page, including all associated documentation, items, and invoices.
In the upper-right corner of the screen, users have access to action buttons:
- Print - Print the current delivery request
- Print Album - View and print any attached documentation or product images
- Complete - Finalize and close the delivery process
This module ensures that all internally procured items are efficiently transferred and documented, closing the procurement loop and enabling traceable delivery to their operational destination.
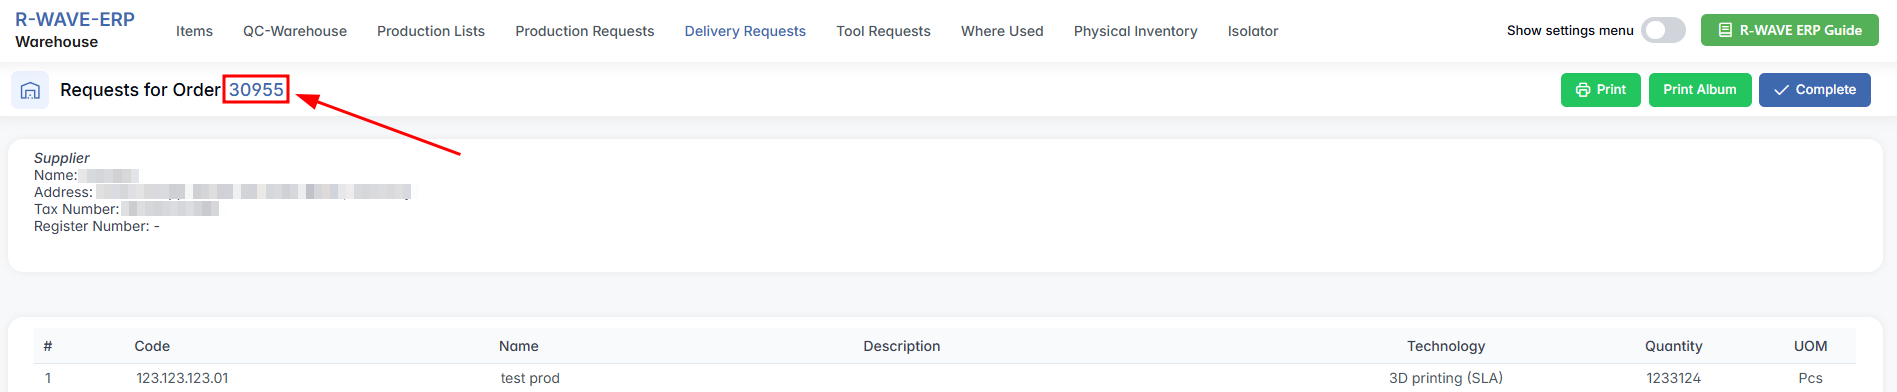
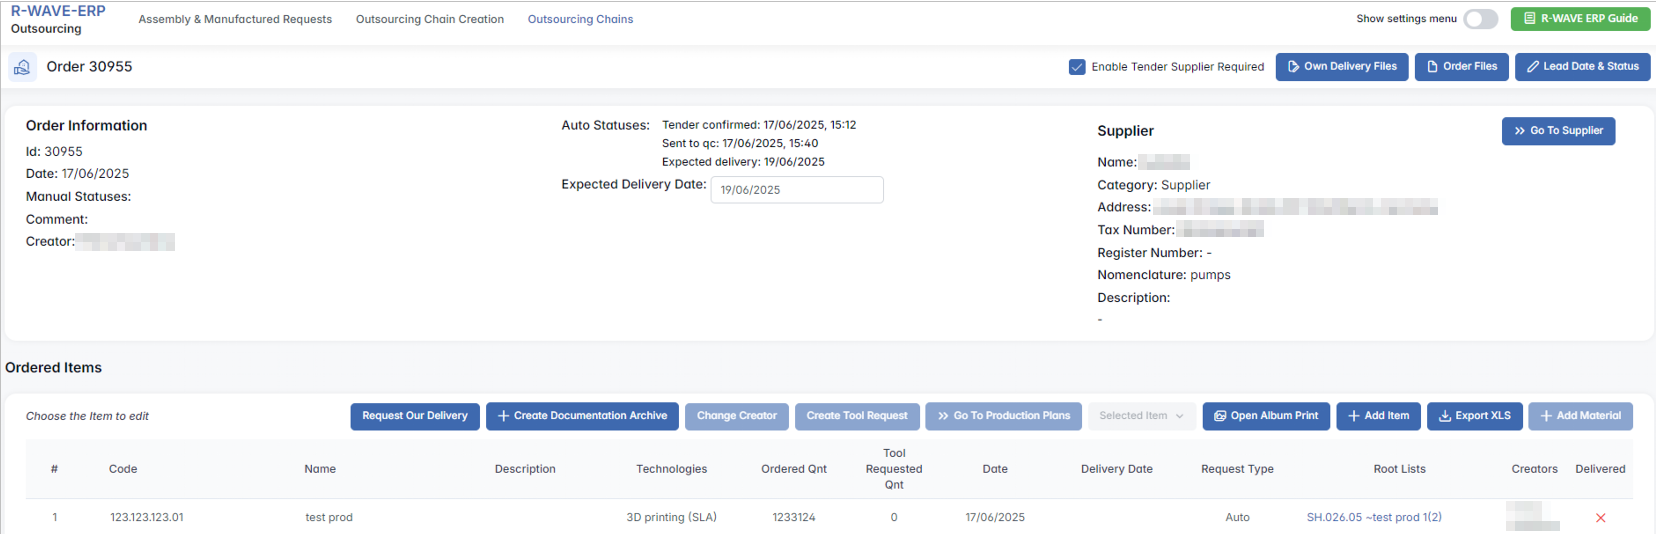
The Order ID (e.g., 30955) is clickable - clicking it redirects the user to the related Outsourcing Order page, which includes: Order Information, Ordered Items, Parts/Materials List, Technical Equipments, Invoices, Payments, and other associated documents and data.
Tool Requests
Tool Requests
The Tool Request section allows warehouse and logistics personnel to manage internal requests for tools, materials, or consumables submitted by various departments or employees. Once these requested items are physically delivered and the request is completed, the items are automatically assigned to the corresponding department’s or employee’s locator. This ensures traceable handover and clear ownership of distributed tools.
This module supports:
- Fulfilling internal needs for tools and supplies
- Tracking item allocation to departments or individuals
- Streamlining the delivery and documentation process
Interface Overview
Upon opening the Tool Request menu, the user is presented with a filter tab to narrow down request records based on the following criteria:
- Created/Completed Date From / To
- Requests State (Open / Closed)
Beneath the filters, a records table is shown with the following sortable columns:
- ID - Unique internal ID of the request
- Area - Department or requesting team
- Locator - Target warehouse locator for delivery
- Creation Date/Completion Date
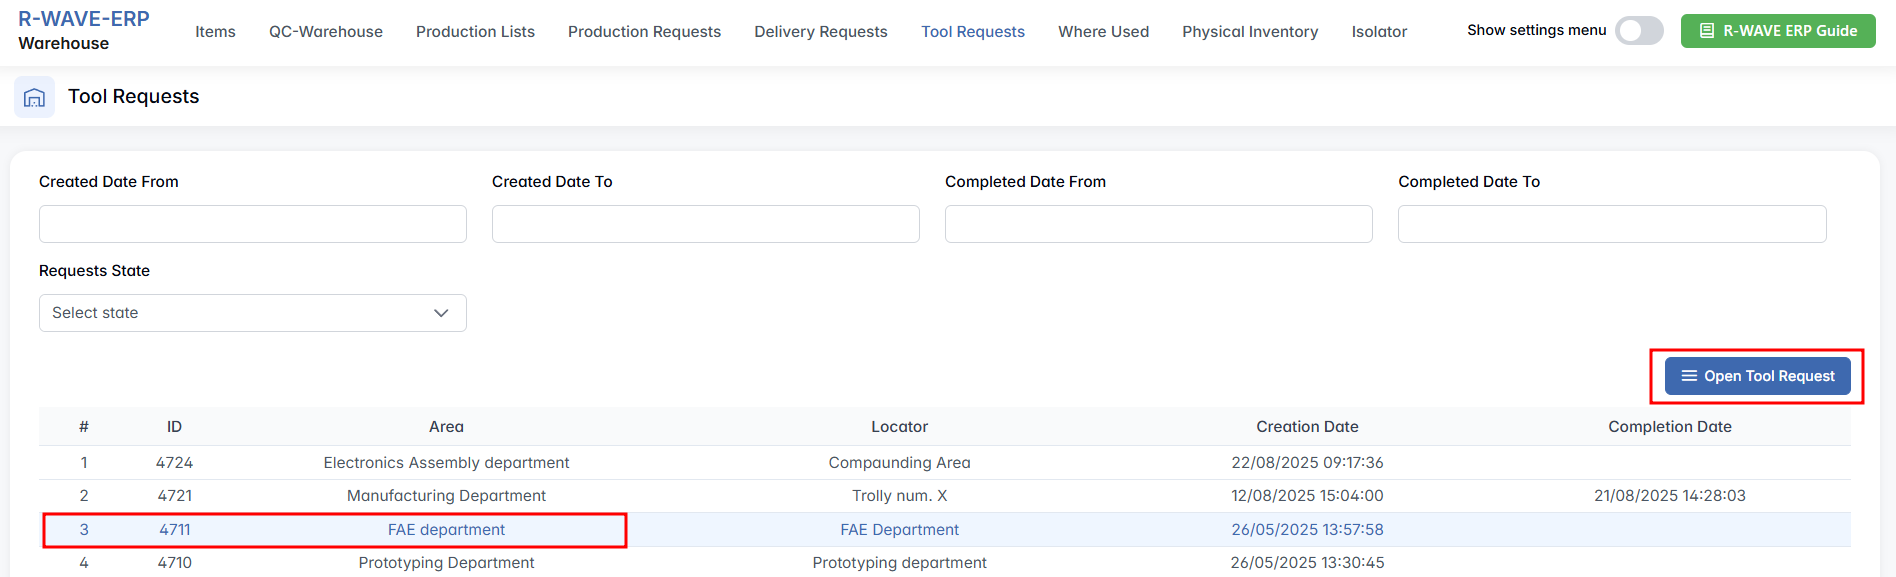
To proceed, the user must select at least one row. This enables the Open Tool Request button at the top of the interface.
Nomenclatures (Tool Request Details)
Clicking the Nomenclatures button opens the detailed view for the selected request. The title of the page reads:
Tool Request Order ID: [number] - Area: [department] - Locator: [locator name]

Available Actions
In the top-right corner, the following buttons are available:
- Complete - Finalizes the delivery and updates the inventory by transferring items from warehouse to the department locator
- Print - Generates a printable copy of the tool request, which can be used to help locate and identify items in the warehouse
When a row is selected in the table, an additional button appears:
- Show Image - Opens the item image to help visually identify the product
This section ensures internal tool distribution is documented, trackable, and easy to execute. Each completed request improves inventory accuracy and supports operational readiness across departments.
Requested In Orders field displays the Production Lists Procurement module - Order ID associated with the tool or material request. The number is clickable - clicking it redirects the user to the Procurement Order page, which contains full details, including: Order Information (general info, supplier, creation date, etc.), Order Items., etc.

Where Used
Where Used
The Where Used section allows users to trace where a specific item (nomenclature) is used across product structures. This is especially helpful for engineers, warehouse staff, or production planners who need to understand the dependencies of individual components-such as screws, electronic parts, or raw materials-within product structures.
This module is used to:
- Identify all assemblies or sub-assemblies that include a specific item
- Support decisions when replacing or updating a component
- Ensure proper planning during procurement or engineering changes
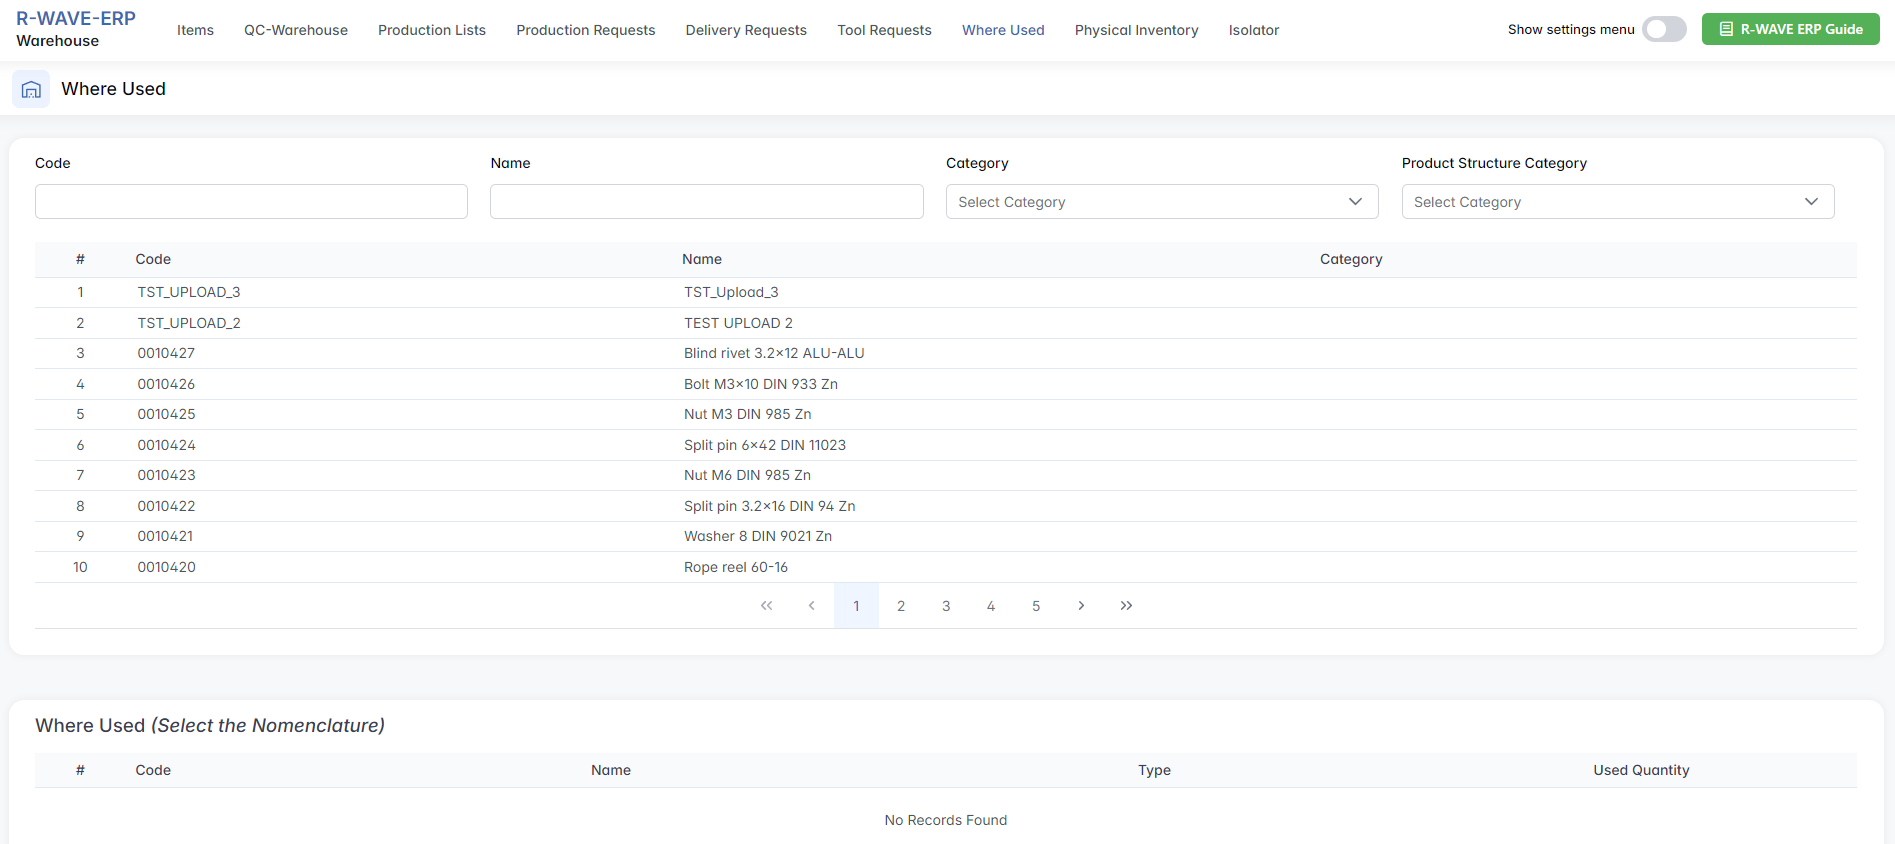
Interface Overview
When entering the Where Used section, the interface consists of two main areas:
1. Filter & Selection Table
At the top, you’ll see a filter tab designed to narrow down the list of items (nomenclatures) based on specific criteria:

Code - Unique item code
Name - Item name or partial name
Category - Multiple selection from the available nomenclature categories
Product Structure Category - Multiple selection from predefined structure categories
Below the filters, there is a table listing matching items with the following columns:
Code - Unique item code
Name - Item name
Category - Type or classification of the item
To proceed, the user must select one row from this table. For example, selecting row 5 with the Nut M3 DIN 985 Zn.

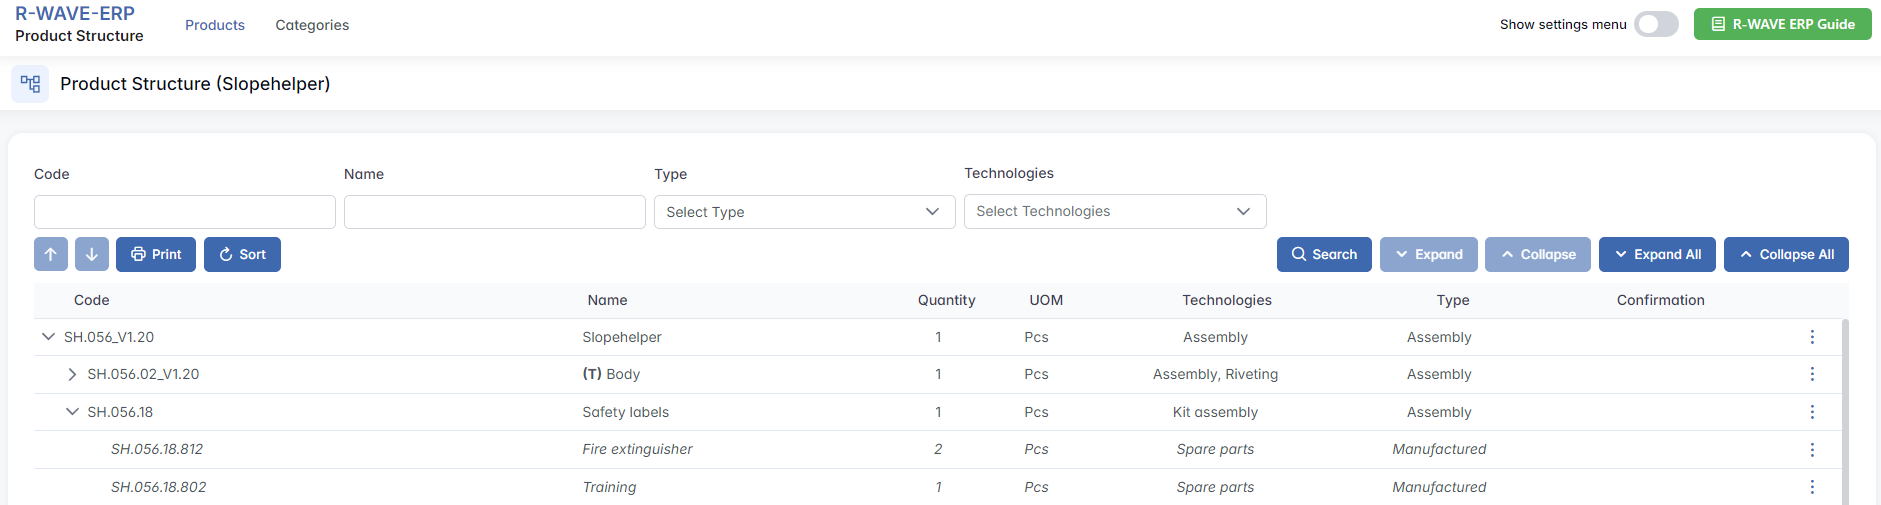
2. Where Used Table
Once an item is selected, a second table appears directly below, titled: Where Used Nut M3 DIN 985 Zn (0010425)

This table shows all assemblies or builds in which the selected item is used. The columns include:
Code - Code of the parent product or assembly
Name - Name of the product or assembly
Type - Indicates the record type (e.g., Assembly)
Used Quantity - Number of times this component is used in the parent product
If you click on the Code (e.g. SH.056_V1.20) in this table, the system will redirect you to the Product Structure page for that assembly. This allows you to explore the full build, see all components, and manage its structure directly.
Physical Inventory
Physical Inventory
The Physical Inventory section in the BINU ERP system is designed to help reconcile the actual stock in the warehouse with the quantities recorded in the ERP system. This ensures inventory accuracy, helps detect discrepancies, and keeps records up to date for future planning and operations.
This module is used to:
- Perform stock counts of selected warehouse locators
- Align digital records with real-life physical stock
- Add any missing items discovered during physical inspection
- Maintain full traceability of quantity corrections
Accessing the Module
When you navigate to the Physical Inventory menu, the main screen displays a filter tab and a results table. Filter fields include:
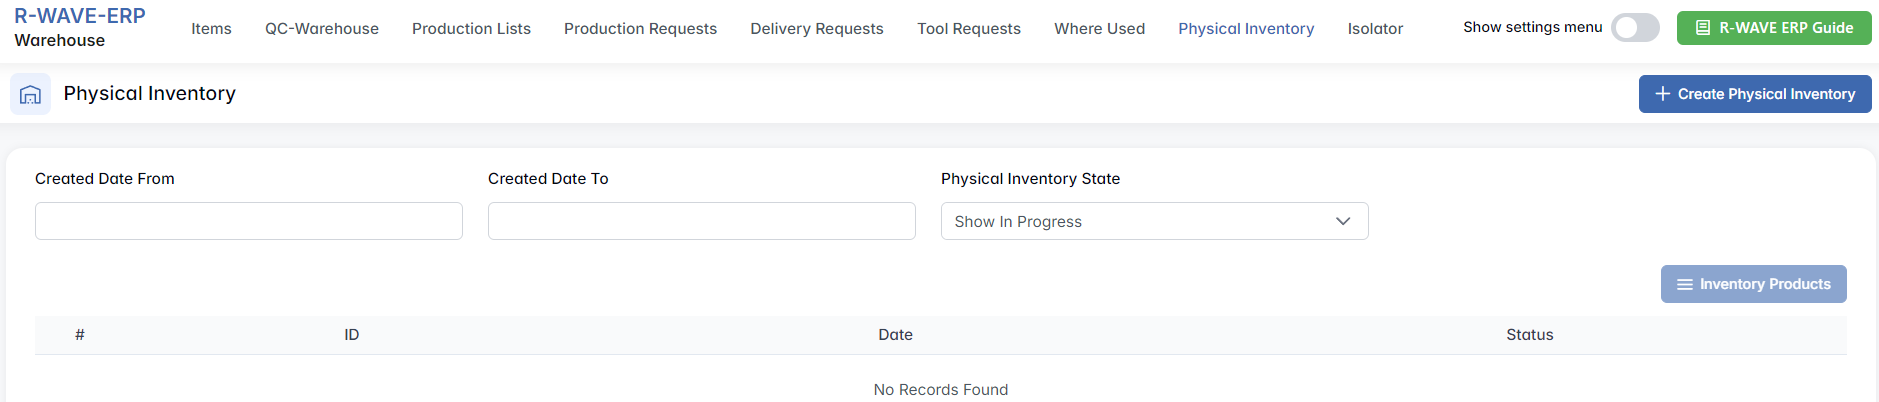
- Created Date From / To - to filter inventory sessions by creation date
- Physical Inventory State - to filter by status (e.g. Show Completed, In Progress)
Creating a New Physical Inventory
To begin a new inventory session, click the Create Physical Inventory button located in the top right corner. A dialog window will open, where you must select:
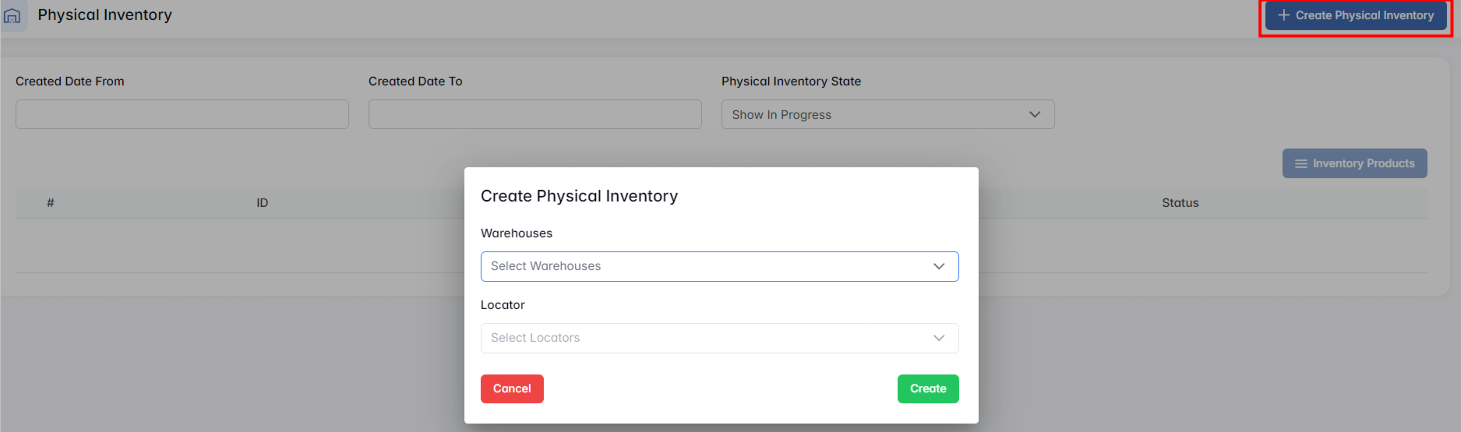
- Warehouses - Choose one or more warehouses where the inventory will take place
- Locators - After selecting the warehouse(s), pick the relevant locators (zones or shelves within a warehouse)
Once confirmed, the system will generate a list of all items currently recorded in those locators. Each item will display:
- Item code and name
- Technology (if applicable)
- Recorded quantity
- Field for entering the actual physical quantity
Your task is to inspect each item in the warehouse and update the entered quantity to match the real amount found on the shelf.
Physical Inventory Products of Warehouses
When the user selects an active inventory and clicks Inventory Products, the system opens a new page: Physical Inventory Products of Warehouses: [Warehouse Name]


This page shows all items currently stored in the selected locators and enables the user to update or verify quantities.
Filter & Category Panel
At the top of the screen, the user can filter inventory records using:
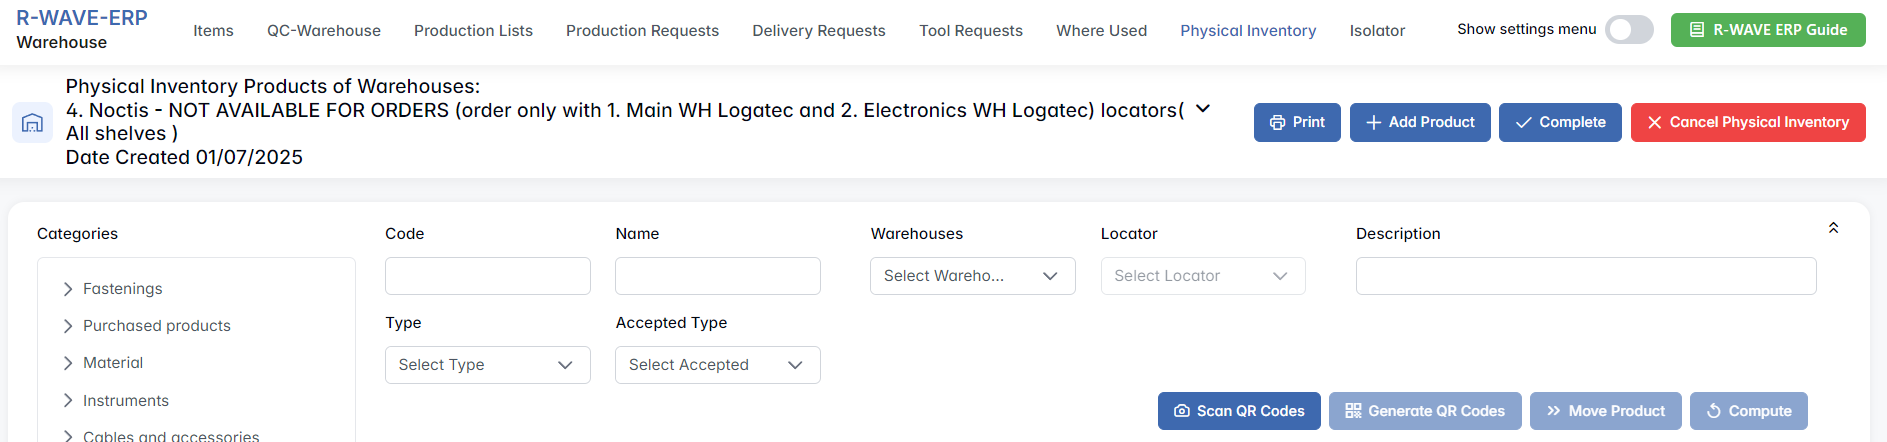
- Code, Name, Warehouse, Locator, Description
- Type and Accepted Type filters (dropdowns)
- On the left-hand side is a Categories panel with quick filters by item groups: Fastenings, Material, Electronics, Furniture, IT, Small tools, To Sort, etc.
Inventory Table Overview
Below the filter panel, the main inventory table is displayed with the following columns:

- Image of the item
- Initial Quantity (recorded in ERP)
- Entered Quantity
During the physical inventory process, the Entered Quantity is manually entered by the user. By default, this field displays the same value as the Initial Quantity. To update the Entered Quantity:
- Click directly on the number in the Entered Quantity column.
- A green check mark will appear next to the field.
- Enter the correct quantity and click the green check mark to confirm your entry.
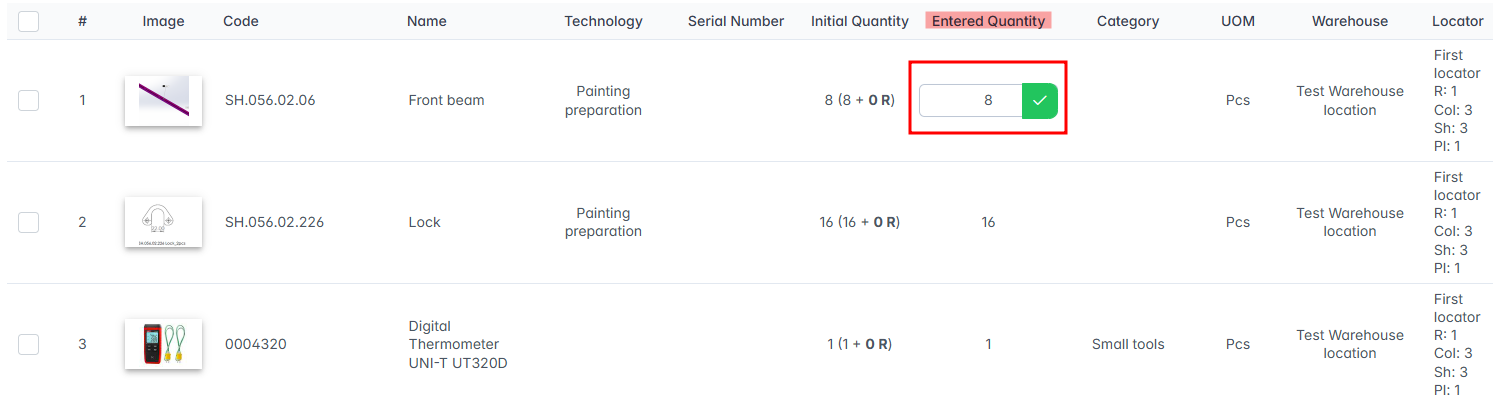
Note: This action is only available when the Physical Inventory State is set to "In Progress." Once the inventory is marked as "Completed," the Entered Quantity fields become read-only and can no longer be edited.
- Warehouse & Locator details
- Technology (if the item is manufactured or an assembly)
The Initial Quantity field may also show reserve stock (e.g. 13 (3 + 10 R)).
Actions and Buttons
Across the top of the screen:

- Print - generate a printable inventory document
- + Add Product - add a new item to the inventory list
- Complete - finalize the inventory when all quantities are entered
- Cancel Physical Inventory - discard the inventory session if needed
Below the filter area:
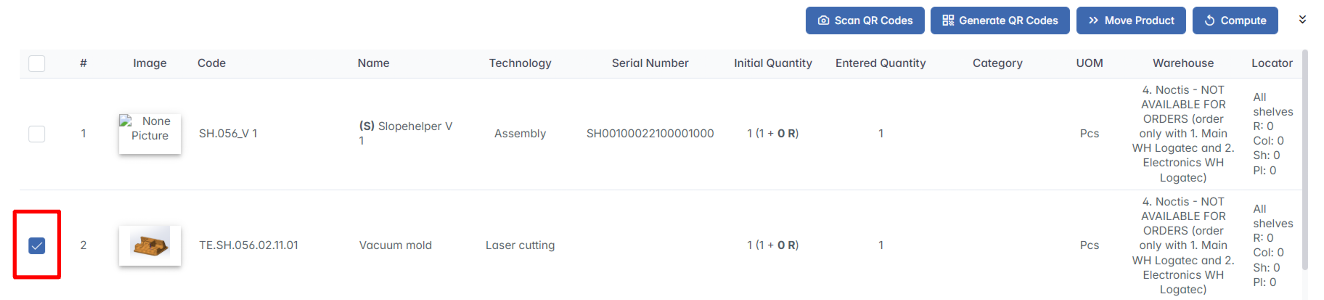
- Scan QR Codes - scan item barcodes with a scanner, tablet, or phone
- Generate QR Codes - create QR labels for printing
- Move Product - change locator assignment
- Compute - Marks the item as verified and processed during physical inventory.
To activate the Generate QR Codes, Move Product, or Compute buttons, the user must select at least one row from the inventory table.
This screen enables users to verify and correct ERP inventory records in a structured and traceable way, helping to ensure accurate stock levels and improve operational reliability.
Isolator
Isolator
The Isolator section in the BINU ERP system is dedicated to handling items that did not pass quality control. These items are separated into three distinct subcategories, based on their origin and handling options. The module allows users to manage, reclaim, write off, or redirect defective items, ensuring transparency and control throughout the process.
There are three subpages:
- Invoices Isolator
- Orders Isolator
- List of Defective Items
Invoices Isolator
This subpage manages items that arrived via procurement invoices but failed QC.
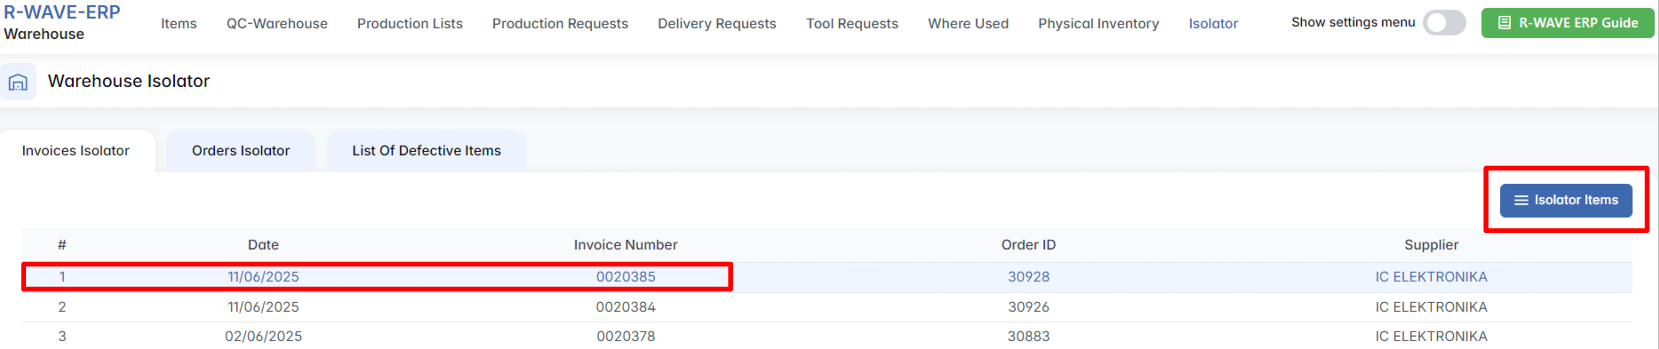
Once a row is selected, the Isolator Items button becomes active.
Invoice Isolator Items
When you open an invoice, the system shows a table of items that failed inspection:

RMA - Opens a window to send a Return Merchandise Authorization:
- Add comment in RMA Comment
- Upload or capture files/photos explaining the issue
- Click Send or Cancel
Write Off - Opens the Write Off Invoice Item window:
- Enter the Write Off Quantity
- Confirm by clicking Write Off
Orders Isolator
This subpage is used to manage defective ordered materials coming from internal production orders.

Selecting a row activates the Isolator Items button.
Order Isolator Items
Items that failed during or after internal production appear in a table:

Write Off - Opens the Write Off Order Item window:
- Enter the Write Off Quantity
- Confirm by clicking Write Off
Technical Equipment Subsection: If any defective technical equipment exists in the order, it will be listed below in a separate table.
List of Defective Items
This subpage handles items that are defective, left over, broken, or unreturnable - whether due to excess, damage, or administrative reasons.

Add New Defective Items
- Click Add Items to add items manually into the isolator.

- A pop-up window opens:
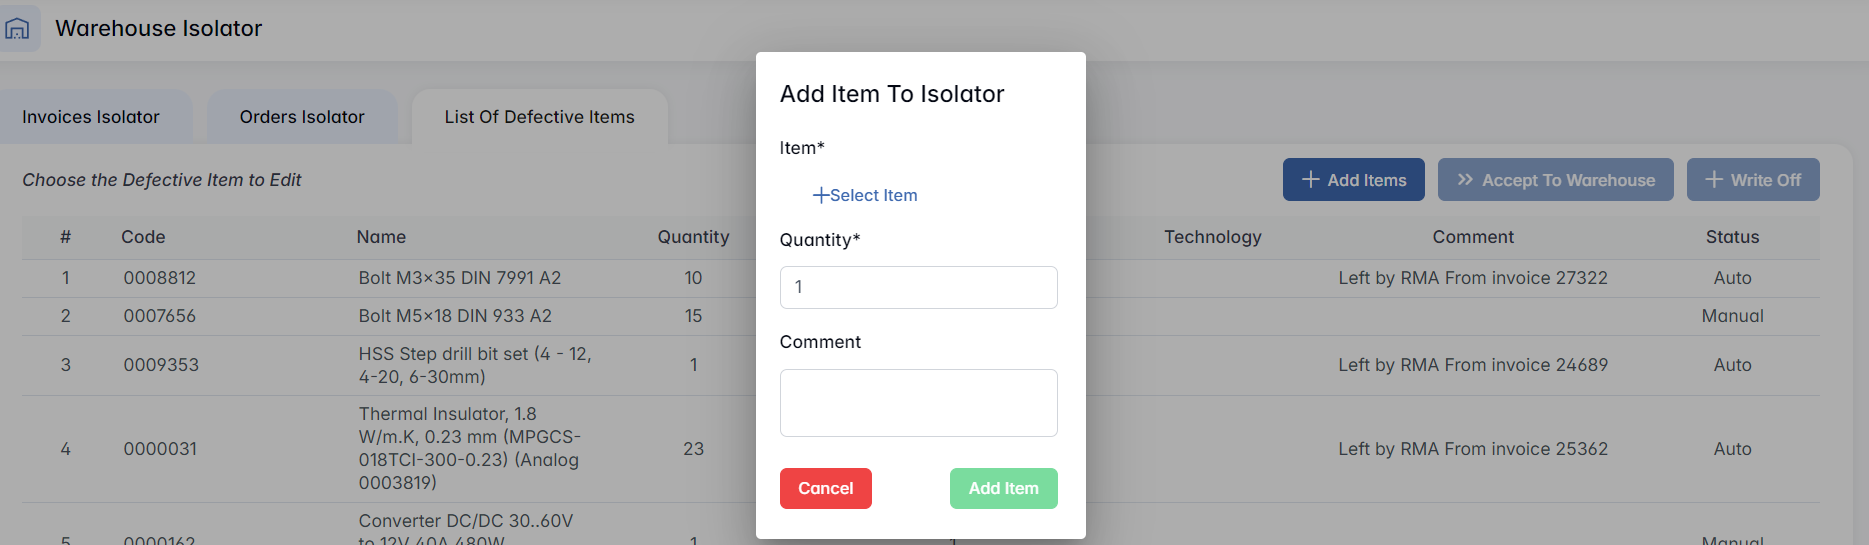
- Item - Select from the item list (filter by Code, Name, Type)
- Choose the desired item and click Select Item
Defective Items Table
This table displays defective, excess, or rejected items that have been detached from their original invoice. he Status column indicates how the item was added:
- Manual - added manually by a user
- Auto - automatically added by the system by RMA
Selecting a row activates the Accept to Warehouse and Write Off button.

Accept to Warehouse - Opens a window to redirect items into stock:

- Select Locator from dropdown
- Enter Quantity
- Click Accept
Write Off - Opens a write-off window:

- Enter Write Off Quantity
- Click Write Off
Hidden Settings in the Warehouse Module
Hidden Settings in the Warehouse Module
The Warehouse module includes a Hidden Settings Menu, which can be accessed by enabling the Show settings menu toggle switch located in the top-right corner of the screen.

Once activated, four additional configuration sections become visible:

- Warehouses
- Categories
- Units of Measure
- Material Types
These settings allow administrators to configure and manage key warehouse parameters, ensuring clean and structured data across all inventory operations.
1. Warehouses
This section displays a table of all existing warehouse locations, each with its name and description.
Viewing the List of Warehouses
Each row in the warehouse list contains:

Name - Full name of the warehouse.
Description - Additional context or usage notes.
When a user selects a row, the Selected Warehouse button becomes active, offering the following options:

- Locators - View and manage all locators within this warehouse.
- Edit - Open the Edit Warehouse popup to change the name or description.
- Remove - Permanently delete the selected warehouse.
Editing a Warehouse
A window titled Edit Warehouse opens.
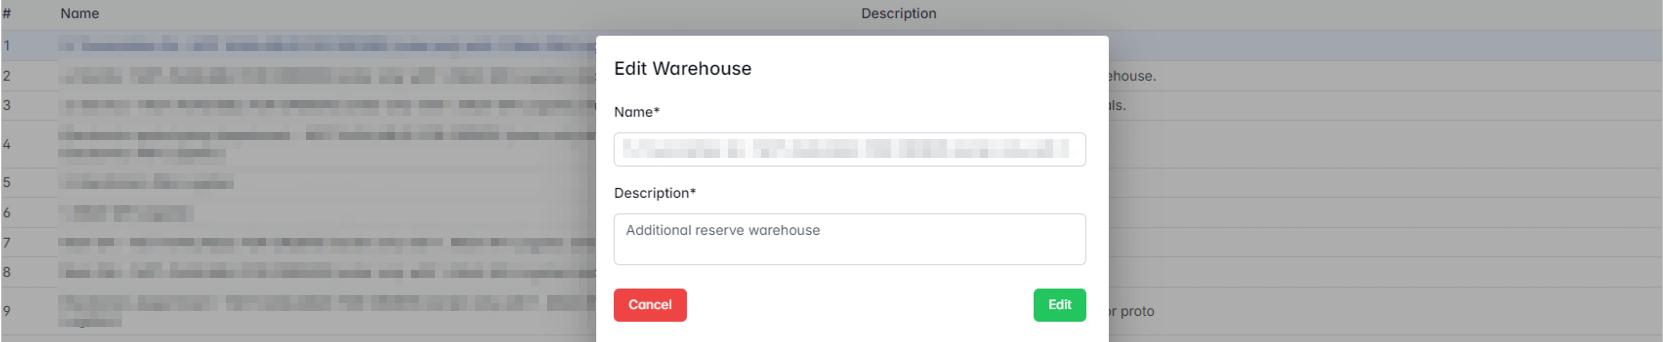
- Click Edit to save changes.
Creating a New Warehouse
- Click the + New Warehouse button in the top-right corner.
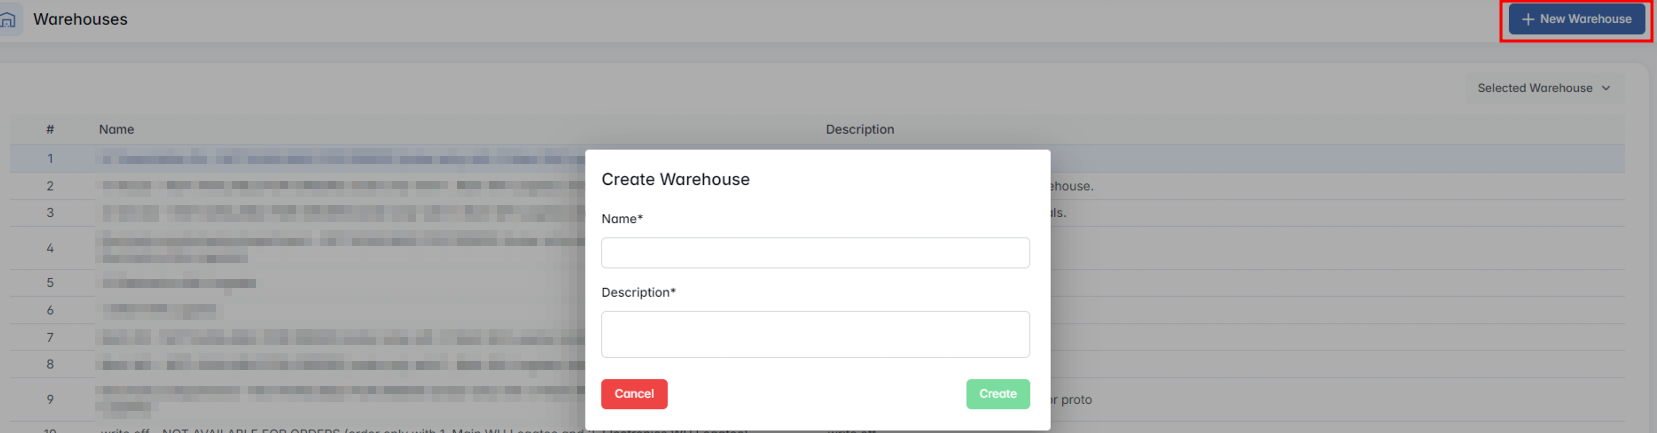
- Click Create to save the new warehouse.
Locators (Inside Warehouses)
When clicking Locators for a selected warehouse, a new page opens titled: Locators (Warehouse: [Warehouse Name])
This page lists all physical locator positions inside the selected warehouse, showing their grid coordinates and descriptions.

When a row is selected, the Selected Locator button is activated with two options:

- Edit - Opens a window to update locator details.
- Remove - Deletes the locator from the system.
Editing a Locator
The Edit Locator window contains:
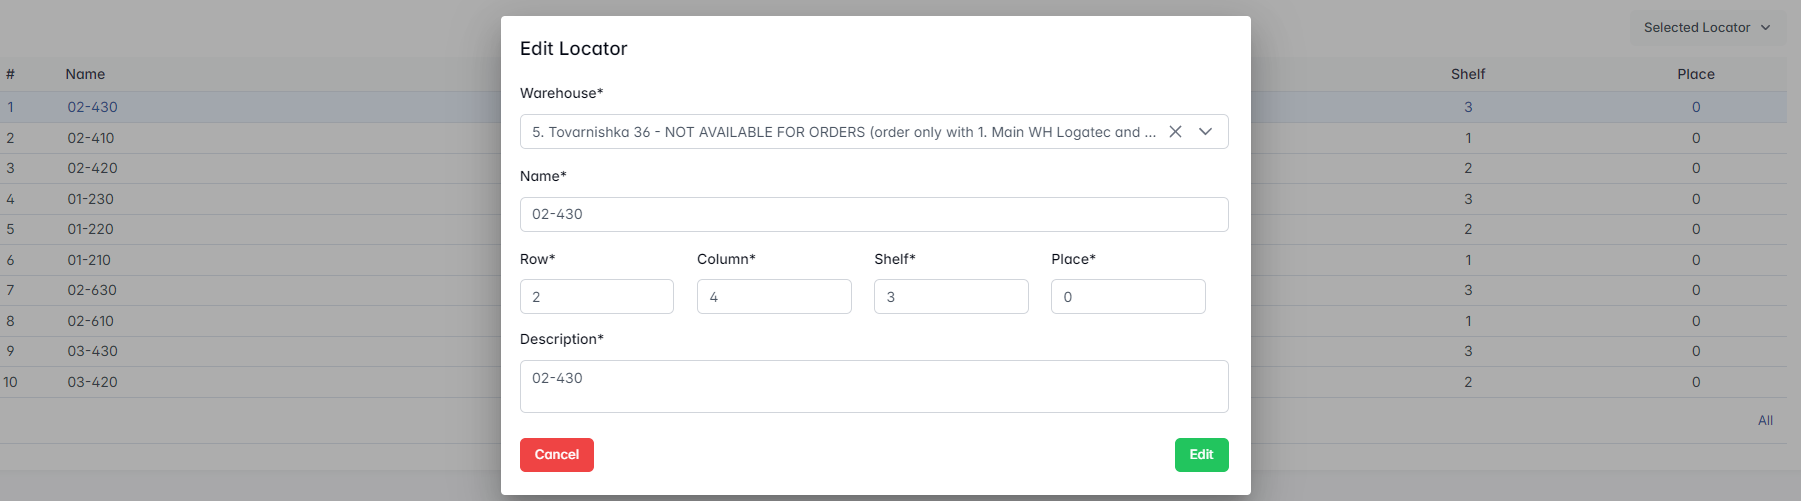
- Click Edit to save updates.
Adding a New Locator
To create a new locator:
- Click + New Locator
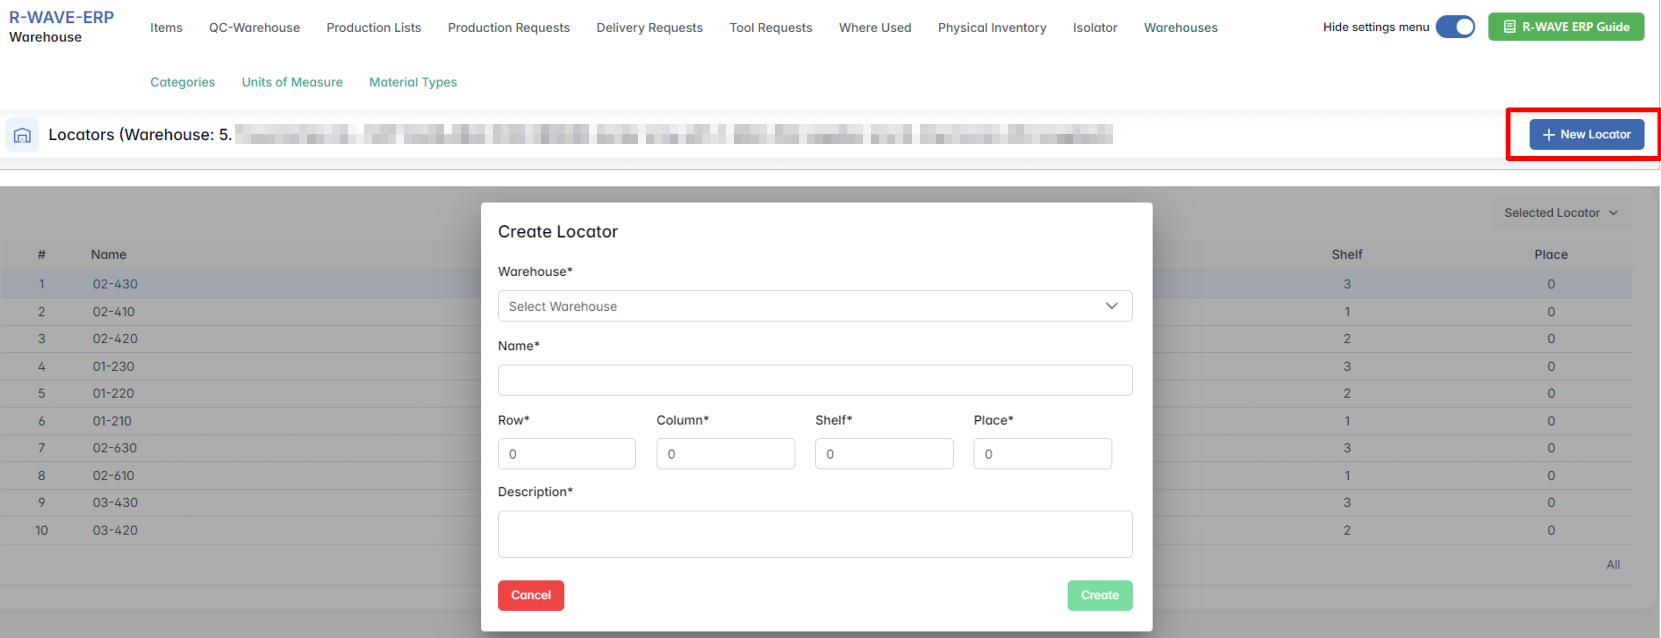
- Click Create to add the locator.
This setup ensures a structured and traceable layout of inventory positions within each warehouse.
2. Categories
This section allows to define and organize nomenclature categories within the warehouse system. Categories help classify nomenclature for easier filtering, grouping, and locating in reports, inventory, and operations.
Viewing Warehouse Categories
The Categories tab displays a hierarchical table of existing nomenclature categories, including:
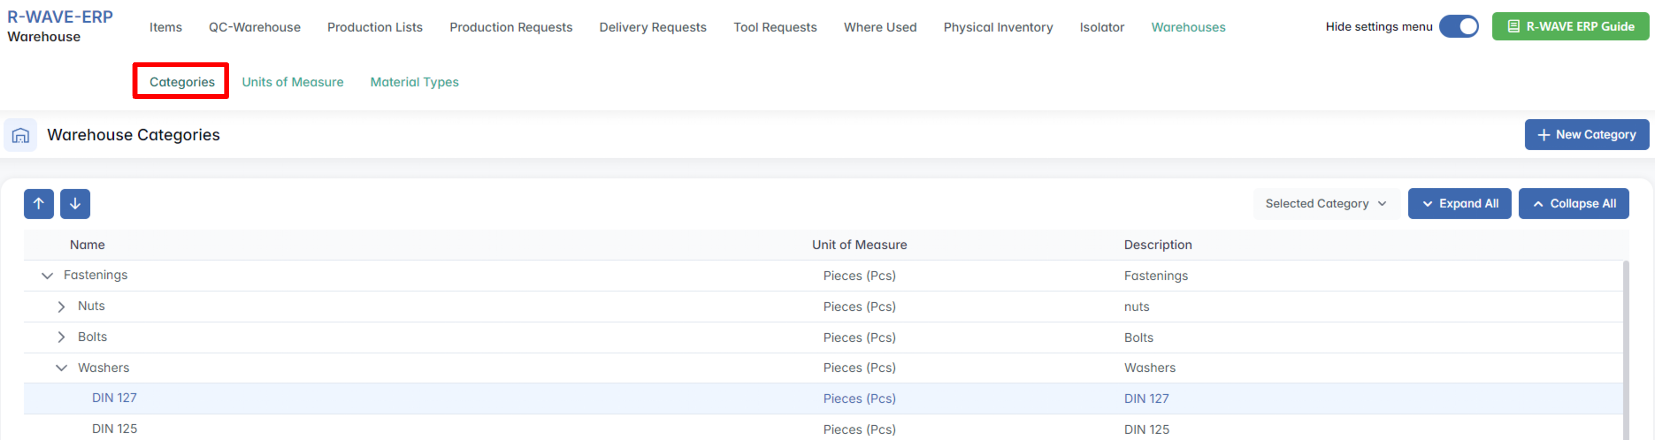
Name - the name of the (sub)category
Unit of Measure - the default unit applied to nomenclature in the category
Description - an optional note or explanation
Parent categories can be expanded to show subcategories using the Expand All button or individually using the triangle toggle.
Creating a New Category
To add a new category:
- Click the + New Category button in the top-right corner.
A pop-up window titled Create Category will appear.
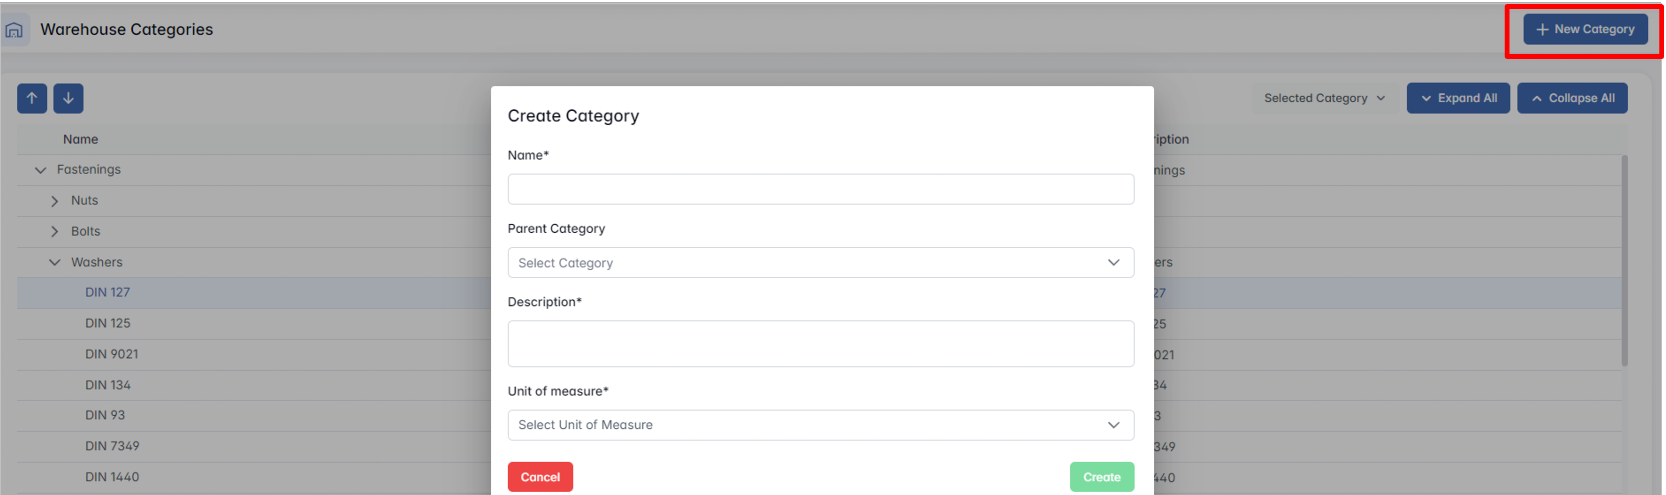
- Click Create to save the category.
If successful, the new category will appear in the main table immediately.
Editing or Removing a Category
Select a row in the category table by clicking on it.
The Selected Category button will become active in the top toolbar.

Click it to choose one of the following actions:
- Edit - opens a pop-up window where you can change thename, parent category, description, or unit of measure
- Remove - deletes the selected category from the system
If a category is in use or has dependent subcategories, removal might be restricted or require additional steps.
3. Units of Measure
The Units of Measure section allows you to manage all measurement units used across the Warehouse module (such as liters, grams, pieces, etc.). These units are associated categories and ensure consistency in inventory tracking, procurement, and reporting.
Viewing Warehouse Units of Measure
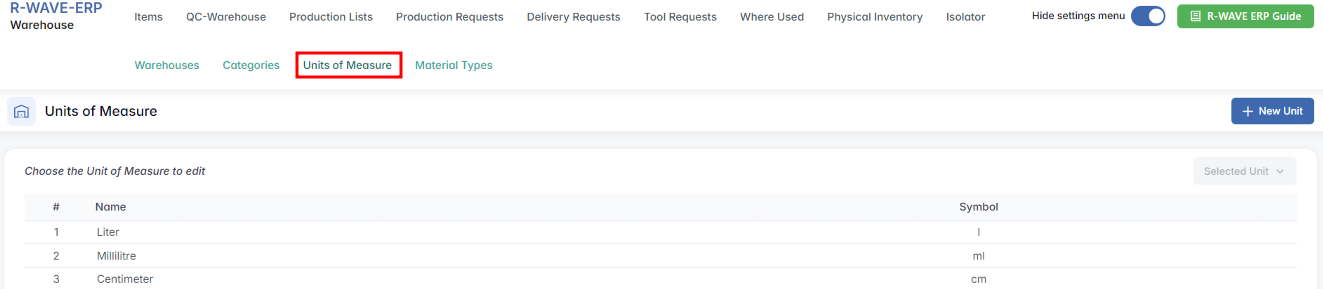
Creating a New Unit
To create a new unit of measure:
Click the + New Unit button.

A modal window will appear with the following required fields:

- Name - the full name of the unit (e.g. Gram).
- Symbol - the unit abbreviation (e.g. gr).
After entering the details, click the Create button to add the unit to the table.
Both fields are mandatory. If either is left empty, the unit will not be saved.
Editing a Unit
To edit an existing unit of measure:
- Select a row from the table by clicking on it.
- In the Selected Unit dropdown (top-right), choose Edit.

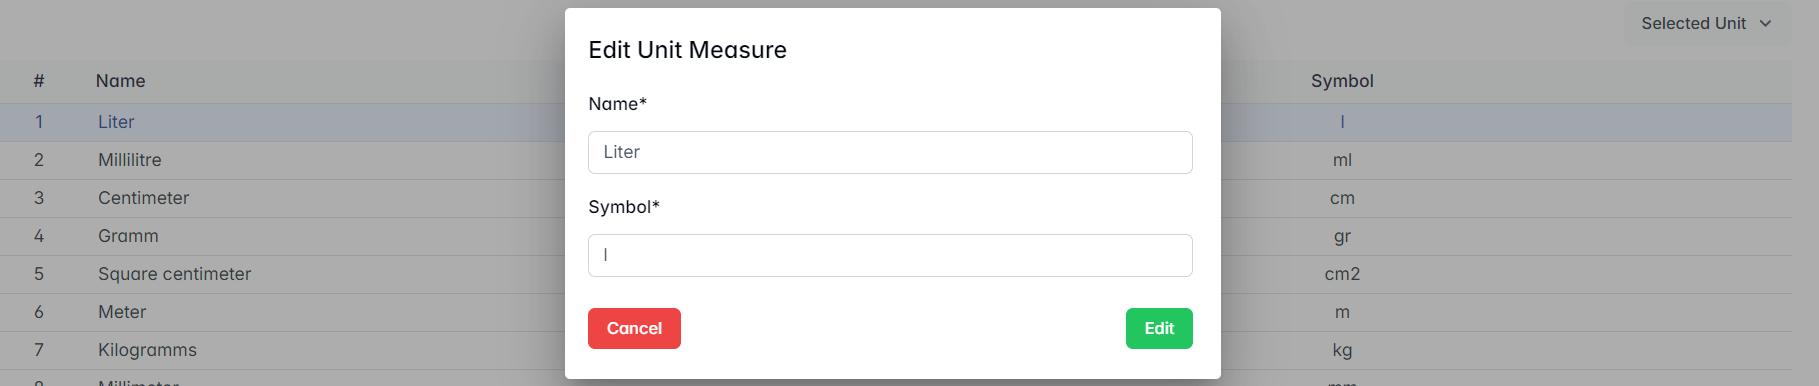
- Click Edit to save the changes or Cancel to discard.
Removing a Unit
To remove a unit of measure:
- Select the unit row from the table.
- In the Selected Unit dropdown, choose Remove.

- Confirm the removal.
A unit cannot be deleted if it is already in use by any item or category. Make sure it is not linked before removing it.
4. Material Types
The Material Types section in the Warehouse module allows users to define and manage types of materials. Each material type includes a Name and a Description to distinguish it during warehouse and production operations.
Interface Overview
The main table displays the following columns:

- Name - name of the material type
- Description - brief description of the material
Creating a New Material Type
To create a new material type:
- Click the + New Material Type button.
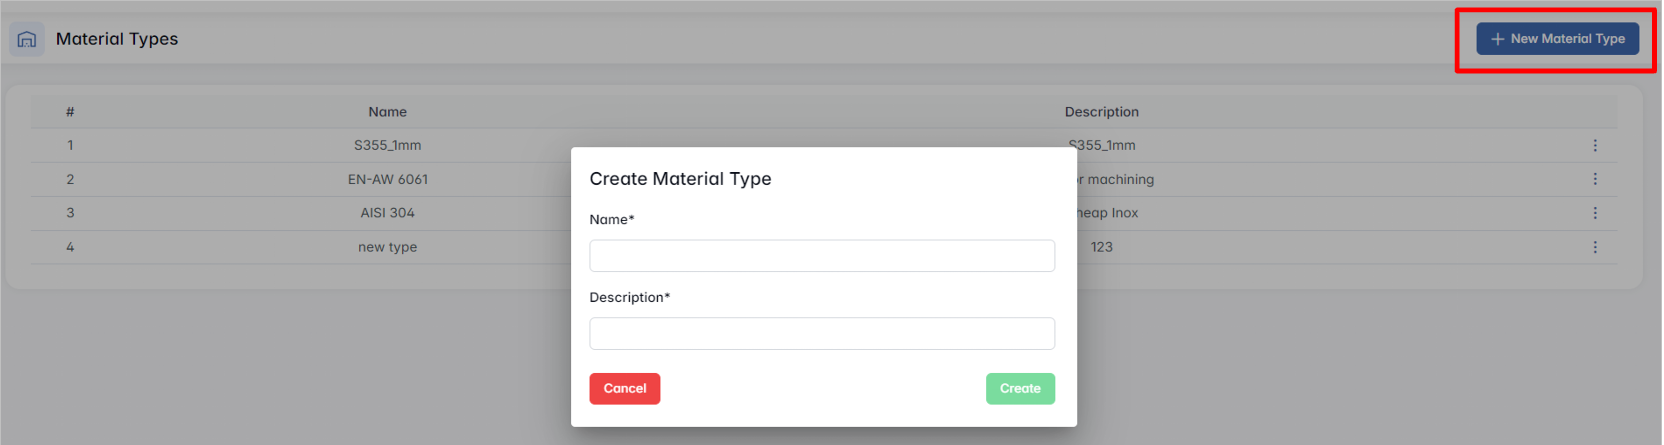
- Click Create to save the entry or Cancel to discard it.
Editing or Deleting a Material Type
To modify or remove a material type:
- Click the three-dot icon (⋮) at the end of the respective row.

- Two options will appear:
- Edit Type - Opens the Edit Material Type modal with current values pre-filled.
- Make the necessary changes in Name or Description.
- Click Edit to save or Cancel to discard changes.
- Delete Type - Permanently deletes the selected material type (confirmation may be required).
- Edit Type - Opens the Edit Material Type modal with current values pre-filled.