Production and Procurement Processes
Production in BINU ERP is tightly integrated with product structure, procurement, and manufacturing processes. The workflow begins in the Product Structure module, progresses through the Procurement module, and concludes in the Manufacturing module. This integrated process is designed to ensure accurate product structure management, enable automatic generation of procurement requests, and facilitate a systematic manufacturing process.
This guide follows one product (test prod 1) end to end as a worked example.
The BINU ERP Guide and AI Assistant Tools {#binu-erp-guide}
The BINU ERP Guide and AI Assistant Tools
The BINU ERP system provides tools to support users in navigating and understanding the processes and functionalities of the system. These tools — the BINU ERP Guide and the BINU AI Assistant — include a built-in contextual help. They are non-intrusive and can be closed or reopened as needed, allowing users to remain focused on their current workflow without interruption.
When you click the BINU ERP Guide icon in the upper-right corner of the screen, the pop-up guide window opens. This feature is available across different modules and is designed to help users understand where they are in the system and how to use the current section effectively.

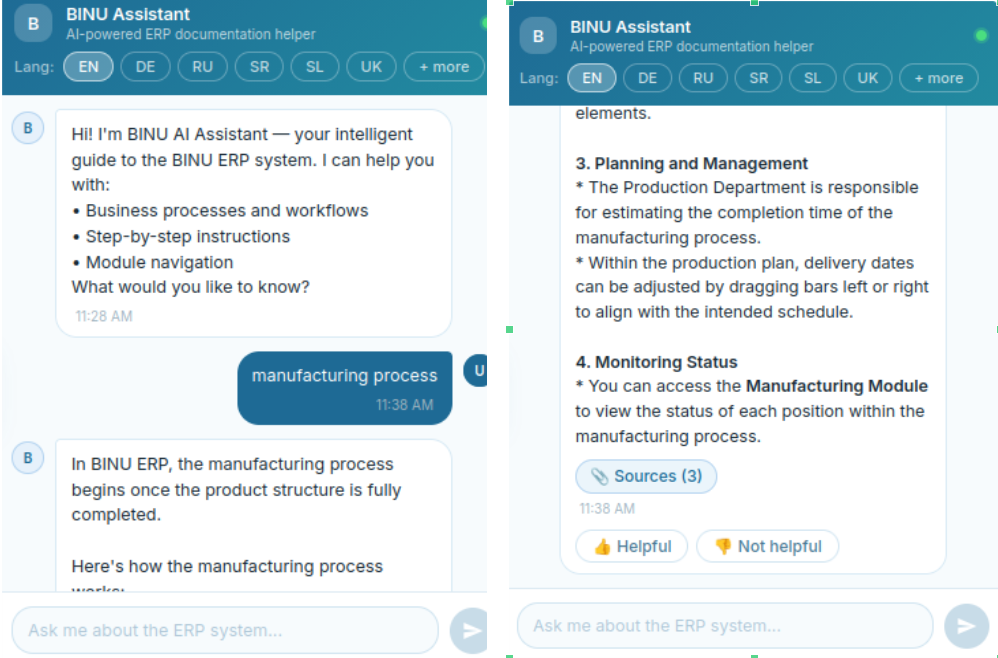
When you click the BINU AI feature on the side of the screen, the chat window opens, where users can choose their language of conversation. The supported languages are: English, Bulgarian, Croatian, French, German, Hungarian, Italian, Romanian, Russian, Serbian, Slovenian, Spanish, Turkish, and Ukrainian.

The BINU AI Assistant provides explanations and documentation for all topics related to the BINU ERP system. Users can ask about specific terms, business processes, system functionalities, or request documentation on a particular topic. To begin, type your question in the input field at the bottom of the chat window.
The BINU ERP Guide: Quick Overview
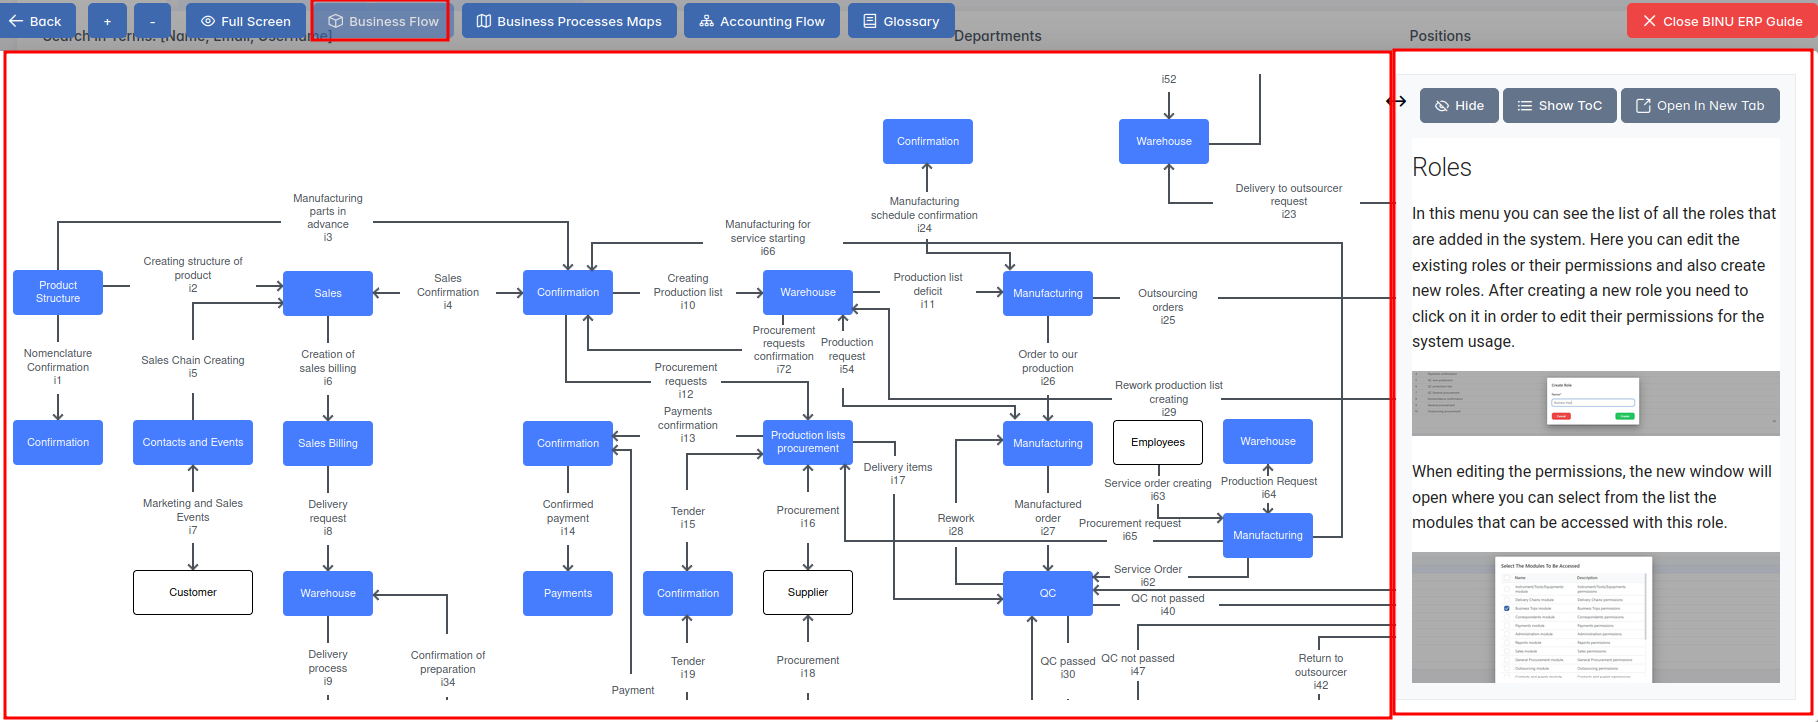
When you click the BINU ERP Guide book icon, you land on the Business Flow map. It has two main sections: the left panel displaying the business flow map and the right panel showing the functional overview.
- Left panel — Business Flow Map — displays a visual diagram of the business processes. It shows how each module is interconnected; for example, you can see how Sales, Manufacturing, Procurement, CRM, QC, and Warehouse are interconnected.
- Right panel — Functional Overview — provides a concise, bullet-style instruction list describing the key operations available in the current module/tab.
Top Bar Options
At the top of the ERP Guide window, you'll find optional tools for deeper understanding: Business Processes Maps, Accounting Flow, and Glossary. The Accounting Flow is meant for financial departments.

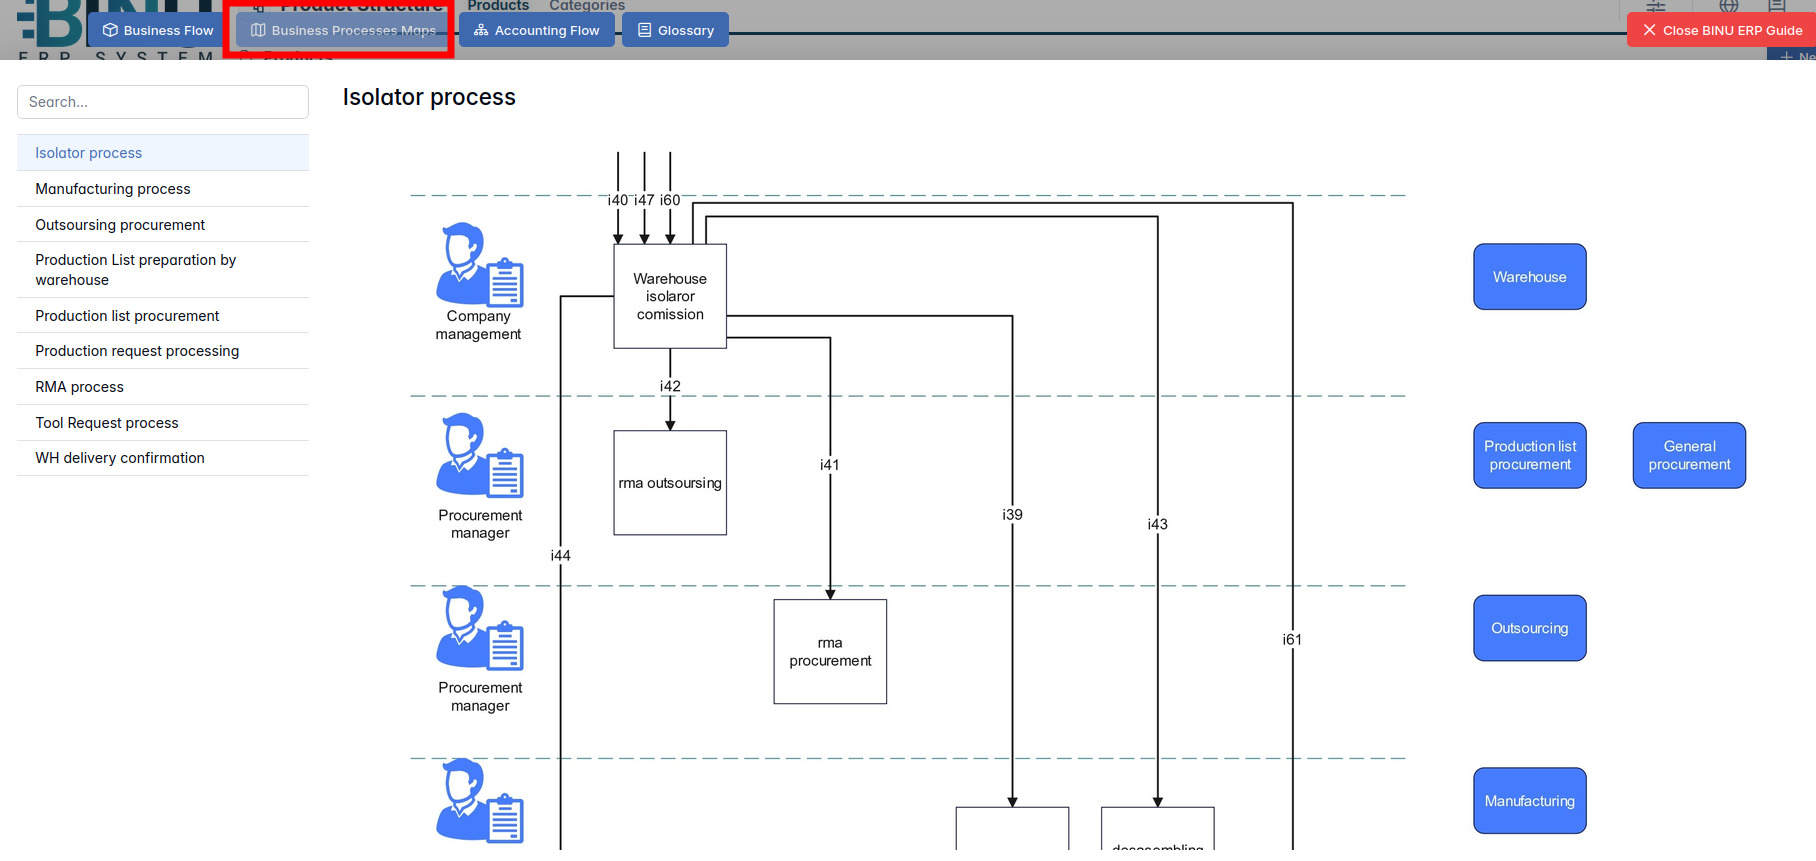
Business Processes Maps
Business Processes Maps provides a visual representation of the company's operational structure and business flow. It helps the user understand how the current module fits into the larger operational structure and makes it easy to grasp the upstream and downstream dependencies within the business processes. The Business Processes Maps can be accessed from various modules.
Accounting Flow: Data Flow Graph and Responsibility Matrix
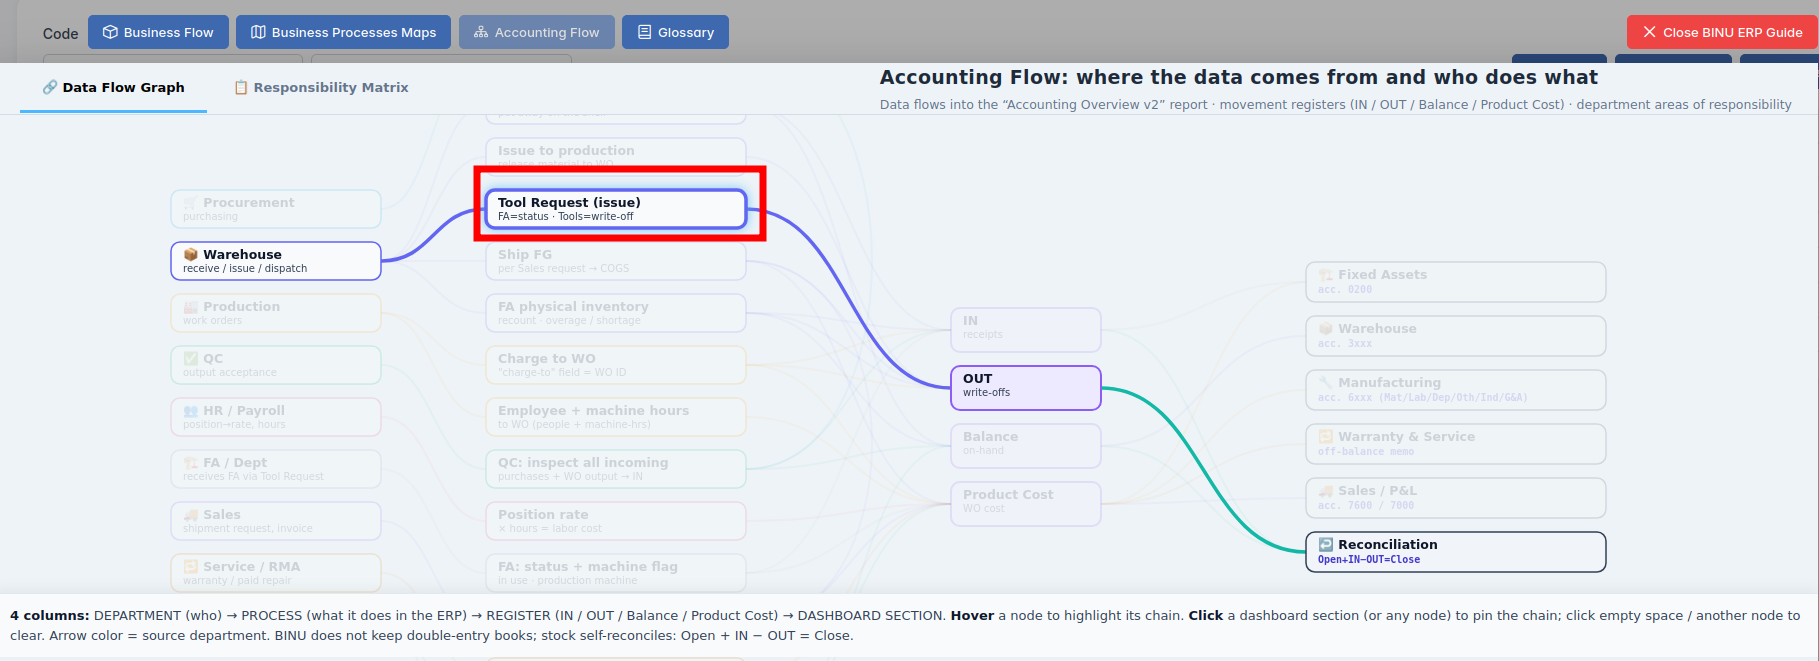
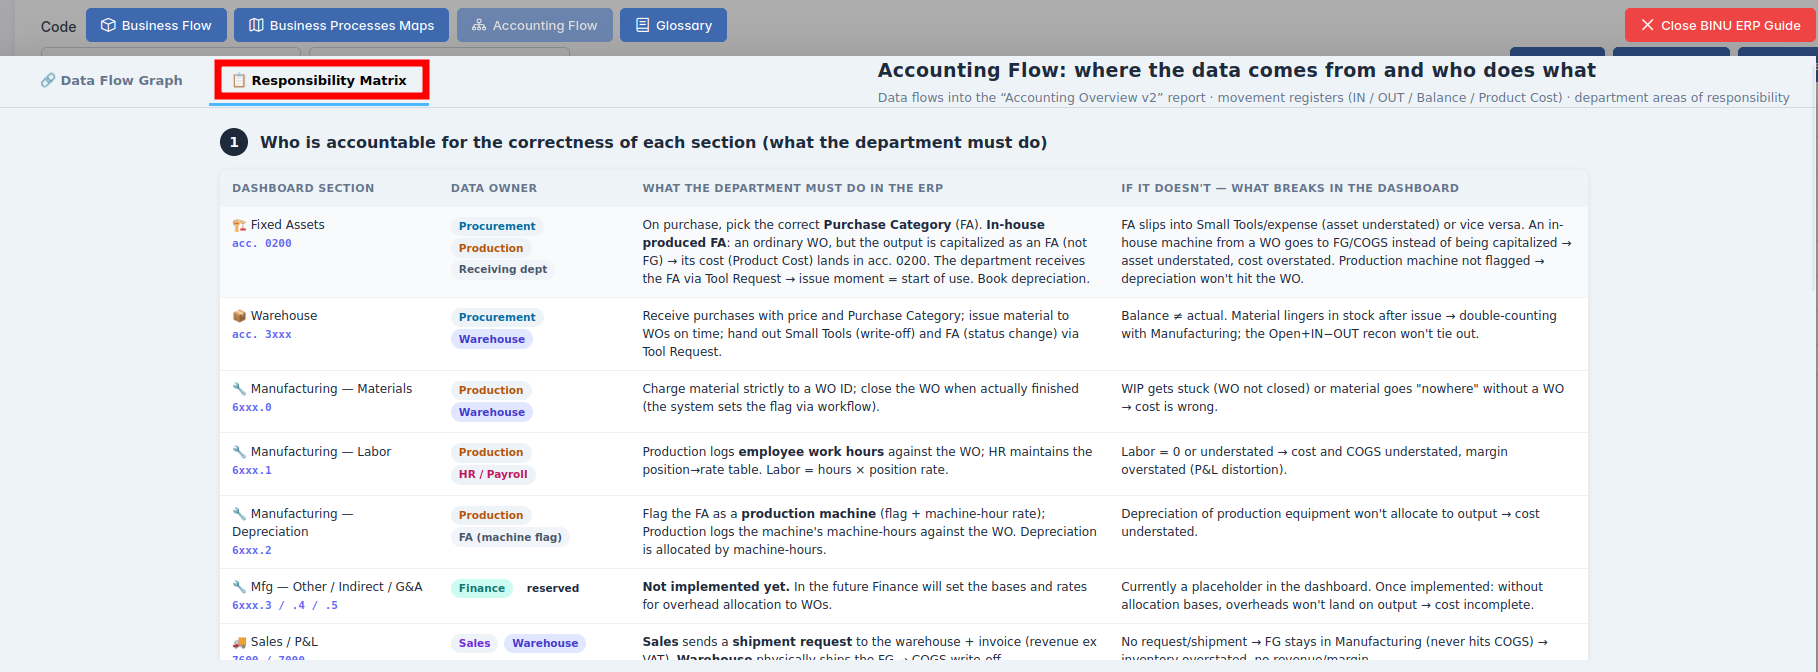
Accounting Flow is a tool designed for the finance department; it shows where the data originates and defines responsibilities. For this purpose, it consists of two parts: a Data Flow Graph and a Responsibility Matrix.
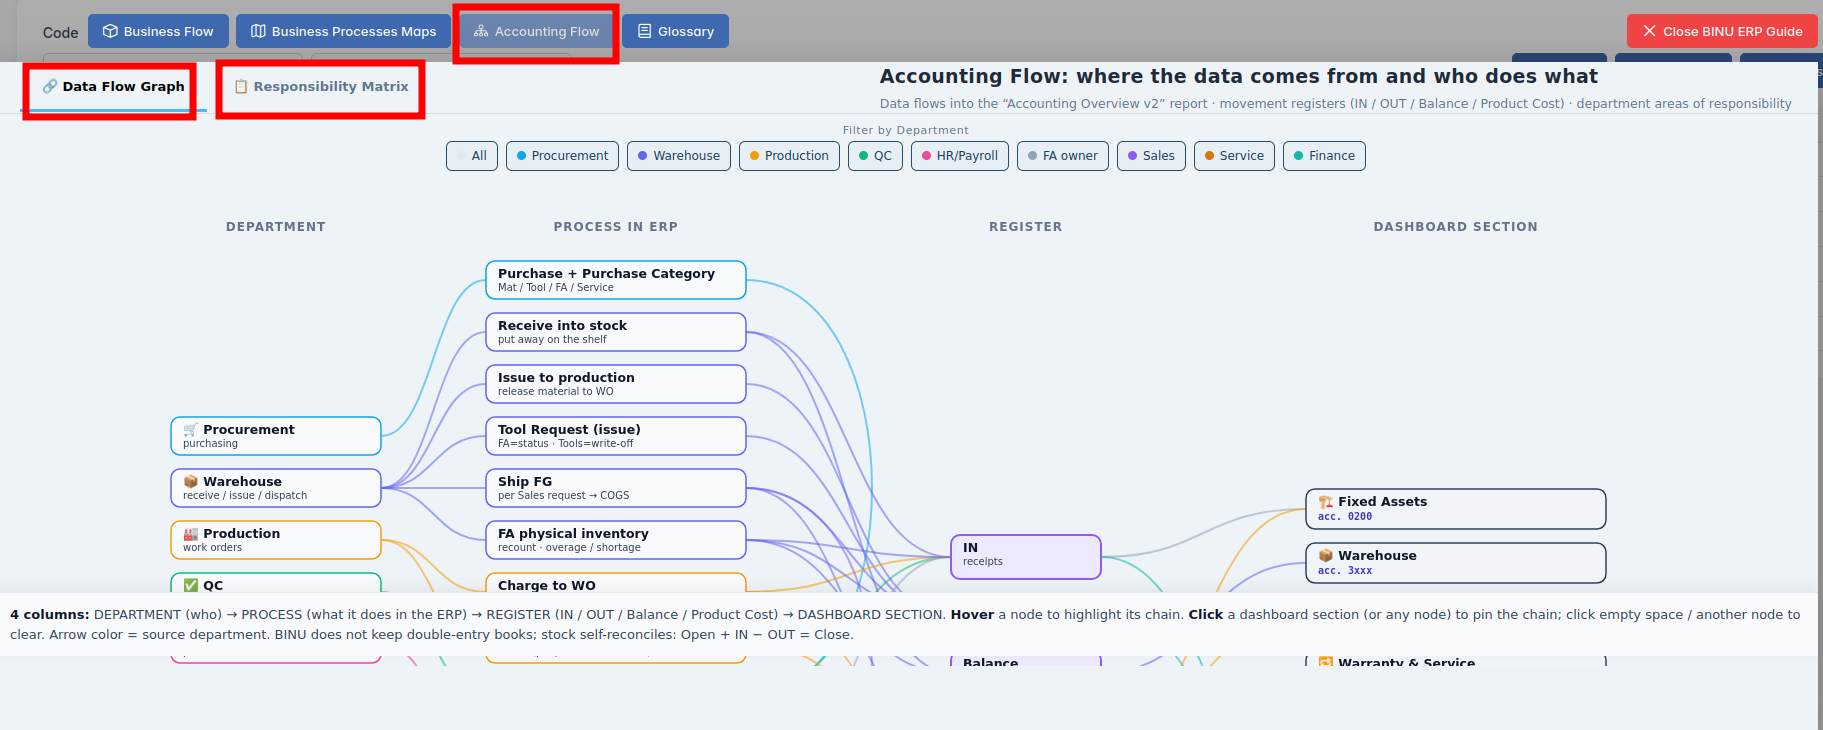
The Data Flow Graph displays the movement of items from departments to the warehouse and from the warehouse to the departments. Based on these movements, the system tracks the flow of goods entering and leaving the company. The Dashboard section, planned for a future release, will allow users to view real-time data (in, out, balance, product costs).
If you hover over a diagram block, the system highlights the corresponding movement chain.
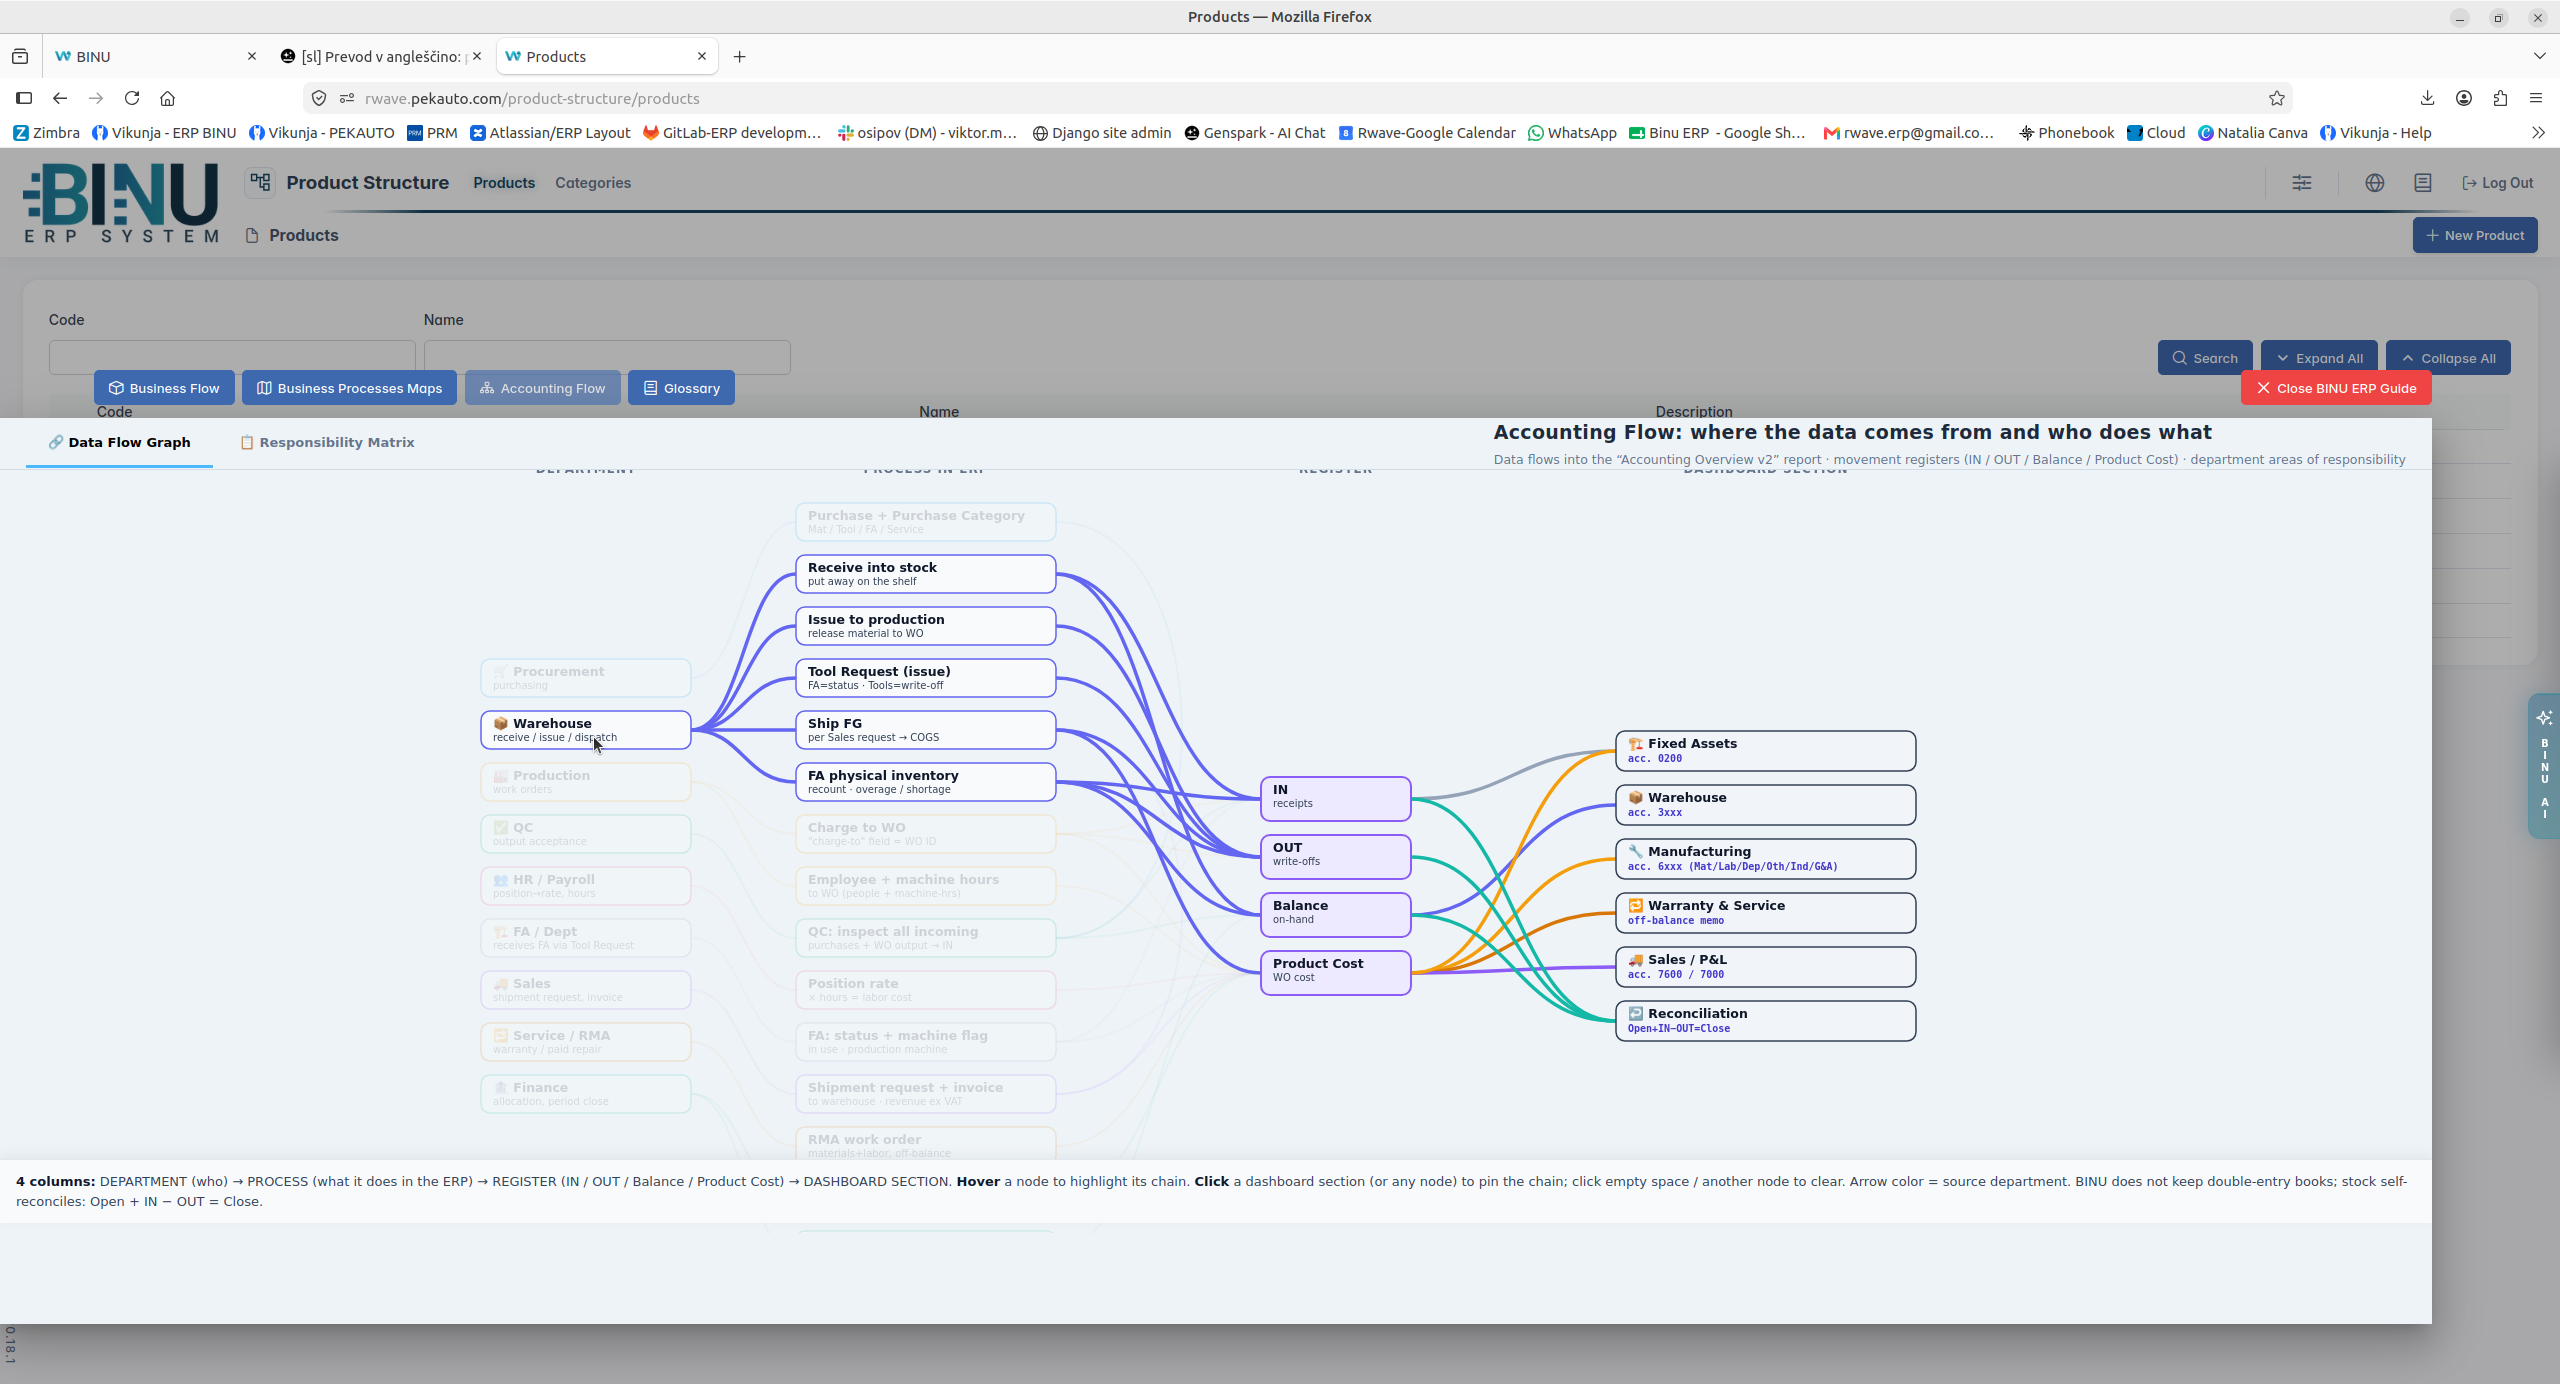
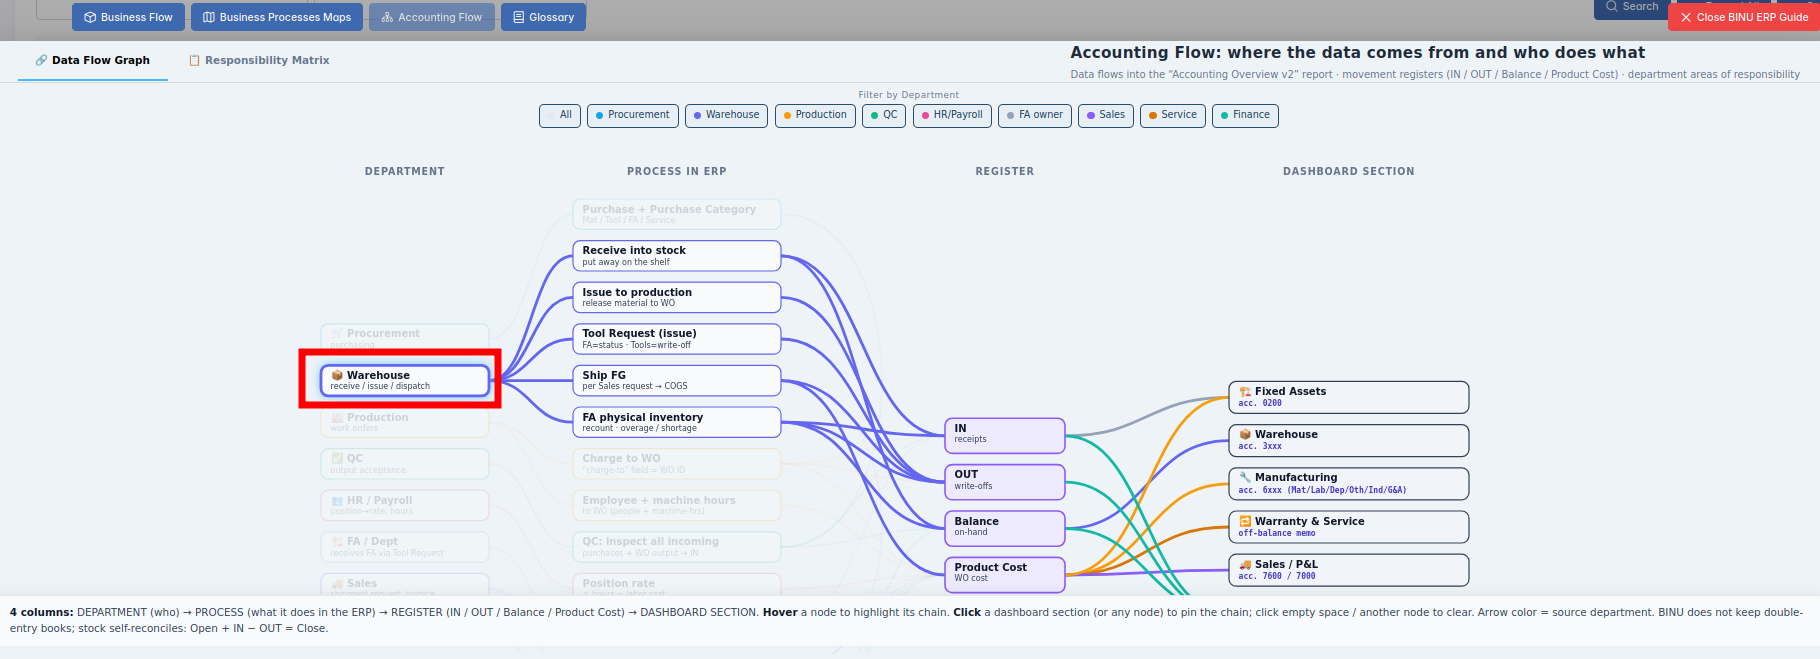
If you click a block in the diagram, you fix the highlighted chain. To narrow the selection further, click a block in the second, third, or fourth column.
The Responsibility Matrix identifies the department accountable for the selected process.
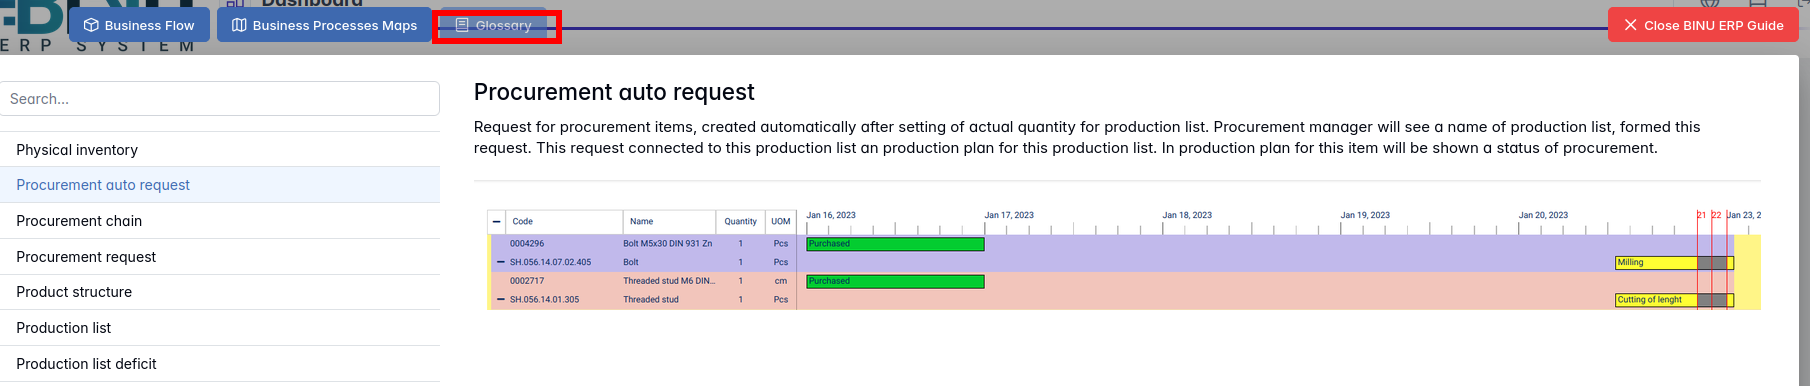
Glossary
Glossary provides definitions and descriptions of key terms and functionalities used throughout the system. The Glossary can be accessed via the BINU ERP Guide, which is available on any page of the system.
The BINU AI Assistant: Quick Overview
The BINU AI Assistant is specifically designed to help the user with ERP documentation questions. It provides information and assistance related to the BINU ERP system. The BINU AI Assistant understands fifteen (15) languages. It is available on every page as a non-intrusive help tool.
The Purpose of the BINU ERP Guide and BINU AI Assistant Tools
The BINU ERP Guide and BINU AI Assistant help users by:
- Showing where they are within the system (module context and current section).
- Providing a visual schema of the business flow, helping them understand how the current module fits into the larger operational structure.
- Offering a quick-reference instruction panel with the main actions and functions available in the current tab (e.g., creating companies, filtering, scheduling events).
- Offering quick access to the relevant documentation (AI-powered ERP documentation helper).
Creating a New Product
Creating a New Product
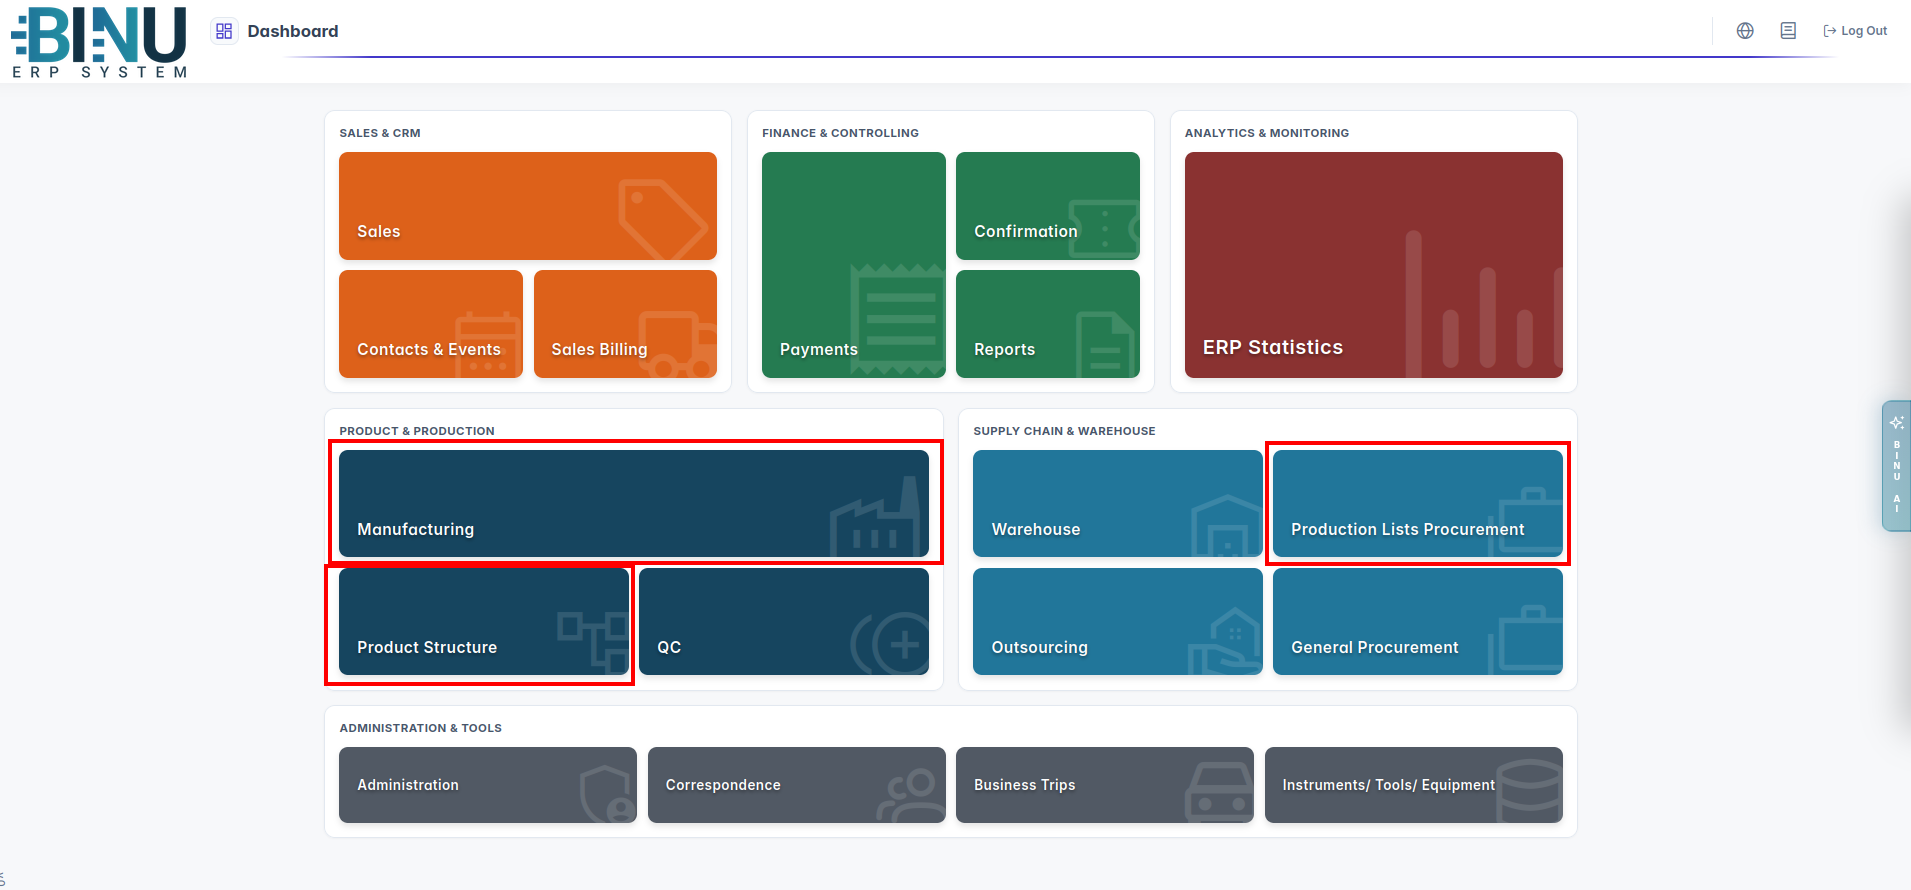
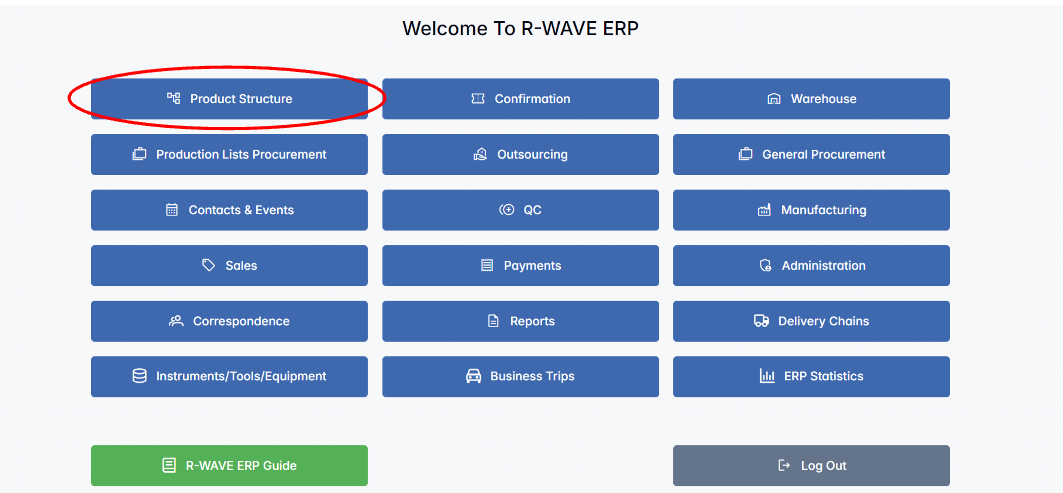
- Navigate to the Product Structure. From the main menu, select Product Structure.
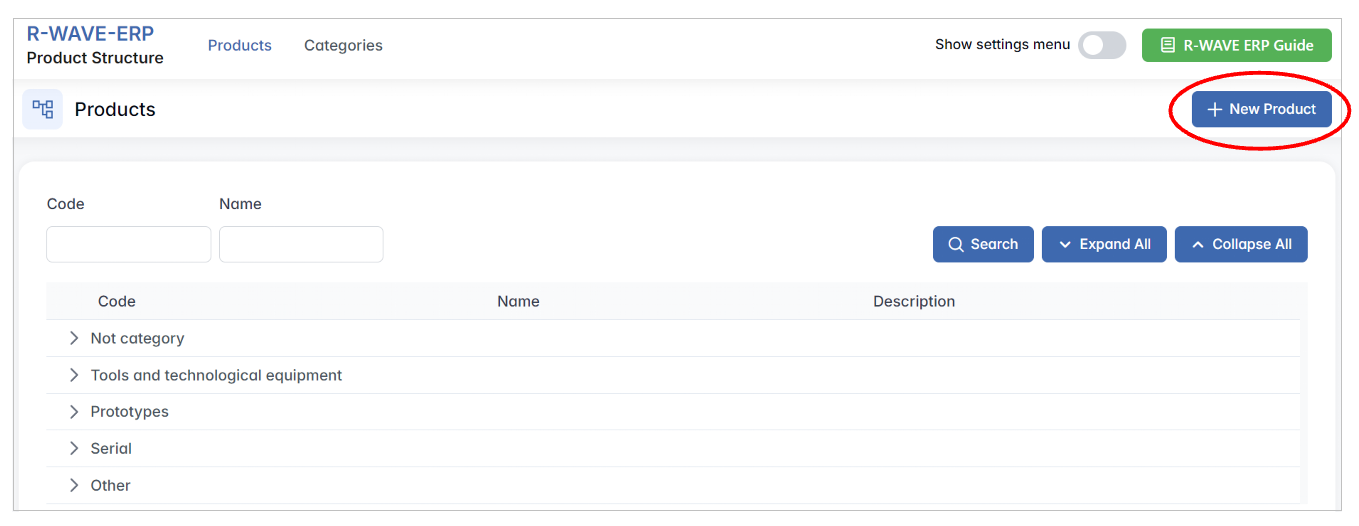
- Create a new product. Click the New Product button located at the top-right corner of the screen.
- Fill out the product information.
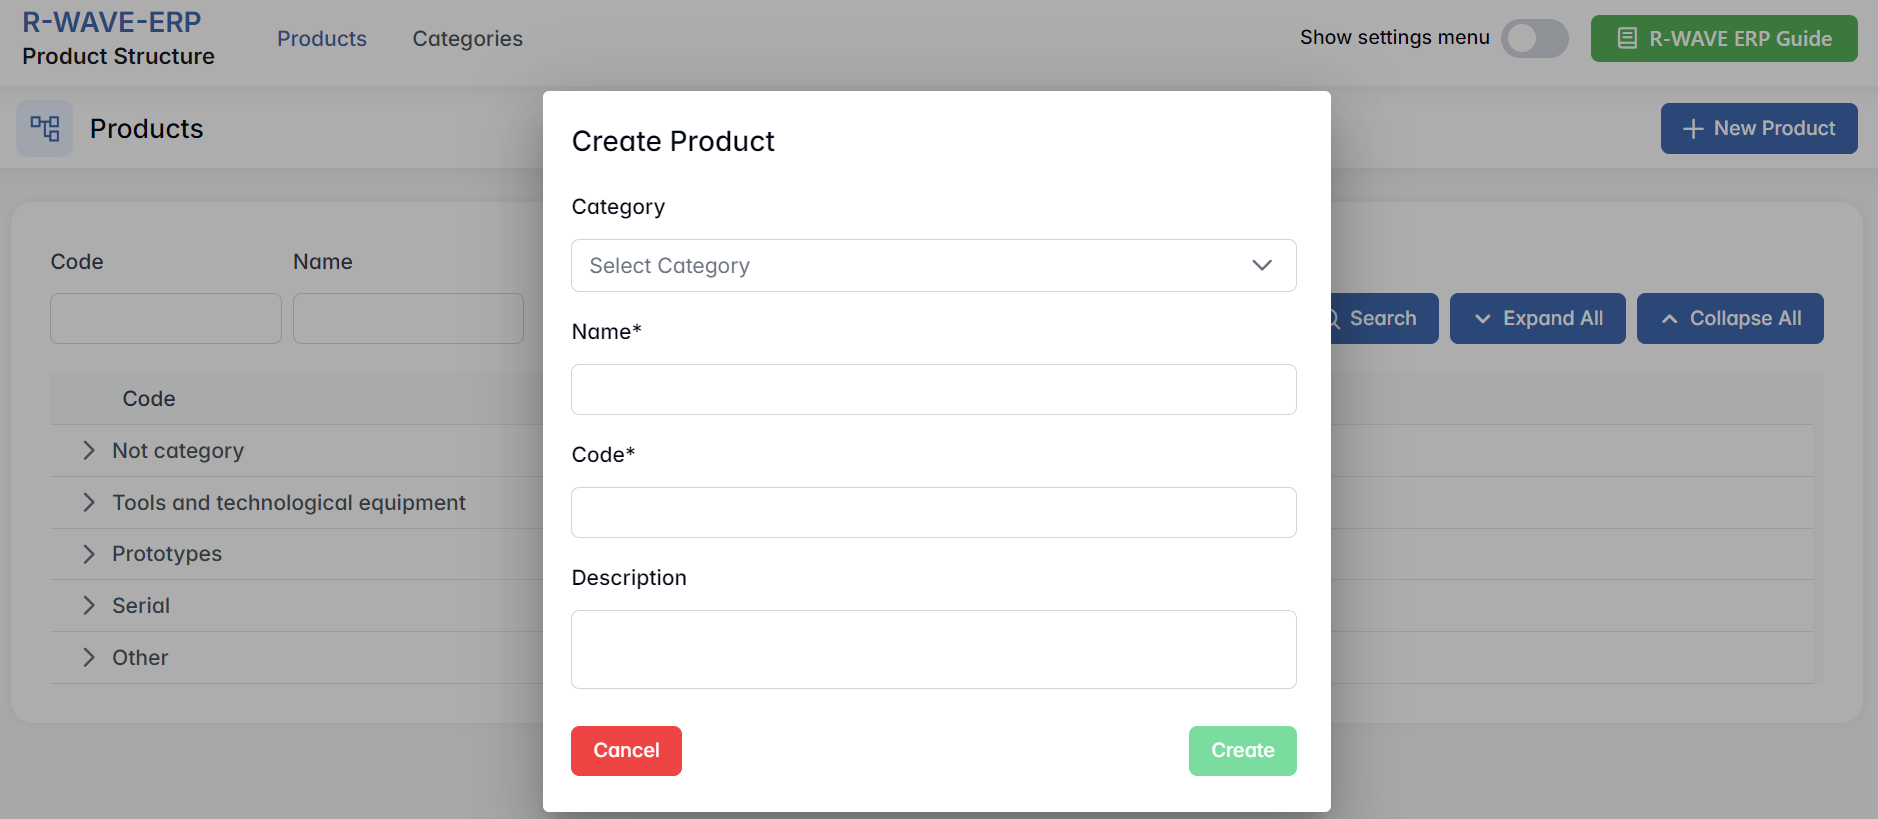
- In the new window, select the Category (e.g., "Prototypes").
- Enter the Product Name (e.g., "Example Product 1") and Product Code (e.g., "1a").
- The Description is optional.
After filling in the required fields, click Create to save the new product.
Define the Product Structure
Define the Product Structure
- Select the created product.
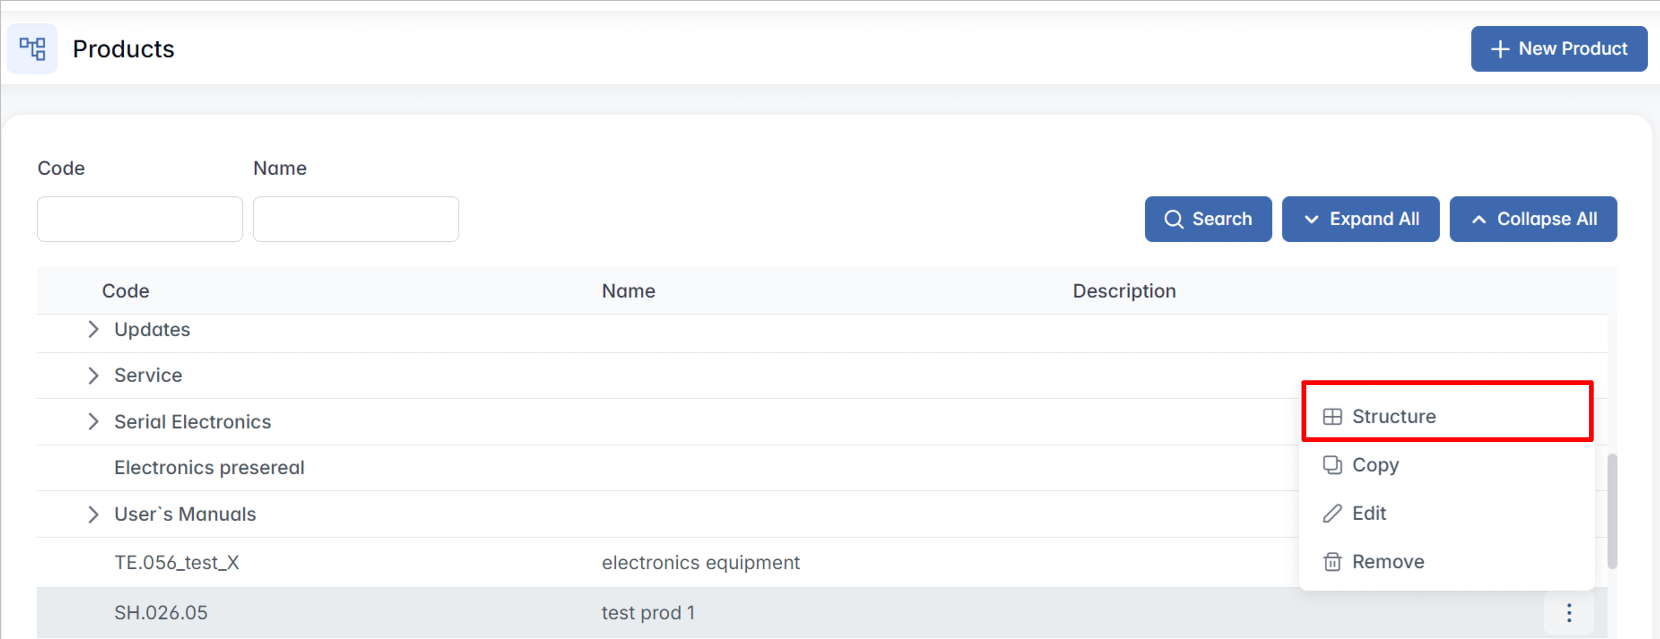
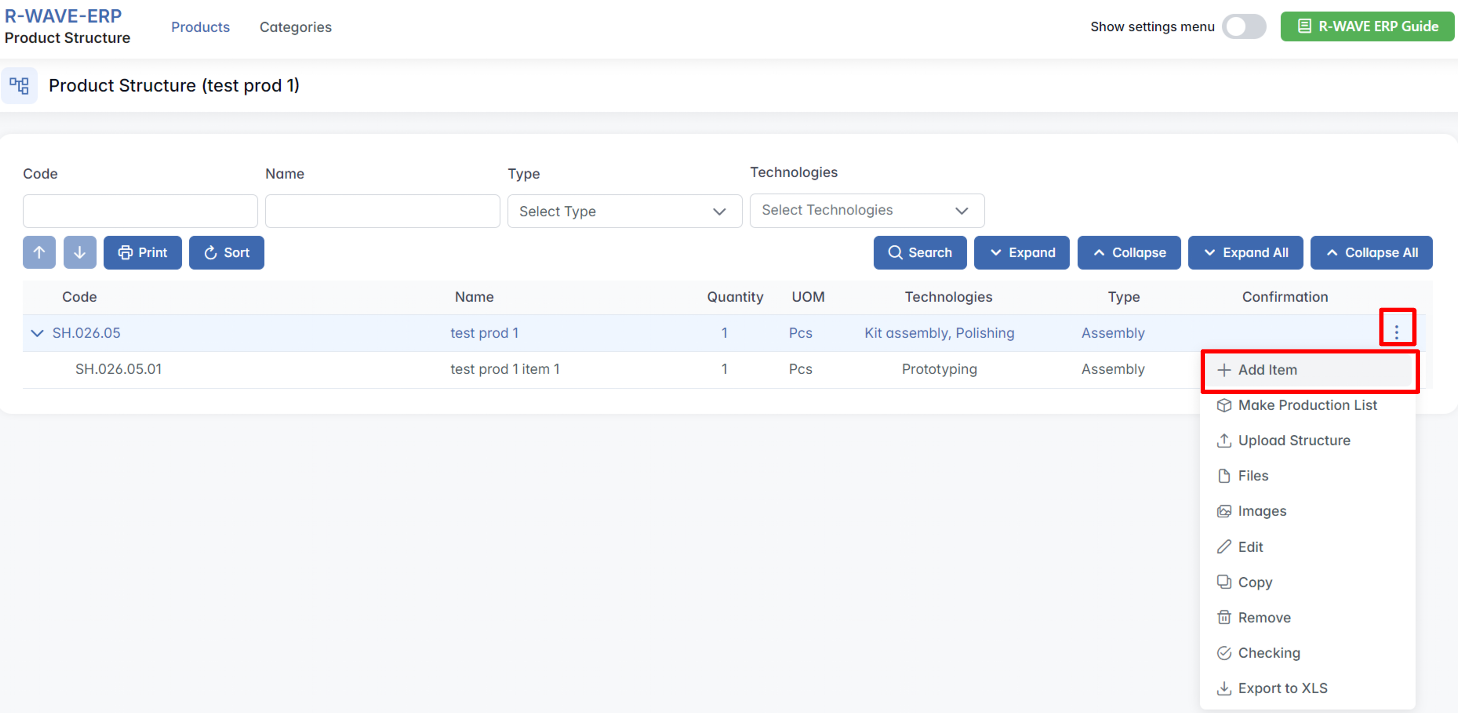
- Define the product's components. In the selected row, click the three-dot menu (⋯) and select Structure. The Product Structure window will open. Select the newly created product, click the three-dot menu, and choose Add Item to add new components to the product.
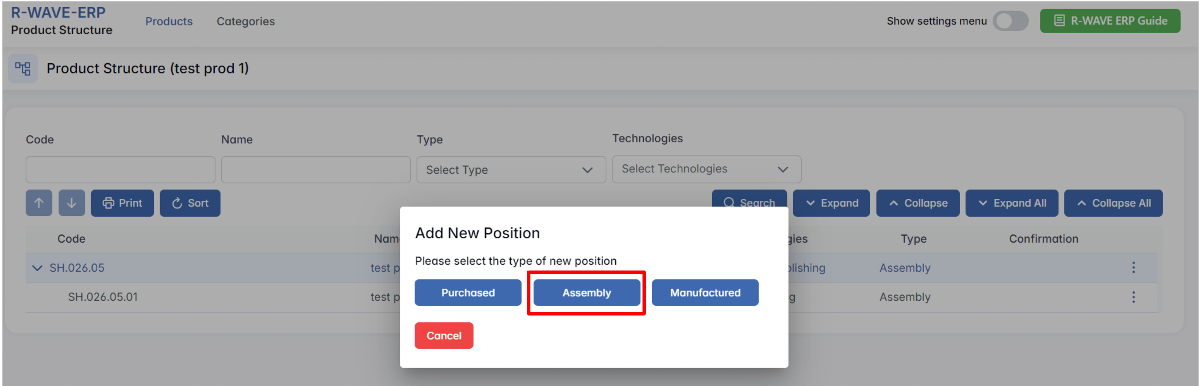
- Choose the type of position. In the "Add New Position" window, select Assembly to indicate that the product will be assembled from other items. Alternatively, choose Purchased if the component will be procured externally, or Manufactured if it will be produced internally.
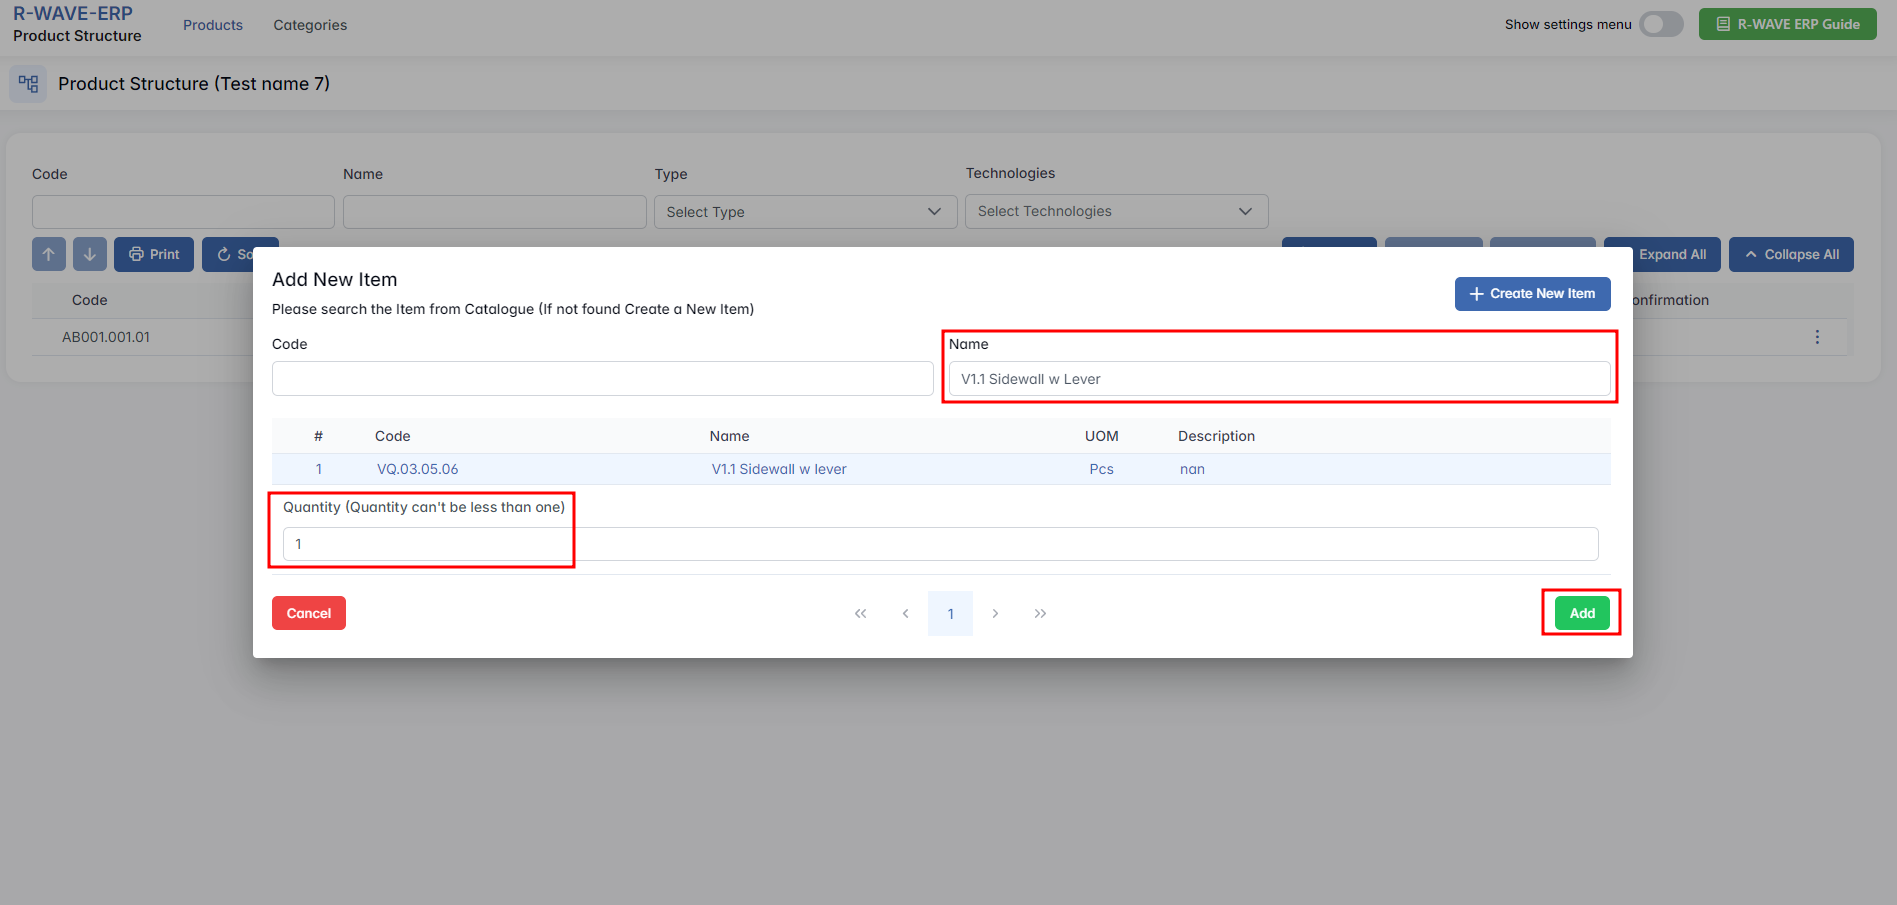
- Add components. For example, the user chooses Assembly. The user can select an item from the existing list or find the exact one by entering its Code or Name (e.g., choose
V1.1 Sidewall w Lever), enter the required Quantity, and click Add.
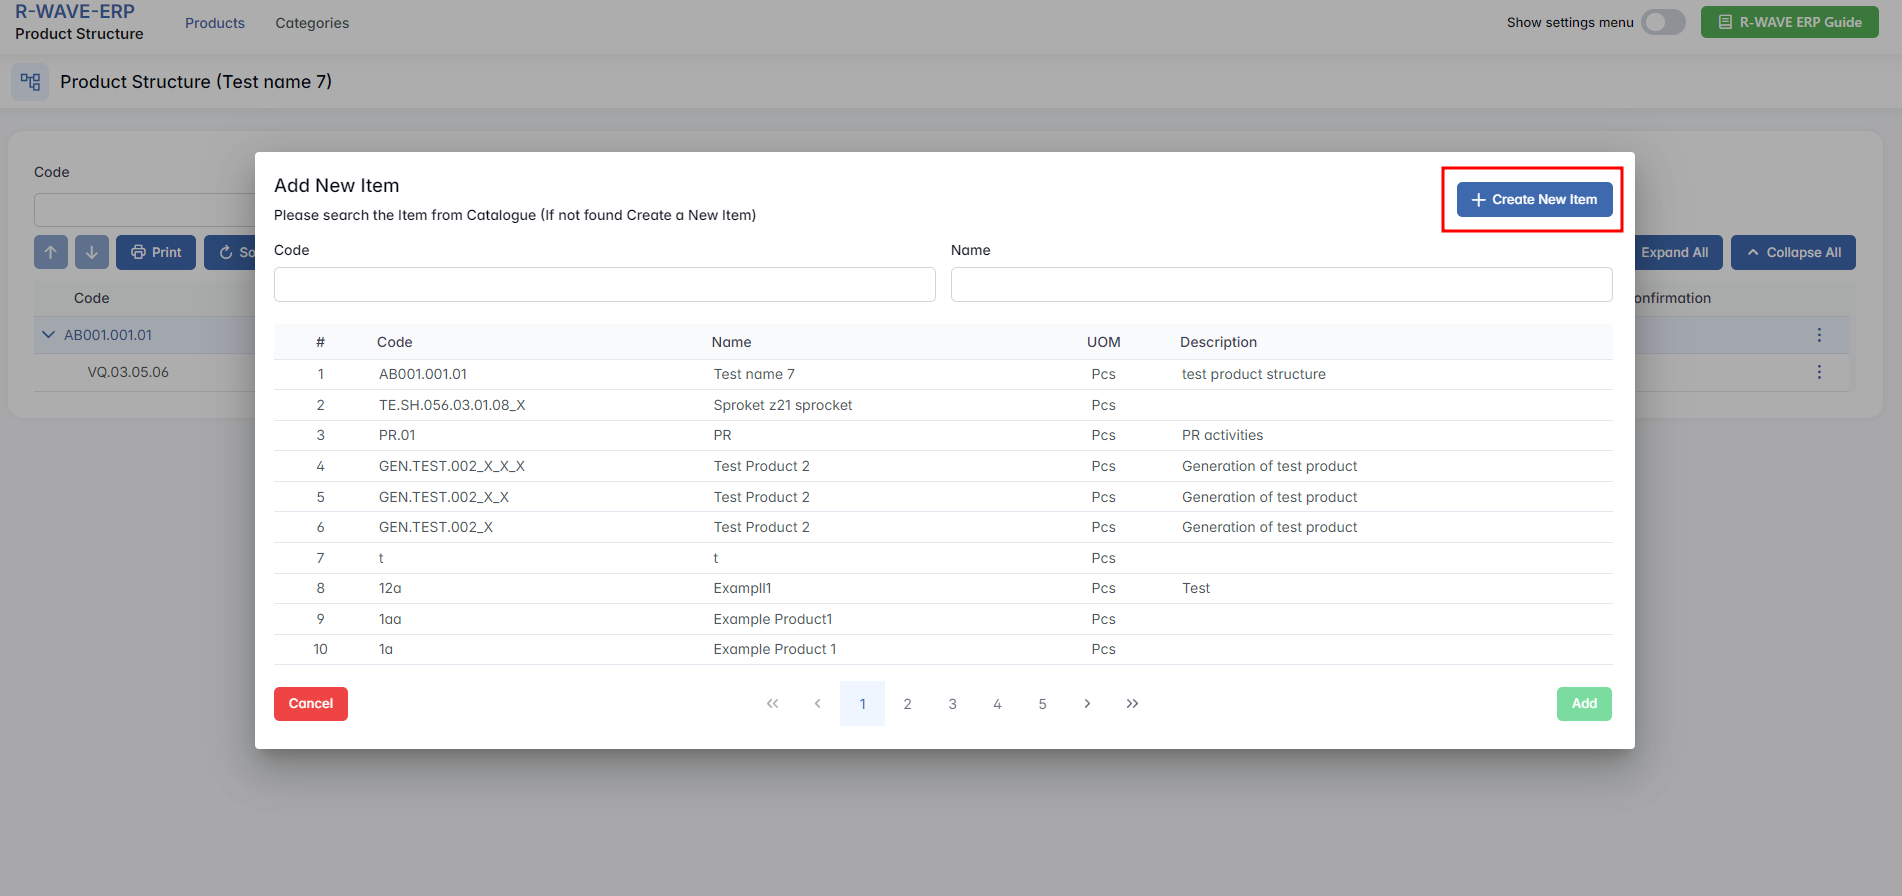
If the required item does not exist in the list, use the + Create New Item button. This opens the corresponding window where you can fill in all necessary data. For more details on filling out item information, refer to the Product Structure guide.
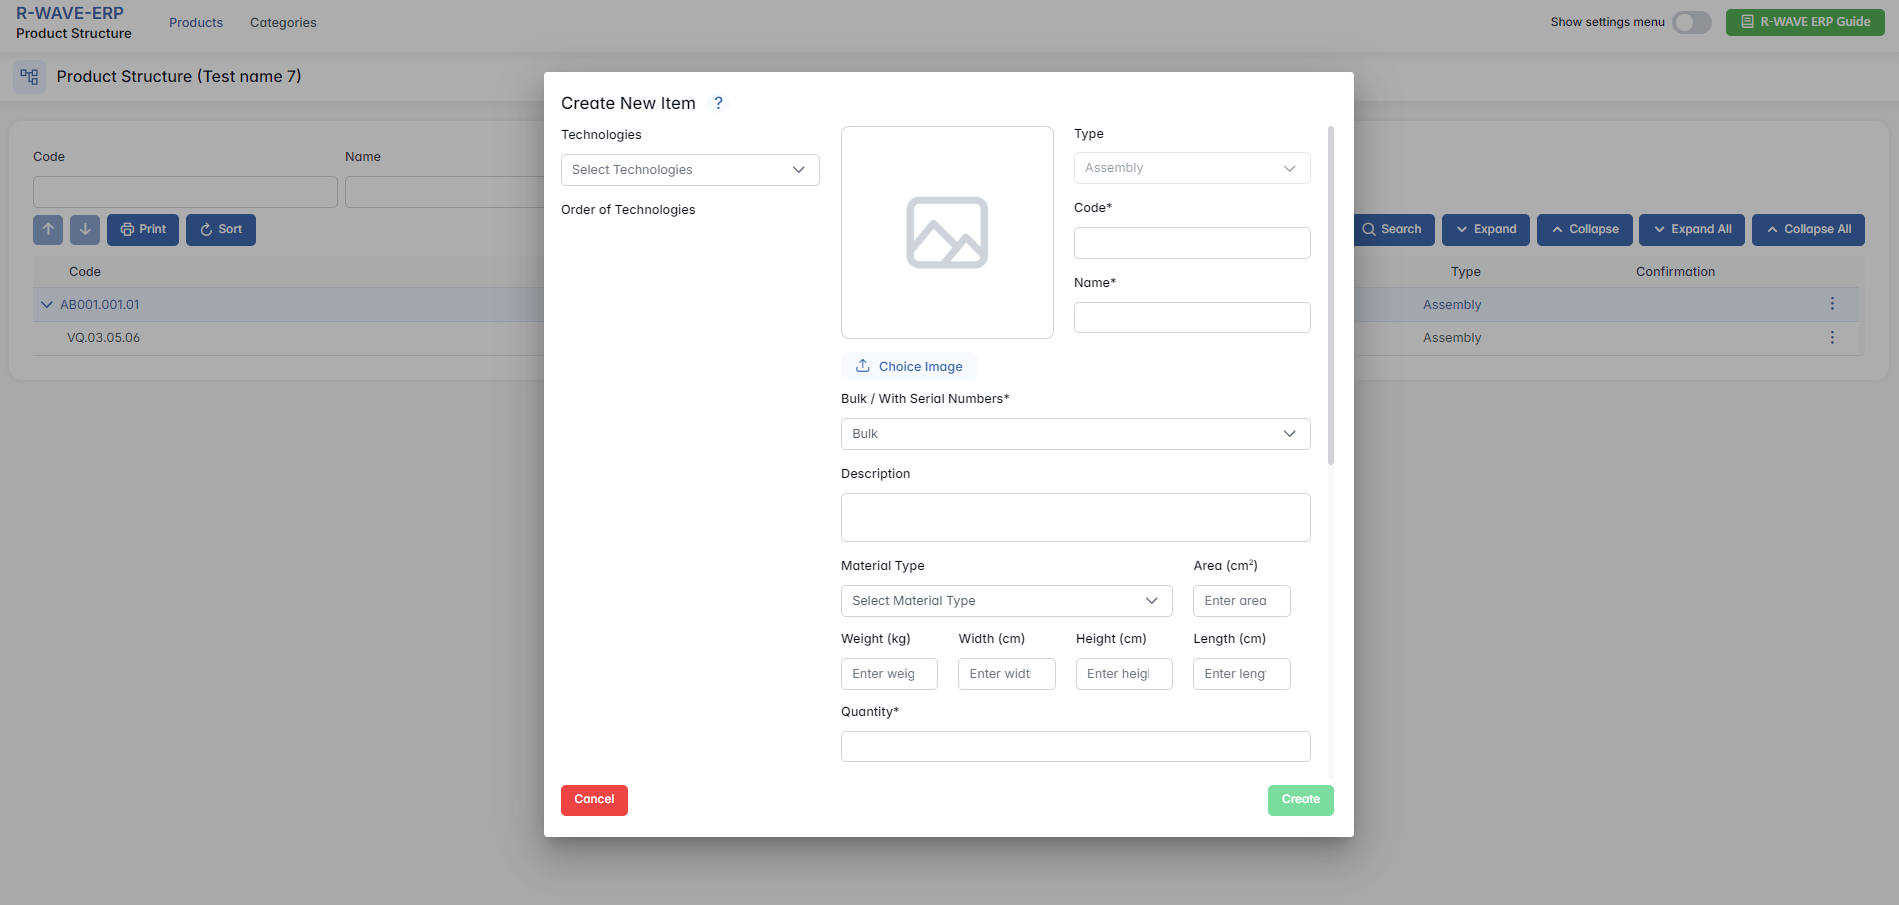
- Add other items. You can add additional items, including purchased or manufactured components, following the same process.
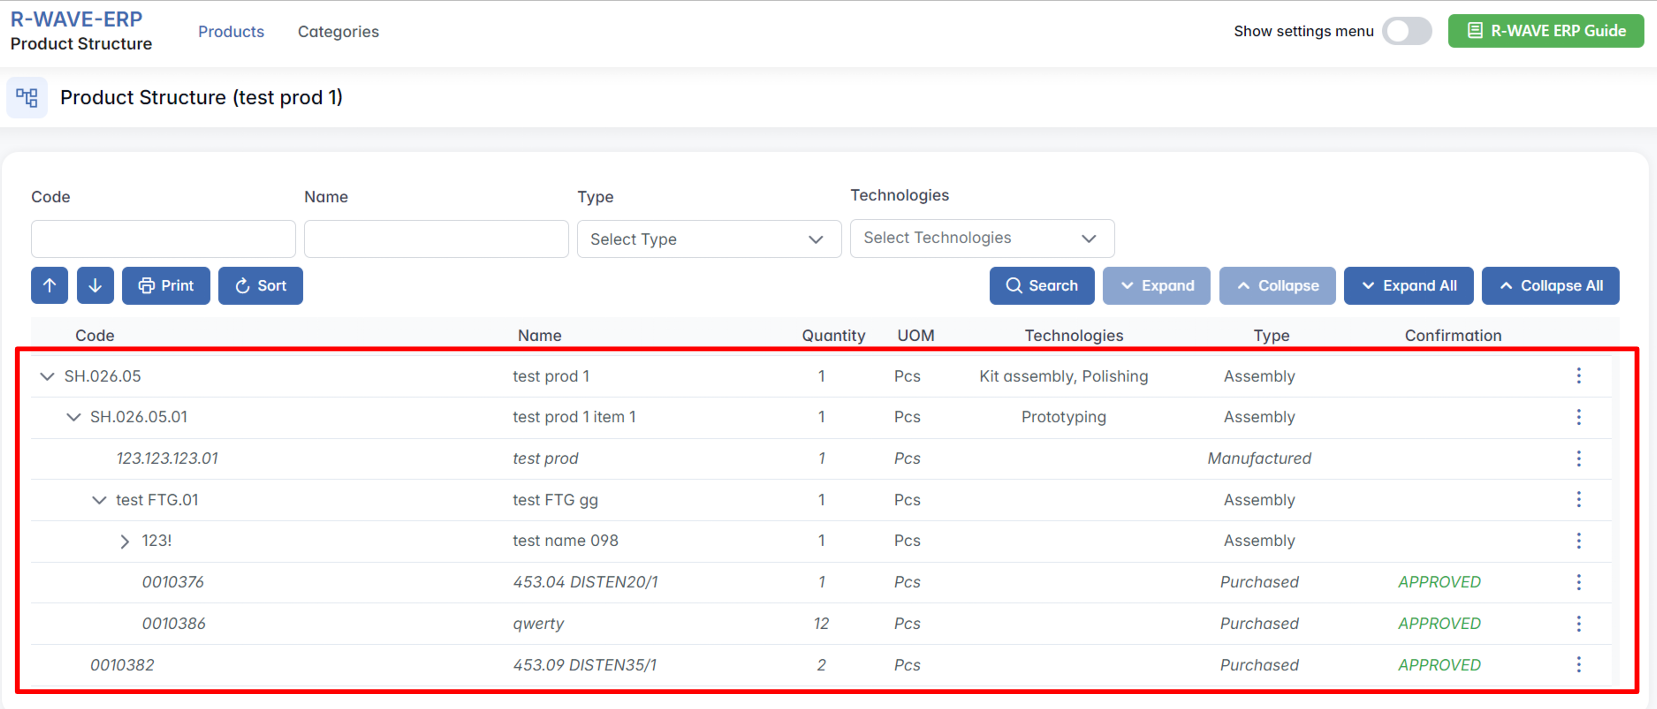
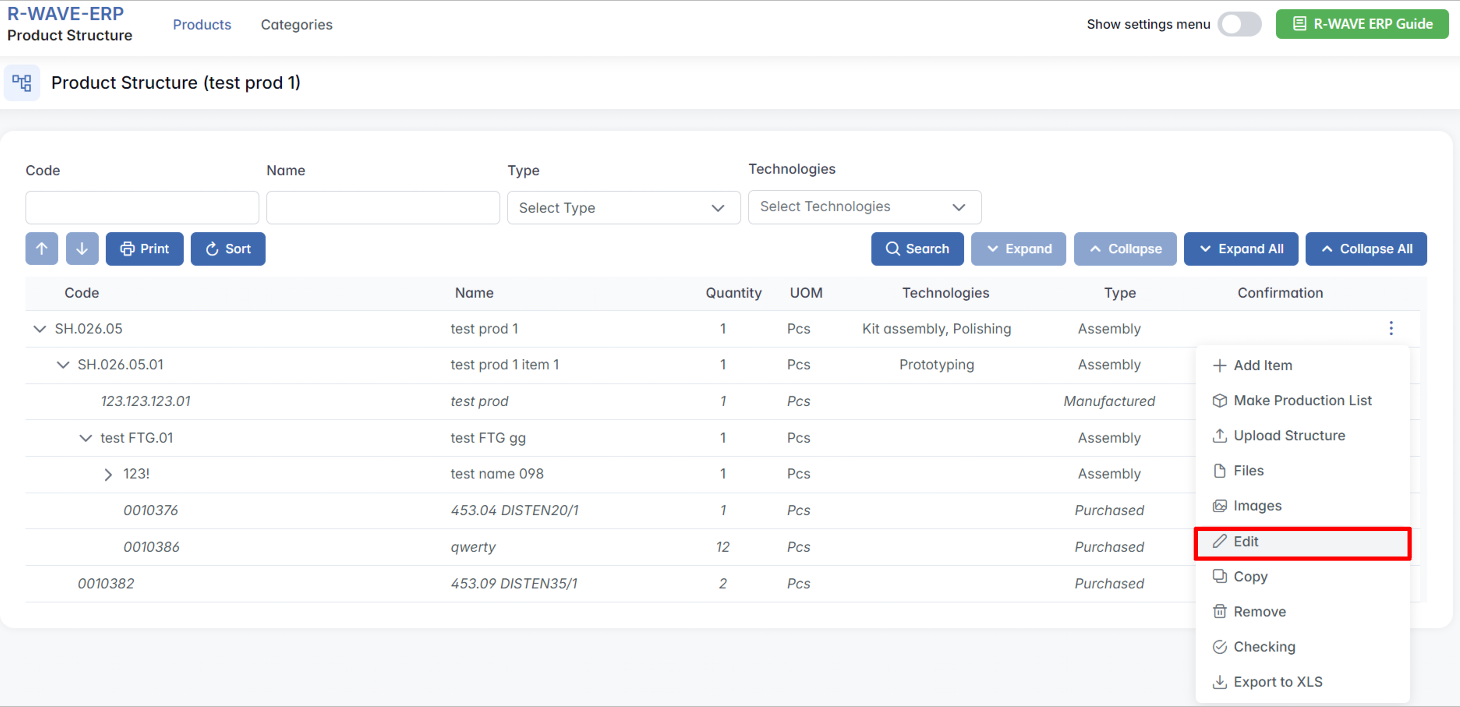
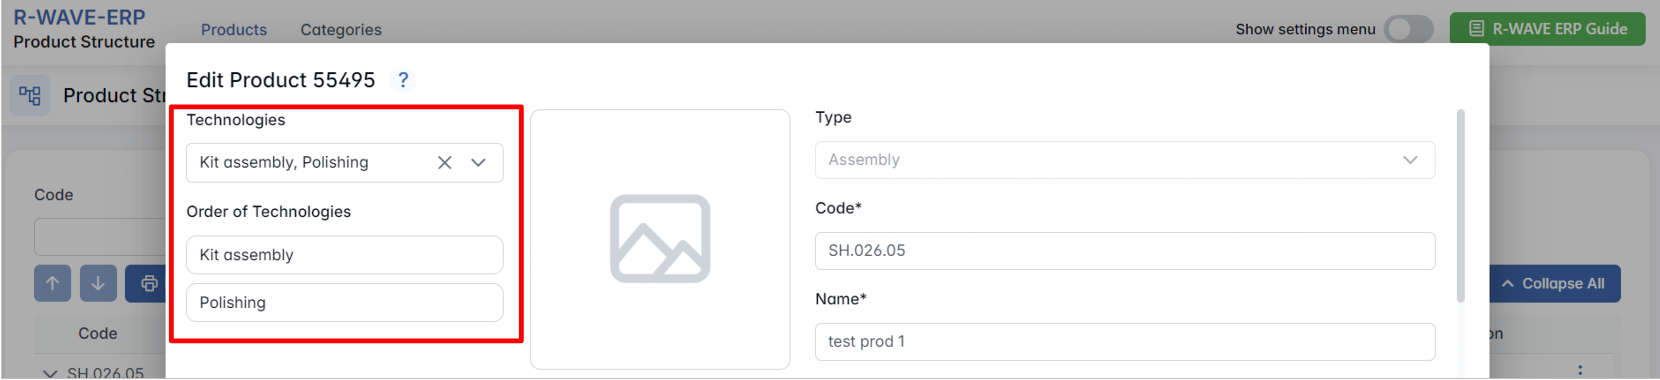
- Edit item information. For each component, open the three-dot menu (⋯) and click Edit to specify additional details such as technology and quantity.
Initiating Production
Initiating Production
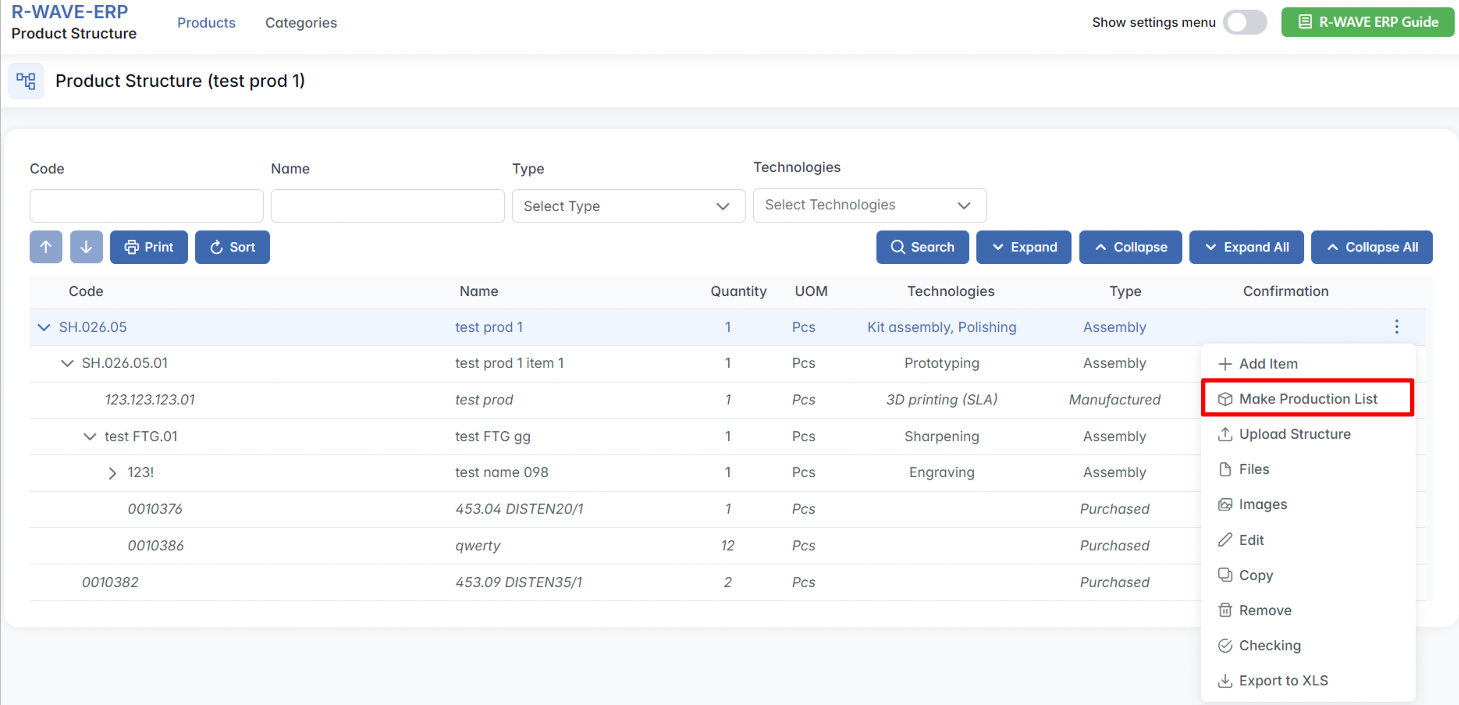
- Create a Production List. Once the product structure is complete and all components are added, click Make Production List in the three-dot menu.
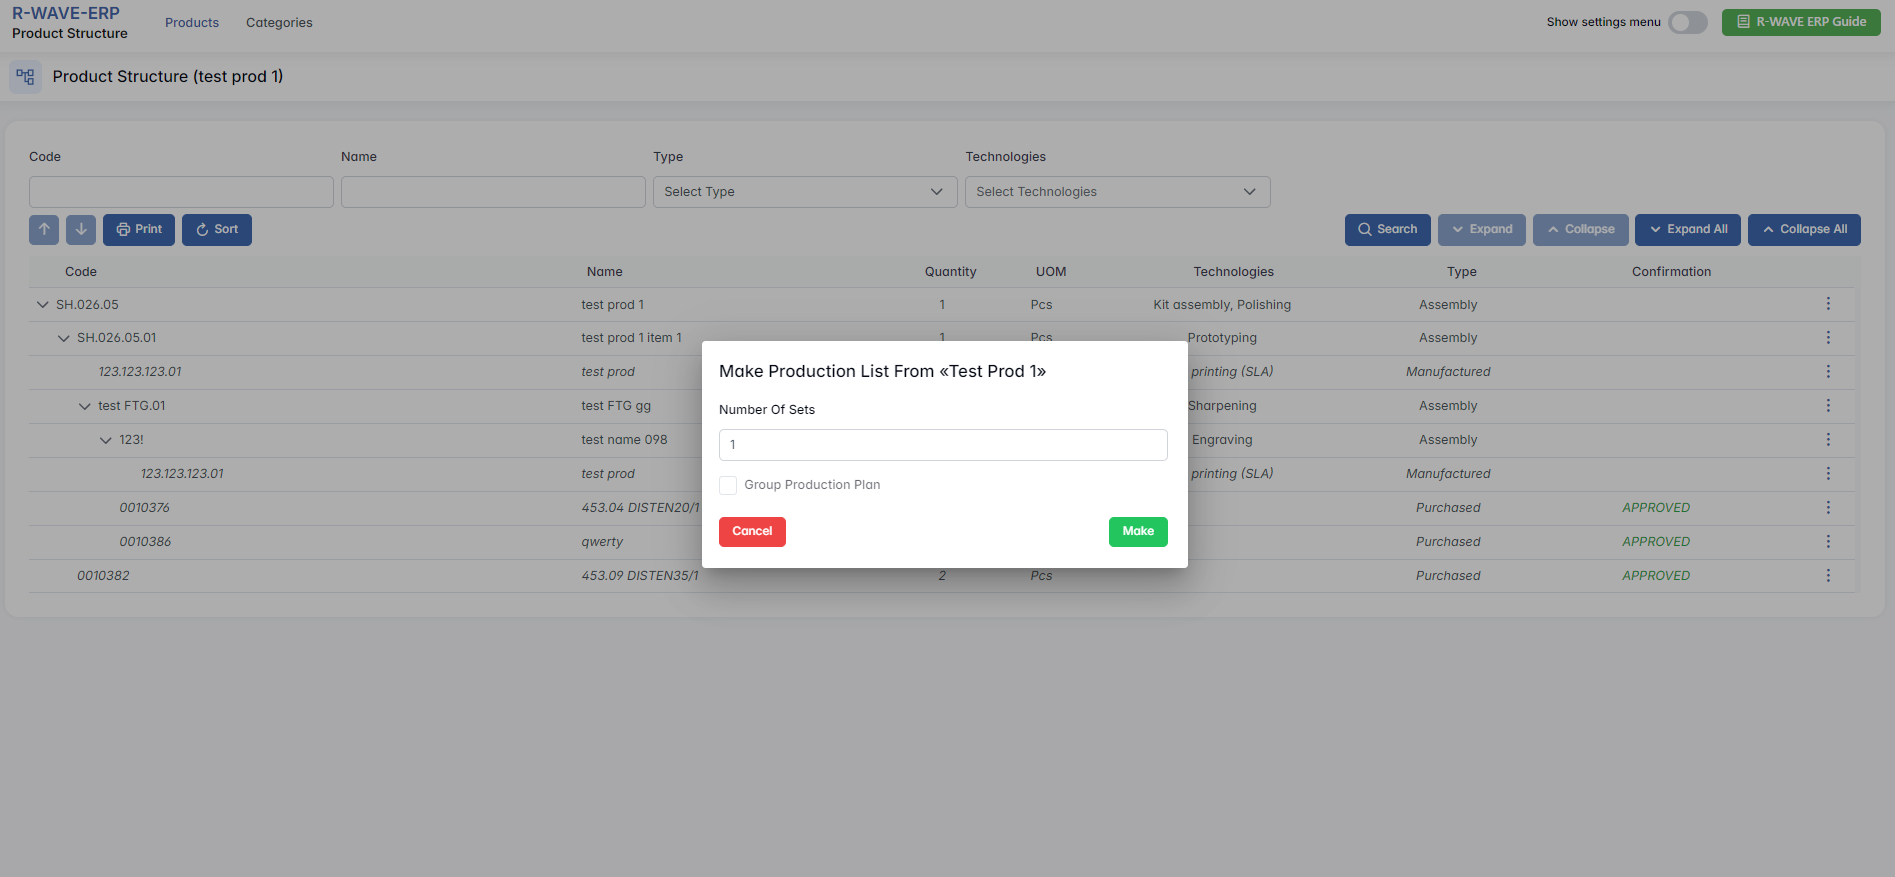
- Set production parameters. A popup window will appear. Here you can specify the Number of Sets to produce (default is 1), and optionally tick Group Production Plan if you want to generate a grouped plan. After setting the parameters, click Make to create it.
Confirming Production
Confirming Production
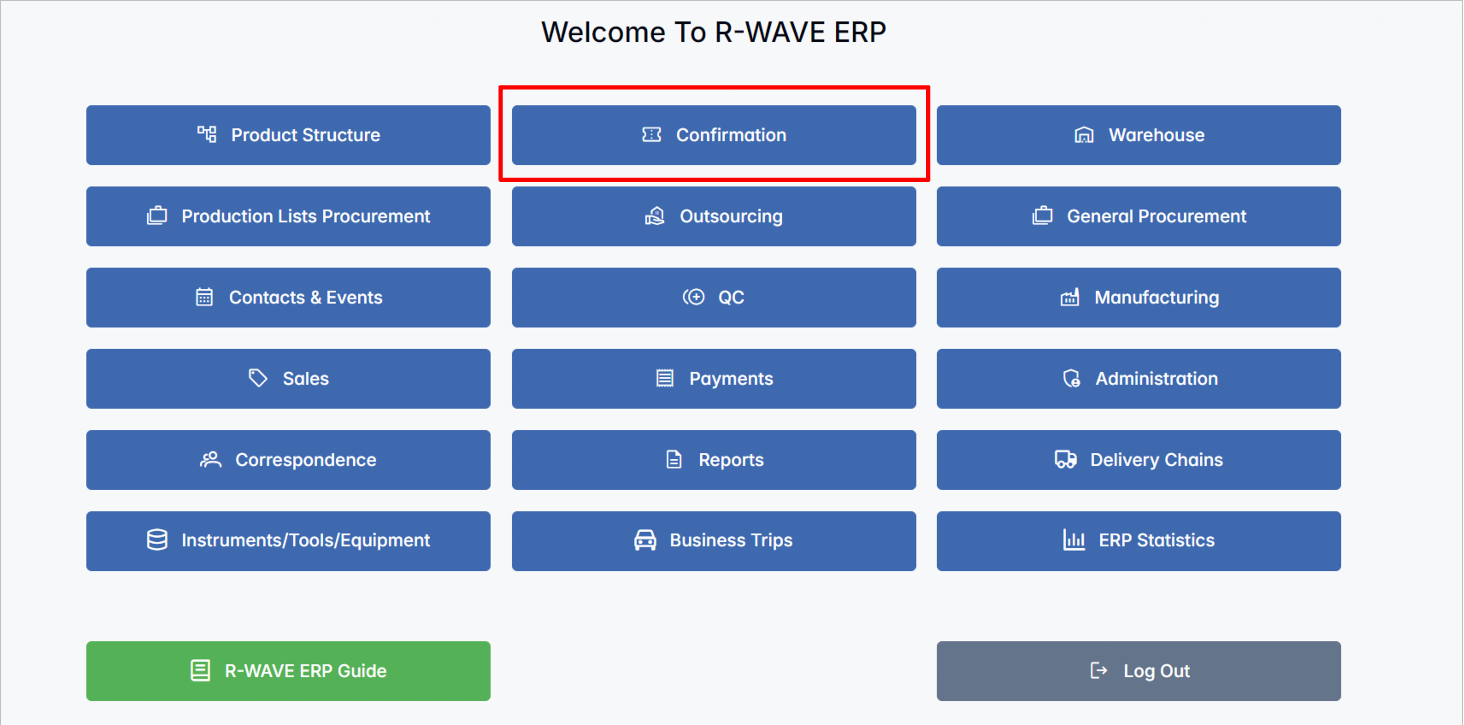
- Navigate to Confirmation. From the main menu, go to Confirmation and select Production Lists Confirmation.

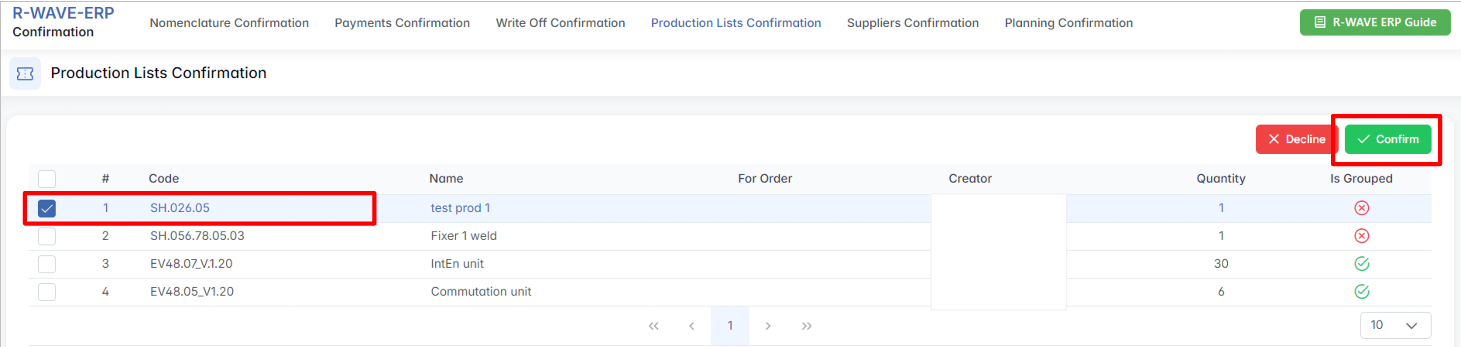
- Confirm the production list. Highlight the product in the confirmation module and click Confirm to approve the production.
Checking Warehouse Inventory
Checking Warehouse Inventory
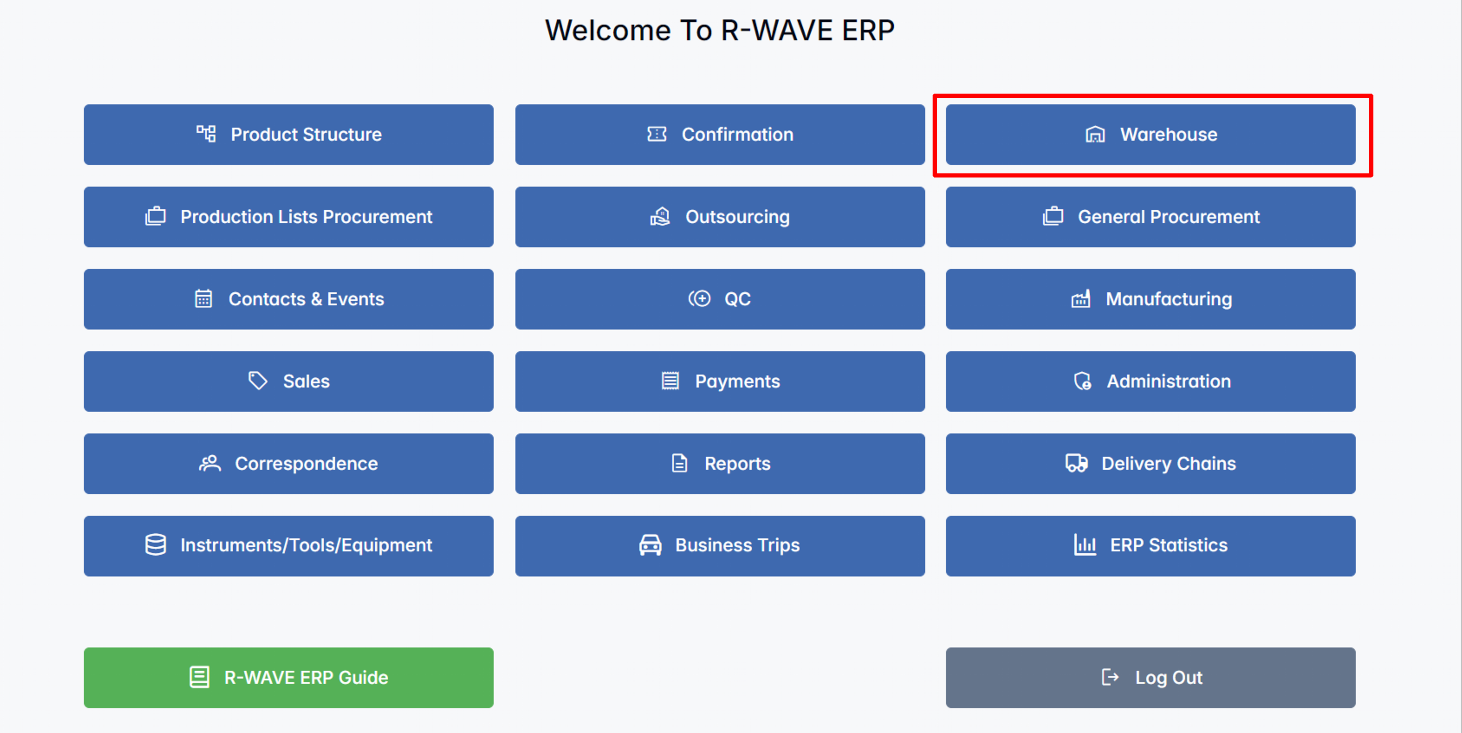
- Access the Warehouse module. Go to the Warehouse section in the main menu.
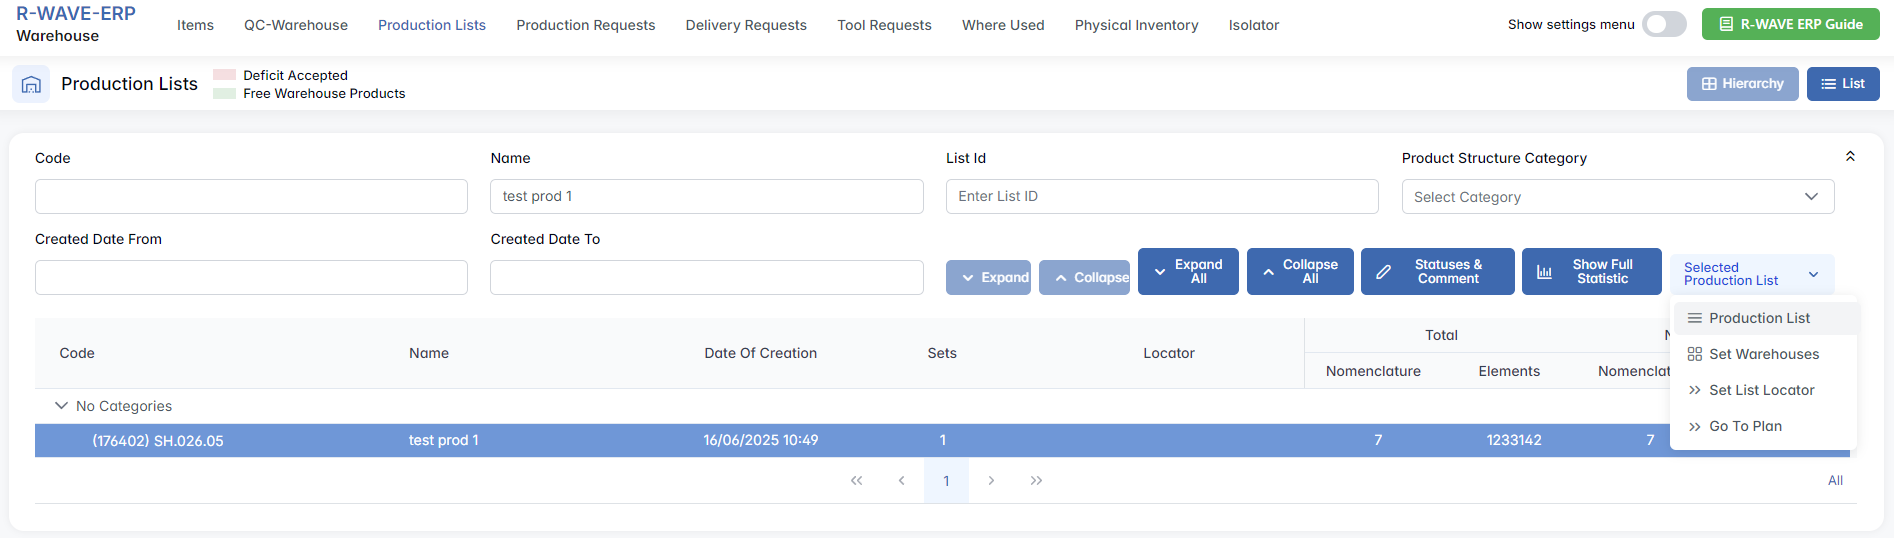
- Check inventory. Under Production Lists, select the item (e.g., "test prod 1") and click Production List to view the inventory details.
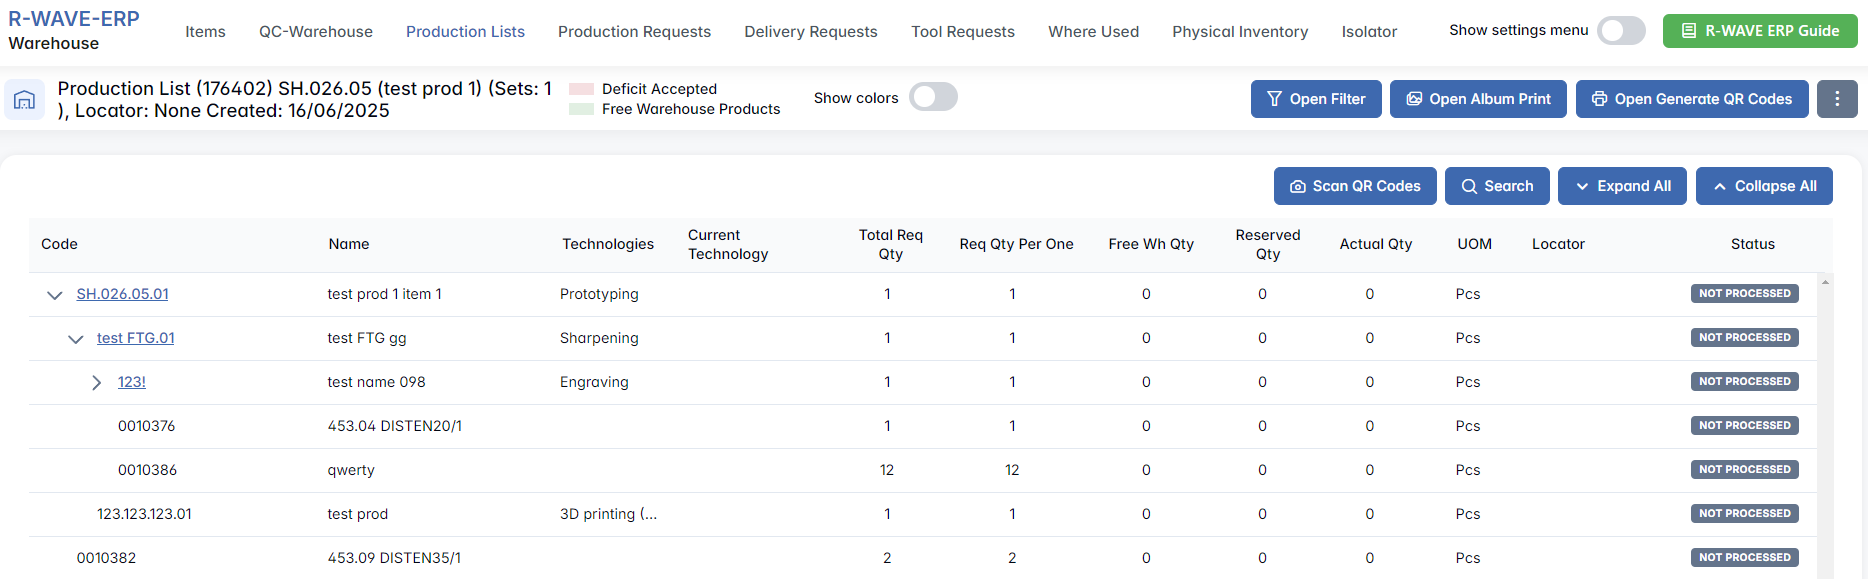
- Set actual quantities. For each item, click the Set Actual Quantity button to update the available stock.
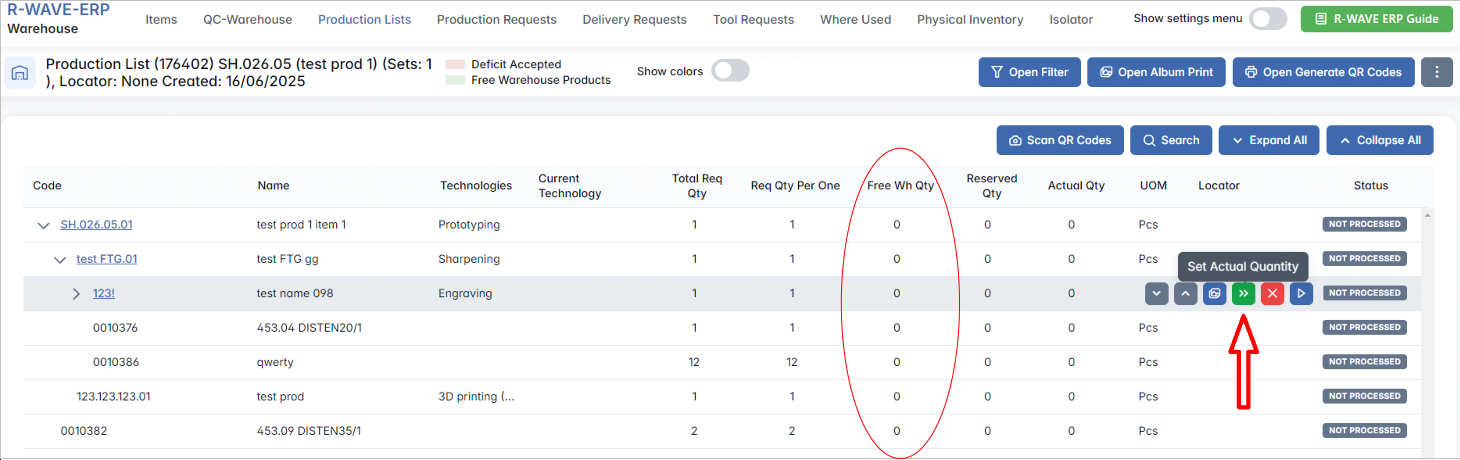
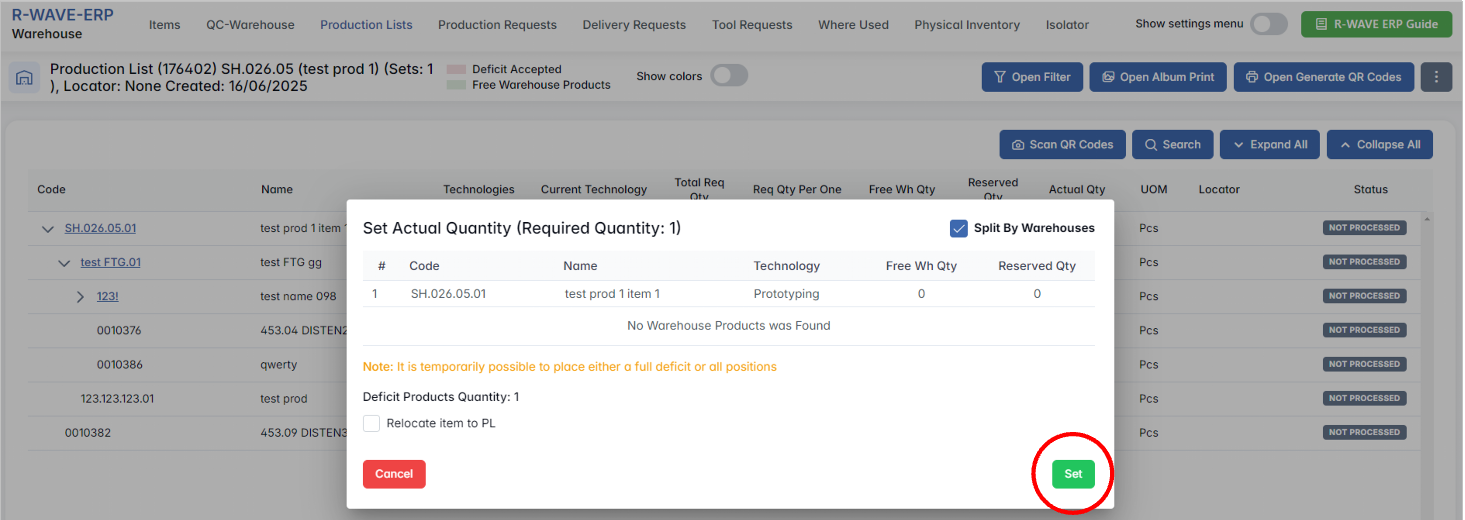
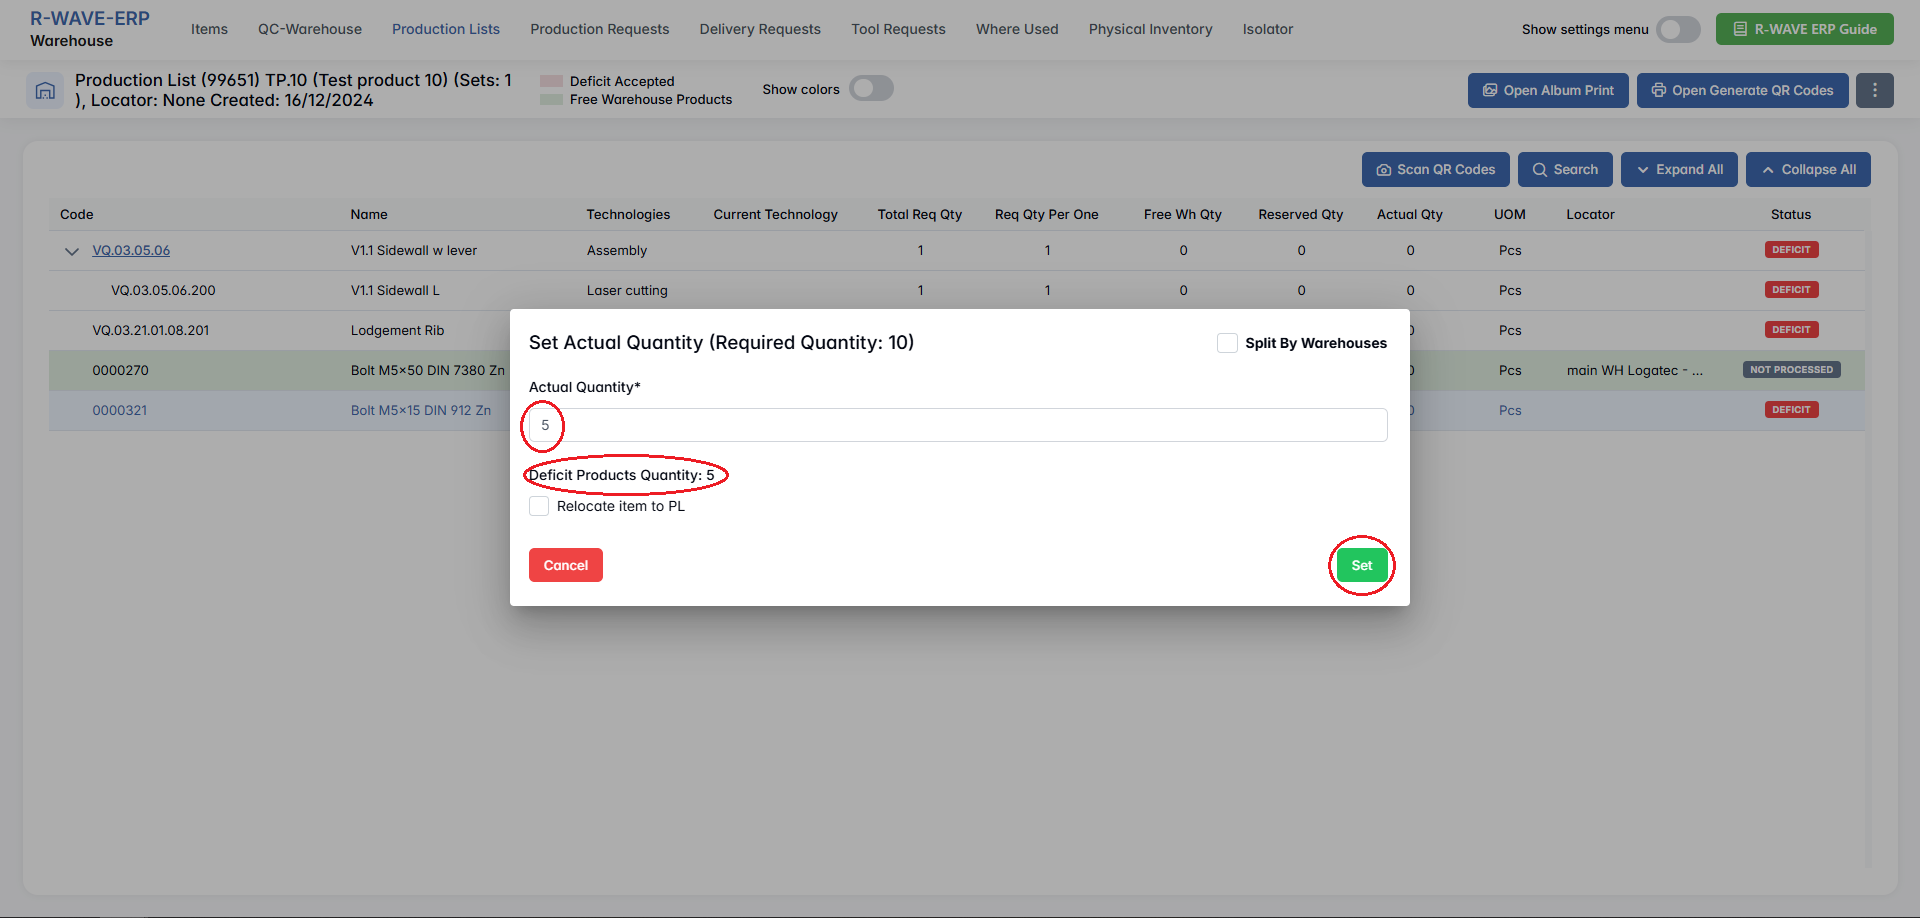
- Handle stock deficits. If the stock is insufficient, input the Actual Quantity to reflect the required quantity for production.
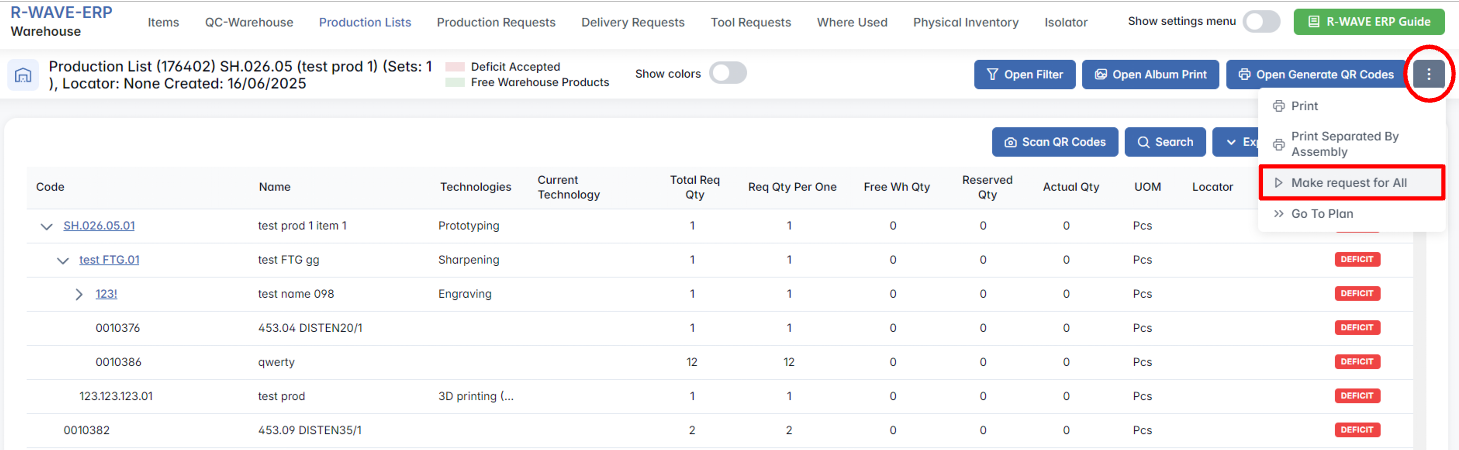
- Send the procurement request. After updating the stock, click Make request for All to send the list to the Procurement Department.
Procurement Process
Procurement Process
- Create a Procurement Chain.
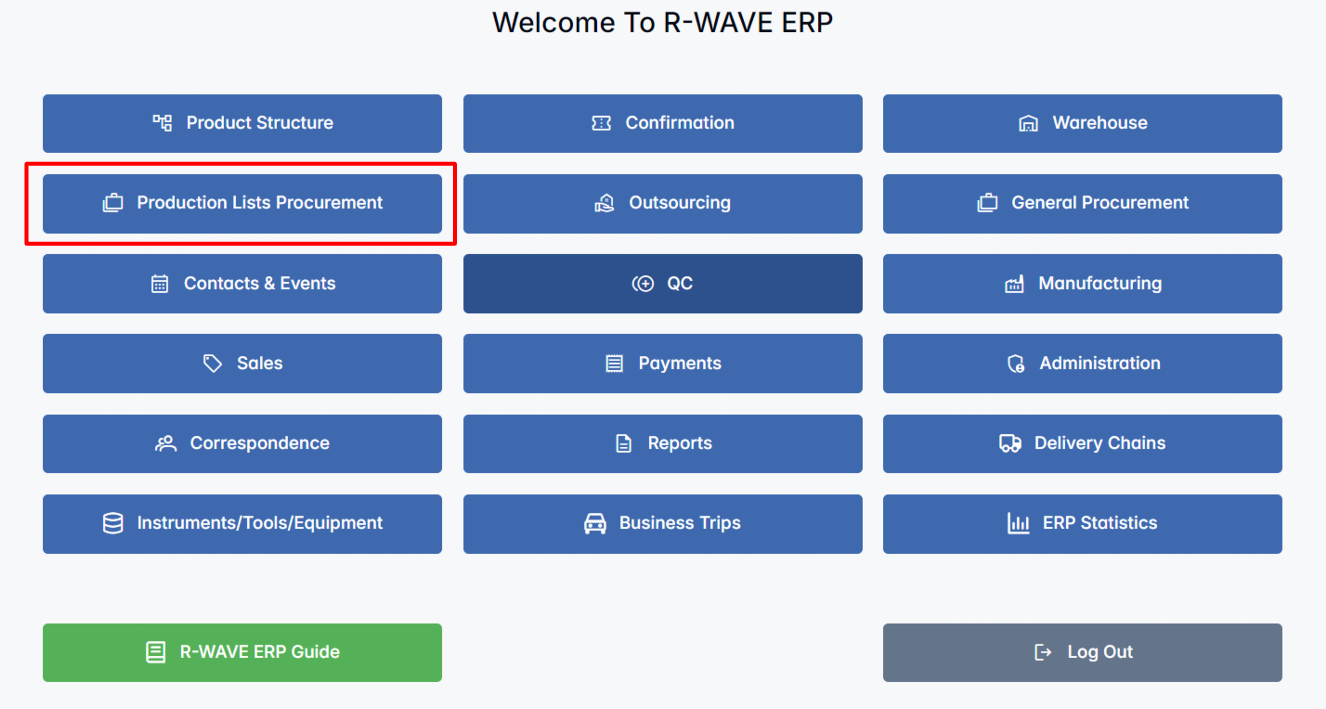
In the Production Lists Procurement module, open the Procurement Requests section and review the procurement requests.
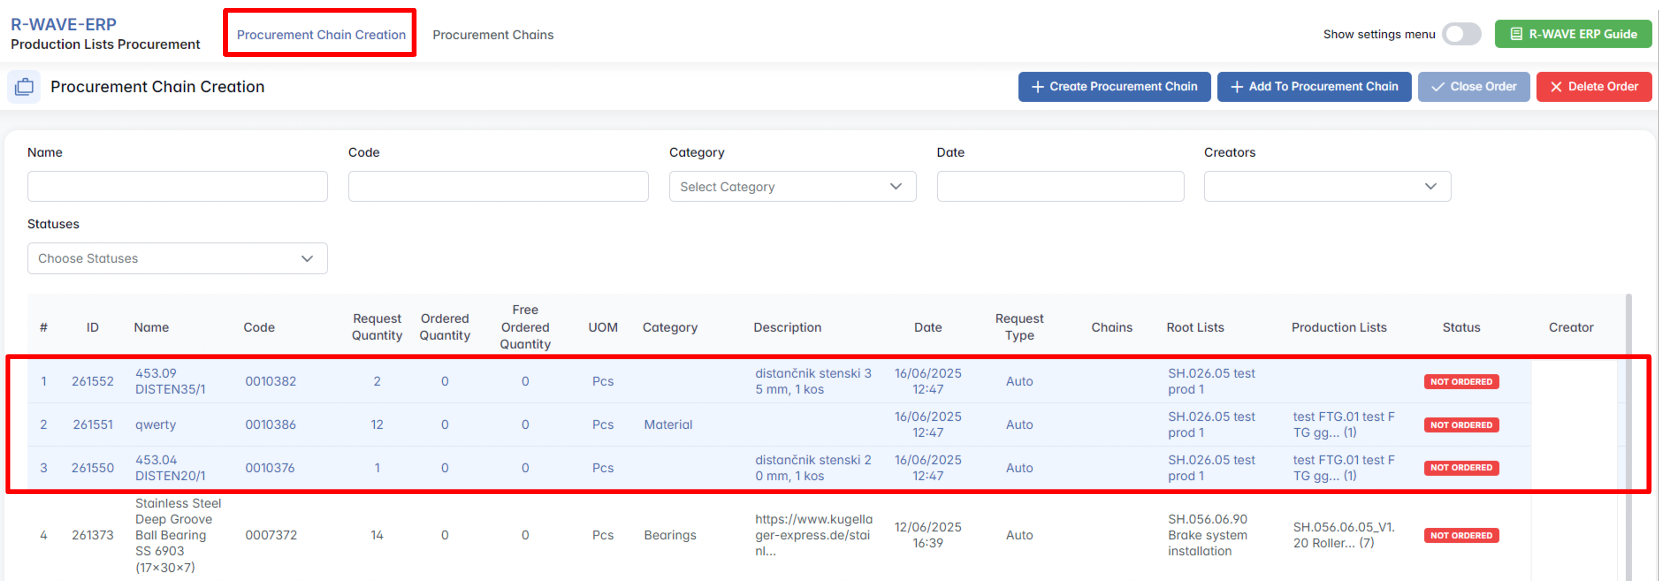
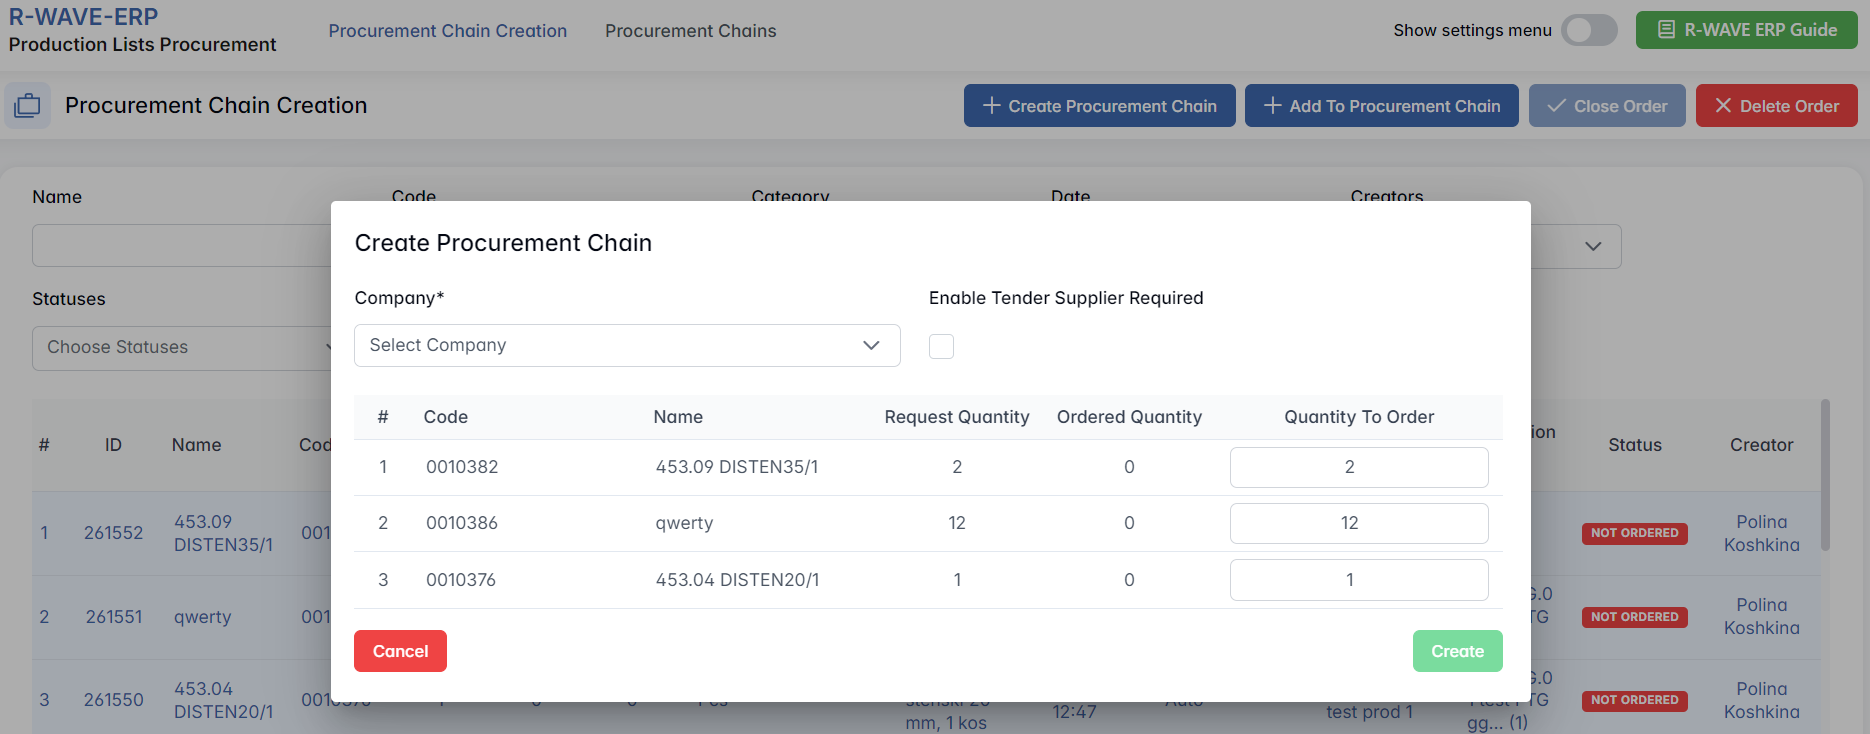
Click Create Procurement Chain to generate the order, choosing the quantity and supplier.
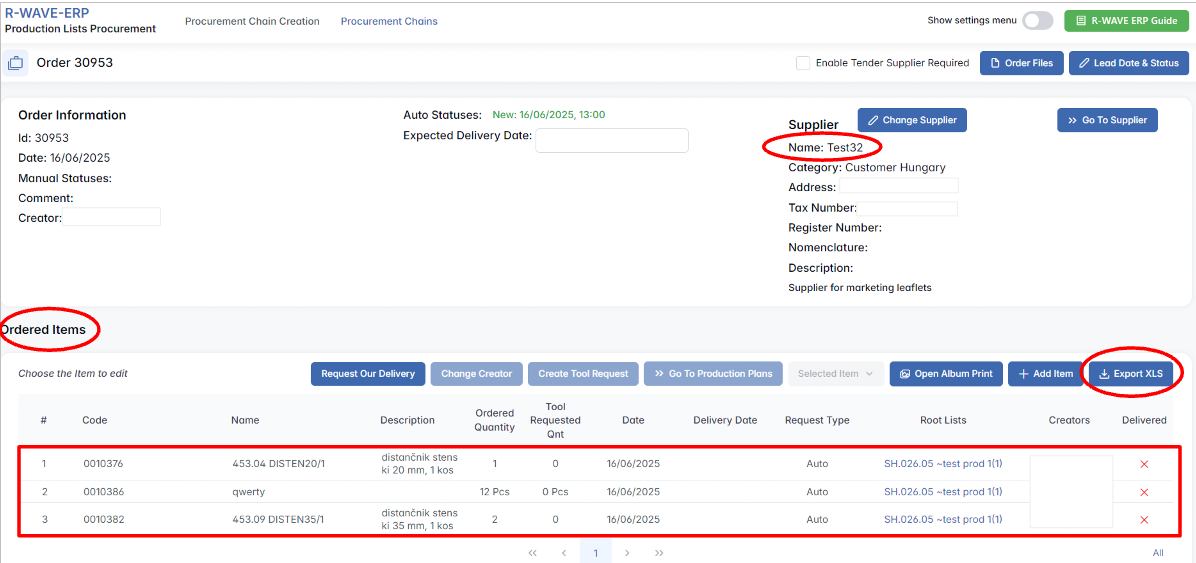
- Generate and export the procurement order. The procurement order (Procurement Chain) will be created. You can export it as an
.xlsfile for sending to the supplier.
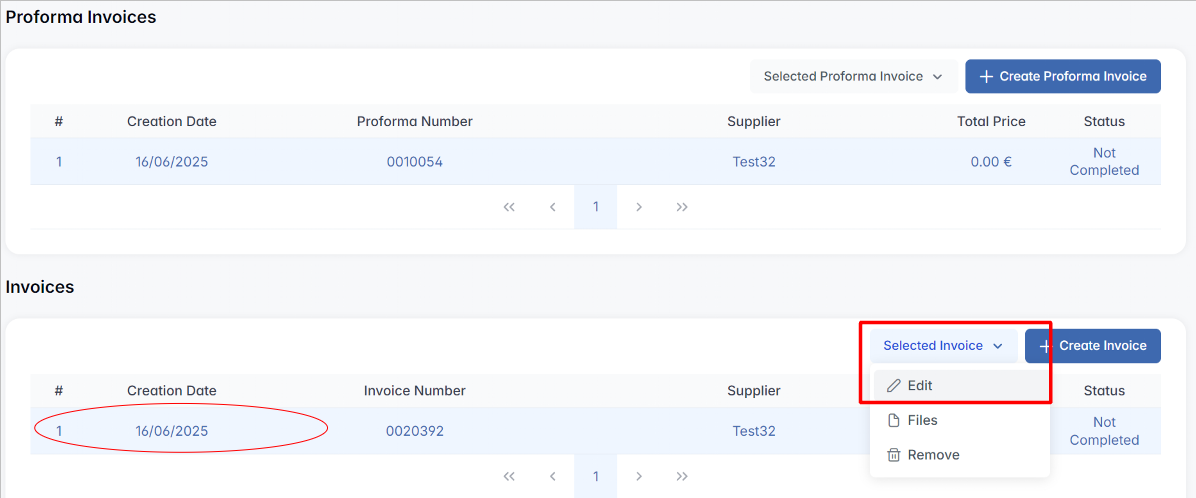
- Create an invoice. From the procurement chain, create a Proforma Invoice or an official invoice.
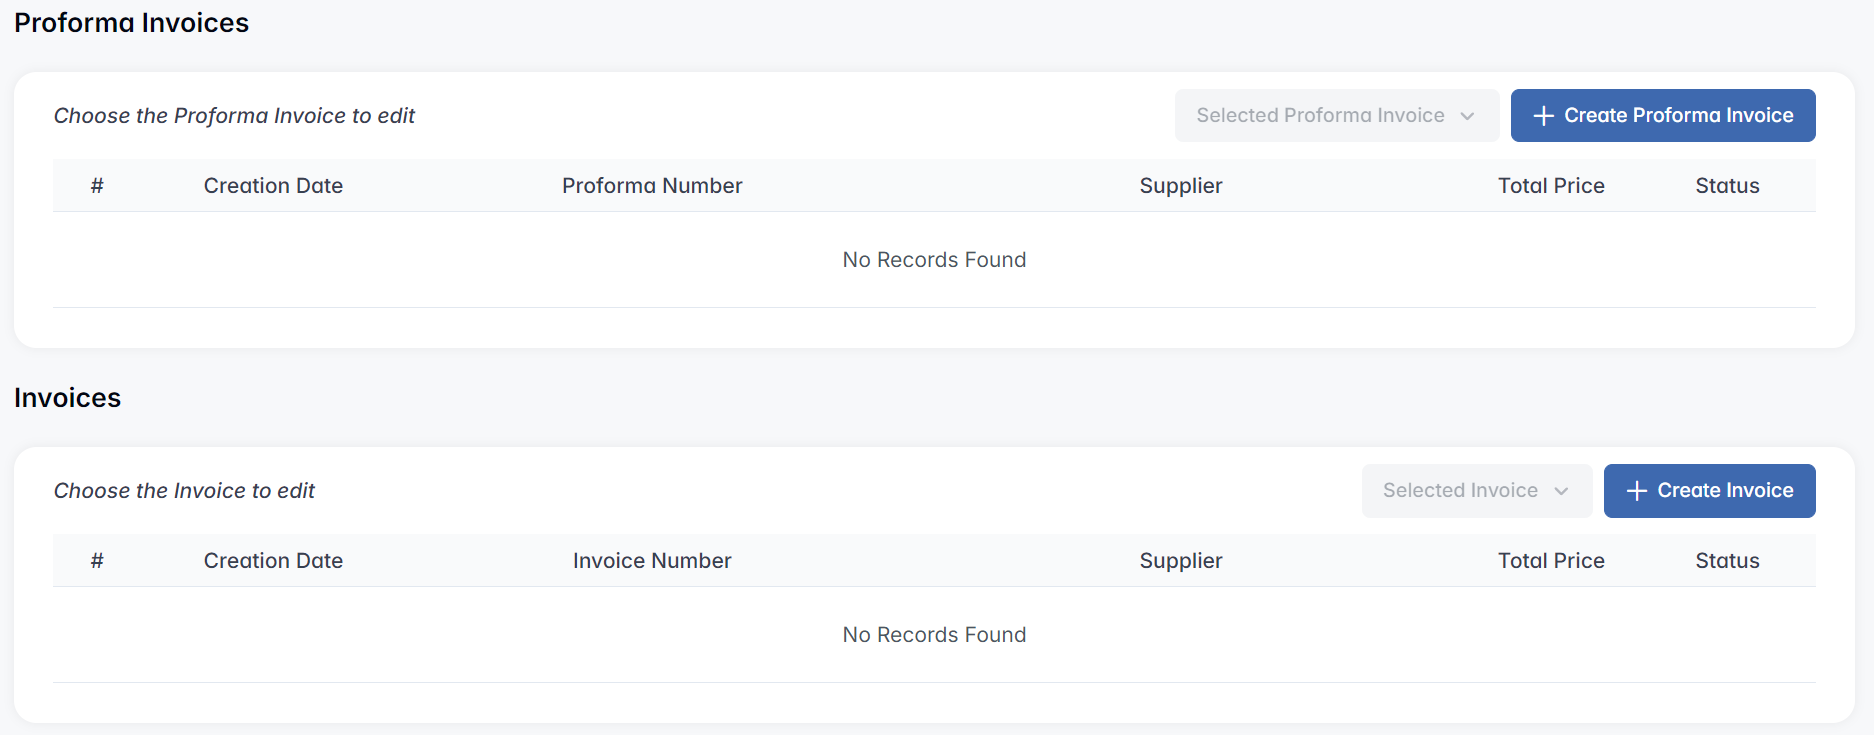
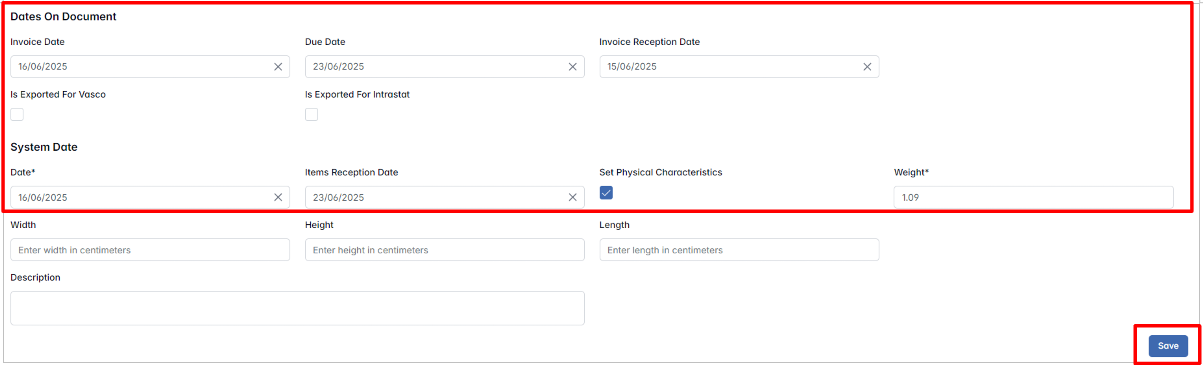
After receiving items, update the invoice with the necessary details (e.g., invoice date, due date, item reception).
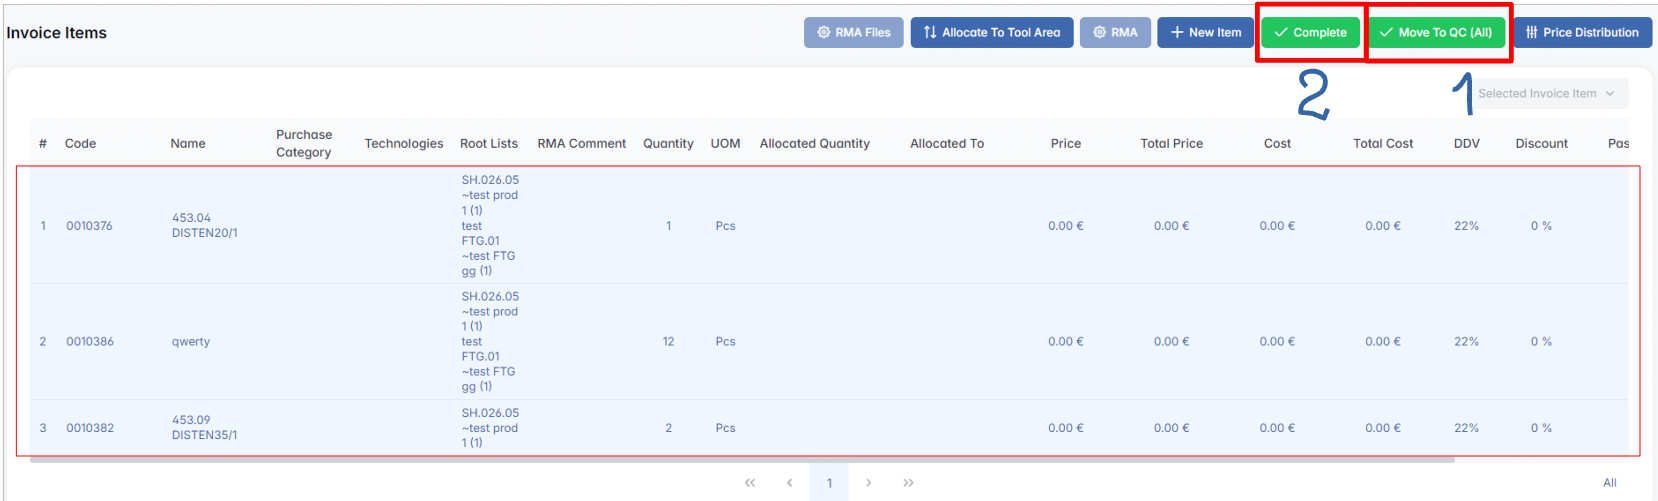
Then send the items to Quality Control.
Quality Control
Quality Control
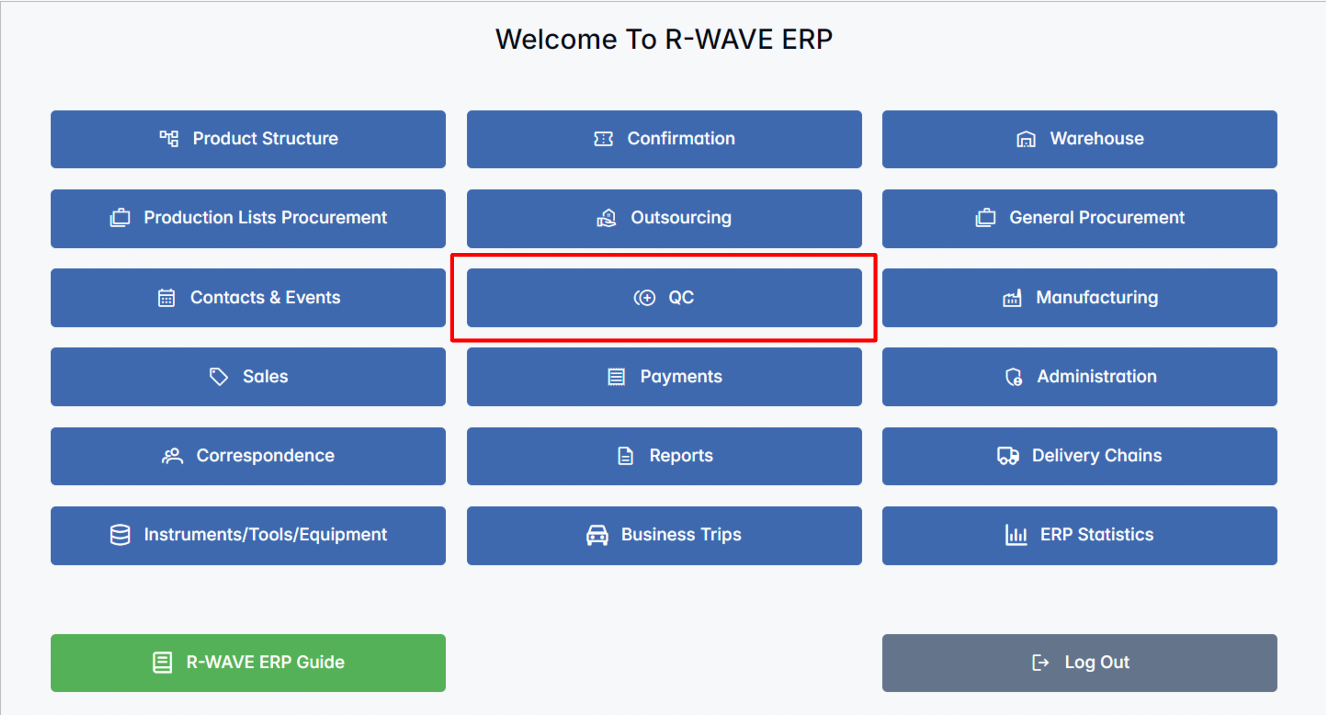
- Access the Quality Control module. Navigate to the Quality Control section and select the Items tab.
- Review and pass items. Highlight the items for the product and check their quality status.
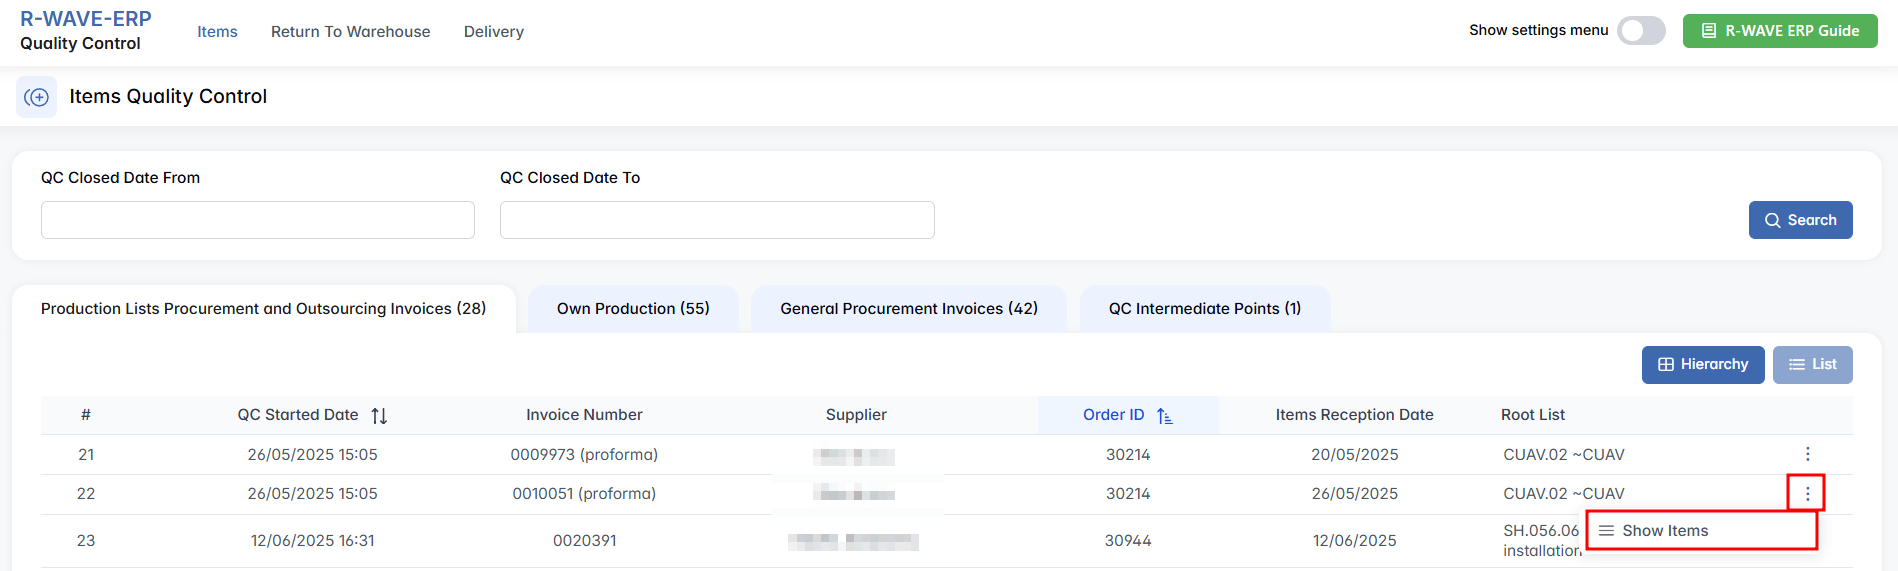
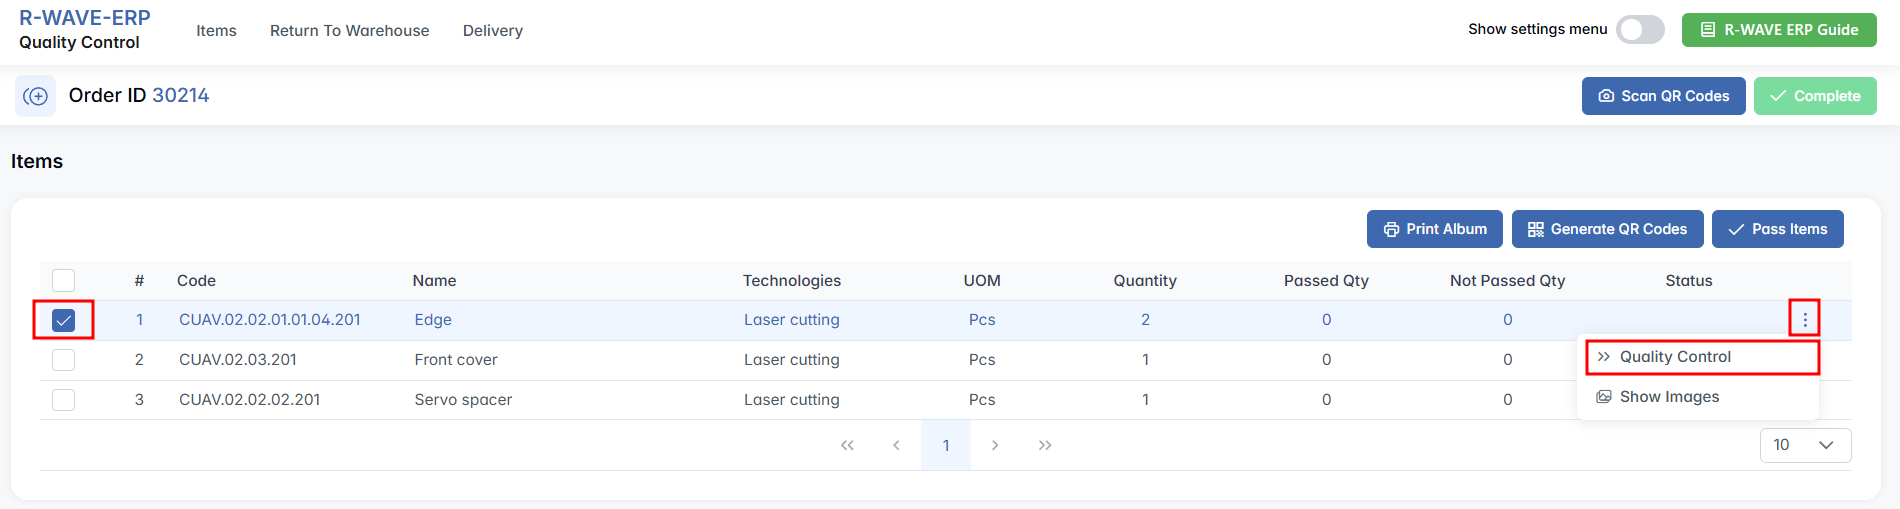
- Example of the quality control process. Suppose 1 out of 2 procured items passed quality control. In that case, you can press the Cancel command since all products have passed the quality check.

- Confirmation. Confirm that all positions have passed quality control.
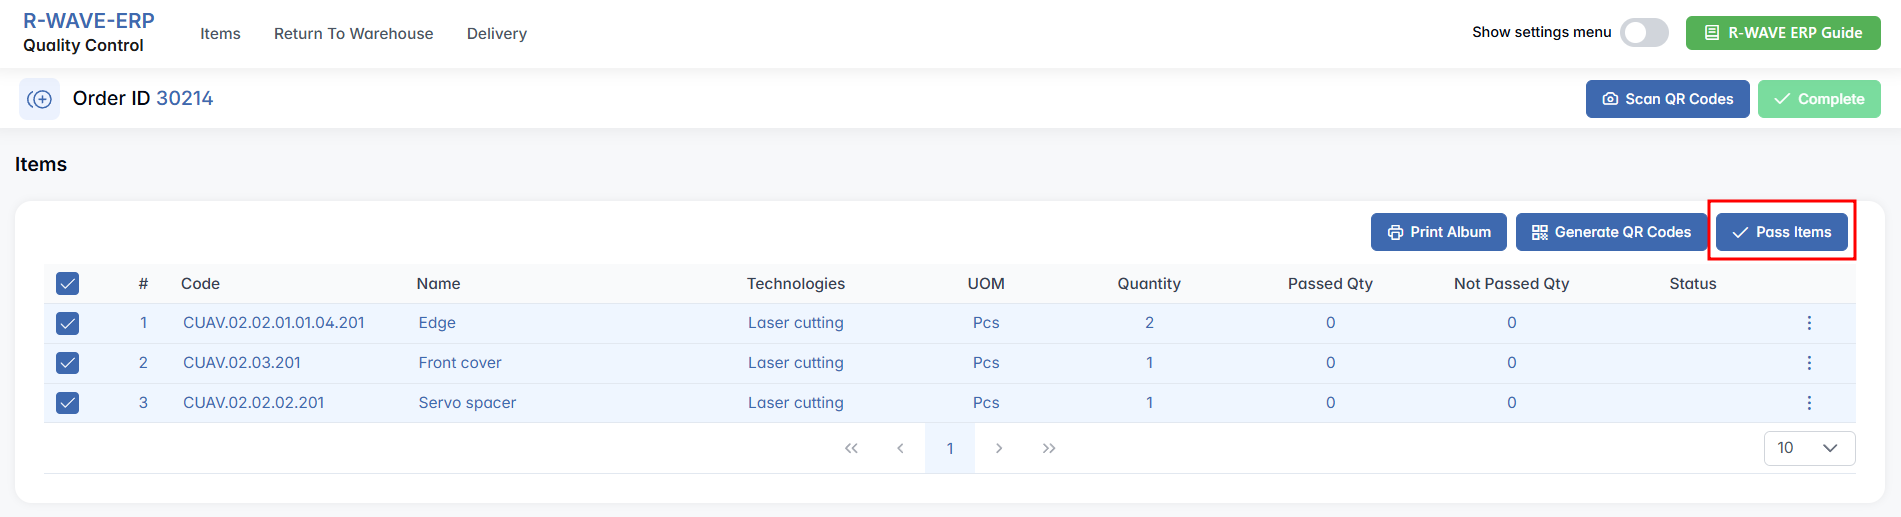
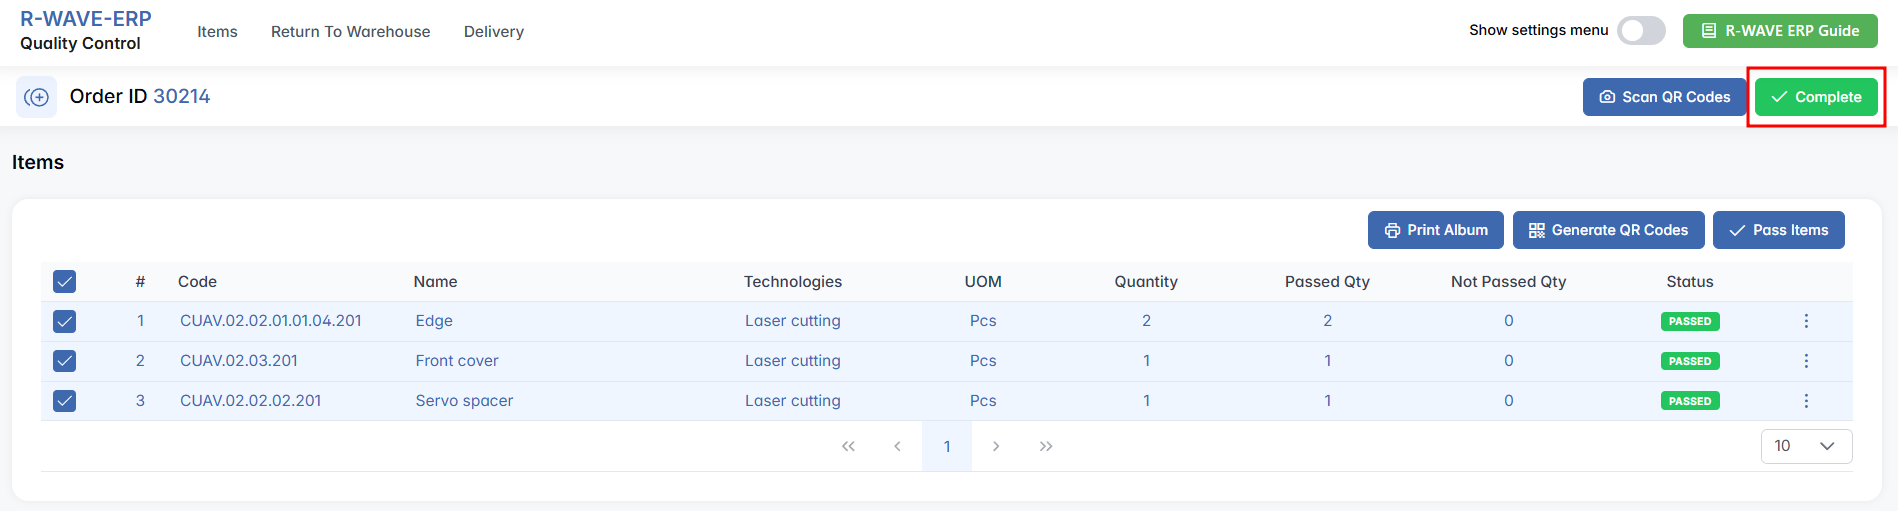
After reviewing, click Complete to finish the quality control process.
Manufacturing
Manufacturing
- Post-quality-control status check. After passing quality control, the position returns to the warehouse. Before going back to the Warehouse module, it is helpful to check the status of each position in the manufacturing process of
test prod 1.
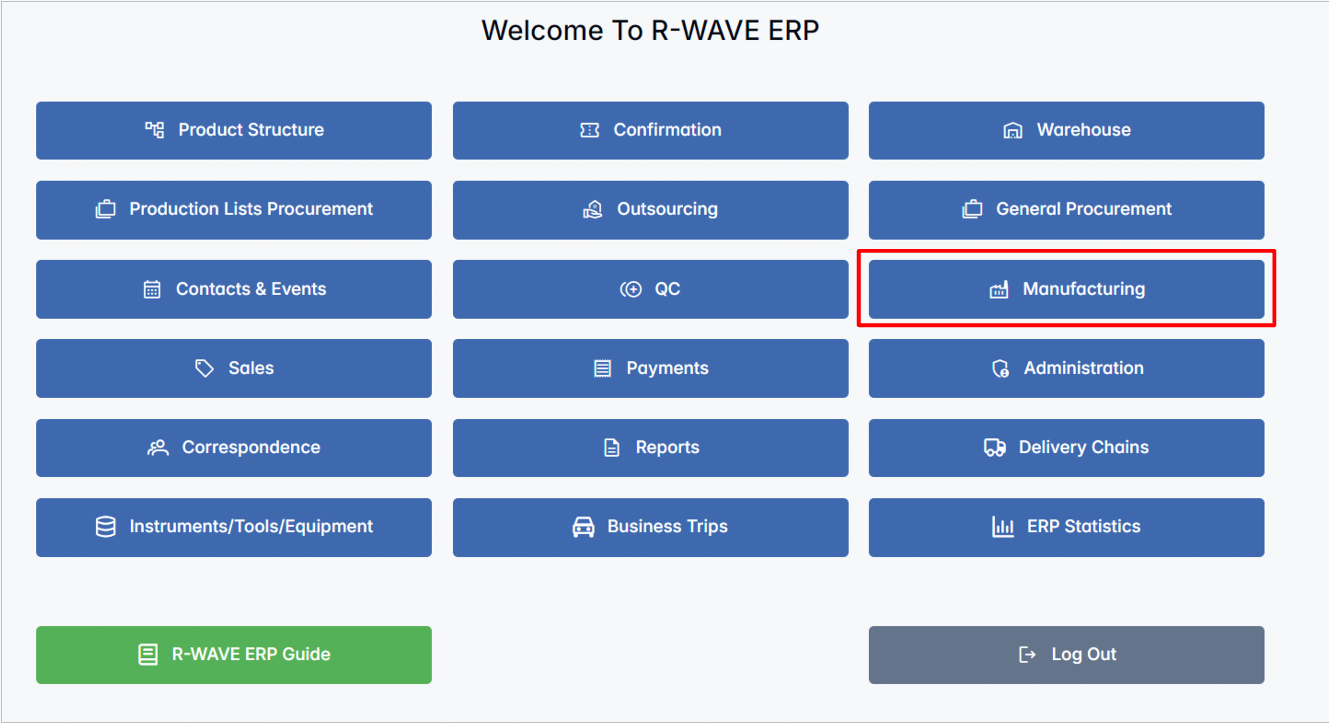
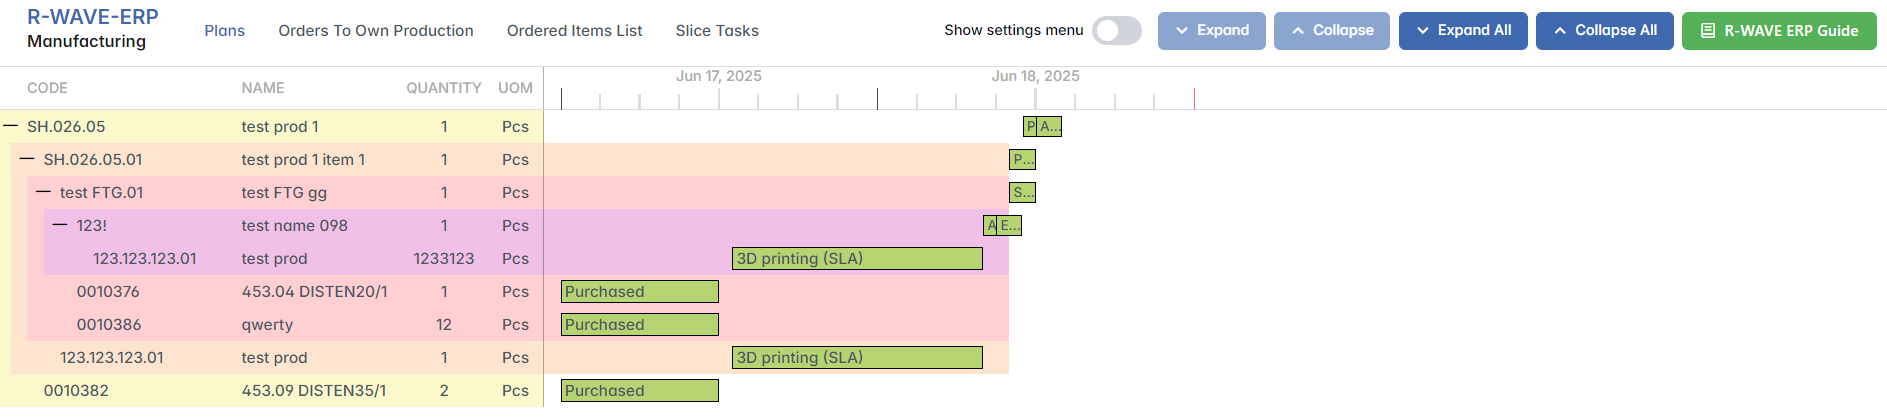
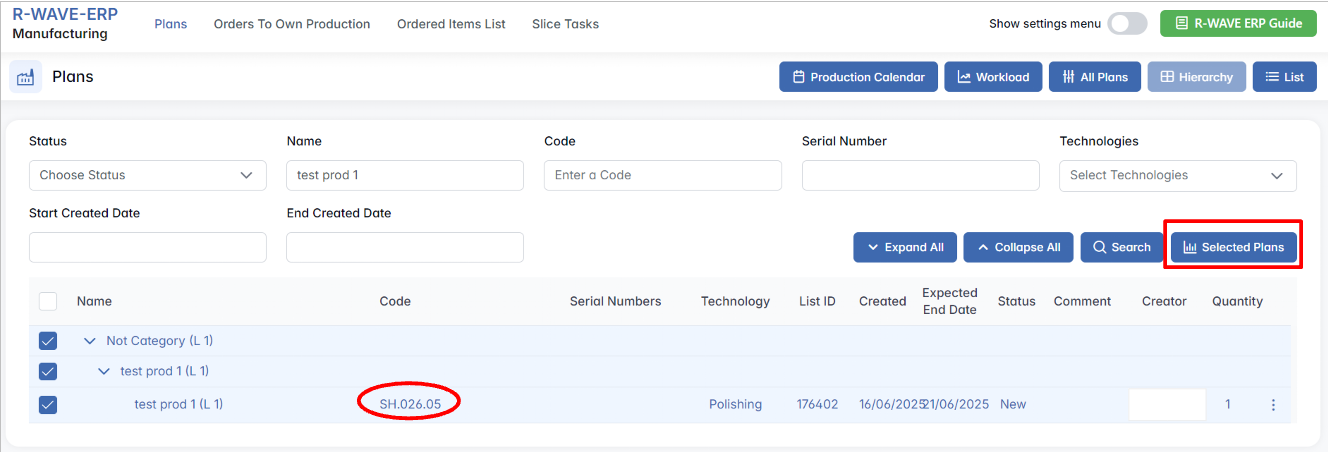
- Access the Manufacturing module. Navigate to the Manufacturing module to view the status of each position. Under Plans, open the list for
test prod 1and click the Selected Plans command or the code of the selected position.
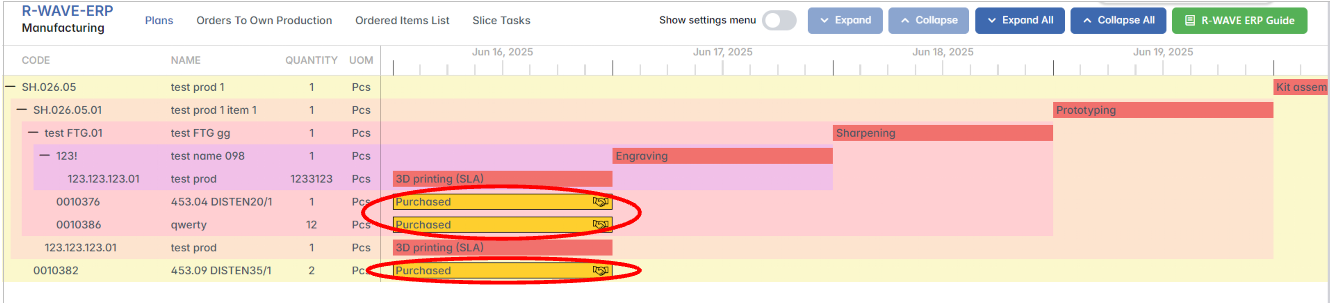
- View position status. In the production plan, you will see the status of each item. For instance, the statuses of
0010376,0010386and0010382are marked yellow, indicating that procurement is still in progress.
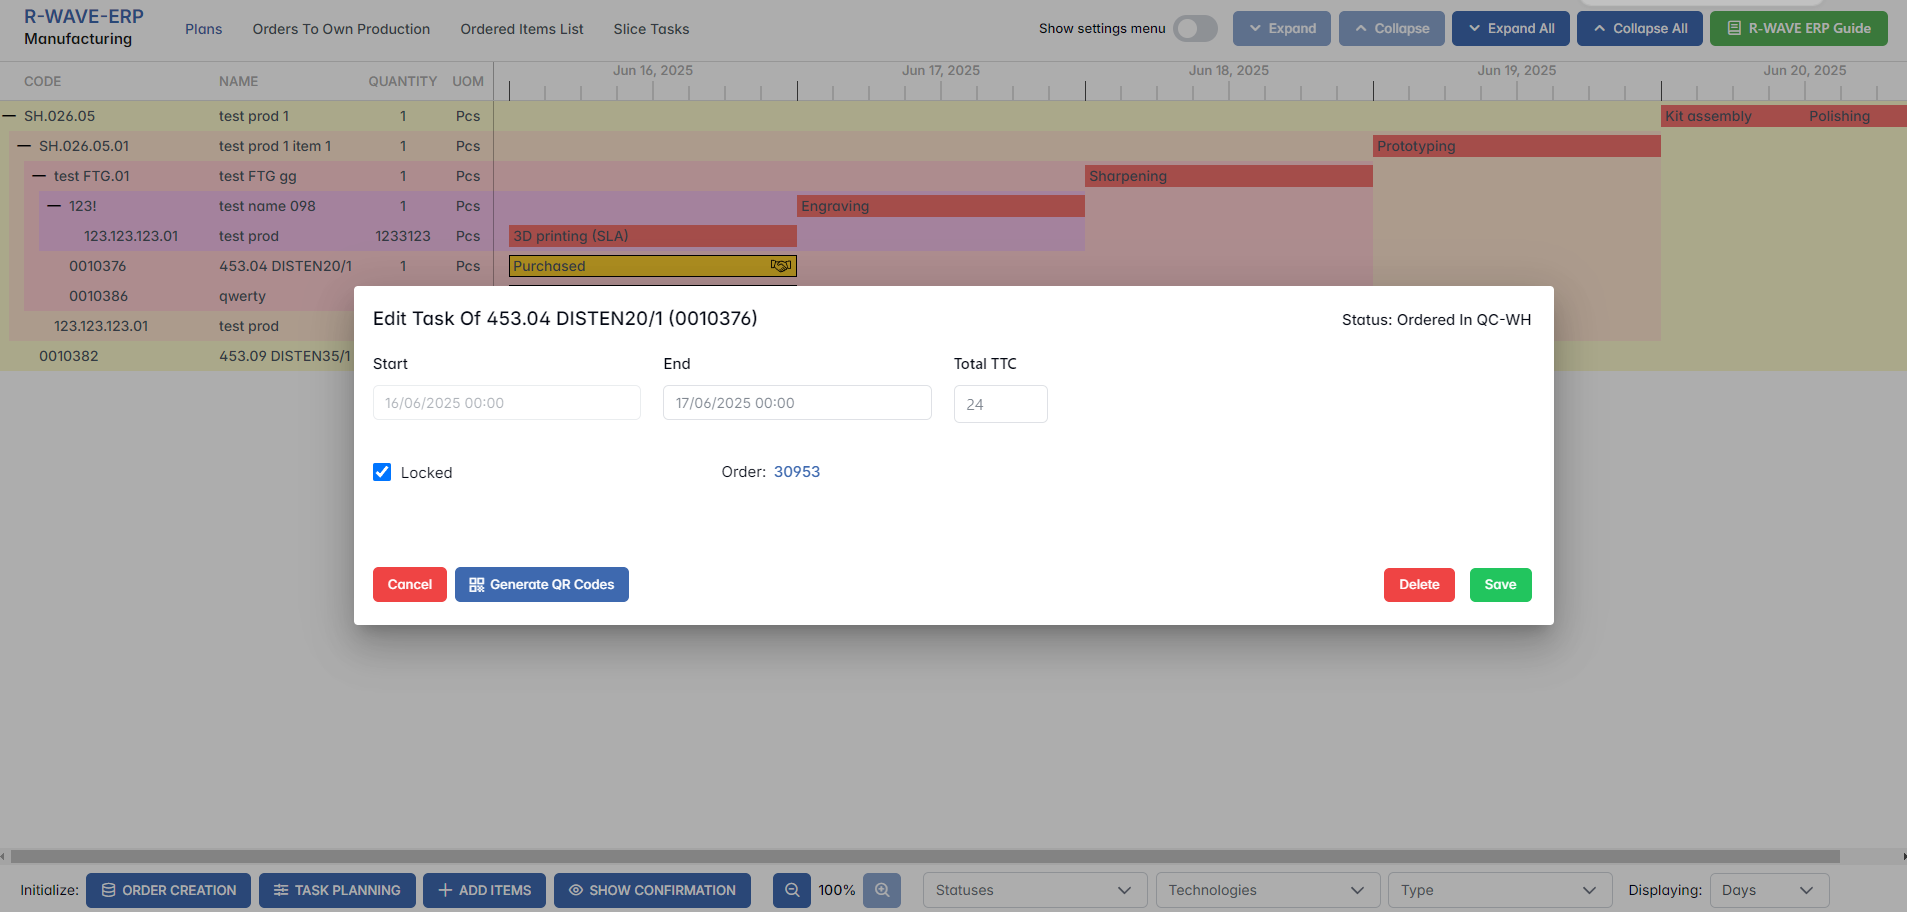
- View detailed status. Click on the horizontal bar of the position to see further details. In our case, the position is between Quality Control (QC) and Warehouse (WH).
Warehouse
Warehouse
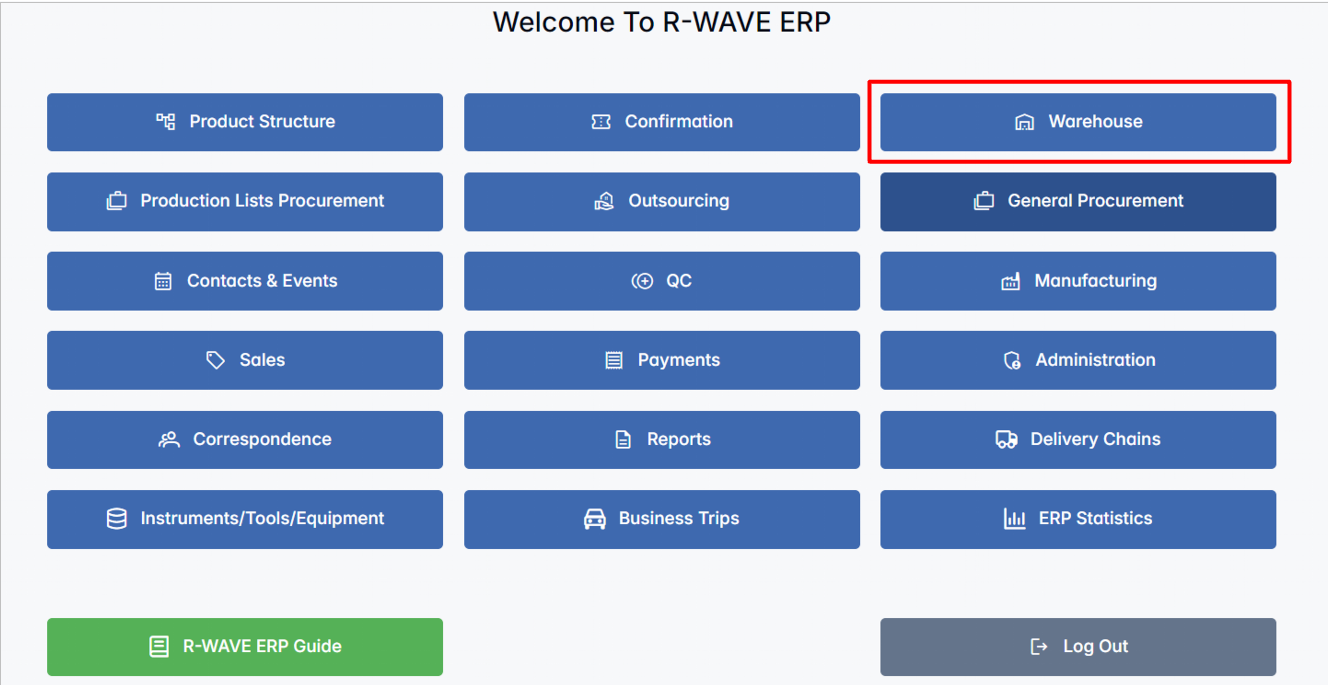
- Access the Warehouse module. Navigate to the Warehouse module to allocate positions that have been procured.
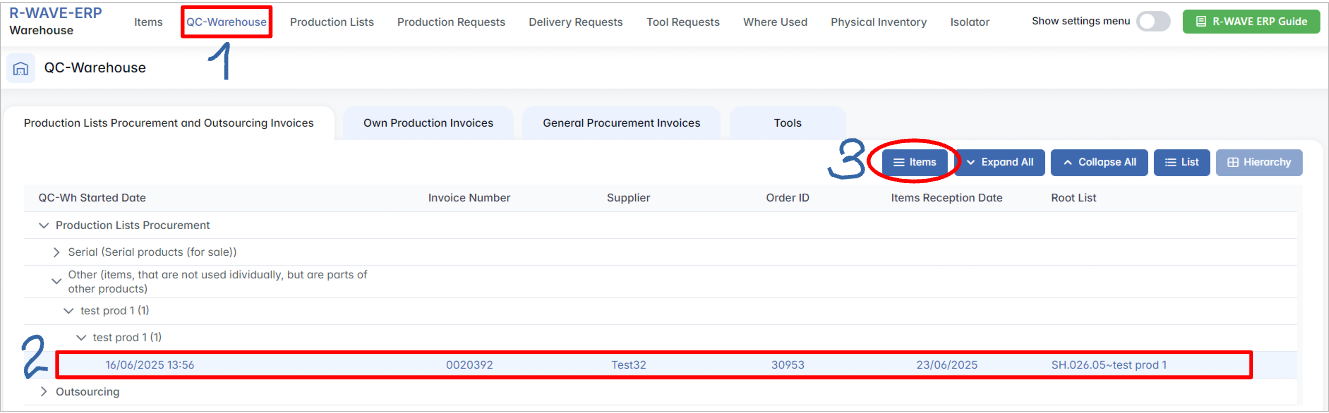
Under QC-Warehouse, choose your product and click the Items command.
- Allocate items to the warehouse. The list of items that passed quality control will appear.

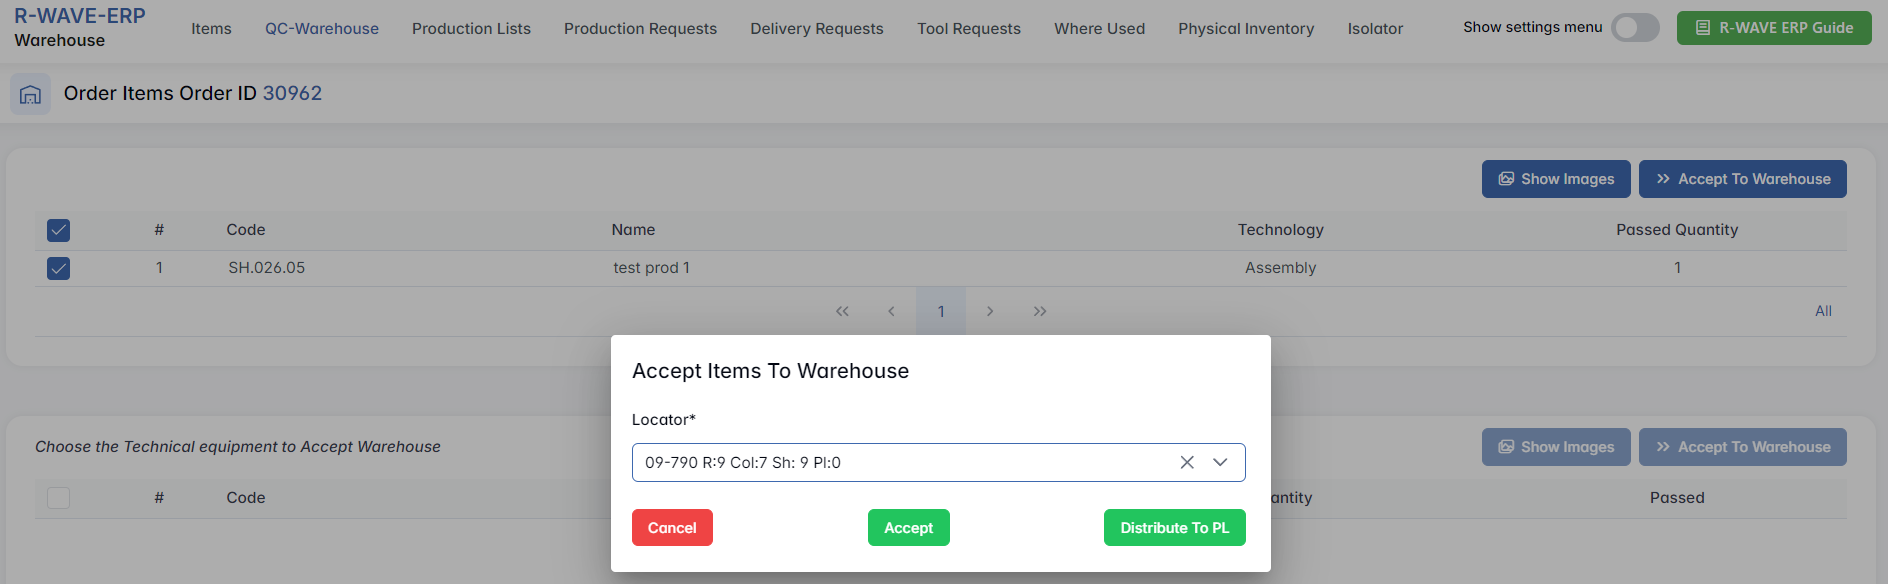
Select the desired number of items and allocate them to the specific warehouse and location using the locator form that appears when you press the Accept To Warehouse command.
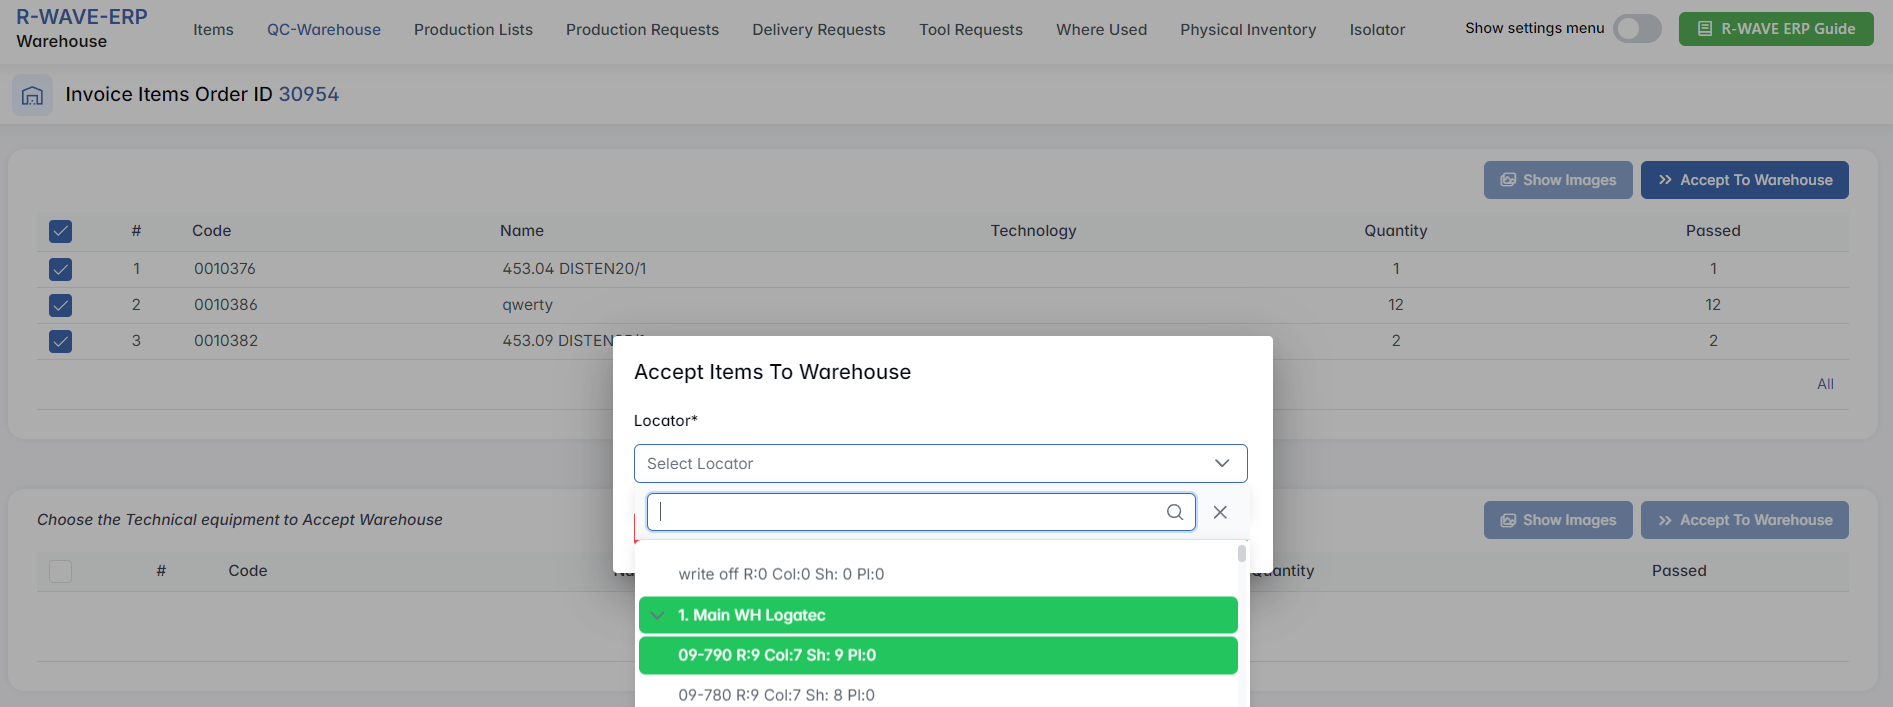
After that, confirm your choice by clicking Accept.
Handling Unallocated Items and Creating Orders
Handling Unallocated Items and Creating Orders
- Update the production plan. Refresh the production plan to observe that the previously yellow positions have turned green, indicating that they are now in the warehouse.
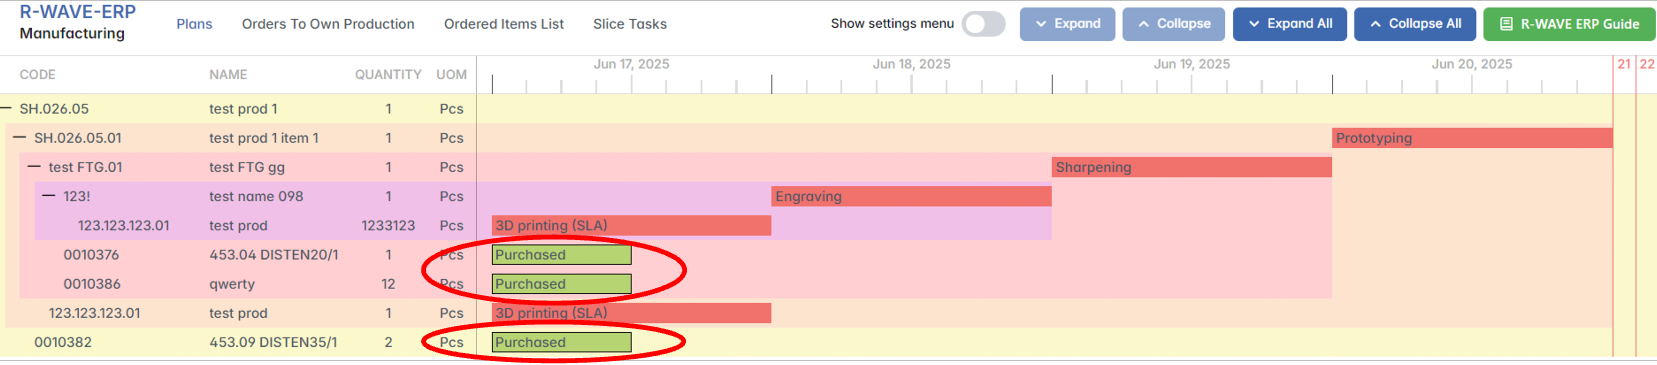
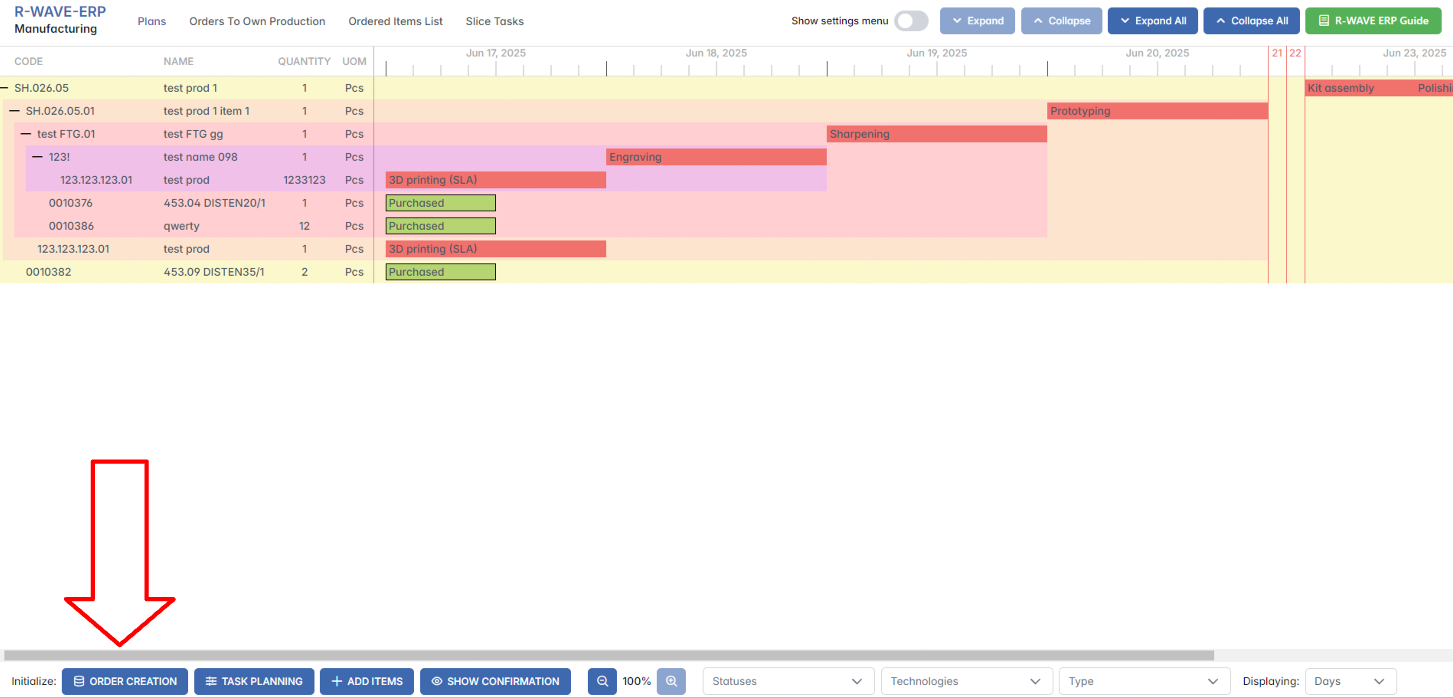
- Handling unallocated positions. There may still be positions marked in red that are not yet in the warehouse. It is the manufacturing department's responsibility to laser cut them. To proceed with 3D printing (SLA) or similar procedures (e.g., laser cutting), you can choose between In-House Production or Outsourced Production by pressing the Unlocked Technology command at the bottom left of the BINU ERP program.
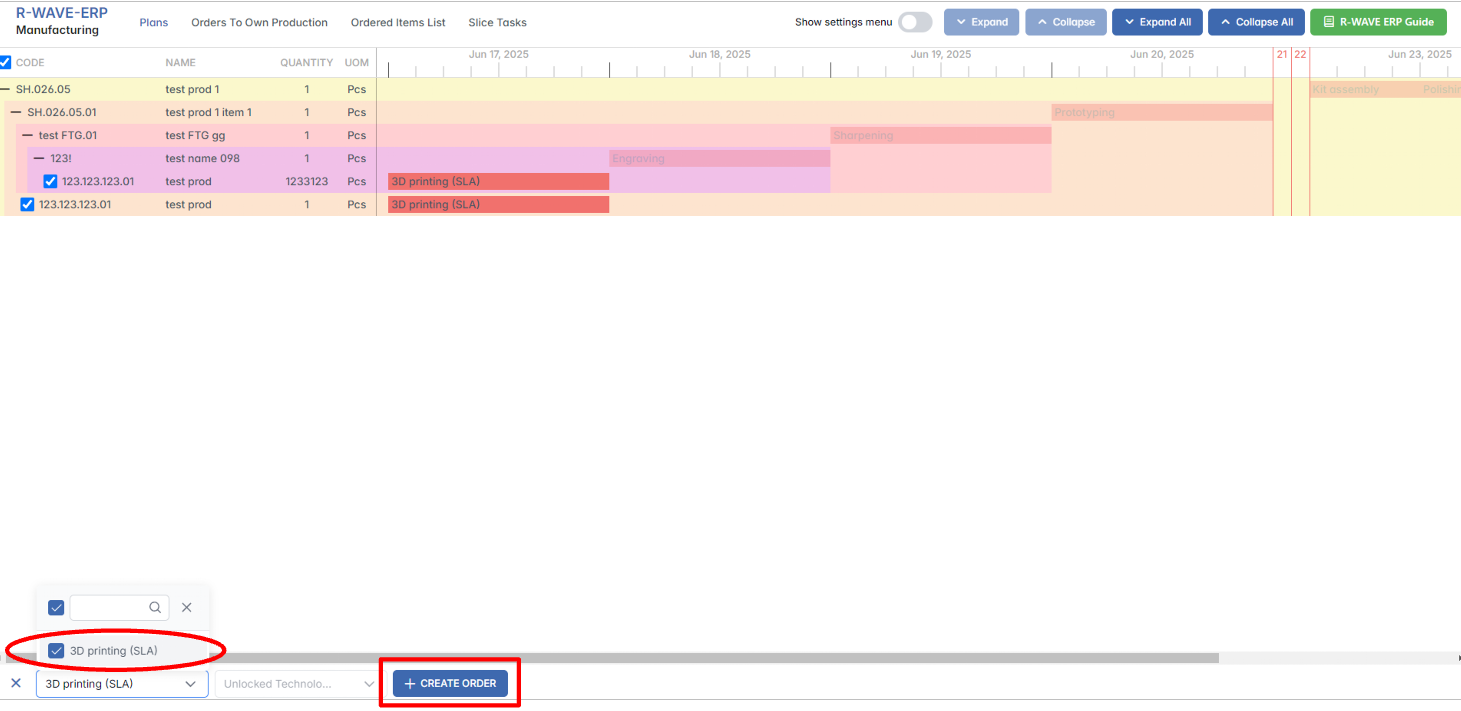
- Create a production order. Tick the "3D printing (SLA)" option and press the CREATE ORDER button.
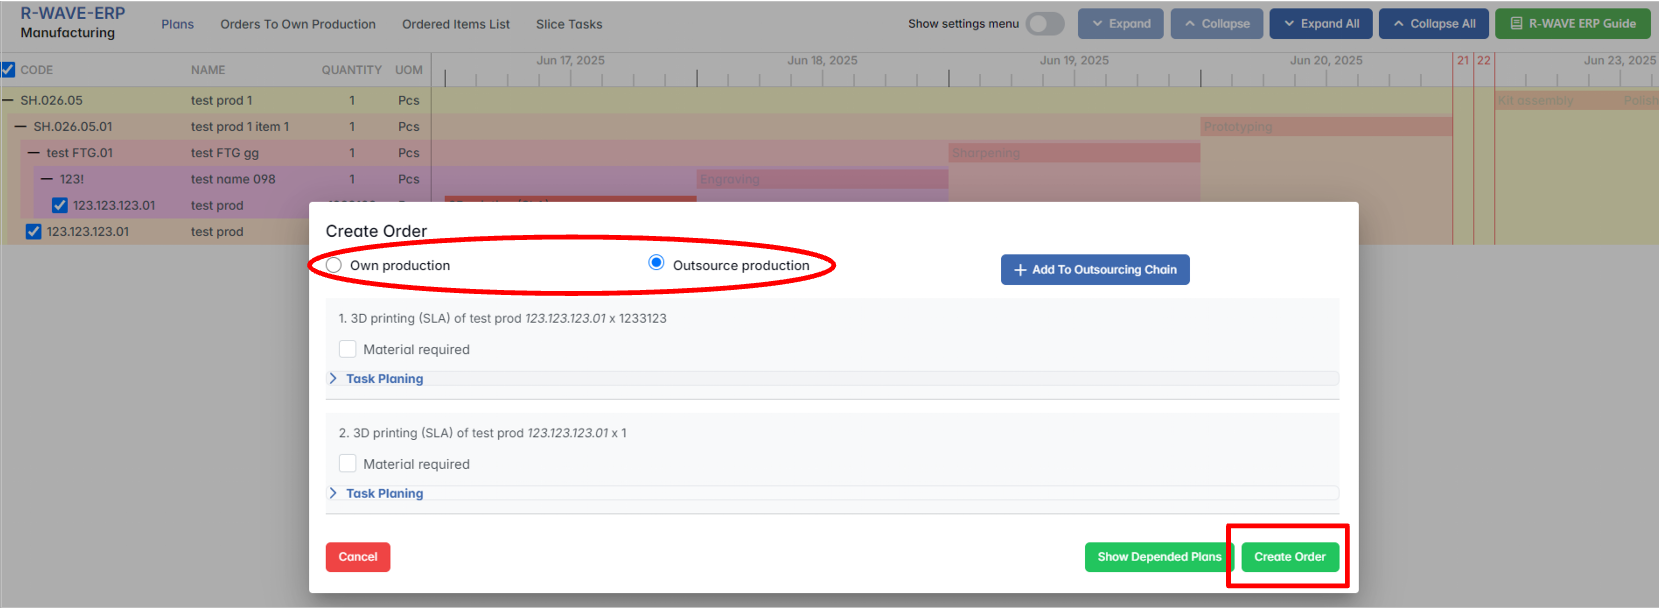
- Create an outsourcing order. In the pop-up Create Order window, choose "Own production" or "Outsource Production" and then proceed.
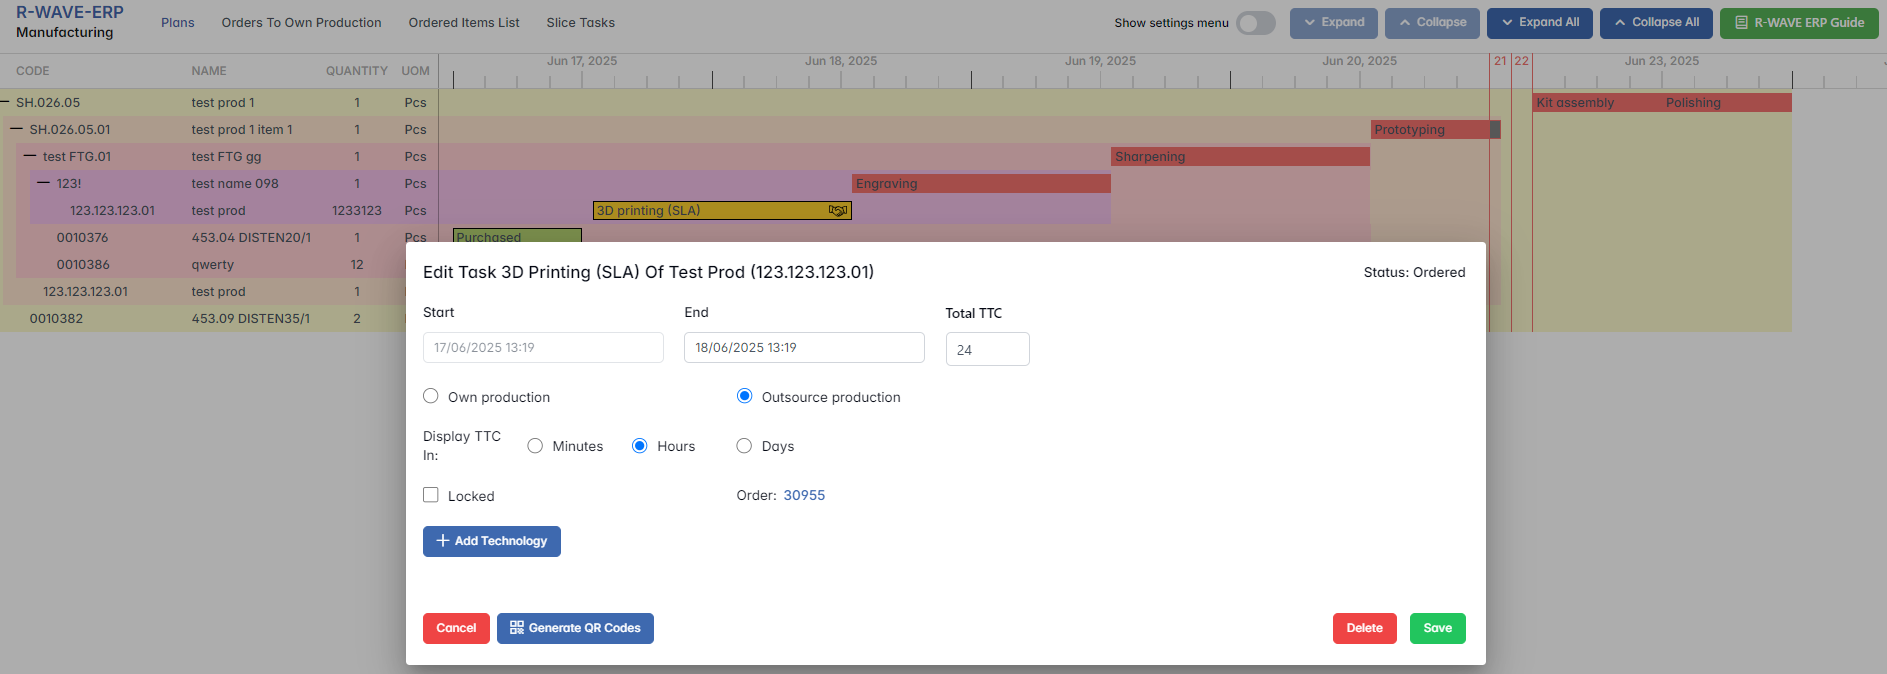
- Update the production plan. Once outsourced, the status color of the positions will gradually update. Initially marked in red (not in warehouse), positions will transition through yellow (order in progress) before turning green once delivered to the warehouse.
Procurement and Delivery Dates
Procurement and Delivery Dates
- Procurement department's responsibility. The procurement department is responsible for selecting the supplier and setting the expected delivery date for outsourced production.
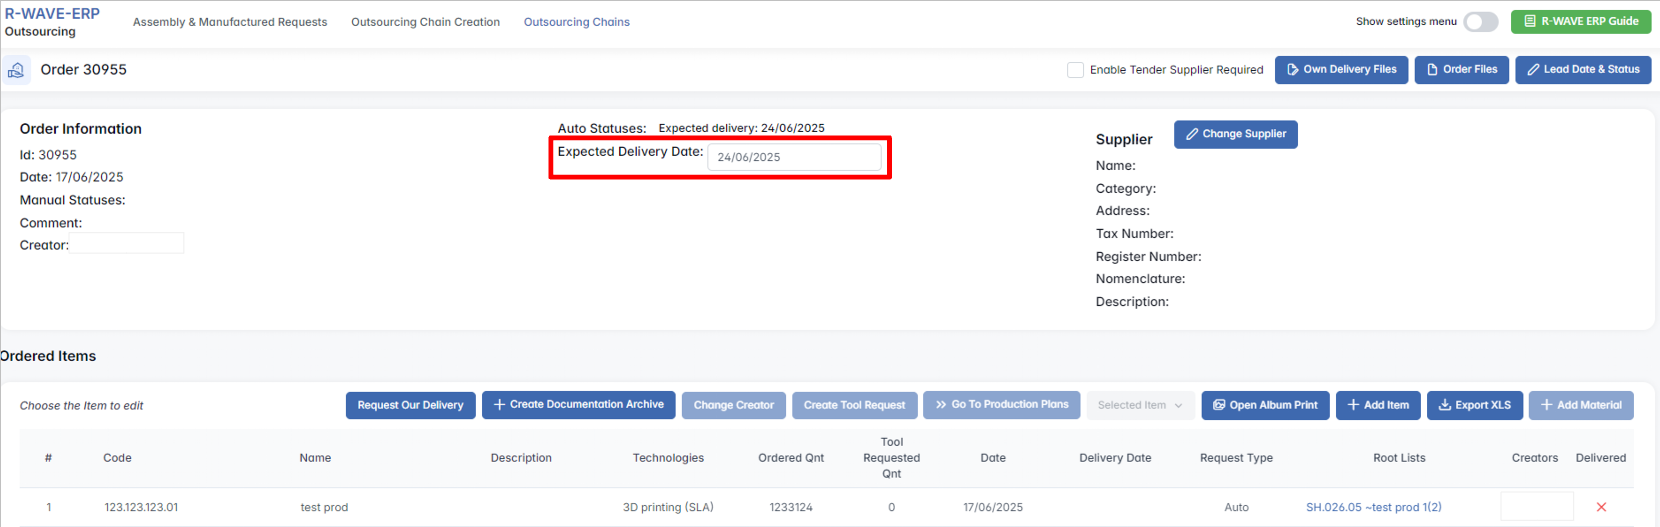
- Update the production plan. After setting the delivery date, refresh the production plan to reflect the updated status. The position will change from yellow to partially gray, indicating that it is awaiting delivery until the expected date.
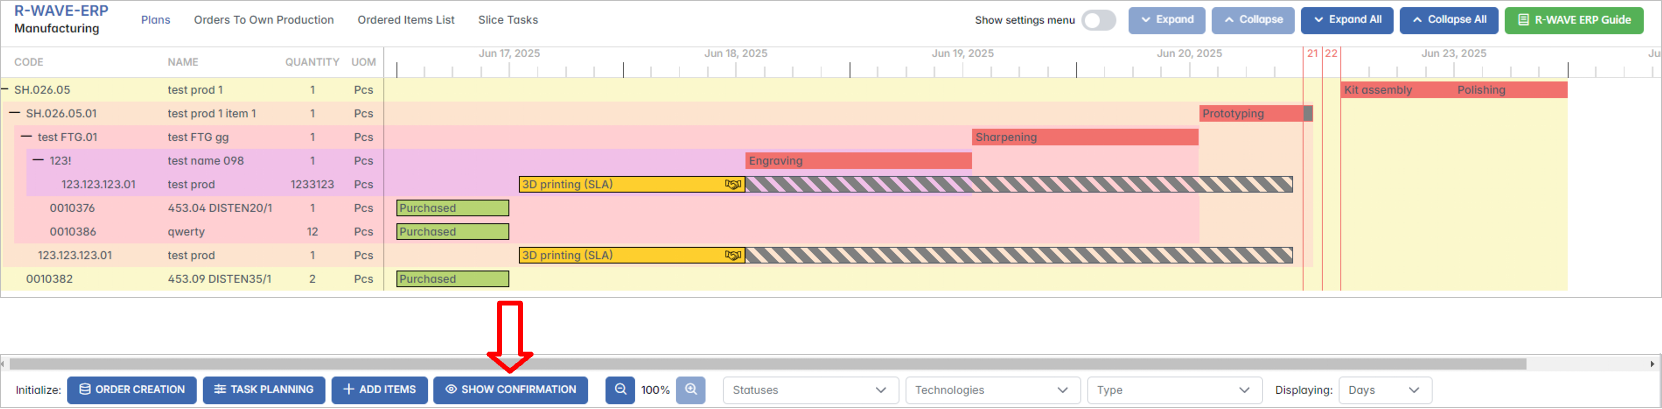
- Confirm the expected delivery date. Once the expected delivery date is confirmed, the manufacturing manager should update the status by changing the color from gray to yellow. This action confirms the planned delivery date.
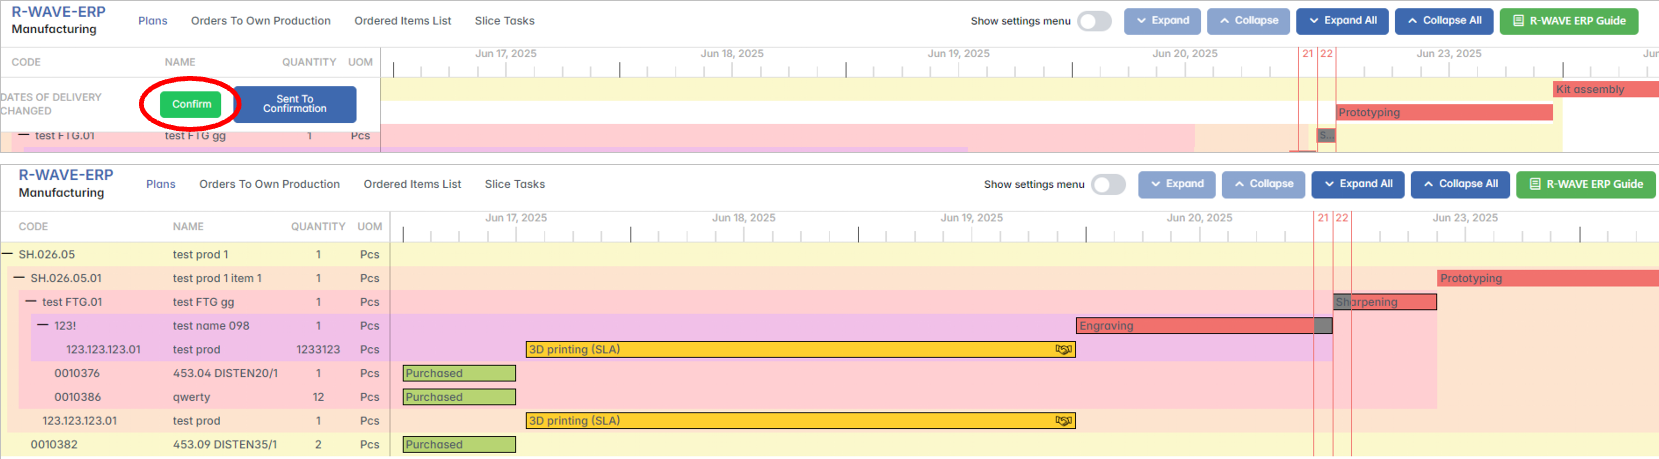
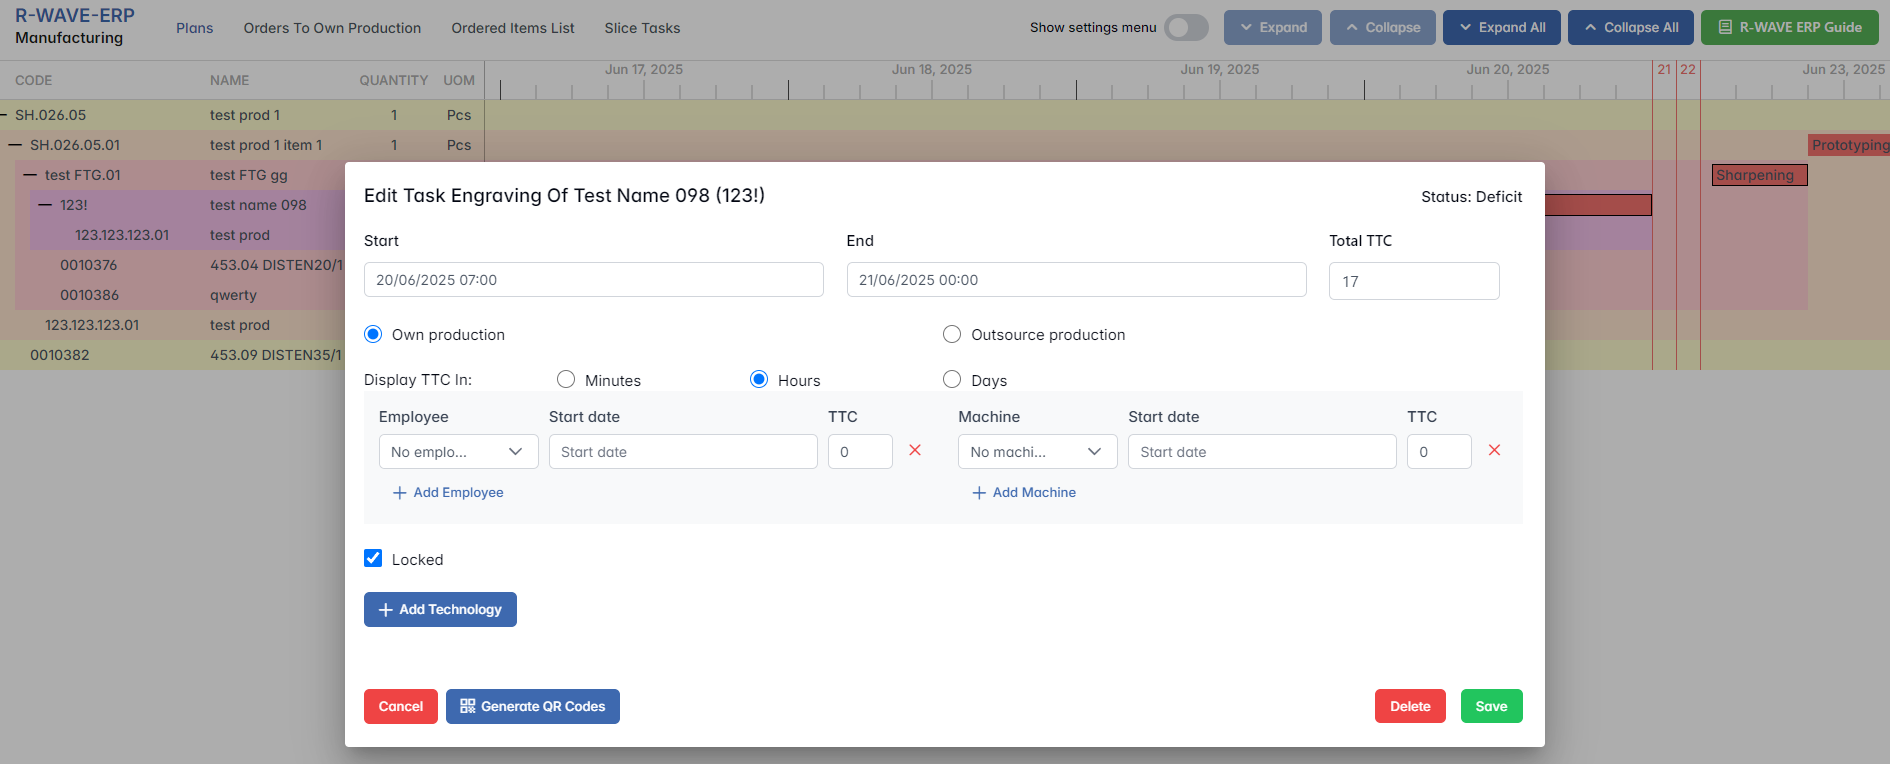
- Responsibility of the production department. The production department is responsible for estimating the completion time of the manufacturing process. In the production plan, delivery dates can be adjusted by dragging the bars left or right to match the intended schedule.

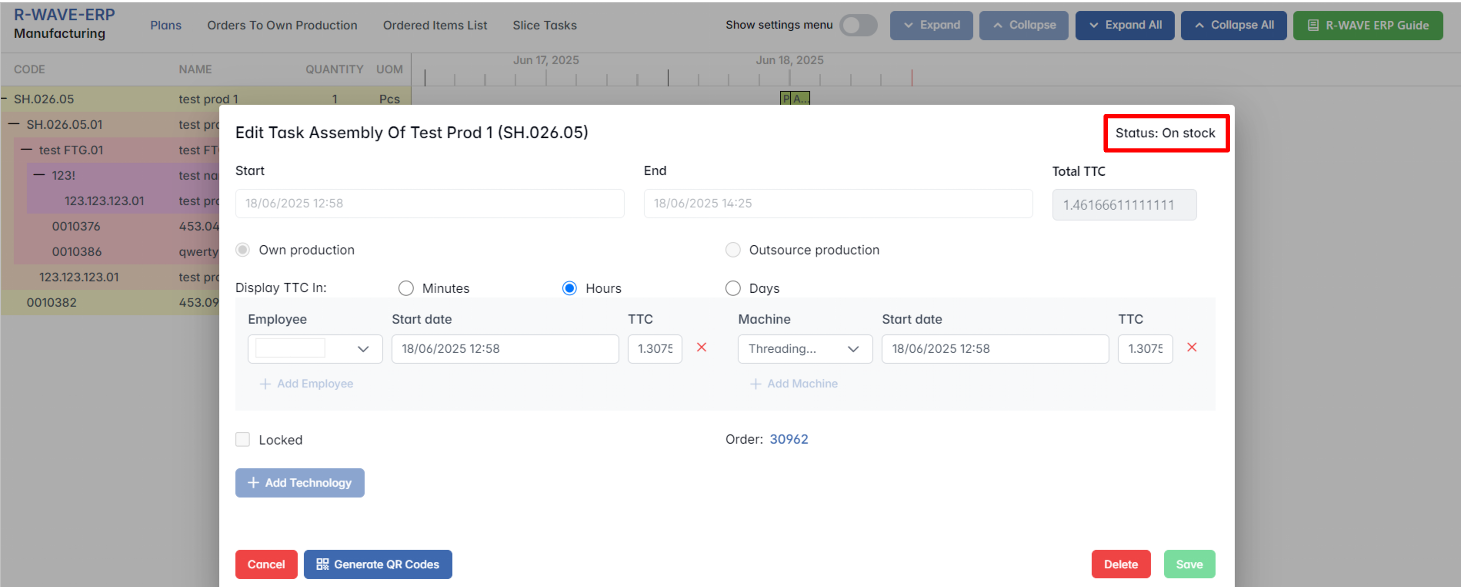
- Assign workers and machines. In the production plan, click on the red bar indicating the assembly to assign specific workers, working hours, and machines for the job. Click Save to apply all parameters.
Outsourcing
Outsourcing
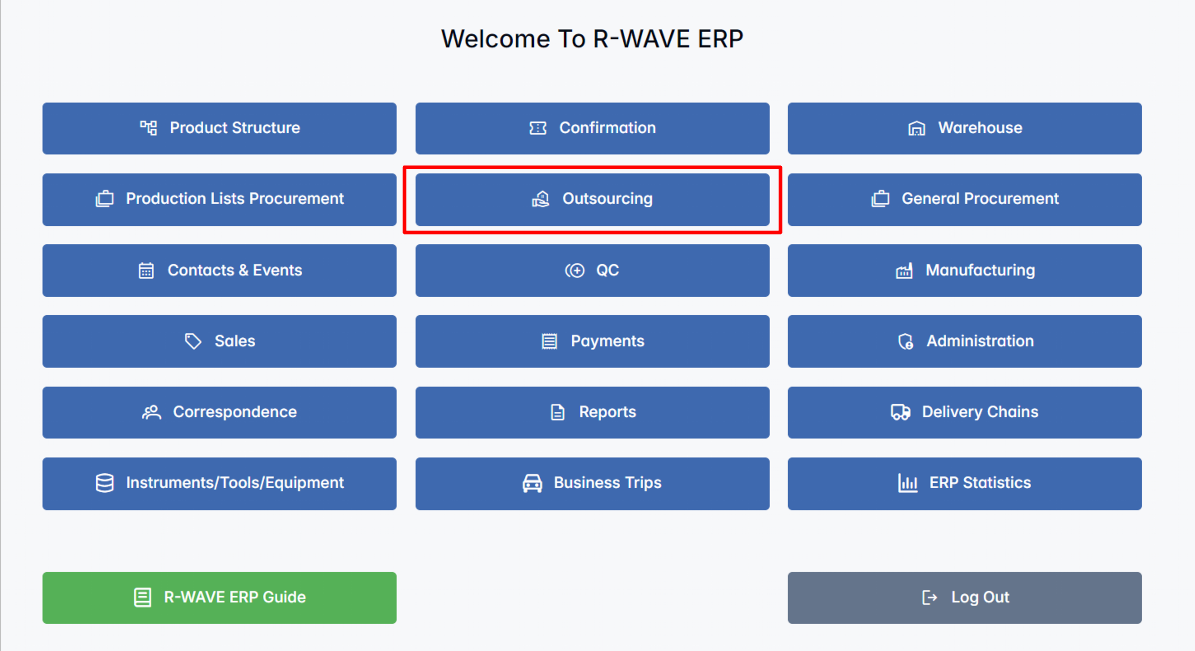
- Accessing the outsourcing chain for laser cutting. Click on the Outsourcing option in the menu, then select the Order ID under the submenu Outsourcing Chains.
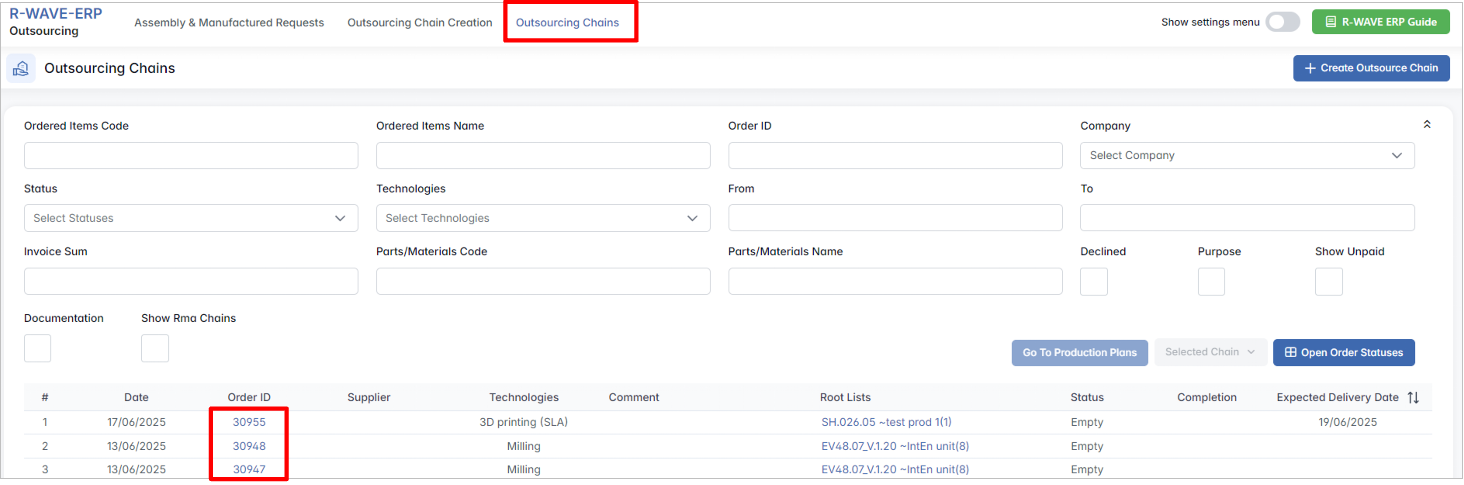
- Alternative access from the production plan. Alternatively, you can reach the outsourcing chain directly from the Production Plan by clicking on the order number in the window that appears after selecting the yellow bar for laser cutting.
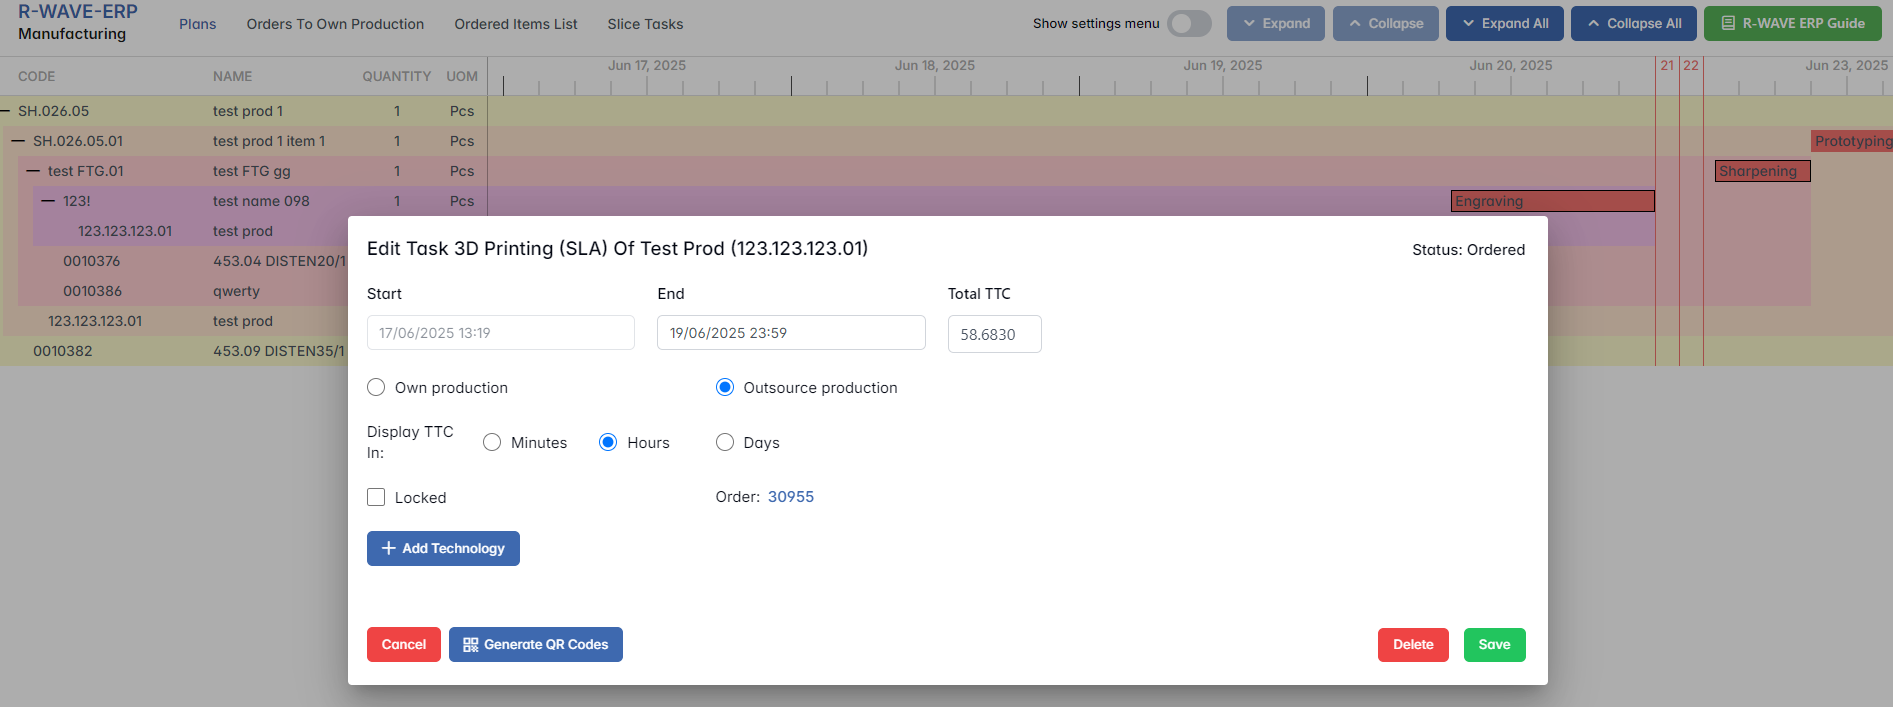
- Creating an order. In the opened order window, begin by enabling the checkbox Enable Tender Supplier Required. This will allow you to select a Supplier.
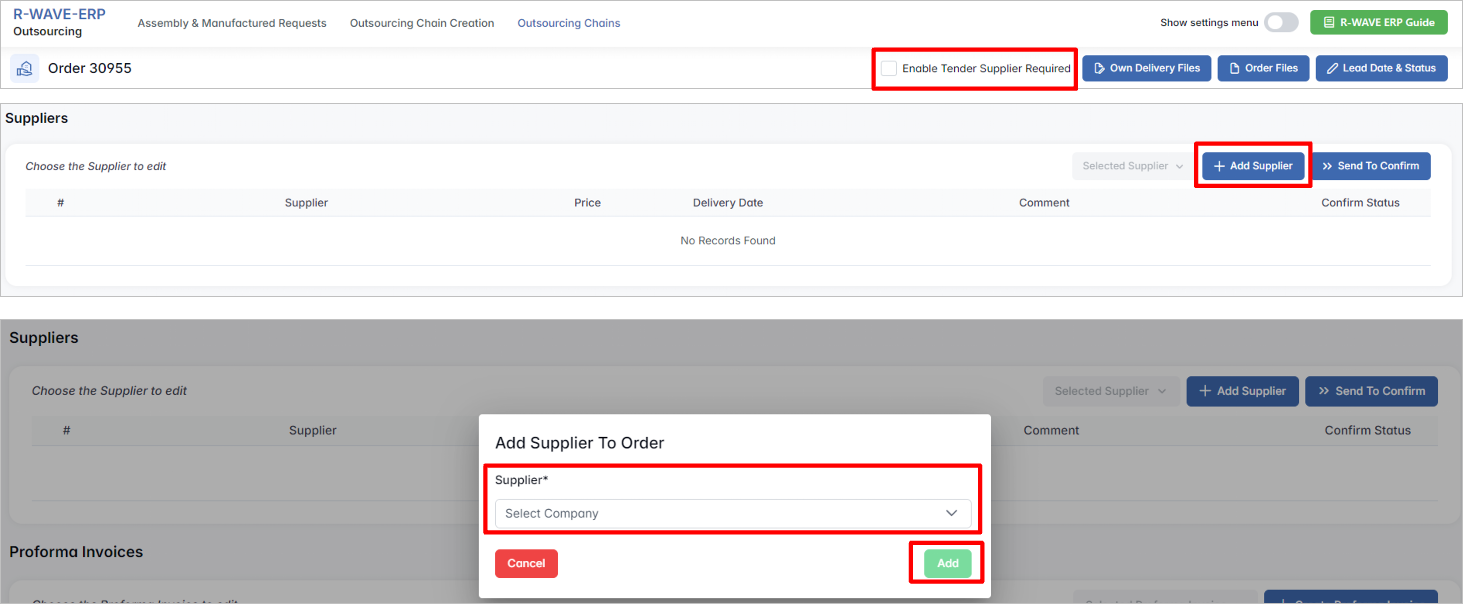
- Confirming the supplier. After adding the supplier, send it to confirm the selection.

Go to the Supplier Confirmation submenu in the Confirmation module to finalize the supplier confirmation.
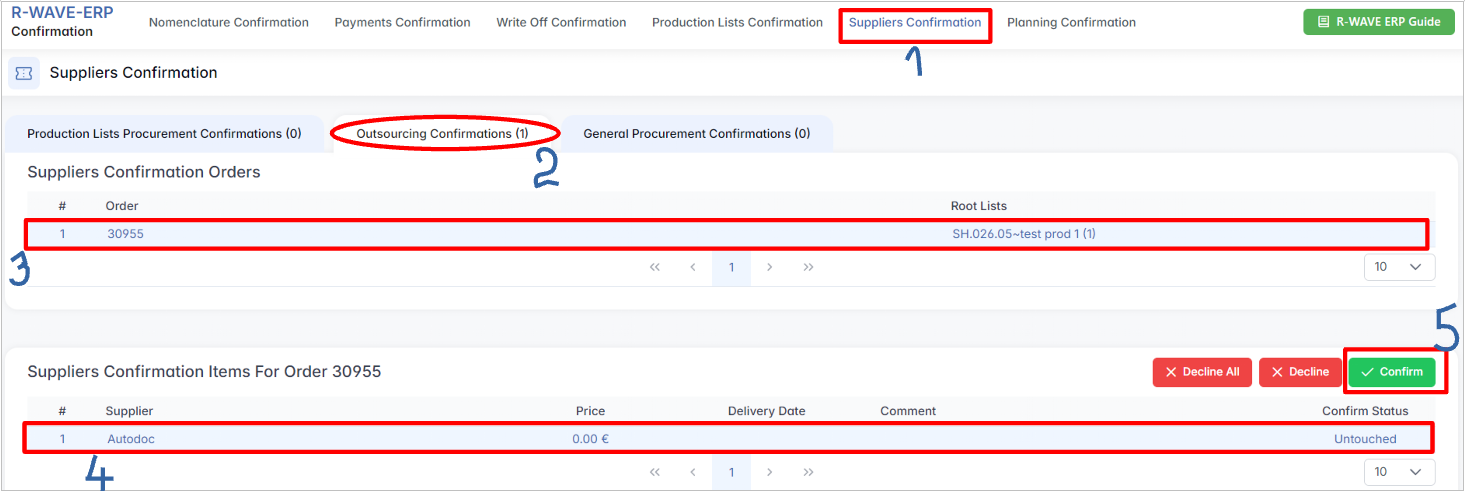
The supplier is now confirmed in the order, and you can proceed with the next steps.
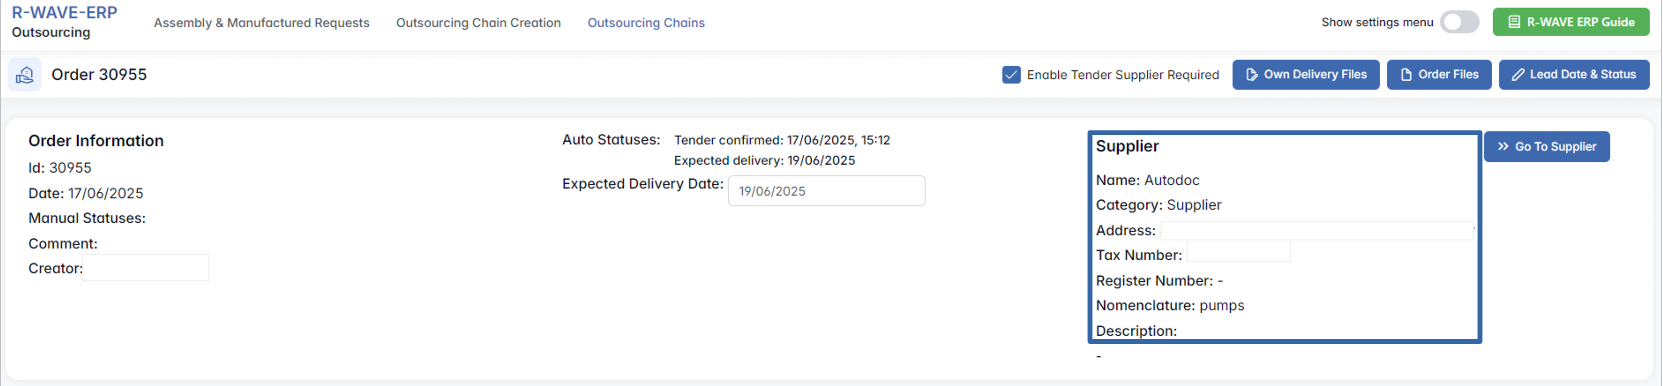
- Invoice creation. In the order, you can now create the Invoice.

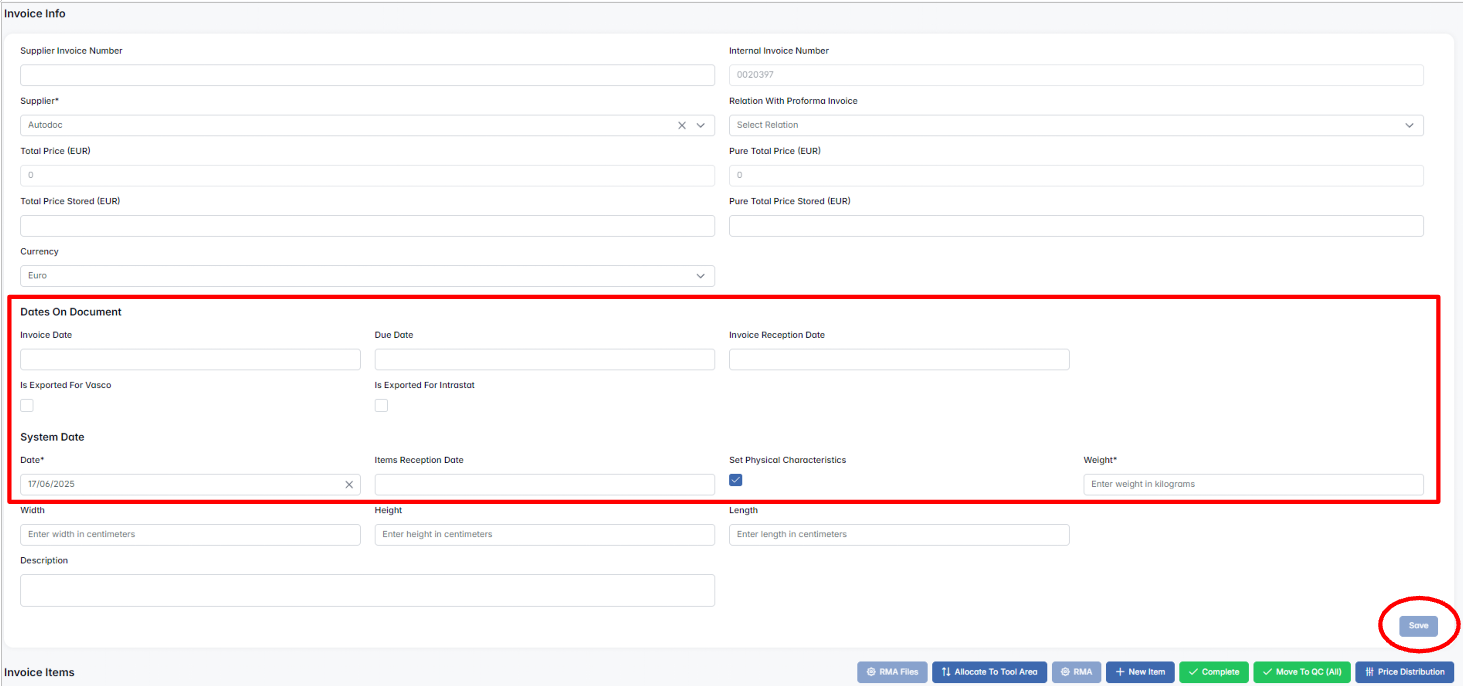
- Editing the invoice. Once the invoice is created, edit it as needed.

After completing all required fields, Save your changes. Then click Complete and Move to QC (All) to send the invoice to Quality Control and finalize the order.
Quality Control in Procurement
Quality Control in Procurement
- Accepting the outsourced position to Quality Control. Accept the outsourced position into the Quality Control module. Highlight the position and click Items to proceed with the quality control.
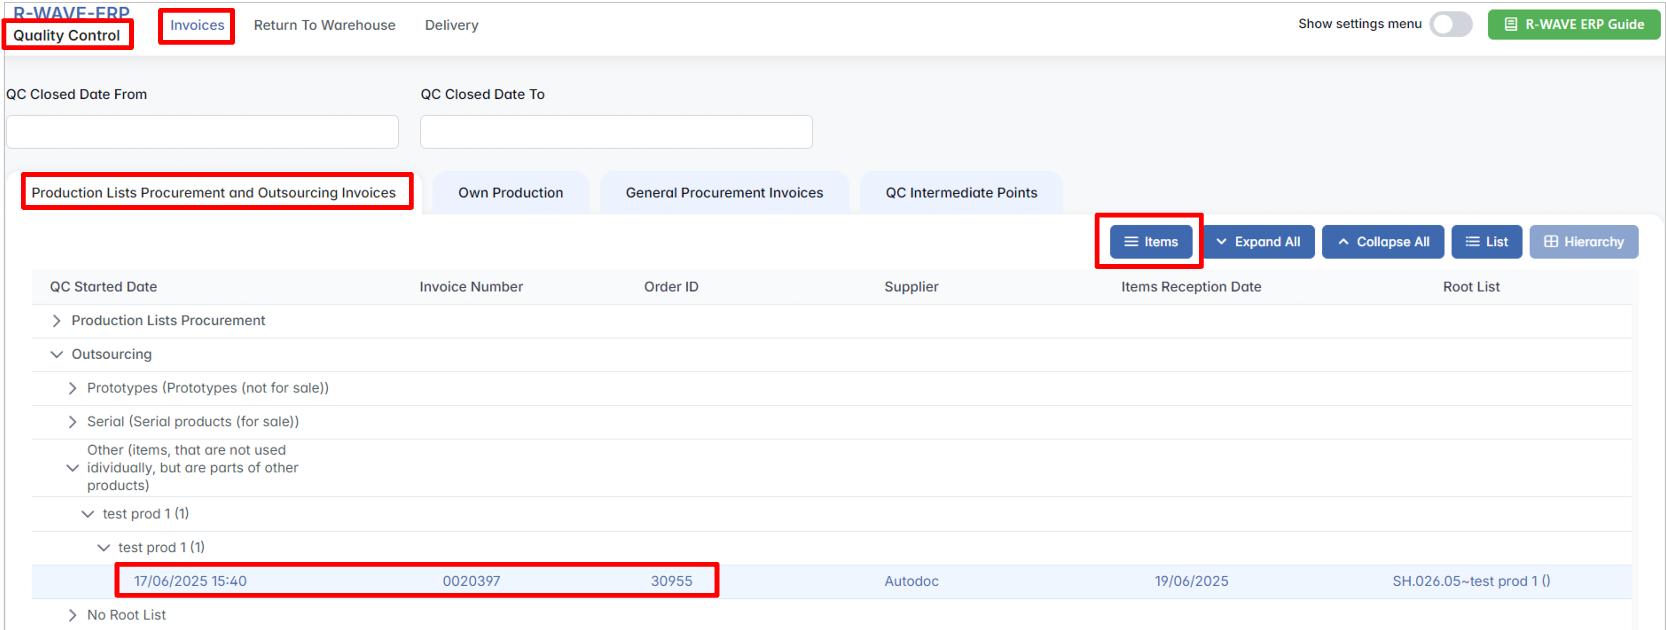
- Processing the position — passing the items. Select the positions, then click Pass Items.

Afterward, click Complete to finish the quality control process.

Warehouse in Procurement
Warehouse in Procurement
- Allocating positions in the warehouse. In the Warehouse module, allocate the positions that have passed quality control. To easily locate the position, press the List command. Highlight the position and click Items to proceed.
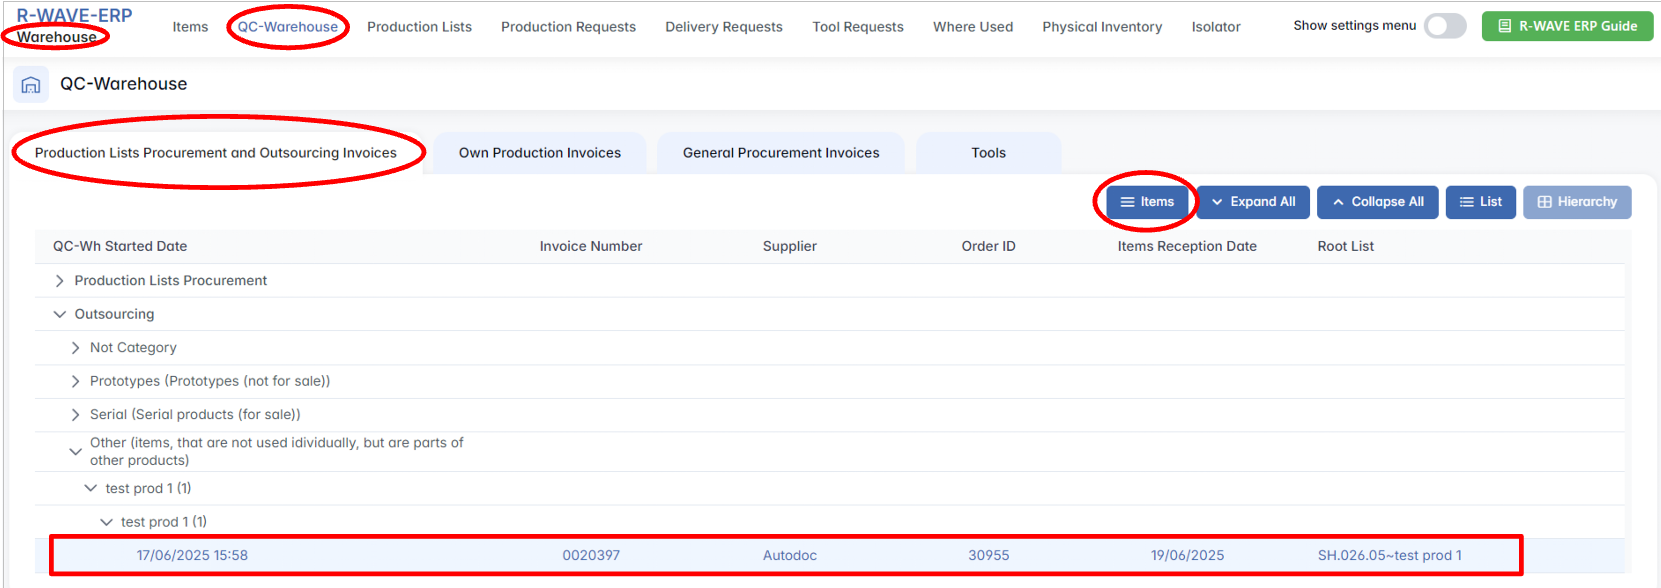
- Allocating to the warehouse. Choose the desired positions and allocate them to the selected warehouse and shelf using the Accept command.
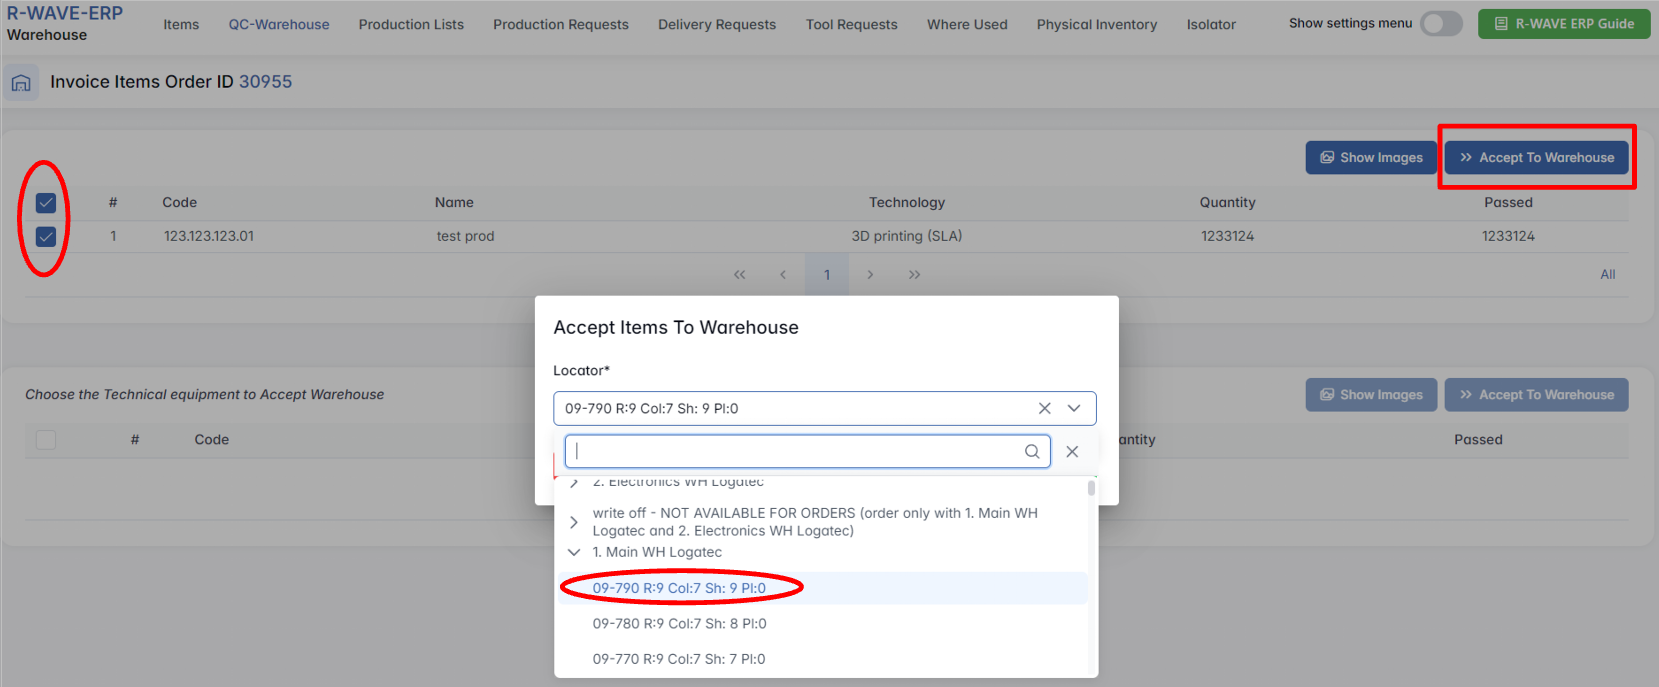
- Refreshing the production plan. After allocation, refresh the Production Plan to see that the yellow positions turn green, indicating they are now available in the warehouse for use. The production plan will automatically adjust the dates to reflect when the positions are available.
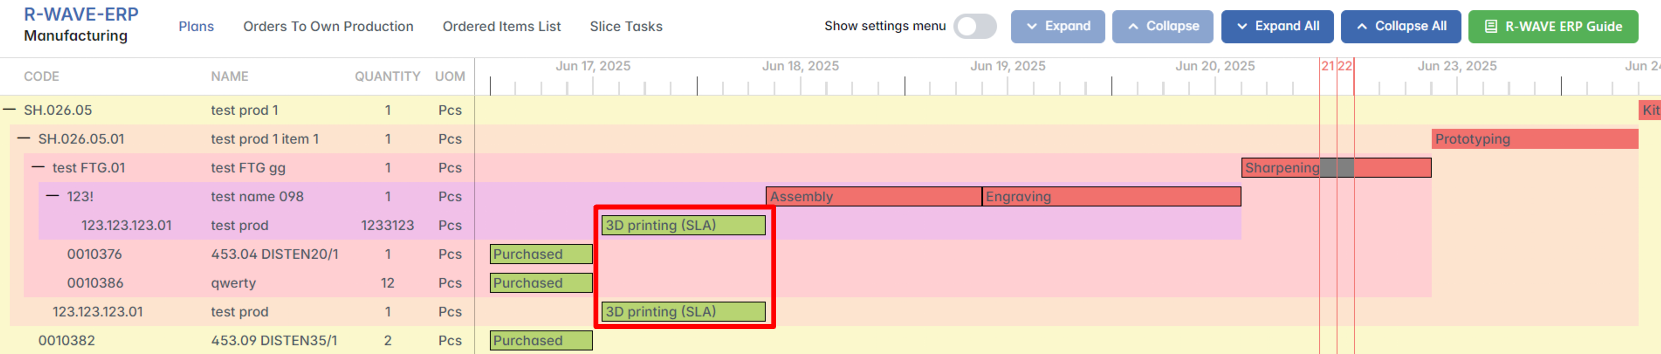
Assembly Manufacturing
Assembly Manufacturing
- Starting the assembly.
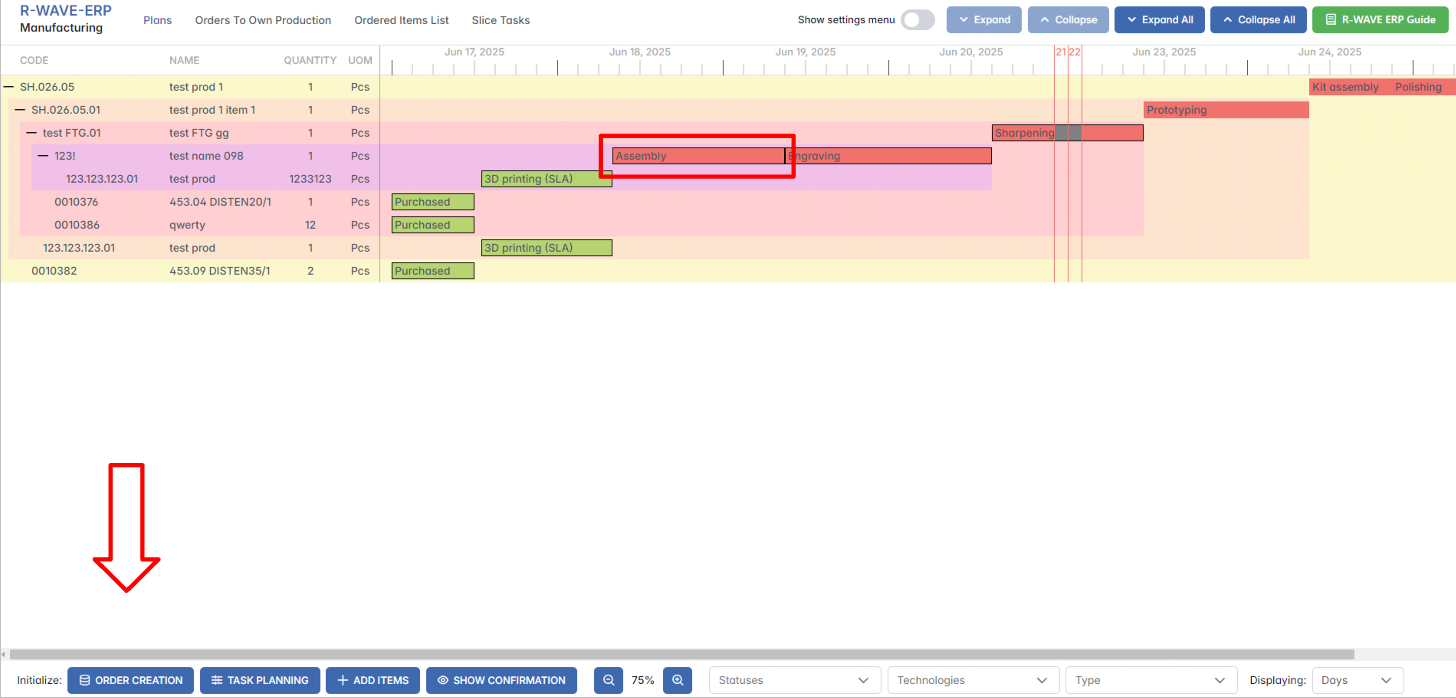
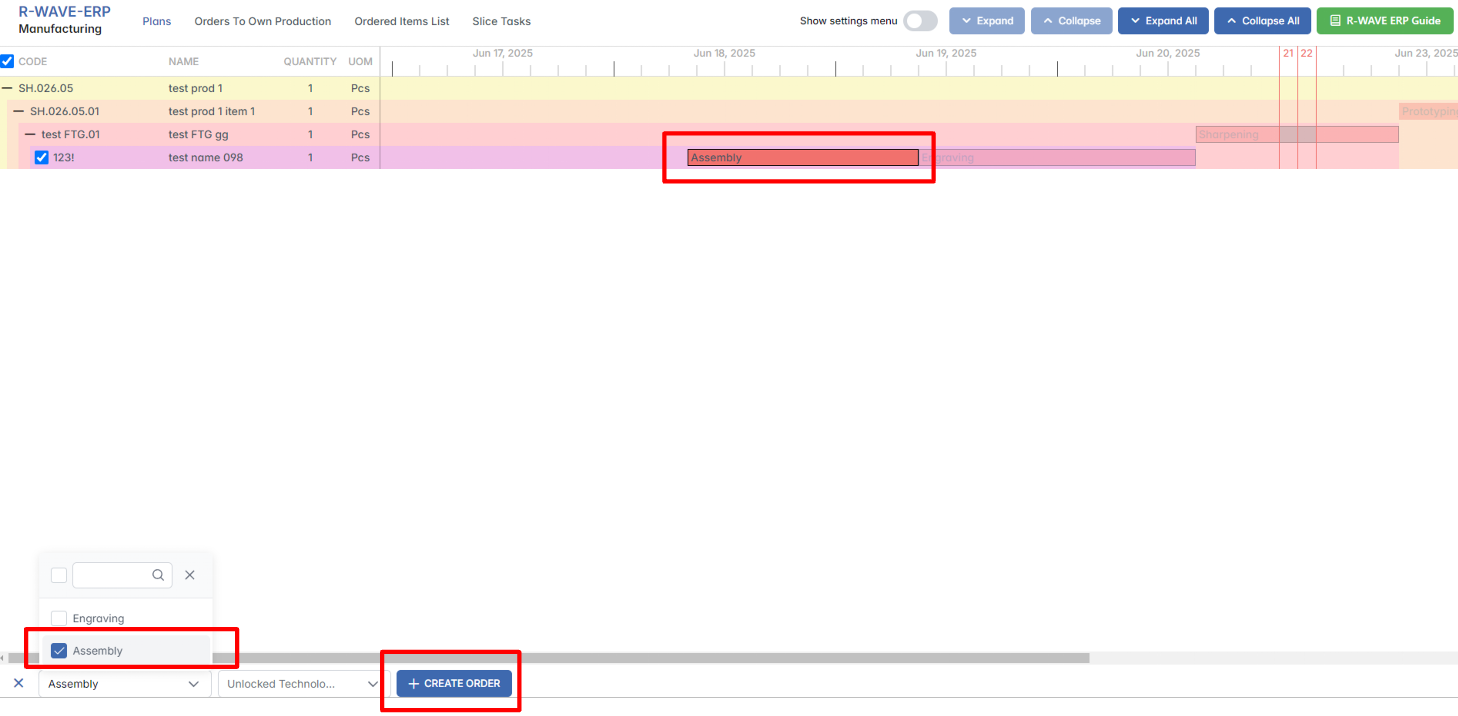
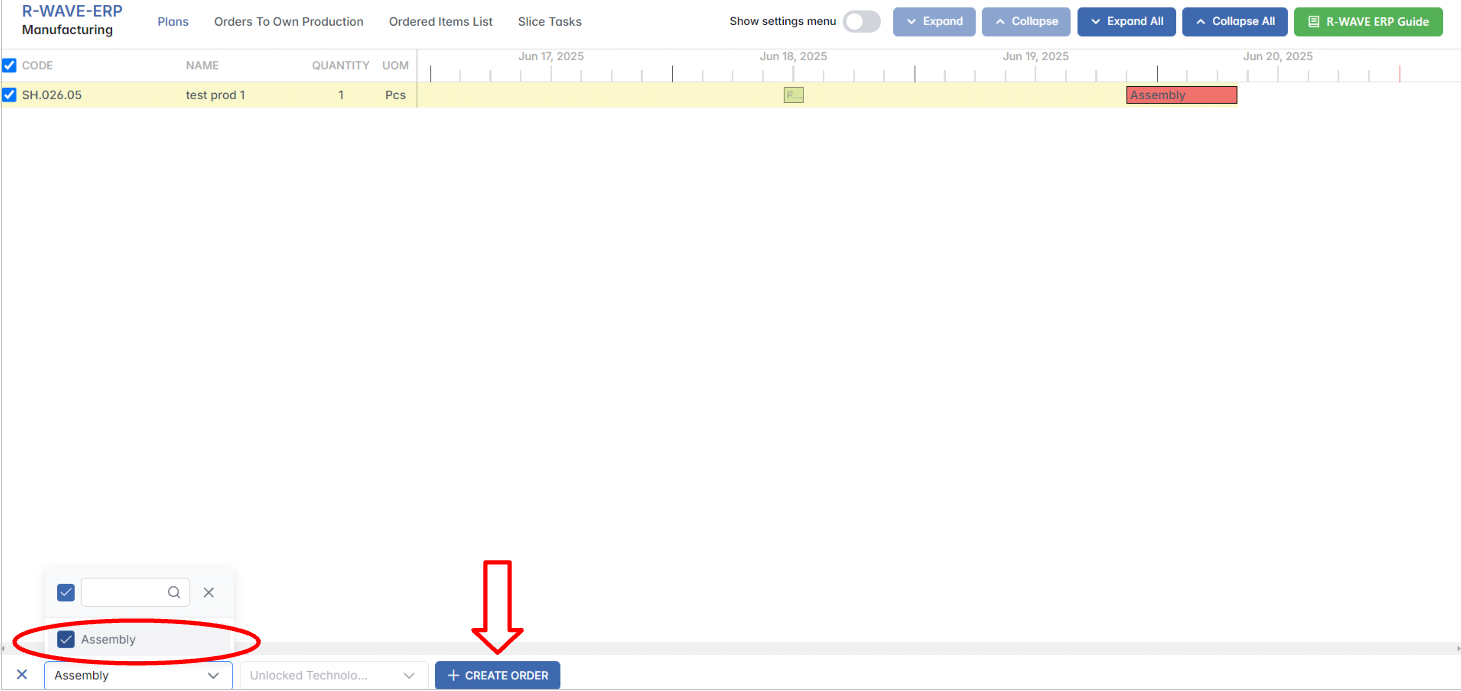
In the Production Plan, select the assembly command in the left corner and create an order. Assembly is the technology selected for this step. If there were multiple technologies set for different positions, they would all appear at this stage; since we only have one technology, only Assembly is shown.
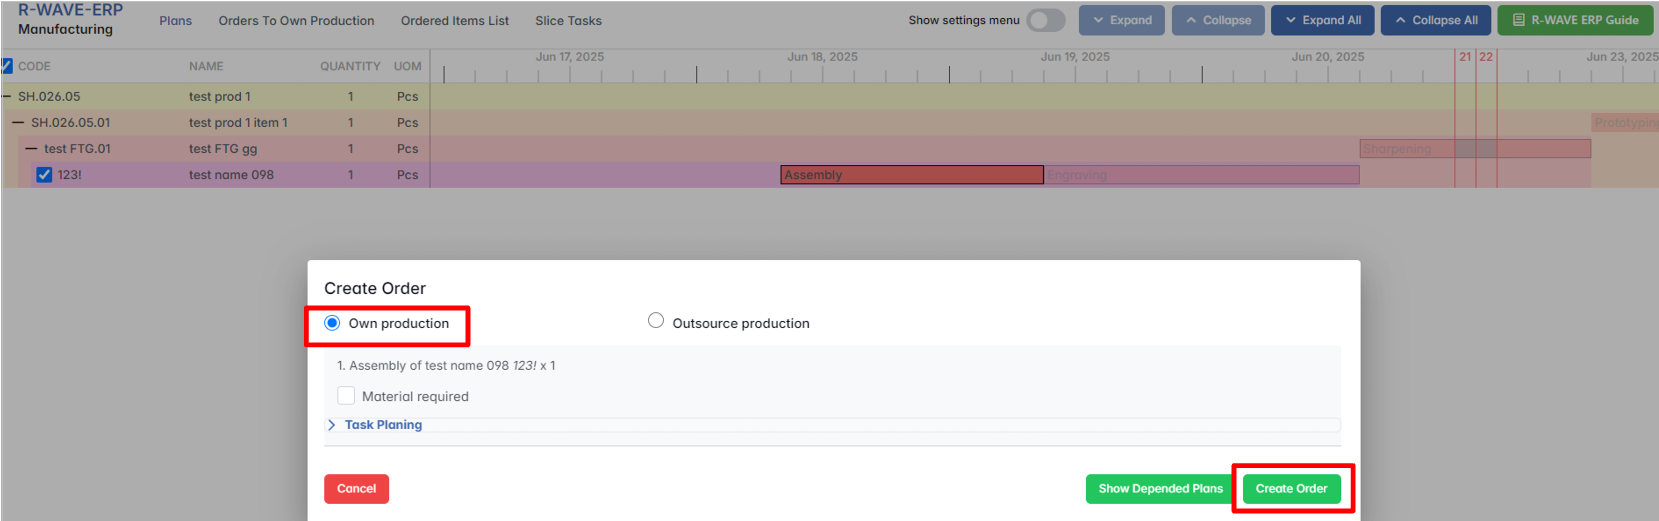
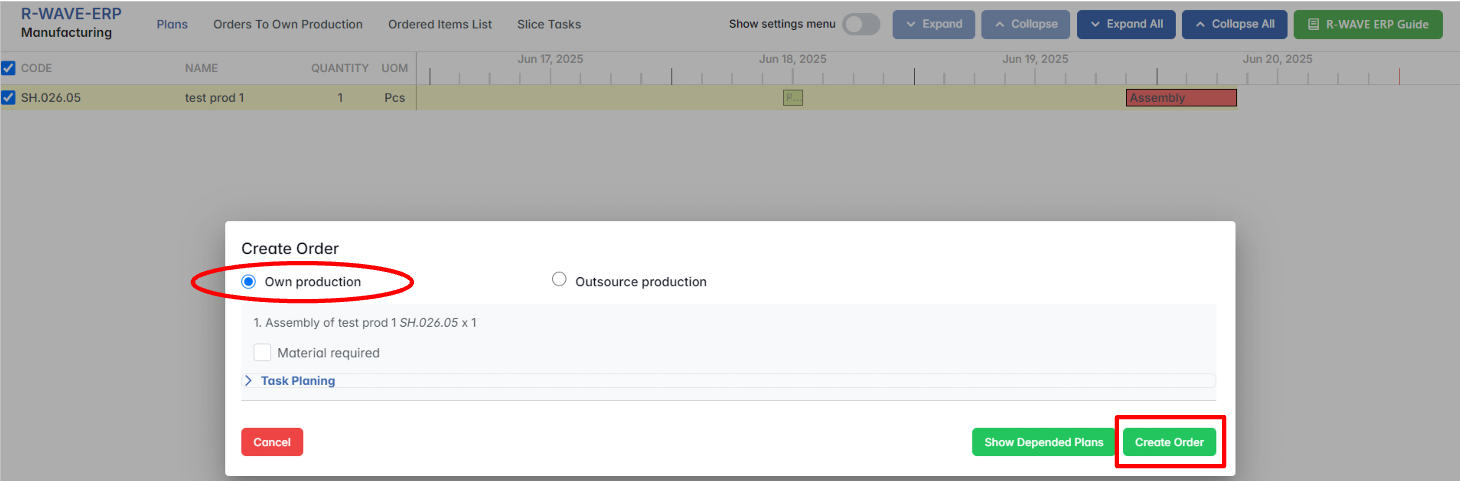
- Creating an order for own production. In the newly opened window, select Own Production and create the order.
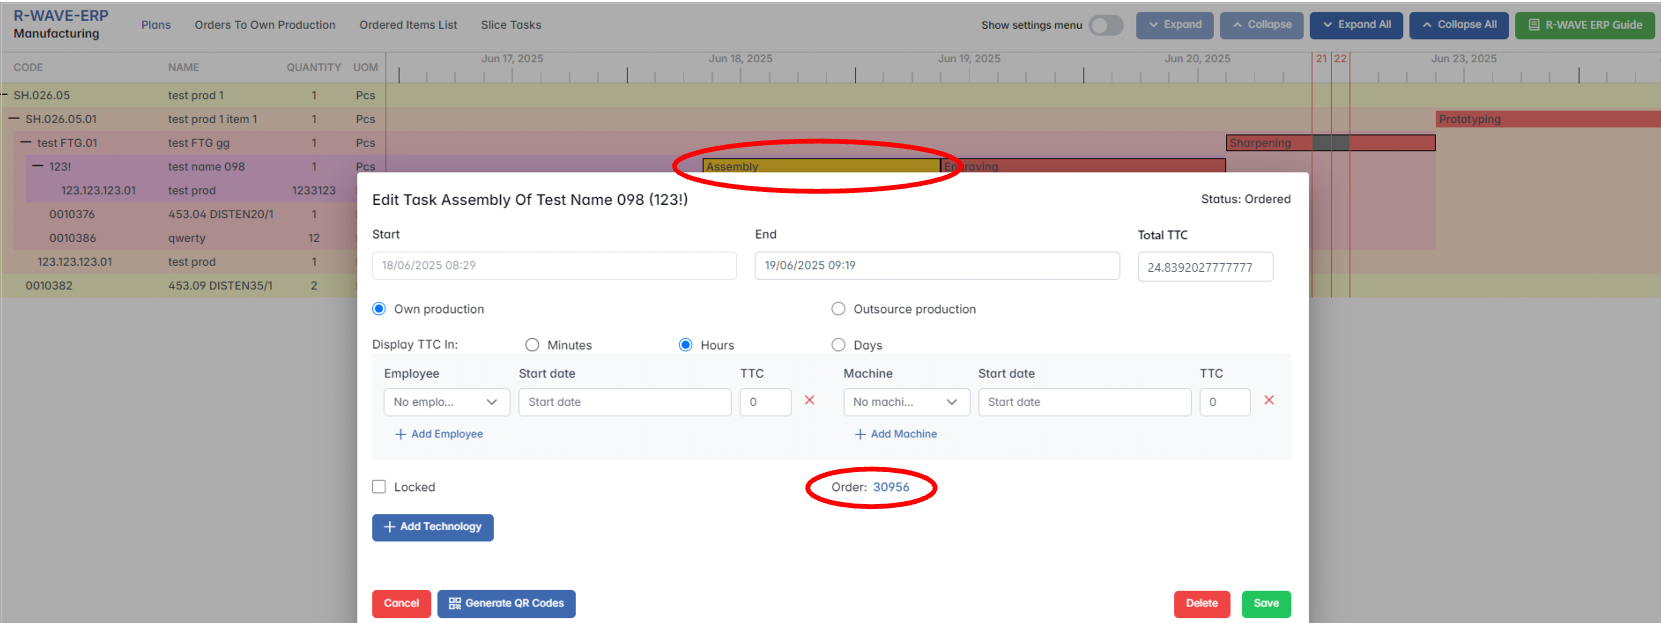
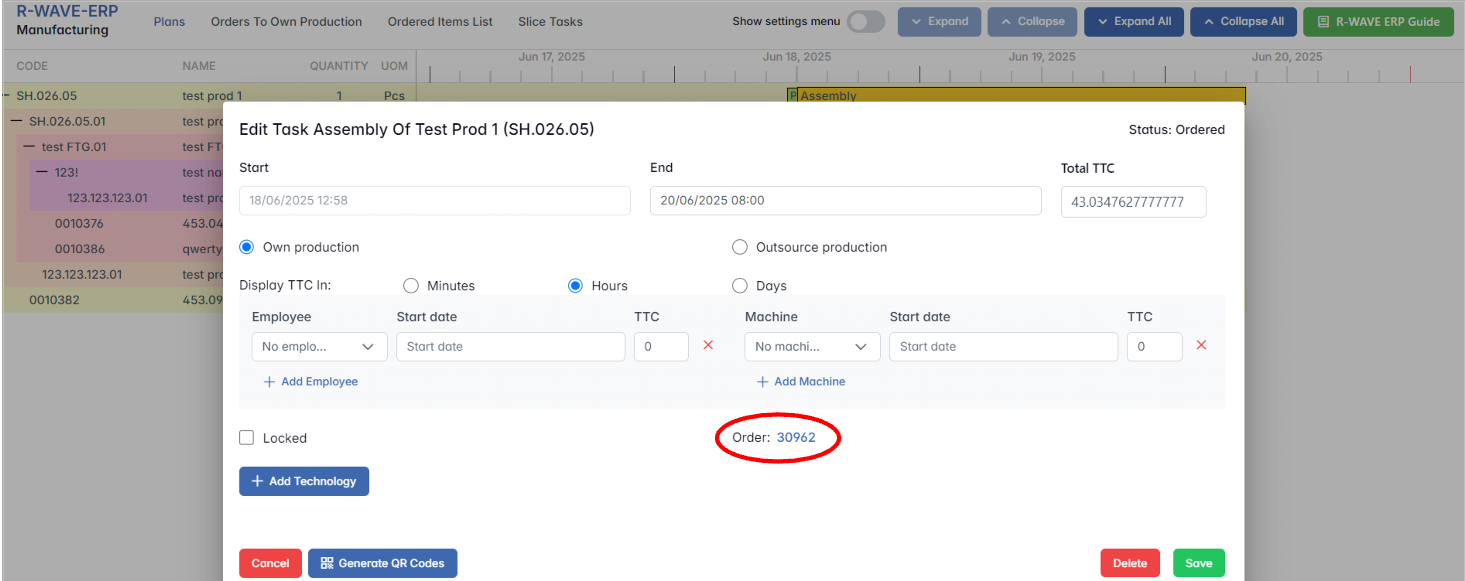
- Checking the order. You can review the Own Production Orders by clicking on the yellow assembly bar and then selecting the order.
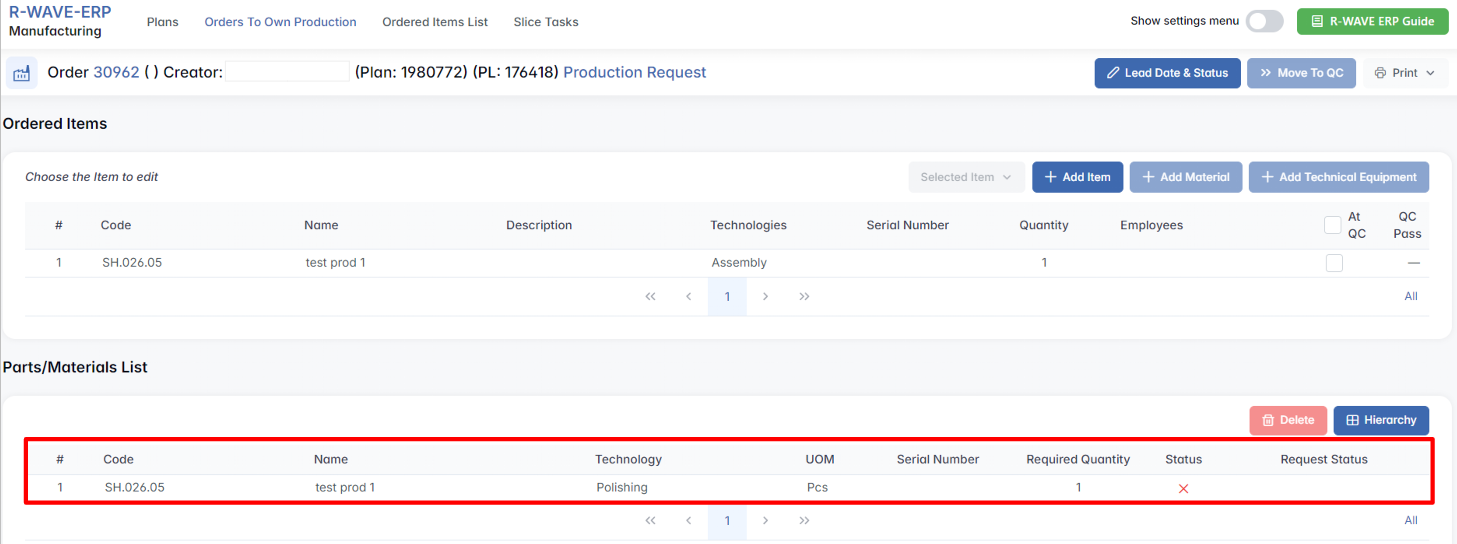
- Checking required parts for assembly. Inside the order, you can see the parts needed to complete the assembly. In our case, 3D printing (SLA) is required for the assembly.
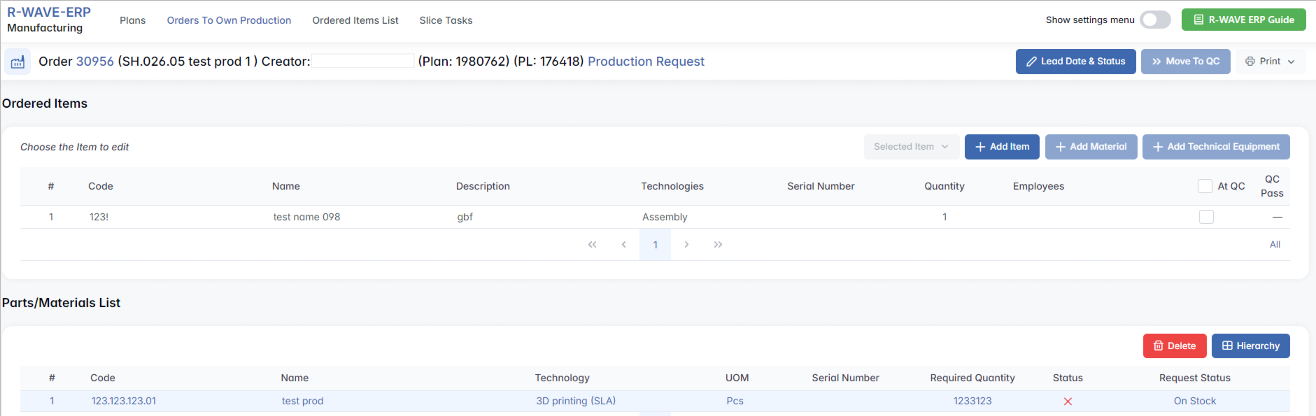
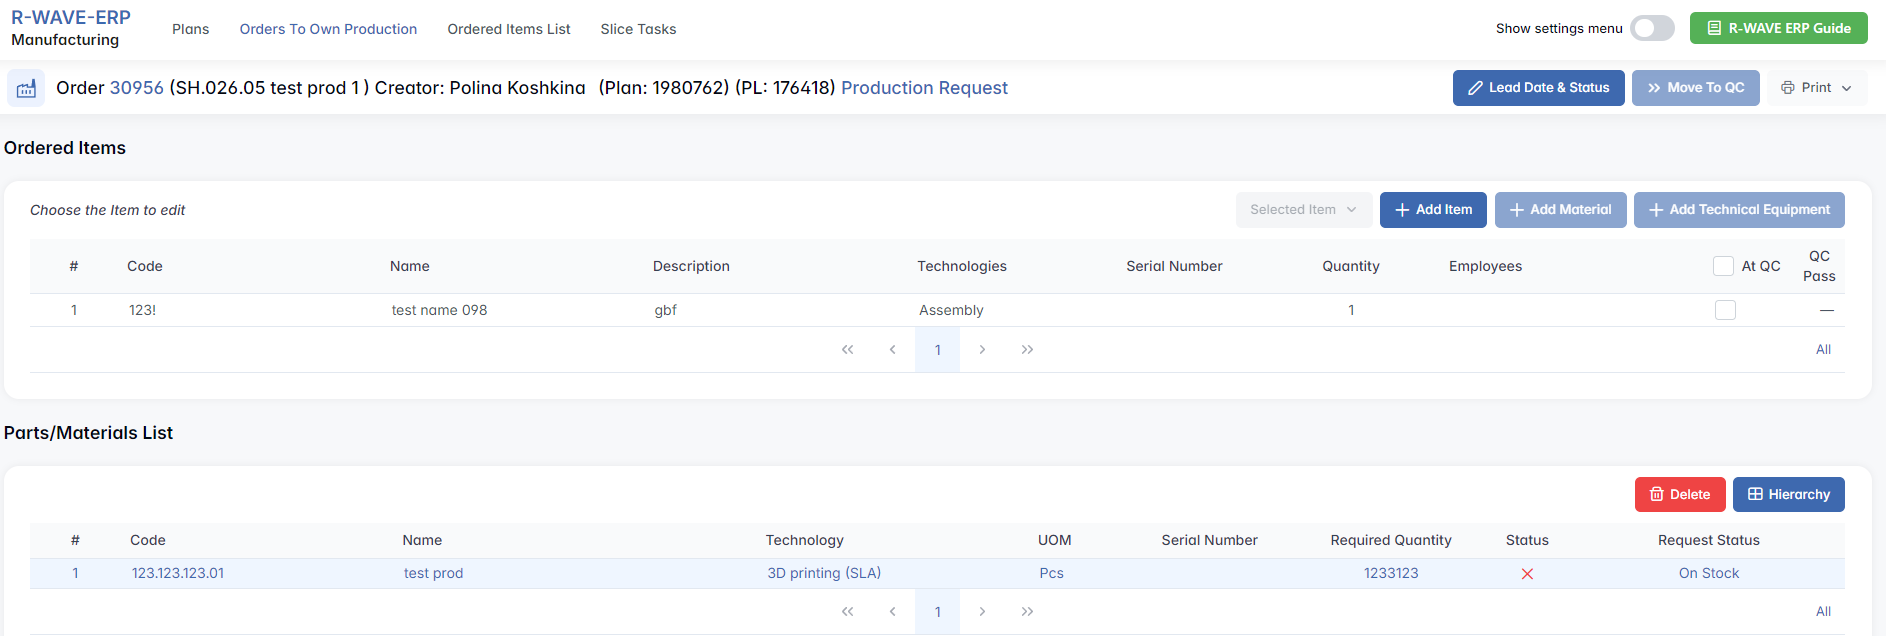
- Warehouse delivery of material. For assembly, the required materials must be in stock in the warehouse. Once the order is created, the warehouse generates a Production Request, which is used to deliver the necessary material to manufacturing.

-
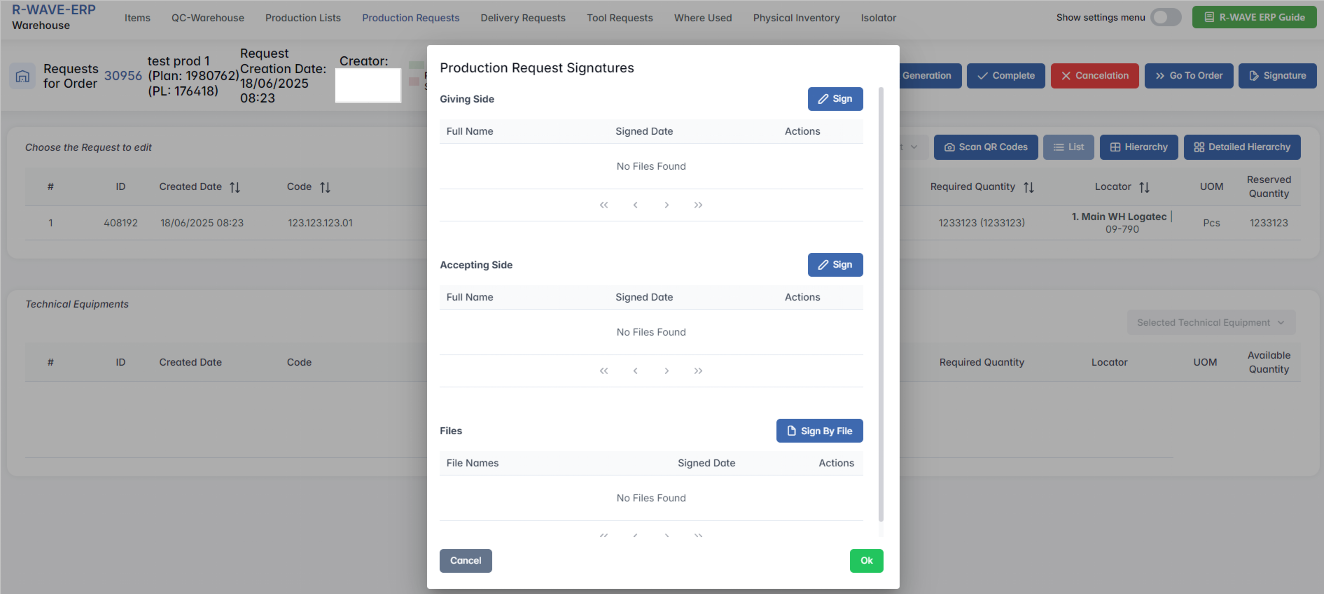
Confirmation for delivery to manufacturing. Before the position can be delivered to manufacturing, all involved parties must provide confirmation in the form of signatures.
-
Signatures. To deliver the position to manufacturing, confirmation is required through signatures from all parties involved — the providing (side) signatures and the receiving-side signatures.

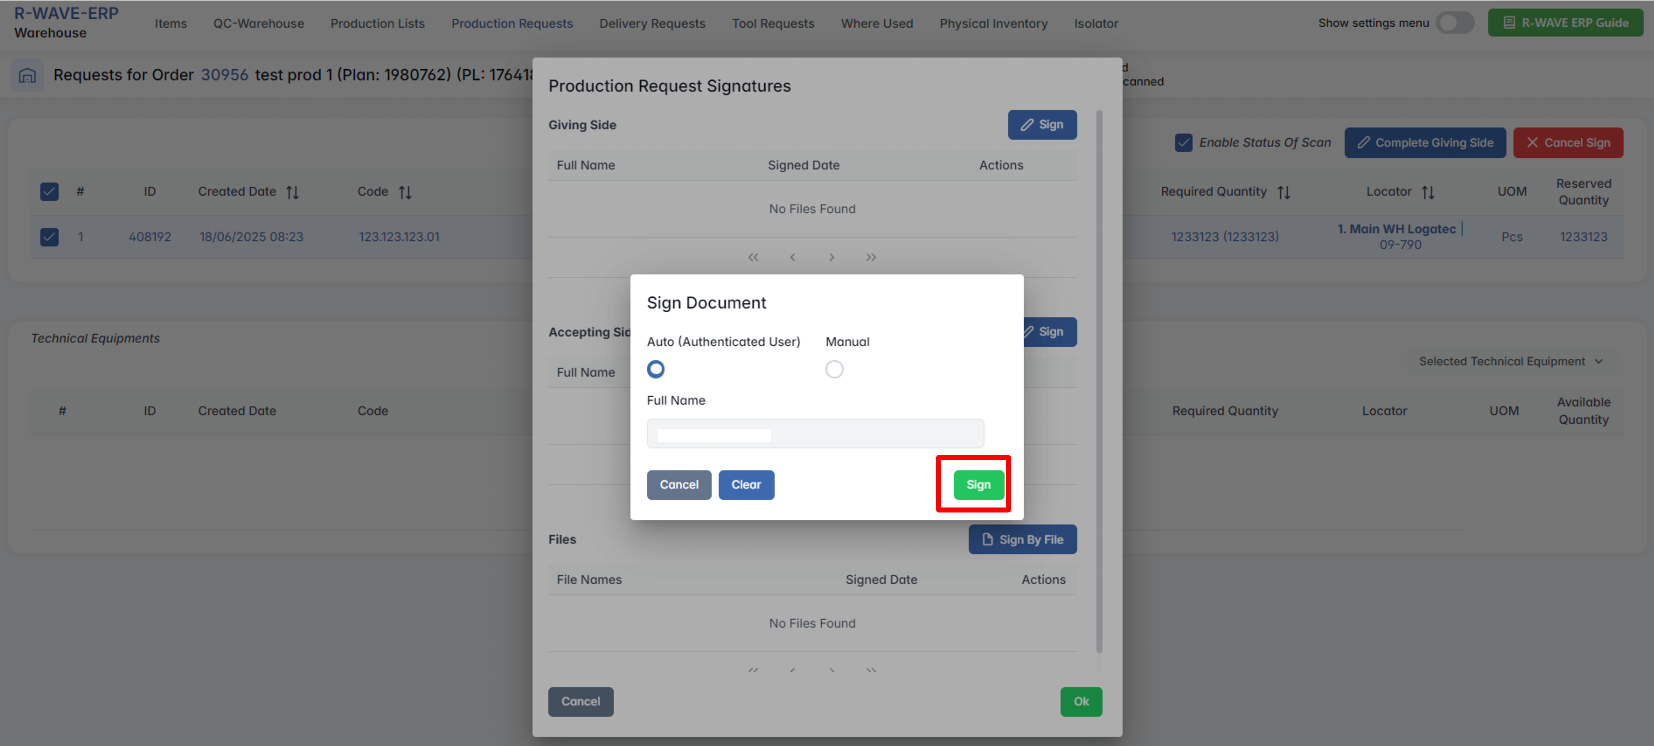
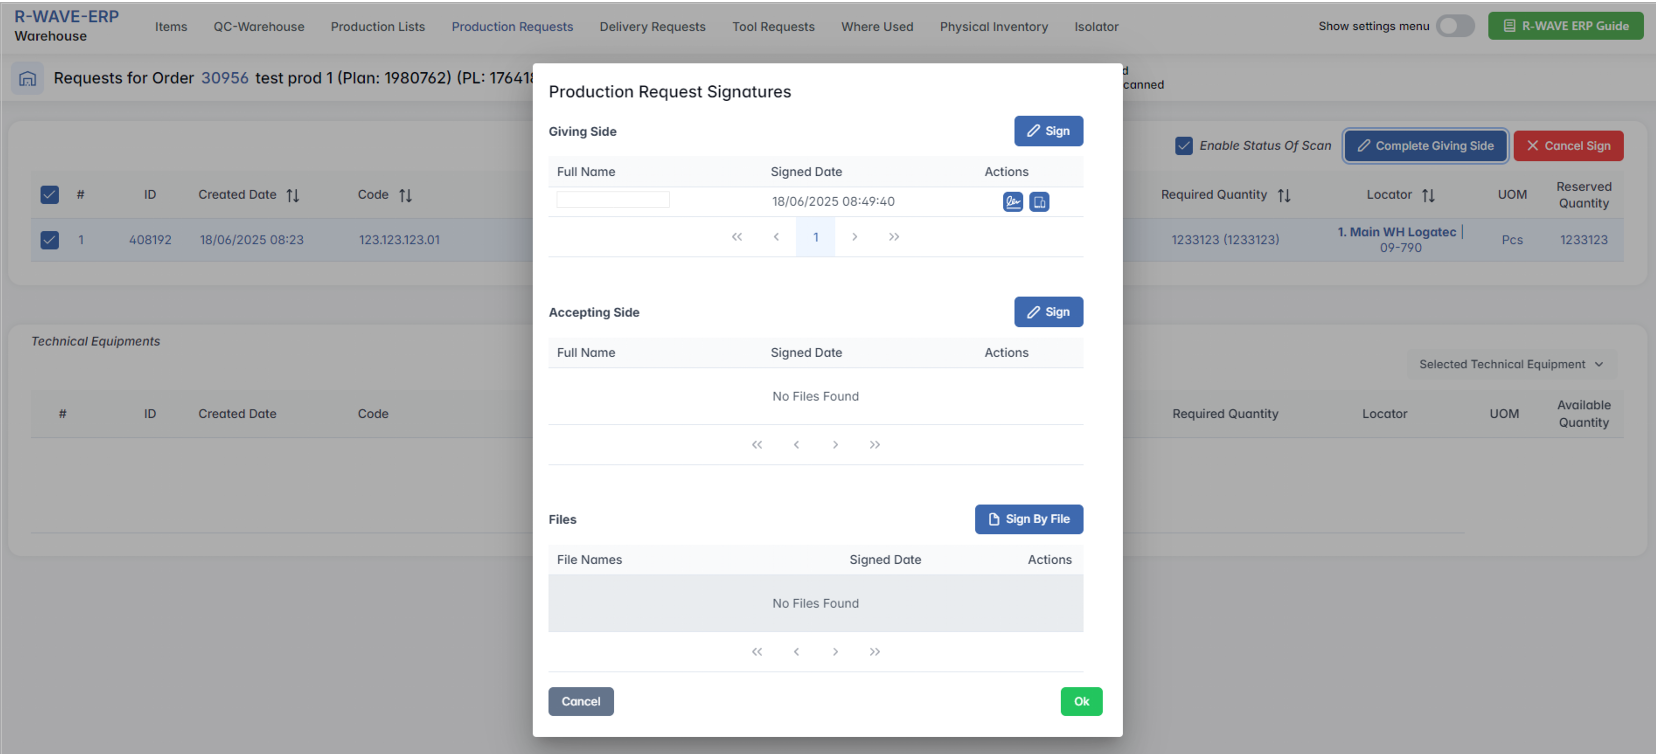

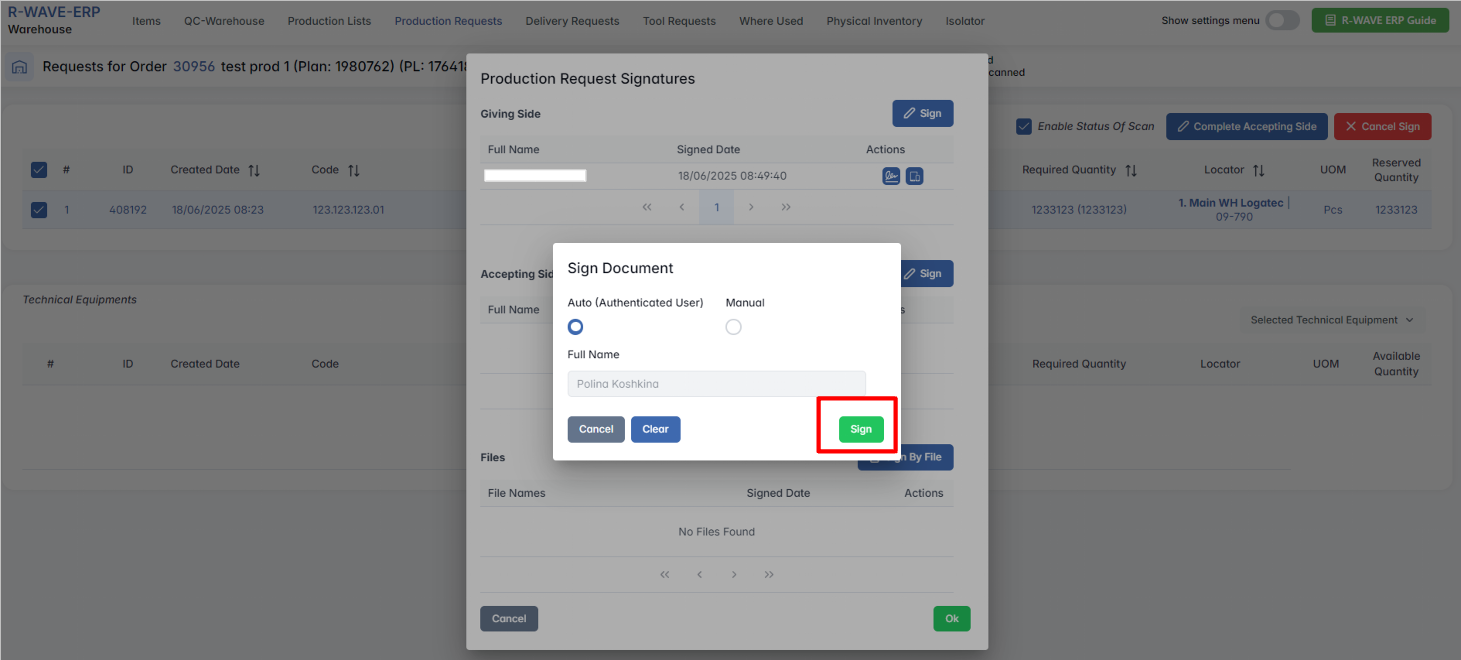
Both signatures confirmed:
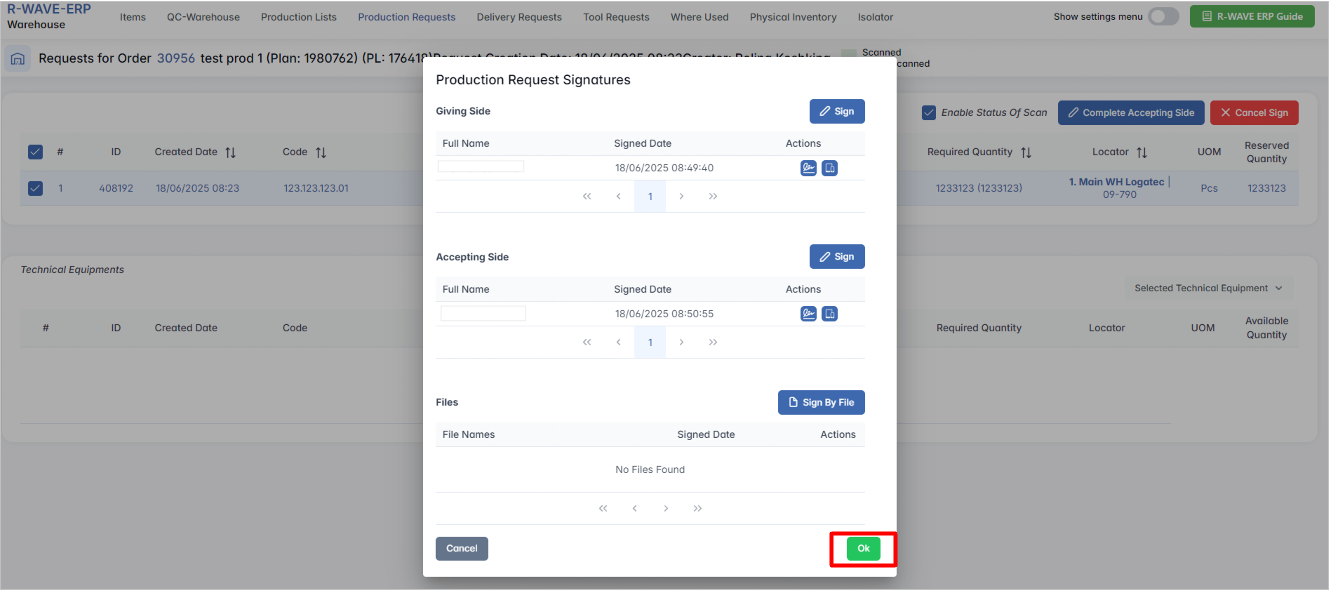
With all necessary signatures now in the system, the manufacturing department has received confirmation that all required materials and positions are available.

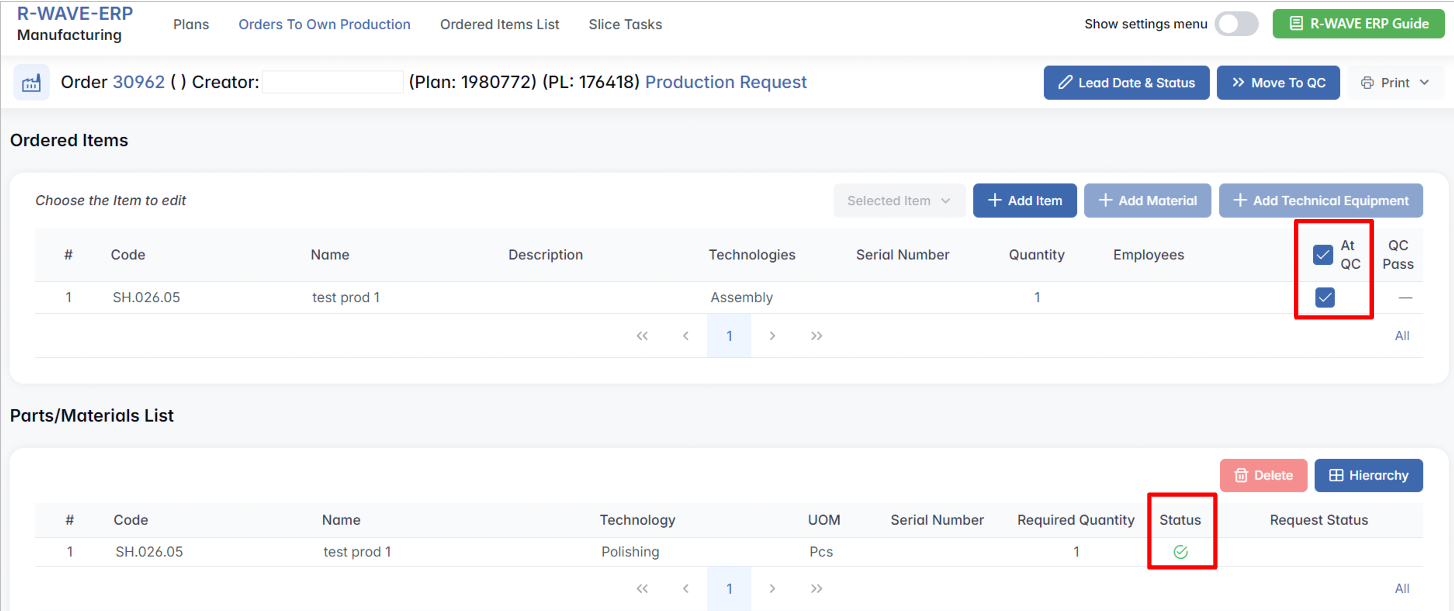
- Check affirmation status. In the manufacturing order, verify that the affirmation status shows all necessary positions have been delivered to manufacturing. Once confirmed, the finished positions can be sent to quality control.
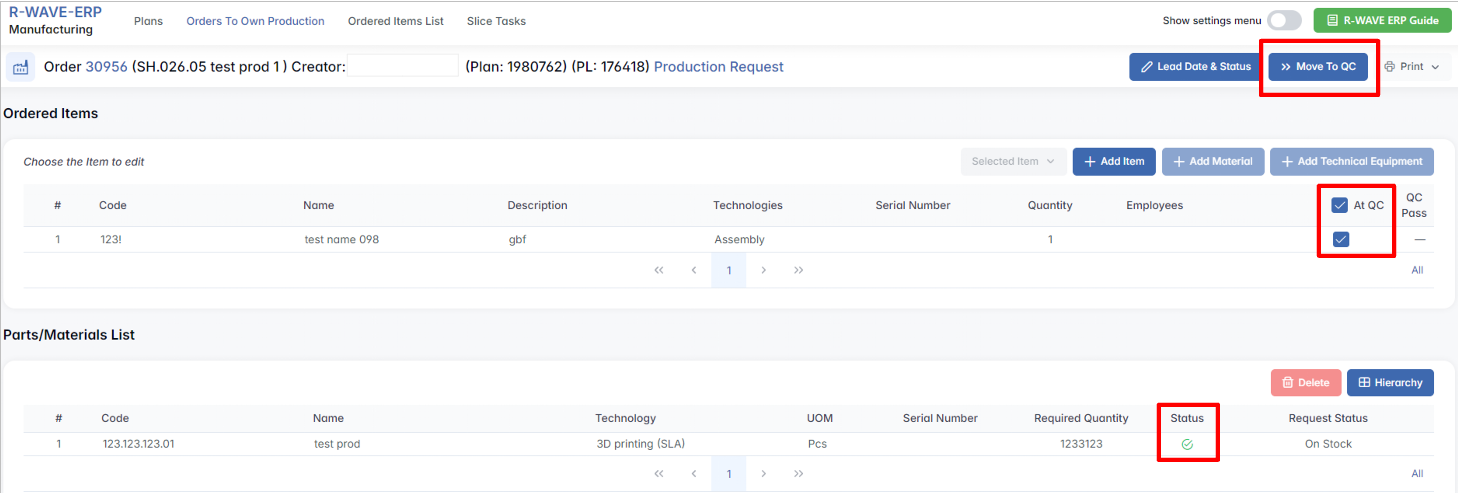
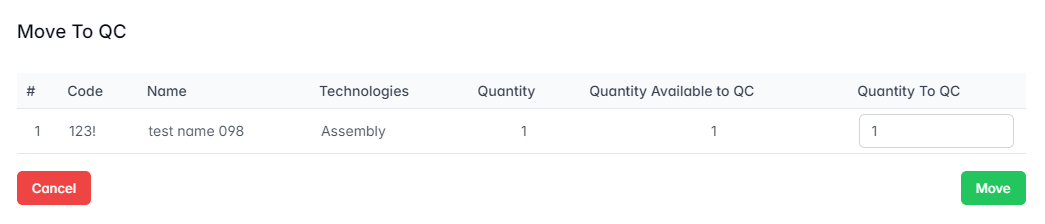
- Access Quality Control. Navigate to the Quality Control module, then select Own Production to open the list of items under
test prod 1.
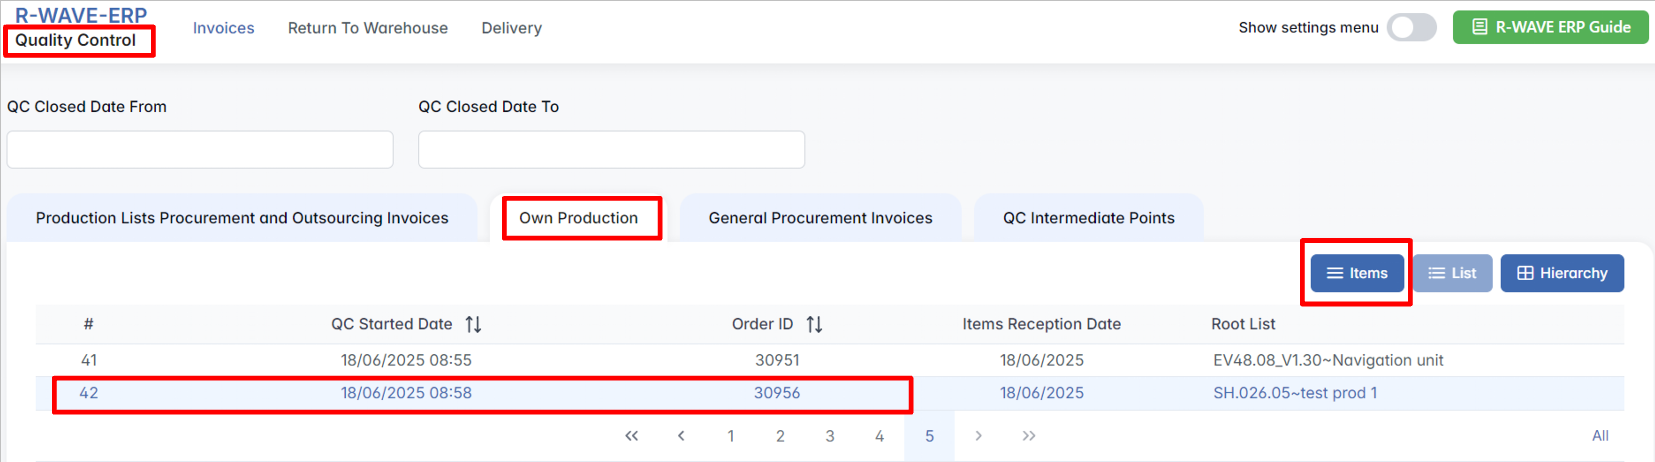
- Pass Quality Control. Review the items and confirm the quality status. Click to pass the position once it meets the required standards.

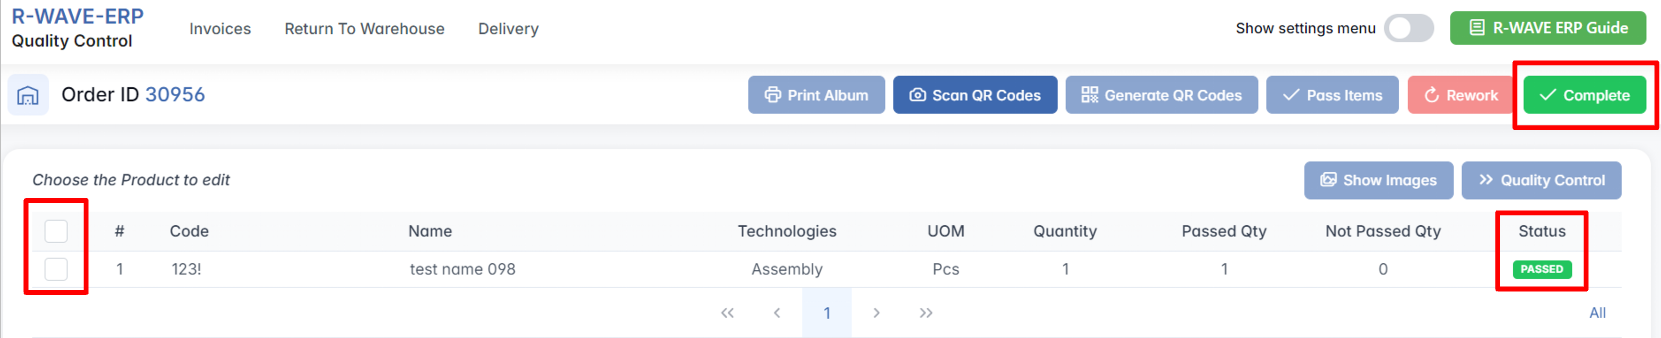
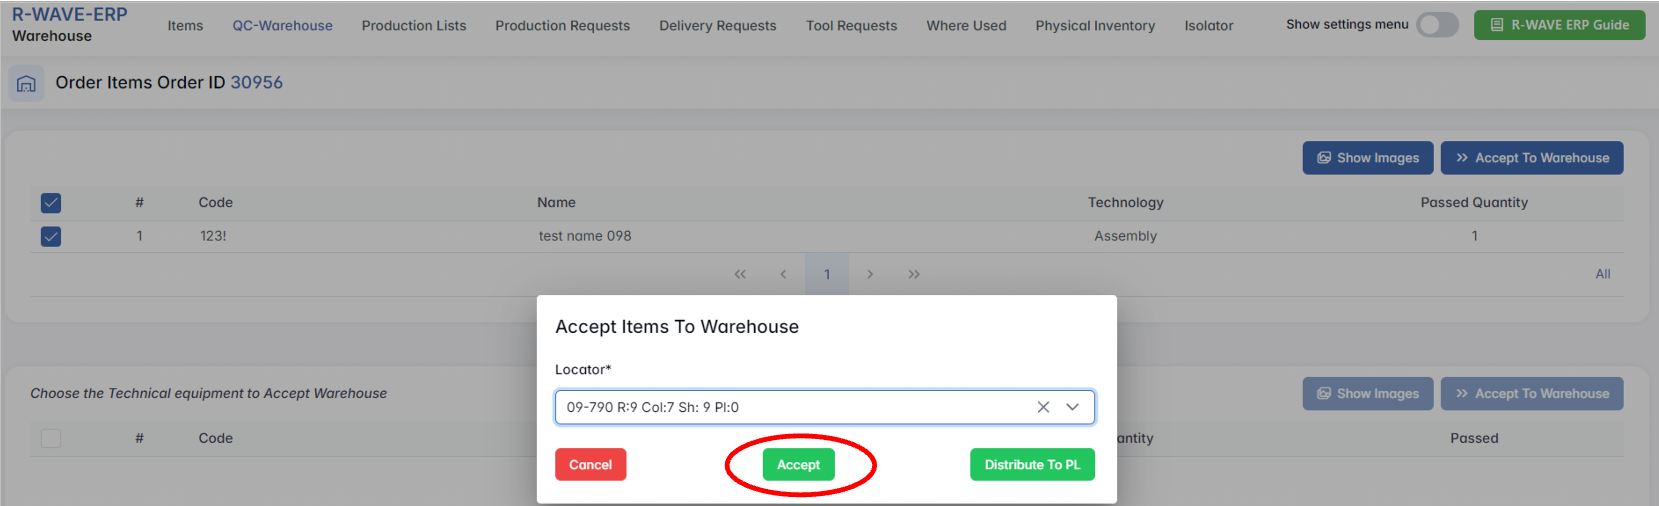
- Allocate procured positions. In the Warehouse module, locate the QC-Warehouse section and select the product for allocation. Click the Items button to allocate positions.

- Confirm position allocation. Allocate the position to the designated warehouse location.

- Actual allocation. Complete the actual allocation of the positions to the warehouse.
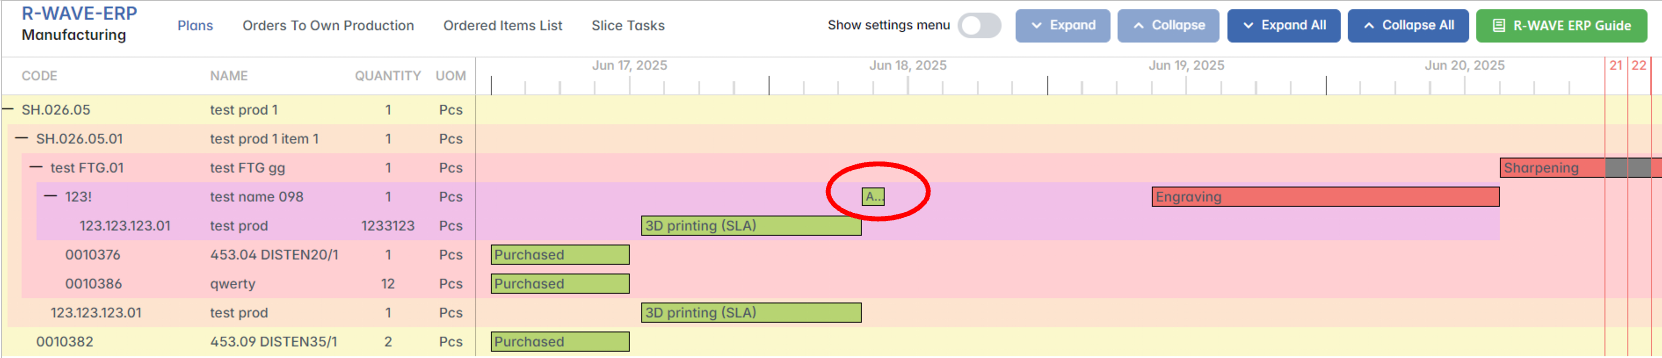
- Verify the production plan. Return to the production plan and observe that the assembly bar has changed from yellow to green, indicating that the position is now available in the warehouse. The next step is to proceed to final assembly.
- Create the assembly order. Select the assembly command in the left corner to create a new order.
- Choose the production type. In the pop-up window, select "Own Production" and proceed to create the order.
- Review open orders. To check the orders, click on the yellow assembly bar and then select the order.
Inside the order, review the opened positions needed for final assembly, which were already completed in earlier instructions.
- Production Request in the warehouse. Similar to the order, the Production Request within the warehouse ensures that the required positions are provided by the warehouse.

- Confirm signature for delivery. To deliver the position to manufacturing, confirm the delivery by collecting signatures from all involved parties, following the same procedure as in the previous steps.
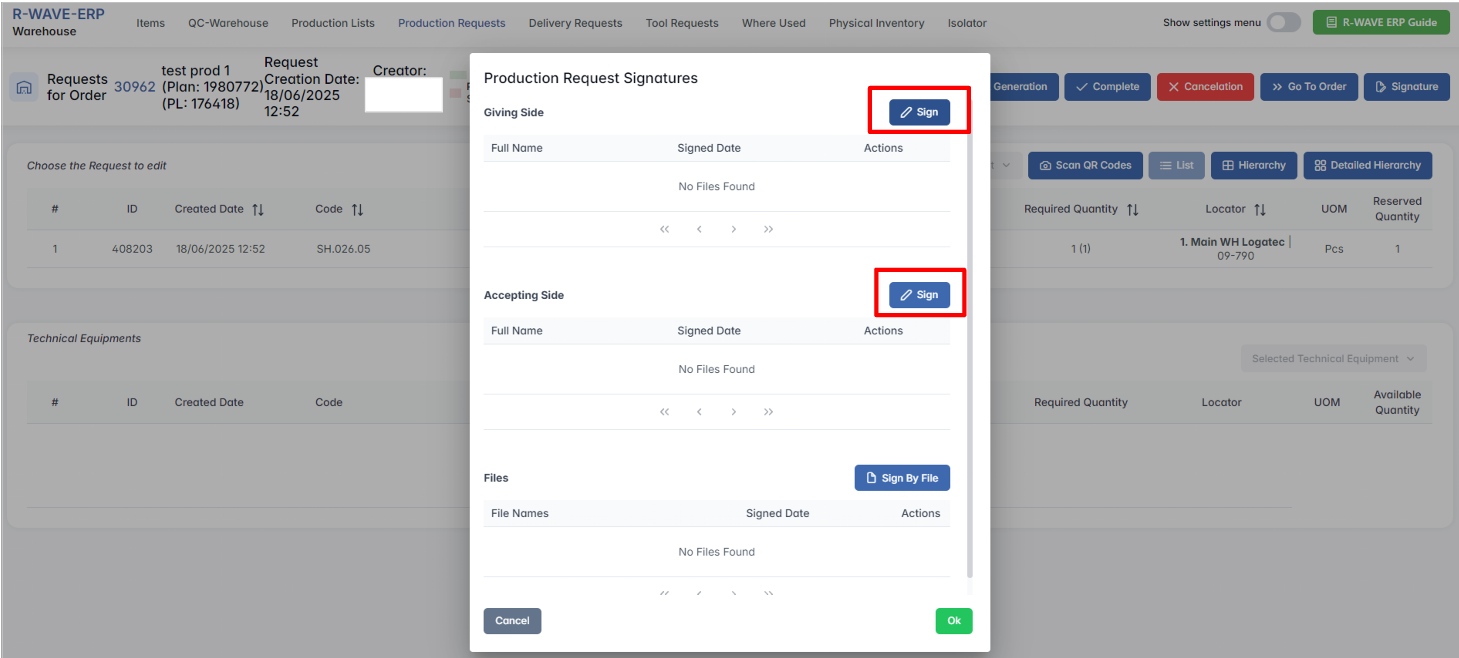
- Finalizing materials. With all required signatures in the system, manufacturing now has the necessary materials and positions to proceed.

- Manufacturing plan setup. From the manufacturing order, the affirmation status indicates all required positions are confirmed for delivery. Proceed to set up the production plan.
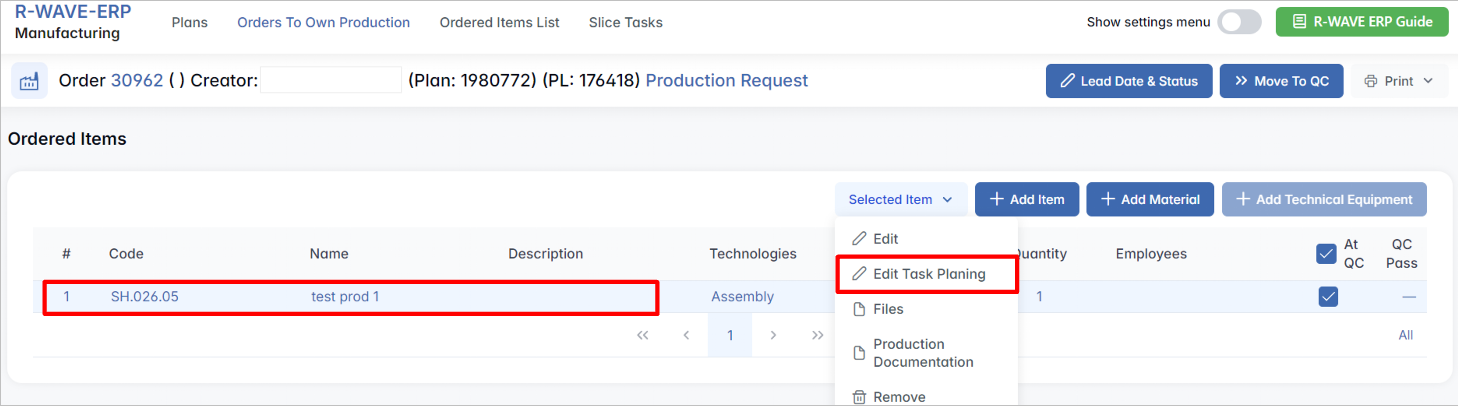
- Edit task planning. Highlight the product in the ordered items list and click the Edit Task Planning command.
- Assign work to an employee.
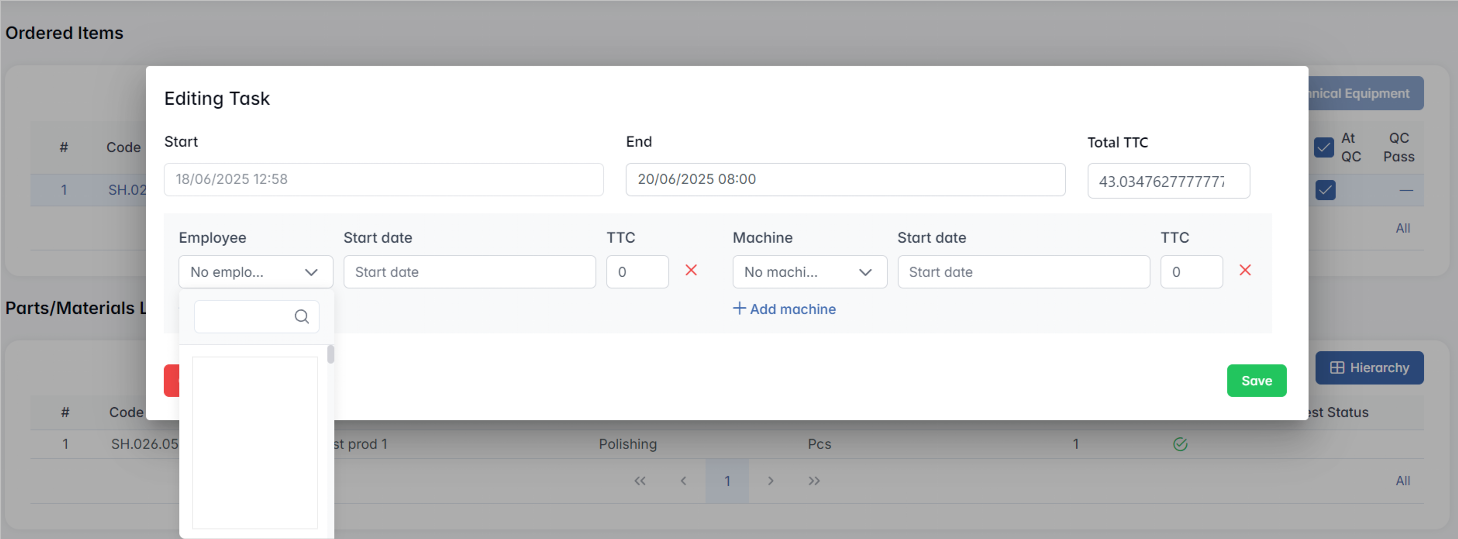
- Schedule work. Set a specific time frame for when the assigned employee will complete the task.
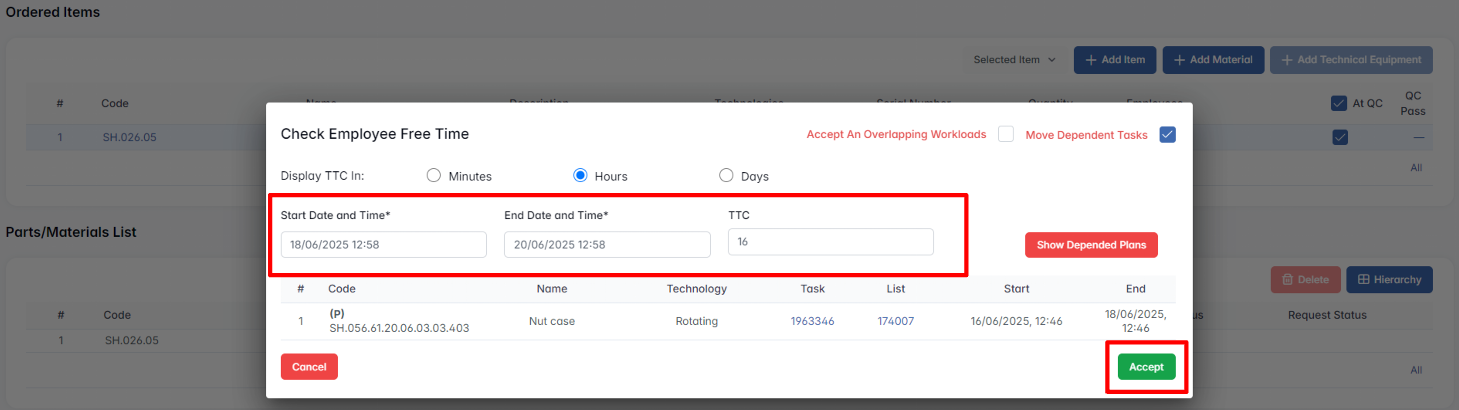
- Dedicate work to a machine. Similar to assigning tasks to an employee, you can assign specific work to a particular machine required for production.
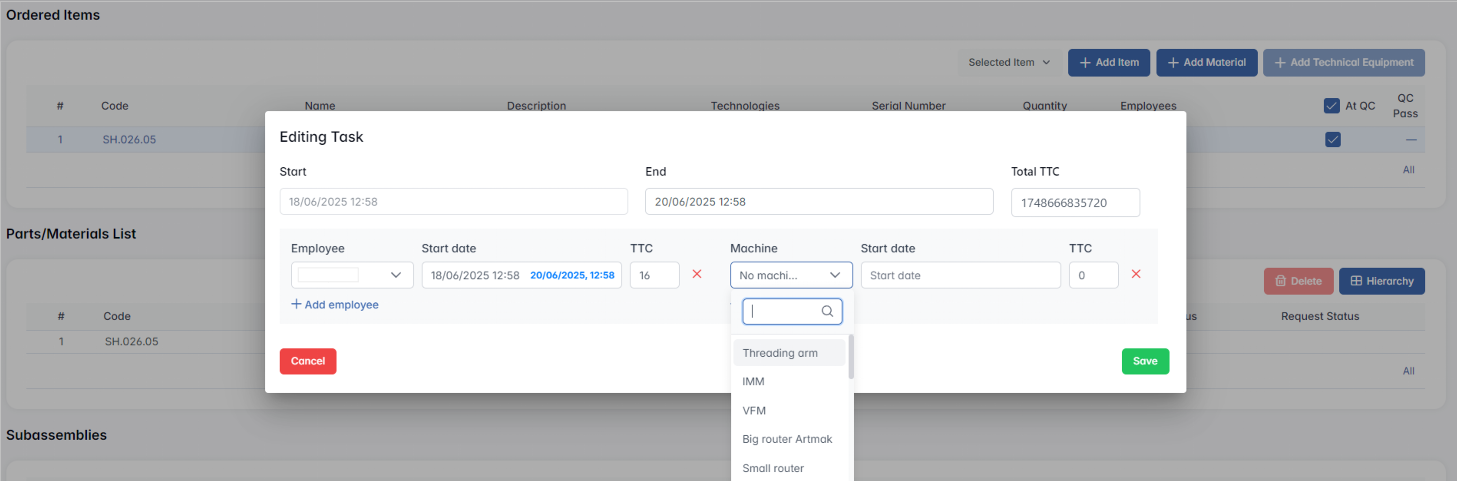
- Set time and timeframe. Define a specific time and timeframe for the chosen machine, ensuring optimal scheduling and resource allocation.
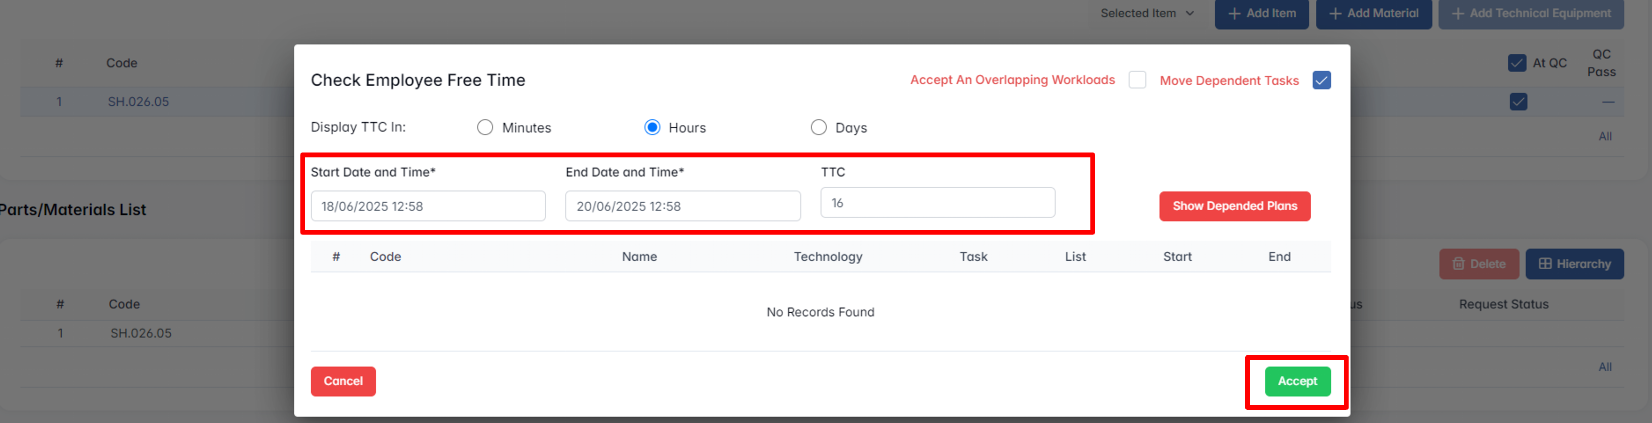
Click Accept at the end to apply all changes and confirm the assigned details.
- Production documentation. Connect relevant production documentation directly to the position for easy access during the manufacturing process.

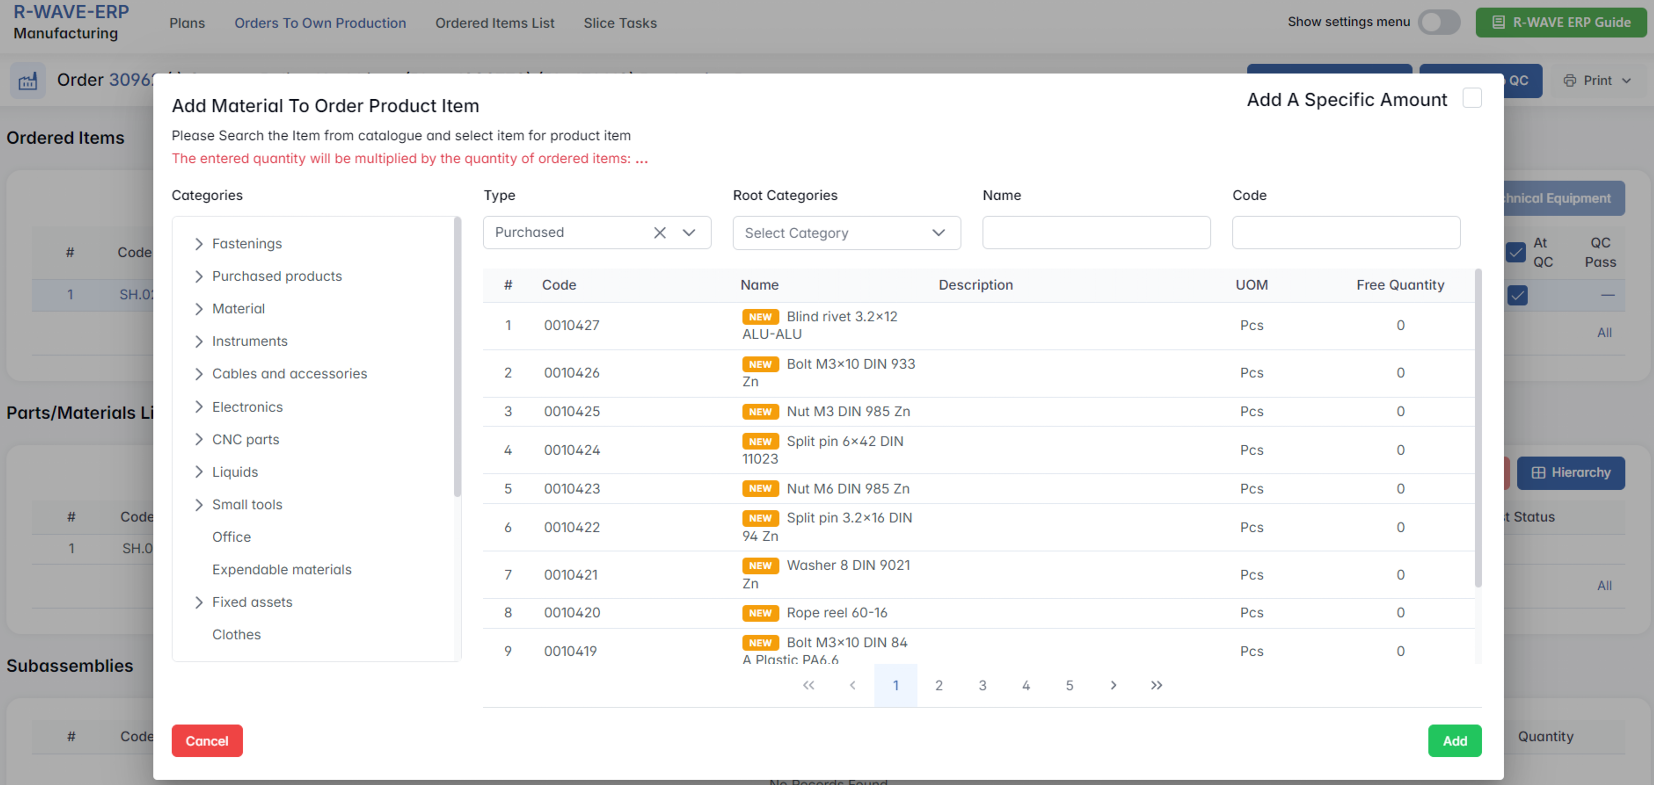
- Add materials. Include additional materials at this stage if required for the production process.

-
Order printing and notes.
-
Print production orders: If some employees do not have access to the BINU ERP web interface, the production order can be printed for offline use.
- Add additional details: Include extra statuses or comments in the production order as needed to provide detailed instructions.
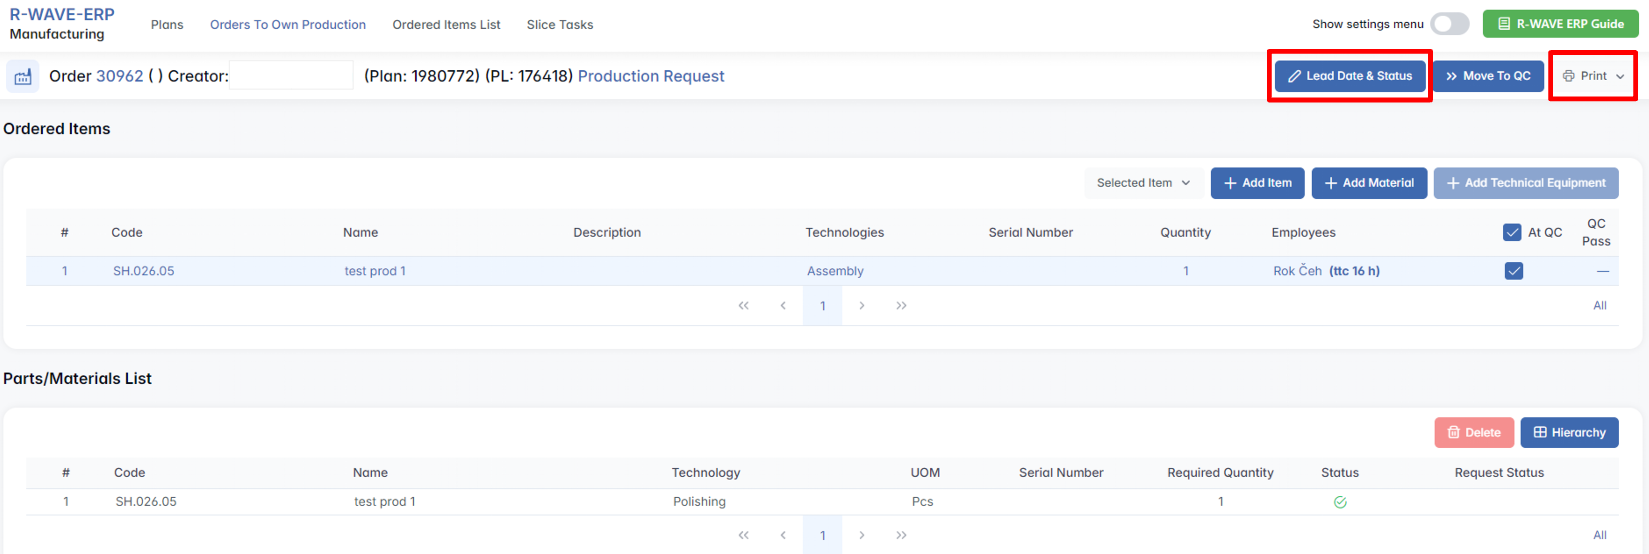
- Technical equipment. Assign additional technical equipment to the order. Equipment added to the order will be necessary for producing the position.

- Quality Control. Navigate to the Quality Control section, select Invoices, and choose Own Production to view a categorized list of items under
test prod 1.
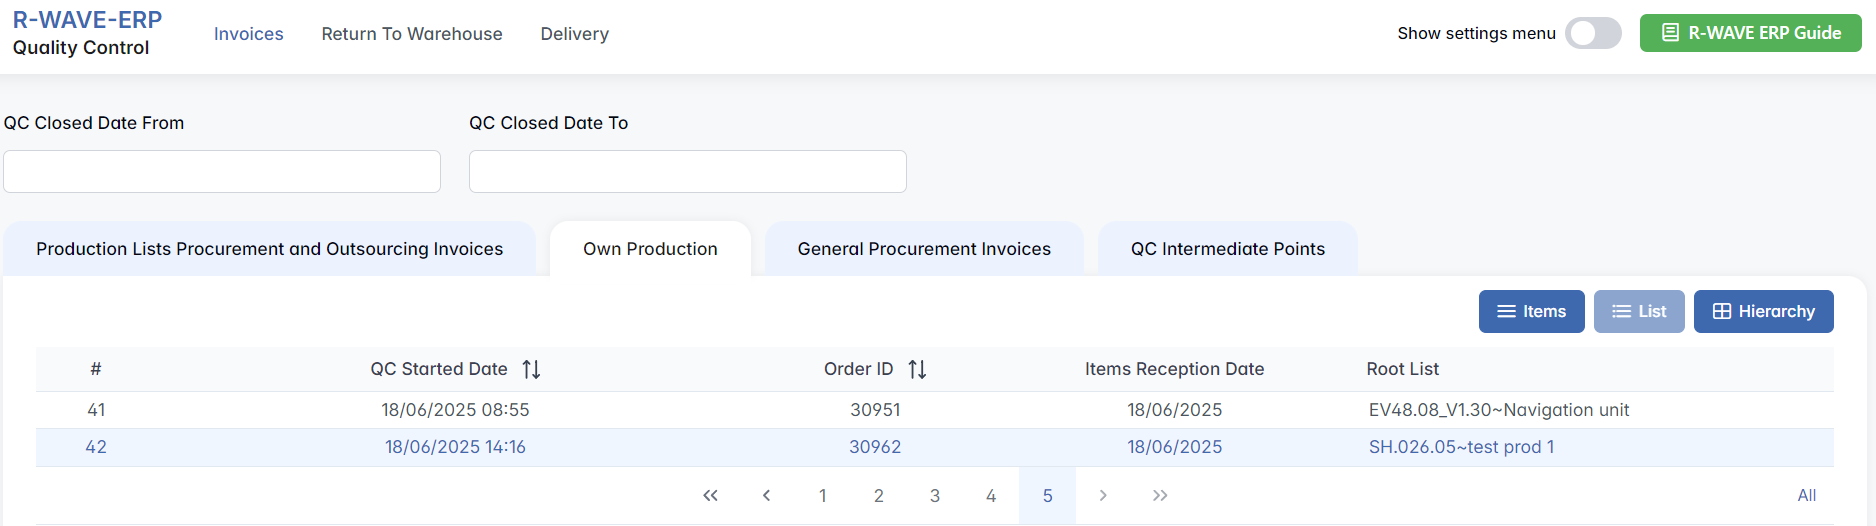
Highlight the required positions and click Pass Items. After verifying, select Complete to finalize the quality control process.
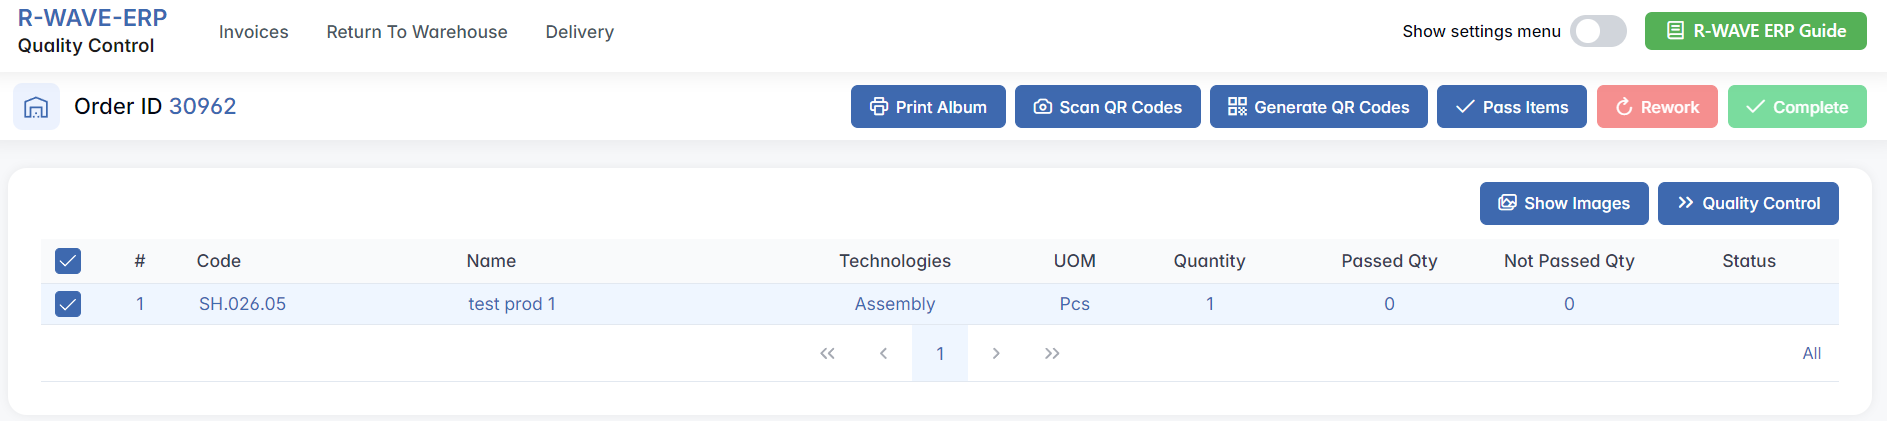
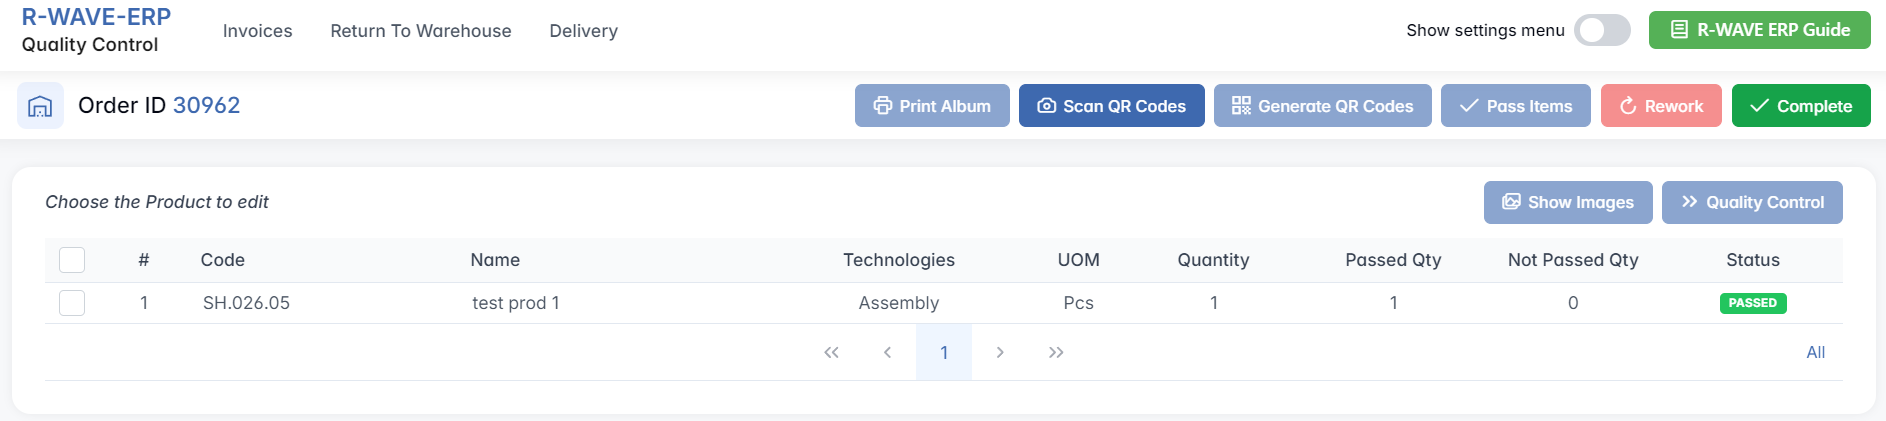
- Warehouse. Navigate to the Warehouse module to assign positions that have passed through quality control. Use the List command to locate the desired position more efficiently.
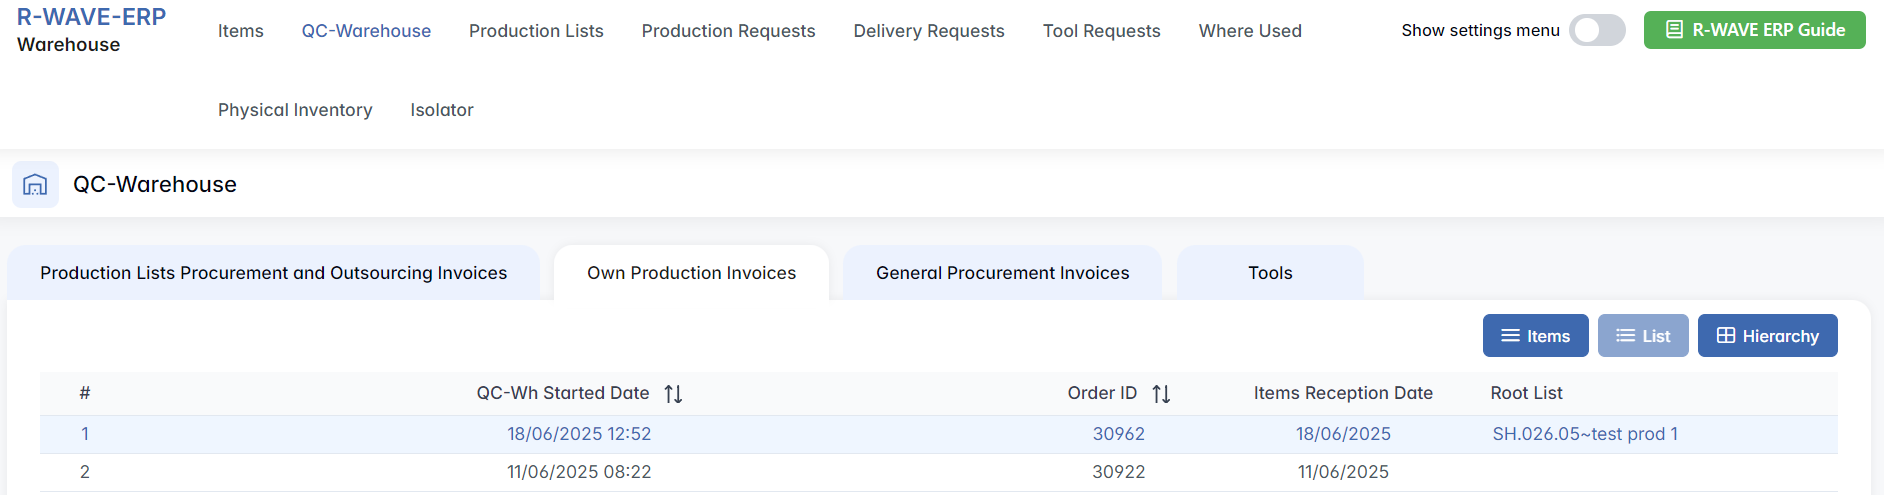
Highlight the position and click Items to view the list of positions that have successfully cleared quality control. Select the required quantity of positions, assign them to a specific warehouse, and designate a location using the locator form by clicking the Accept To Warehouse command.

- Production plan completion. Check the production plan to confirm that all bars are green, indicating that the final position is stocked in the warehouse and marked as completed.