General Procurement Module
The General Procurement module in BINU ERP is designed to manage all purchasing activities initiated by departments or employees through manual requests. It covers the complete procurement life cycle — from material requests to delivery, invoicing, and payment confirmation — and is essential for ensuring supply continuity outside of automated production procurement.
This module enables procurement staff to consolidate manual purchase requests, manage supplier interactions, track order progress, and handle related financial documentation, including proforma invoices and payments. It supports transparency, traceability, and flexibility in procurement operations, especially for indirect purchases, one-time needs, or smaller-scale orders.
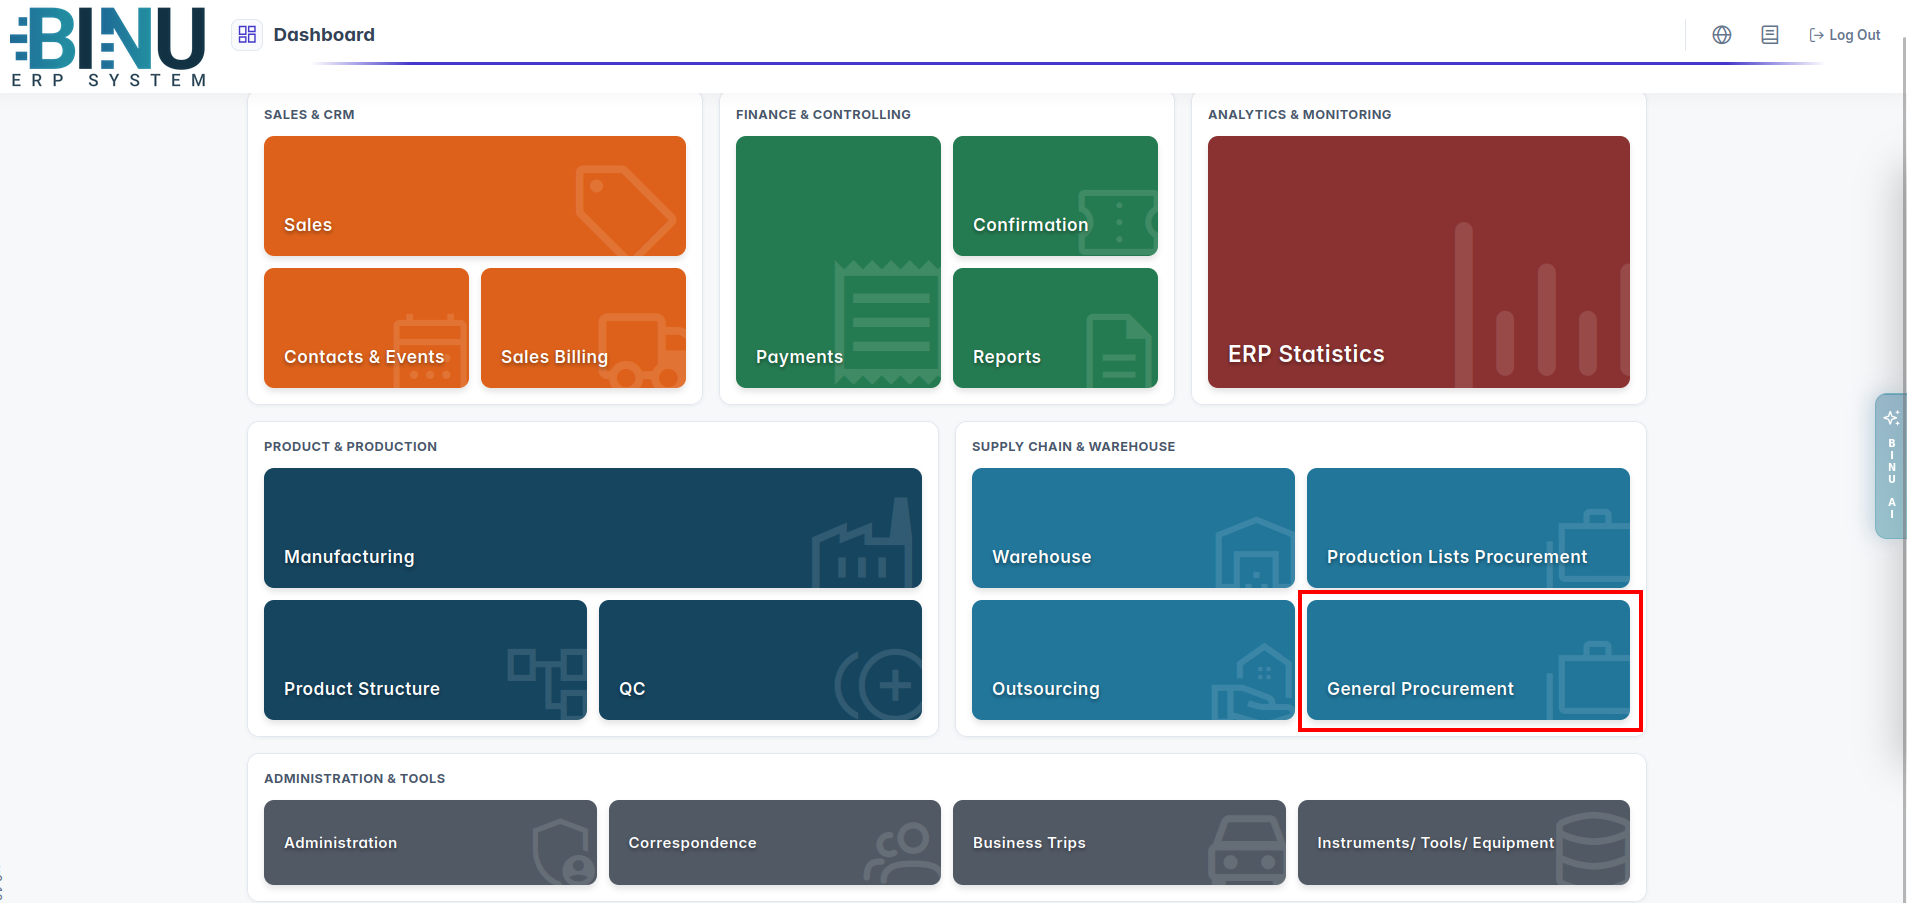
The module is divided into two main tabs in the top header:

- Procurement Requests – manually entered records representing a material or tool need.
- Procurement Chains – procurement order created from selected procurement requests.
The BINU ERP Guide and AI Assistant Tools
The BINU ERP Guide and AI Assistant Tools
The BINU ERP system provides tools to support users in navigating and understanding the processes and functionalities of the system. These tools — the BINU ERP Guide and the BINU AI Assistant — include a built-in contextual help. They are non-intrusive and can be closed or reopened as needed, allowing users to remain focused on their current workflow without interruption.
When you click the BINU ERP Guide icon in the upper-right corner of the screen, the pop-up guide window opens. This feature is available across different modules and is designed to help users understand where they are in the system and how to use the current section effectively.

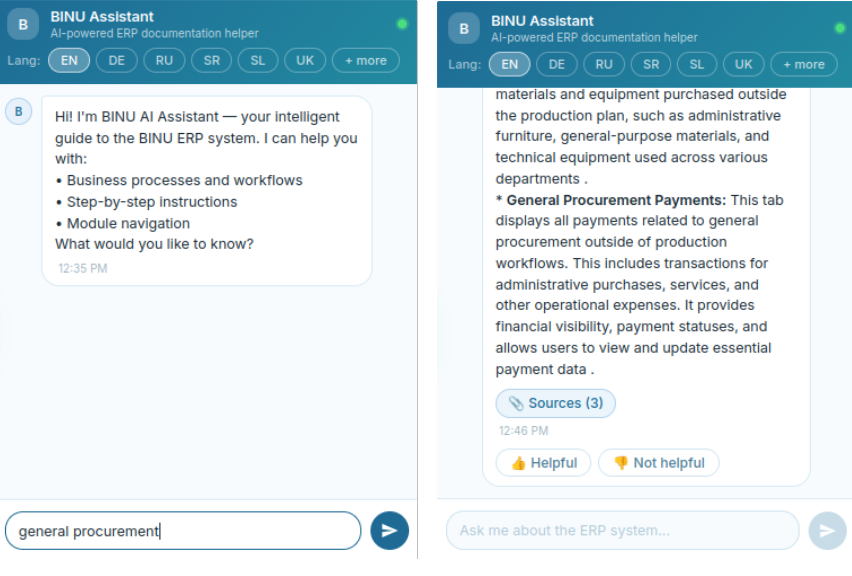
When you click the BINU AI feature on the side of the screen, the chat window opens, where users can choose their language of conversation. The supported languages are: English, Bulgarian, Croatian, French, German, Hungarian, Italian, Romanian, Russian, Serbian, Slovenian, Spanish, Turkish, and Ukrainian.

The BINU AI Assistant provides explanations and documentation for all topics related to the BINU ERP system. Users can ask about specific terms, business processes, system functionalities, or request documentation on a particular topic. To begin, type your question in the input field at the bottom of the chat window.
The BINU ERP Guide: Quick Overview
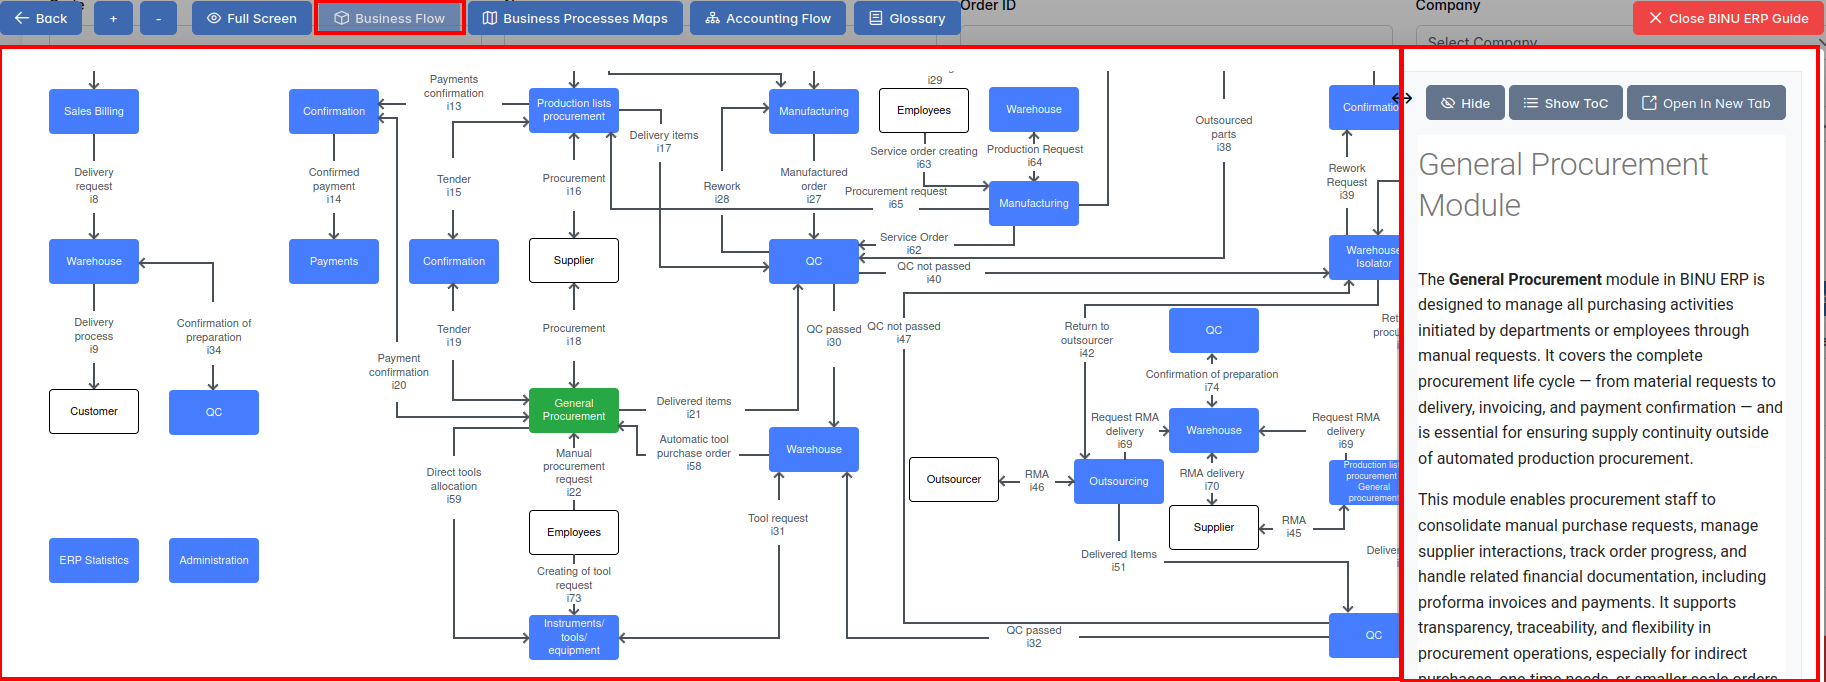
When you click the BINU ERP Guide book icon, you land on the Business Flow map. It has two main sections: the left panel displaying the business flow map and the right panel showing the functional overview.
- Left panel — Business Flow Map — displays a visual diagram of the business processes. It shows how each module is interconnected; for example, you can see how Sales, Manufacturing, Procurement, CRM, QC, and Warehouse are interconnected.
- Right panel — Functional Overview — provides a concise, bullet-style instruction list describing the key operations available in the current module/tab.
Top Bar Options
At the top of the ERP Guide window, you'll find optional tools for deeper understanding: Business Processes Maps, Accounting Flow, and Glossary. The Accounting Flow is meant for financial departments.

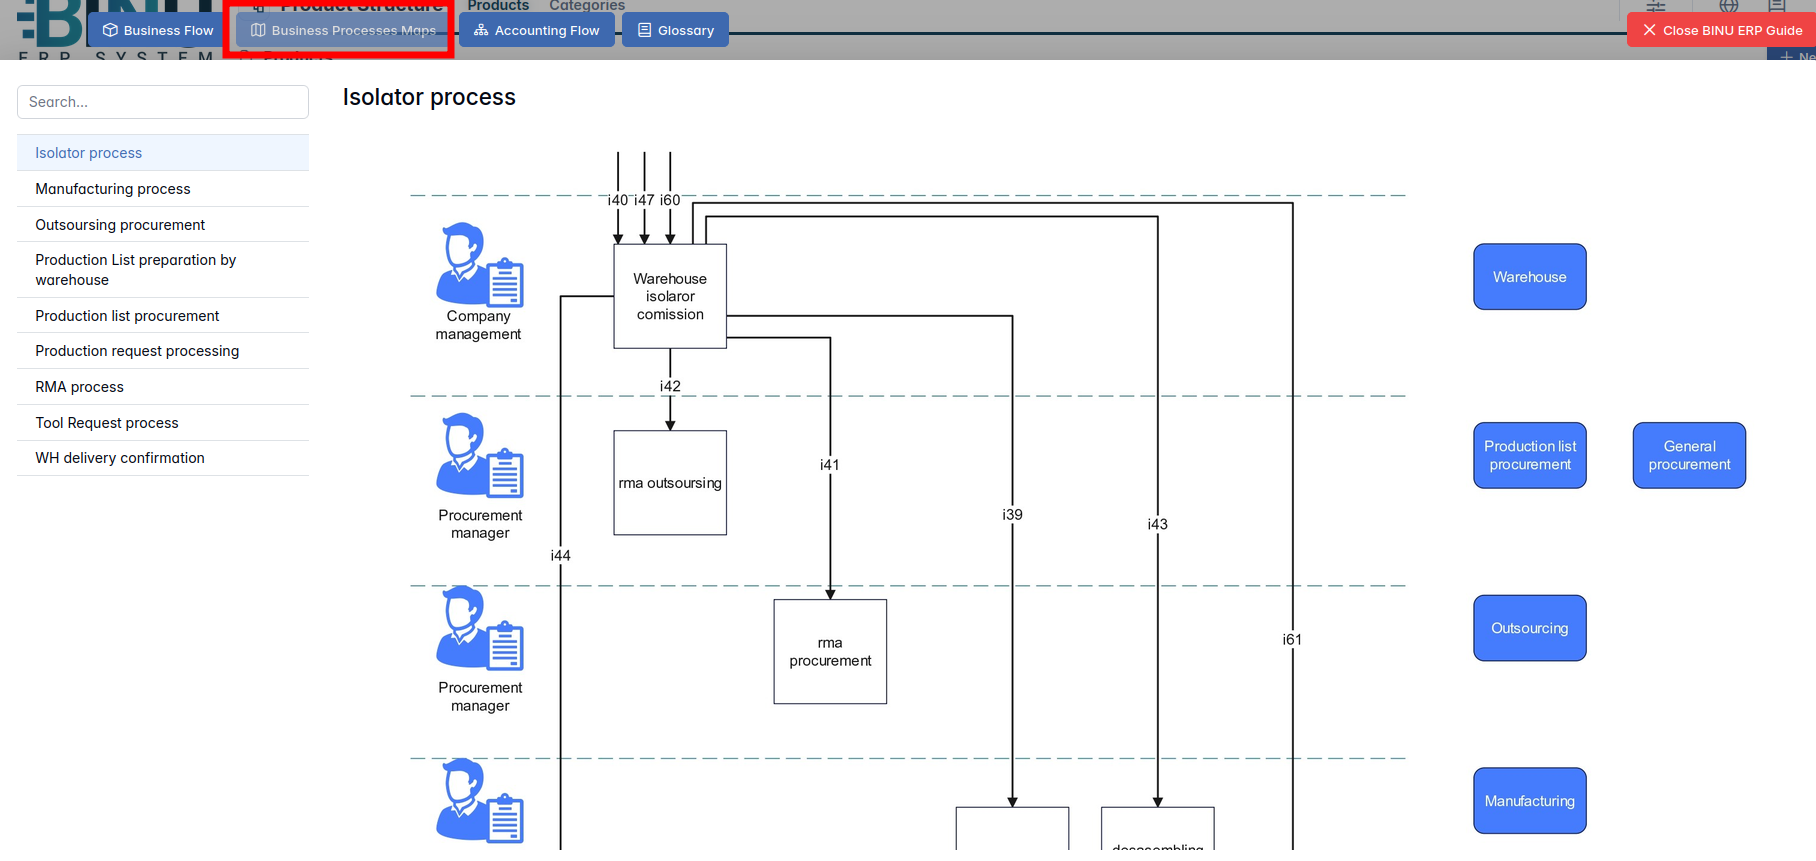
Business Processes Maps
Business Processes Maps provides a visual representation of the company's operational structure and business flow. It helps the user understand how the current module fits into the larger operational structure and makes it easy to grasp the upstream and downstream dependencies within the business processes. The Business Processes Maps can be accessed from various modules.
Accounting Flow: Data Flow Graph and Responsibility Matrix
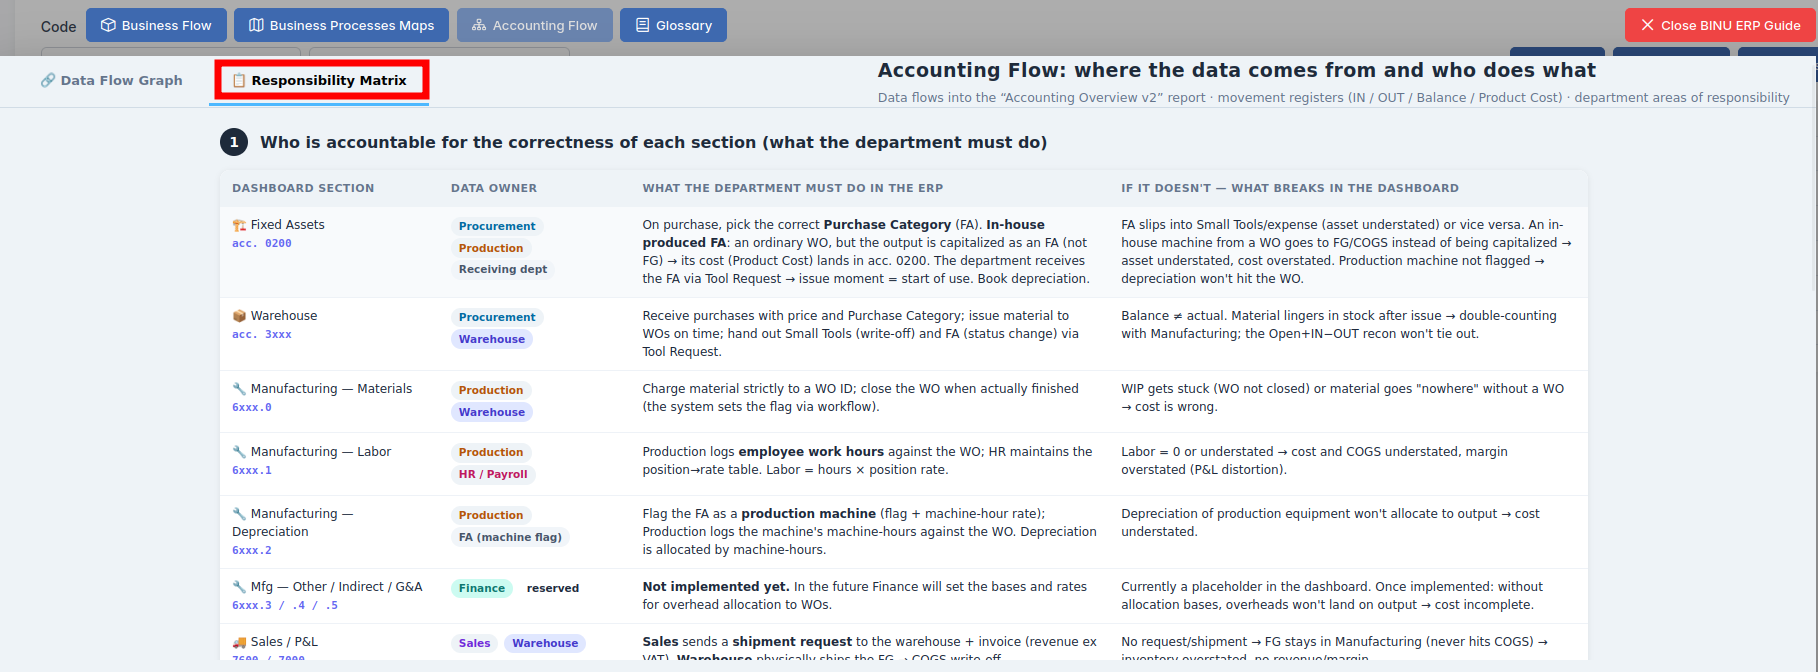
Accounting Flow is a tool designed for the finance department; it shows where the data originates and defines responsibilities. For this purpose, it consists of two parts: a Data Flow Graph and a Responsibility Matrix.
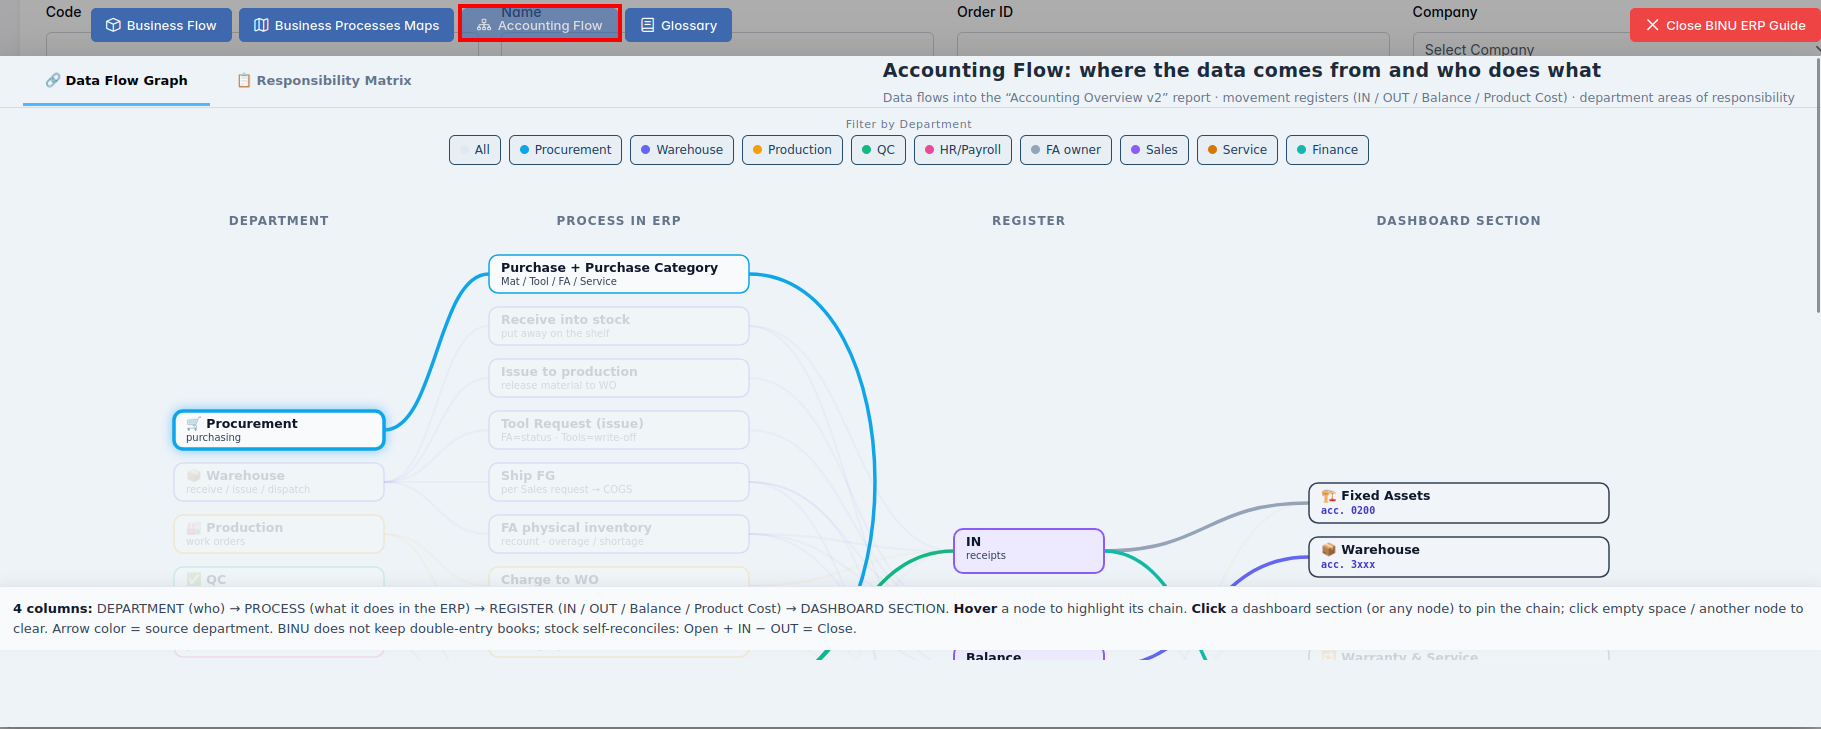
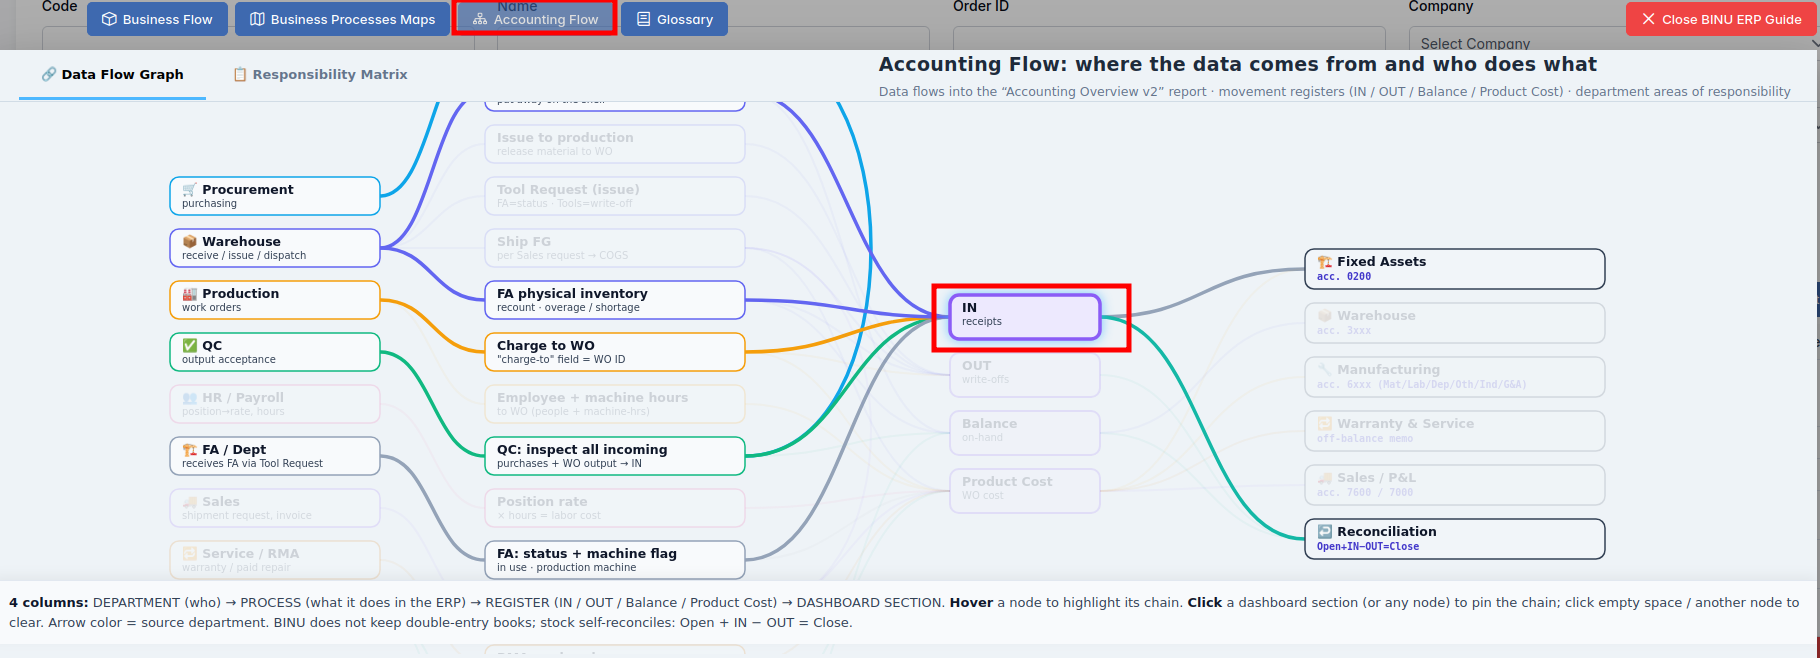
The Data Flow Graph displays the movement of items from departments to the warehouse and from the warehouse to the departments. Based on these movements, the system tracks the flow of goods entering and leaving the company. The Dashboard section, planned for a future release, will allow users to view real-time data (in, out, balance, product costs).
If you hover over a diagram block, the system highlights the corresponding movement chain.
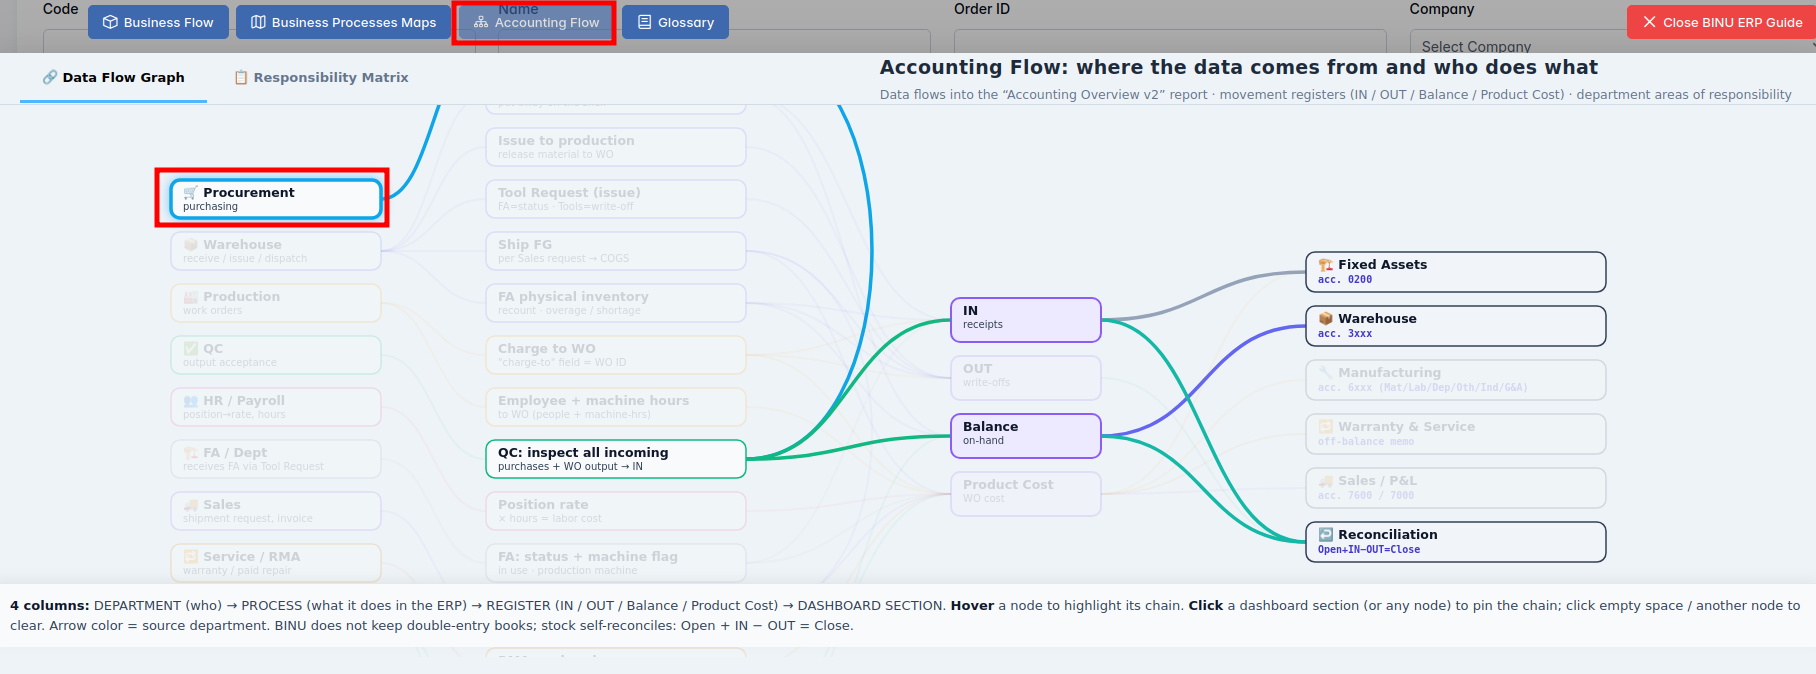
If you click a block in the diagram, you fix the highlighted chain. To narrow the selection further, click a block in the second, third, or fourth column.
The Responsibility Matrix identifies the department accountable for the selected process.
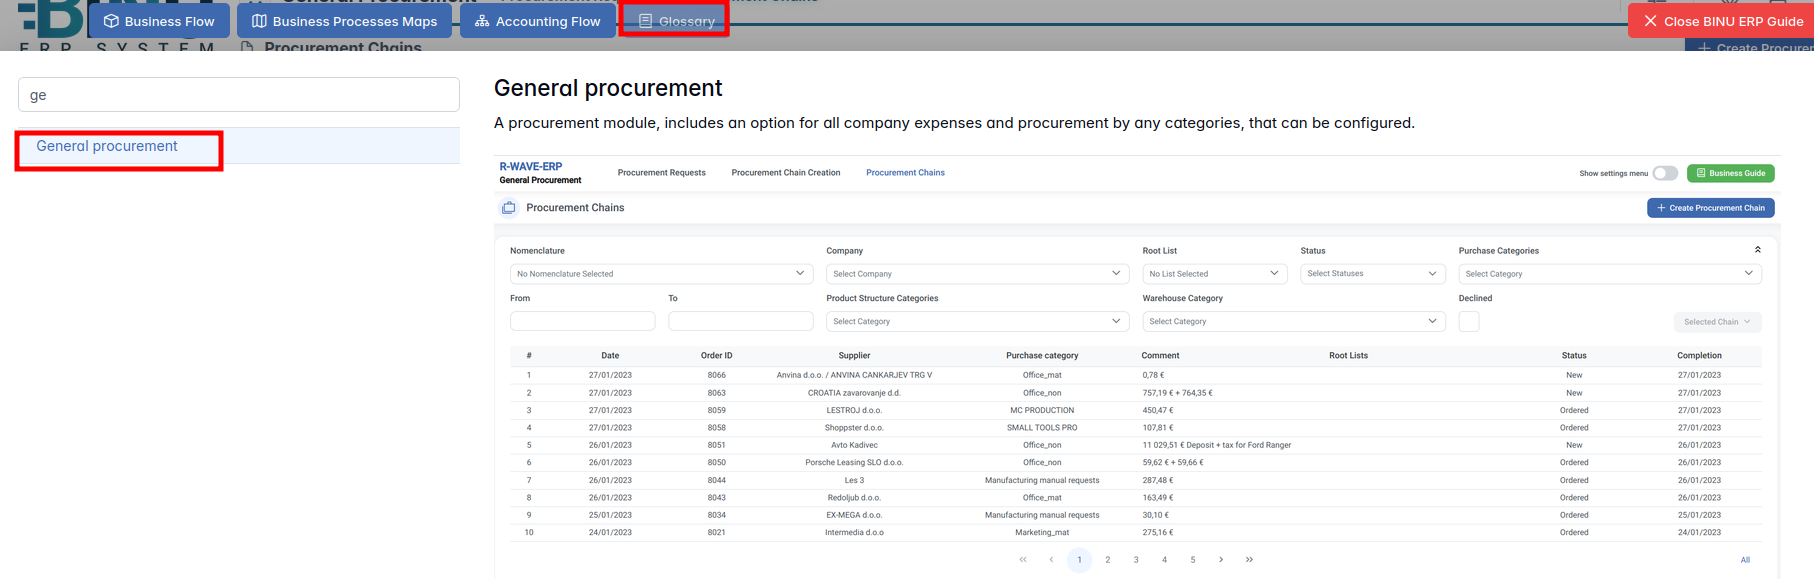
Glossary
Glossary provides definitions and descriptions of key terms and functionalities used throughout the system. The Glossary can be accessed via the BINU ERP Guide, which is available on any page of the system.
The BINU AI Assistant: Quick Overview
The BINU AI Assistant is specifically designed to help the user with ERP documentation questions. It provides information and assistance related to the BINU ERP system. The BINU AI Assistant understands fifteen (15) languages. It is available on every page as a non-intrusive help tool.
The Purpose of the BINU ERP Guide and BINU AI Assistant Tools
The BINU ERP Guide and BINU AI Assistant help users by:
- Showing where they are within the system (module context and current section).
- Providing a visual schema of the business flow, helping them understand how the current module fits into the larger operational structure.
- Offering a quick-reference instruction panel with the main actions and functions available in the current tab (e.g., creating companies, filtering, scheduling events).
- Offering quick access to the relevant documentation (AI-powered ERP documentation helper).
General Procurement Module Overview
The General Procurement module provides users with a structured interface to manage all non-automated purchasing workflows, typically initiated by internal departments through manual requests. It is particularly suited for indirect or operational purchases that fall outside standard production procurement. The module acts as a bridge between internal demand and external suppliers, enabling procurement teams to handle diverse purchasing scenarios with flexibility and control.

The module is divided into two main tabs, accessible via the top menu:
- Procurement Requests — allows procurement staff to group internal material requests and convert them into procurement chains. It supports supplier selection, quantity adjustment, and categorization of purchases.
- Procurement Chains — manage the entire lifecycle of each procurement chain, from order creation to invoicing and payment tracking. All supplier data, documents, and delivery statuses are centralized in this view.
When users enter the module, the system opens by default to the Procurement Chains page for quick access to ongoing orders and invoice management.
Procurement Requests
Procurement Requests
The Procurement Requests tab is a central workspace where users can manage and monitor procurement requests before they are fully integrated into the purchasing process. This module is designed to help supply chain and procurement teams transform material needs into structured procurement chains, enabling transparency, prioritization, and control across manual or automated requests.
Upon accessing this page, users are presented with a filter tab at the top and a data table below it. The interface allows users to search, filter, and review material requests that may be pending ordering or are in the process of being partially or fully ordered.
Filter Section Overview
The filter section allows users to narrow down request entries based on several parameters:

- Name – Text input to search for specific item names.
- Code – Unique material code identifier.
- Category – A hierarchical tree of categories with multiple selection via checkboxes (e.g., fasteners, connectors, rods, sensors).
- Date – Filter by creation date of the request.
- Creators – Multi-select dropdown to filter requests by the individuals who created them.
- Statuses – Allows filtering by procurement progress: NOT ORDERED, PARTLY ORDERED, ORDERED.
These filters support dynamic data exploration and decision-making by helping teams focus on outstanding or urgent items.
Data Table Overview
Below the filter section, users find a detailed table containing procurement request records. Each row represents an individual material request with full contextual and quantitative data:

| Column | Description |
|---|---|
| ID | Unique identifier of the request. |
| Name | Material or item name. |
| Code | Internal code for the item. |
| Request Quantity | The total quantity of material originally requested. |
| Ordered Quantity | Quantity that has already been ordered. |
| Free Ordered Quantity | The excess quantity that was ordered beyond the required amount. |
| UOM | Unit of measure (e.g., Pcs, cm, cm²). |
| Category | Classification group, selected from a predefined list. |
| Description | Free text or link with detailed specifications or supplier references. |
| Date | The creation date of the request. |
| Request Type | Source of the request: Manual (user-created or triggered by min. stock) or Tool Request (from tool requisition). |
| Chains | Associated procurement chains (if already assigned). |
| Root Lists / Production Lists | Additional lists or production plans linked to the item. |
| Status | Current status in the procurement process (NOT ORDERED, PARTLY ORDERED, ORDERED). |
| Creator | The person responsible for creating the request. |
Filter Behavior and System Feedback
When applying filters in the General Procurement module, users might receive error messages if certain conditions aren't met. For example, if a user applies only Status: ORDERED without additional filters, the system returns: 400: ["At least one additional filter parameter must be passed along with the status 'ORDERED'."]. This enforces better-defined filtering criteria and ensures efficient data retrieval.
Action Buttons Behavior
Above the filter section, the following action buttons are available:

- + New Request
- + Create Procurement Chain
- + Add To Procurement Chain
- Close Request
- Delete Request
These buttons are only active when one or more rows are selected from the request table. Their availability depends on the status of the selected records:
| Selected Record Status | Active Buttons |
|---|---|
| Ordered | None – all buttons remain disabled |
| Partly Ordered (1+ selected) | All except Delete Request |
| Not Ordered (1+ selected) | All except Close Request |
| Mixed: Not Ordered + Partly Ordered (1+ selected) | All except Close Request and Delete Request |
Request Type Specifics
Some requests are created automatically when items reach minimum volume thresholds. These are labeled as Requested by minimum volume — the creator field is empty, because these records appear without manual user initiation.

Procurement Chain Navigation
For items in Ordered or Partly Ordered status:

- The Chains column displays a clickable number.
- Clicking this number redirects the user to the Production Lists Procurement module.
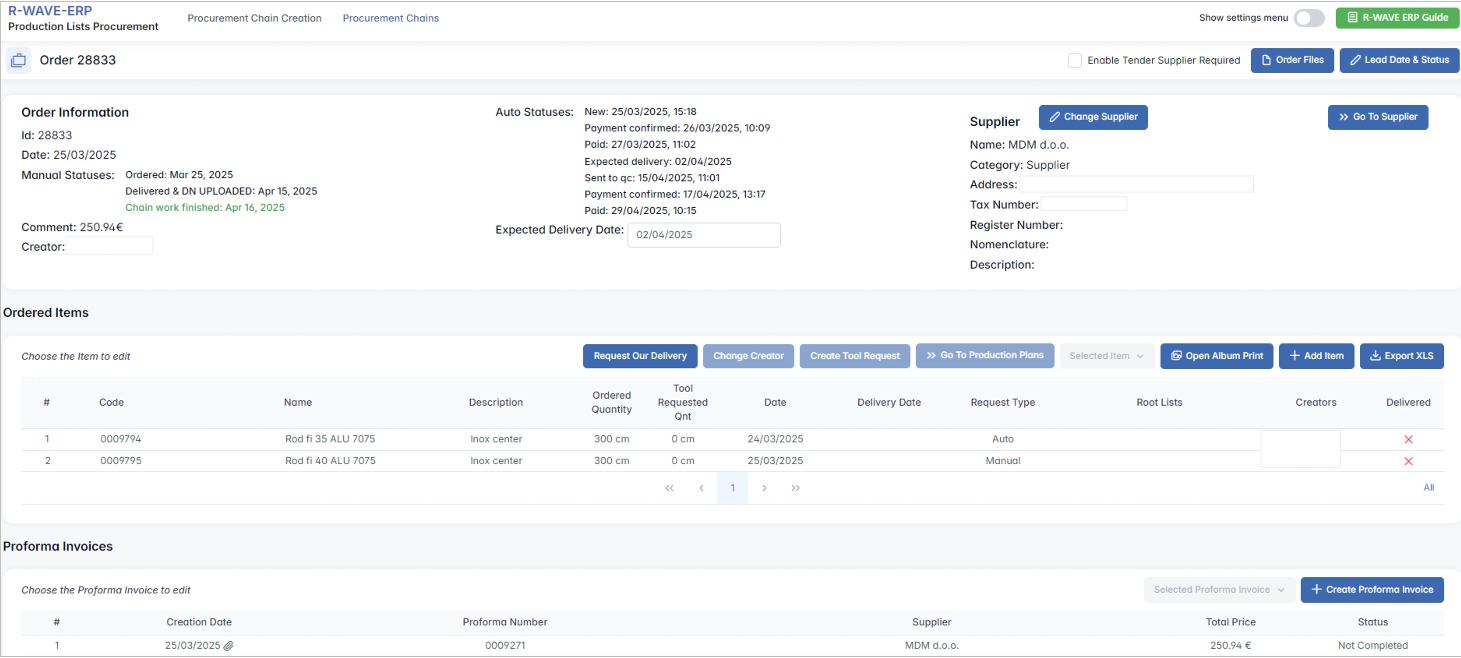
This module contains detailed information, such as Order number, Ordered quantity, Payments, and other additional procurement details.
Creating a Procurement Chain
To initiate a procurement process in the BINU ERP system, the first step is to select the relevant procurement request(s). These are the material or tool needs that require supplier fulfillment.
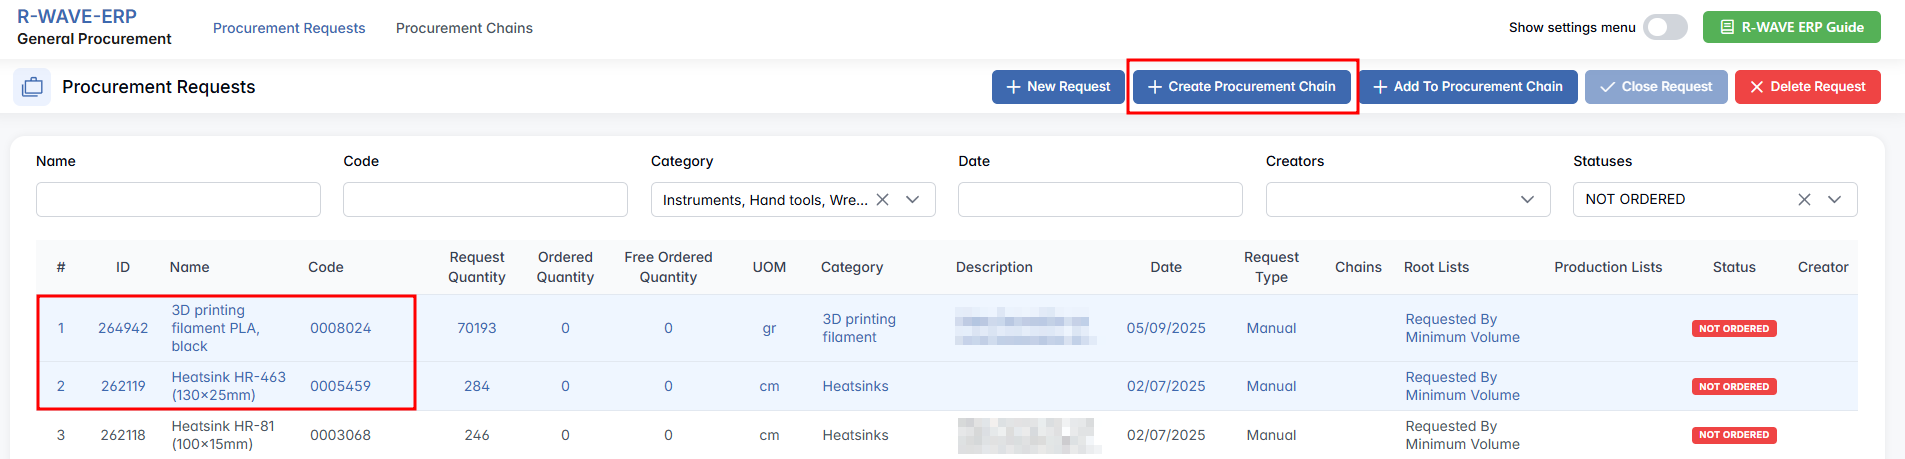
Once you've selected the appropriate request rows, click the + Create Procurement Chain button. This will open a modal window containing the creation form. In this form:
- Company must be selected unless the "Enable tender supplier required" checkbox is checked (used when a supplier isn't yet chosen).
- Purchase Category must be selected.
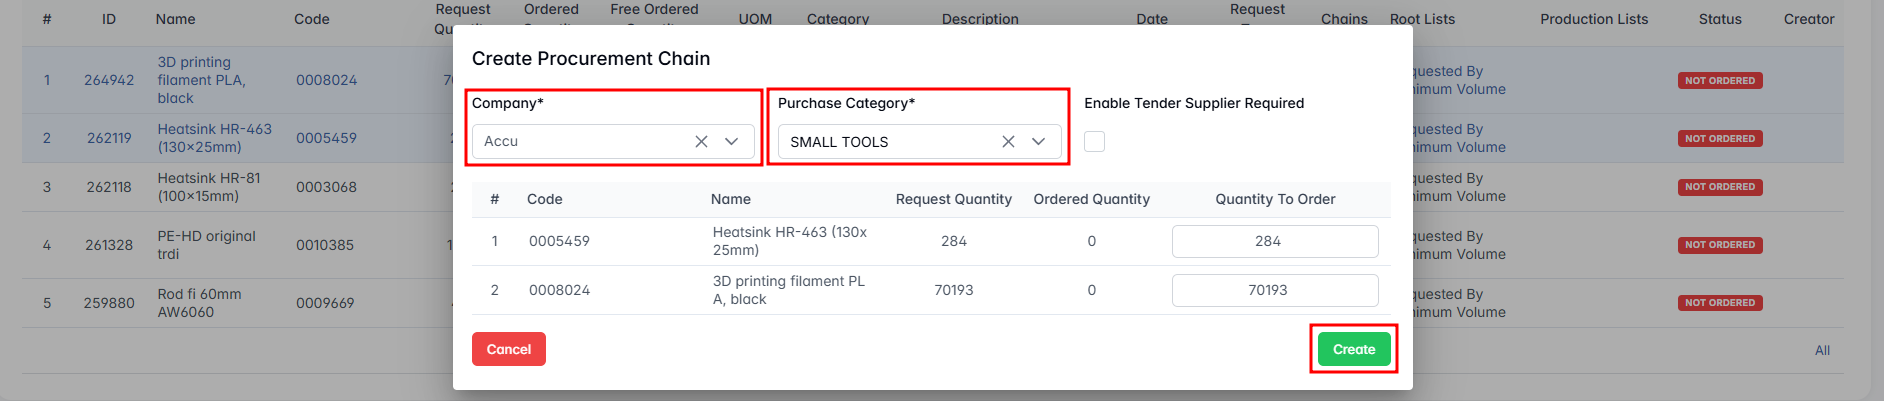
- Request Quantity — Quantity initially requested.
- Ordered Quantity — Quantity already ordered (if any).
- Quantity To Order — Editable field where the user specifies the actual amount to be ordered in this chain.
Note: The Quantity To Order can exceed the original request if necessary.
After clicking Create, the system will generate the procurement chain and redirect you to the newly created Order page under the Procurement Chains tab.
Order Page – Overview
The Order page is divided into several tabs. The top section includes the Order Information, including the Order number, Type, Supplier information and more.
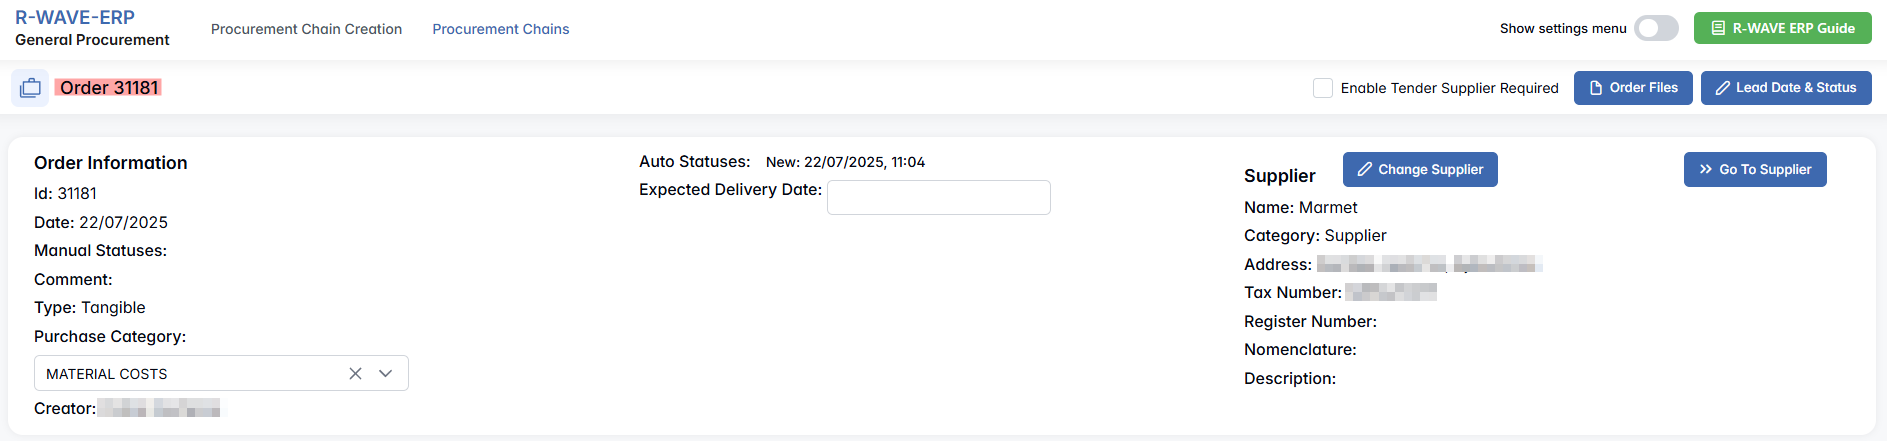
Actions:
- You can modify the Purchase Category, set the Expected Delivery Date, or modify Supplier information by clicking Change supplier.
- If you want to see detailed information about the supplier, click Go to Supplier, which opens the supplier Company Card.
- If you haven't defined a supplier yet, you can check the Enable Tender Supplier Required option.
- You may also upload files relevant to the chain or view existing ones by clicking Order Files.
The Lead Date & Status button opens a modal where you can track or update the progress of the chain:
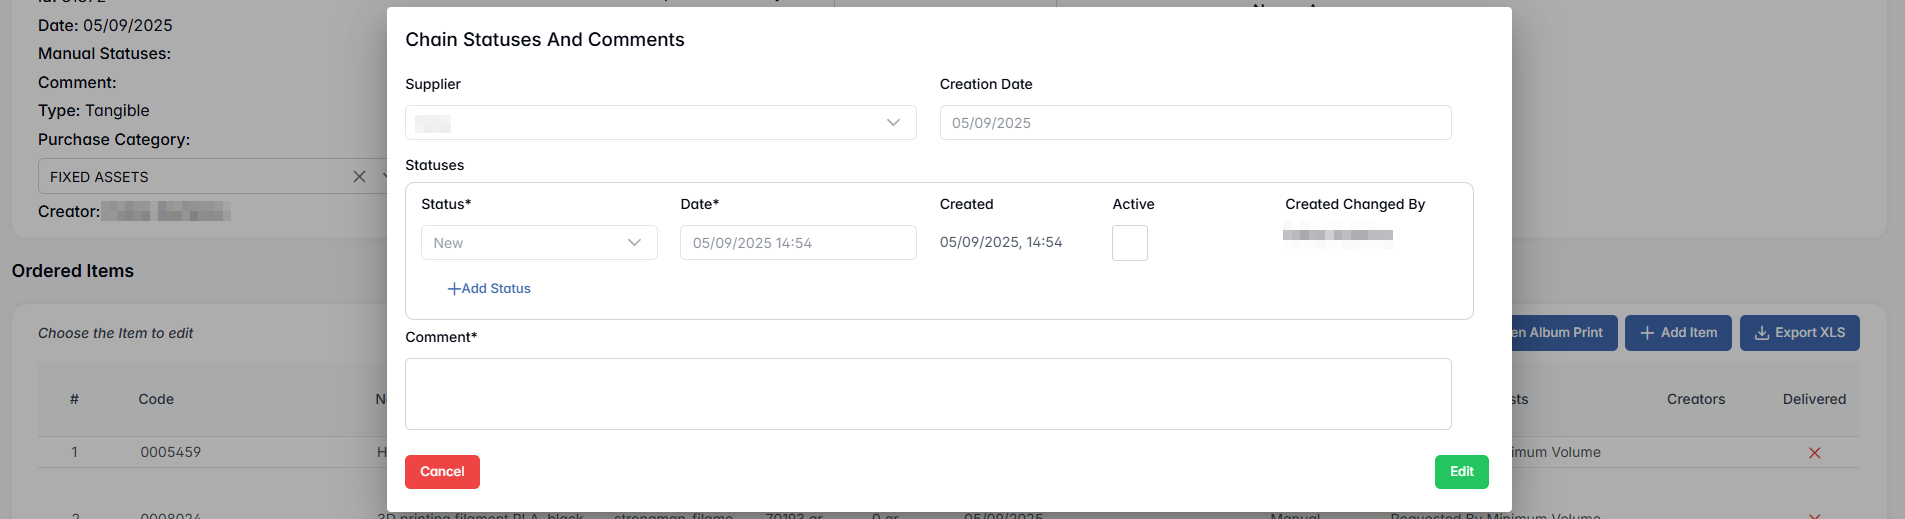
- You can add multiple statuses, but only one can be marked as Active at a time.
- The Comment field is optional.
Credit Lines
When a new production list procurement order is created, users can add a credit line to it.
At the top of the Credit Lines section on the Procurement Order page, you will find:
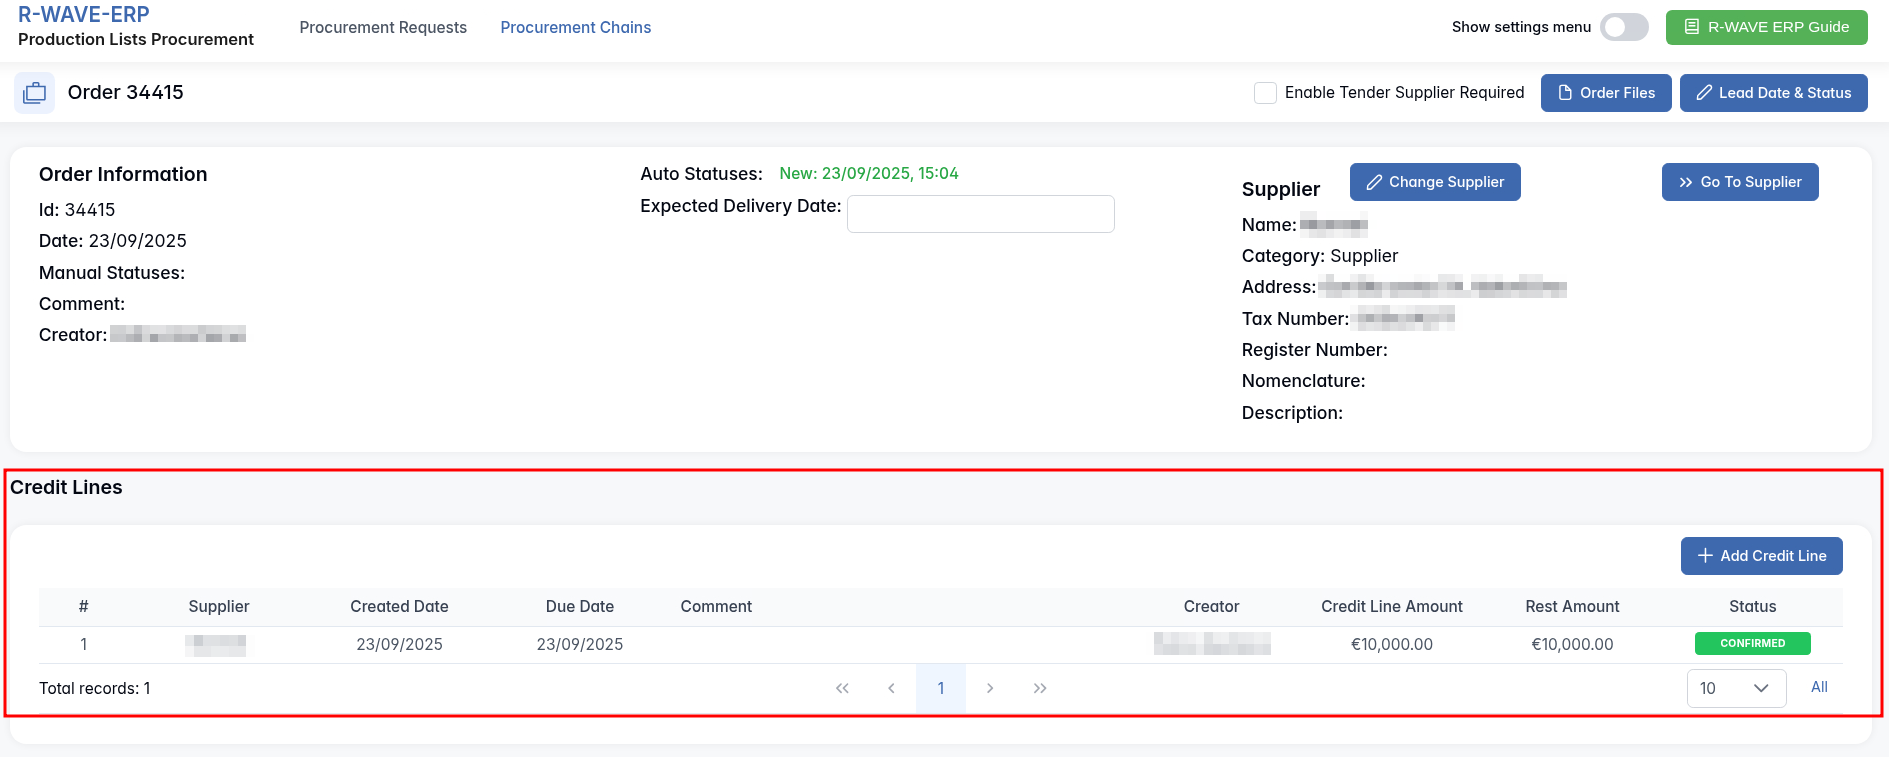
- A + Add Credit Line button.
- A table that lists all existing credit lines for the order (initially empty).
Click + Add Credit Line. A modal window Create Credit Line will open.

- Credit Line Amount * – required, numeric value greater than zero.
- Due Date * – required; set by default to the current date but can be adjusted.
- Comment – optional text field.
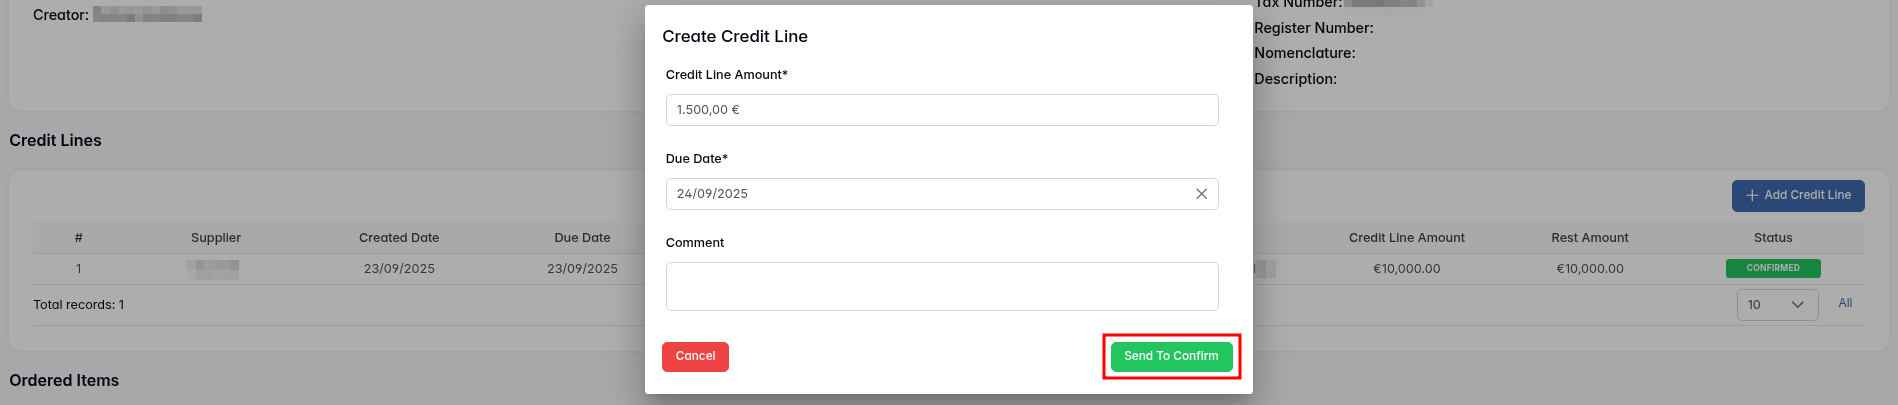
Click Send to Confirm to create the credit line. The new credit line appears in the table with status IN CONFIRMATION.
Each created credit line is displayed with the following details: Supplier, Created Date, Due Date, Comment, Creator, Credit Line Amount, Rest Amount (available balance after payments), Status (IN CONFIRMATION, CONFIRMED, DECLINED).
All newly created credit lines must be confirmed in the Confirmation module.

Note: If a payment has already been created in the procurement chain before the first credit line, the system will not allow adding a new credit line — the + Add Credit Line button becomes disabled.
Ordered Items
This section displays all items requested within this chain. Several key functions are available:

- Print options – Print List of Ordered Items and Material Receipt.
- Request Our Delivery – used when a supplier informs you that the ordered item is ready for pickup, and the delivery will be arranged internally — not through an external delivery service. By selecting the relevant items for delivery and clicking + Create Delivery Request, a pickup request is generated for the warehouse team (Warehouse module > Delivery Requests > Ordered Items Delivery). This informs them that they need to collect the item directly from the supplier.

- Change Creator – Assigns a different creator to the selected item.
- Create Tool Request – Generates a tool/material request to internal departments.

This function allows the procurement team to create an internal tool or material request directly during the procurement process when a free ordered quantity is available. It is used when part of the ordered items is intended for internal use, ensuring that such usage is properly registered and managed through the formal tool request process.
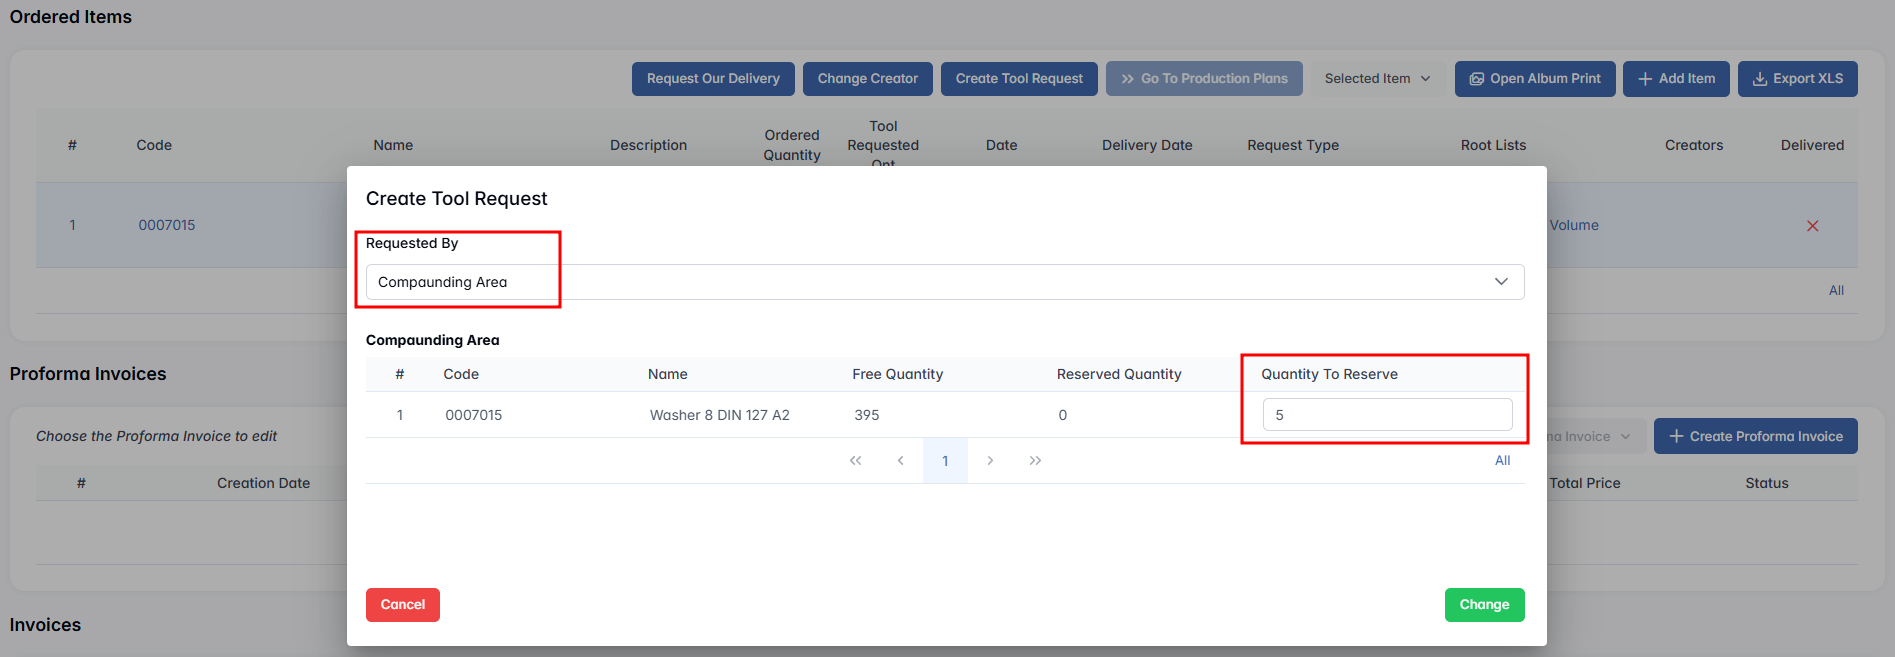
- Selected Item menu lets you:

- Edit quantity

- Set Delivery Date
- Remove the item
Additional buttons:
- + Add Item – Manually adds a new item to the chain
- Export XLS – Download a list of ordered items
- Open Album Print – Print related visuals or data
Proforma Invoices Section
Click + Create Proforma Invoice to register a new proforma invoice. A confirmation modal will pop up — click Confirm to proceed. This action creates a default row in the Proforma Invoices table, which includes all ordered items that are not yet part of any proforma and not yet invoiced.
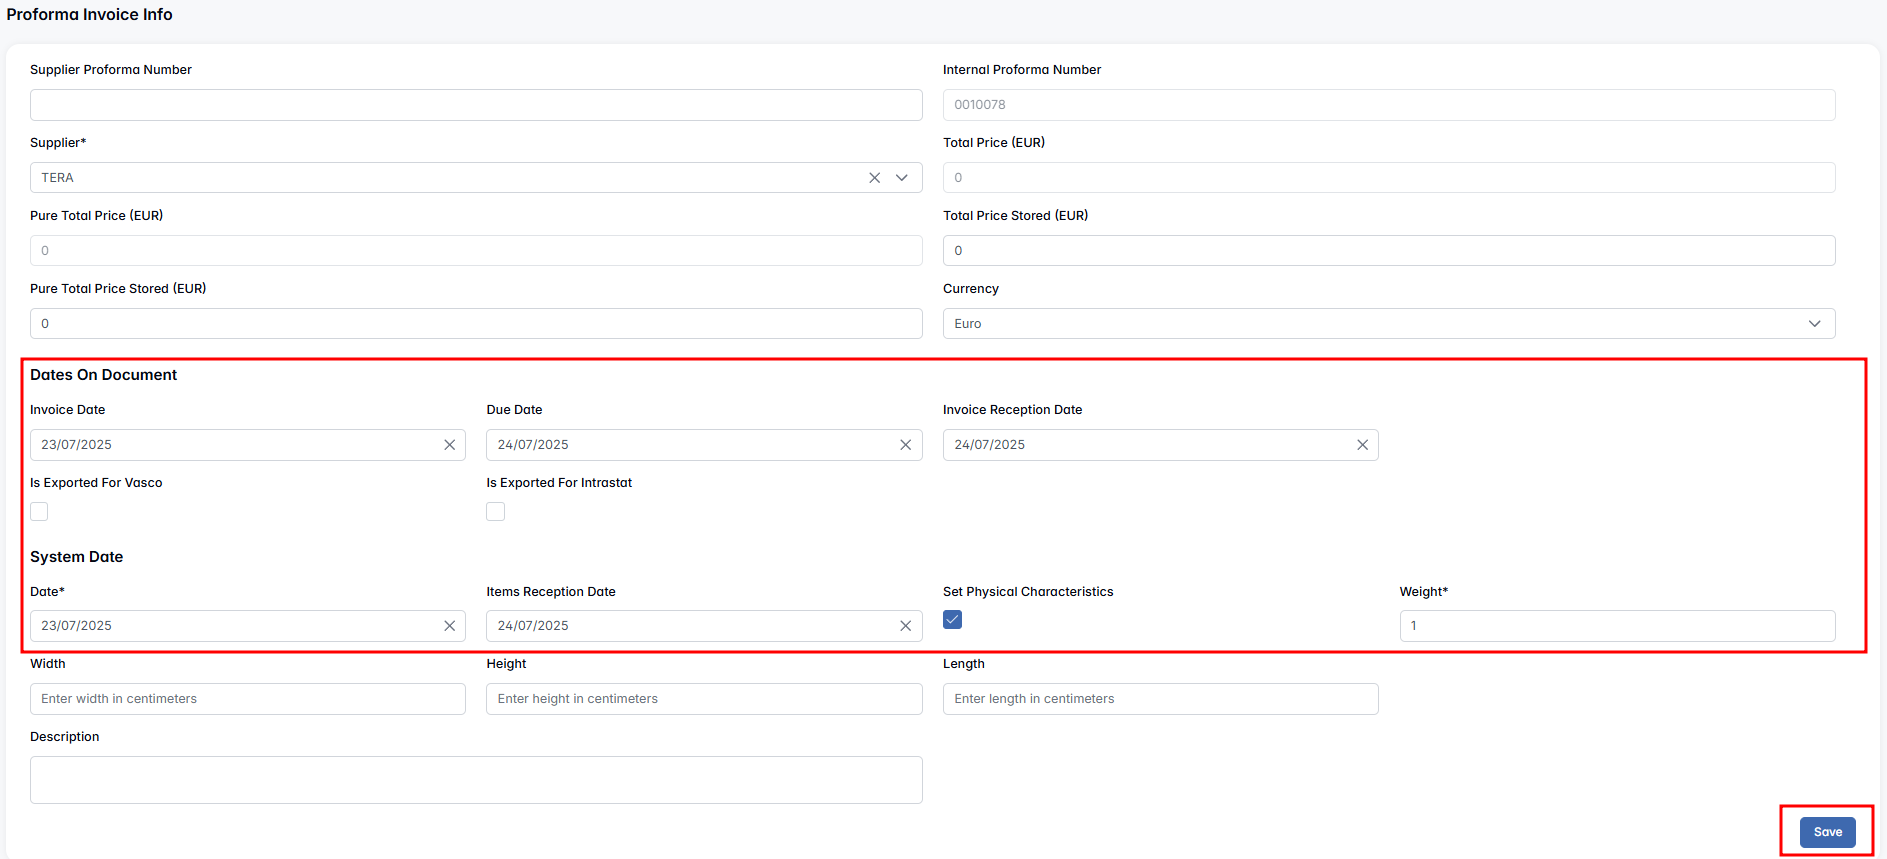
All relevant details — such as proforma invoice dates, quantities, prices, and file attachments — must be reviewed and completed in the next step by editing the Proforma Invoice. This ensures that the invoice is correctly prepared for the next stages of delivery and quality control.
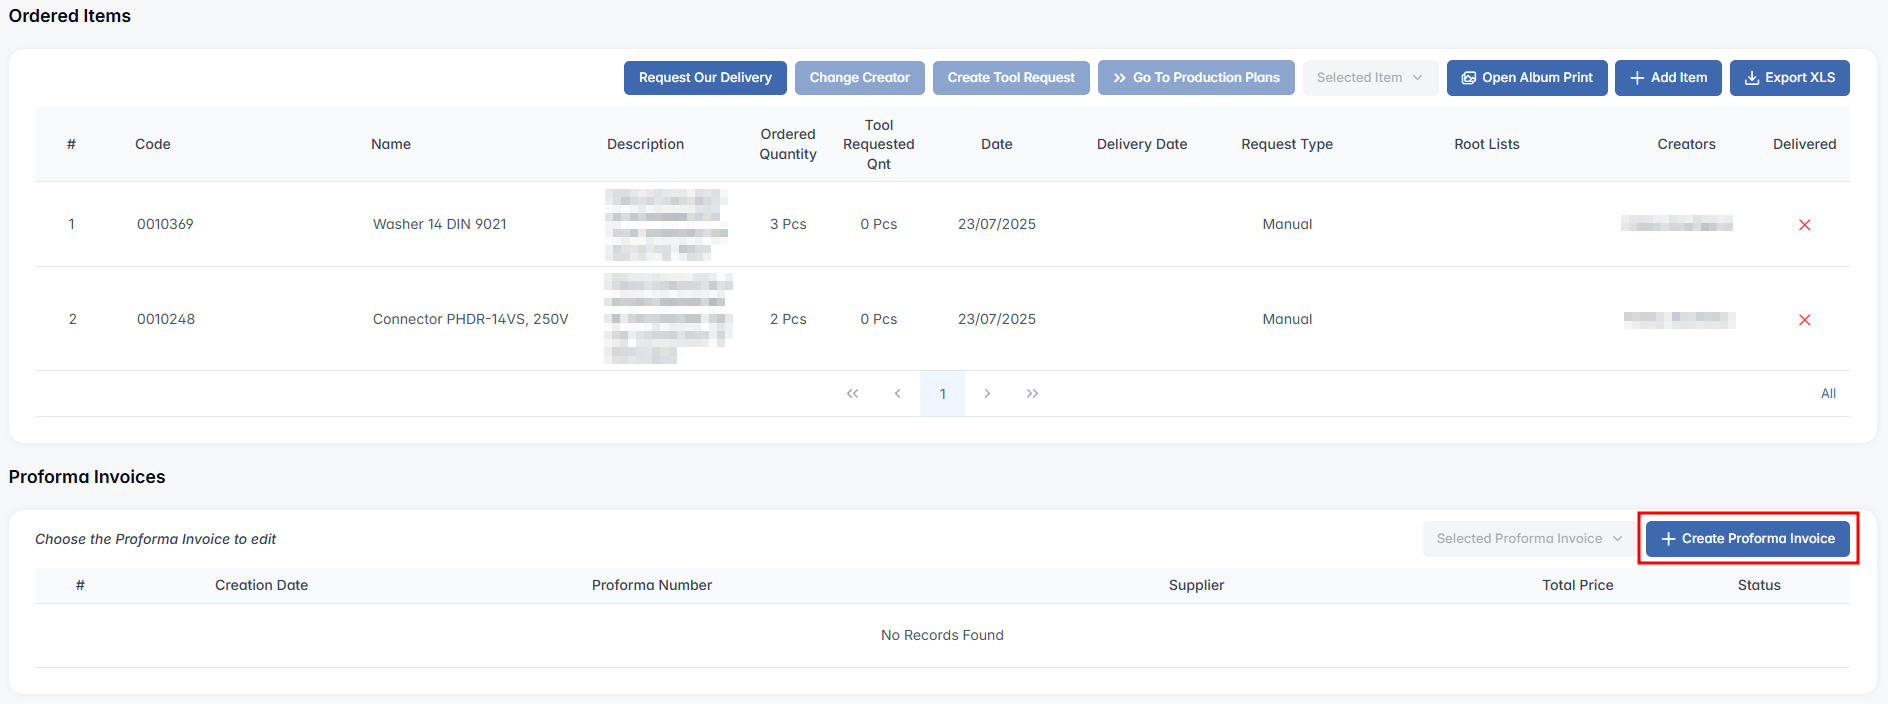
Once a row is created, the Selected Proforma Invoice button becomes active. When you click it after selecting a row, you'll get three options:

- Edit — opens the Proforma Invoice Edit page. Here, you can set Dates on Document, including System Date (mandatory before proceeding to QC).
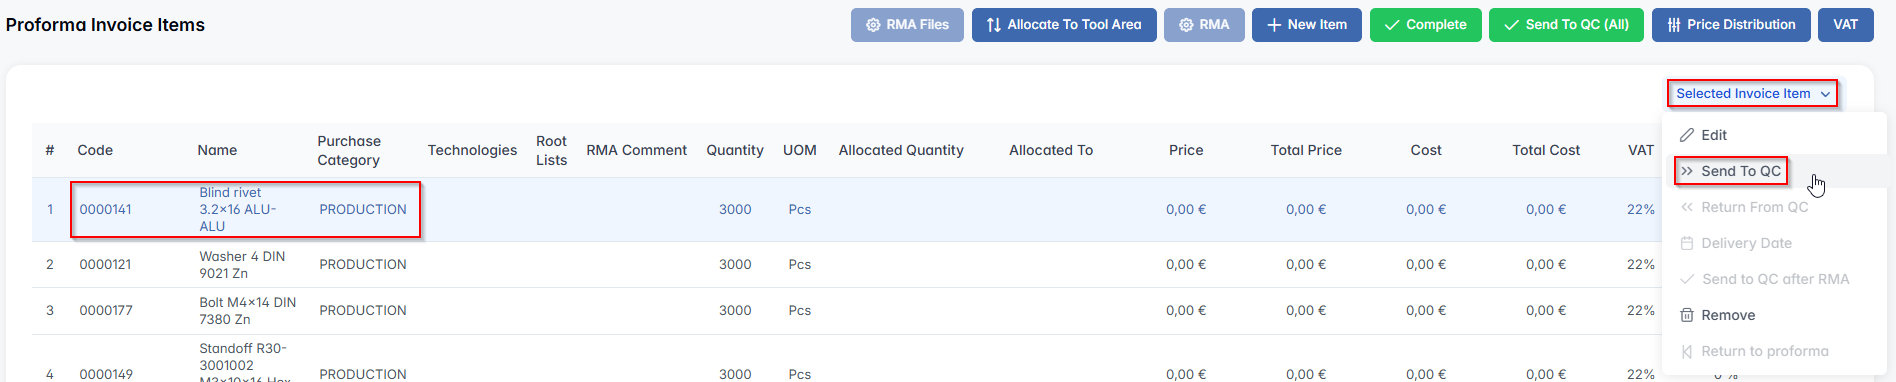
Use the Send to QC (All) button to send all items to the Quality Control department, or select a specific row, click Selected Invoice Item, and choose the Send to QC option to send only the selected item. For this to be possible, all required fields must be filled out, including Supplier Invoice Number, all dates and prices, and Weight.

To approve or reject items in Quality Control, the user must go to the QC module, open the Invoice tab, and navigate to the Production List / General Procurement Invoices subtab. From the list, select the relevant invoice and click the Items button to view the associated invoice items.
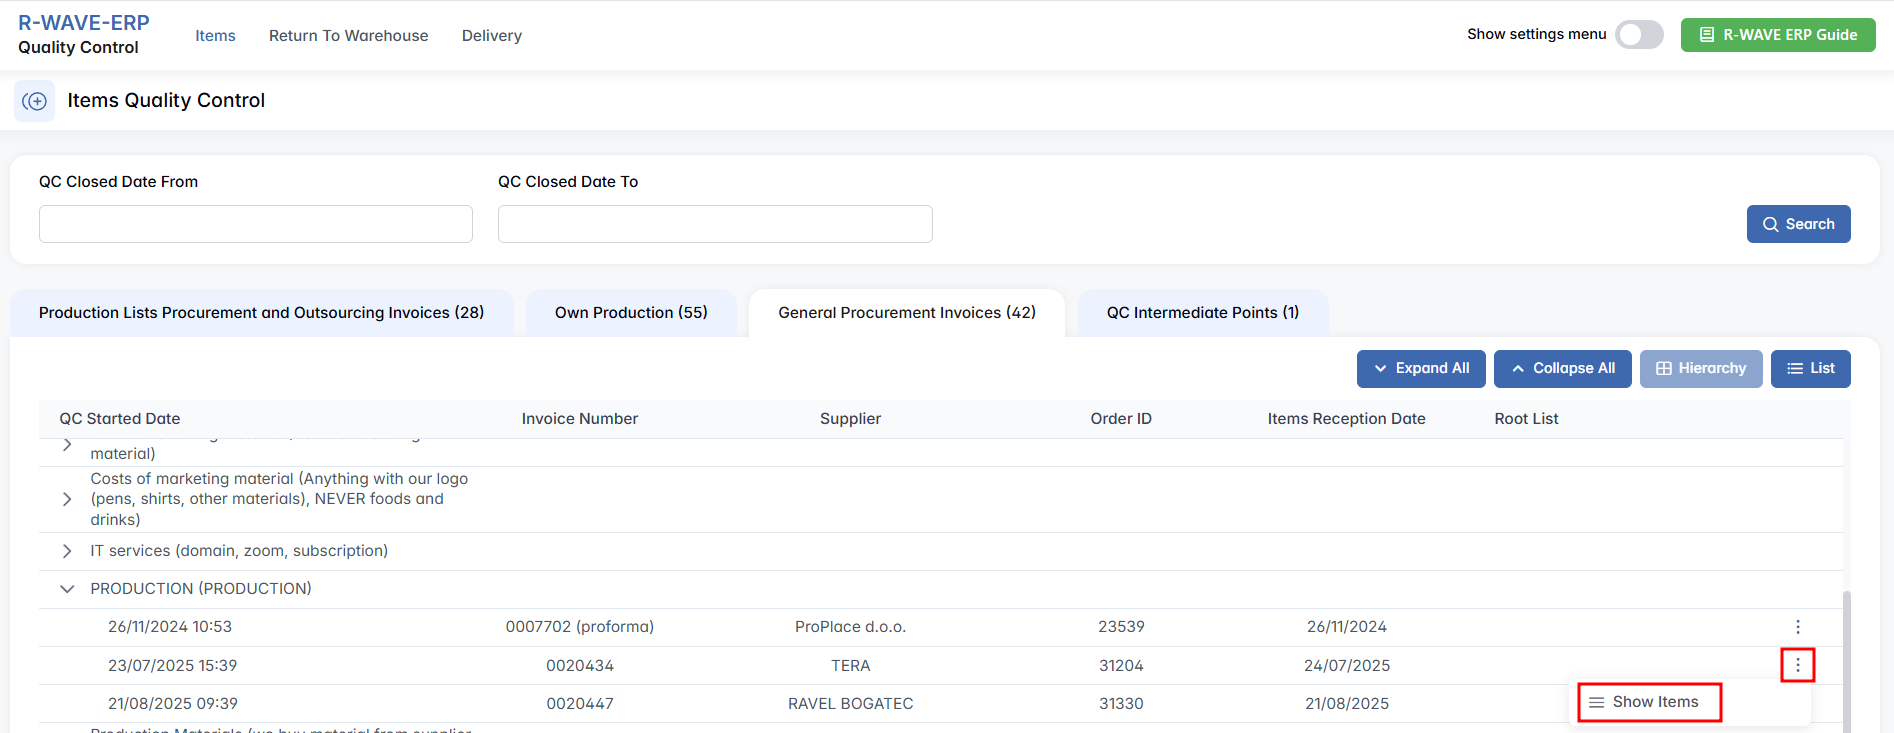
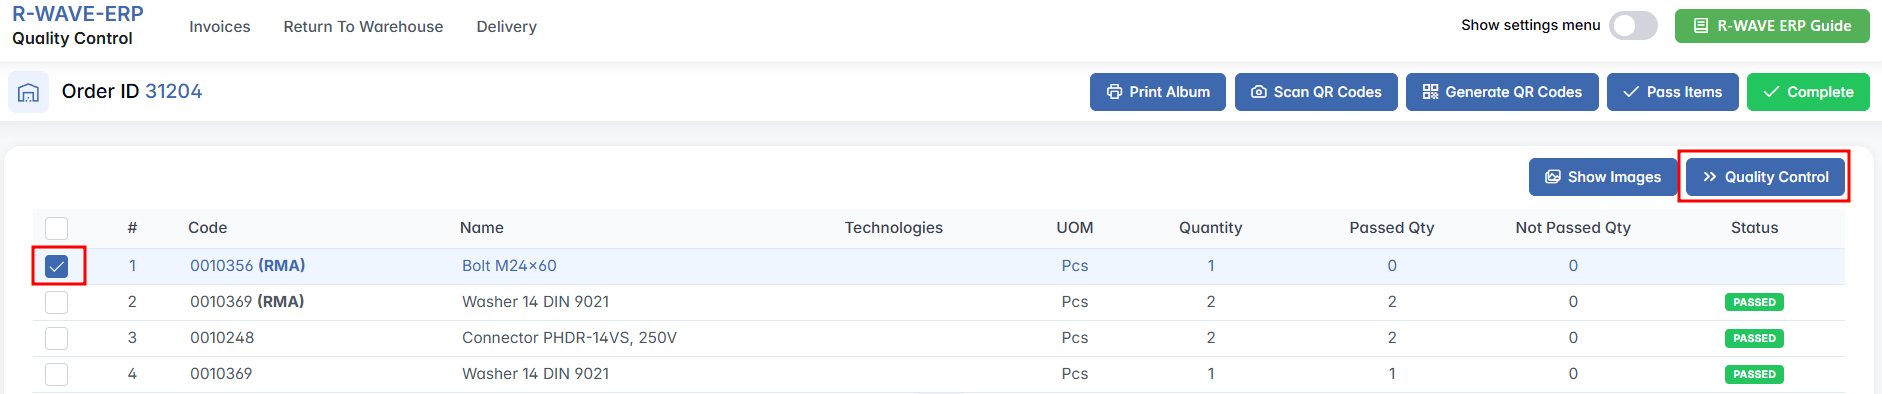
On the invoice page, any item awaiting QC will be listed. To proceed, select the checkbox next to the item row and either:
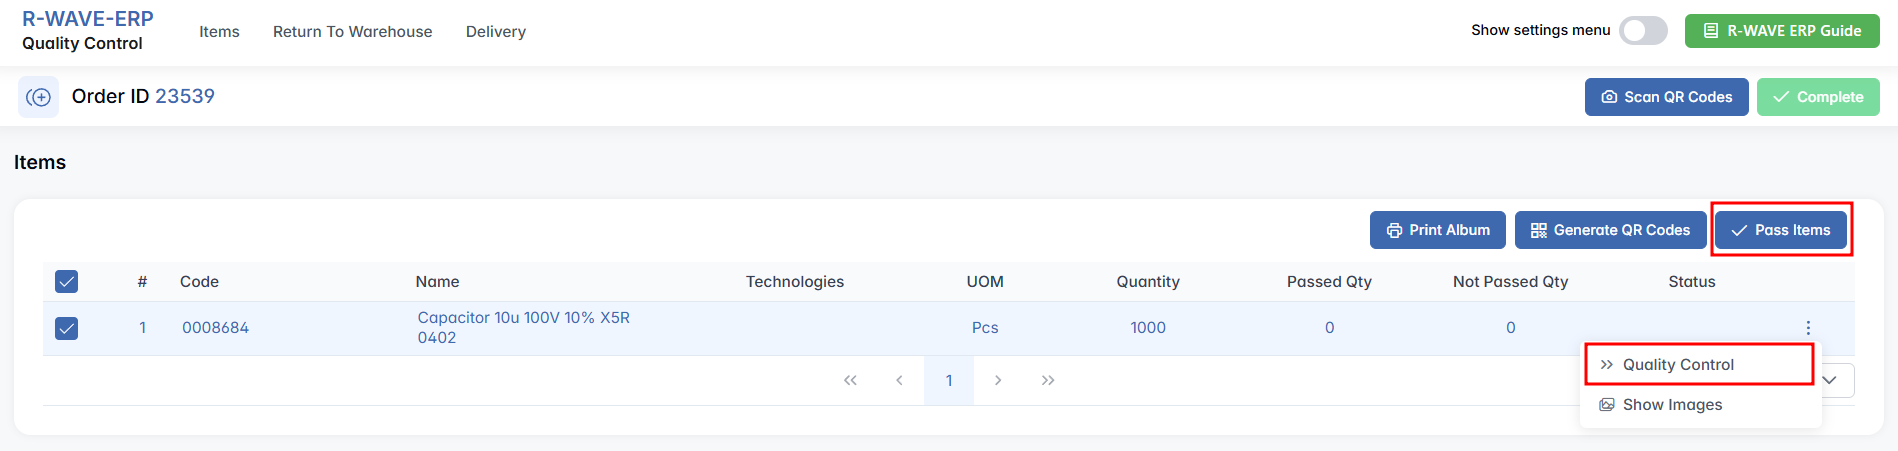
- Click the Pass Items button to quickly mark the selected quantity as passed, or
- Click the three-dots menu next to an item and select Quality Control to open a detailed evaluation window.
In this popup window, the user must enter the number of units that Passed and Not Passed. The system will show the total quantity expected, and the Save button becomes active only when the sum of passed and not passed units exactly matches the expected quantity.
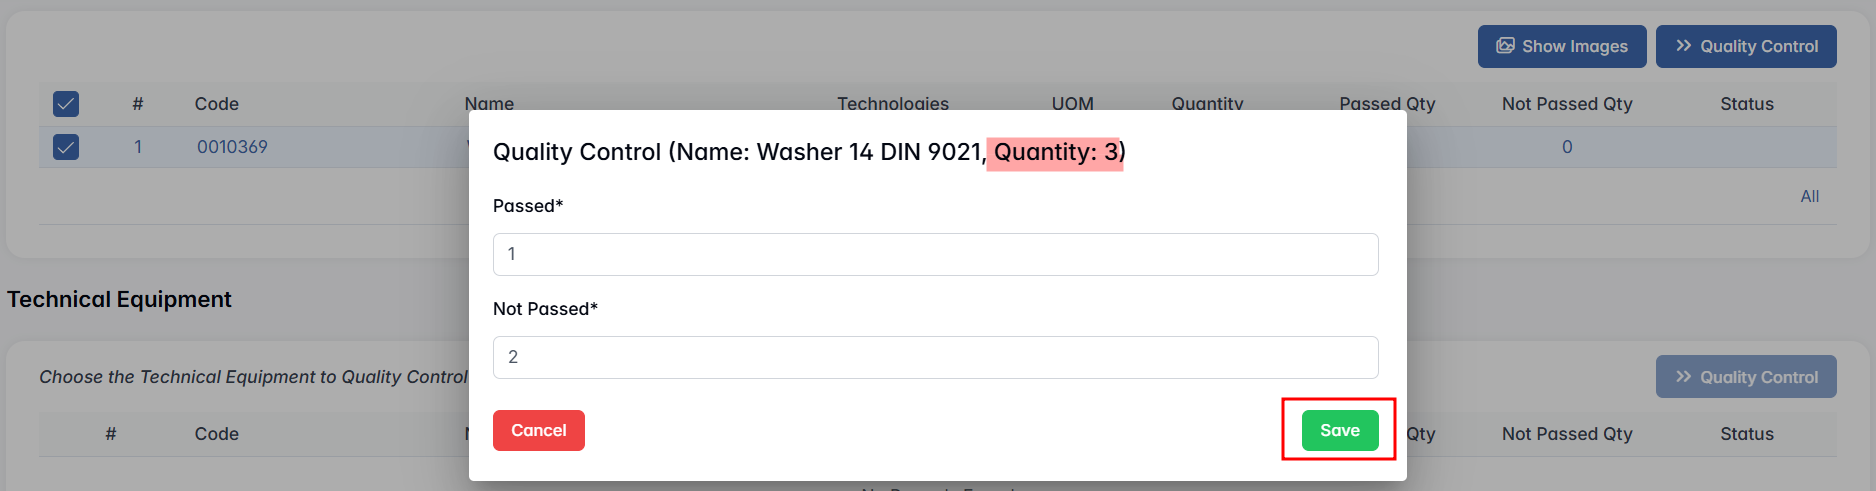
Based on the results:
- If all items passed – status is Passed
- If no items passed – status is Not Passed
- If some passed and some didn't – status is Partly Passed

Once QC evaluation is complete, click the Complete button to finalize the Proforma Invoice.
- If QC fails any item, it will be sent to the Isolator.

- From the Isolator, the item can be forwarded to RMA, along with a comment explaining the issue.

Once the QC evaluation is completed, refresh the Proforma Invoice / Invoice Items tab, which will now display the updated statuses for each item. Items that have successfully passed QC are shown with a green "Passed" label, while those that failed are marked with an (RMA)(New) label.

When you go back to the Order page and choose an invoice, you can also click on Selected Invoice Item to add or view Files (supporting documents) or Remove the invoice (if the invoice contains items that have been sent to QC but not yet returned, this option is unavailable).
Invoices Section
To register a final original invoice, click + Create Invoice.

A confirmation modal appears — click Confirm to proceed. The system will generate a new invoice row in the table, containing all ordered items that were already included in a Proforma Invoice and not yet invoiced elsewhere.
Invoices and Proforma Invoices share nearly identical structure and functionality in BINU ERP. However, the invoice serves as the final financial document used for billing and payment processing, whereas the Proforma Invoice is more of a preliminary record for delivery and QC purposes.
After an invoice is created, the Selected Invoice button becomes active when a row is selected. Options include:

- Edit — Opens the invoice in the Reports Module, where you can complete invoice fields (dates, attached files, services) and view auto-calculated totals (Total Price, Pure Total), which cannot be manually edited.
- Files — Attach or view supporting documents.
- Remove — Deletes the invoice, if allowed by system conditions.
Invoice Edit Page: Overview
The Invoice Edit page allows users to adjust invoice metadata and manage invoice items, following the same logic and structure as in the Proforma Invoice interface.
When a row is selected from the Invoice Items section of the invoice, the Selected Invoice Item menu becomes active. One of the key options available here is Return to Proforma. This option allows the user to remove selected items from the current invoice and move them back to the Proforma Invoice tab.

It is used in scenarios where not all items should be included in the final invoice — for example, if only part of the ordered items have been invoiced by the supplier at this stage. Since the system automatically includes all items from the related Proforma Invoice during invoice generation, the user may need to manually adjust the invoice contents to reflect the real-life invoice received from the supplier.
Using Return to Proforma ensures that items not covered by the current invoice remain properly tracked and can be invoiced later. It prevents double billing and preserves accuracy between system records and external supplier documents.
RMA (Return Material Authorization)
The logic described in this section applies to both Proforma Invoices and Invoices. Regardless of the document type, RMA actions follow the same process and interface behavior.
If any items are rejected in QC and sent to Isolator, they can be marked with an (RMA) label. When such an item is selected, the RMA button becomes active.

Clicking RMA opens a window with two options:

- Refund – Issues a monetary refund. (Note: this only works if a final invoice was already created. Otherwise, the system will display an error.)
- Reclamation – Triggers a replacement item from the supplier.
After choosing Reclamation, you'll be prompted: "What to do with the redelivered item?"
Return the item

Requires the user to follow these steps:

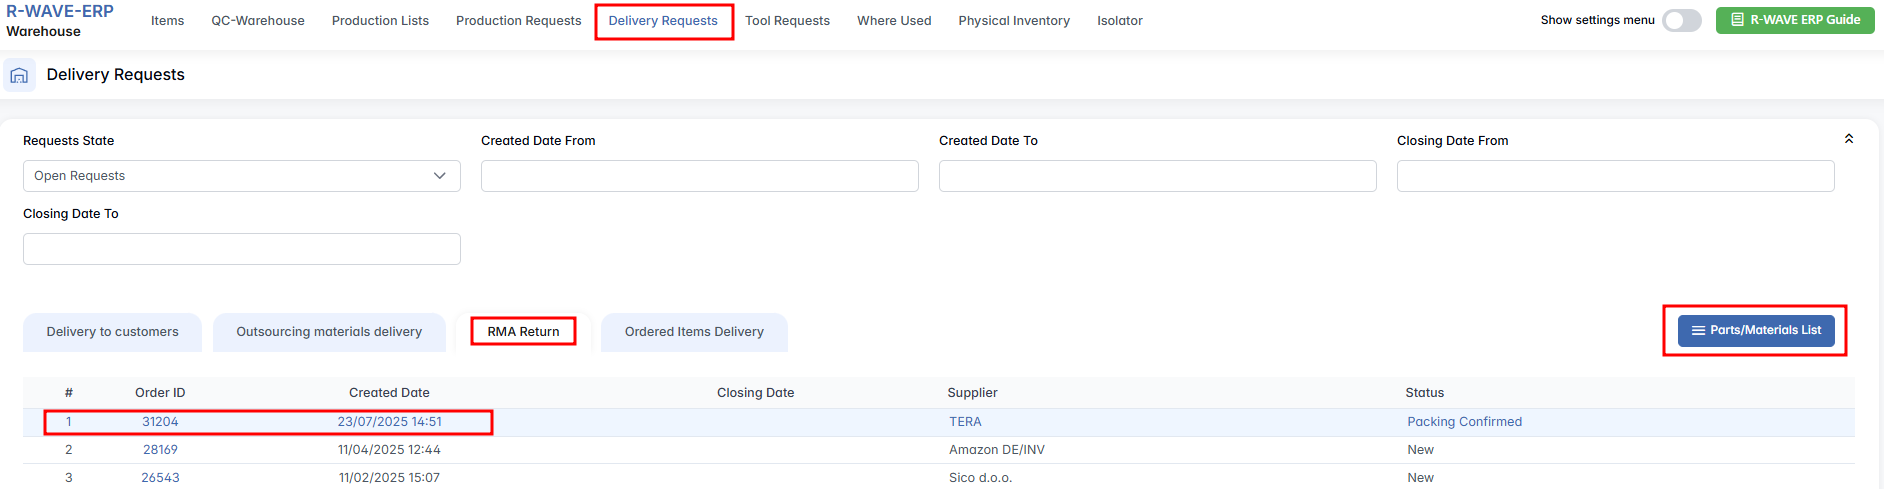
- Go to Warehouse > Delivery Requests > RMA Return

- Move item to QC

- Go to Quality Control > Delivery > RMA Return
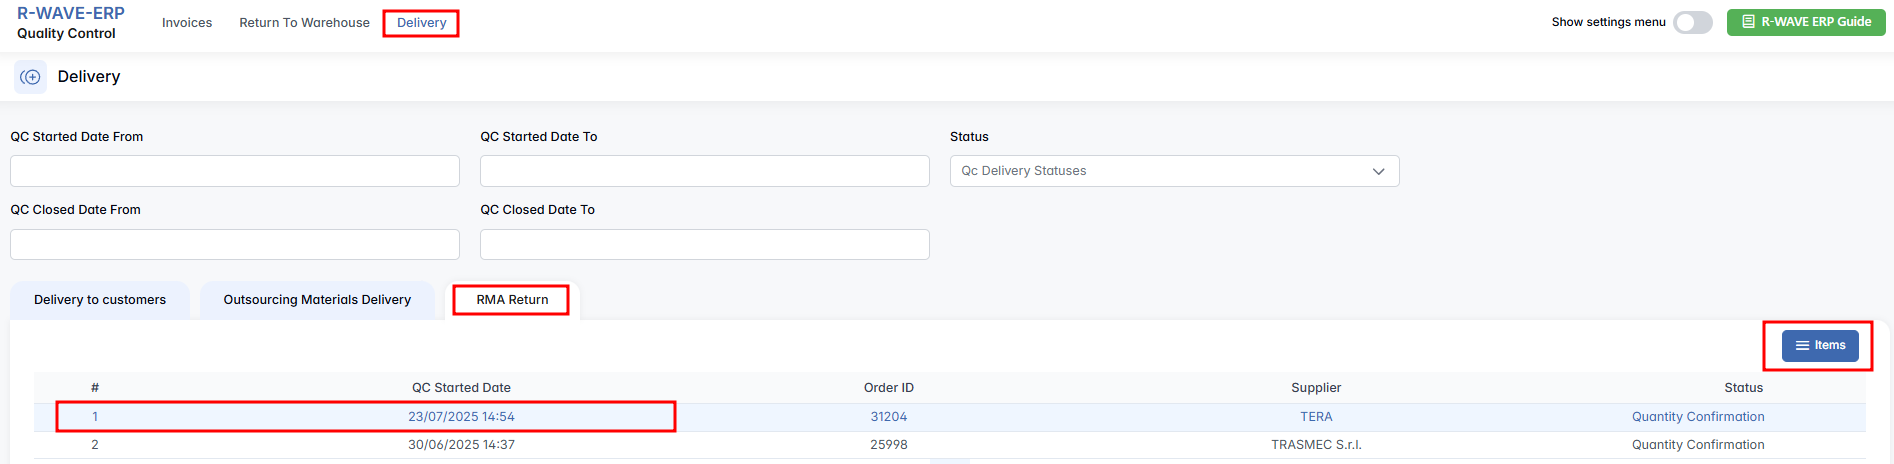
- Confirm Quantity and Packing
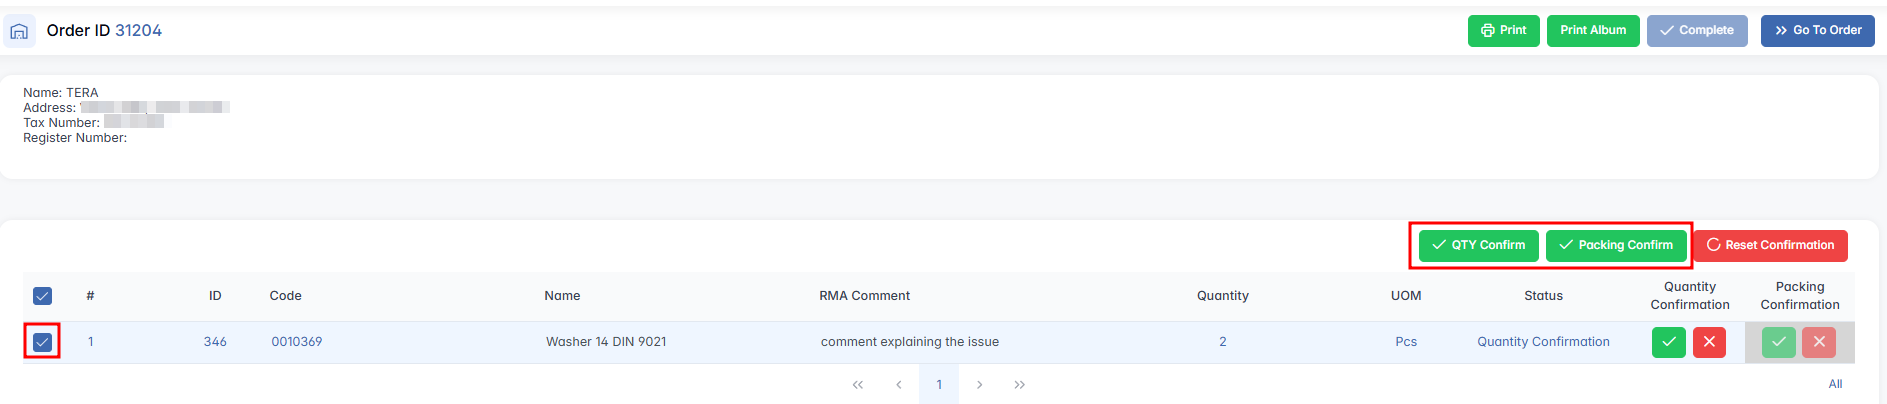
- Click Complete
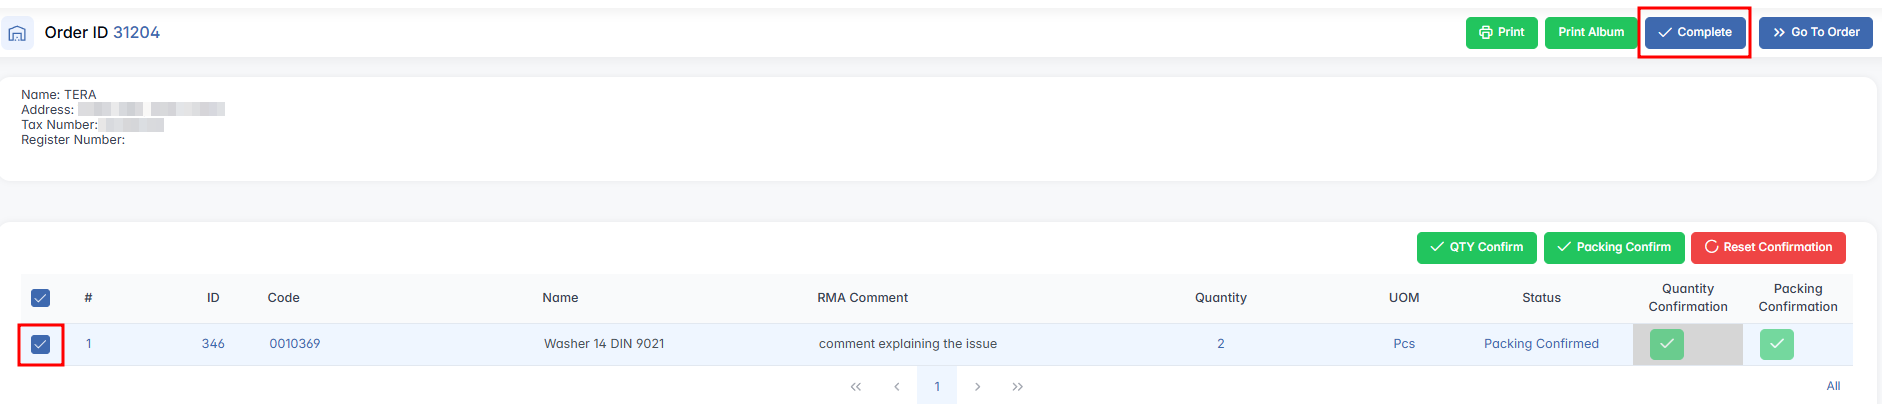
- Go to Warehouse > Delivery Requests > RMA Return
- Click Complete
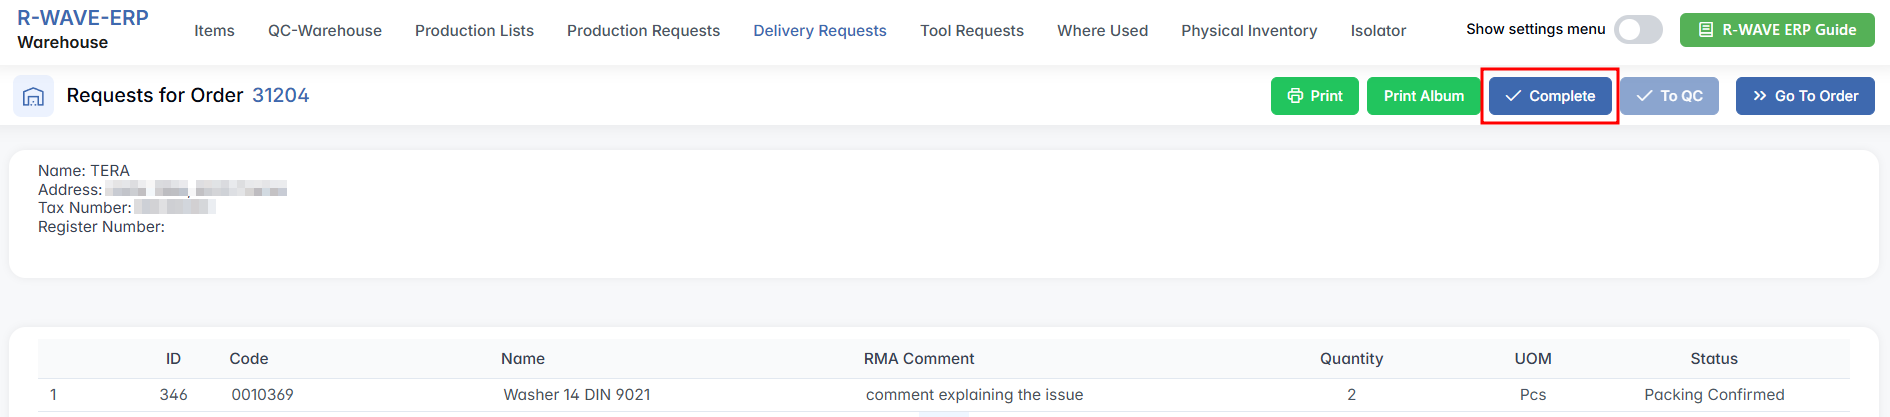
- Return to the Proforma Invoice / Invoice Edit page and click Confirm the Delivery of the Item
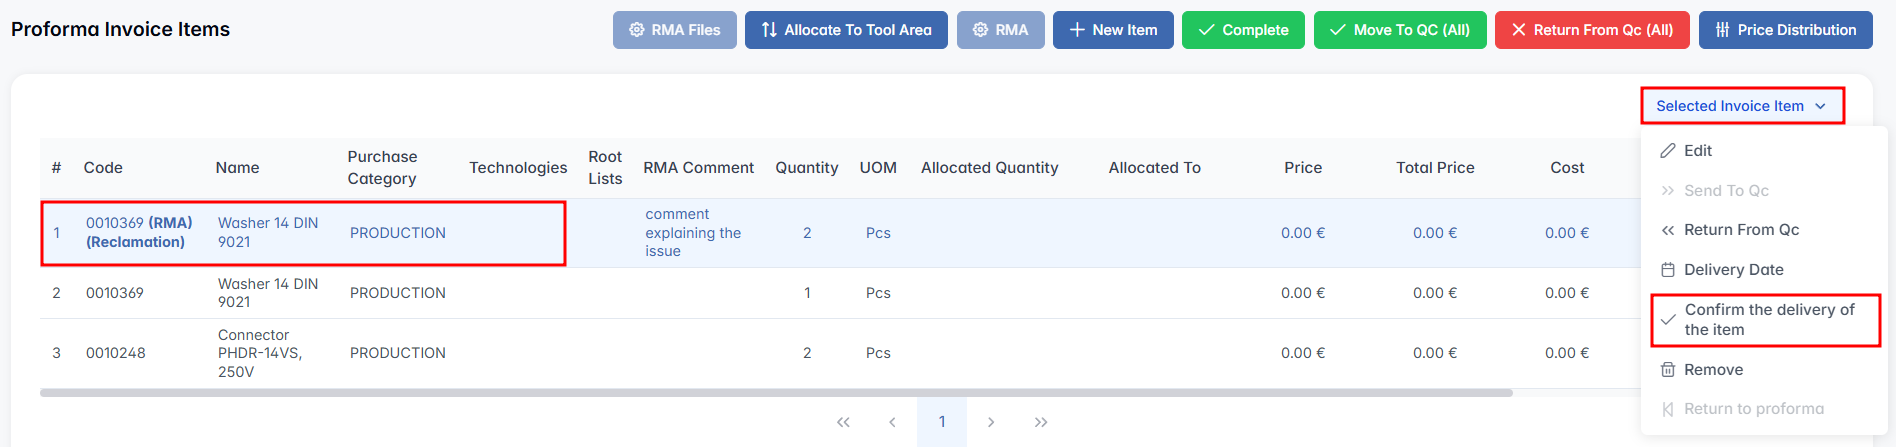
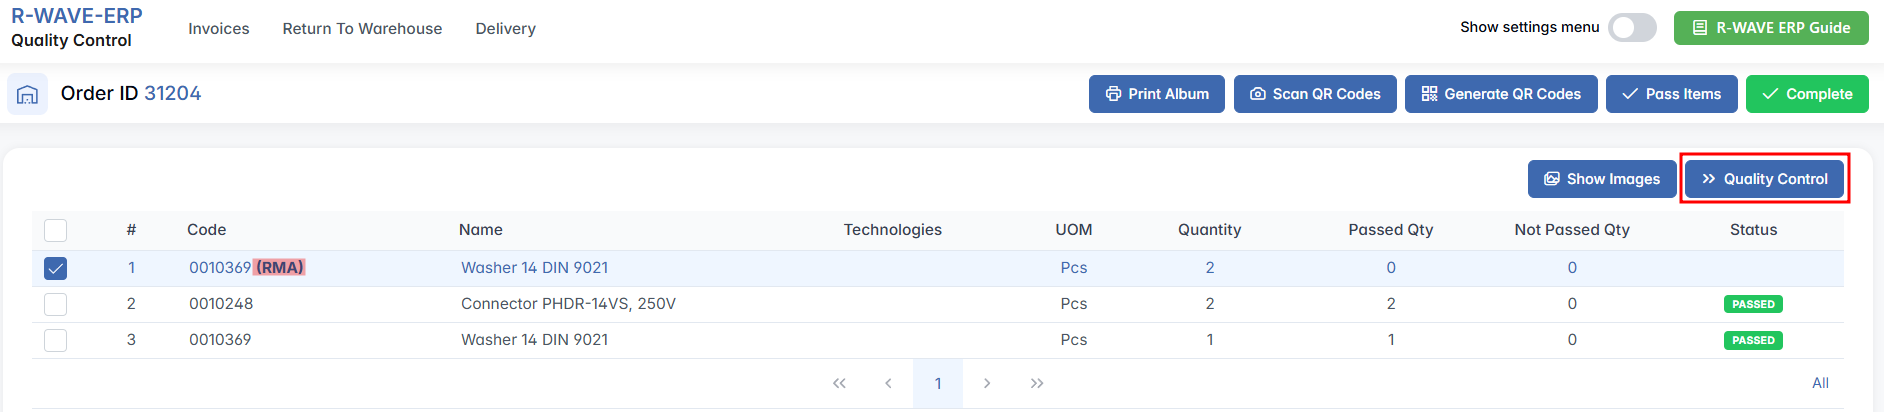
- Perform a new QC round for the re-delivered item marked with (RMA)
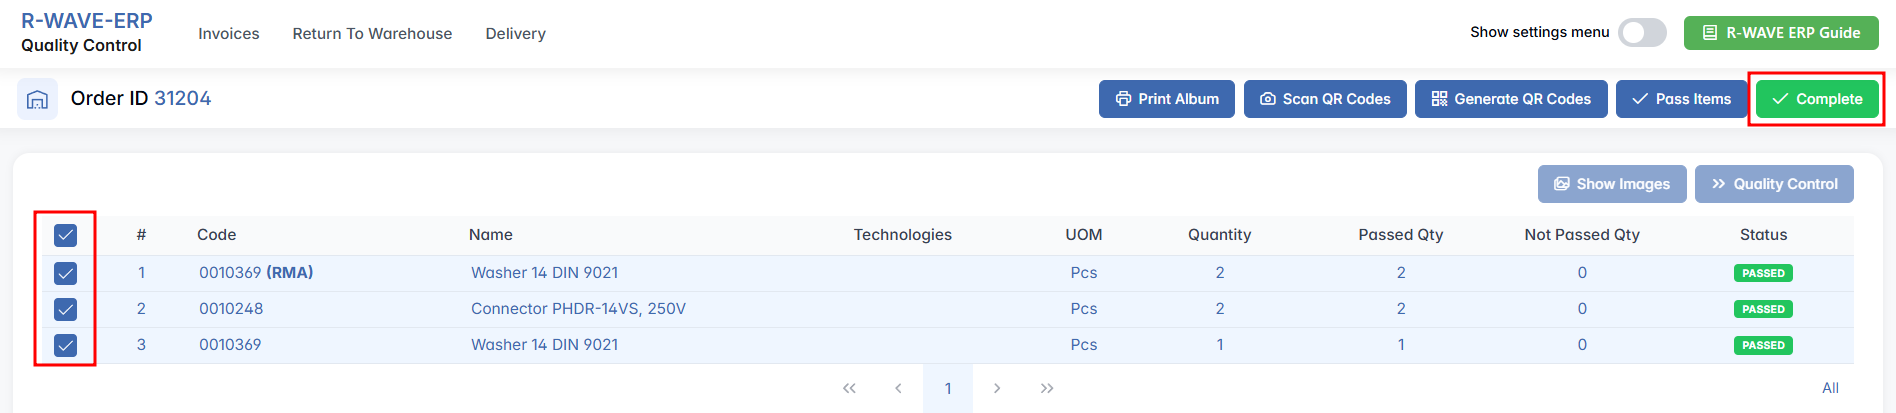
- Click Complete
Leave an item in the warehouse

No warehouse movement is needed at this stage. Once the redelivered item has physically arrived and the delivery has been performed, go to the Proforma Invoice / Invoice Edit page and use the Confirm Delivery of the Item function to register its arrival in the system. This step ensures that the item is officially marked as received and can proceed to quality control if needed.
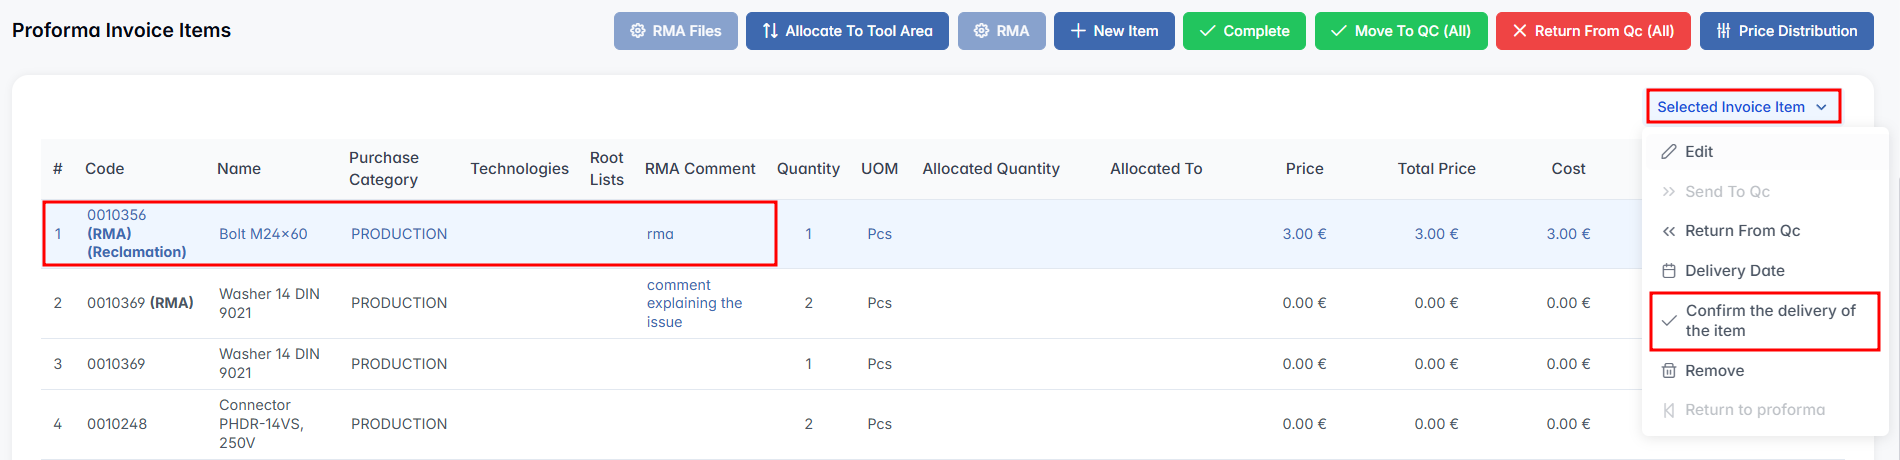
QC will still be performed on the new (RMA) item. Perform the quality control, then click Complete.
Payments
Once the invoice has been created and confirmed, the next essential step is to register the payment for this invoice. Recording payments ensures that financial operations stay transparent and trackable within the ERP system, allowing the company to monitor which orders have been settled and which are still pending.
- Scroll down to the Payments section (after the Proforma Invoices and Invoices sections).
- Click the + Create Payment button to begin the payment registration process.

A pop-up window titled Create Payment will appear. Fill in the form with the required details:
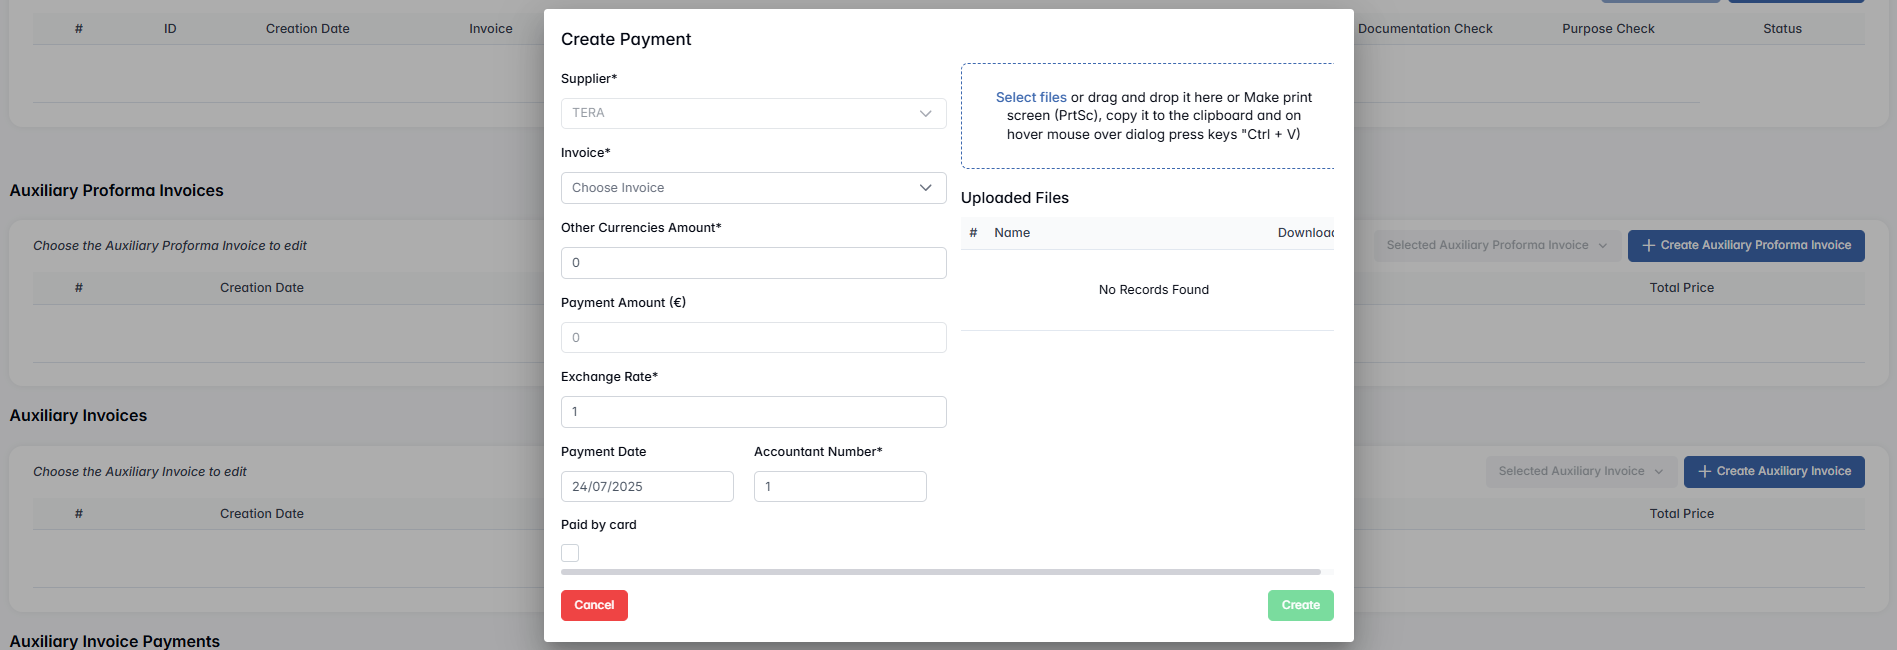
- Supplier – auto-filled based on the chain's data; indicates who the payment is being made to.
- Invoice – Select the corresponding invoice(s) from the dropdown list. These invoices must have been created and listed in the invoice section above. You may select multiple if applicable.
- Other Currencies Amount – May auto-fill based on the invoice currency but can also be manually edited to match the actual transferred amount in the supplier's currency.
- Payment Amount (€) – Reflects the amount converted into Euros. It is not editable and duplicates the value from the previous field, converted using the exchange rate.
- Exchange Rate – Enter the conversion rate used for this transaction.
- Payment Date – Define the date when the payment was or will be made.
- Accountant Number – Enter the bank account number of your company.
- Paid by Card – Tick this box if the payment was done by credit/debit card instead of a bank transfer.
- Uploaded Files – Attach documents that prove the payment. Files can be uploaded via drag-and-drop, the file picker, or pasted directly from your clipboard.
After reviewing all data, click the Create button to save the payment.

A new payment record will appear both in the Payments section of the procurement chain and in the Payments module. Initially, the status will be set to WAITING, as the payment must be confirmed through the Confirmation module under the Payments Confirmation tab.

Once confirmed, the status will change to CONFIRMED.

And when the payment is actually completed, it will be updated to PAID.

Users can create multiple payment records if partial payments are required. However, the total sum of all payments for the same invoice must not exceed the invoice amount.
Additional Financial Records
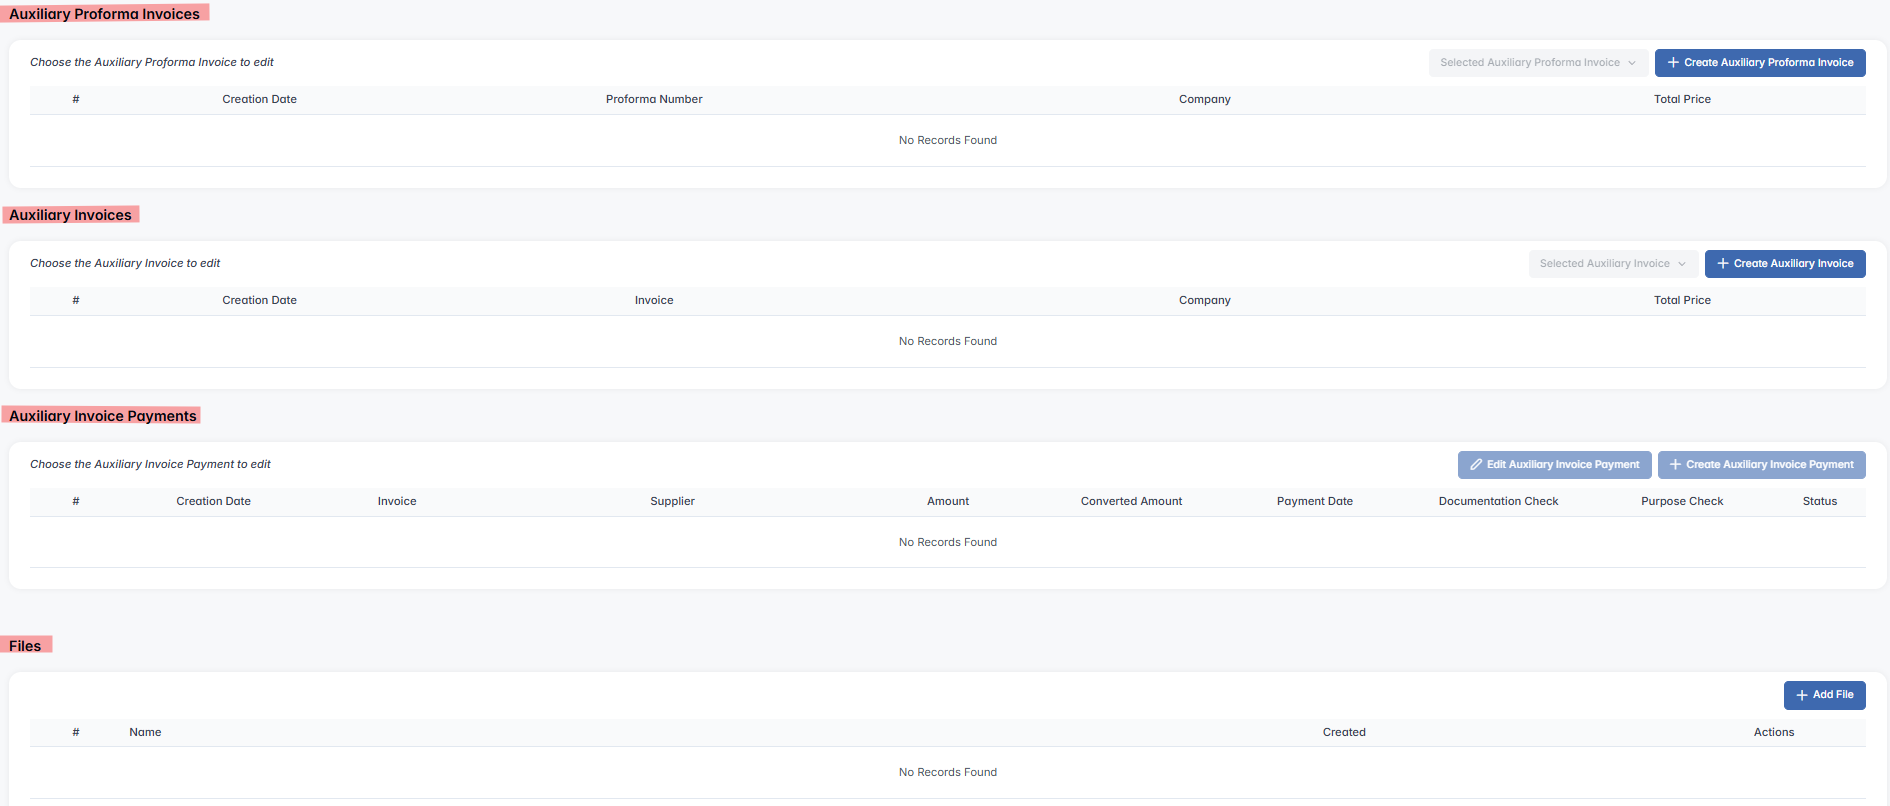
If the delivery requires extra services (such as customs, logistics, or special fees), you can also document them using the following options:
- Auxiliary Proforma Invoices – For services that need to be quoted and verified before billing.
- Auxiliary Invoices – Final service-related invoices received from external providers.
- Auxiliary Invoice Payments – To register payments for the above invoices.
- Files – Any related supporting documentation (contracts, delivery notes, receipts) can be uploaded to the chain using the Add File function.
Adding to Procurement Chain
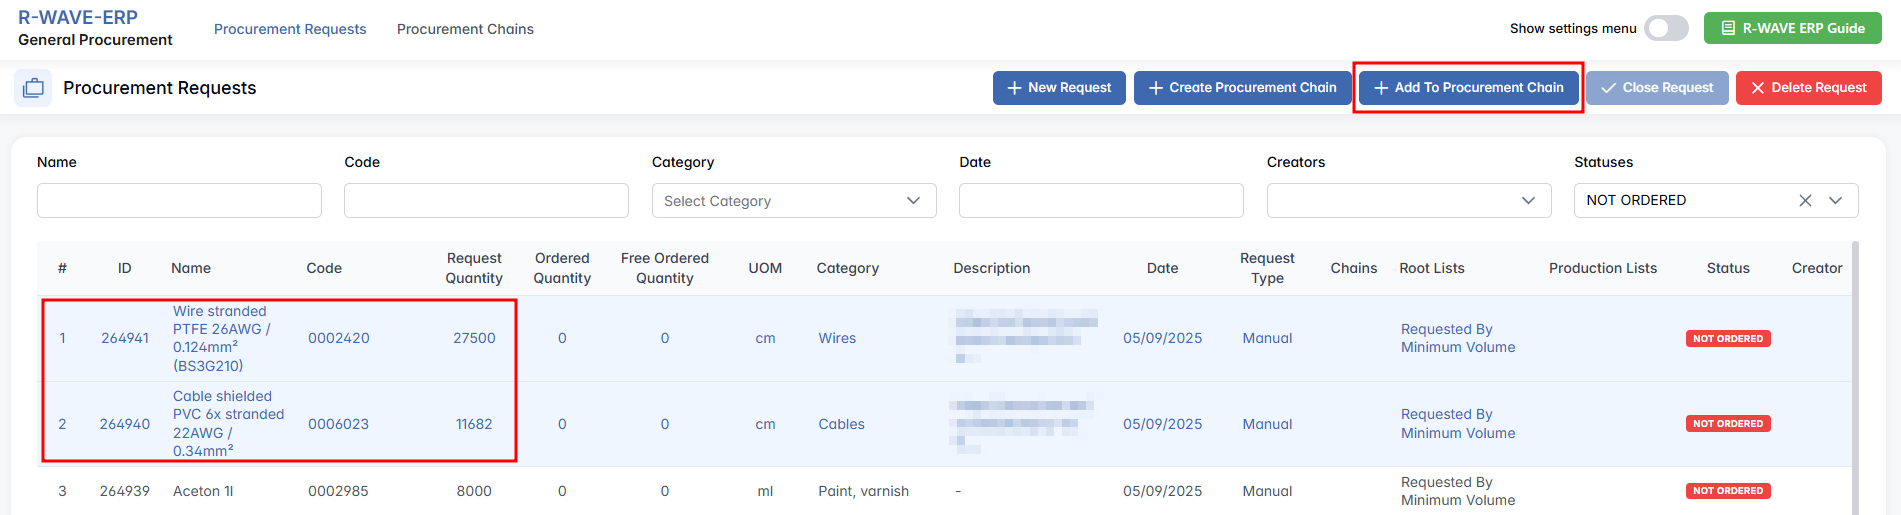
The + Add To Procurement Chain function is used when a selected procurement request can be fulfilled using an existing procurement chain that already contains sufficient Free Ordered Quantity, or because the requested item can still be added to that chain. Instead of creating a new procurement order, this action allows users to link the request to an existing chain, helping to avoid duplication, optimize procurement efforts, and maintain clear order tracking.
When you click the + Add To Procurement Chain button, a pop-up window appears listing all procurement chains with available quantities that match the current request. Select the appropriate chain(s) and confirm the action to include the request.
Fill in the form with the required details:
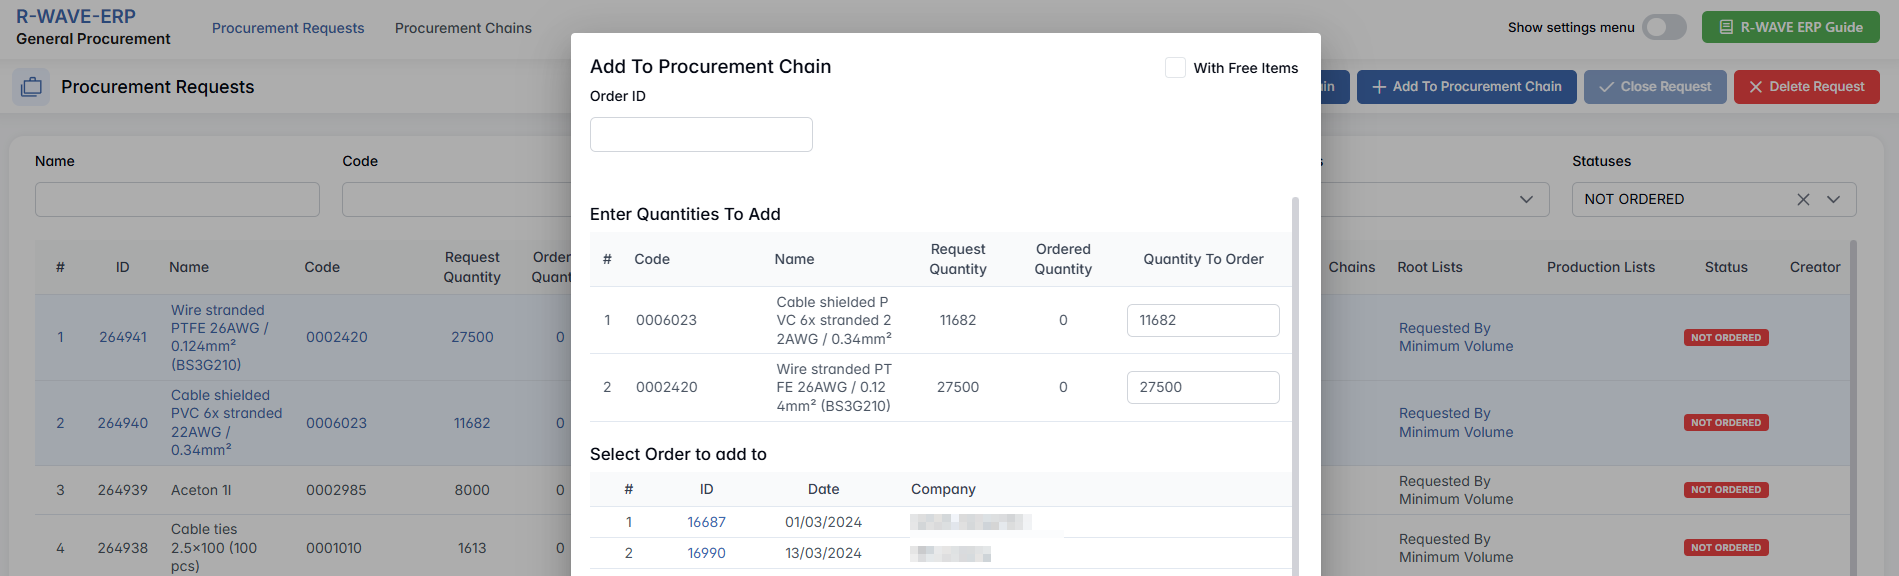
- Order ID – Direct search by order identifier.
- Enter Quantities To Add – Enter how many items you would like to order.
- With Free Items – If checked, only procurement chains that contain the requested item with available free quantity will be shown.
With Free Items checked
- The request is covered by the chain's already ordered but unallocated stock.
- Ordered quantity does not increase.
- Free quantity in the chain decreases by the amount allocated to the request.
- This option is only available if the requested item already exists in the chain.
Without Free Items (unchecked)
- The requested quantity will be added to the ordered quantity of the chain.
- If the item already exists in the chain – ordered quantity for that item increases.
- If the item does not exist in the chain – a new item record is created, and ordered quantity is set equal to the requested quantity.
Deleting a Request

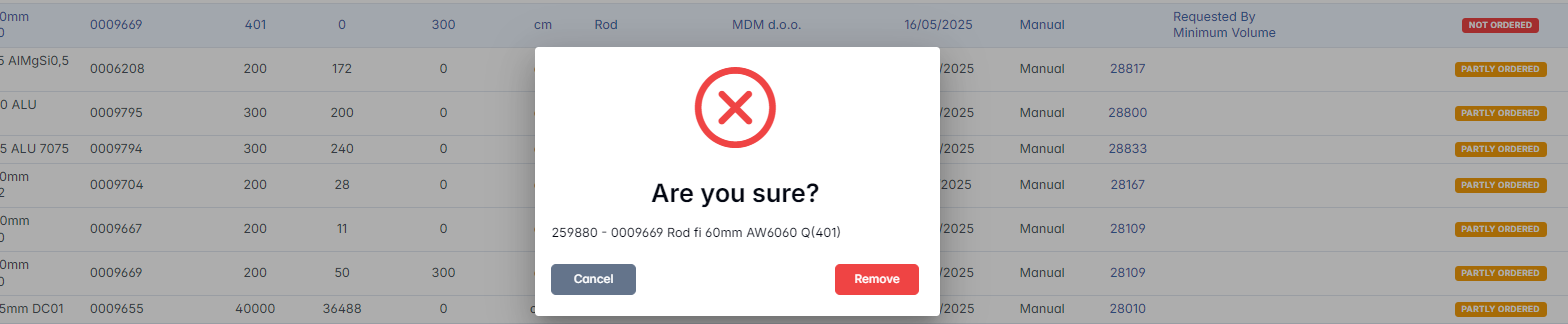
If you want to delete a request, you can click the Delete Request button in the upper-right corner. You can only delete records with status Not Ordered. When you select a Not Ordered item and click Delete Request, a confirmation modal appears:
Creating a New Request
Clicking + New Request opens the Add a New Item to Request form.

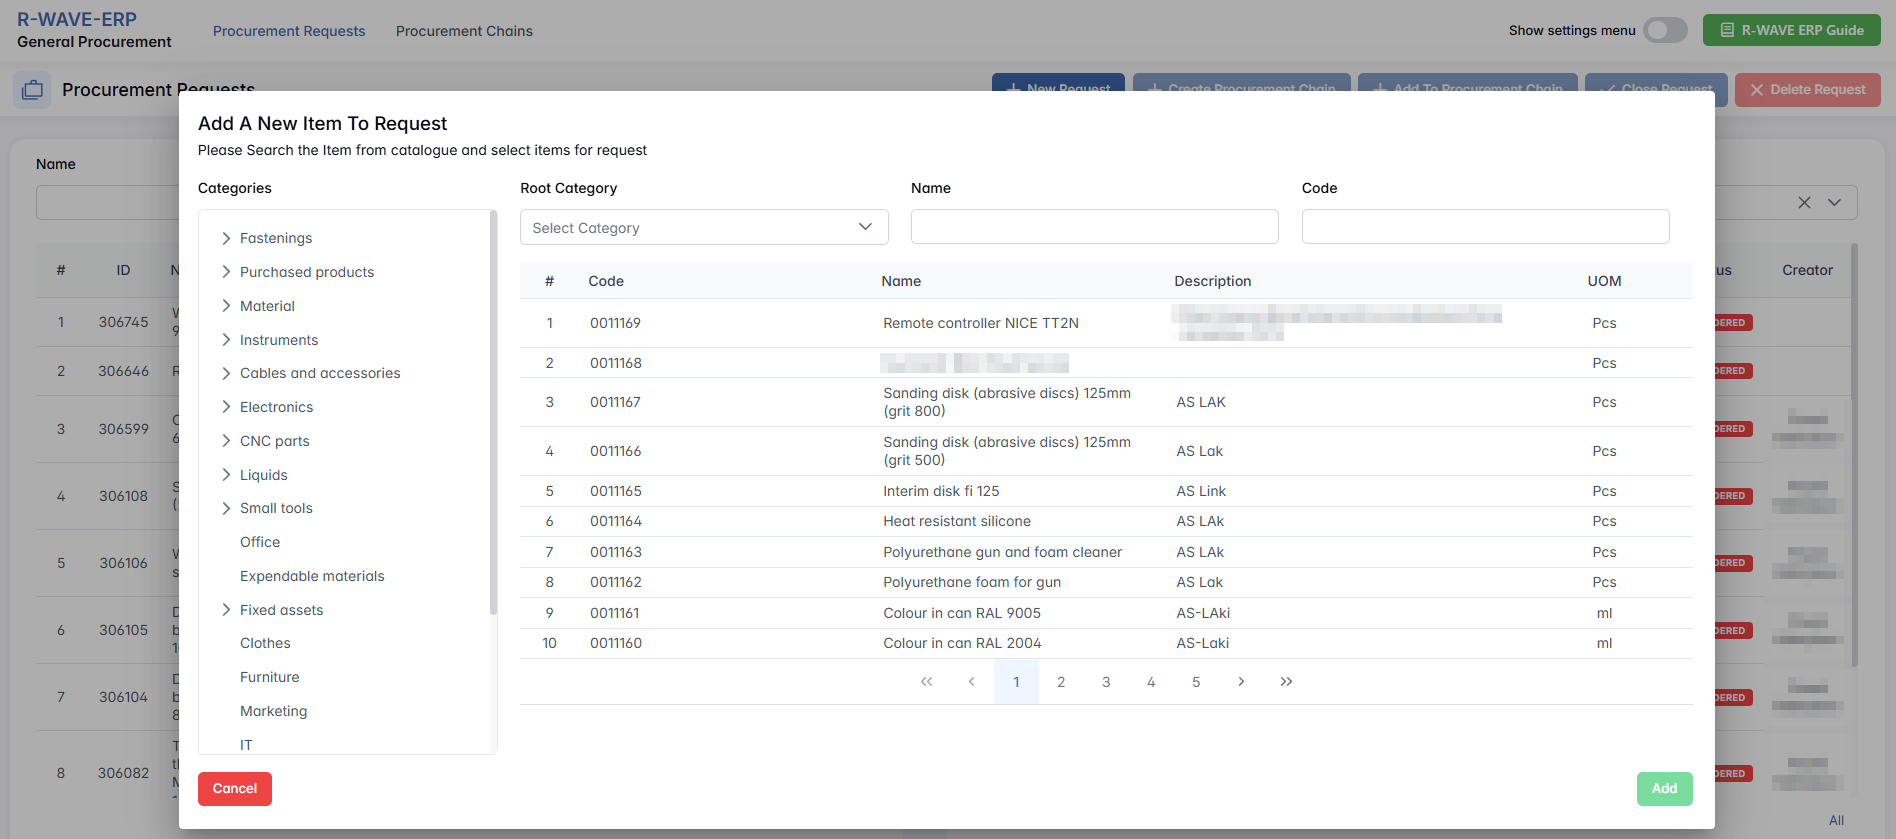
Search the item using filters: Categories, Root Category, Name, or Code. Items marked as NEW and (Not Confirmed) cannot be added to a request. Only confirmed items are selectable. Once a confirmed item is selected, the user must enter the Quantity * and press Add.
Procurement Chains
Procurement Chains
The Procurement Chains page is designed to help users monitor, search, and manage procurement requests grouped into chains. It provides detailed filtering options to locate specific procurement chains and allows users to view, update, and maintain the status and documentation related to these chains. This page supports procurement process tracking and coordination between suppliers, warehouses, and internal teams.
Filter Tab
The page includes a comprehensive filter panel to narrow down procurement chains by multiple criteria:
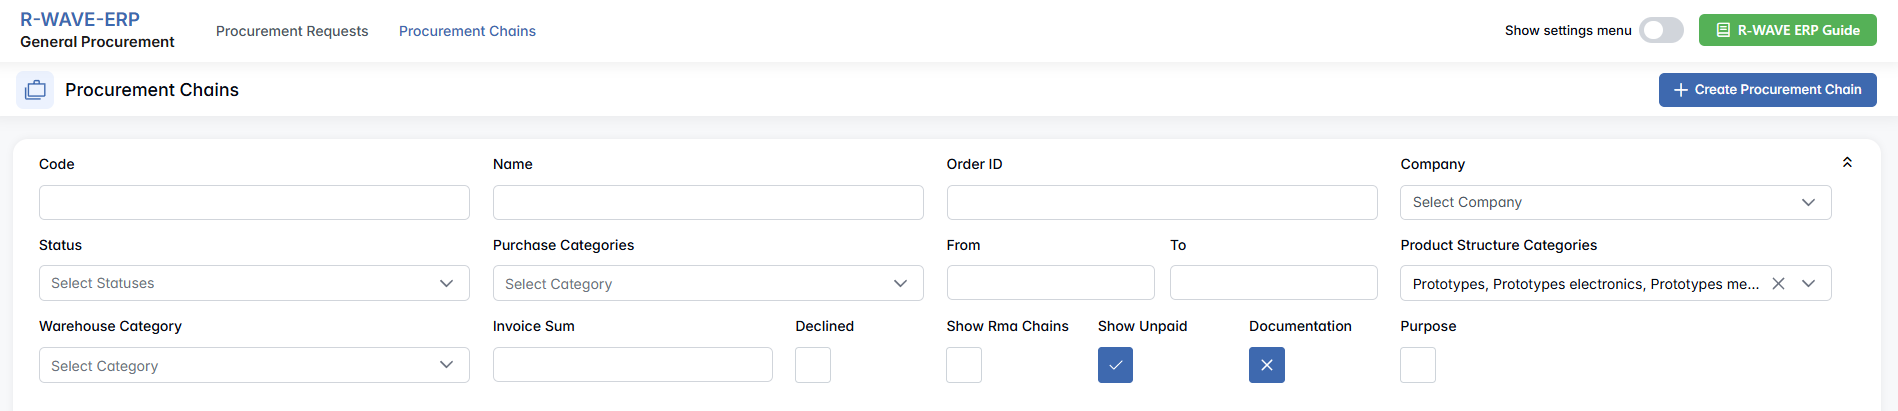
| Filter Field | Description |
|---|---|
| Code | Filter by item/product code |
| Name | Filter by item/product name |
| Order ID | Filter by specific procurement order number |
| Company | Select one company from the dropdown list to filter orders by supplier or client company |
| Status | Multi-select status filter for order statuses (e.g., New, Sent to QC, Unpaid) |
| Purchase Categories | Multi-select filter for purchase categories |
| From / To | Date range filter to select procurement chains created within specific dates |
| Product Structure Categories | Multi-select hierarchical filter based on product categories |
| Warehouse Category | Multi-select hierarchical filter related to warehouse categories |
| Invoice Sum | Filter by total invoice amount |
Additionally, several checkboxes allow further filtering:
- Declined
- Show RMA Chains (Return Merchandise Authorization related chains)
- Show Unpaid
- Documentation — indicator for whether all required files are attached
- Purpose — whether the payment's justification is complete
Checkboxes have a three-state toggle. The first click marks the checkbox with a check (✔), meaning to include items with this attribute. The second click changes it to a cross (✖), meaning to exclude items with this attribute. The third click clears the checkbox, meaning no filtering by this attribute.
Action Buttons
- Search — Applies the current filter selections and updates the procurement chains table.

- Go To Production Plans — Redirects the user to the Production Plan from which the selected position was originally formed. It is only active if the selected row(s) contain a value in the Root Lists column; if the column is empty, the button remains inactive.
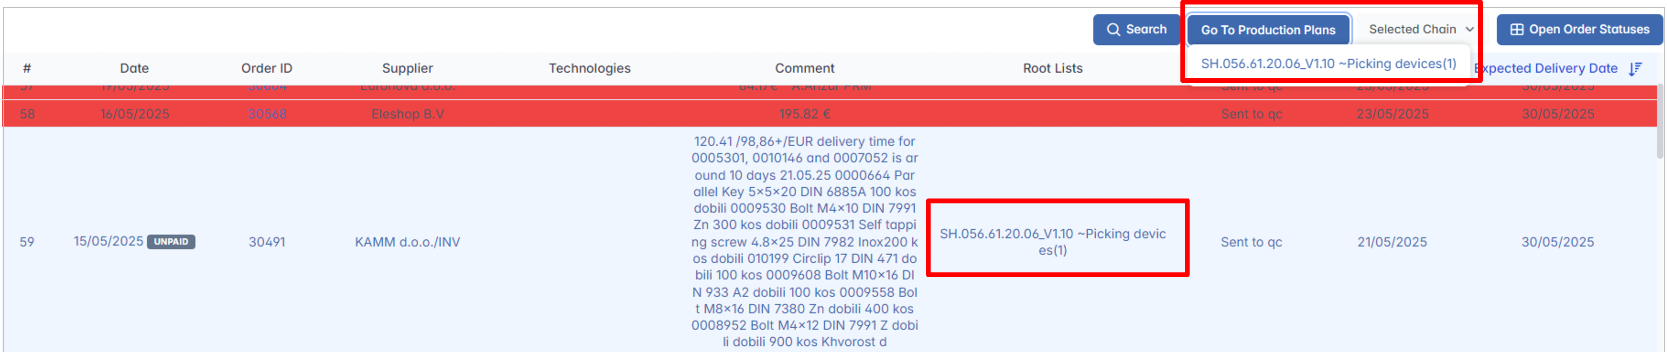

- Selected Chain — Activates only after the user selects a row in the table. When clicked, it shows options for managing the selected procurement chain.
- Open Order Statuses — Clicking this button changes the table view to show detailed order statuses. Users can scale the chart on the right to the desired size, expand it and hide the list, or open it in a separate window for a better overview.
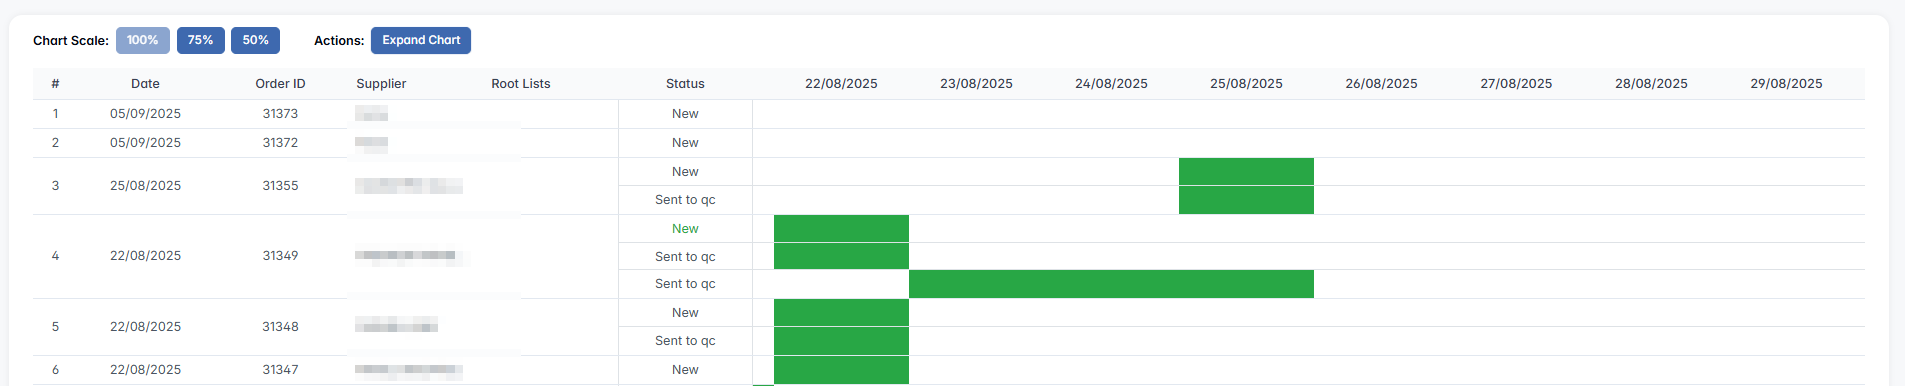
The button then changes to Close Order Statuses, which lets the user return to the previous table view.

Procurement Chains Table

The main table lists procurement chains with the following columns:
| Column | Description |
|---|---|
| Date | Creation date of the procurement chain |
| Order ID | Unique identifier for the procurement order |
| Supplier | Supplier or company name |
| Technologies | Relevant technologies related to the procurement |
| Comment | Notes or comments associated with the order |
| Root Lists | Indicates the root list of requests; if empty, related actions (Go To Production Plan) are disabled |
| Status | Current status of the procurement chain |
| Completion / Expected Delivery Date | Expected date of completion or delivery (sortable ascending/descending) |
Selected Chain Options
When a procurement chain row is selected, the Selected Chain button activates and offers management options:

- Open Chain — Opens a dedicated page Order #### that displays comprehensive details: Order information, Ordered items, Proforma invoices, Invoices, Payments, and other related procurement data.
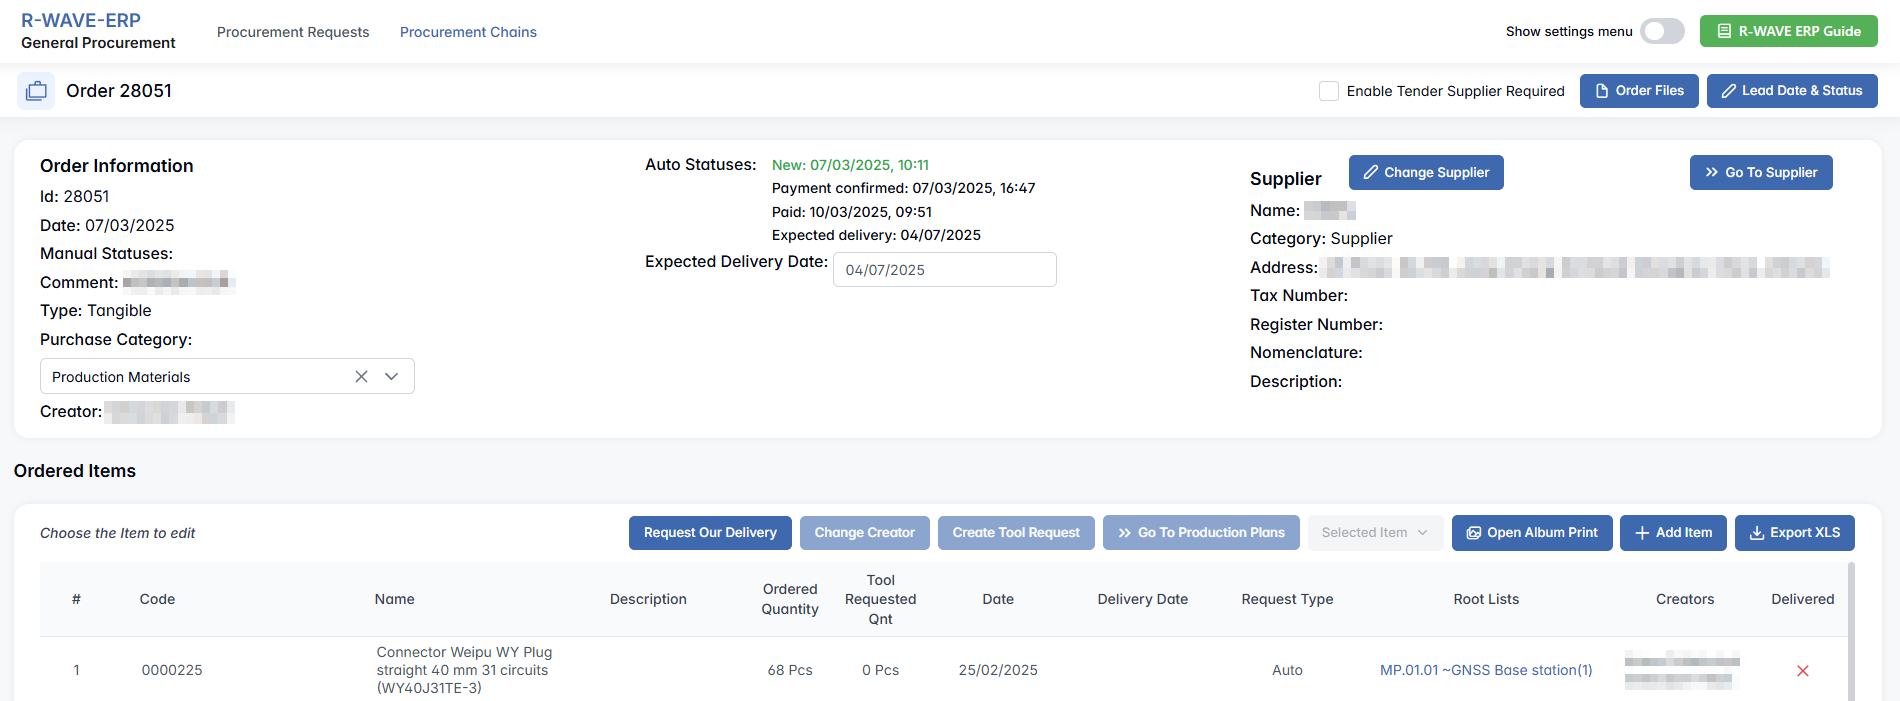
- Remove — Allows deletion/removal of the selected procurement chain.
- Add Files — Opens an upload interface where users can drag and drop or select files to attach to the procurement chain, and lists previously uploaded files with metadata.
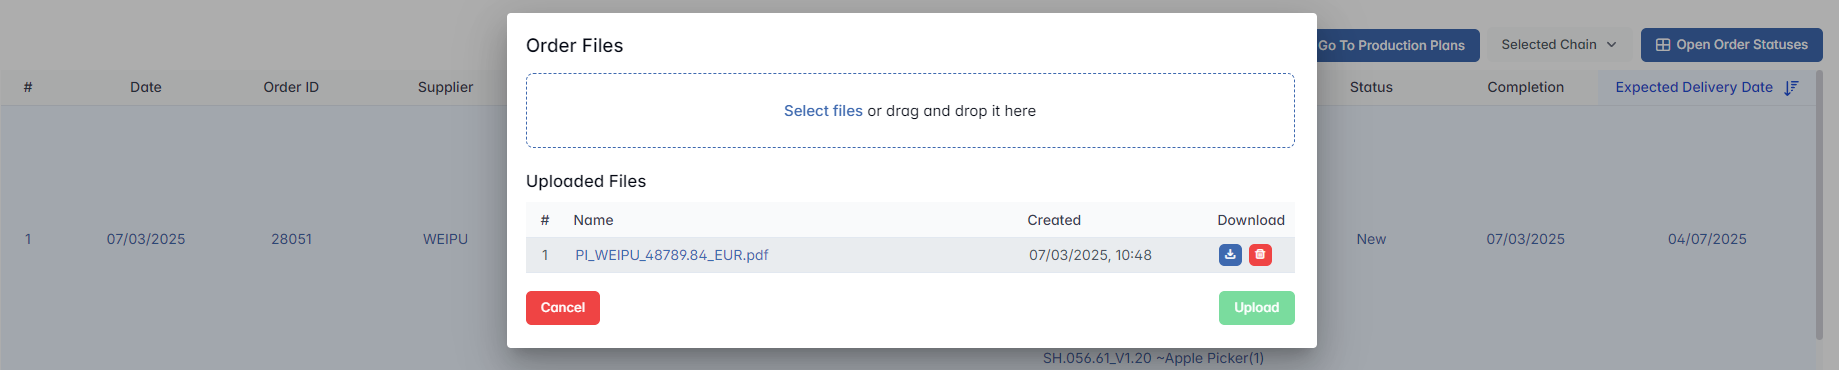
- Edit Status — Shows a list of statuses linked to the procurement chain, each with:
| Field | Description |
|---|---|
| Status * | Name of the status |
| Date * | Date and time when status was set |
| Created | Date/time the status record was created |
| Changed By | User who created or updated the status |
| Active Checkbox | Checkbox to mark which status is currently active |
Users can add new statuses via the + Add status button.
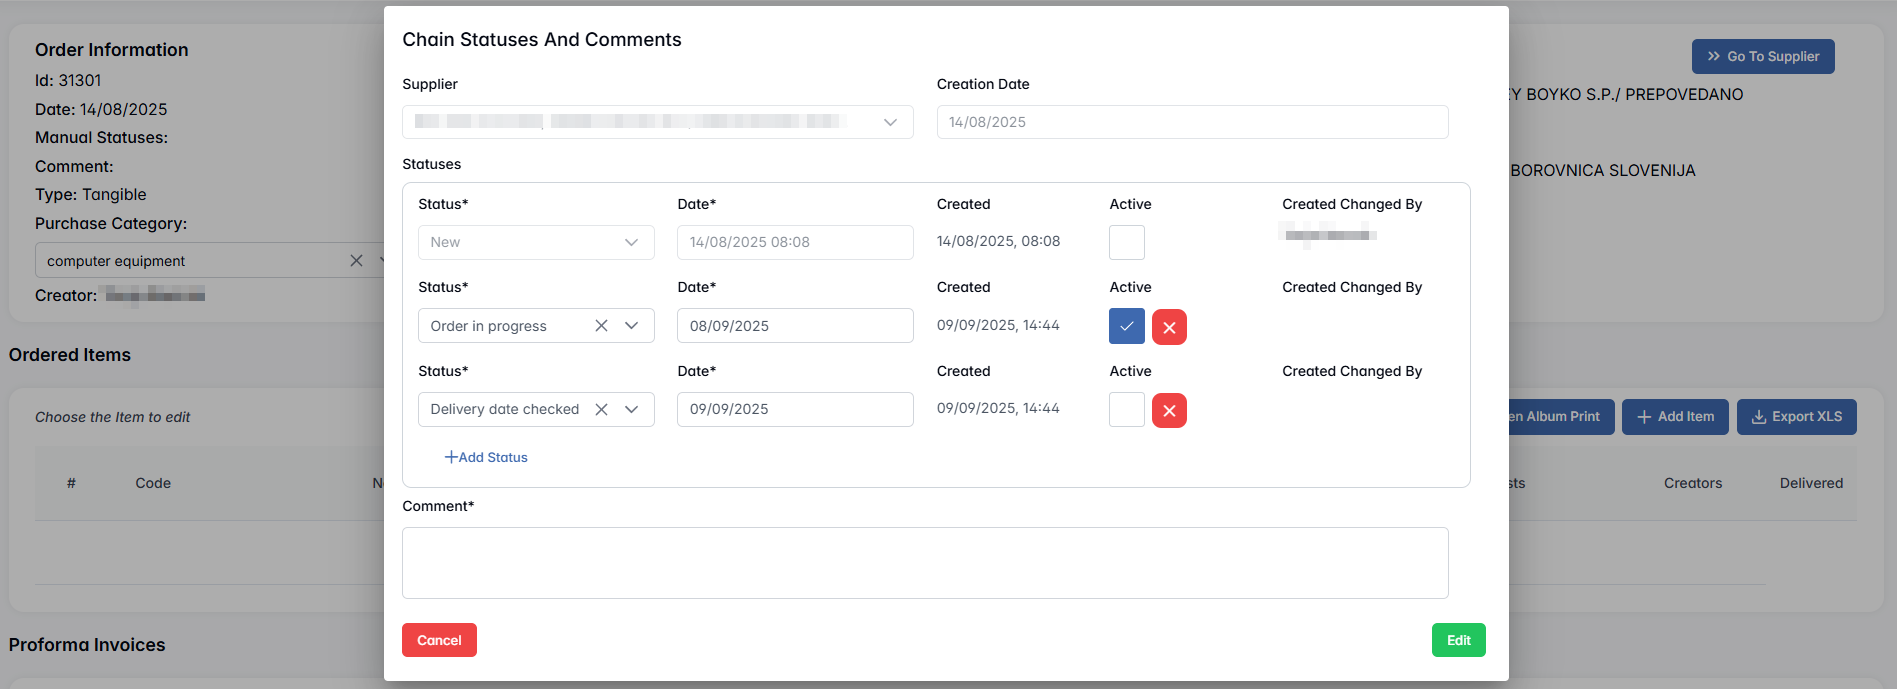
Any manually created status (added by the user) can also be deleted — a delete icon (×) will be available next to it. System-generated statuses cannot be deleted. These are created automatically by the system, for example:
- New – created after procurement order creation.
- Expected Delivery – generated if the expected delivery date field is filled in.
In such cases, no delete icon is shown. Changes are saved by clicking the Edit button.
Creating a Procurement Chain
In the upper-right corner of the Procurement Chains page, the user can click the + Create Procurement Chain button to manually create a new procurement chain.

A pop-up titled Create Empty Procurement Chain appears, where the user must fill in the following fields:
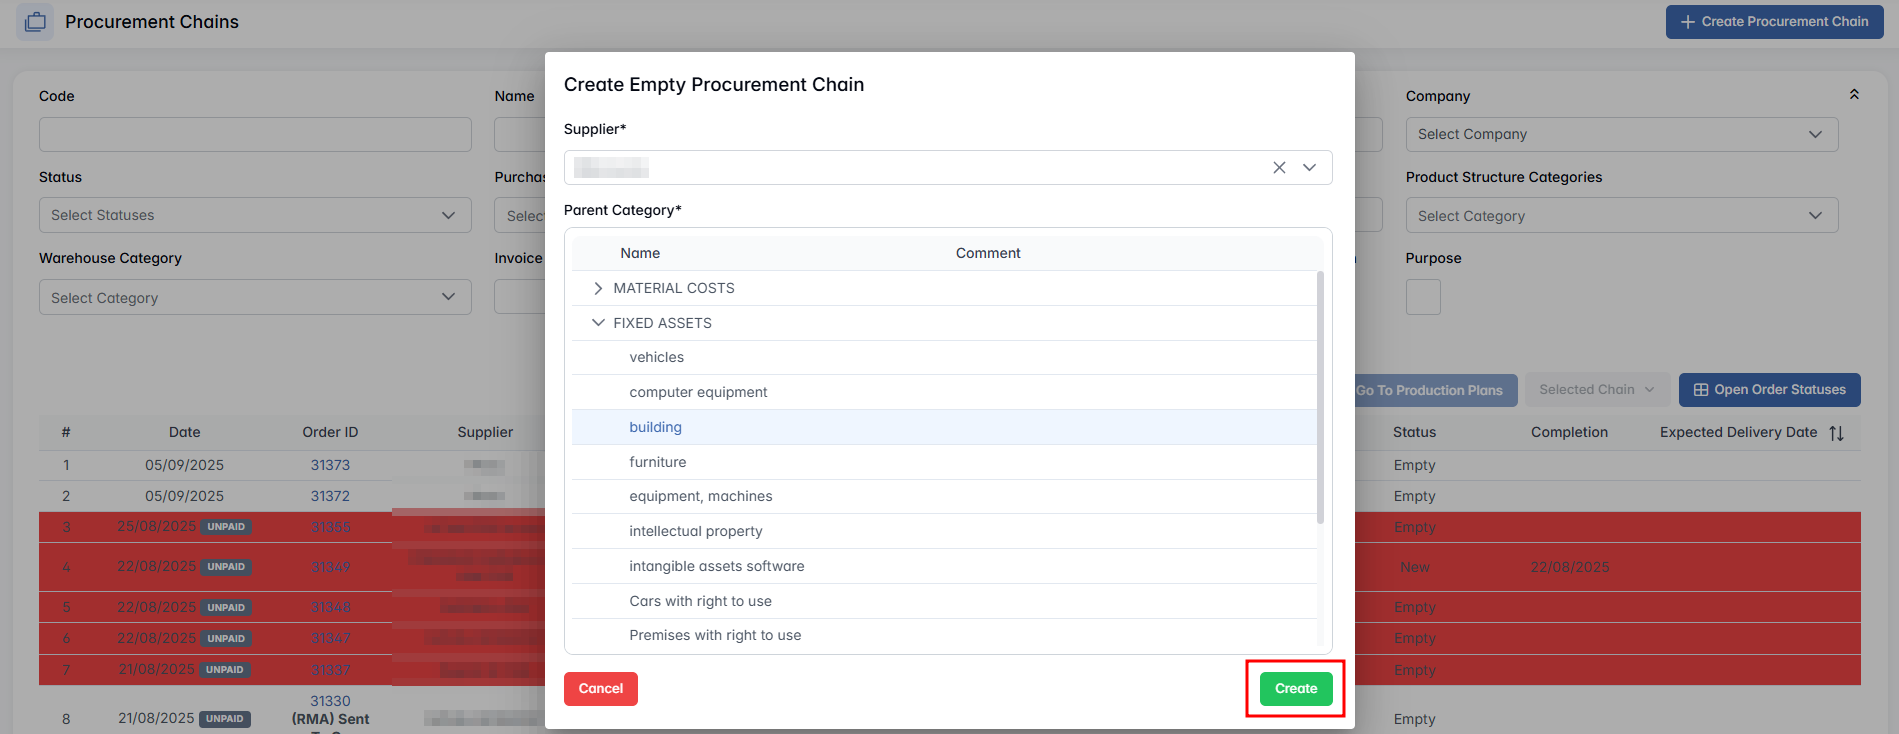
- Supplier * (required): select the company supplying the goods
- Parent Category * (required): select a predefined procurement category
Hidden Settings in General Procurement
Hidden Settings in General Procurement
These settings become available when the Hide settings menu toggle (top-right corner) is enabled. It reveals two additional configuration tabs:


Procurement Categories
This tab is used to define and manage the classification of items and services procured within the organization. Categories help structure procurement chains and reporting.
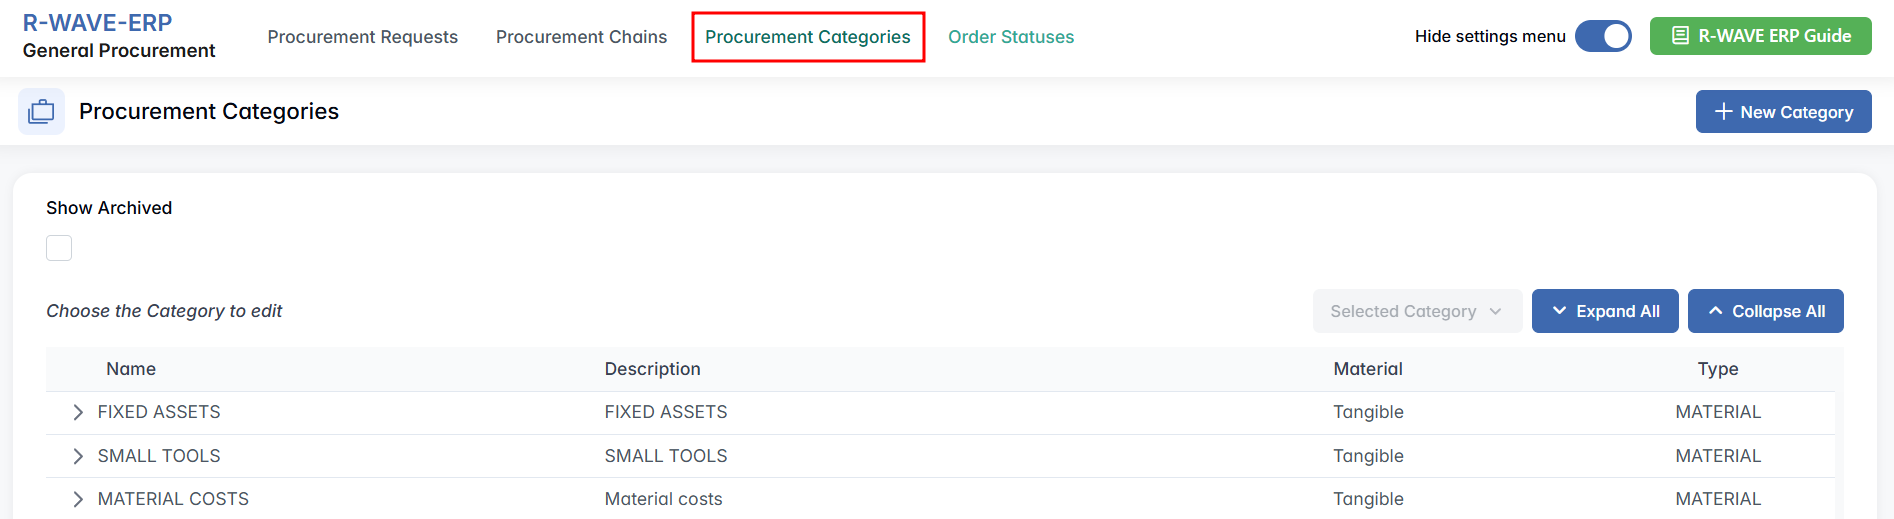
Manage procurement categories, including creating, editing, and archiving.
Functionality:
- Show Archived — checkbox to view archived categories.
- Dropdown Selected Category with options:

- Edit — edit the selected category.
- Remove — delete the selected category.
- Expand All / Collapse All — for easier navigation through nested categories.
Creating a New Procurement Category
To add a new category, click the + New Category button. A modal window will open with the following fields:

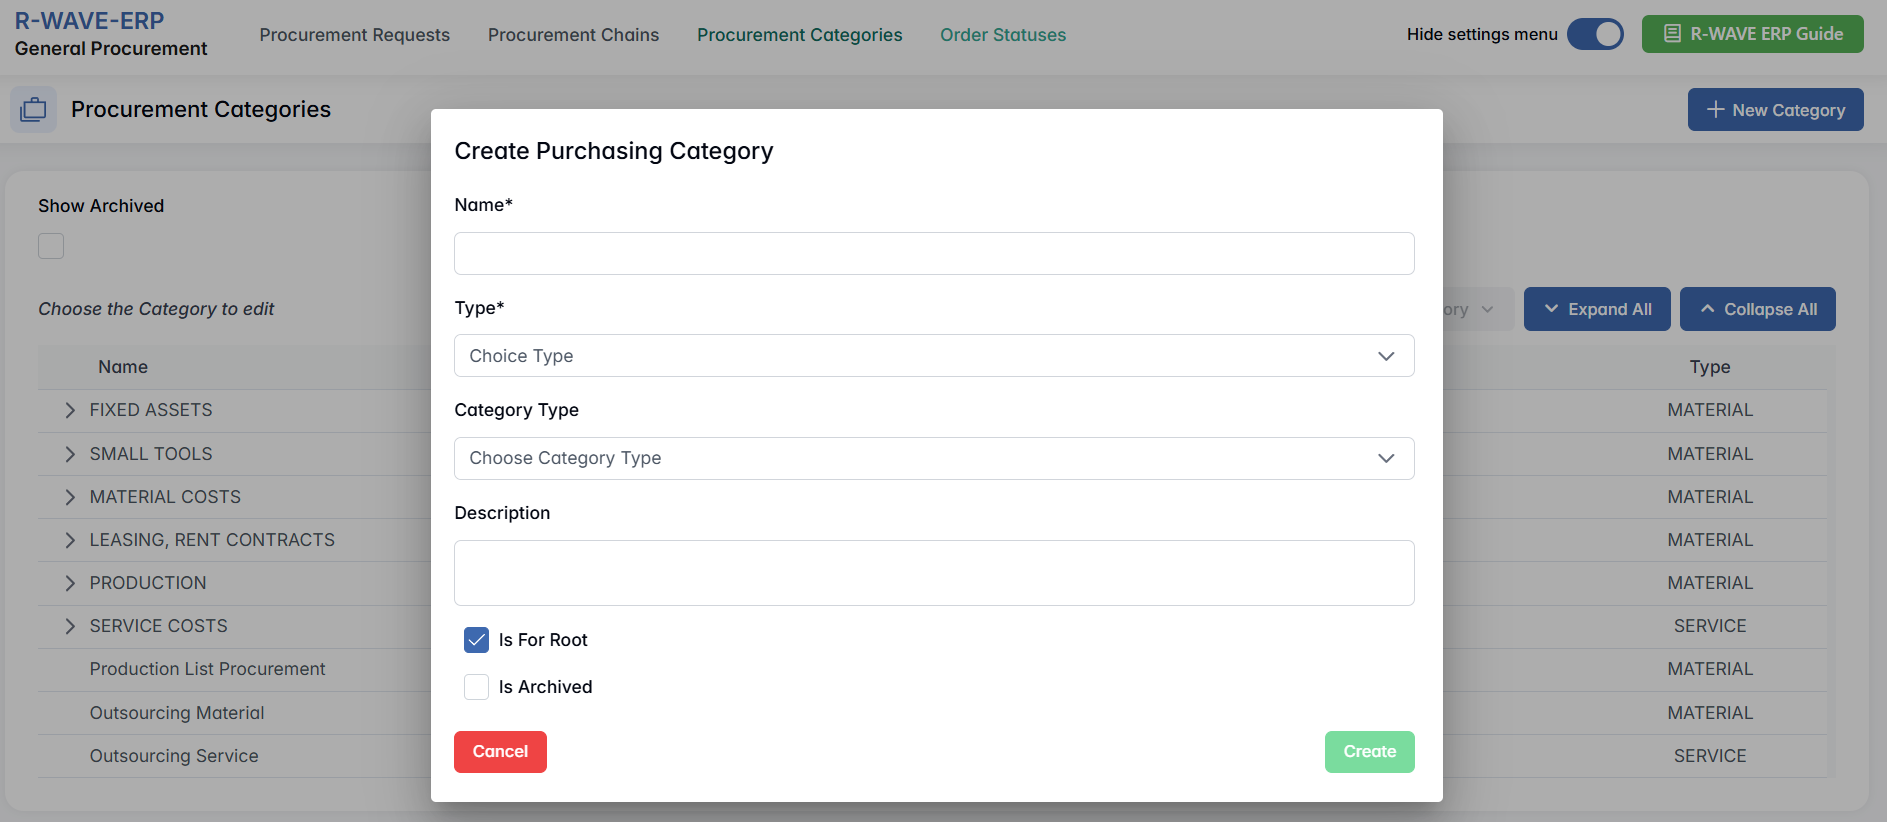
- Name * — name of the category.
- Type * — select between Tangible and Intangible.
- Category Type — either Material or Service.
- Description — a brief description of the category.
- Is For Root — checkbox to mark the category as a root-level category.
- Is Archived — checkbox to archive the category.
Order Statuses
This tab allows you to create and manage the manual statuses that are used to track the progress of procurement orders. Each status can represent a step in the order lifecycle, and certain statuses can be marked as a final step in a procurement chain.
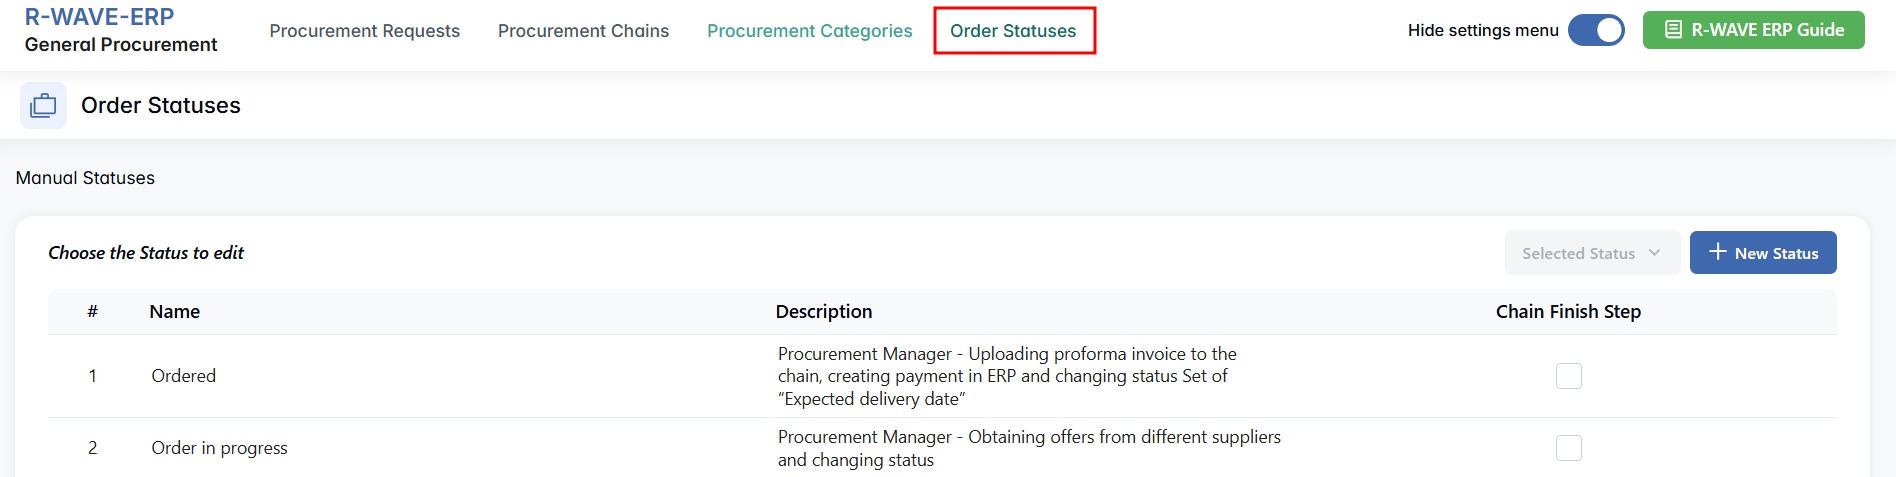
Functionality:
- Dropdown Selected Status with options:

- Edit — edit the selected status.
- Remove — delete the selected status.
- Each status has an optional checkbox to mark it as a Chain Finish Step (used for completion logic in procurement chains).

Creating a New Order Status
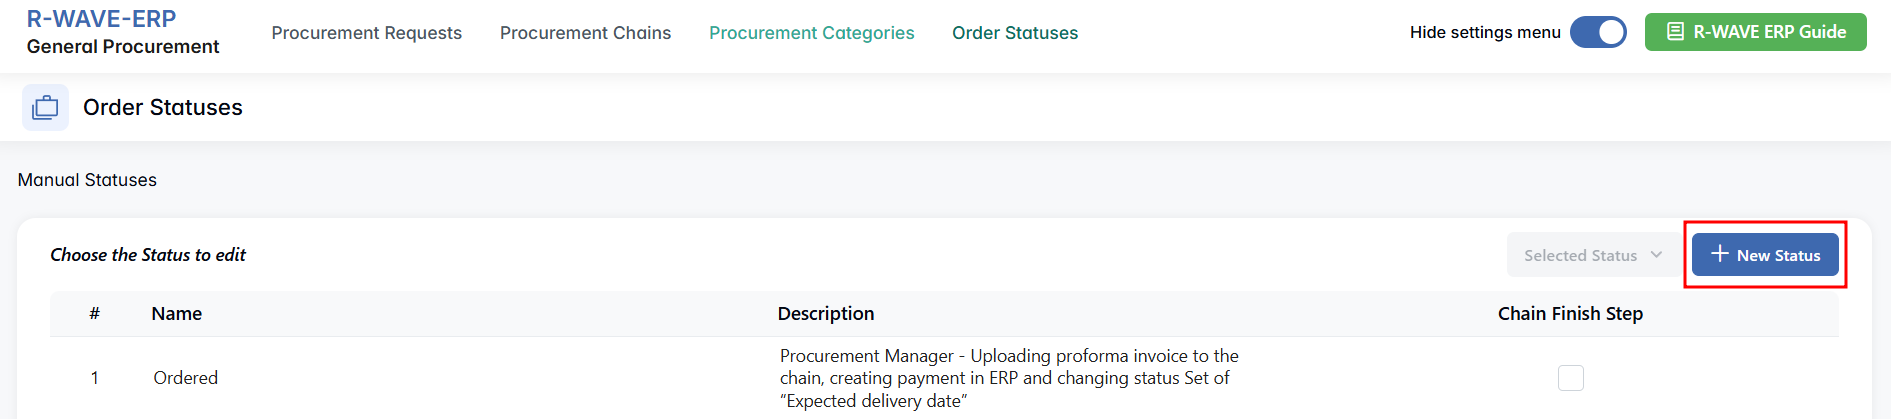
To add a new order status, click the + New Status button. A pop-up window will appear with the following fields:
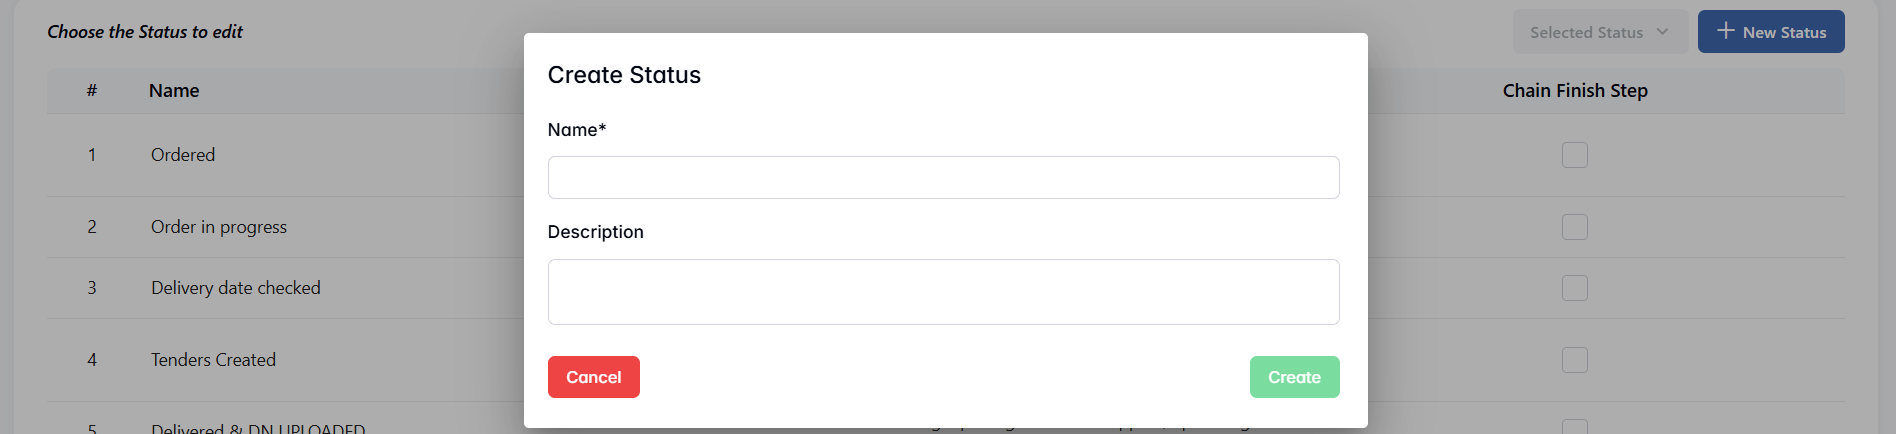
- Name * — the title of the status (required).
- Description — optional details describing when and by whom this status is used.
After filling out the fields, click Create to save the status. You may optionally mark this status in the list as a Chain Finish Step if it represents the final step in the procurement process. This customization allows the organization to adapt the order lifecycle to match real-world procurement processes and workflows.