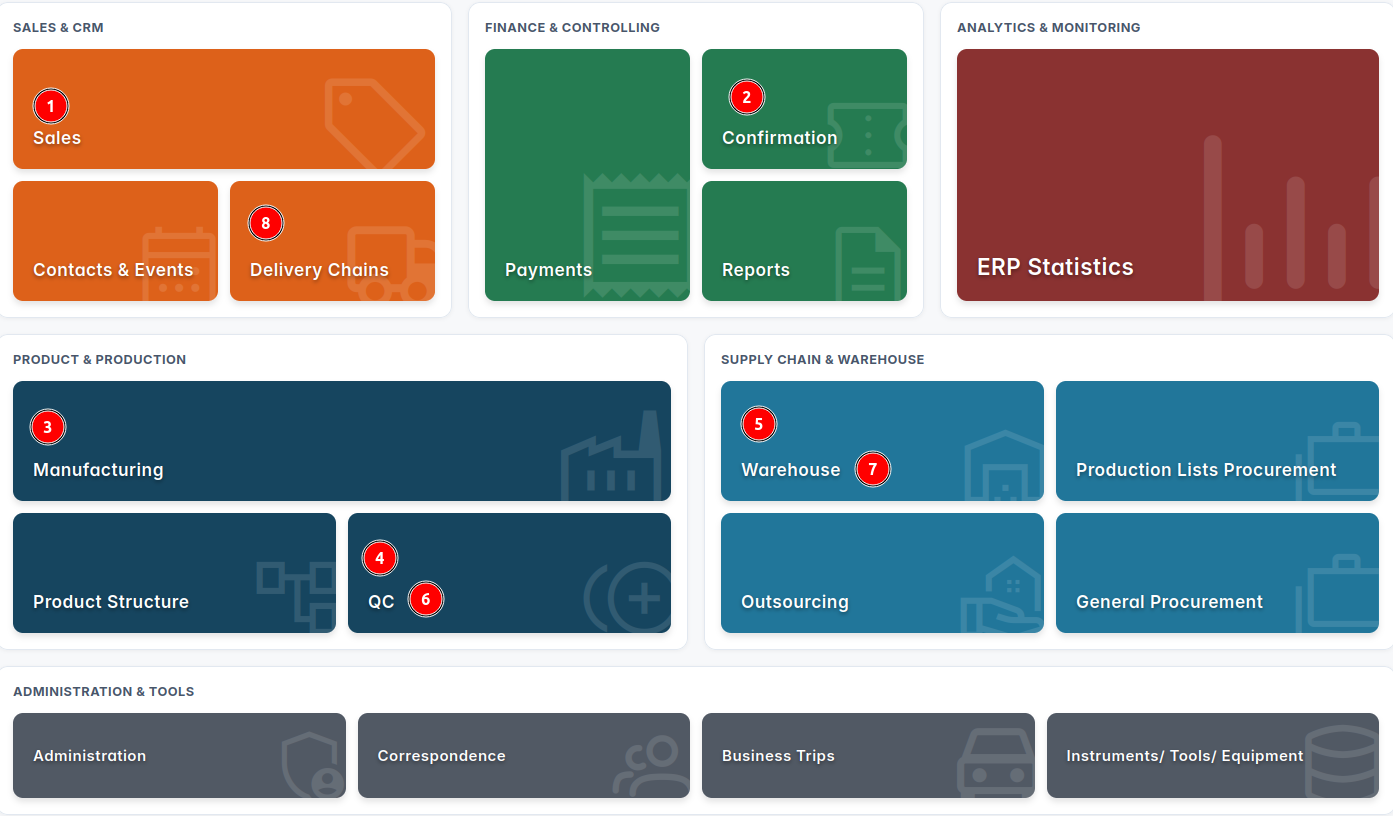
Sales
SALES CHAIN
Last updated by nt 27.5.2026
When we do not initiate the process from the Product Structure, but instead wish to process an order directly from the Sales module, the sequence of operations follows the order of the numbered modules below:
1. Sales
-
Confirmation
-
Manufacturing
-
QC (Quality Control)
-
Warehouse
-
QC (Quality Control)
-
Warehouse
-
Delivery Chain.
Why do certain modules repeat in this sequence?
This repetition occurs because the exact same sales chain transitions through different operational stages and distinct functional procedures, even though these activities are executed within the same module, as will be explained in the following text.
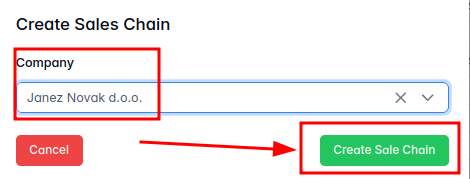
- SALES
Once we have selected the "Sales" module, we click on "Create Sales Chain".

An interface window will open, allowing us to select the specific company for which we are preparing an offer, proforma invoice, or final invoice.
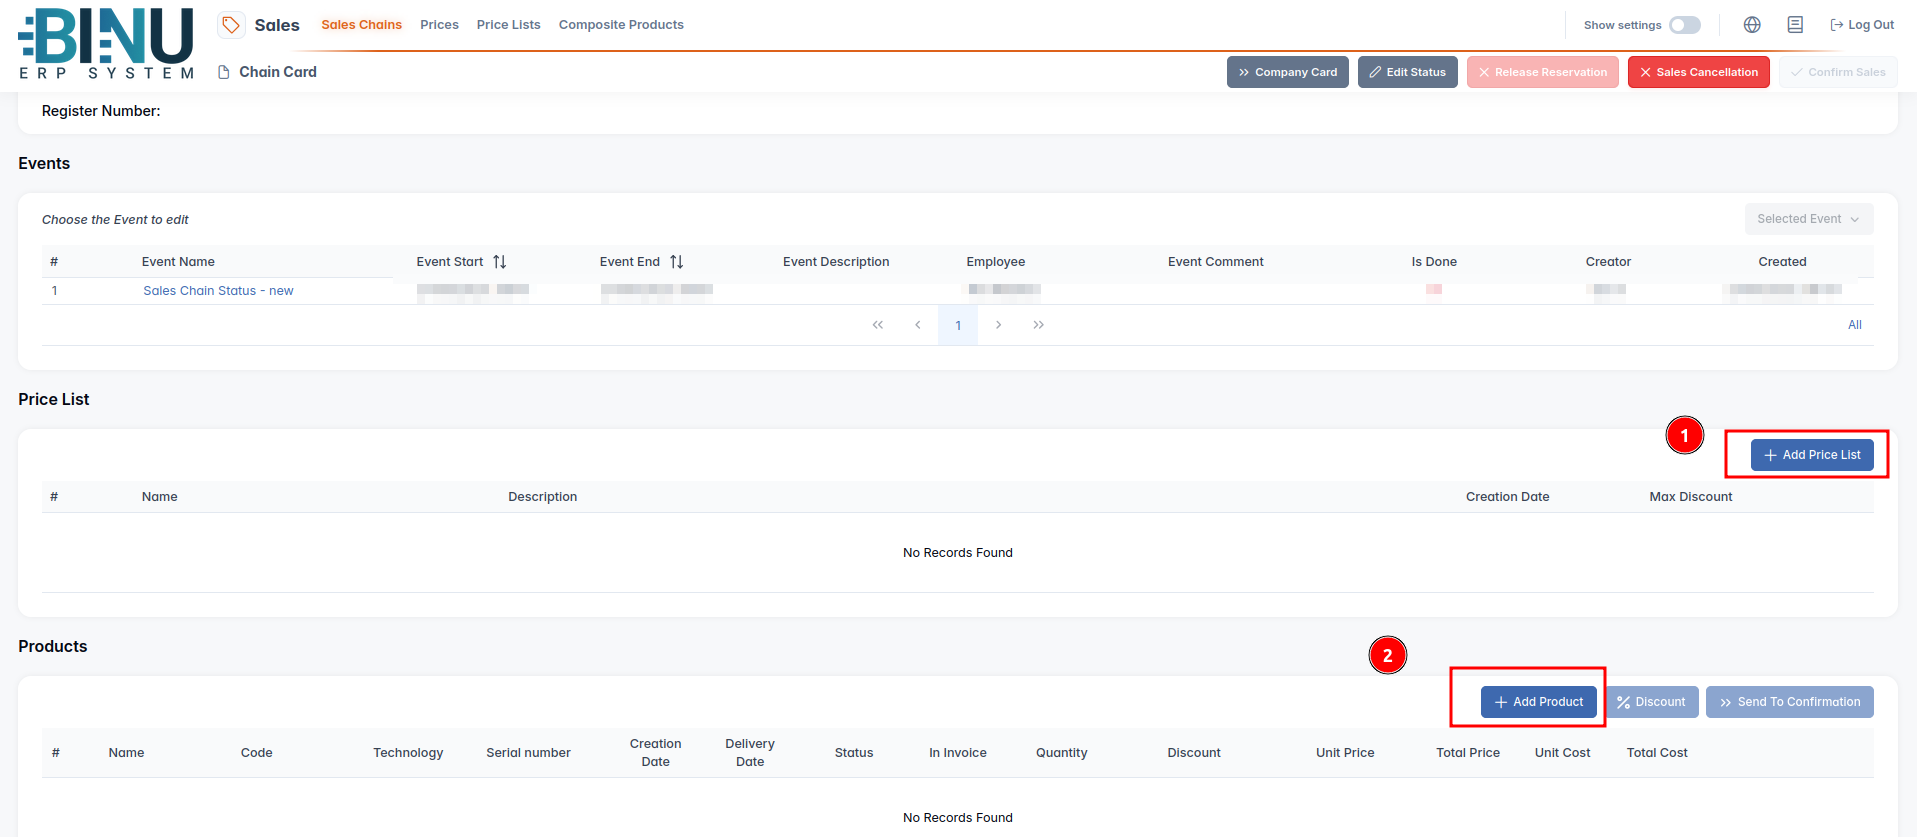
In the table view, a new row containing the chosen company's name will appear. We must select this row so that it becomes highlighted. Highlighting this row activates the "Selected Sales Chain" menu, where we then click on "Chain page".

This action opens a new page called the "Chain Card", where we can add the products that will be included in our offer, proforma invoice, or invoice. Completing this stage requires two distinct steps.
First Step: Add Price List
We select the pre-prepared price list. Once selected, the corresponding row is highlighted, and we click the "Add" button.
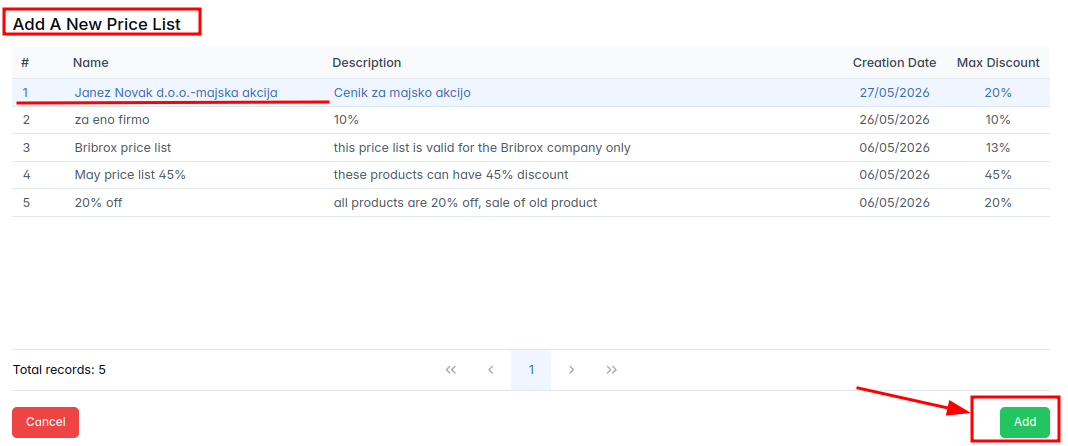
In our specific scenario, we have selected a price list where the maximum permitted discount is set to 20%. This means we can manually adjust the discount for the products on this list anywhere from 0% to 20%; we can apply the same discount rate across all products or define a unique rate for each individual item.
When dealing with composites, the price list and the corresponding discounts are not determined for the composite unit as a whole, but are instead specified individually for each of its underlying components.
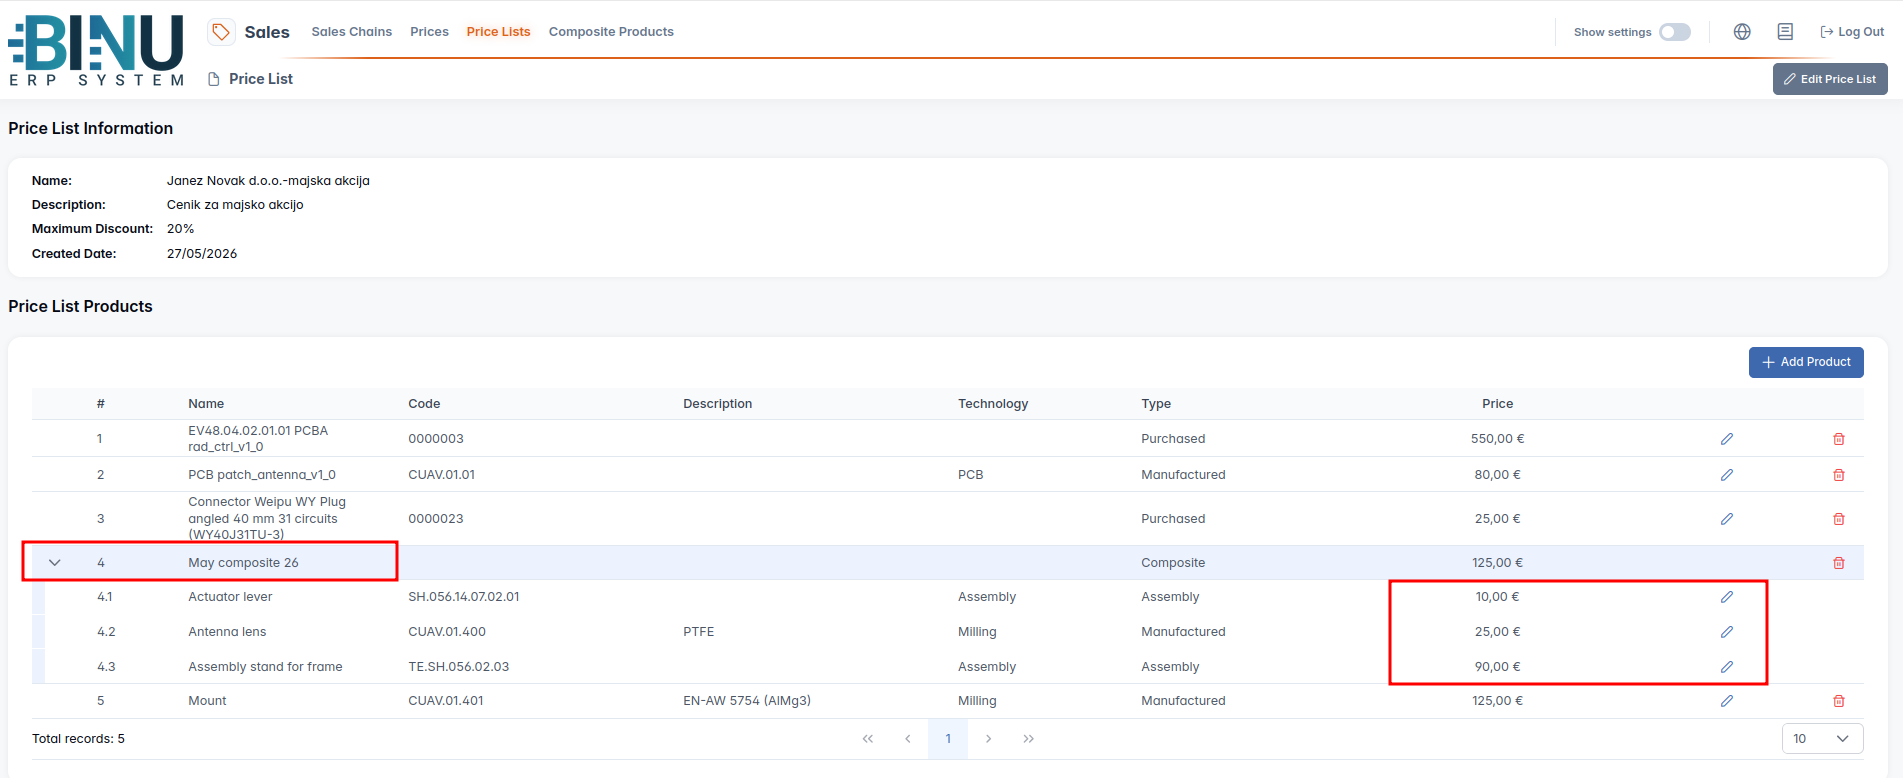
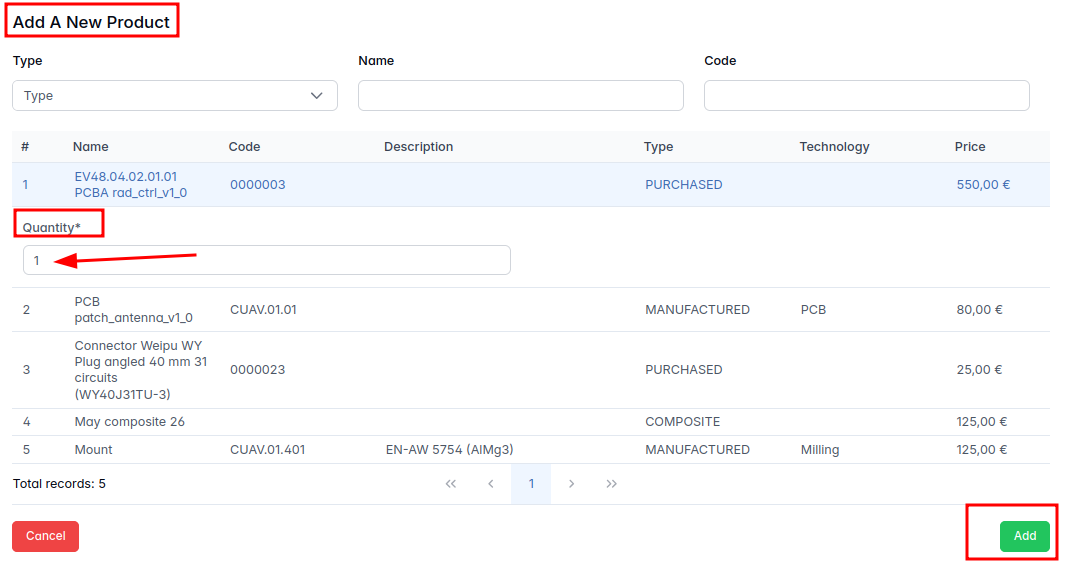
Once the price list is selected, we proceed to the second step, where we select products from the filtered list.
Second Step: Add Products and set Discount
The system dynamically assists us by offering only those products that are actively associated with our chosen price list.

Upon choosing each product, the system prompts us to input the desired quantity.
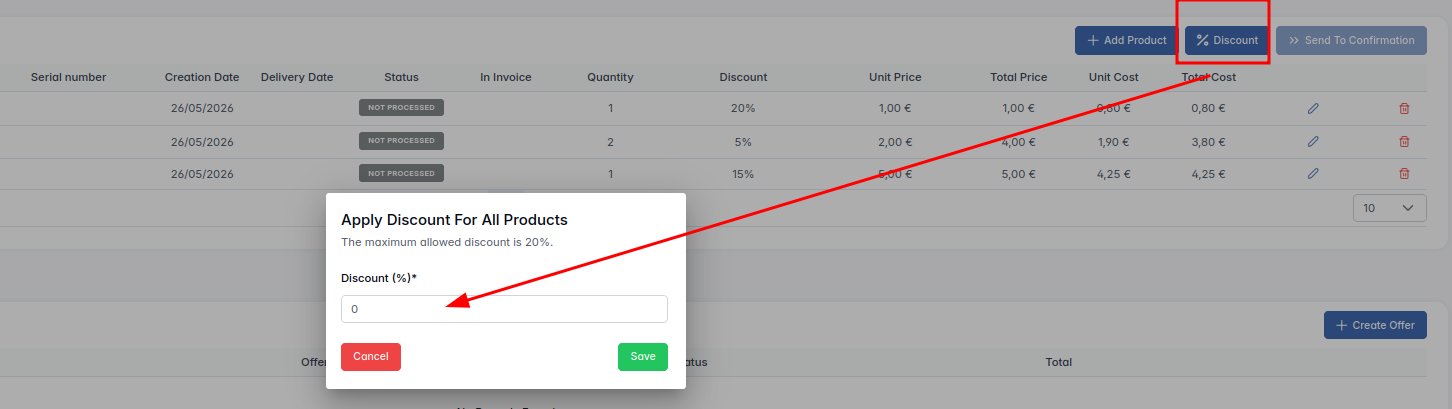
Once the products have been chosen and their quantities defined, we will see in the table overview that the discounts are not automatically activated. Instead, they must be manually specified. This can be done individually for each product or applied globally to all selected products at once.
Discounts can be adjusted up to the maximum percentage established for that specific price list during its creation. In our example, this maximum limit is 20%. If we attempt to manually assign a discount greater than 20%, the system will automatically correct and revert the value back to the maximum limit of 20%.
Manual Discount Entry
If we decide to set the discounts manually, we must save our changes by clicking the green checkmark icon.
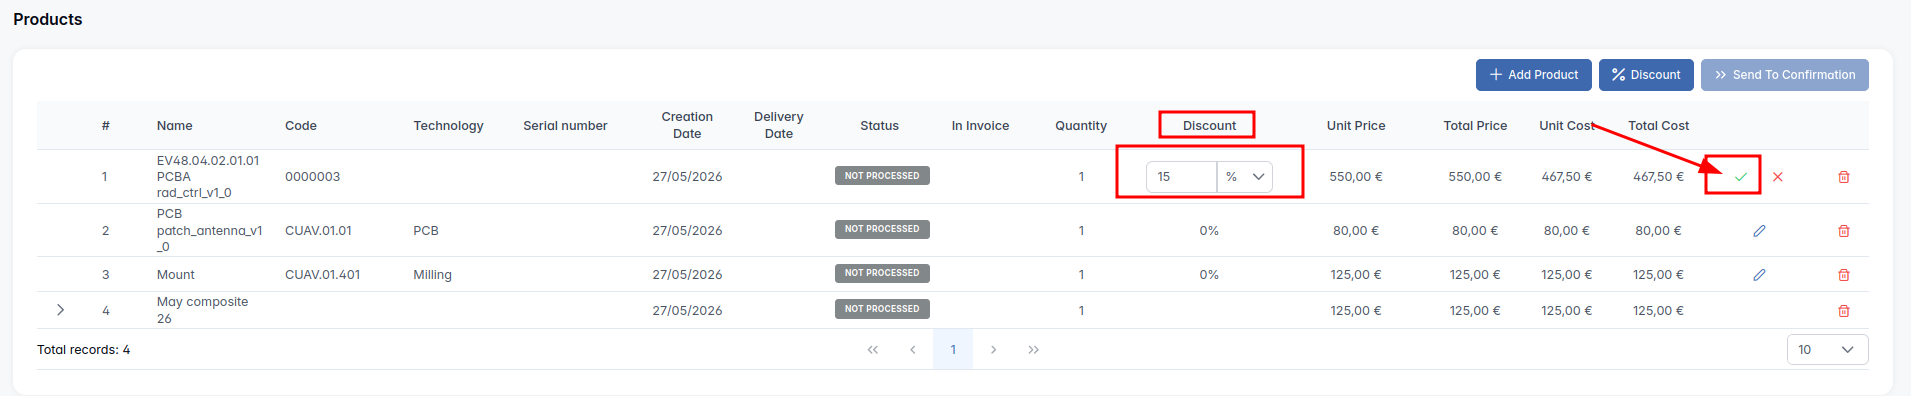
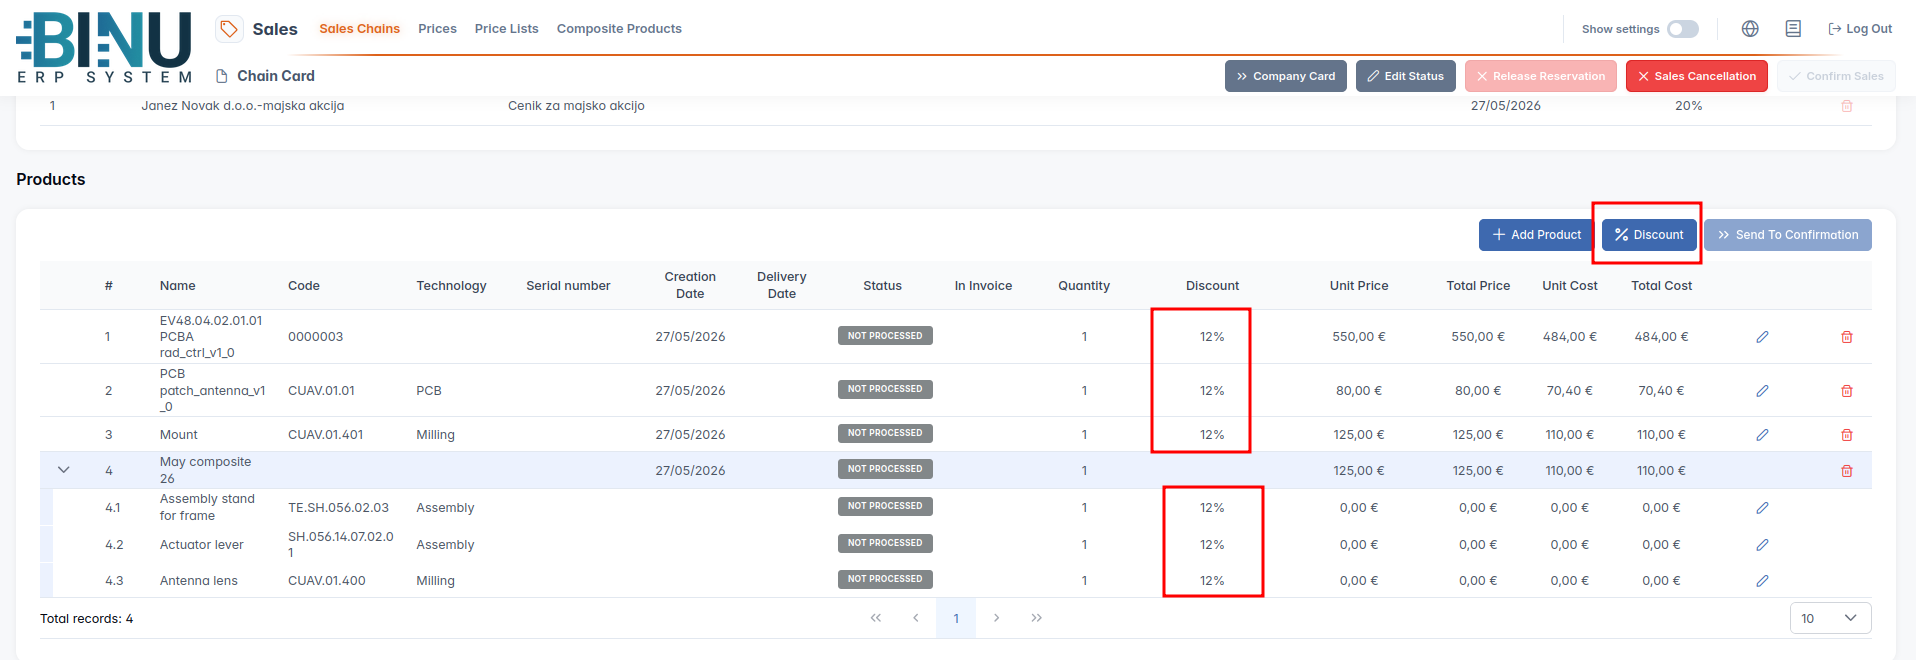
When processing composites, the manual discount must be specified individually for each component rather than the composite group as a single entity.
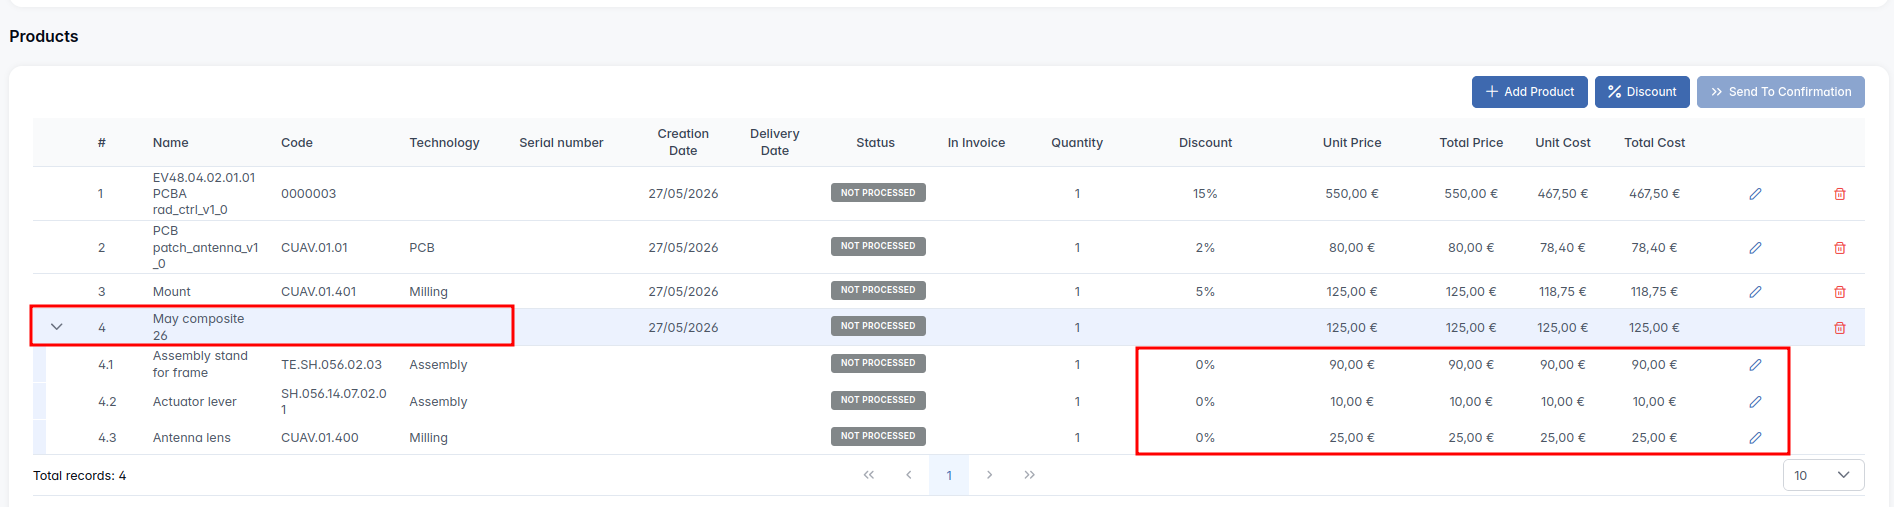
Automatic Discount Configuration for All Products (Including Composites)
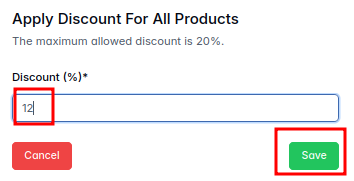
To apply a discount globally, we click the "%Discount" button. This action opens a dialog window where we enter the desired discount rate to be applied to all selected products, which is 12% in our example.
Once this data is saved, we can observe that the system automatically recalculates and applies a 12% discount to every single product, including the individual components of any composite products.
Create Offer
We generate the official offer by clicking the "Create Offer" button.
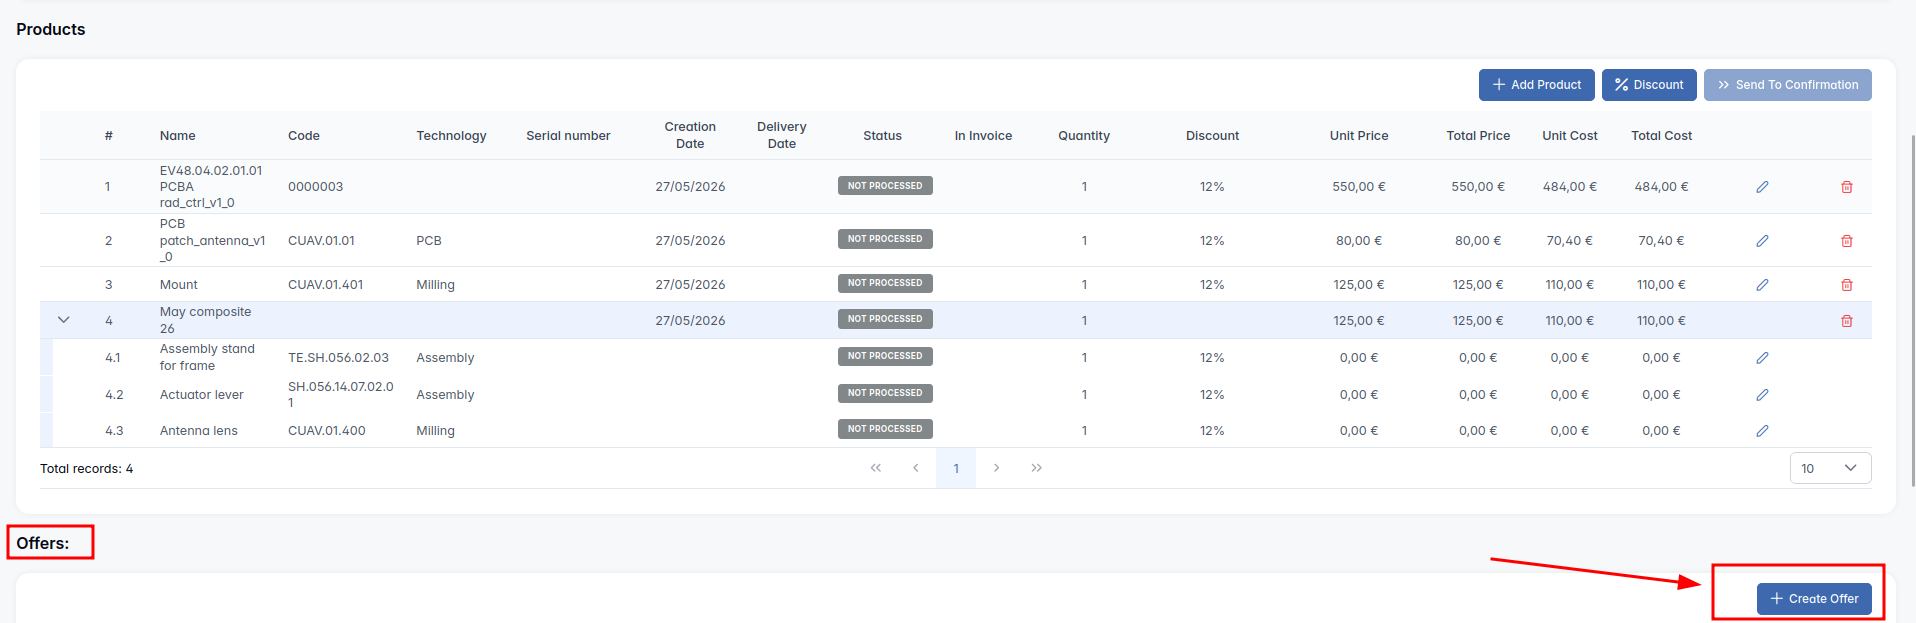
Clicking this button instantly generates the offer in PDF format and automatically attaches it to the "Offers" table. The document is immediately available to be opened and saved locally.

Initially, the newly created offer is assigned a status of "New".
When the customer accepts the offer, we register this in the system by clicking "Confirm Offer". If the customer decides to reject it, we click "Decline Offer".

In our specific case, the customer has accepted the offer, so we confirmed it in the system, updating its status to "Confirmed".

If the customer subsequently changes their mind, contacts us, and rejects the previously approved offer, the system provides the flexibility to decline an already confirmed offer.

In the event that the customer contacts us again to change their mind once more---finally confirming the offer they had first accepted and then declined, agreeing to pay everything in advance---the system allows us to generate and confirm a brand-new offer after the previous one was declined. Every single one of these transitional events is logged in the system for tracking purposes.

To convert the validated offer into a proforma invoice, we must first coordinate with the production department to verify whether they can manufacture the order within the required deadline. We send the order details to them for review by clicking the "Send to Confirmation" button.
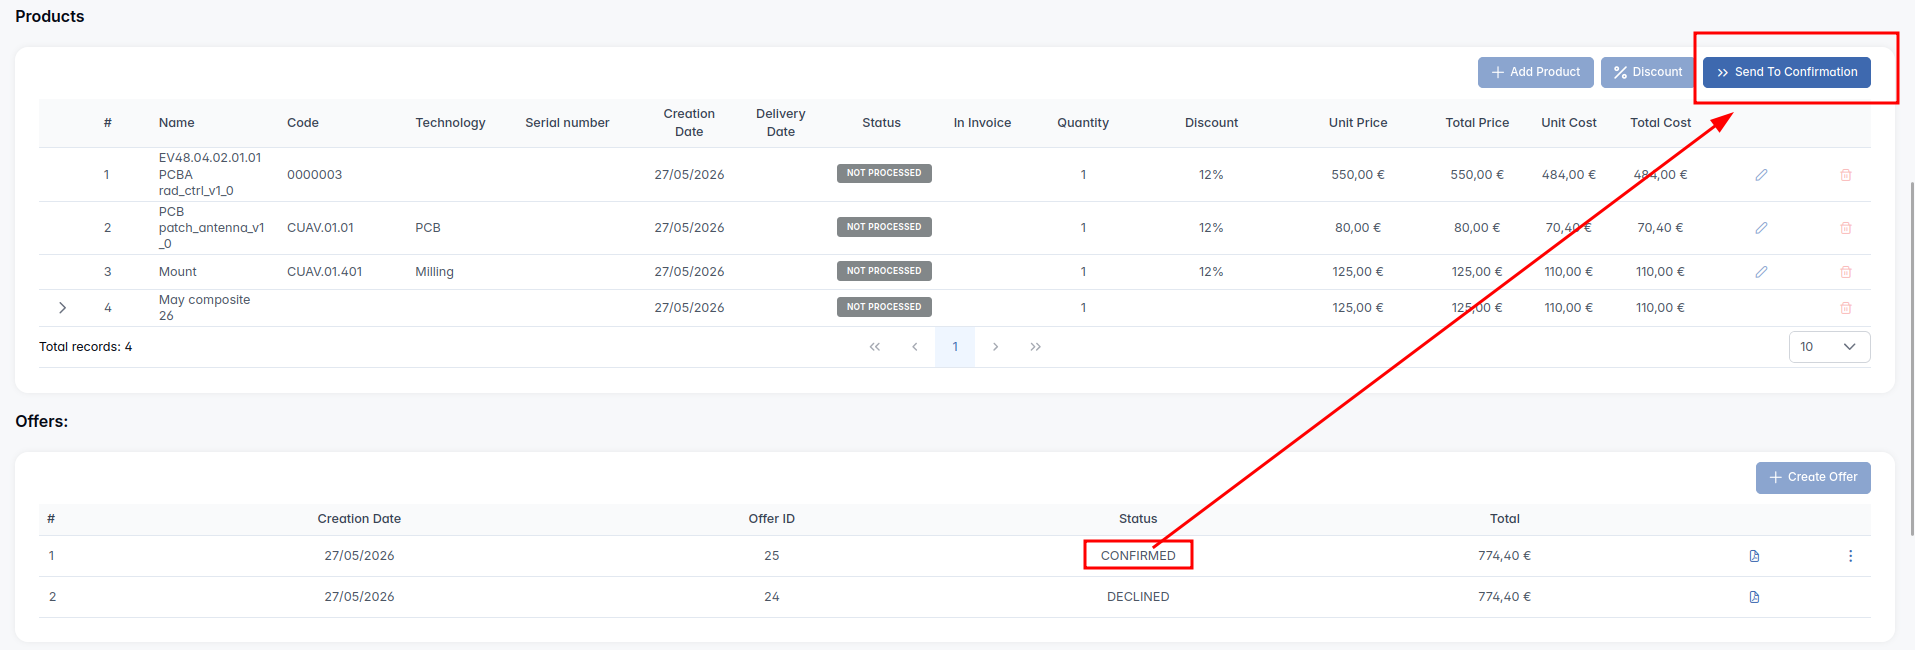
Once this action is executed ("Send to Confirmation"), the status of the ordered products transitions from the gray-colored "in process" status to the orange-colored "in confirmation" status.

- CONFIRMATION
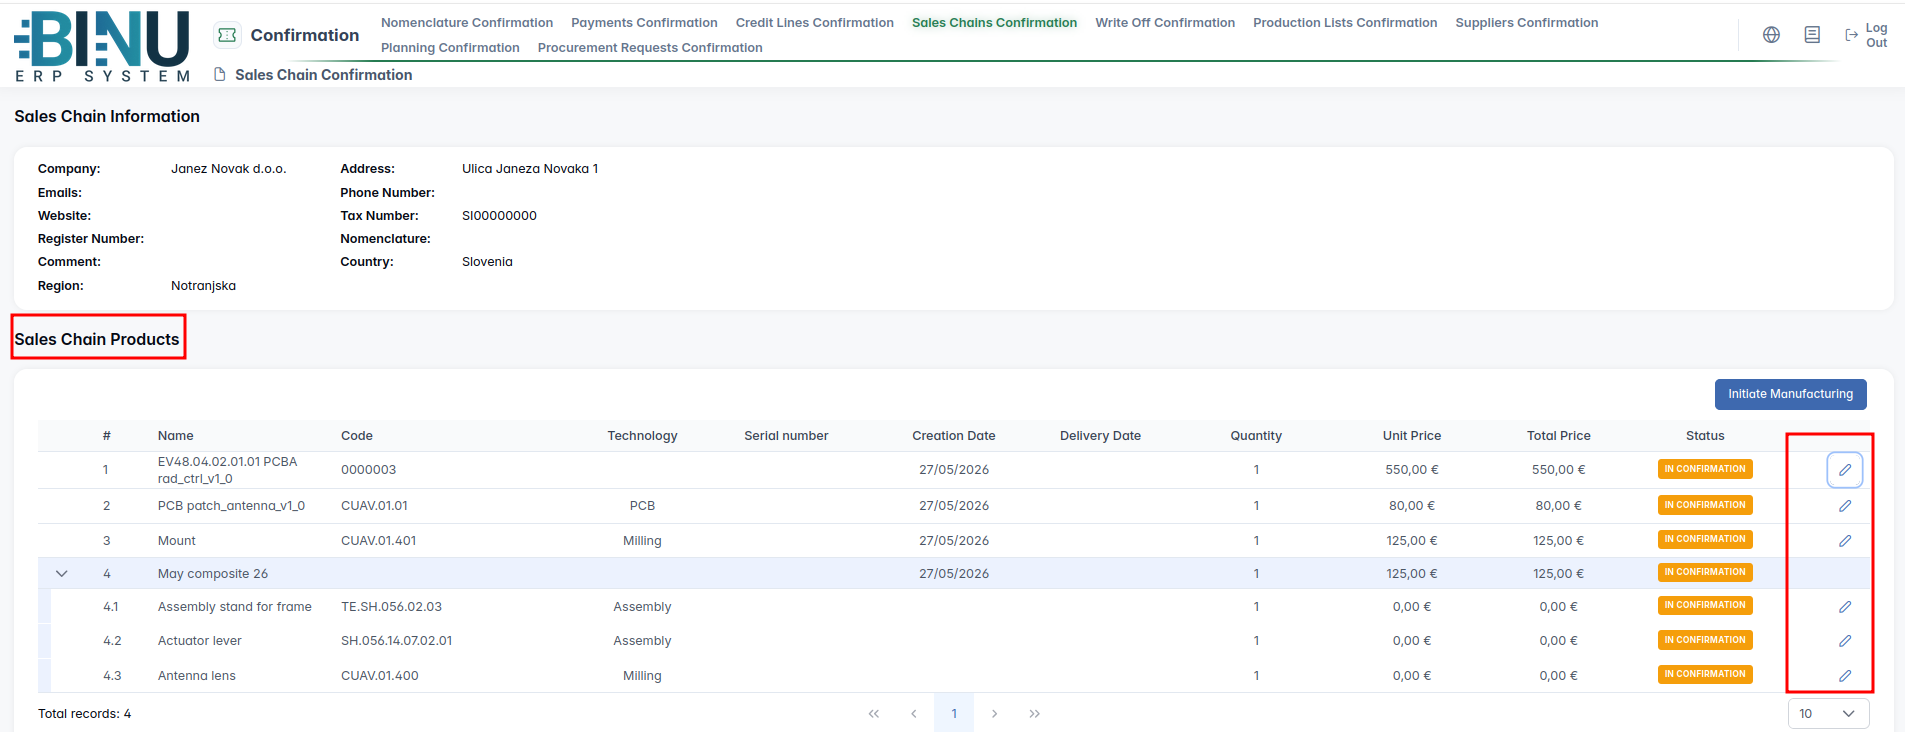
Within the "Confirmation" module, under the "Sales Chain Confirmation" tab, the individual responsible for production management reviews the pending orders. He clicks on the row with the new order opens it and verifies whether the requested products can realistically be manufactured.

Within the sales chain, the production manager must review the requirements for each individual product separately by clicking the pencil icon.
Clicking the blue "Initiate Manufacturing" button allows us to confirm in-house production for all elements in accordance with the requested quantities. But in our case we want to manually check each item.
Each ordered item must be reviewed by production manager, who has to provide information wherefrom will he provide the items; he also needs to enter the quantities required by the order, and confirm the data by clickin buttn "Confirm".
Procurement Sourcing Options:
- Warehouse: Sourced from existing stock if the items are already available.
- Ongoing Production: Sourced from ongoing manufacturing if there are unallocated items available.
- Initiate Manufacturing: Starting a brand-new in-house production to fulfill the order.
This sourcing allocation must be determined for every single ordered item.
If items are unavailable at a specific location (such as the warehouse or ongoing production), we cannot input the requested quantity for that source. The quantity can only be entered into fields that are currently viable. (Note that outsourcing procurement options are not available here, as purchased products are managed separately through the outsoursing chain).
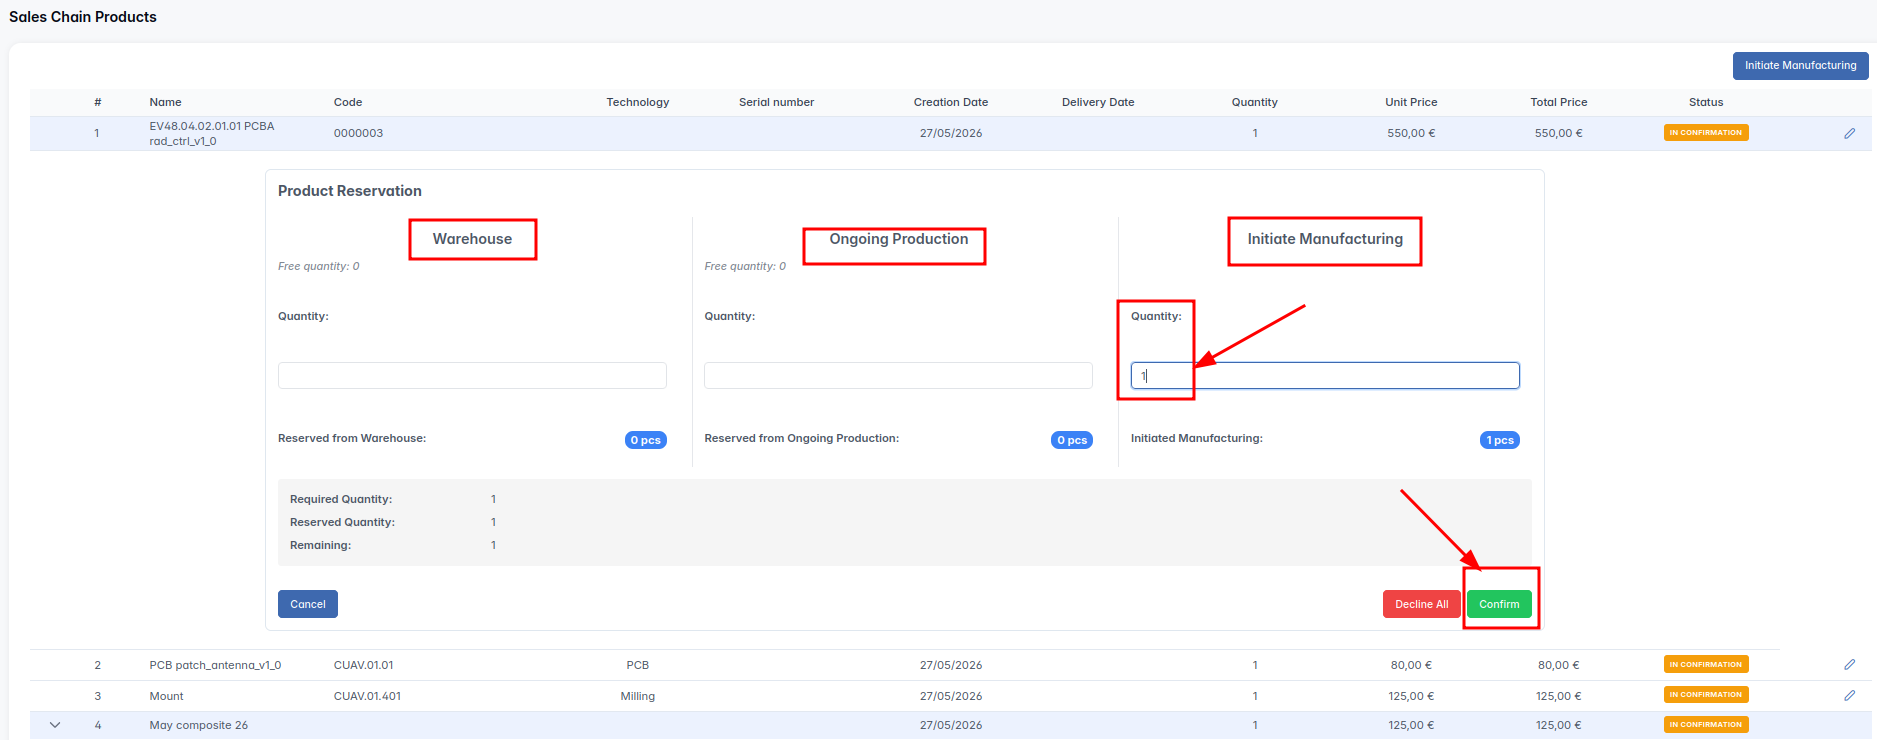
Once the source for a specific item is designated, the status of the ordered product shifts from the orange "in confirmation" status to the purple "in production" status.

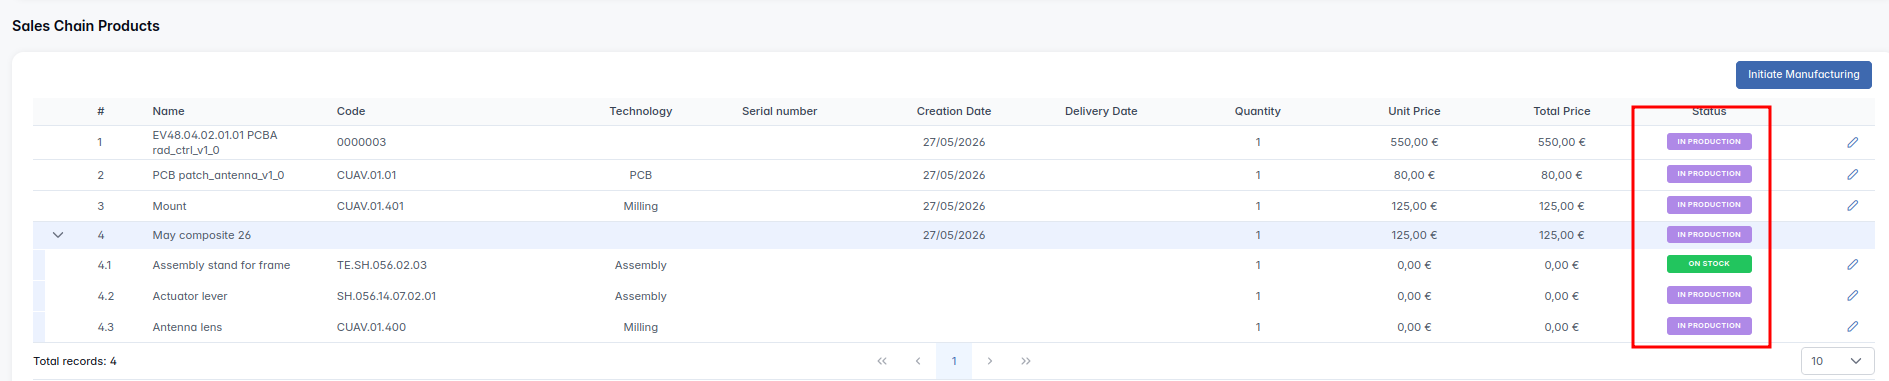
Upon completing this process, every ordered item will display either the "in production" or "on stock" status. These identical statuses are visible in both the "Confirmation" module and the "Sales" module.
When all production prerequisites are met (such as receiving the advance payment), we return to the "Sales" module and click the "Confirm Sales" button to signal that we want to initiate the production and delivery of the products; the production can start. At this exact moment, the system automatically generates the corresponding "Delivery Chain".
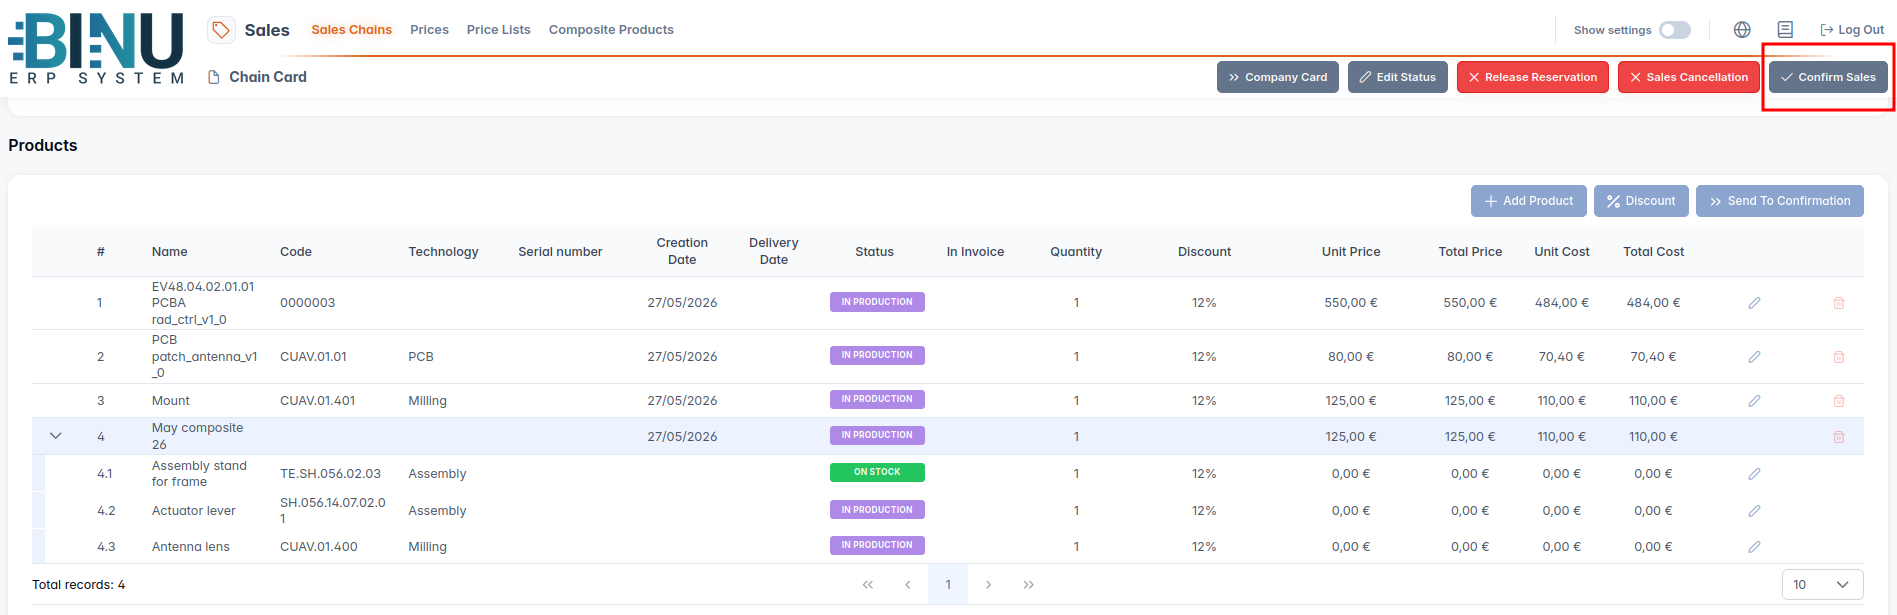
In the "Confirmation" module, where all key approvals take place, we go to the "Manufacture Items" tab, select the products to be produced, and confirm our selection by clicking "Confirm". (Note: The screenshots and examples from this point onward are derived from a different order).
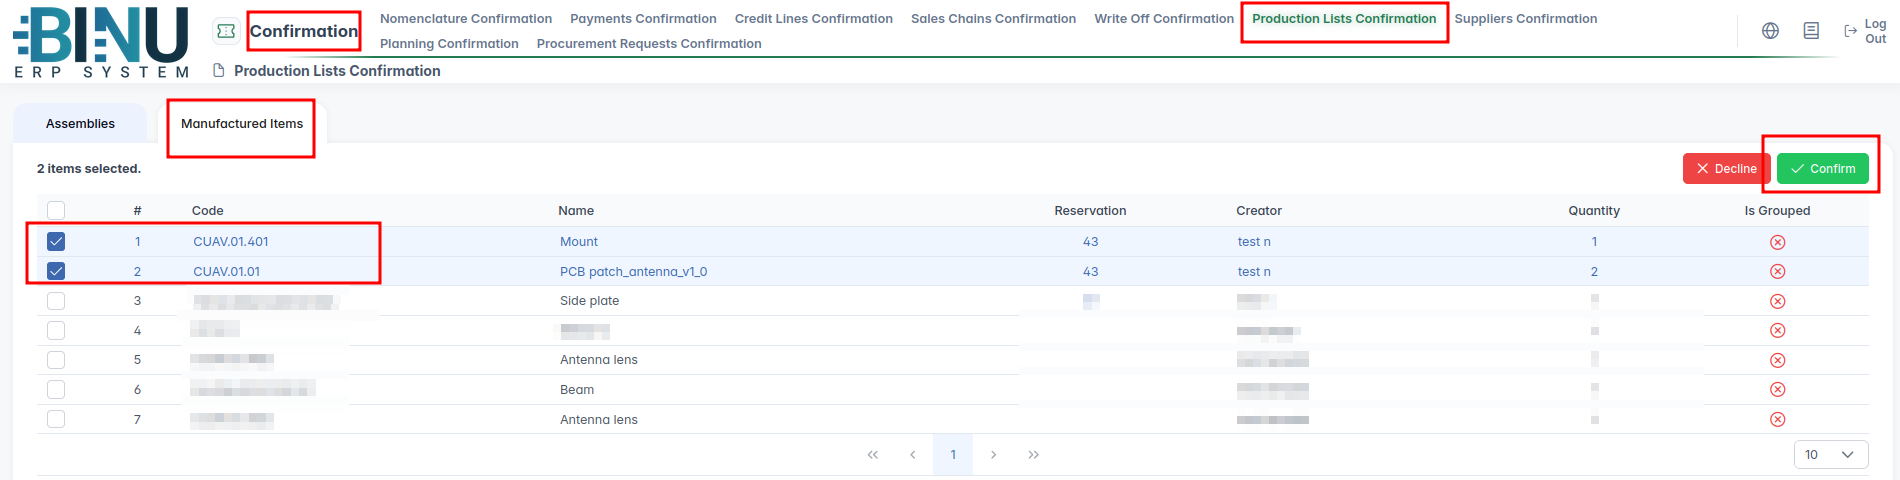
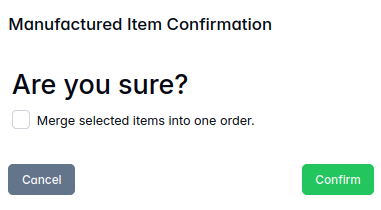
A confirmation window will appear, asking if we want to combine the production of these items into a single, unified production order. In our example we have ticked the box for "yes".
- MANUFACTURING
Once the ordered items have been successfully produced, we navigate to the "Manufacturing" module under the "Orders to Own Production" tab. Here, we select our unified work order, open it, and submit it to the Quality Control (QC) department.

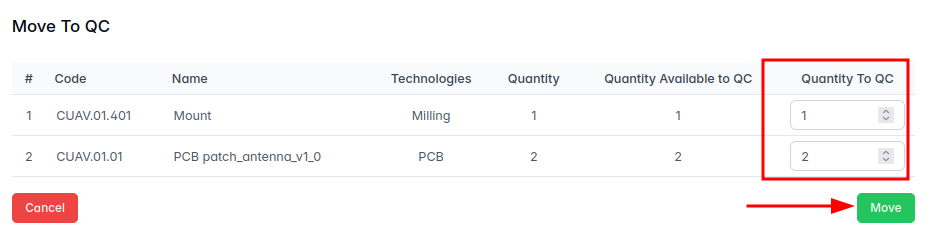
On the work order screen, we check box "At QC" to indicate we want the quality control, and then click button 2 - "Move to QC" to move the items to the quality control department.

This triggers the "Move to QC" dialog window, where we can specify the exact quantities of the products that we are transferring to quality control.
- QC (Quality Control)
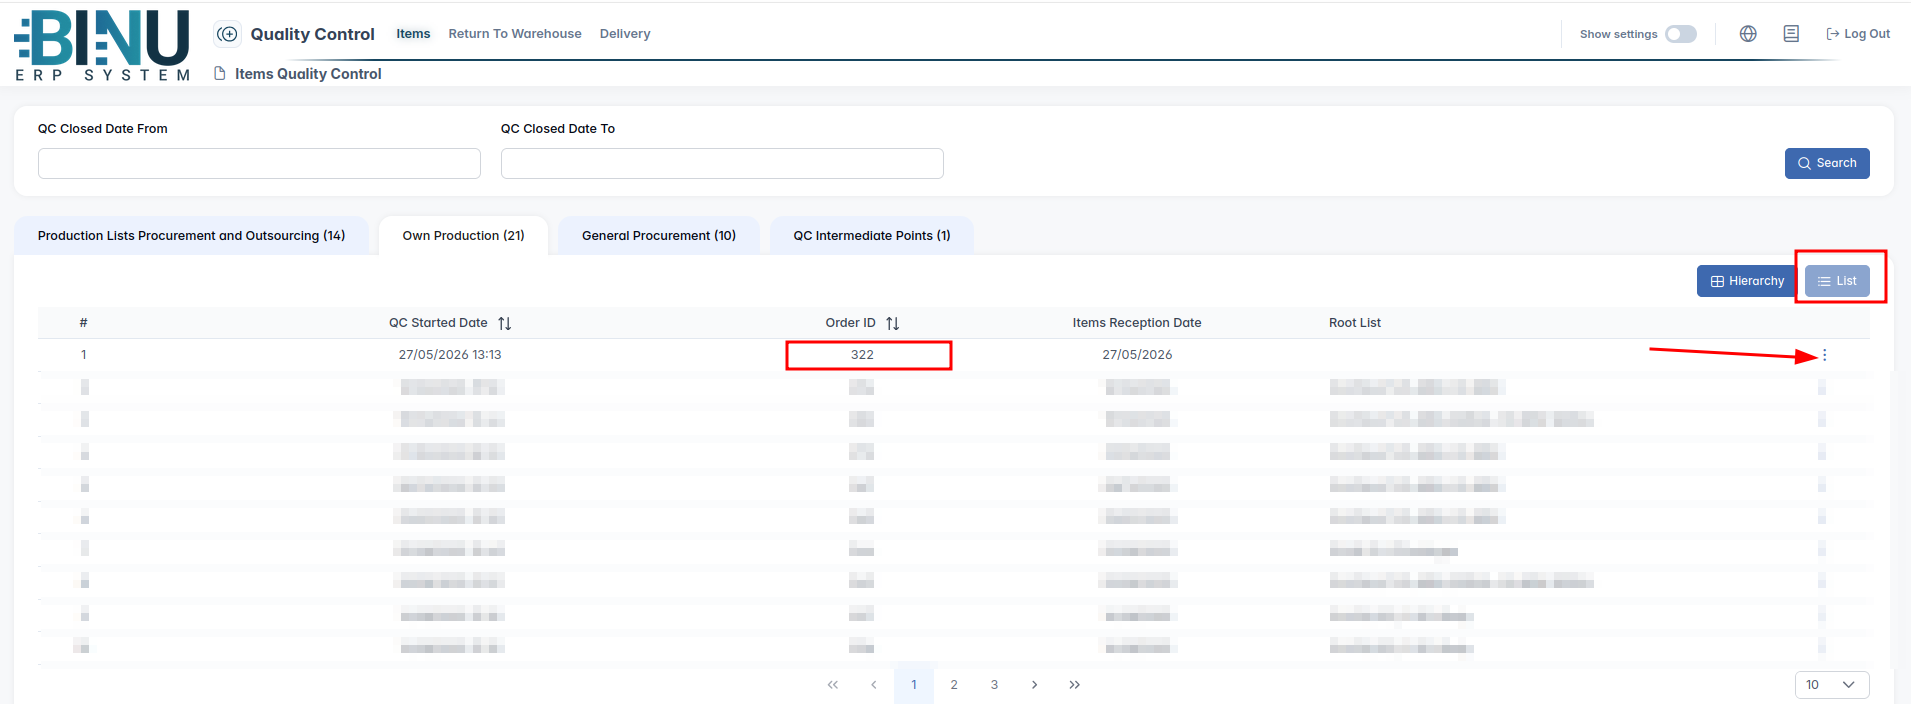
In the "QC" module, under the "Own Production" tab, we can locate our specific work order by its Order ID.
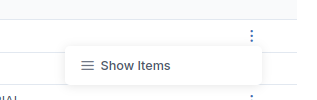
Clicking on the three dots icon opens the "Show Items" option. Clicking this option reveals the specific products and elements that have been received by the quality control department for inspection.
Once the QC department has thoroughly inspected the items and verified that they have successfully passed visual and quantitative inspections, they select the inspected elements in QC module and click the "Pass Items" button, and then click "Confirm".
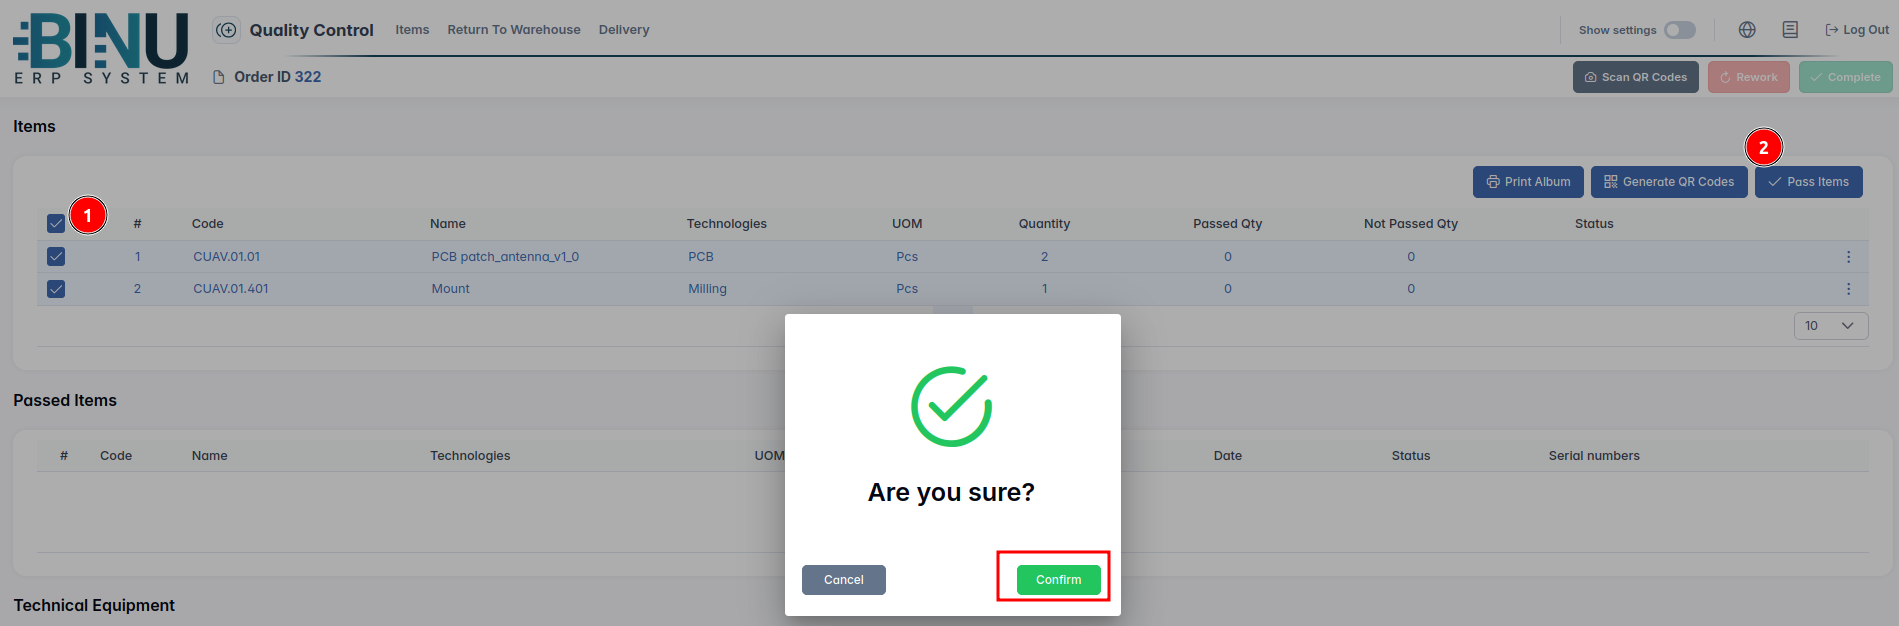
We will then see that the status of the successfully inspected elements turns green, showing the label "passed". To finalize this step, we simply need to click the "Complete" button located in the top-right corner.

The status will then transition to "completed" (indicating that quality control of QC department is concluded).

5a.WAREHOUSE QC (Warehouse Quality Control)
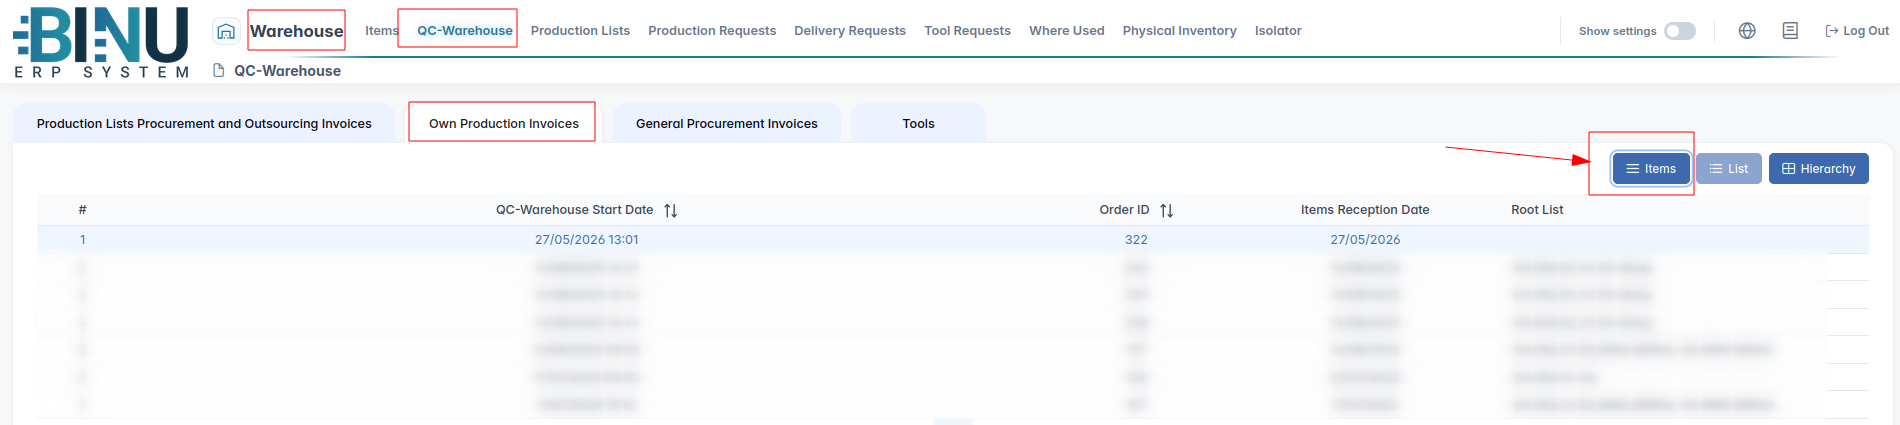
Next, we navigate to the "Warehouse" module, open the "QC-Warehouse" tab, and go to the "Own Production Invoices" sub-tab. There, we select our specific work order and click on the "Items" button.
We select all the elements and click the "Accept To Warehouse" button.

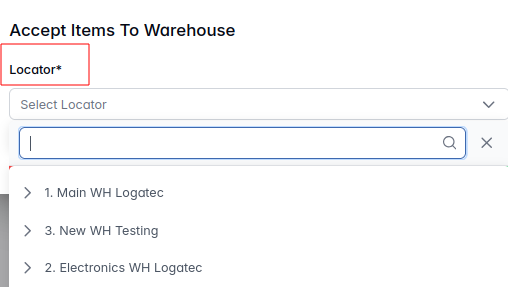
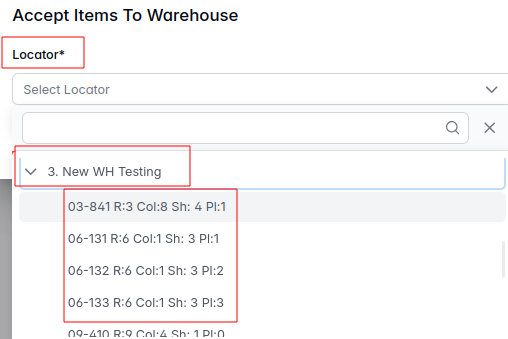
The system will then prompt us to specify exactly where within the warehouse (the specific warehouse, shelf, and locator) we wish to move the inspected elements.
Now that the products have been transferred from the quality control department into the warehouse quality control, we can see in the sales chain that they are prepared for delivery and marked as "on stock".

The product is available in the warehouse and ready to be prepared for dispatch.
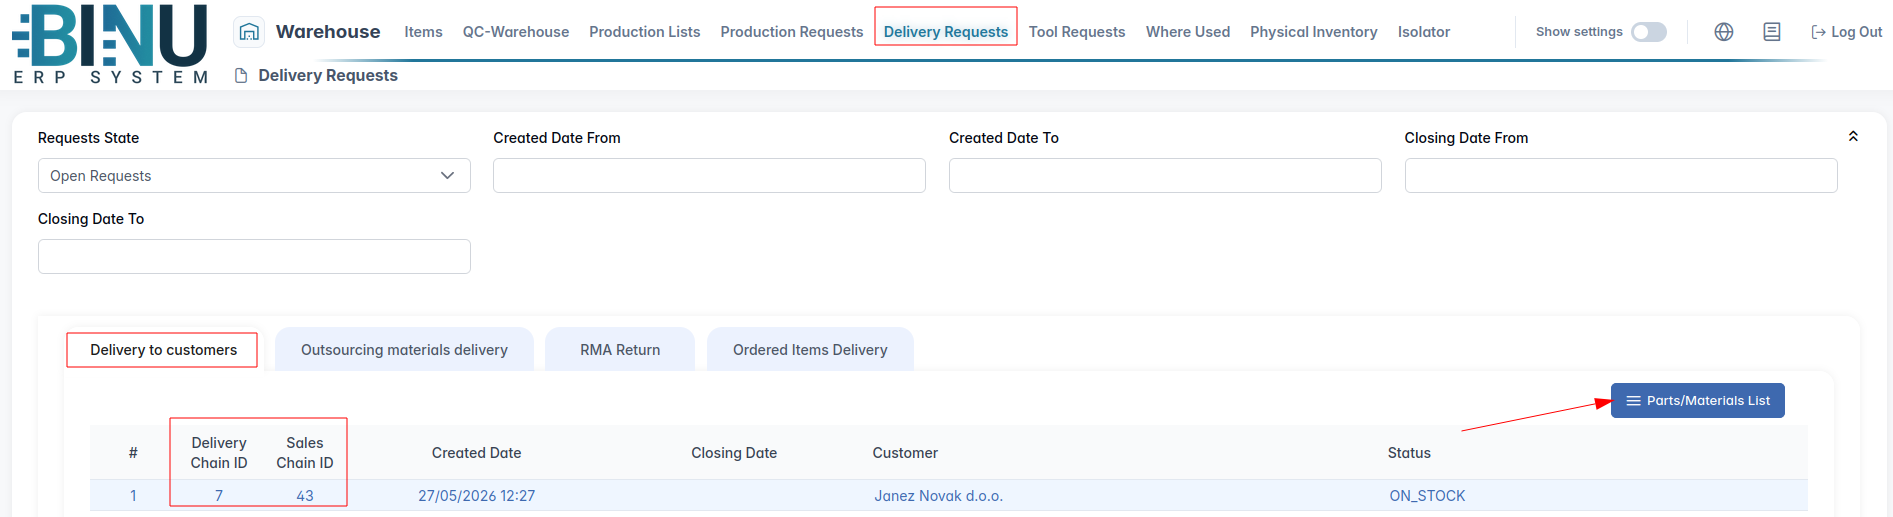
5b. WAREHOUSE → Delivery Request
We proceed to the "Warehouse" module and, under the "Delivery to Customers" tab, locate our specific delivery/sales chain. We highlight it and click the "Parts/Material List" button.
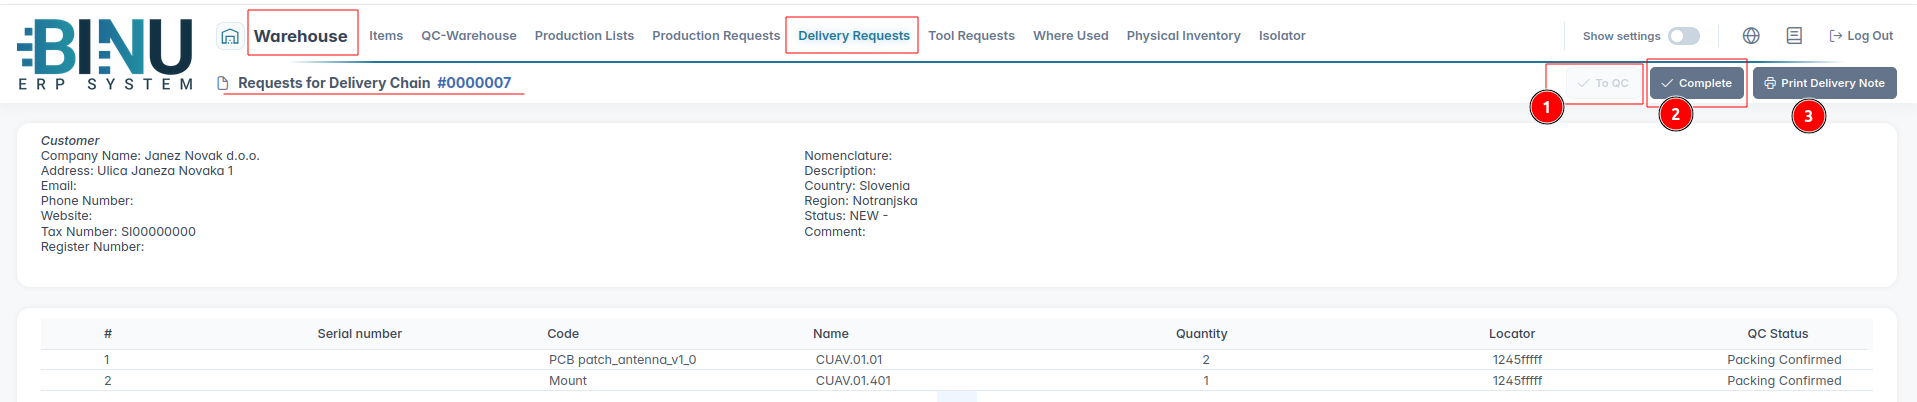
This opens the "Request for Delivery Chain" interface. Because the final product must undergo a quantity and packaging verification check before being dispatched to the customer, we first click "To QC".
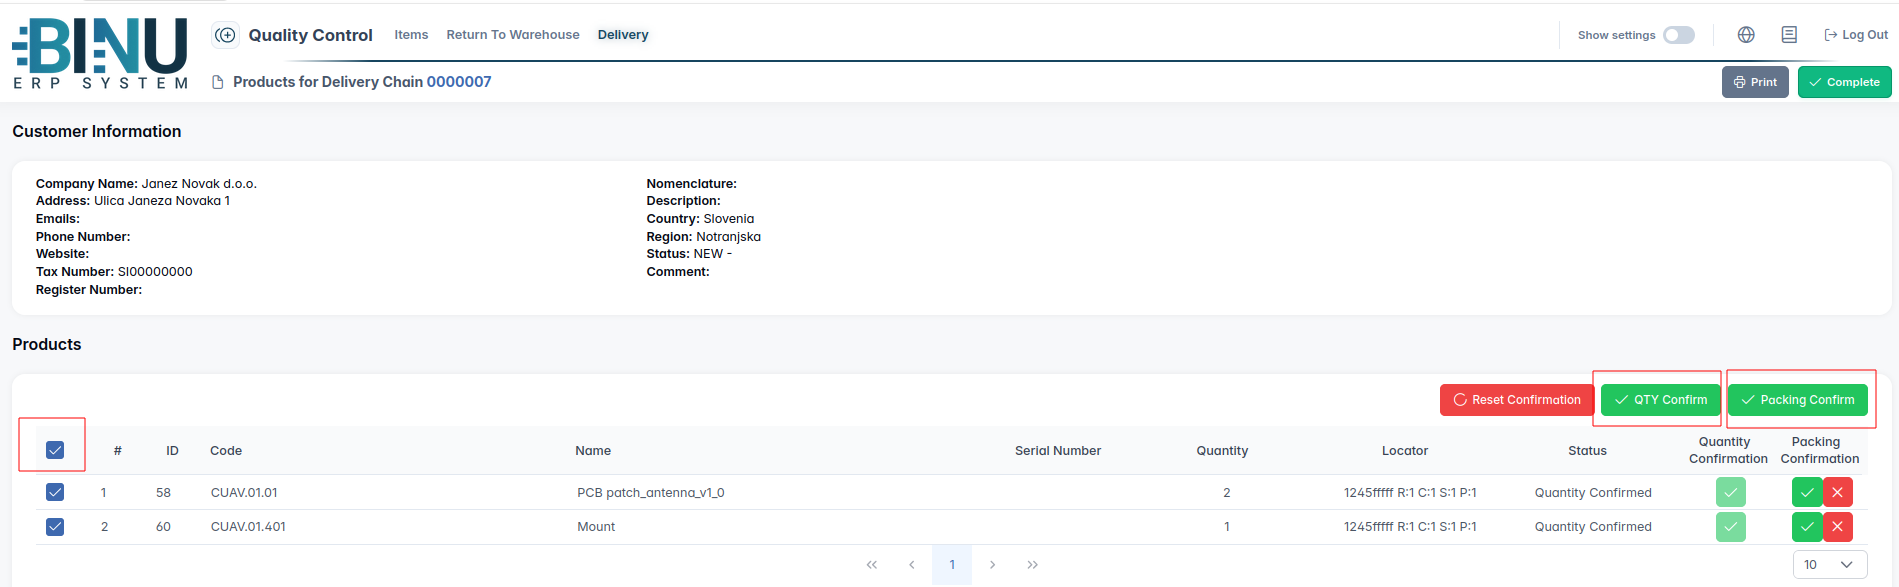
6. QC → DELIVERY (Quality Control Prior to Final Product Delivery)
In the QC module, under the "Delivery" tab, we inspect the final product to verify both its quantity and packaging. First, we verify the quantity of the final product; if it is correct, we click the "QTY Confirm" button. If there is a discrepancy, we click the red "X" icon. (Where does the item go?)
Next, we inspect the packaging; if it is satisfactory, we confirm it by clicking the "Packing Confirmed" button. If the packaging is inadequate, we click the red "X" icon, which sends the delivery back for remediation until it is ready for re-inspection.
Once our final product successfully meets all quantity and packaging requirements, we confirm both parameters (quantity, packaging) and complete the process by clicking the "Complete" button in the upper-right corner.
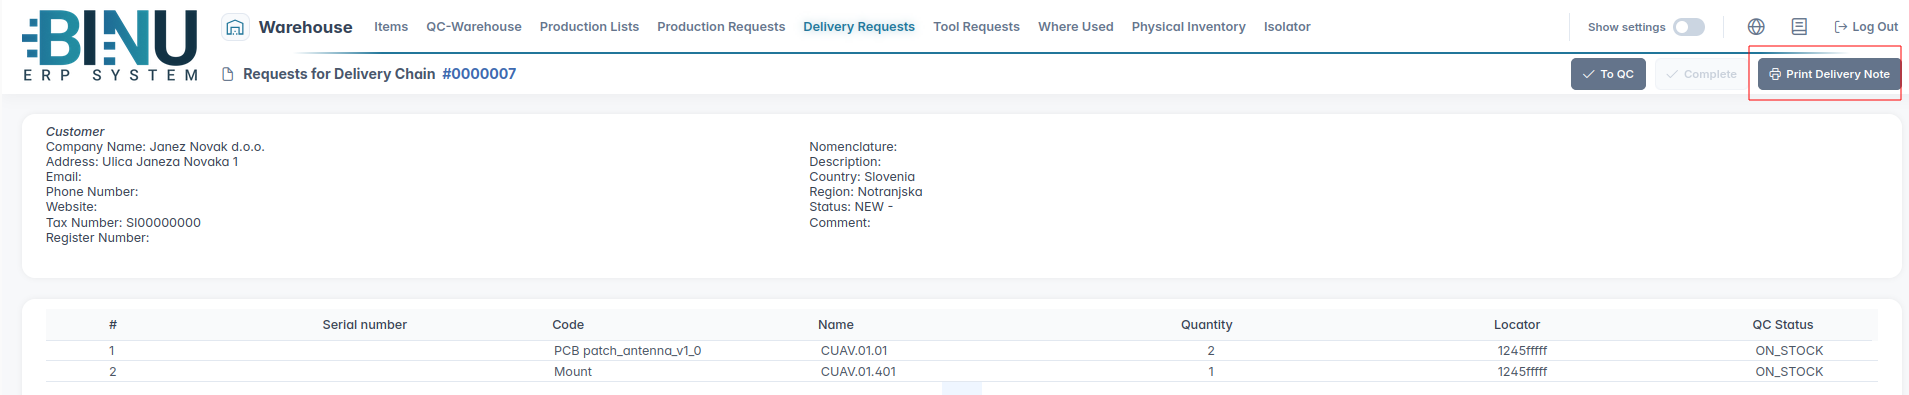
7. WAREHOUSE → Delivery Request
Once the final product is fully ready for physical dispatch we return to the "Warehouse" module under the "Delivery Request" tab, click "Complete" to conclude this final step and print the delivery note by clicking the "Print Delivery Note" button.
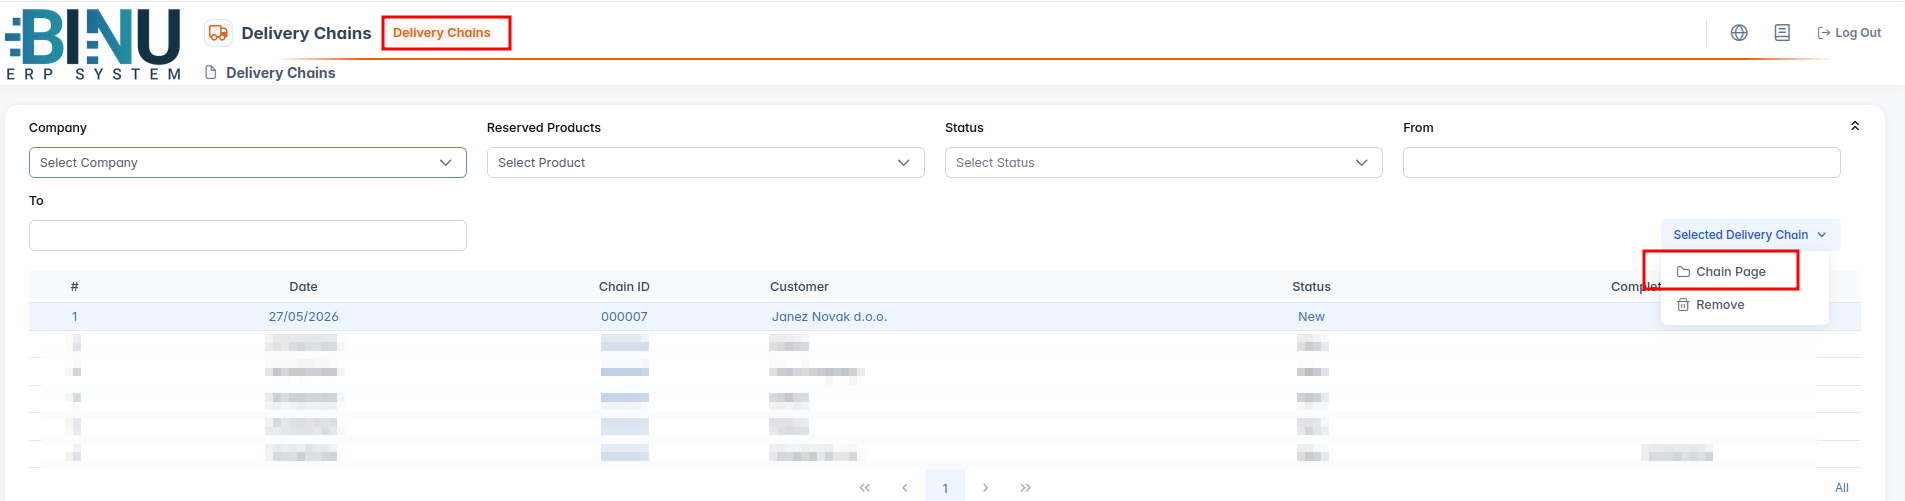
- DELIVERY CHAIN → Invoice
As noted earlier, when we confirm the sale using the "Create Sales" button, the system simultaneously and automatically generates the "Delivery Chain".
In the "Selected Delivery Chain" menu, we click on "Chain page".
The status of the final product will now be updated to "delivered".
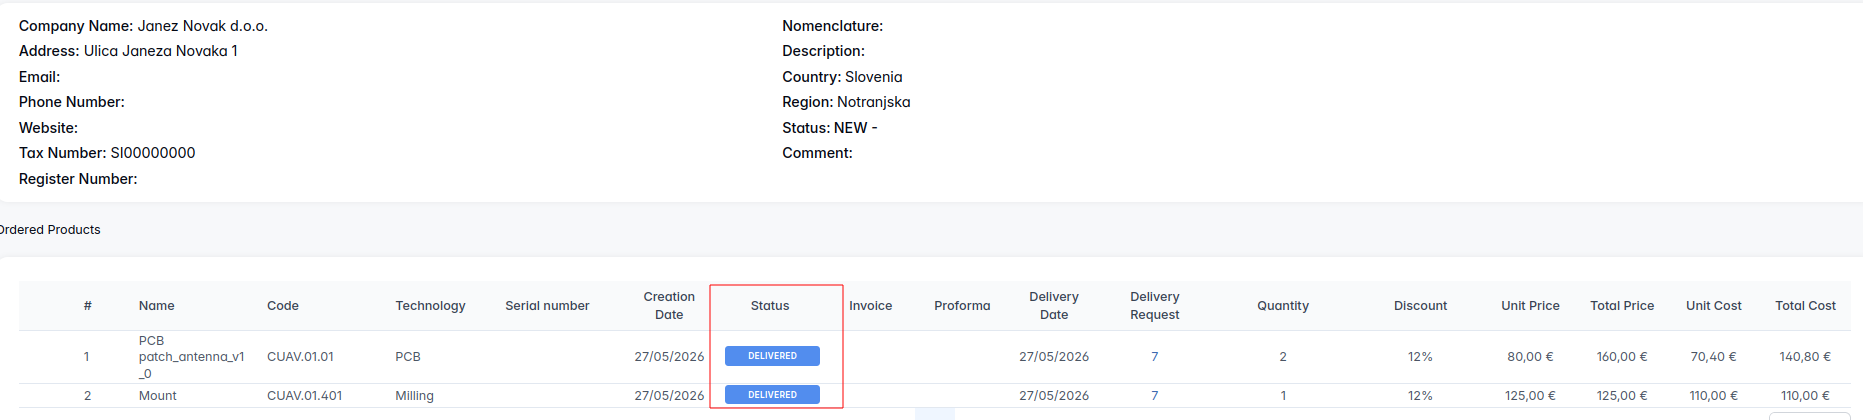
Once we receive the signed delivery note back from the customer, we proceed to issue the invoice.
In the "Delivery Chain" module, we locate the corresponding delivery chain, open it, and click the "Create Invoice" button.
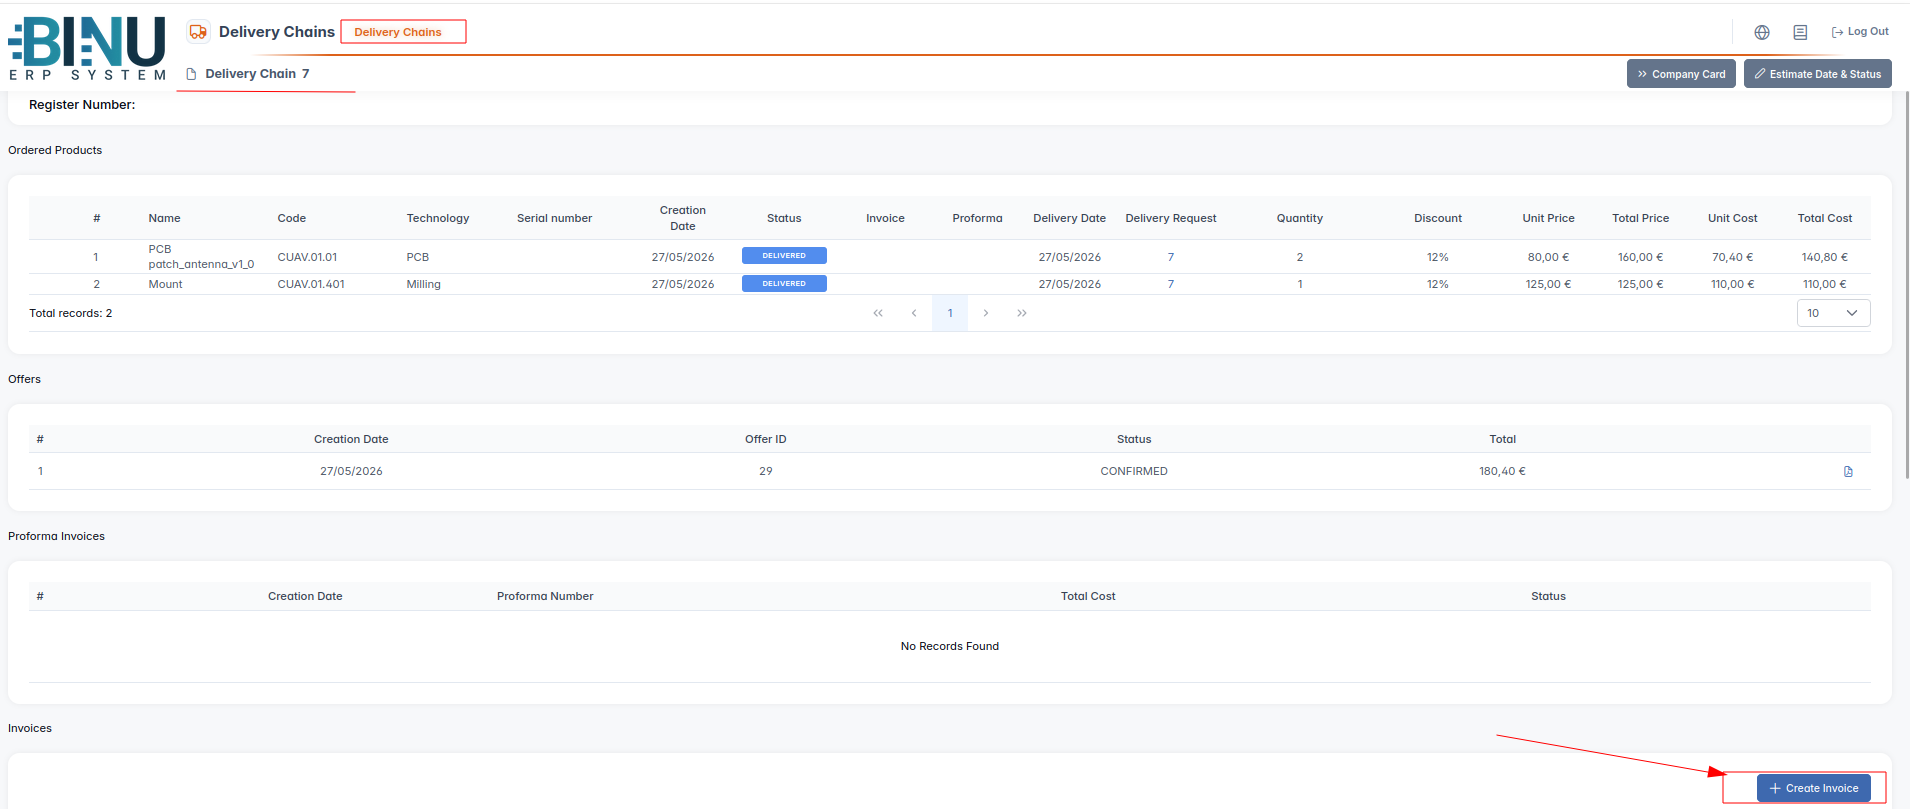
The system gives us the flexibility to issue either a partial invoice or a full invoice. In our example, we choose to issue a full invoice; we select all the elements that have been processed and delivered to the client and click the green "Create Invoice" button.

The invoice is successfully generated and it is assigned a unique invoice number and an initial status of "not completed".

To finalize the invoice, we click the three dots icon on the right side of the screen and select "Edit".

On the invoice edit screen, we fill in the payment due date (value date), the date the invoice was received by the client, the date of the signed delivery note, and any additional notes as required. We then click the blue "Save" button.
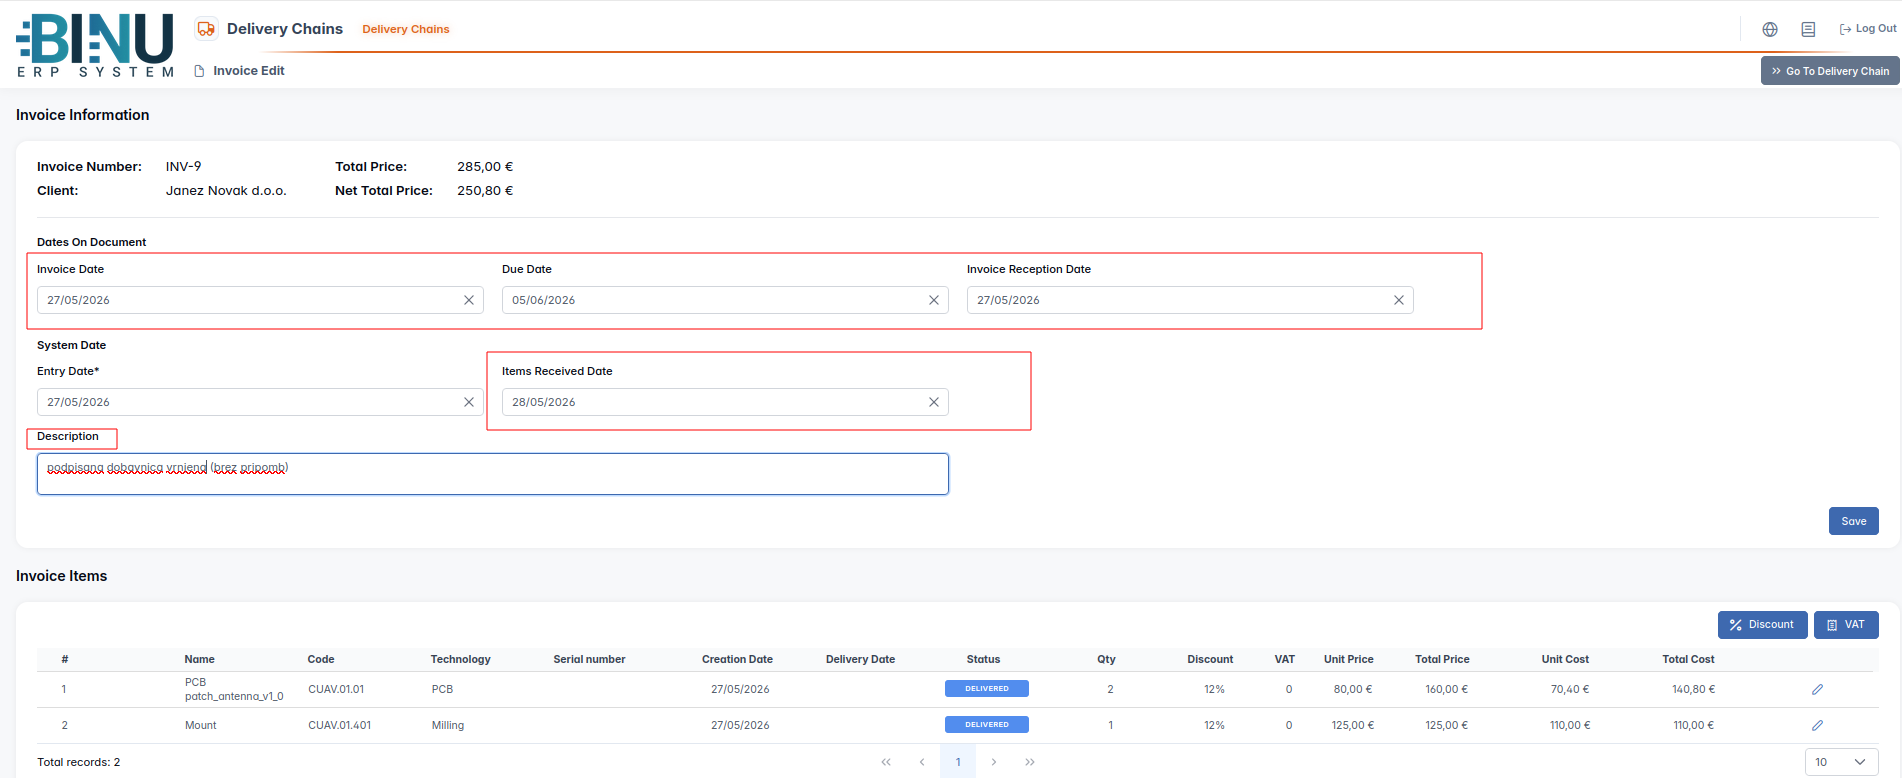
Next, we define the applicable tax rate. We click the blue "VAT" button, which opens a window where we enter the tax rate---for example, 22%---and save this information by clicking the green "Save" button.
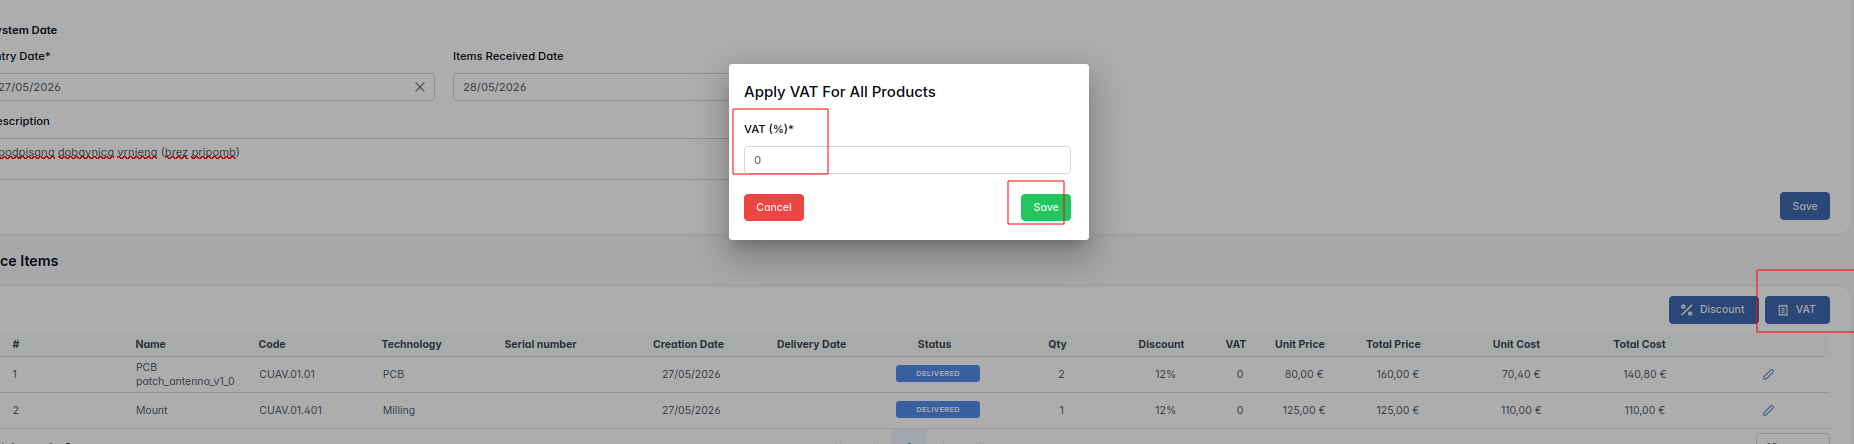
We can see that the final total is automatically recalculated and now includes the calculated VAT amount:

We can then download the finalized invoice as a PDF file.

The system also allows us to include additional expenses in the invoice under the "Invoice Services" section, and we can attach supporting documents, photos, or other evidence under the "Files" section.

The end.