Business Trips Module
The Business Trips module in BINU ERP provides a centralized hub for managing and documenting employee travel, ensuring that all business-related trips are well-organized, properly recorded, and easy to track. It is fully integrated with the Events Calendar, supporting better coordination, scheduling, and overall travel planning. It reduces administrative workload and ensures better control over business travel expenses.
Within the Business Trips module, users can enter key travel details, including the trip's start and end dates, departure and arrival locations, intermediate stops, travel purpose, vehicle used, and trip initiator. Users can also add hotel information and upload supporting documents, such as receipts, invoices, or other evidence of travel-related expenses, for reimbursement purposes.
The module also supports the verification of business trips, helping ensure that submitted travel information and expense documentation are accurate, complete, and compliant with company policies. During the verification process, responsible users can review the trip details, check uploaded evidence, validate the declared costs, and confirm whether the trip has been properly documented. This creates a more transparent approval process and helps maintain a reliable audit trail for finance, controlling, and internal reporting.
Accessing the Module
Accessing the Module
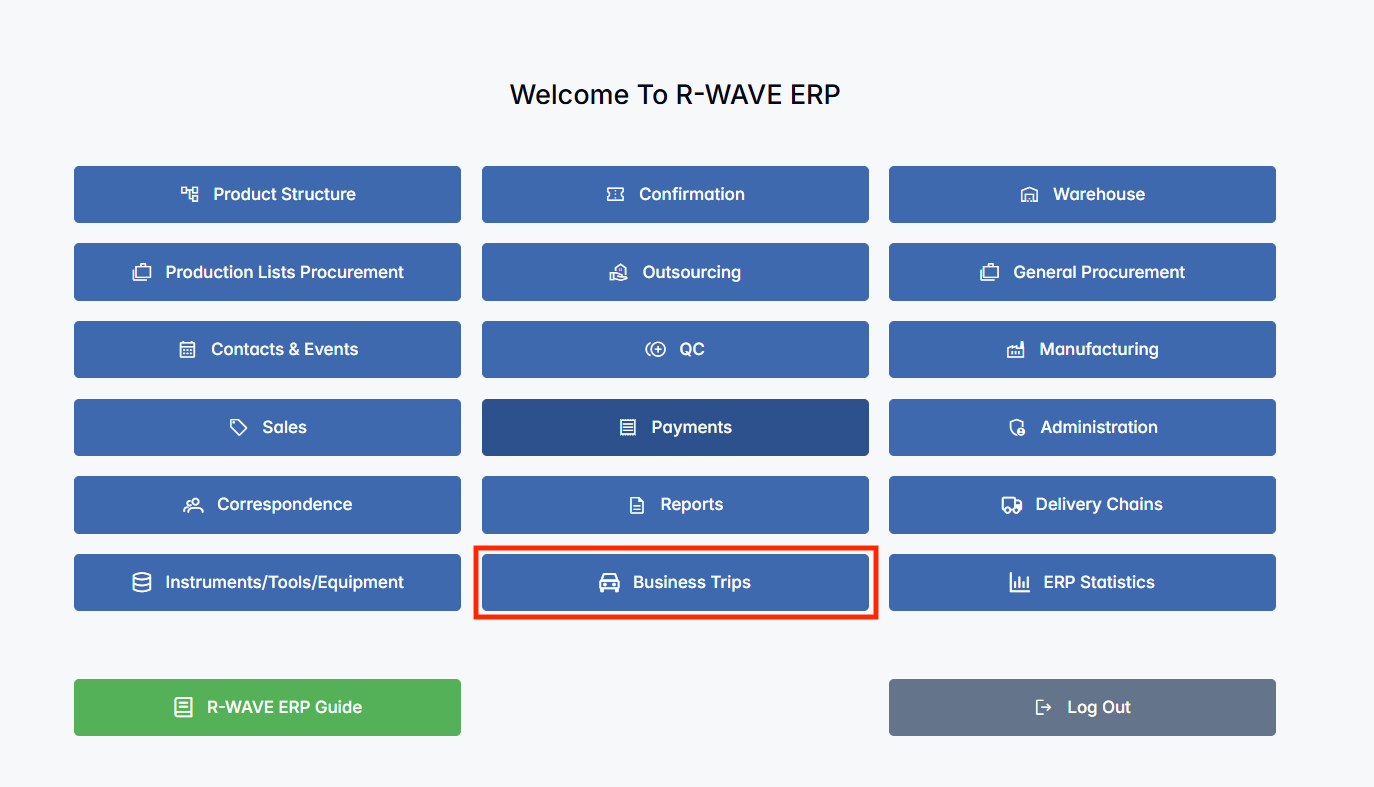
You can access the Business Trips module directly from the main menu of the ERP system. Once opened, you will be directed to the module dashboard where all registered business trips are displayed.

The BINU ERP Guide and AI Assistant Tools
The BINU ERP Guide and AI Assistant Tools
The BINU ERP system provides tools to support users in navigating and understanding the processes and functionalities of the system. These tools — the BINU ERP Guide and the BINU AI Assistant — include a built-in contextual help. They are non-intrusive and can be closed or reopened as needed, allowing users to remain focused on their current workflow without interruption.
When you click the BINU ERP Guide icon in the upper-right corner of the screen, the pop-up guide window opens. This feature is available across different modules and is designed to help users understand where they are in the system and how to use the current section effectively.

When you click the BINU AI feature on the side of the screen, the chat window opens, where users can choose their language of conversation. The supported languages are: English, Bulgarian, Croatian, French, German, Hungarian, Italian, Romanian, Russian, Serbian, Slovenian, Spanish, Turkish, and Ukrainian.
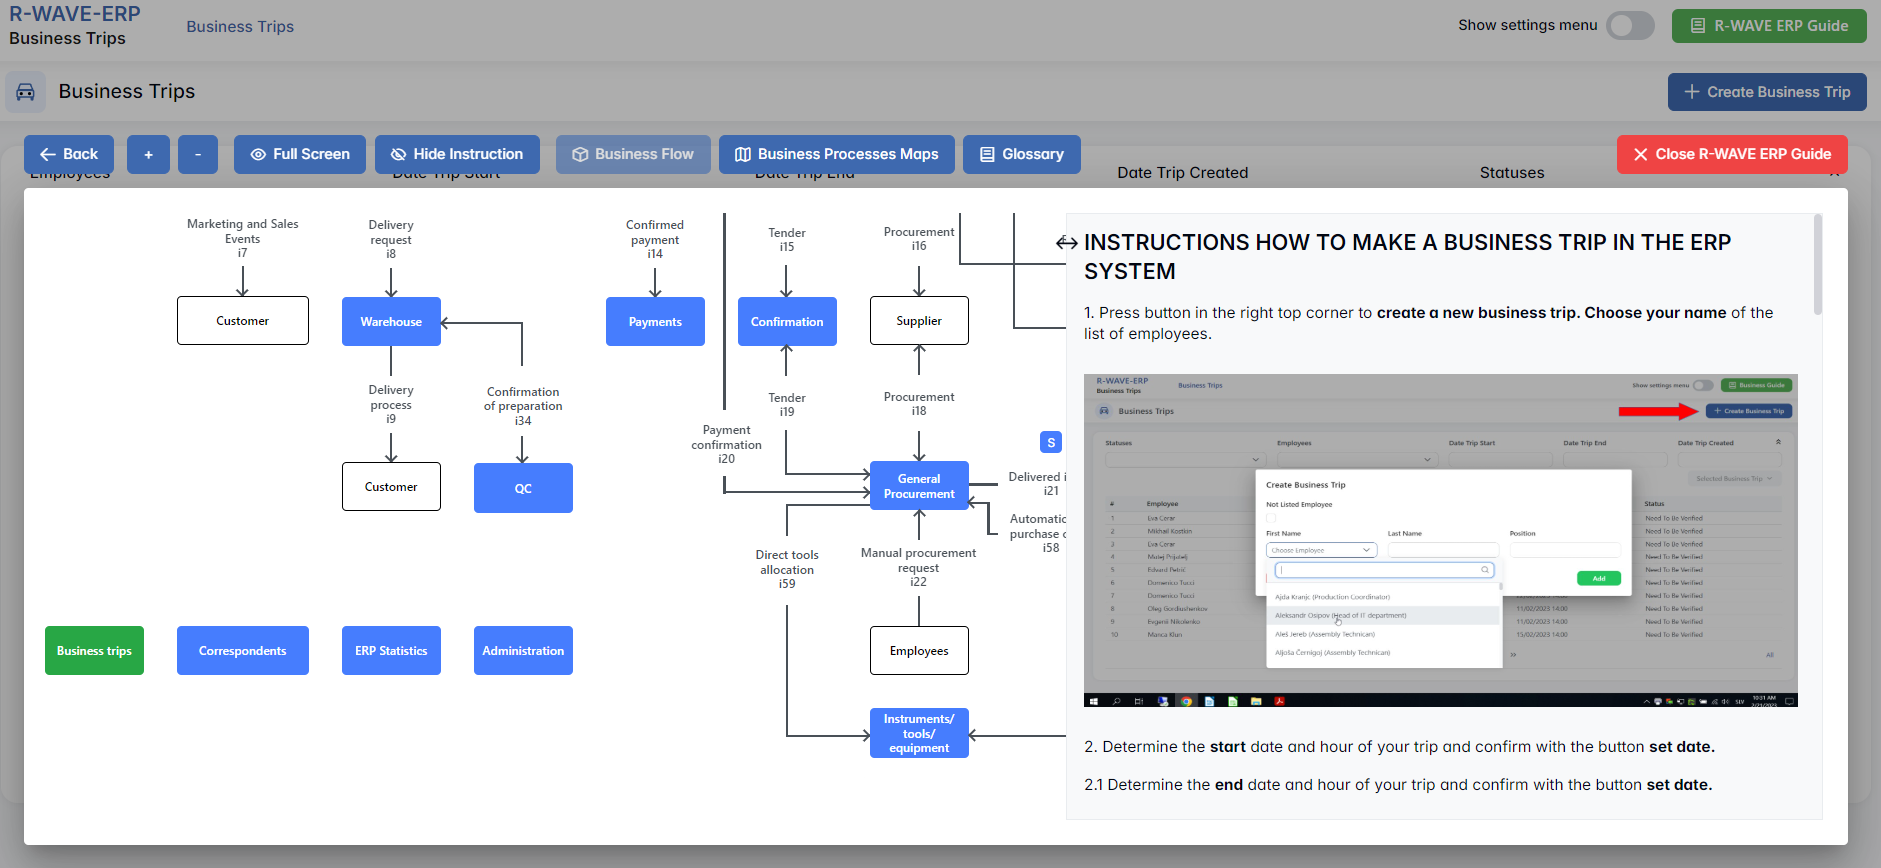
The BINU AI Assistant provides explanations and documentation for all topics related to the BINU ERP system. Users can ask about specific terms, business processes, system functionalities, or request documentation on a particular topic. To begin, type your question in the input field at the bottom of the chat window.
The BINU ERP Guide: Quick Overview
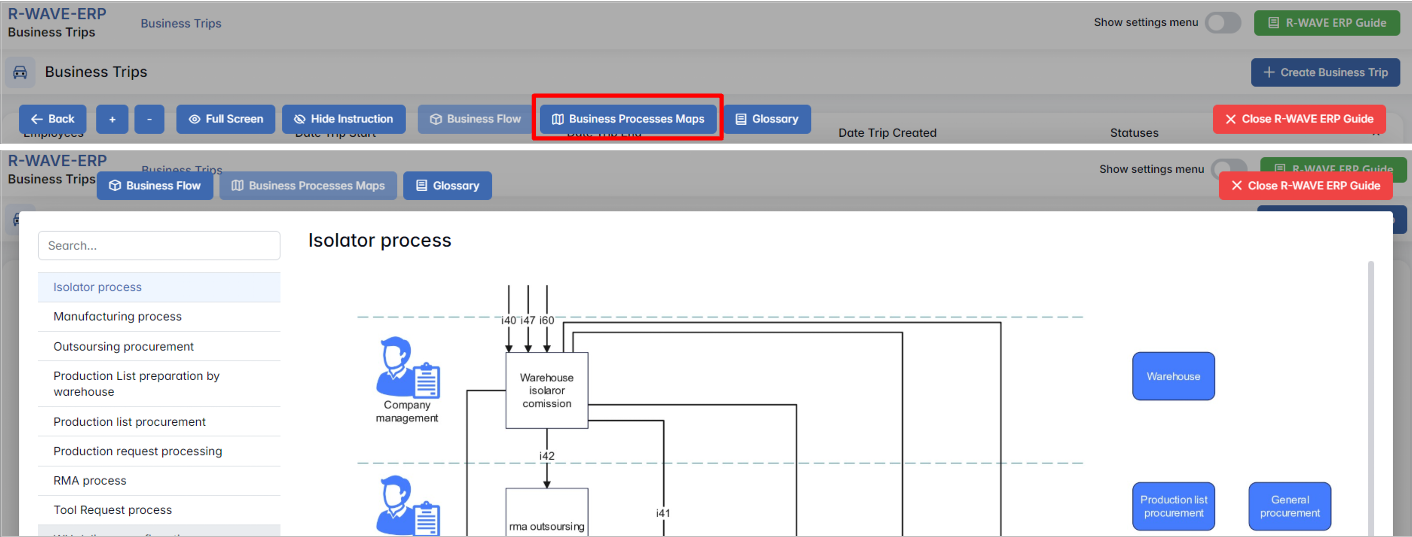
When you click the BINU ERP Guide book icon, you land on the Business Flow map. It has two main sections: the left panel displaying the business flow map and the right panel showing the functional overview.
- Left panel — Business Flow Map — displays a visual diagram of the business processes. It shows how each module is interconnected; for example, you can see how Sales, Manufacturing, Procurement, CRM, QC, and Warehouse are interconnected.
- Right panel — Functional Overview — provides a concise, bullet-style instruction list describing the key operations available in the current module/tab.
Top Bar Options
At the top of the ERP Guide window, you'll find optional tools for deeper understanding: Business Processes Maps, Accounting Flow, and Glossary. The Accounting Flow is meant for financial departments.
Business Processes Maps
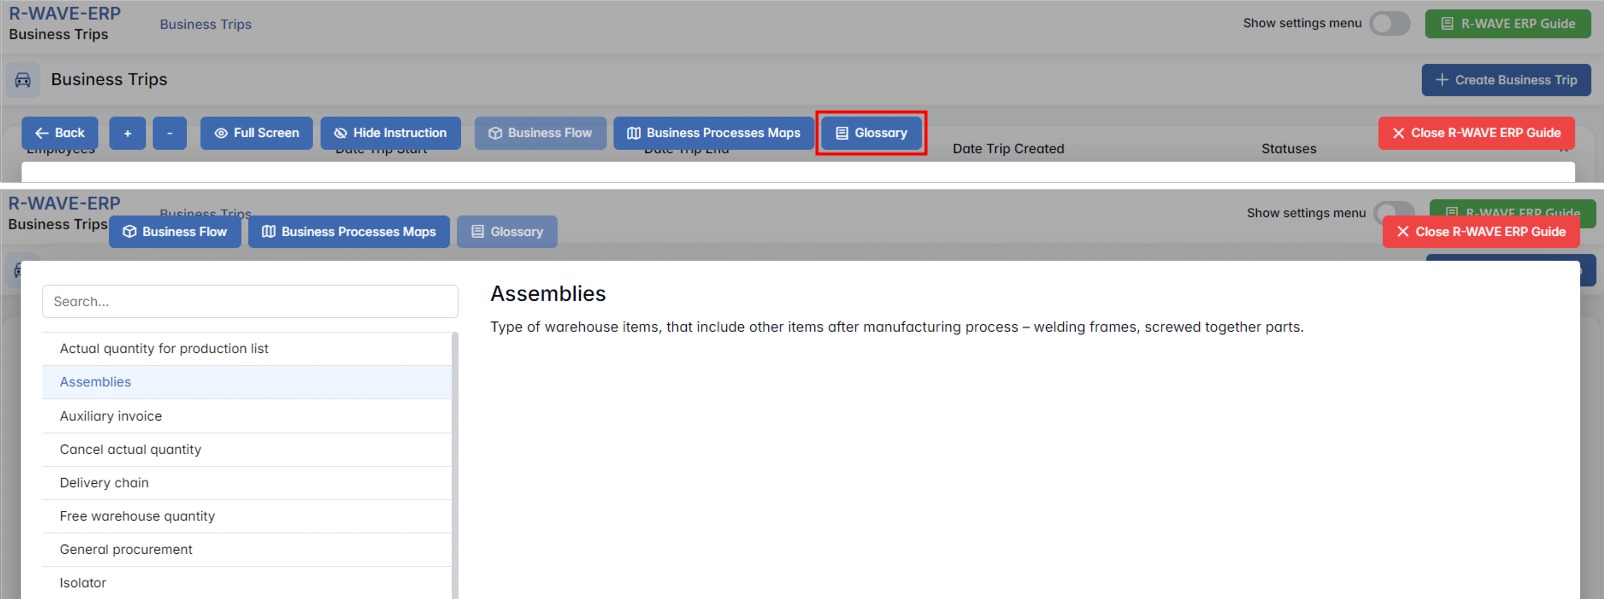
Business Processes Maps provides a visual representation of the company's operational structure and business flow. It helps the user understand how the current module fits into the larger operational structure and makes it easy to grasp the upstream and downstream dependencies within the business processes. The Business Processes Maps can be accessed from various modules.
Accounting Flow: Data Flow Graph and Responsibility Matrix
Accounting Flow is a tool designed for the finance department; it shows where the data originates and defines responsibilities. For this purpose, it consists of two parts: a Data Flow Graph and a Responsibility Matrix.
The Data Flow Graph displays the movement of items from departments to the warehouse and from the warehouse to the departments. Based on these movements, the system tracks the flow of goods entering and leaving the company. The Dashboard section, planned for a future release, will allow users to view real-time data (in, out, balance, product costs).
If you hover over a diagram block, the system highlights the corresponding movement chain.

If you click a block in the diagram, you fix the highlighted chain. To narrow the selection further, click a block in the second, third, or fourth column.
The Responsibility Matrix identifies the department accountable for the selected process.

The BINU AI Assistant: Quick Overview
The BINU AI Assistant is specifically designed to help the user with ERP documentation questions. It provides information and assistance related to the BINU ERP system. The BINU AI Assistant understands fifteen (15) languages. It is available on every page as a non-intrusive help tool.
Glossary
Glossary provides definitions and descriptions of key terms and functionalities used throughout the system. The Glossary can be accessed via the BINU ERP Guide, which is available on any page of the system.
The Purpose of the BINU ERP Guide and BINU AI Assistant Tools
The BINU ERP Guide and BINU AI Assistant help users by:
- Showing where they are within the system (module context and current section).
- Providing a visual schema of the business flow, helping them understand how the current module fits into the larger operational structure.
- Offering a quick-reference instruction panel with the main actions and functions available in the current tab (e.g., creating companies, filtering, scheduling events).
- Offering quick access to the relevant documentation (AI-powered ERP documentation helper).
The ERP Guide window can usually be opened via a dedicated icon or help button (often located in the upper-right corner of the screen). It is non-intrusive and can be closed or reopened as needed, allowing users to stay focused without losing their place.


Business Trips Module Overview
Business Trips Module Overview
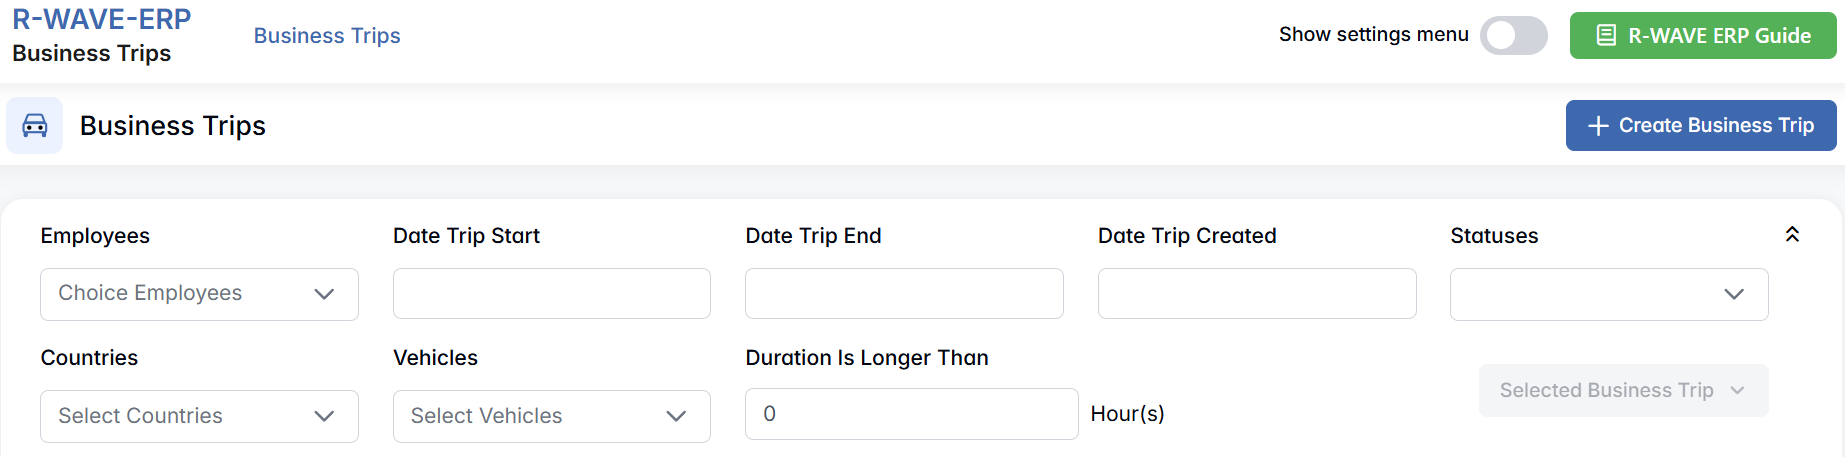
When the user opens the Business Trips module, the first element they see is the filter panel at the top of the page. This panel enables them to search and refine the list of trips based on various criteria, making it particularly useful for quickly locating specific trips, analyzing travel patterns, or preparing reports.
Available Filters
To apply filters:
- Fill in or select the necessary fields.
- The list of trips below will update automatically to reflect the filtered results.
| Filter Field | Description |
|---|---|
| Employees | Multi-select field. Allows you to filter trips by one or more employees. |
| Date Trip Start | Choose a start date range to display only trips that begin within the selected period. |
| Date Trip End | Filter trips based on their ending date. Useful for finding ongoing or recently ended trips. |
| Date Trip Created | Filter trips by the date they were registered in the system. |
| Statuses | Filter by trip status. |
| Countries | Multi-select field. Filter trips based on destination countries. |
| Vehicles | Multi-select field. Allows filtering by vehicles assigned to the trip. |
| Duration Is Longer Than | Enter a number (in hours) to find trips exceeding a certain duration. |
Business Trip List Result
Business Trip List Result
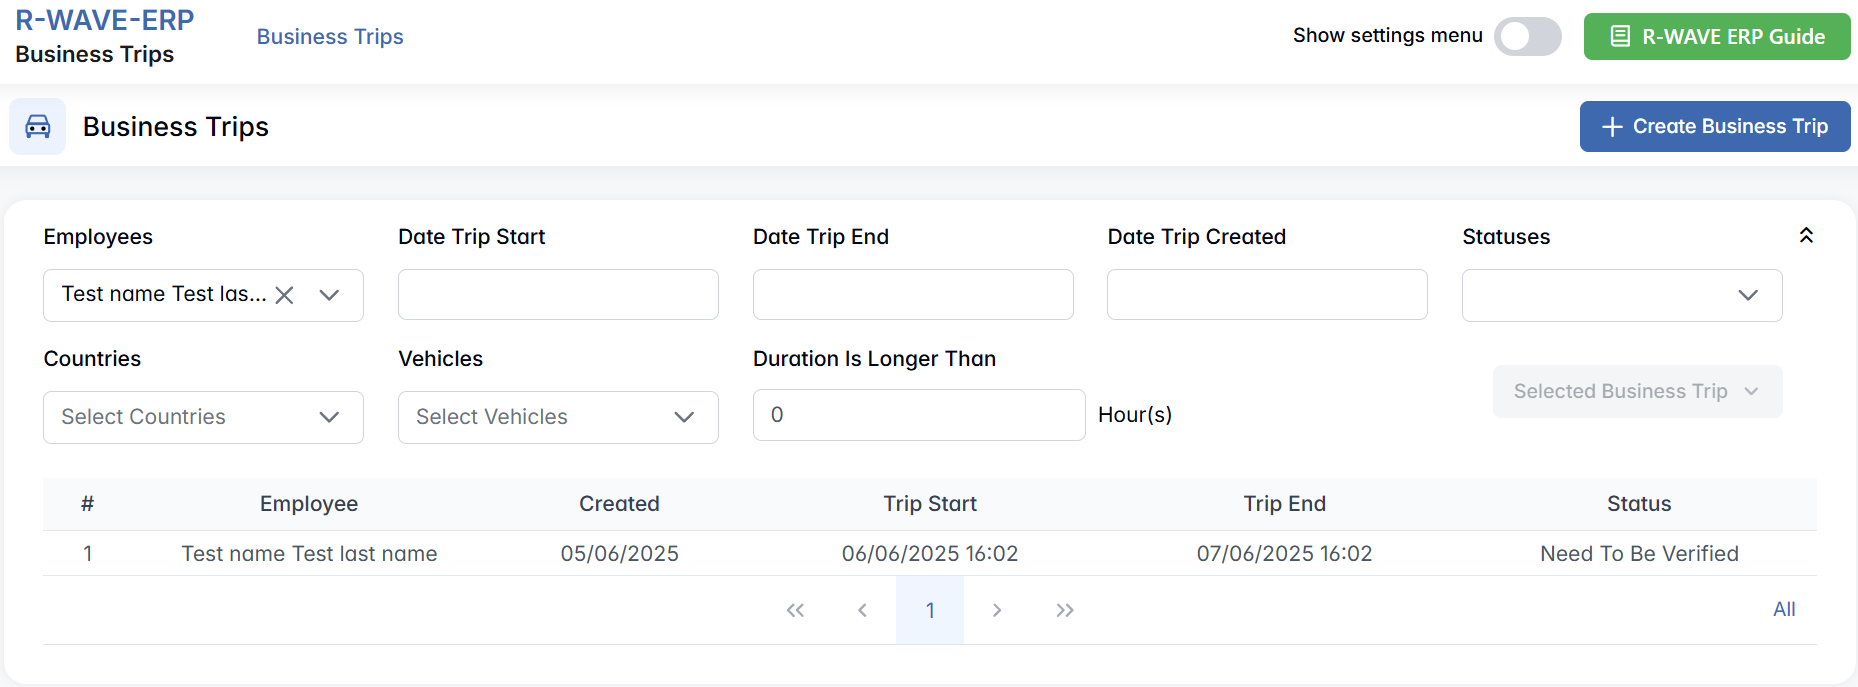
Below the filter panel is a table listing all business trips that match the selected criteria (or all trips if no filter is applied). Each row represents a single trip.
For every trip, the following information is displayed:
- A number indicating its order in the current list.
- The name of the employee going on the trip.
- The date when the trip was created in the system.
- The scheduled start and end dates of the trip (if already defined).
- The status of the trip.
This layout gives you a quick overview of all current and past business trips in the system.
Understanding Trip Statuses
Each business trip has a status field, which helps track its current state. At the moment, the logic behind statuses is not fully automated, so here's how they work in practice:
- In Progress – shown if the trip has no start or end dates entered yet. It means the trip is in the system but not fully scheduled.
- Need to Be Verified – currently, almost all trips appear under this status, even if the trip has already ended and didn't involve any expenses. It indicates that the trip hasn't gone through a formal review or approval process.
- Verified – appears only for trips that included expenses and were reviewed and confirmed, likely by the accounting department or another authorized user. It means the trip has been finalized and approved.
Since the automatic logic behind these statuses is still being developed, users are encouraged to double-check trip records manually and coordinate with the responsible team when necessary.
Creating a New Business Trip
Creating a New Business Trip
To add a new business trip in BINU ERP, follow the steps below. This process allows you to register all the necessary information about an employee's travel — including dates, destinations, purpose, and logistics — so the trip can be tracked and managed properly.
- Open the Business Trips module. From the main menu of the ERP system, click on Business Trips to enter the module. At the top-right corner of the screen, you'll see the button + Create Business Trip — click this to start the creation process.

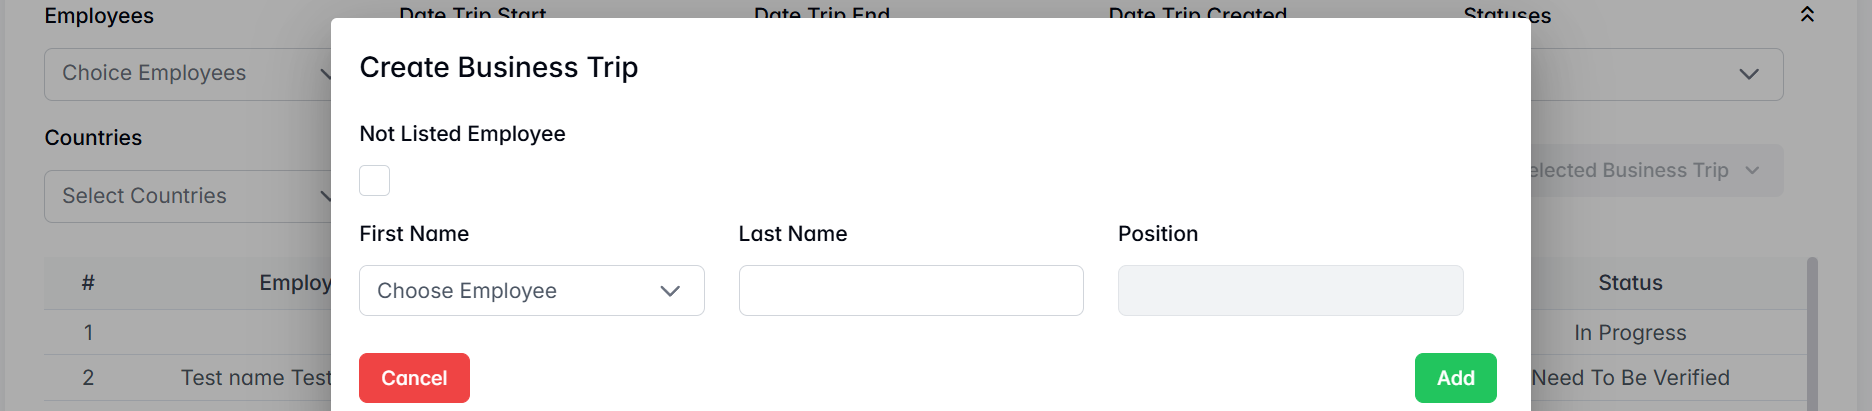
- Fill in trip details. A pop-up window titled Create Business Trip will appear. This form allows you to enter information about the person taking the trip:
- Not Listed Employee (checkbox) – enable this if the employee is not already in the system. When checked, the fields become fully editable so you can manually enter the employee's details.
- First Name – if the employee exists in the system, use the dropdown list to select their name. If you're adding a new employee (with the checkbox above), just type the first name.
- Last Name – enter the last name of the employee.
- Position – optionally enter or select the employee's job title or role. This helps track who is traveling and why, but is not mandatory.
None of the fields are required — you can create a trip even with partial data. However, for better tracking and reporting, it's recommended to fill in as much detail as possible.
- Save the trip. After entering the information, click Add to save the business trip. The trip will now appear in the main list and can be edited, filtered, or reviewed at any time.
Editing an Existing Business Trip
Editing an Existing Business Trip
Once a business trip has been created, you can update or expand the trip's information at any time. This is especially useful when more details become available — such as travel dates, meeting locations, or supporting documents.
1. Accessing the Edit Option
To edit a business trip:
- Open the Business Trips module from the ERP main menu.
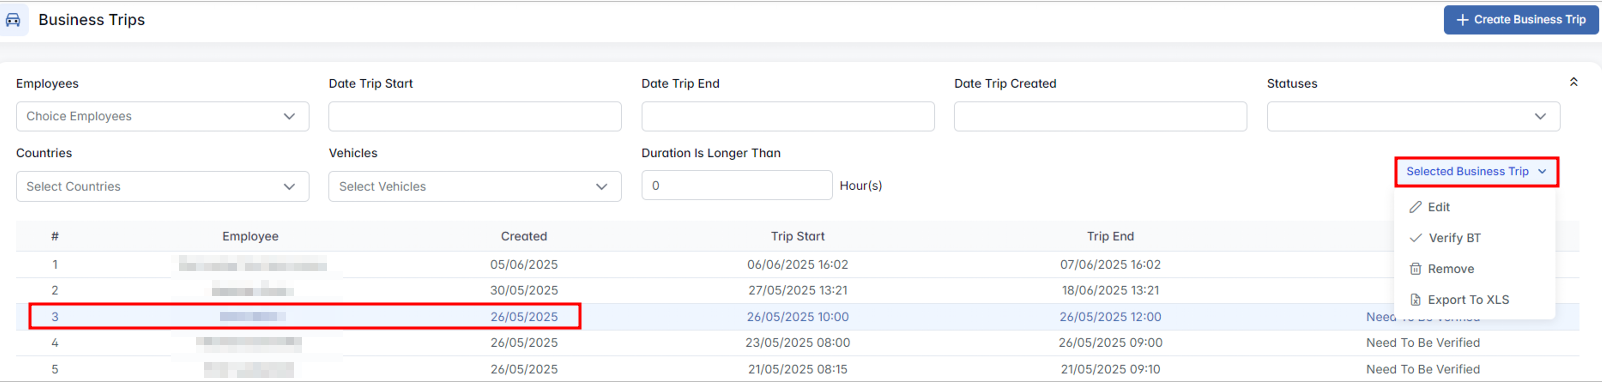
- In the trip list, click on the row of the business trip you wish to edit. This activates the Selected Business Trip button in the top-right.
- Click Selected Business Trip, then choose Edit from the dropdown.
Additional options include Remove (to delete the trip) and Export to XLS (to download the trip details in Excel format).
2. Editing the Business Trip
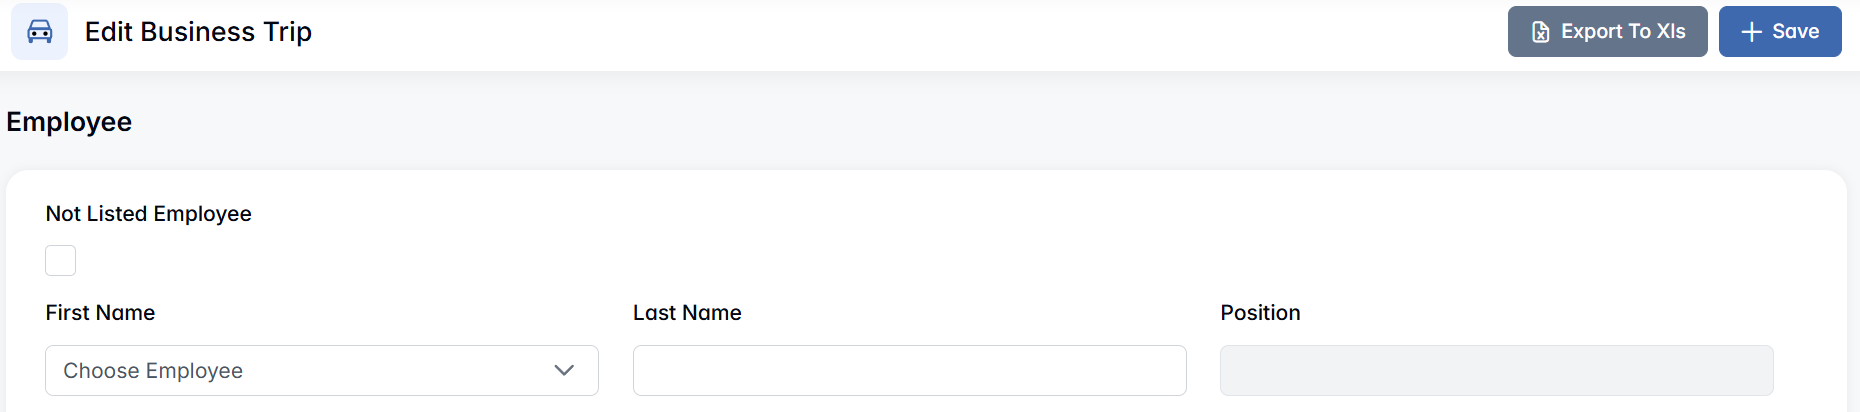
After selecting Edit, the Edit Business Trip page opens. This page includes all available fields to update or complete the trip's information.
Employee Details

- Not Listed Employee (checkbox) – check this box if the employee is not in the internal employee list — this allows free-text input.
- First Name / Last Name / Position – fill in or update the employee's full name and role. Position is optional.
Travel Dates

- Trip Start / End Dates – use the calendar and time picker to define the start and end of the trip. After selecting dates, always click Set Date to confirm your selection.
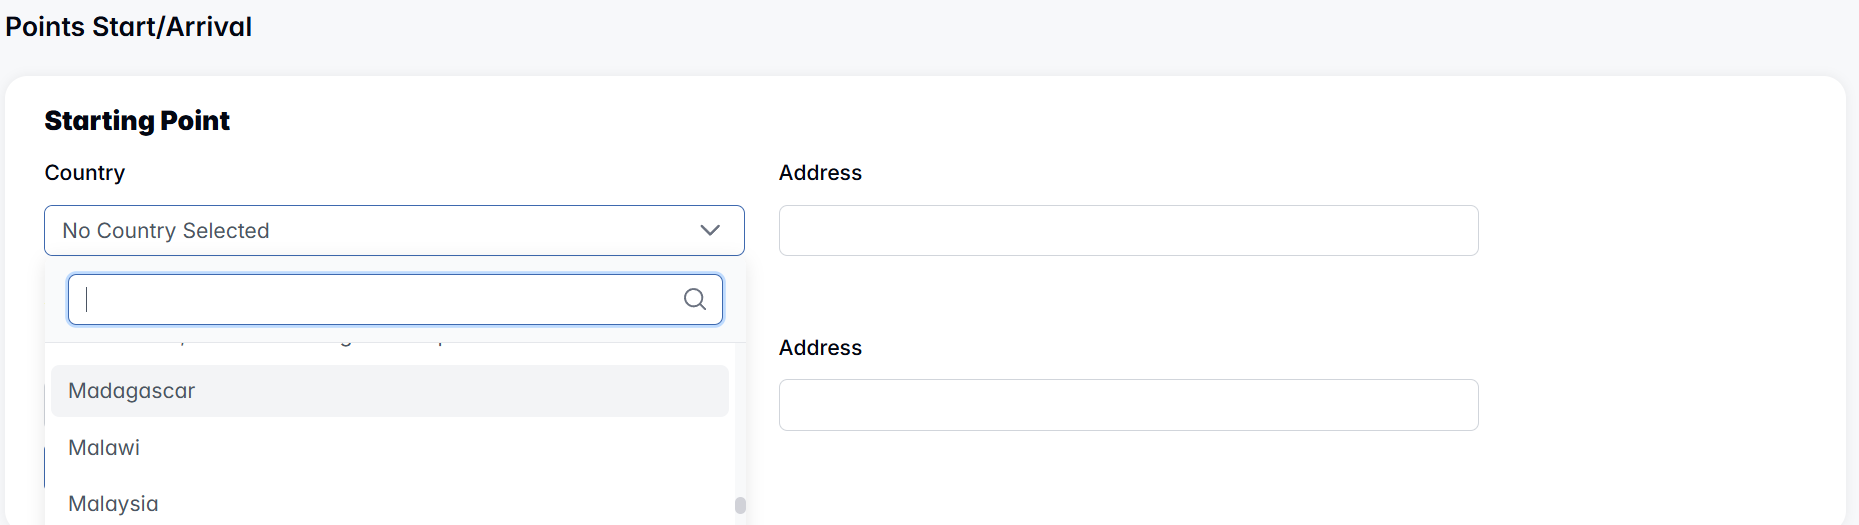
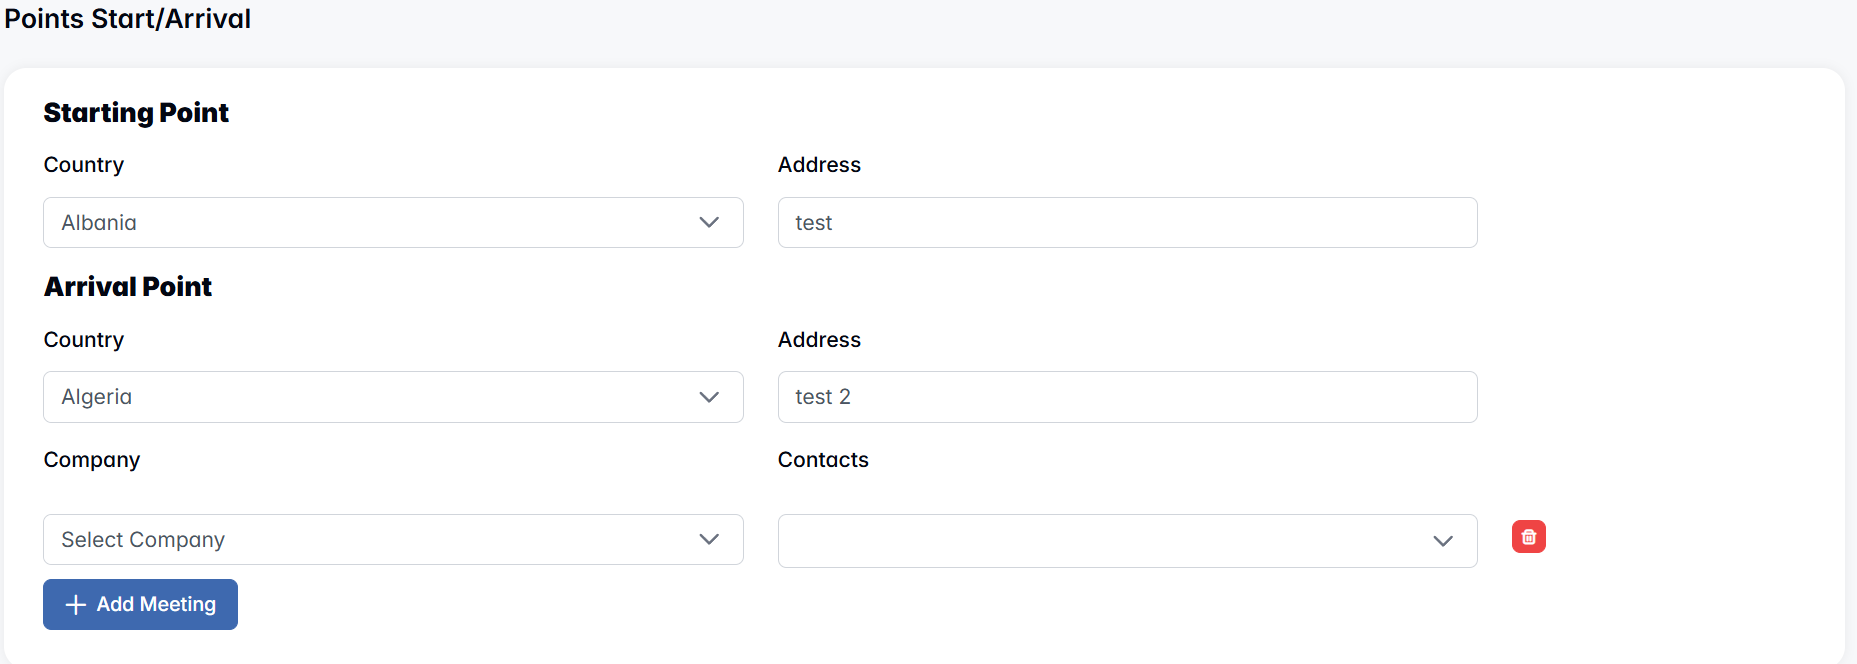
Travel Points
- Starting Point – select the country and enter the address where the trip begins.
- Arrival Point – similar to the starting point; define the destination country and address.
You can also click + Add Meeting if there's a planned meeting with a company at the arrival point.
Intermediate Points
If the trip includes stops along the way (e.g., a visit to another office), click + Add Intermediate Point to enter each additional location. Click + Add Meeting if there's a planned meeting with a company at the intermediate point.

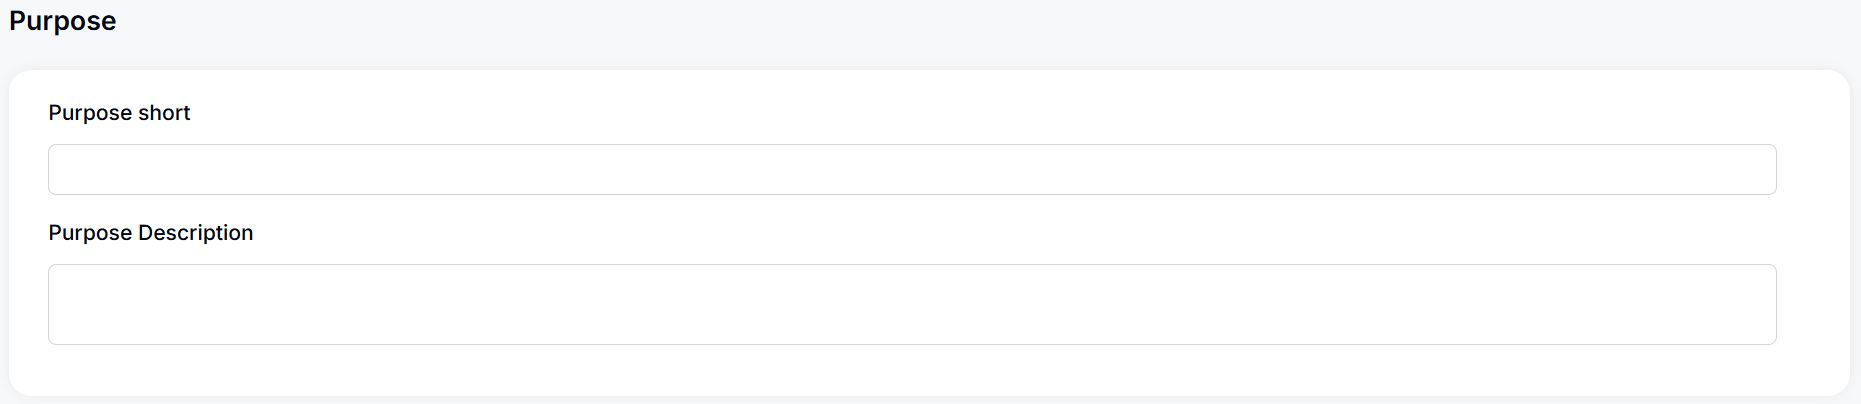
Purpose
- Purpose Short – a brief summary (e.g., "Client Presentation").
- Purpose Description – a longer explanation if needed.
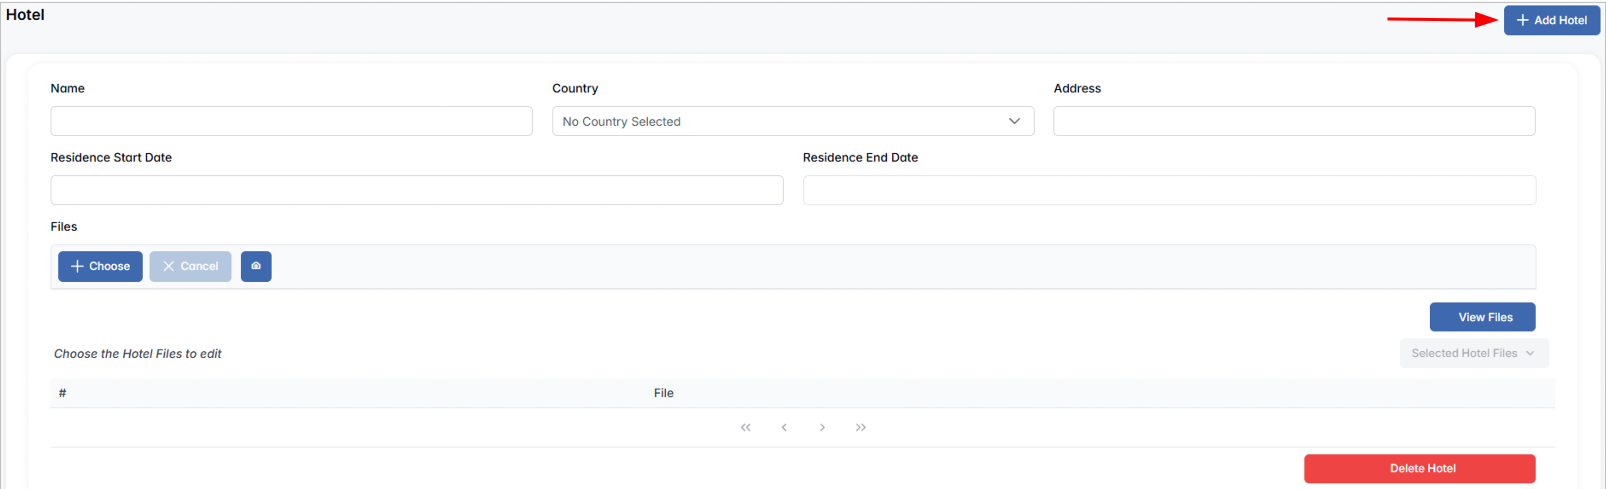
Hotel
Click + Add Hotel to include lodging details:
- Hotel Name
- Country
- Address
- Residence Start and End Date

You can also upload hotel-related files, such as bookings or invoices, and manage them using the table interface: View file, Selected Hotel files, and Delete Hotel.
Vehicle
- Vehicle Type – choose from: Without Car, Private Car, Rent, Company Car.
If any vehicle option is selected (except "Without"), additional fields appear:
- Vehicle – type or name of vehicle
- Vehicle Registration Plate
- Start Mileage / End Mileage – enter distance values
- File Uploads – upload supporting files (e.g., mileage photo, rental confirmation)
Initiator
Select the initiator of the trip (the person who proposed it) from the employee list.
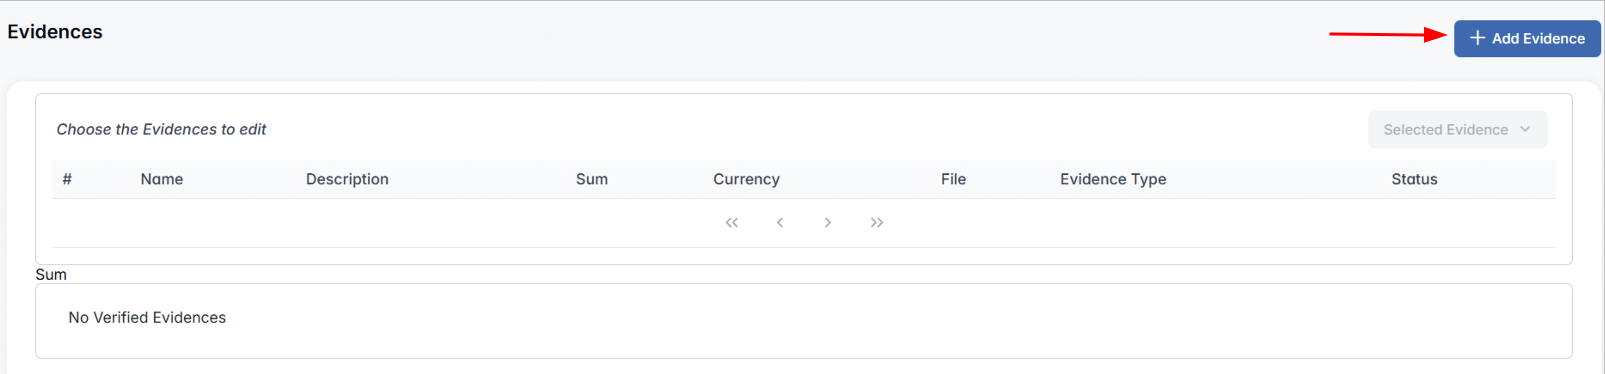
Evidences
To attach receipts or proofs related to expenses:
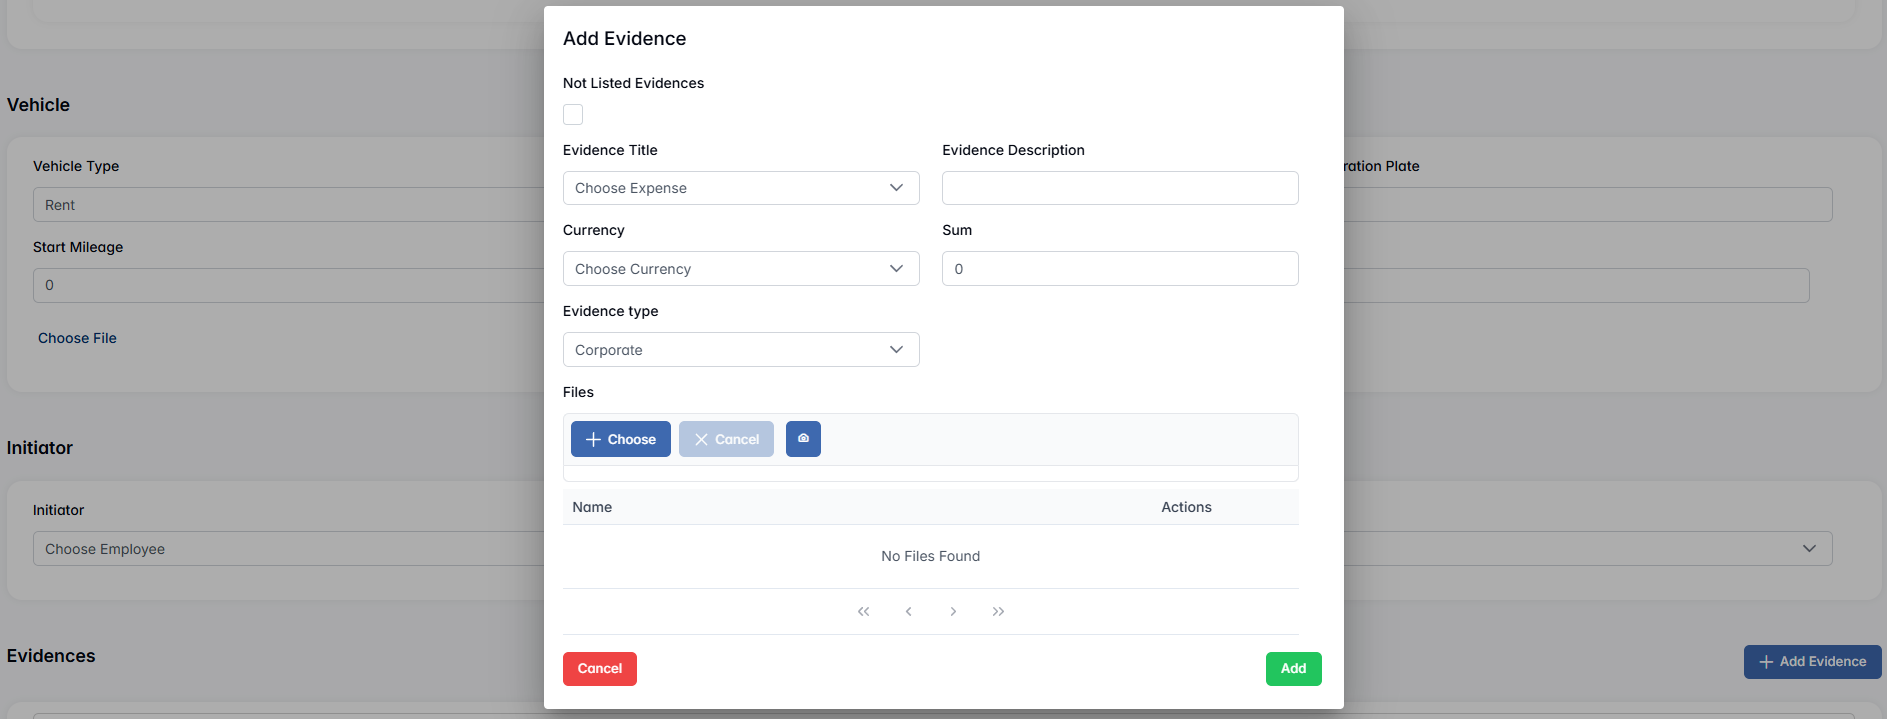
- Click + Add Evidence to open a popup window titled Add Evidence. In the popup, fill in the following fields:
- Not Listed Evidences (checkbox) – enable if the evidence is not linked to a predefined template or entry.
- Evidence Title – give the evidence a name (e.g., "Train Ticket", "Lunch with Client").
- Evidence Description – provide a short explanation.
- Currency – select the appropriate currency.
- Sum – enter the total amount.
- Evidence Type – choose from available categories (e.g., Transport, Accommodation, Meals).
- File Uploads – attach relevant documents (invoices, receipts). If no files are uploaded, the message "No Files Found" will appear. Once uploaded, files will be listed with the option to delete if needed.
- Click Add in the popup to finalize the evidence.
All added evidences will then appear in the Evidences section of the main Edit page, where they can be viewed, verified, or edited later.
After making all necessary edits — including updating travel details, uploading hotel or vehicle information, and adding evidences — don't forget to click the Save button at the top of the page to store all changes in the system.

Next to the Save button, you will also find the Export to XLS option. Clicking this will generate and download an Excel file containing all the key data from the business trip. This export is especially useful for reporting, archiving, or sharing trip details with accounting or management.
Verifying and Exporting a Business Trip
Verifying and Exporting a Business Trip
After selecting a trip from the list and clicking Selected Business Trip, you'll see four available actions: Edit, Verify BT, Remove, Export to XLS.
The Edit and Remove options have been described above. This section explains the Verify BT and Export to XLS actions in more detail.
Verify BT (Business Trip)
The Verify BT option is used to review and confirm the details of a business trip — especially related to expenses. This option is only available to users with appropriate permissions. If you do not have access, the button will be hidden or disabled.
When you click Verify BT, the same page as for editing the trip will open and you will see additional controls, specifically under the Evidences section:
When selecting an evidence entry that has status Need to Be Verified, the following buttons become available:
- Verify Evidence – confirms the expense item and changes its status.
- Cancel Evidence – rejects the evidence and marks it as not accepted.
Above the list of evidences, two additional buttons are shown:
- Verify Business Trip – finalizes the entire trip verification once all necessary checks are completed.
- Add Evidences – allows adding any missing or additional evidence if needed.
This verification process ensures proper review of submitted receipts and expense items before the trip is finalized.
Export to XLS
The Export to XLS option is available in two places — at the top of the Edit/Verify Business Trip page:
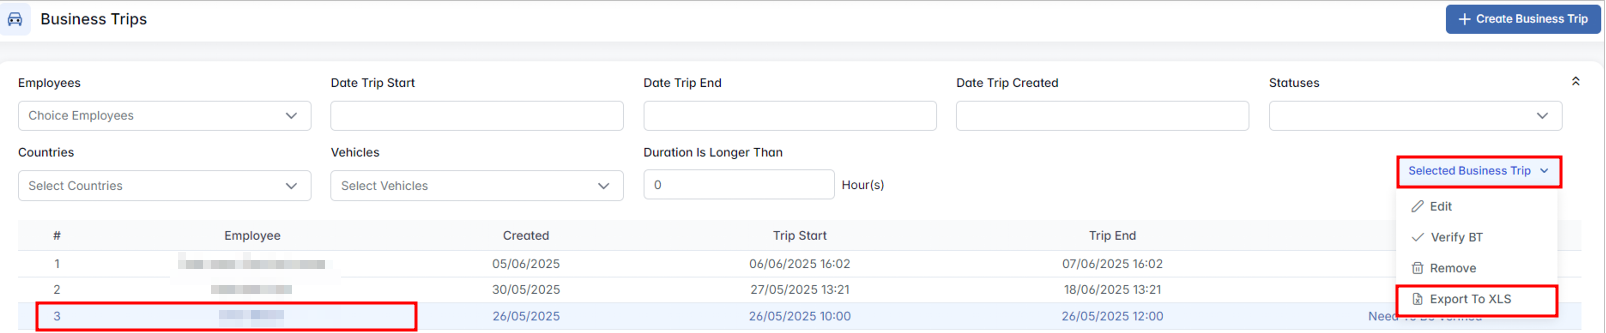
and as a quick action from the Selected Business Trip dropdown:
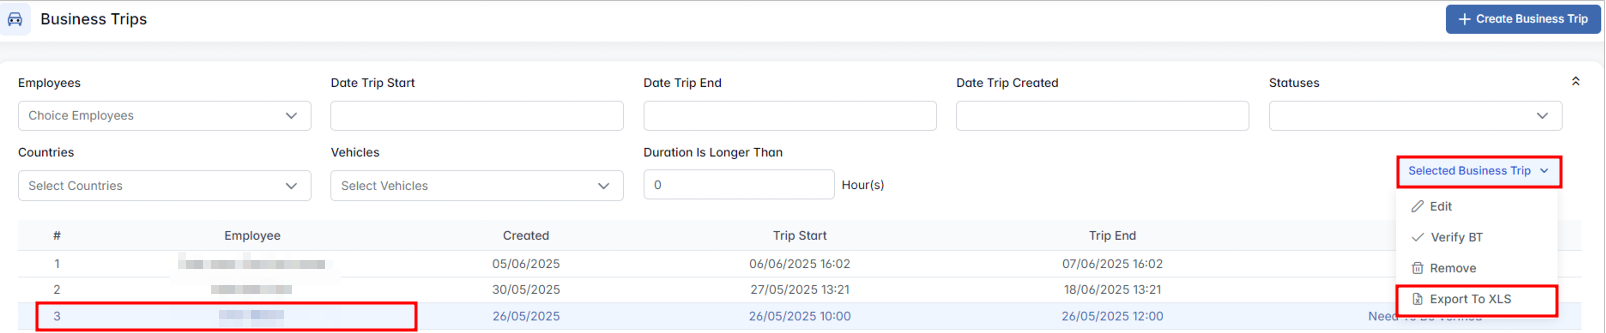
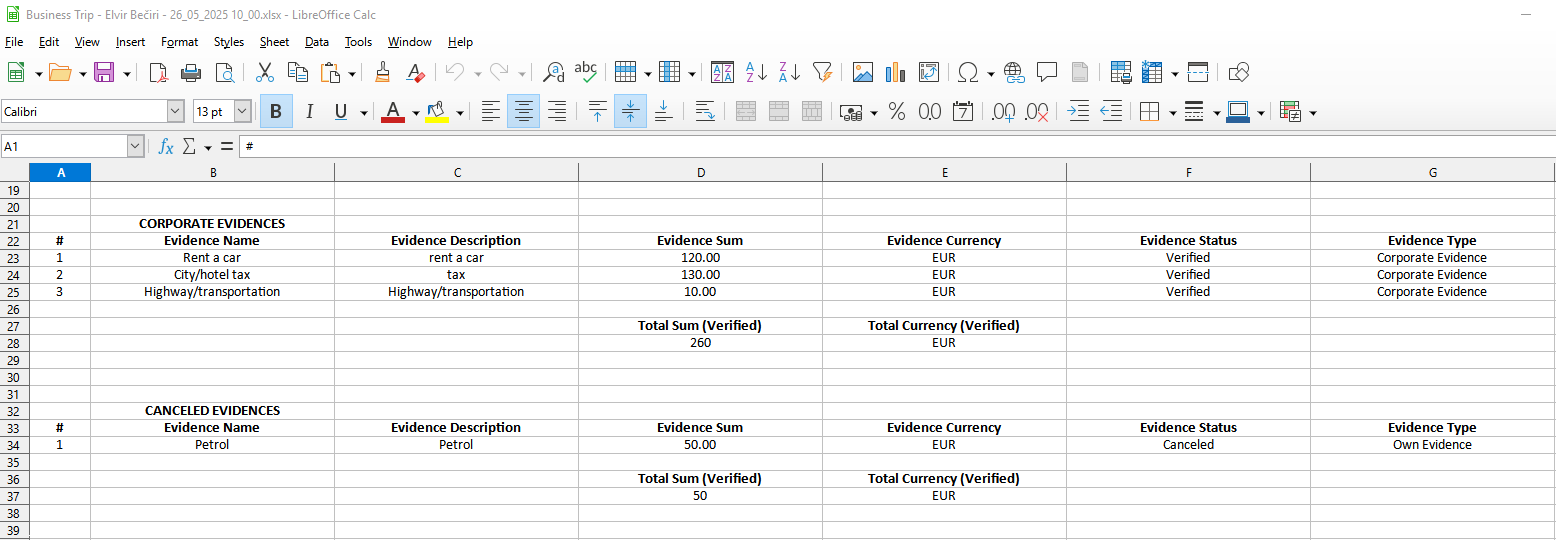
In both cases, the export functionality is identical. Clicking Export to XLS will:
- Generate and download an Excel file with all trip-related data.
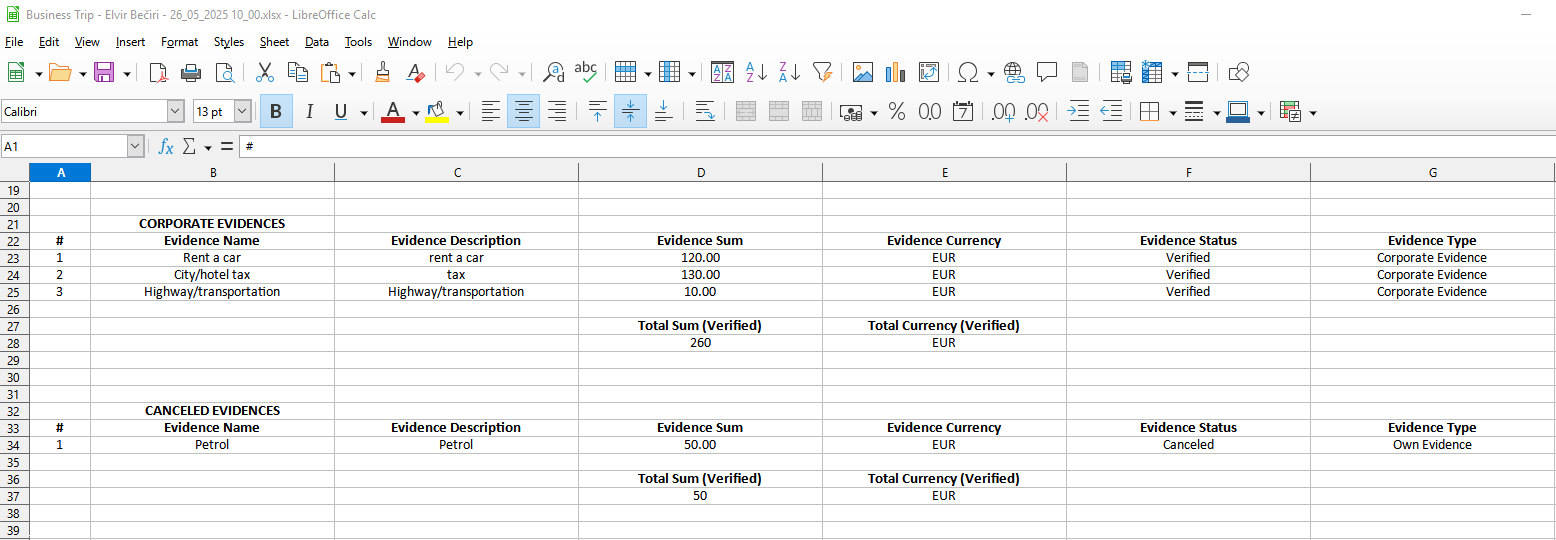
- Include all expense evidences.
- Organize expenses by type, currency, and display total amounts for financial analysis.
This export is useful for financial reporting and reconciliation, documentation and audit purposes, and sharing structured data with accounting or management teams. You can return to the trip at any time to re-export or update the data, depending on your access rights.
Hidden Settings in the Business Trips Module
Hidden Settings in the Business Trips Module
The Business Trips module includes a Hidden Settings menu that can be accessed by enabling a toggle switch located in the top-right corner of the screen. Once activated, two additional settings sections become visible:

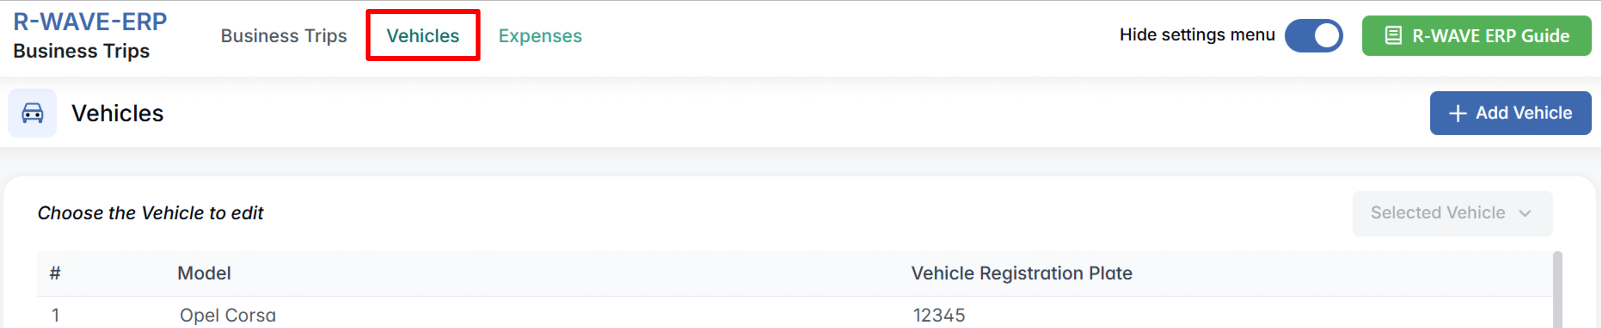
Vehicles
This section allows you to manage the list of vehicles used for business trips.
Viewing the List of Vehicles
Once inside the Vehicles section, you will see a table containing the existing vehicle records. Each row includes:
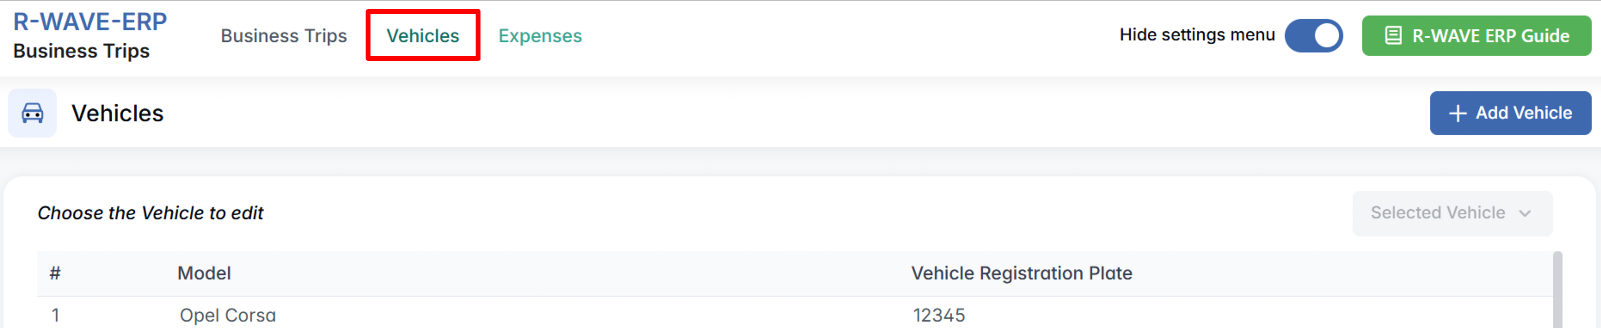
- Model – the make or name of the vehicle.
- Vehicle Registration Plate – the license plate number.
This list helps administrators maintain an organized set of available vehicles for company use, rentals, or mileage tracking.
Adding a New Vehicle
To register a new vehicle in the system:
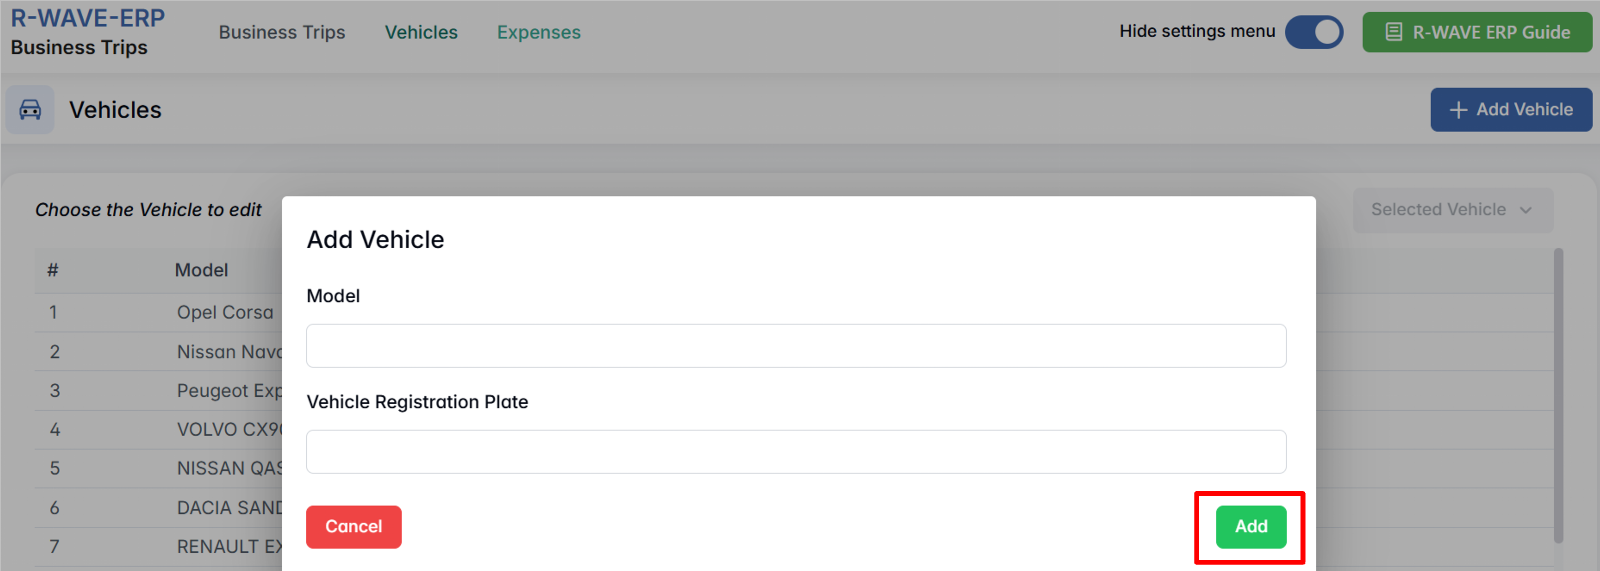
- Click the + Add Vehicle button in the top-right corner.

- A popup window titled Add Vehicle will appear. Fill in the following fields:
- Model – enter the name or type of the vehicle.
- Vehicle Registration Plate – enter the full plate number.
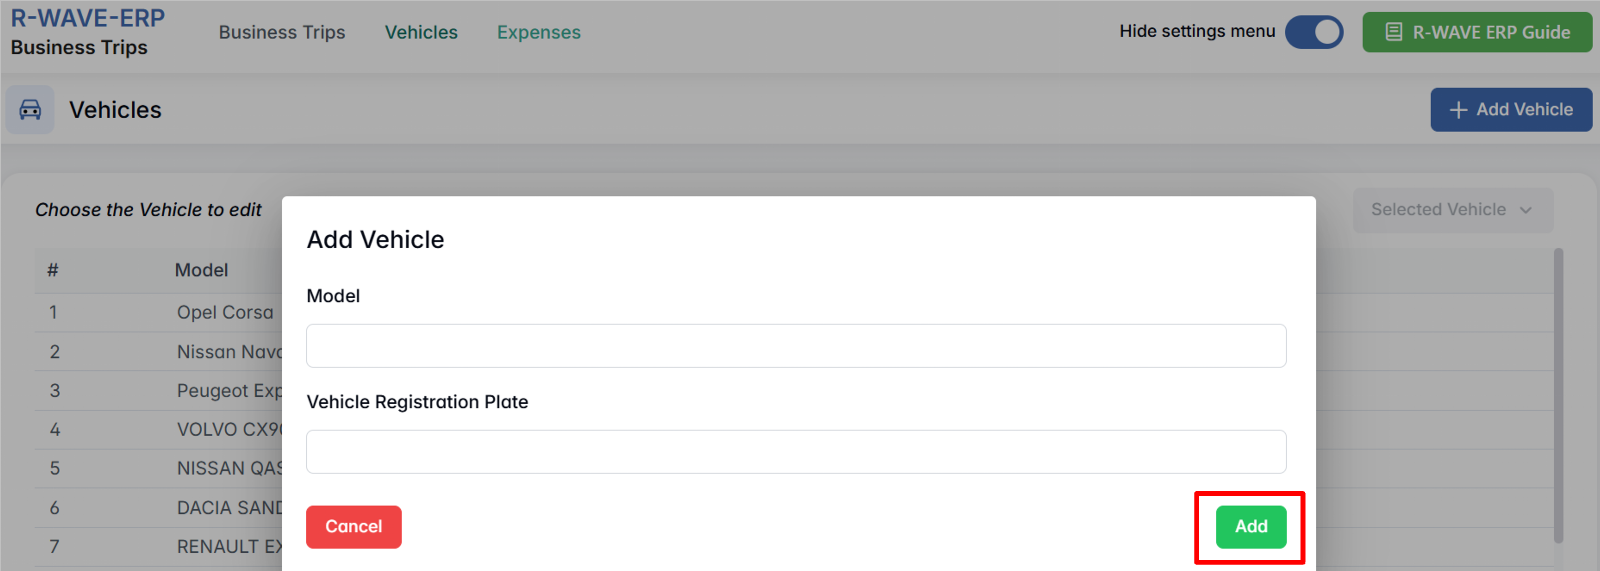
- Click Add to add the vehicle to the system.
Editing or Removing an Existing Vehicle
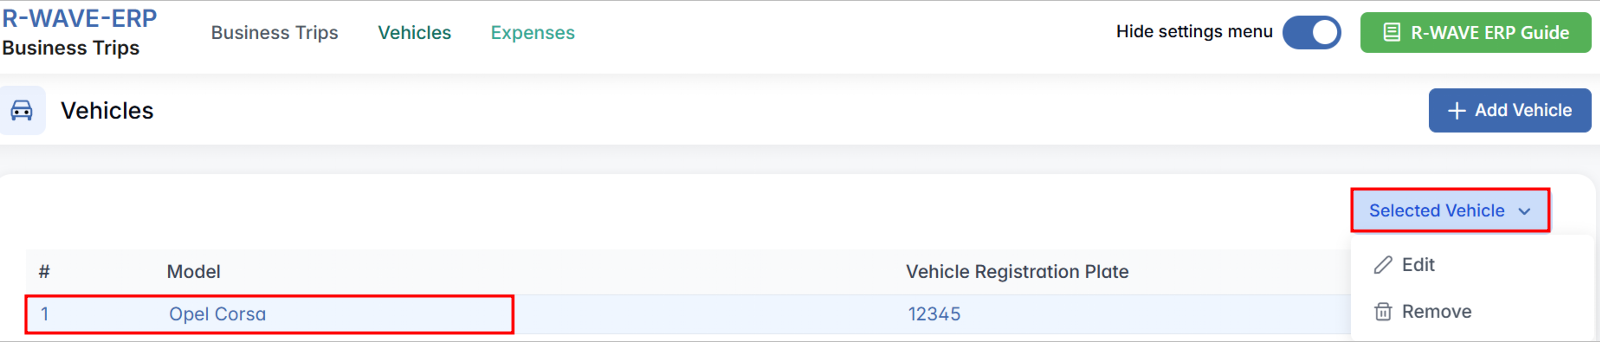
To update or delete a vehicle:
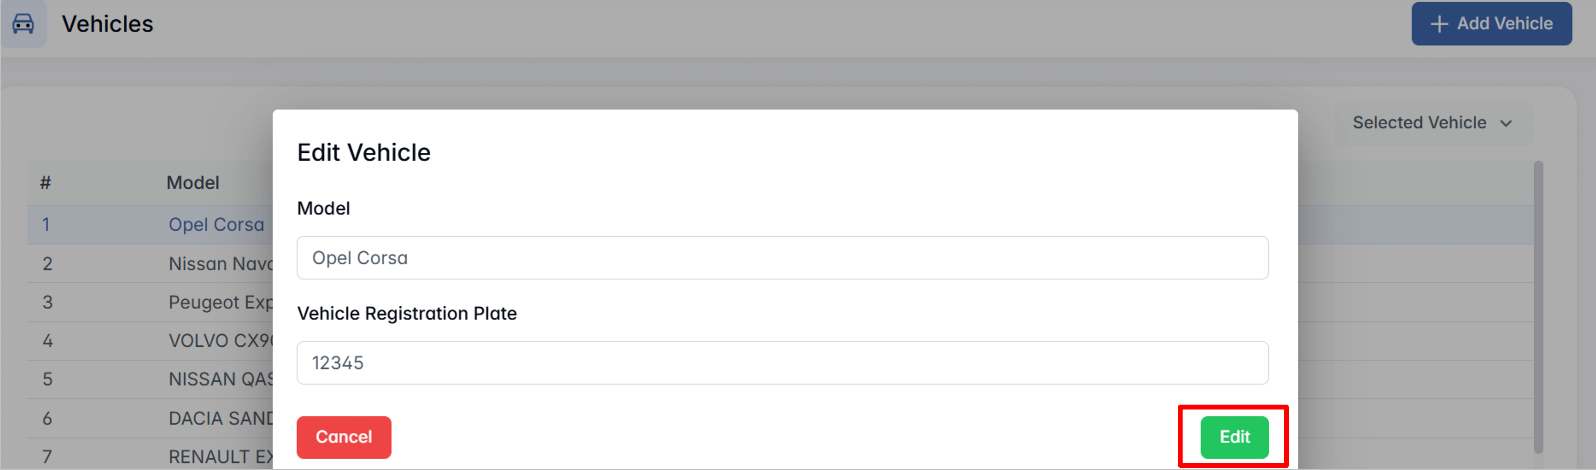
- Select a row from the vehicle list. The Selected Vehicle button will become active.
- Click this button and choose one of the options:
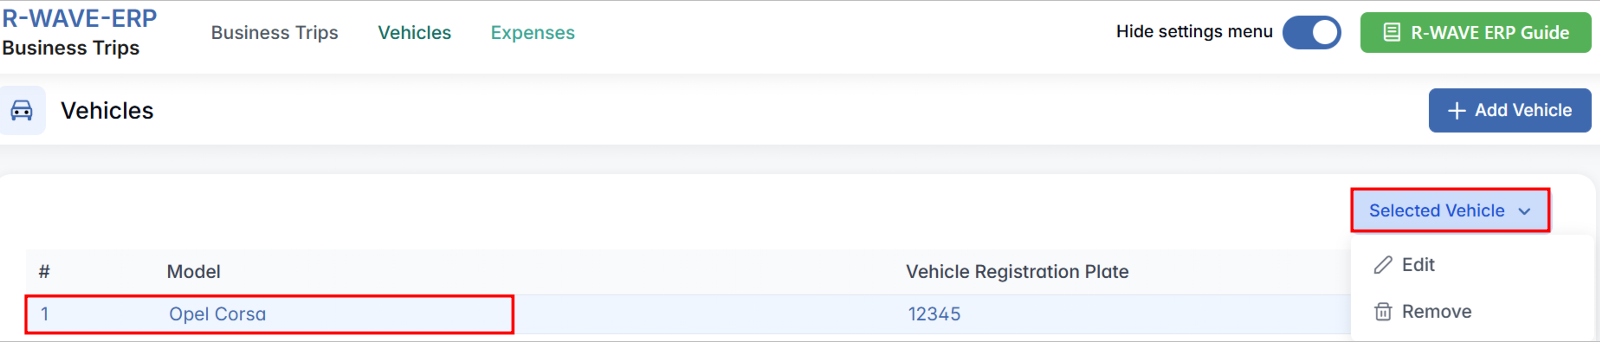
- Edit – opens the Edit Vehicle popup, where you can update the model or registration plate.
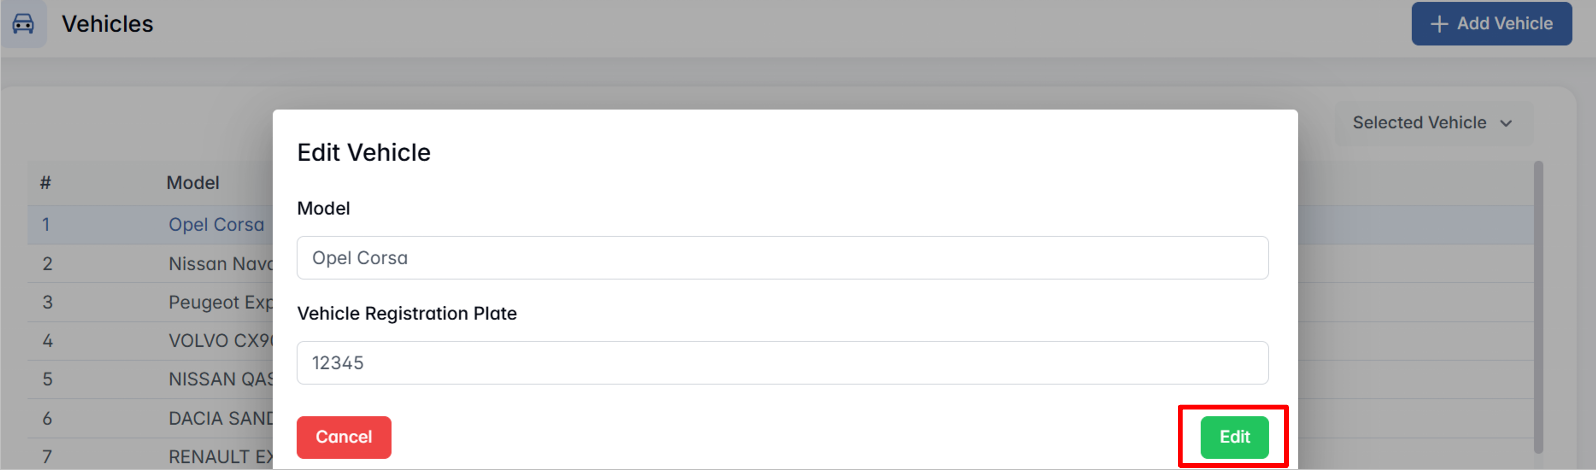
- Remove – permanently deletes the vehicle from the list.
This ensures that only relevant and up-to-date vehicle information is available when planning business trips.
Expenses
The Expenses section within the hidden settings menu allows you to manage predefined types of expenses that can be later selected when adding evidence to business trips. This helps standardize reporting and streamline data entry.
Viewing the List of Expenses
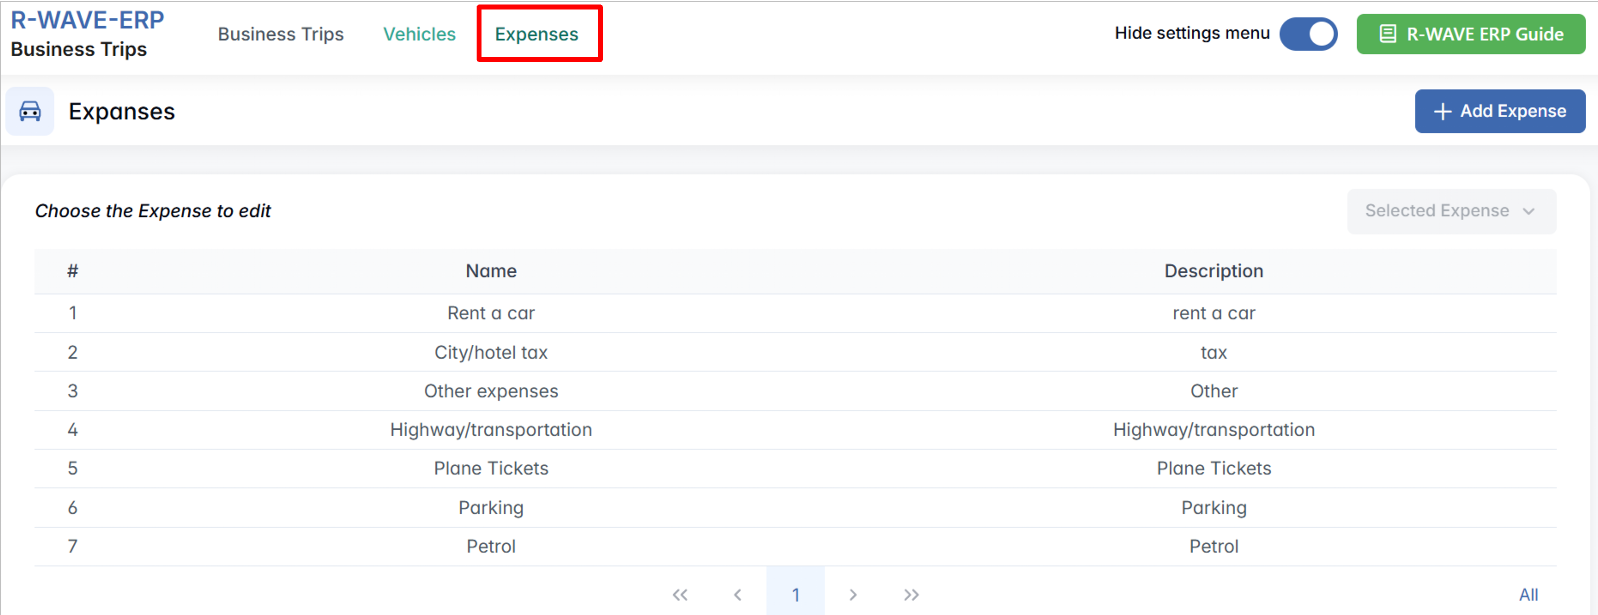
After entering the Expenses section, you will see a list of all existing expense types. Each row includes:
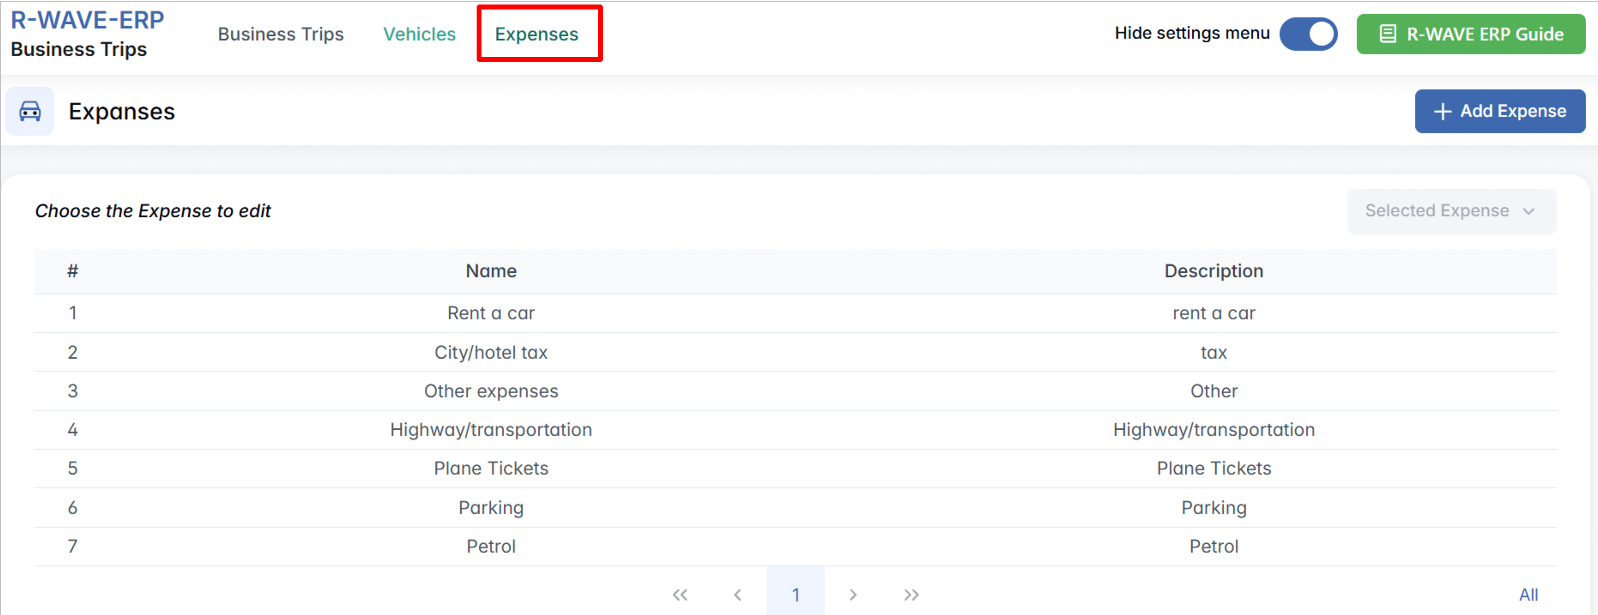
- Name – the title of the expense type.
- Description – a short explanation or context for the expense type.
This list helps categorize evidence submissions when employees provide cost reports for business trips.
Adding a New Expense Type
To add a new expense type to the system:
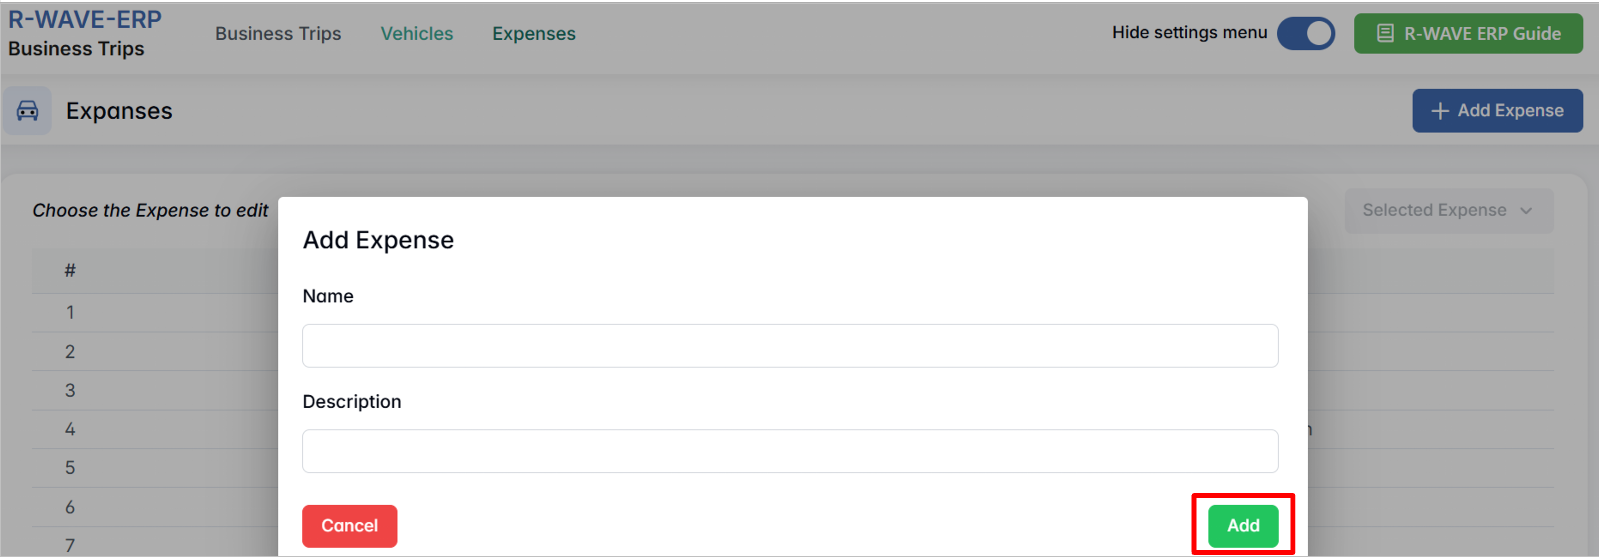
- Click the + Add Expense button in the top-right corner.

- A popup titled Add Expense will appear. Fill in the fields:
- Name – give the expense type a clear title.
- Description – optionally provide context or clarification.
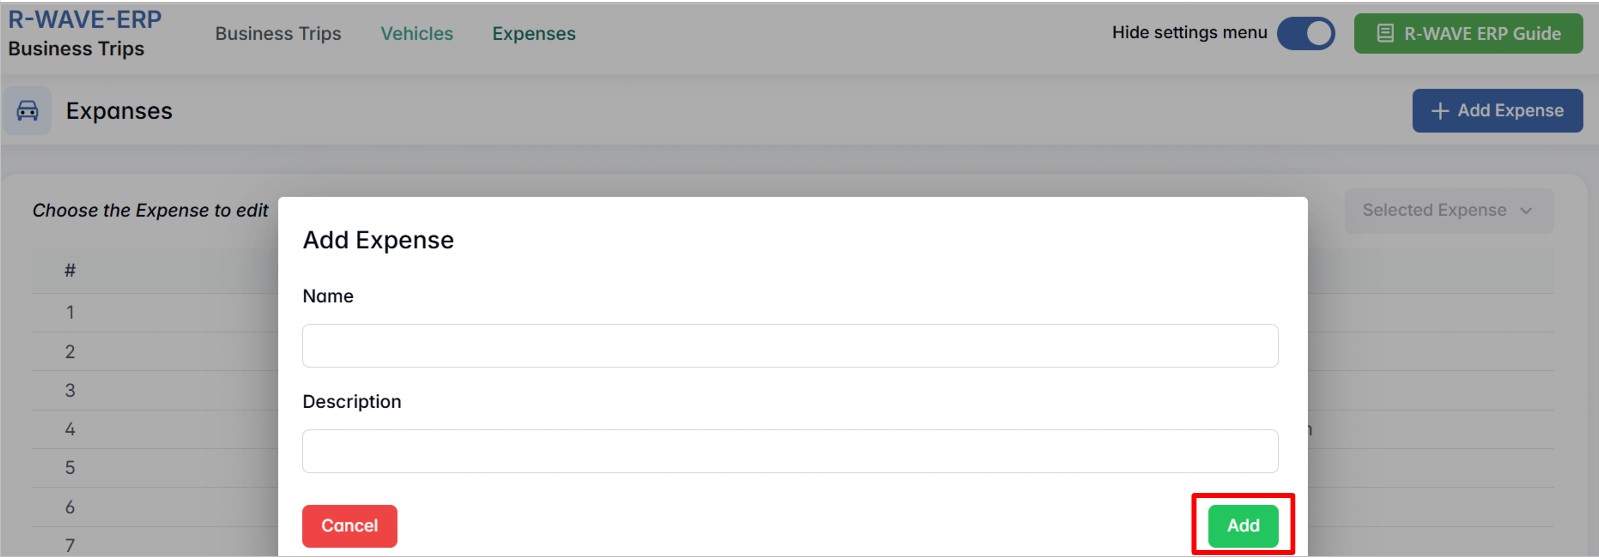
- Click Add to save the new expense type.
Editing or Removing an Expense Type
To edit or delete an existing entry:
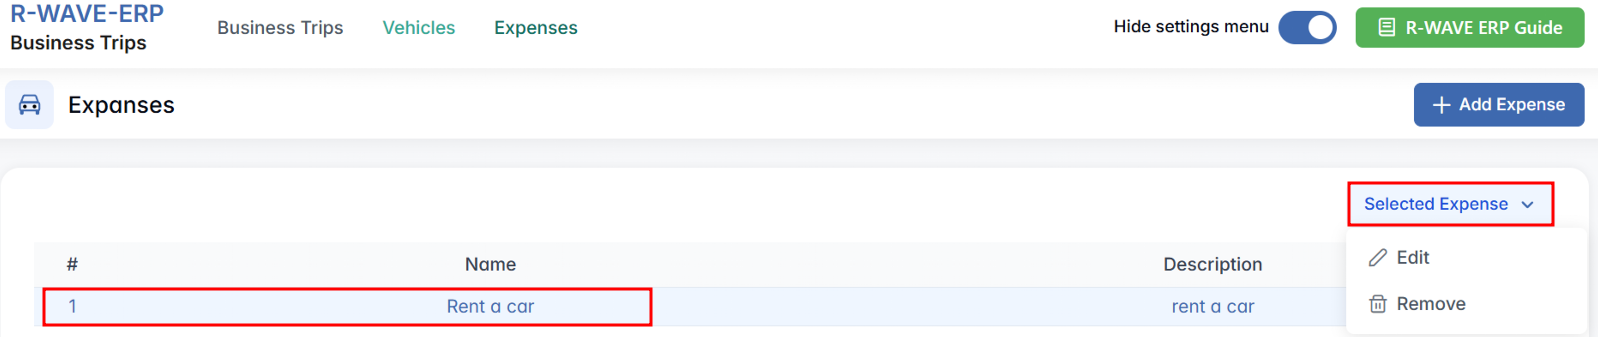
- Select a row from the expense list. The Selected Expense button will become active.
- Click it to choose between:
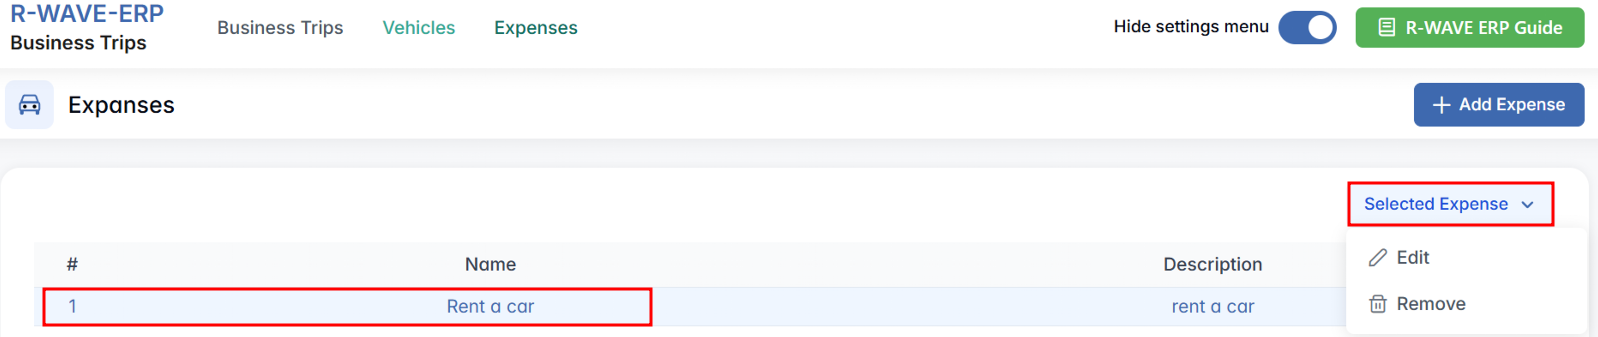
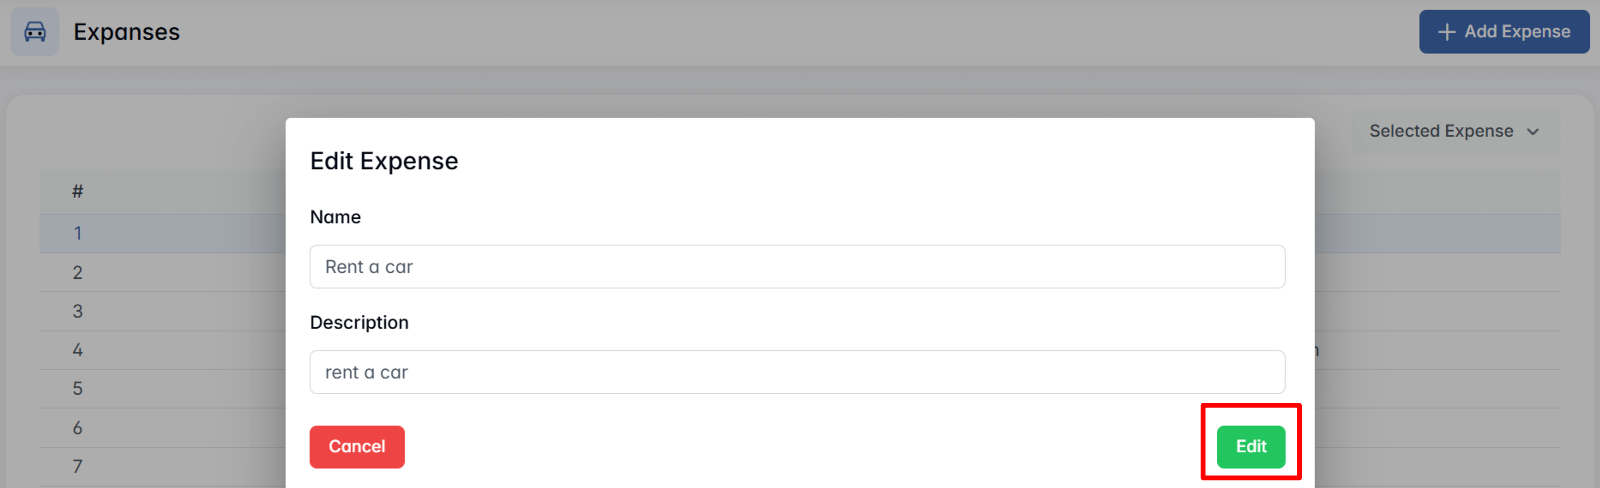
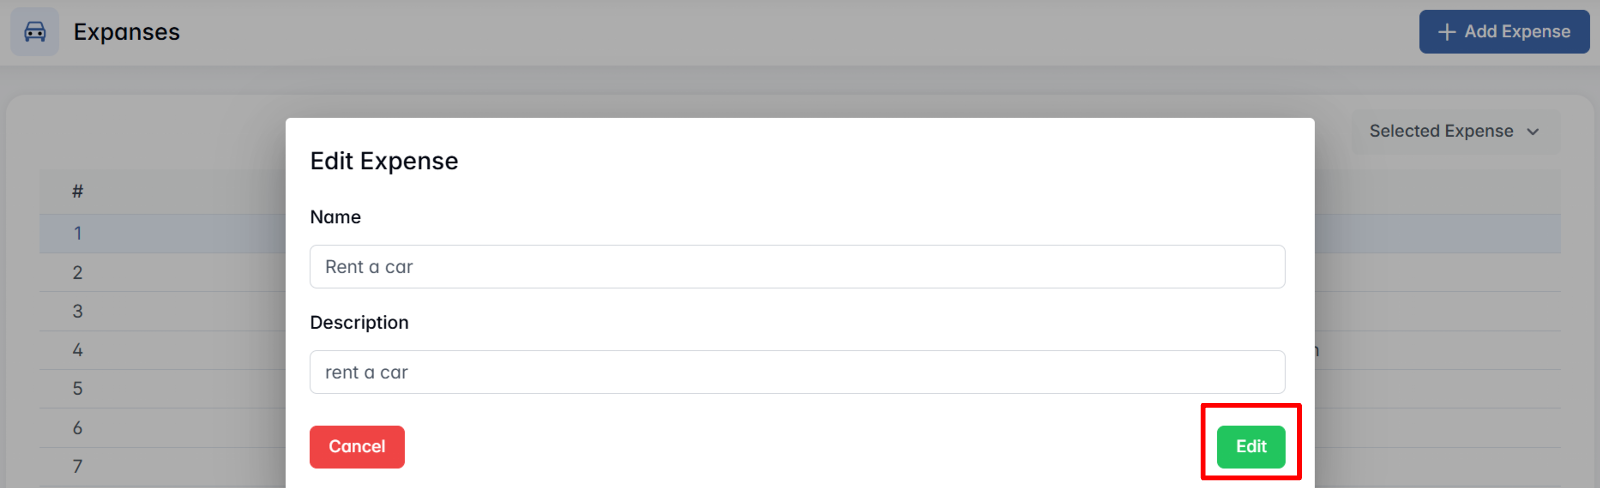
- Edit – opens the Edit Expense popup, where you can update information.
- Remove – deletes the selected expense type from the system.
This configuration helps ensure that expense evidence is linked to well-defined categories, simplifying verification and financial reporting.