Correspondence Module
The Correspondence module in BINU ERP is designed to help organizations register, manage, and archive official communication with external entities such as tax authorities, banks, and partner companies. It provides a structured and secure environment for tracking both incoming and outgoing letters, ensuring that all critical correspondence is properly recorded and accessible when needed.
Accessing the Module
You can access the Correspondence module from the dashboard.
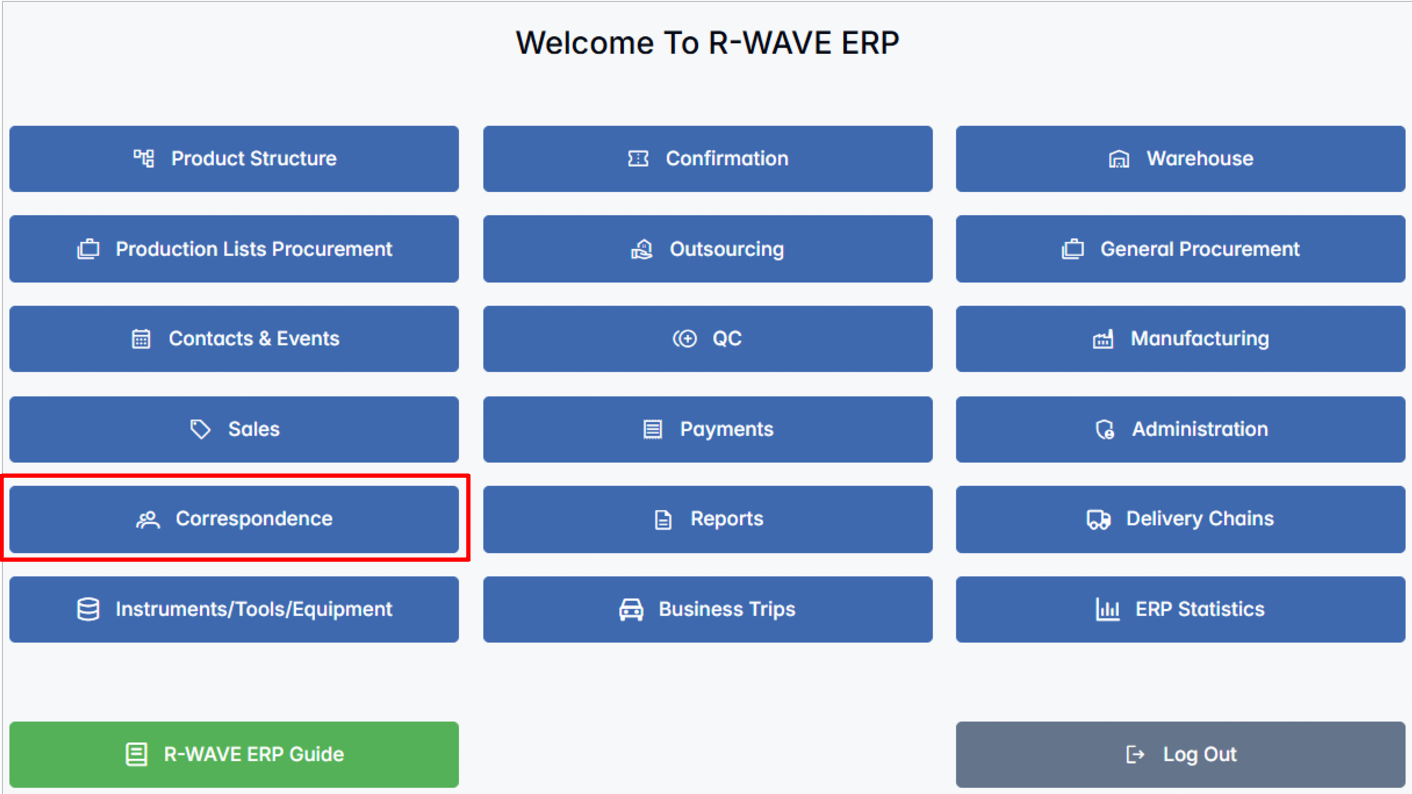
Once opened, you will have all the registered correspondence displayed, categorized into two main types:
- Incoming Correspondence – letters or documents received by your organization.
- Outgoing Correspondence – letters or documents sent from your organization.
From this dashboard, users can filter, review, create, and edit correspondence records, attach supporting files, and track the flow of documents across departments.
The BINU ERP Guide and AI Assistant Tools
The BINU ERP Guide and AI Assistant Tools
The BINU ERP system provides tools to support users in navigating and understanding the processes and functionalities of the system. These tools — the BINU ERP Guide and the BINU AI Assistant — include a built-in contextual help. They are non-intrusive and can be closed or reopened as needed, allowing users to remain focused on their current workflow without interruption.
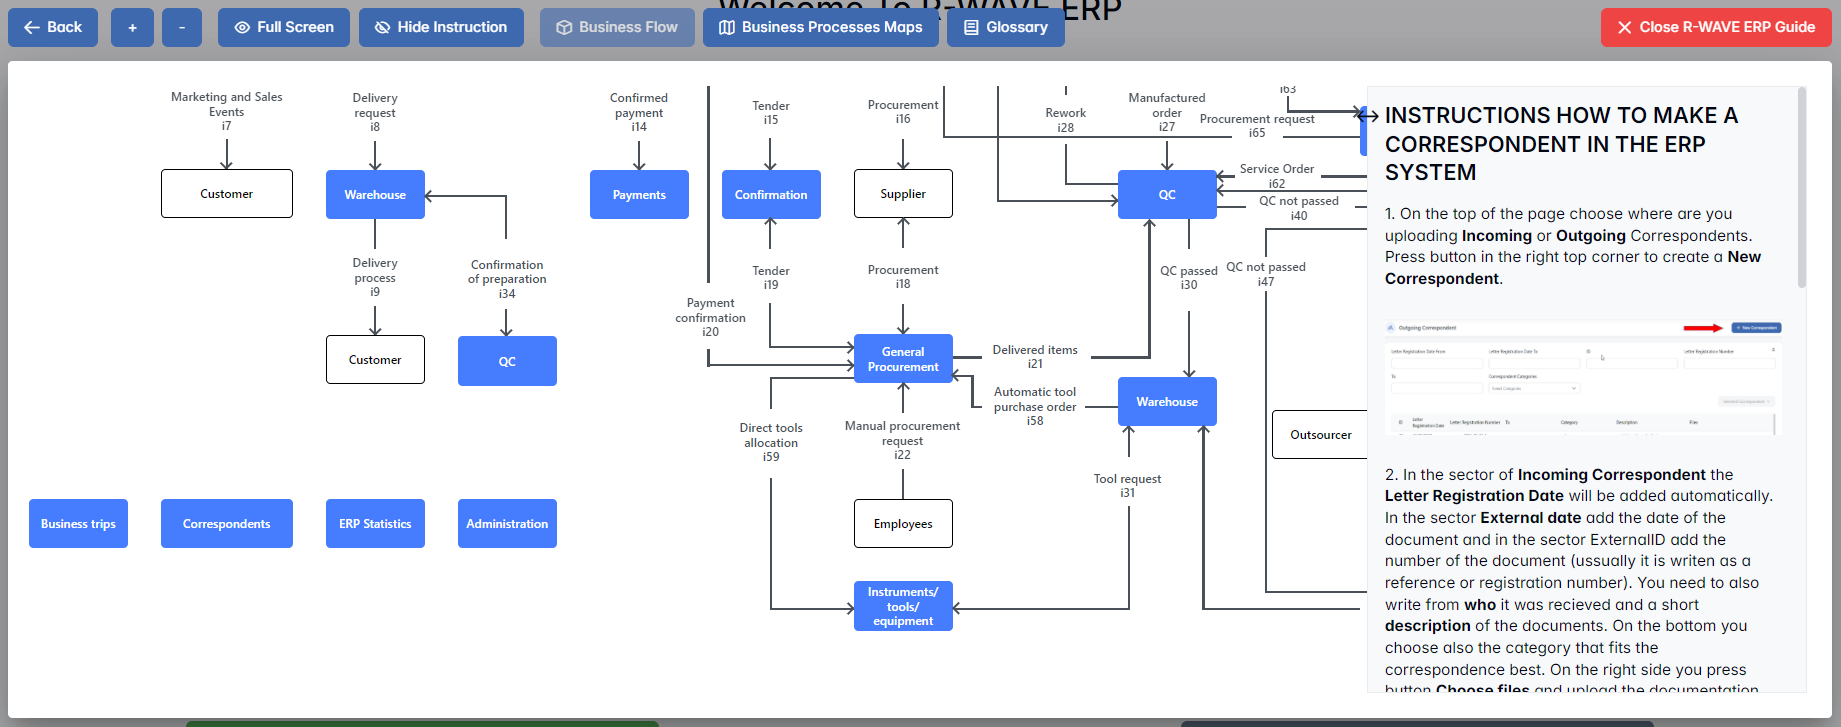
When you click the BINU ERP Guide icon in the upper-right corner of the screen, the pop-up guide window opens. This feature is available across different modules and is designed to help users understand where they are in the system and how to use the current section effectively.

When you click the BINU AI feature on the side of the screen, the chat window opens, where users can choose their language of conversation. The supported languages are: English, Bulgarian, Croatian, French, German, Hungarian, Italian, Romanian, Russian, Serbian, Slovenian, Spanish, Turkish, and Ukrainian.
The BINU AI Assistant provides explanations and documentation for all topics related to the BINU ERP system. Users can ask about specific terms, business processes, system functionalities, or request documentation on a particular topic. To begin, type your question in the input field at the bottom of the chat window.
The BINU ERP Guide: Quick Overview

When you click the BINU ERP Guide book icon, you land on the Business Flow map. It has two main sections: the left panel displaying the business flow map and the right panel showing the functional overview.
- Left panel — Business Flow Map — displays a visual diagram of the business processes. It shows how each module is interconnected; for example, you can see how Sales, Manufacturing, Procurement, CRM, QC, and Warehouse are interconnected.
- Right panel — Functional Overview — provides a concise, bullet-style instruction list describing the key operations available in the current module/tab.
Top Bar Options
At the top of the ERP Guide window, you'll find optional tools for deeper understanding: Business Processes Maps, Accounting Flow, and Glossary. The Accounting Flow is meant for financial departments.
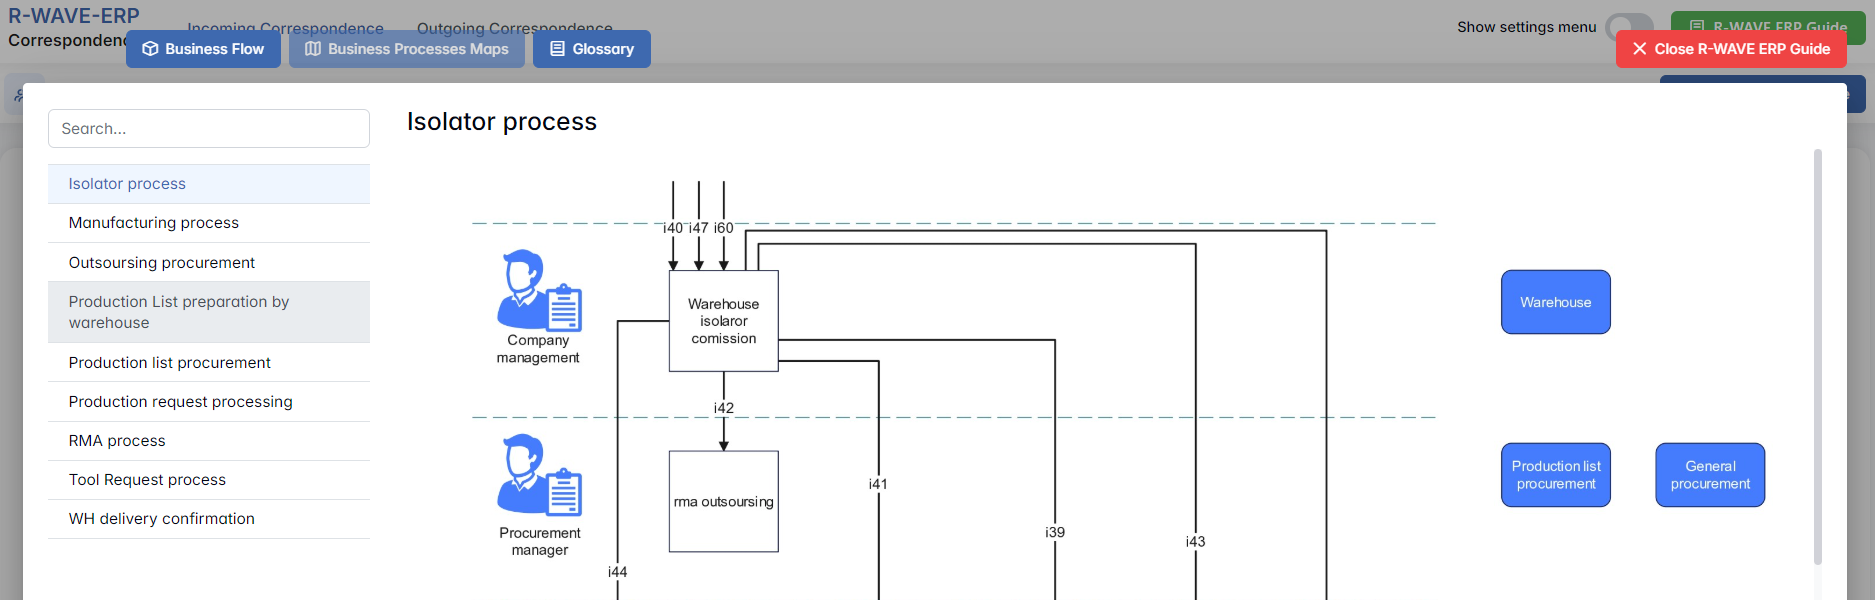
Business Processes Maps
Business Processes Maps provides a visual representation of the company's operational structure and business flow. It helps the user understand how the current module fits into the larger operational structure and makes it easy to grasp the upstream and downstream dependencies within the business processes. The Business Processes Maps can be accessed from various modules.

Accounting Flow: Data Flow Graph and Responsibility Matrix
Accounting Flow is a tool designed for the finance department; it shows where the data originates and defines responsibilities. For this purpose, it consists of two parts: a Data Flow Graph and a Responsibility Matrix.

The Data Flow Graph displays the movement of items from departments to the warehouse and from the warehouse to the departments. Based on these movements, the system tracks the flow of goods entering and leaving the company. The Dashboard section, planned for a future release, will allow users to view real-time data (in, out, balance, product costs).
If you hover over a diagram block, the system highlights the corresponding movement chain.

If you click a block in the diagram, you fix the highlighted chain. To narrow the selection further, click a block in the second, third, or fourth column.

The Responsibility Matrix identifies the department accountable for the selected process.

Glossary
Glossary provides definitions and descriptions of key terms and functionalities used throughout the system. The Glossary can be accessed via the BINU ERP Guide, which is available on any page of the system.
The BINU AI Assistant: Quick Overview
The BINU AI Assistant is specifically designed to help the user with ERP documentation questions. It provides information and assistance related to the BINU ERP system. The BINU AI Assistant understands fifteen (15) languages. It is available on every page as a non-intrusive help tool.
The Purpose of the BINU ERP Guide and BINU AI Assistant Tools
The BINU ERP Guide and BINU AI Assistant help users by:
- Showing where they are within the system (module context and current section).
- Providing a visual schema of the business flow, helping them understand how the current module fits into the larger operational structure.
- Offering a quick-reference instruction panel with the main actions and functions available in the current tab (e.g., creating companies, filtering, scheduling events).
- Offering quick access to the relevant documentation (AI-powered ERP documentation helper).
Working with the Correspondence Module
Working with the Correspondence Module
The Correspondence module in BINU ERP is built to streamline the handling of official communications within an organization. It helps register, store, and manage both incoming and outgoing letters from and to tax authorities, banks, partner organizations, and other external entities. By using this module, companies can maintain a well-documented history of correspondence and ensure that no important communication is lost or overlooked.
Default View and Navigation
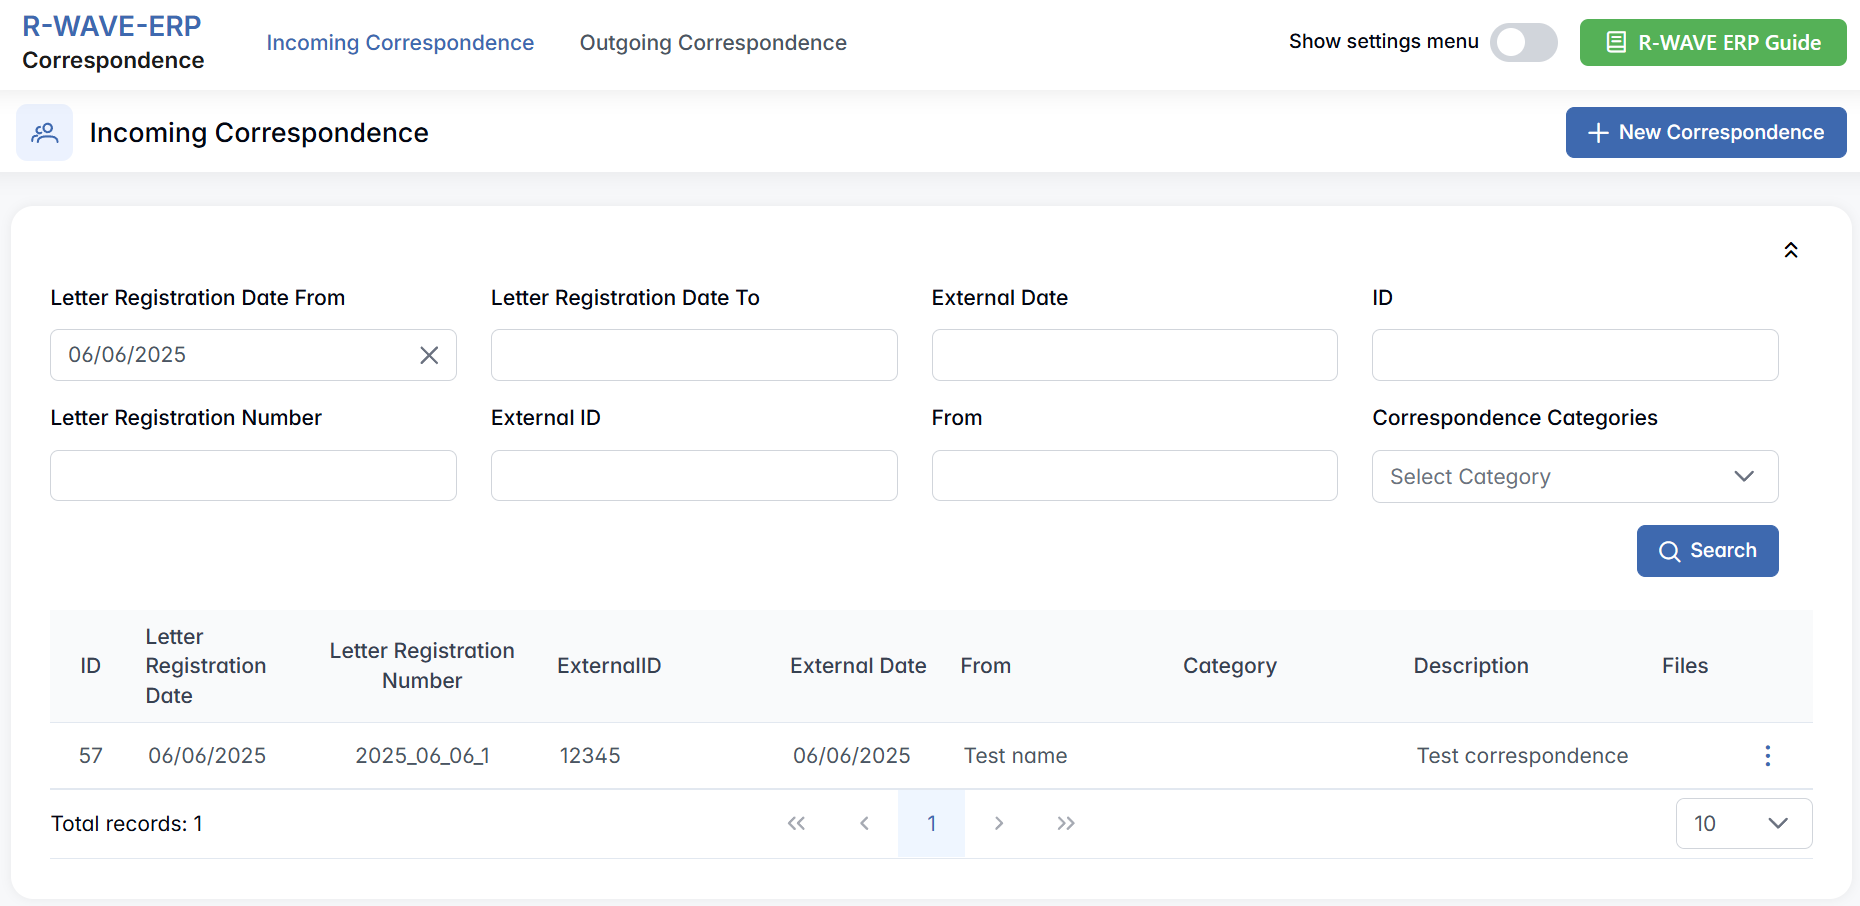
When you enter the Correspondence module, the Incoming Correspondence page is opened by default.
At the top of the screen, right next to the module logo, you will see two navigation sections:
- Incoming Correspondence
- Outgoing Correspondence
You can easily switch between these two views by clicking on the corresponding button. The page content will update accordingly.
Incoming Correspondence
The Incoming Correspondence section displays all letters or documents received by your organization. This view allows you to track when a letter was received, from whom, and what type of correspondence it was.
Filter Panel
To locate a specific entry or group of entries, use the filter panel at the top of the page. The available filters include:

- Letter Registration Date From / To – Filter by the internal registration date range.
- External Date – Date on the original document or letter.
- ID – Internal system ID of the correspondence.
- Letter Registration Number – Assigned registration number within your company.
- External ID – The original ID number from the sender.
- From – The organization or individual who sent the correspondence.
- Correspondence Categories – Filter by predefined correspondence types.
- Search – Click to apply the selected filters and update the list below.
Correspondence Table
Below the filters, the page shows a list of all incoming letters matching your criteria.
Creating Incoming Correspondence
To register a new incoming letter or document in the system, follow the steps below. This process ensures that all incoming communications are properly archived, traceable, and accessible to authorized users.
- Open the Incoming Correspondence page. Navigate to the Correspondence module from the main menu. By default, the Incoming Correspondence view is opened. If you are not on this page, click the Incoming Correspondence button at the top of the screen.
- Click + New Correspondence.
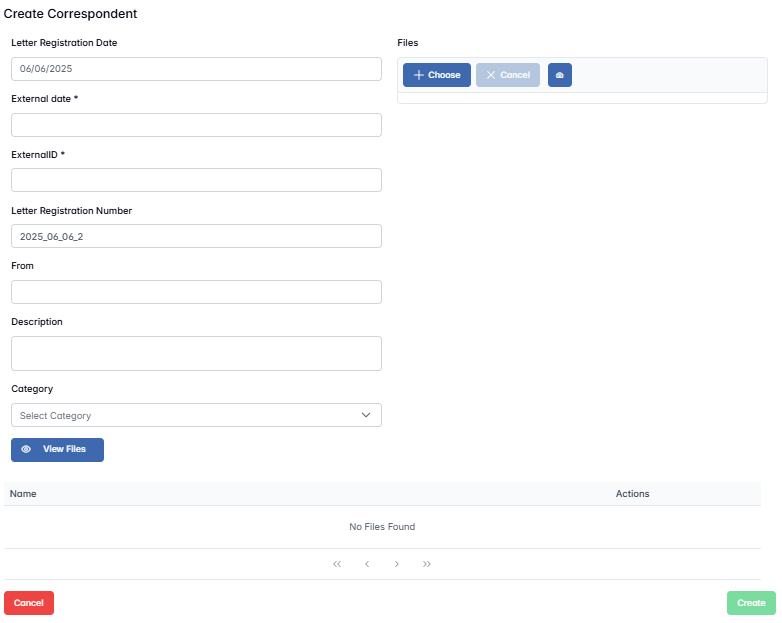
A pop-up window titled Create Correspondence will appear.
- Fill in the correspondence details. In the pop-up form, enter the following information:

- Letter Registration Date – automatically filled with the current date. It represents the date when the correspondence is being registered in the system. This date is for internal tracking and cannot be manually changed.
- External Date (required) – the date that appears on the original letter or document. This is the official date the document was issued by the external organization or authority.
- External ID (required) – the ID or reference number assigned by the sender (e.g., tax authority or bank). This value ensures that the document can be matched or verified against the sender's records.
- Letter Registration Number – generated automatically in the format
YYYY_MM_DD_N(e.g.,2025_06_06_3). It combines the current date and an internal order number representing the sequence of correspondence registered on that date. - From – the name of the organization or person from whom the correspondence was received.
- Description – a brief summary or description of the letter's content (e.g., "Confirmation of tax payment", "Bank statement for May").
-
Category – a predefined correspondence category from the drop-down list. These categories are configured in the hidden settings and help classify incoming letters.
-
Attach files (optional). Click the Choose button to open your file explorer and select the file from your computer. Uploaded files appear in the table below with the columns Name (the original name of the uploaded file) and Actions (options to download or remove the file). If no files are added, the message "No Files Found" is shown.
- Save the record. Once all fields are completed and files (if needed) are uploaded, click the Create button to save the correspondence. The record will now appear in the list of Incoming Correspondence and be available for filtering, tracking, and future reference.
Editing or Removing Incoming Correspondence
After a correspondence entry has been created, you may need to update its information or remove it from the system. This can be done directly from the Incoming Correspondence list.
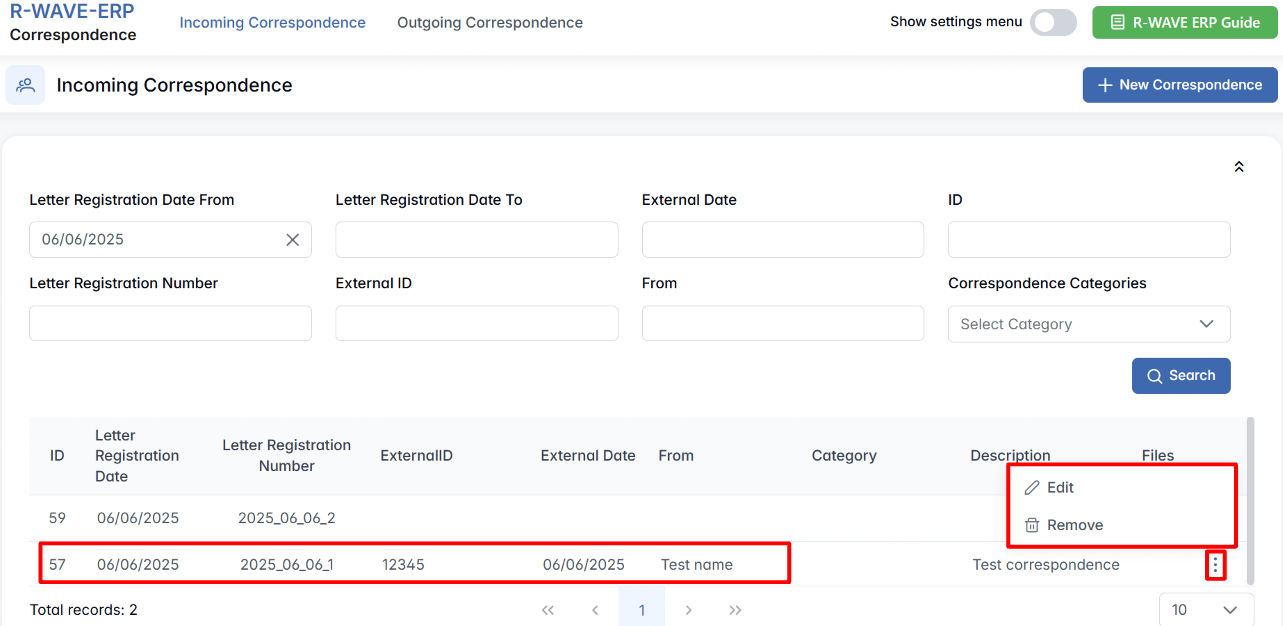
- Locate the record. Use the filter panel at the top of the Incoming Correspondence page to narrow down the list of records if needed (e.g., by date, sender, ID, or category).
- Open the options menu. In the far-right column of the row you want to modify, click the three dots (⋯) icon. This opens a small menu with available actions for the selected correspondence.
- Choose an action:
- Edit – Opens the Edit Correspondence pop-up window, where you can update any of the previously entered details, such as external date, description, sender, or files. After making changes, click Edit to apply them.
- Remove – Permanently deletes the correspondence record from the system. Be cautious when using this option, as it cannot be undone.
This quick-access menu makes it easy to manage correspondence records directly from the list, ensuring fast updates and streamlined record maintenance.
Outgoing Correspondence
The Outgoing Correspondence section of the module is used to register and track official letters or documents sent from your company to external parties. These may include tax declarations, responses to bank inquiries, partnership notifications, or other types of communication with government institutions, clients, or vendors. By registering outgoing correspondence, your organization ensures that every sent document is archived, accessible, and traceable in the system.
Filter Panel
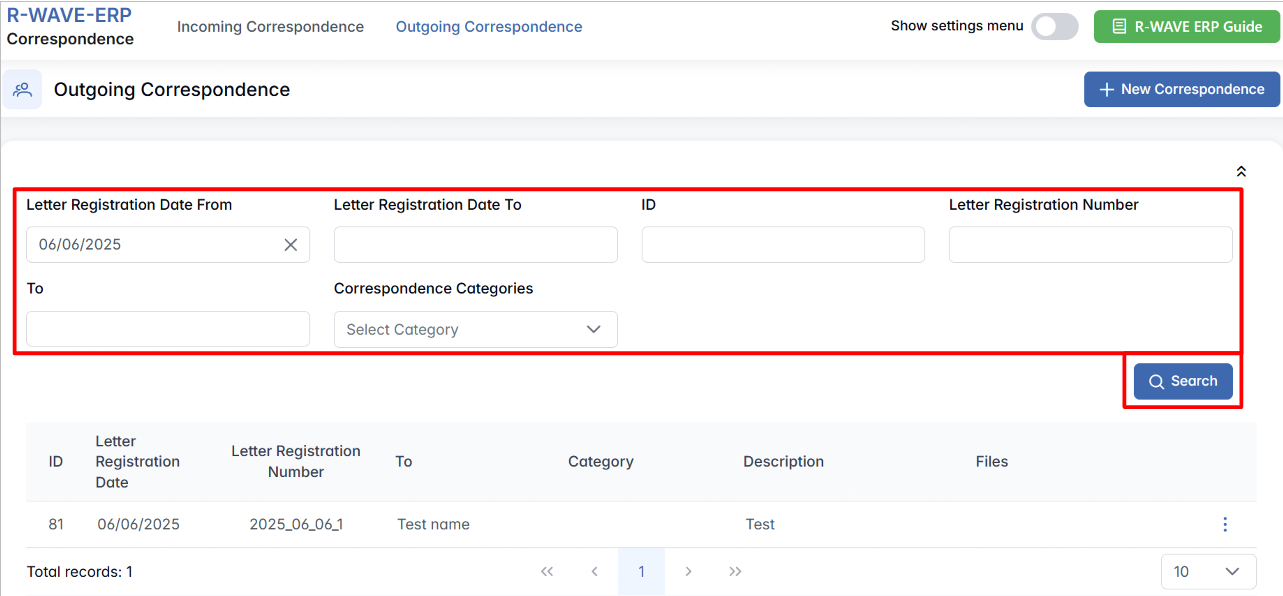
The filter panel at the top of the Outgoing Correspondence page helps you quickly find specific letters based on multiple criteria. Available filters include:
- Letter Registration Date From / To – Filter by internal registration date range.
- ID – Internal correspondence ID assigned by the system.
- Letter Registration Number – Unique outgoing letter number created on registration.
- To – Organization or recipient to whom the letter was sent.
- Correspondence Categories – Classify letters based on predefined types (e.g., Legal, Financial, General).
- Search – Applies the selected filters and refreshes the correspondence list.
Correspondence Table
Below the filter panel, the table displays all outgoing letters matching the applied filters.

Creating Outgoing Correspondence
To register a new outgoing letter or document, follow these steps:
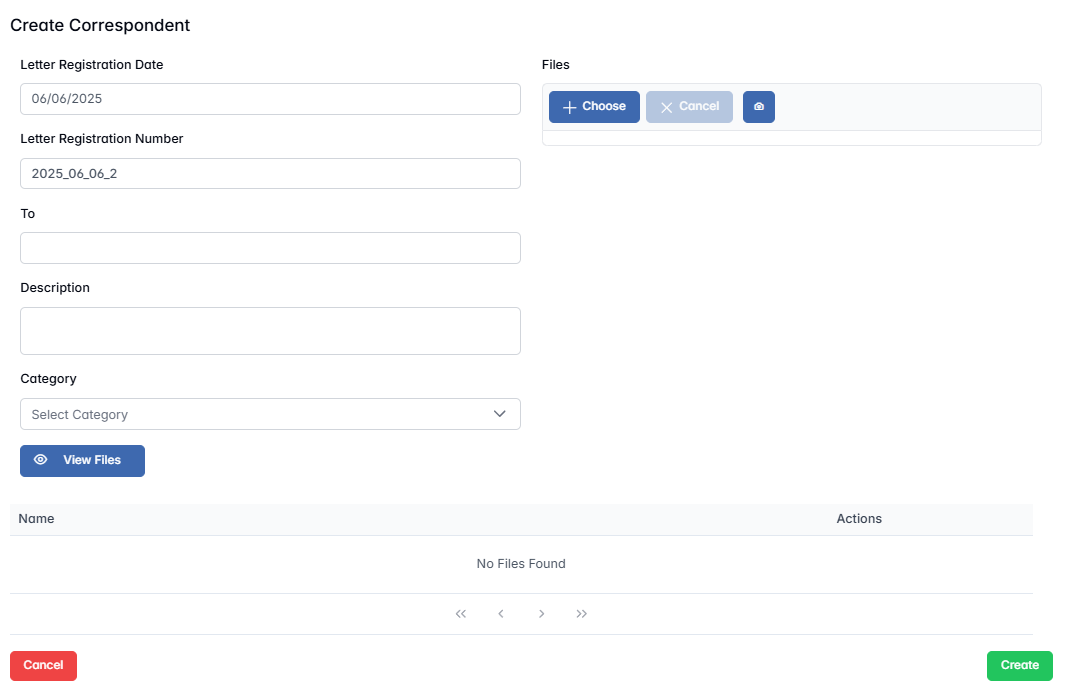
- Click + New Correspondence. In the upper-right corner of the Outgoing Correspondence page, click the + New Correspondence button. This opens a pop-up window titled Create Correspondence.
- Fill in the correspondence details. Inside the pop-up, complete the following fields:
- Letter Registration Date – automatically populated with the current date. It indicates when the correspondence was created in the system and is used for internal tracking.
- Letter Registration Number – automatically generated in the format
YYYY_MM_DD_N(e.g.,2025_06_06_3). This number reflects the date and sequence of registration. - To – the name of the organization or recipient the letter is being sent to (e.g., "Bank of Slovenia", "Tax Authority").
- Description – a brief summary of the content or purpose of the correspondence (e.g., "Submission of VAT report", "Partnership agreement letter").
-
Category – the relevant category from the drop-down list of predefined correspondence types (configured via hidden settings). Categories help classify outgoing letters and streamline reporting and filtering.
-
Attach files (optional). If the letter or communication exists in digital form (PDF, scanned image, etc.), click the Choose button to open your file explorer and select the relevant document(s). Uploaded files are shown in the file table with columns for Name (file name as uploaded) and Actions (options to download or remove each file). If no files are uploaded, the message "No Files Found" appears in the table.
- Save the record. Once all fields are completed and files are attached (if needed), click the Create button. The correspondence will be saved and added to the list of outgoing records, fully traceable and filterable within the system.
Editing or Removing Outgoing Correspondence
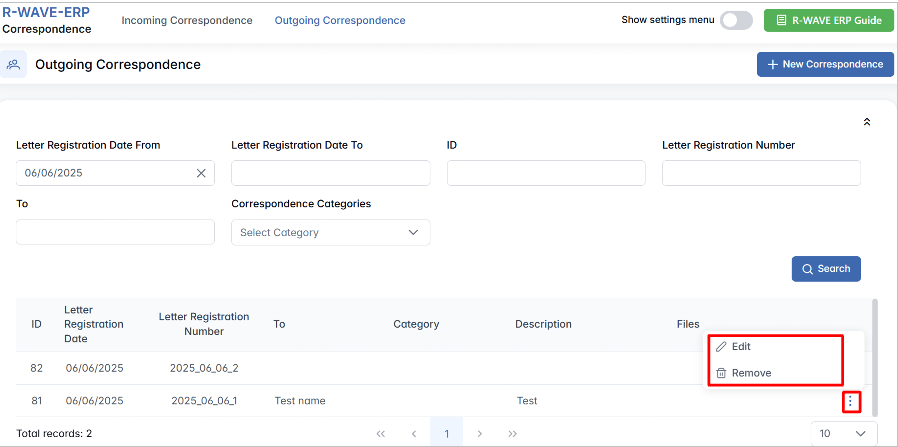
Just like with incoming letters, outgoing correspondence can be easily updated or deleted:
- Locate the record. Use the filter panel if needed to find the relevant outgoing correspondence entry.
- Open the options menu. In the far-right column of the row, click the three dots (⋯) icon. This reveals available actions.
- Choose an action:
- Edit – Opens the Edit Correspondence pop-up window, where you can update recipient details, category, description, or attached files. After changes, click Edit to save.
- Remove – Permanently deletes the correspondence record from the system. Deletion is irreversible. Only use this action if the record was created in error.
This menu makes it easy to manage your outgoing documents without leaving the main correspondence list.
Hidden Settings in the Correspondence Module
Hidden Settings in the Correspondence Module
To support better organization and classification of official communication, BINU ERP allows you to configure custom Correspondence Categories. These categories help users classify incoming and outgoing letters more accurately during the registration process.
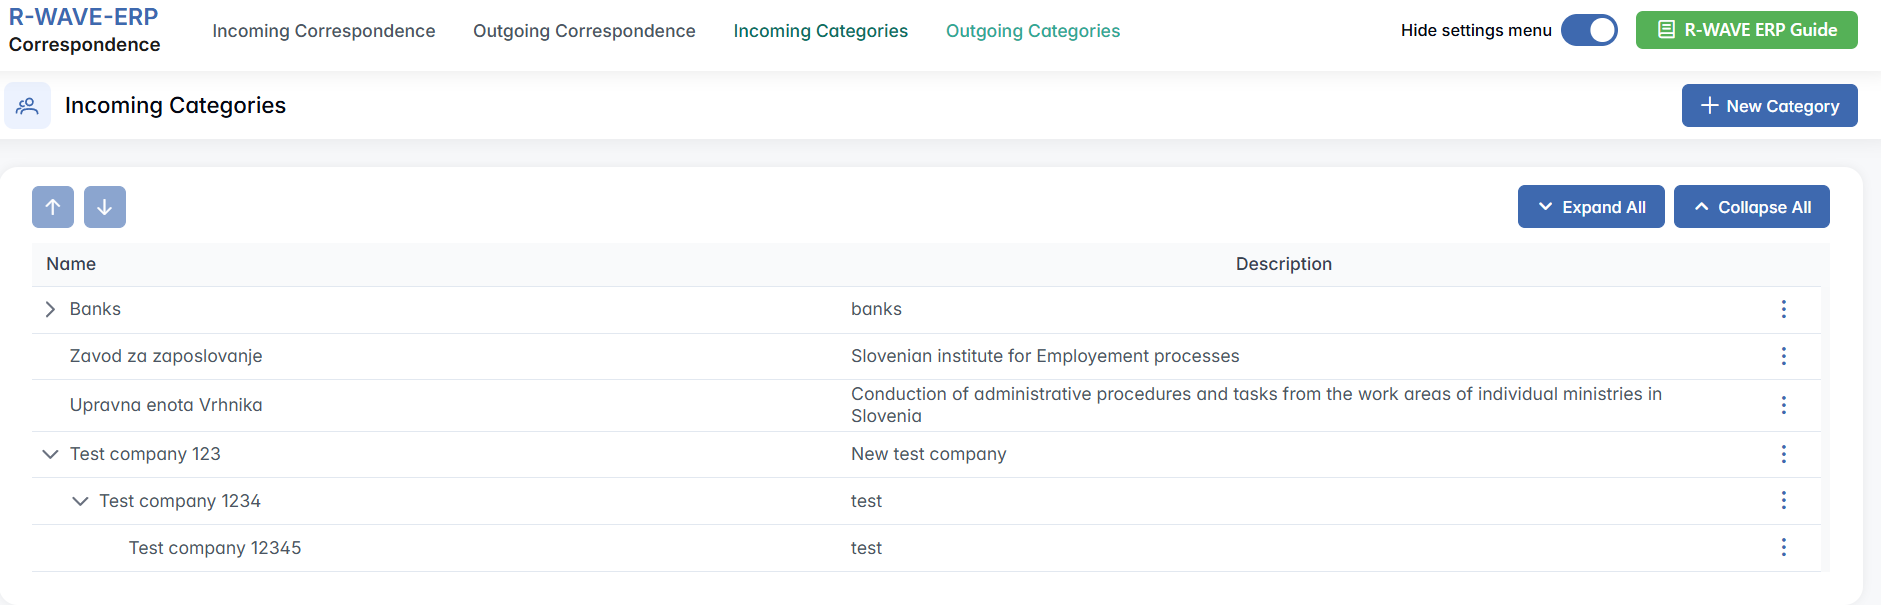
Correspondence Categories are accessible via the hidden settings menu of the Correspondence module. Once activated, you will be able to create, manage, and structure the categories used in both Incoming and Outgoing correspondence.

Incoming Categories Overview
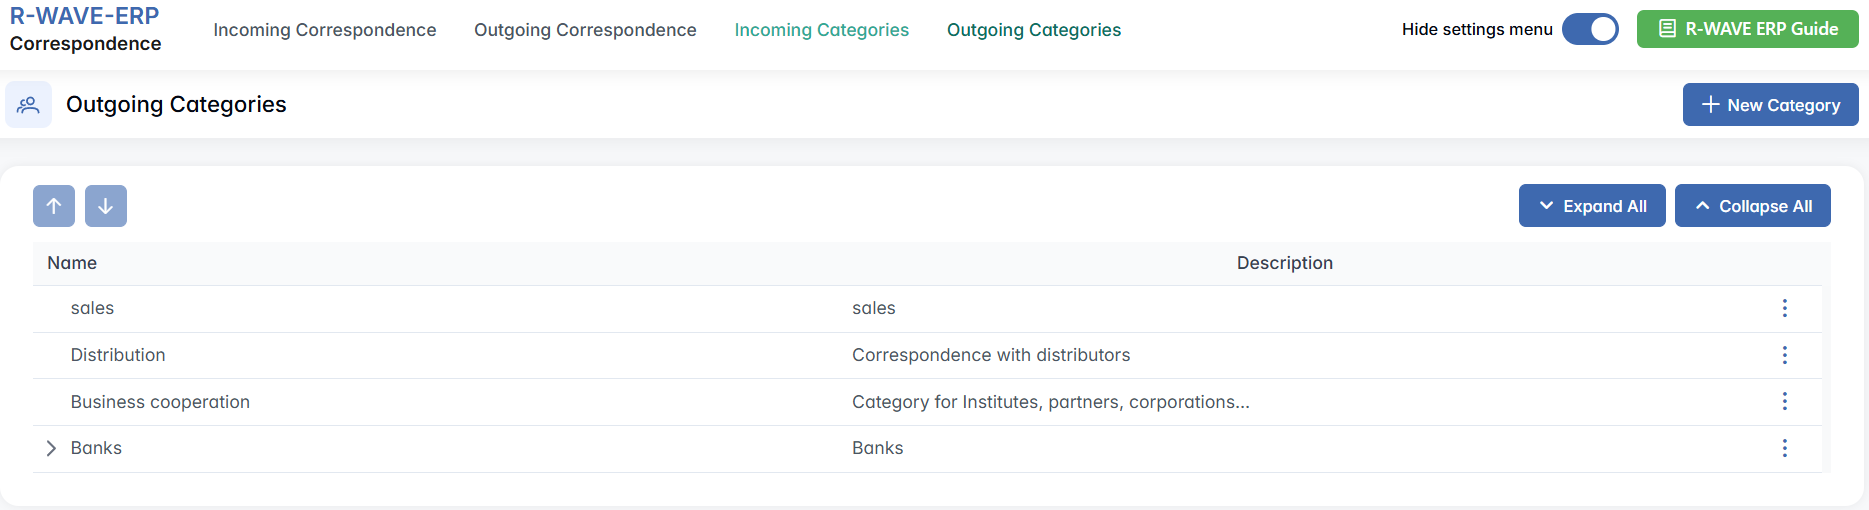
When you open the Incoming Categories section from the hidden settings, you'll see a table listing all currently defined categories. These categories can represent different departments, communication types, or organizational flows.
Each category is displayed with the following columns:
- Name – The title of the correspondence category.
- Description – A short explanation of what kind of correspondence belongs in this category.
Hierarchical Structure
Categories support a nested (hierarchical) structure, meaning you can organize categories and subcategories (e.g., "Finance" as a parent category, with subcategories such as "Tax," "Invoices," and "Reports"). This allows for flexible structuring that matches your company's communication logic.
Creating a New Incoming Category
To add a new correspondence category:
- Click the + New Category button in the top-right corner.
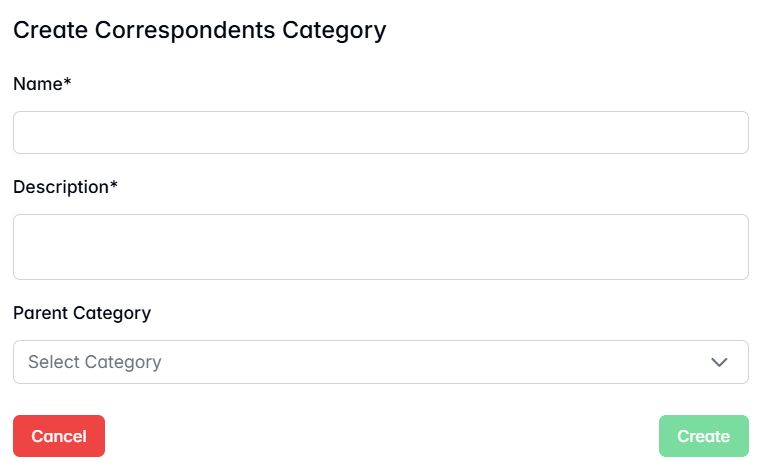
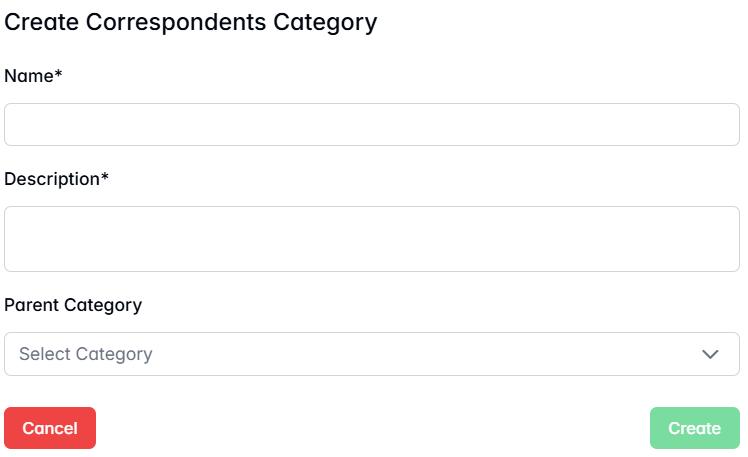
- A pop-up window titled Create Correspondents Category will appear. Fill in the required fields:
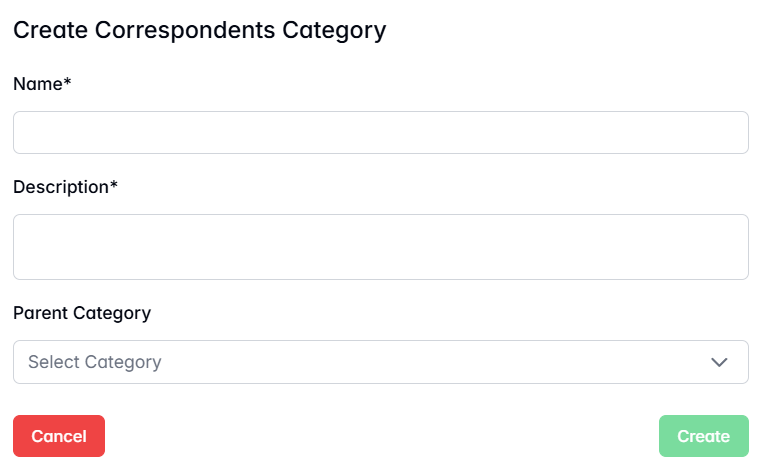
- Name (required) – Enter the name of the category (e.g., "Tax Documents").
- Description (required) – Provide a brief explanation of what this category covers.
-
Parent Category (optional) – If this should be a subcategory, select the parent category from the drop-down list. If left blank, the new category will be created at the root level.
-
Click Create to save the category.
Once saved, the new category will appear in the table and can be used in the Incoming Correspondence creation form.
Editing or Removing a Category
To modify or delete an existing category:
- Locate the desired row in the table.
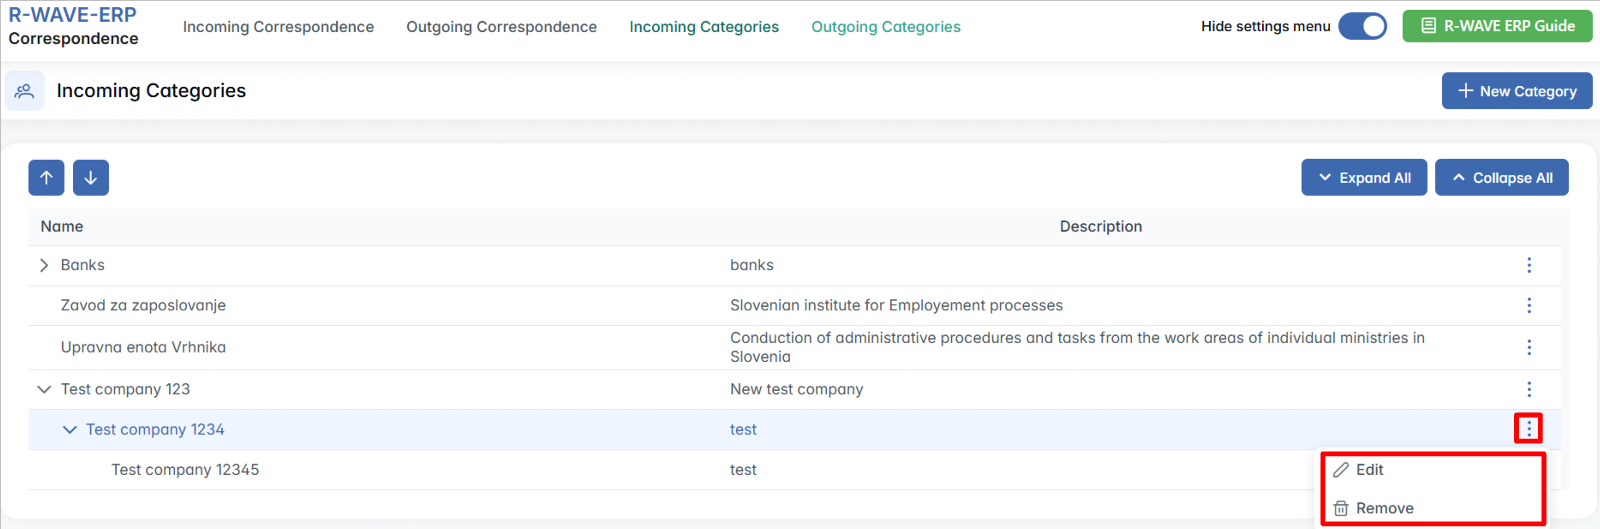
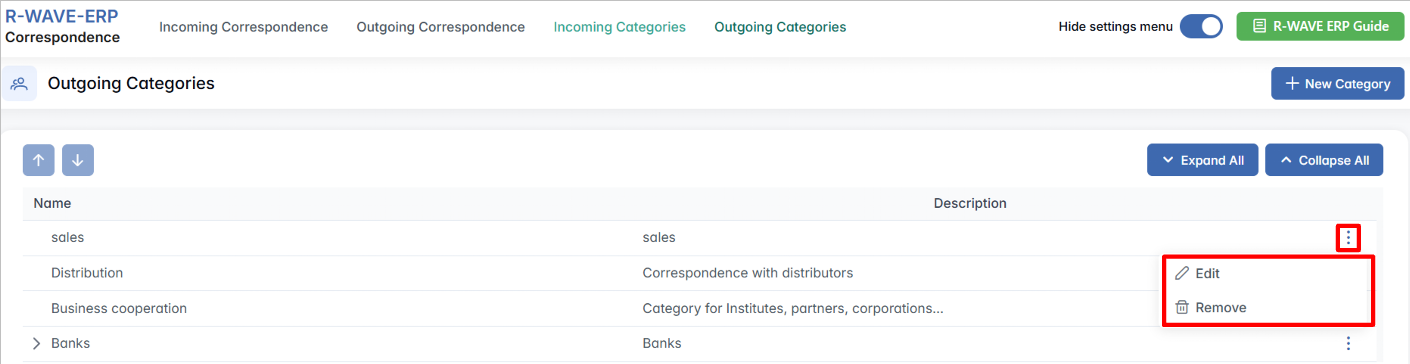
- Click the three dots (⋯) at the end of the row to open the actions menu.
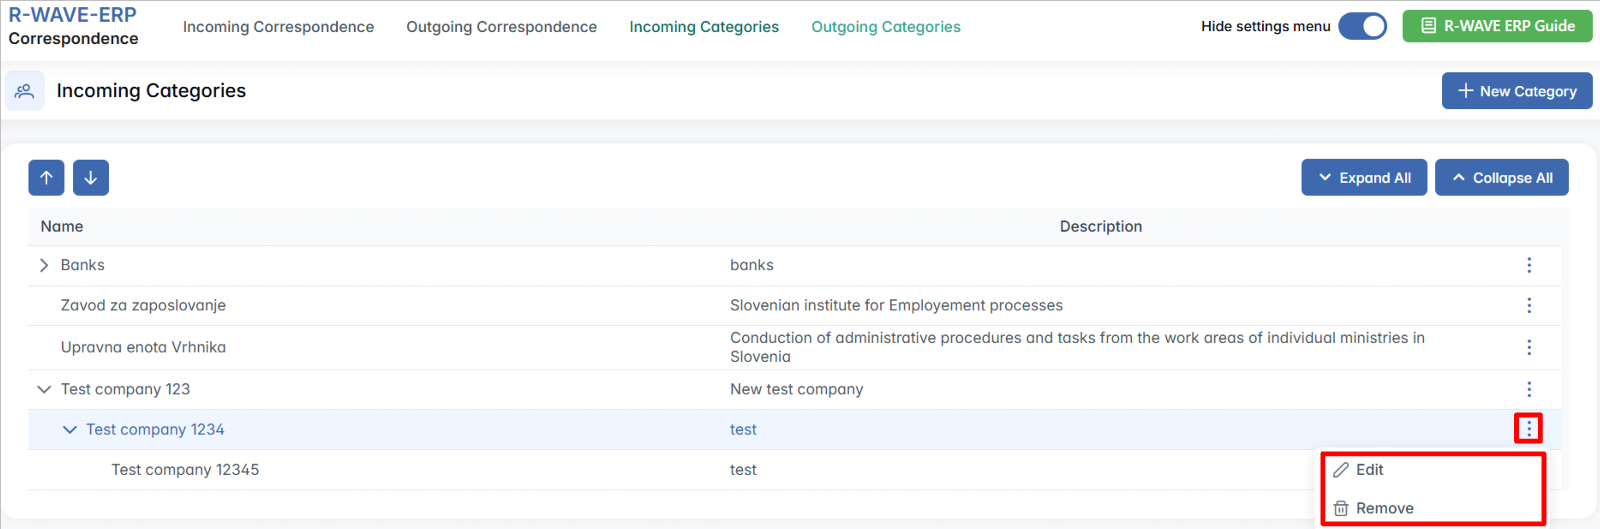
- Choose one of the following options:
- Edit – Opens a pop-up window where you can update the category's name, description, or parent category.
- Remove – Deletes the category from the system.
Deleting a category will remove it from the drop-down options used when registering correspondence. Be careful not to delete categories currently in use.
Outgoing Categories Overview
When you access the Outgoing Categories section from the hidden settings menu, you'll see a structured list of all predefined categories used to classify outgoing correspondence.
Each row in the table includes:
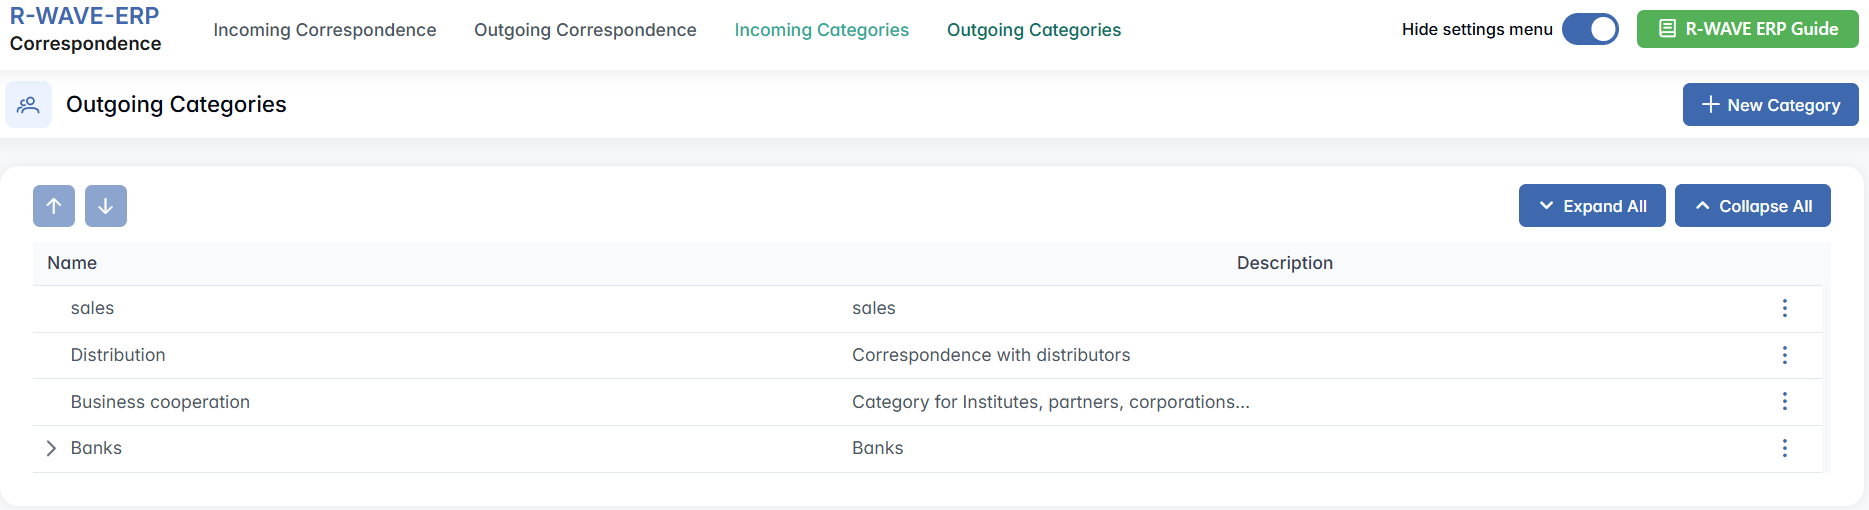
- Name – The name of the category (e.g., "Contracts", "Reports", "HR Letters").
- Description – A short explanation of the type of documents included in this category.
Outgoing Categories also support a hierarchical structure, allowing you to create parent categories with nested subcategories. This is helpful for large organizations with multiple departments or types of communication.
Creating a New Outgoing Category
To add a new category for outgoing correspondence:
- Click the + New Category button in the upper-right corner of the Outgoing Categories page.

- A pop-up window titled Create Correspondents Category will appear. Complete the form with the following fields:
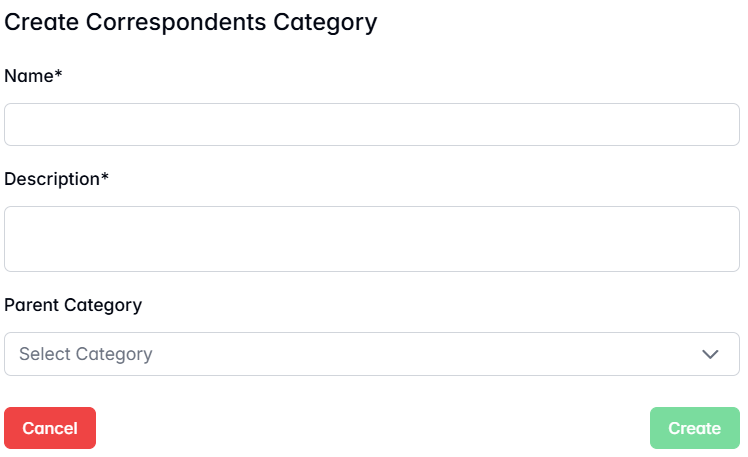
- Name (required) – Enter the title of the new category.
- Description (required) – Provide a brief description explaining what this category represents.
-
Parent Category (optional) – Select a parent category if this should be created as a subcategory. If left blank, the new category will be created at the top level.
-
Click Create to save the new category.
The new category will now appear in the category list and can be selected when creating outgoing correspondence records.
Editing or Removing an Outgoing Category
To update or delete a category from the list:
- Find the desired row in the table.
- Click the three dots (⋯) at the end of the row.
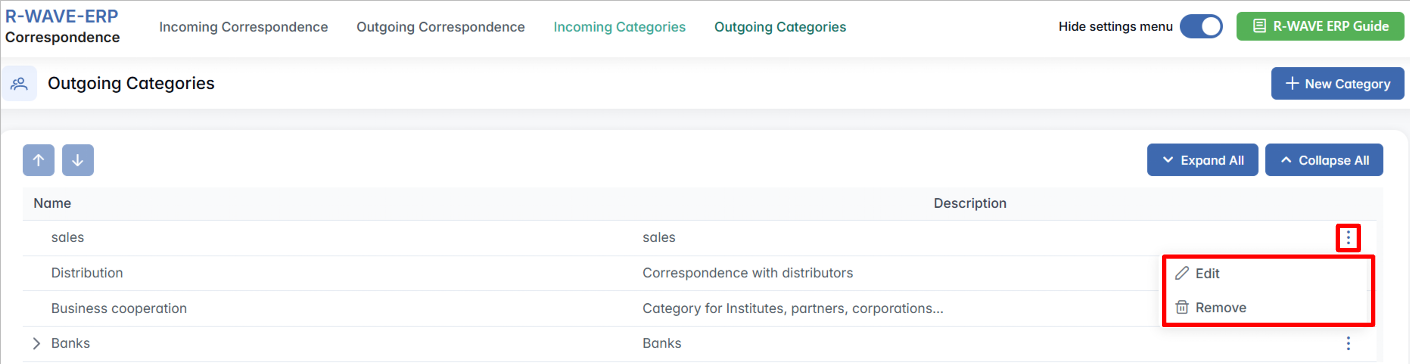
- Choose one of the following options:
- Edit – Opens a pop-up where you can modify the category's name, description, or parent category.
- Remove – Permanently deletes the category from the system.
Deleting a category will remove it from the drop-down options used when registering correspondence. Be careful not to delete categories currently in use.