Contacts and Events Module
The Contacts and Events module in BINU ERP serves as a centralized place for managing company records, business contacts, events, schedules, associated persons, and event-related reports in one place. It helps users keep track of internal and external business interactions, organize repeating activities, and maintain an up-to-date contact database.
The module provides a structured overview of all company cards and their related activity history. From the Company Cards page, users can search and filter companies by several criteria, which makes it easier to quickly find specific customers, suppliers, partners, or other business contacts.
The company list displays key information such as the company name, description, and the latest related event. Event statuses, such as "Not Done", help users monitor pending actions and follow-ups more effectively.
The Contacts & Events module helps improve CRM organization by keeping company information, contact history, planned activities, event records, and follow-up statuses centralized and easy to access. This supports better communication tracking, improves transparency between teams, and helps ensure that important customer or partner interactions are properly documented and followed up on.
The BINU ERP Guide and AI Assistant Tools
The BINU ERP Guide and AI Assistant Tools
The BINU ERP system provides tools to support users in navigating and understanding the processes and functionalities of the system. These tools — the BINU ERP Guide and the BINU AI Assistant — include a built-in contextual help. They are non-intrusive and can be closed or reopened as needed, allowing users to remain focused on their current workflow without interruption.
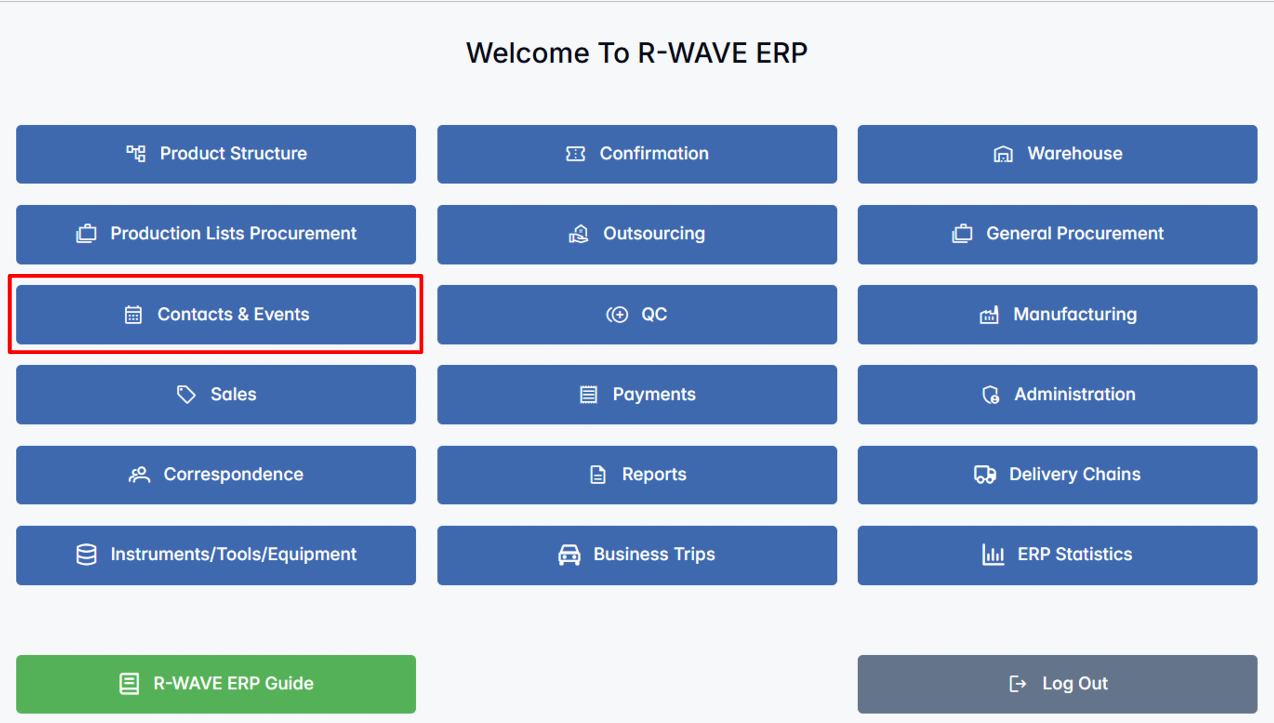
When you click the BINU ERP Guide icon in the upper-right corner of the screen, the pop-up guide window opens. This feature is available across different modules and is designed to help users understand where they are in the system and how to use the current section effectively.

When you click the BINU AI feature on the side of the screen, the chat window opens, where users can choose their language of conversation. The supported languages are: English, Bulgarian, Croatian, French, German, Hungarian, Italian, Romanian, Russian, Serbian, Slovenian, Spanish, Turkish, and Ukrainian.
The BINU AI Assistant provides explanations and documentation for all topics related to the BINU ERP system. Users can ask about specific terms, business processes, system functionalities, or request documentation on a particular topic. To begin, type your question in the input field at the bottom of the chat window.
The BINU ERP Guide: Quick Overview

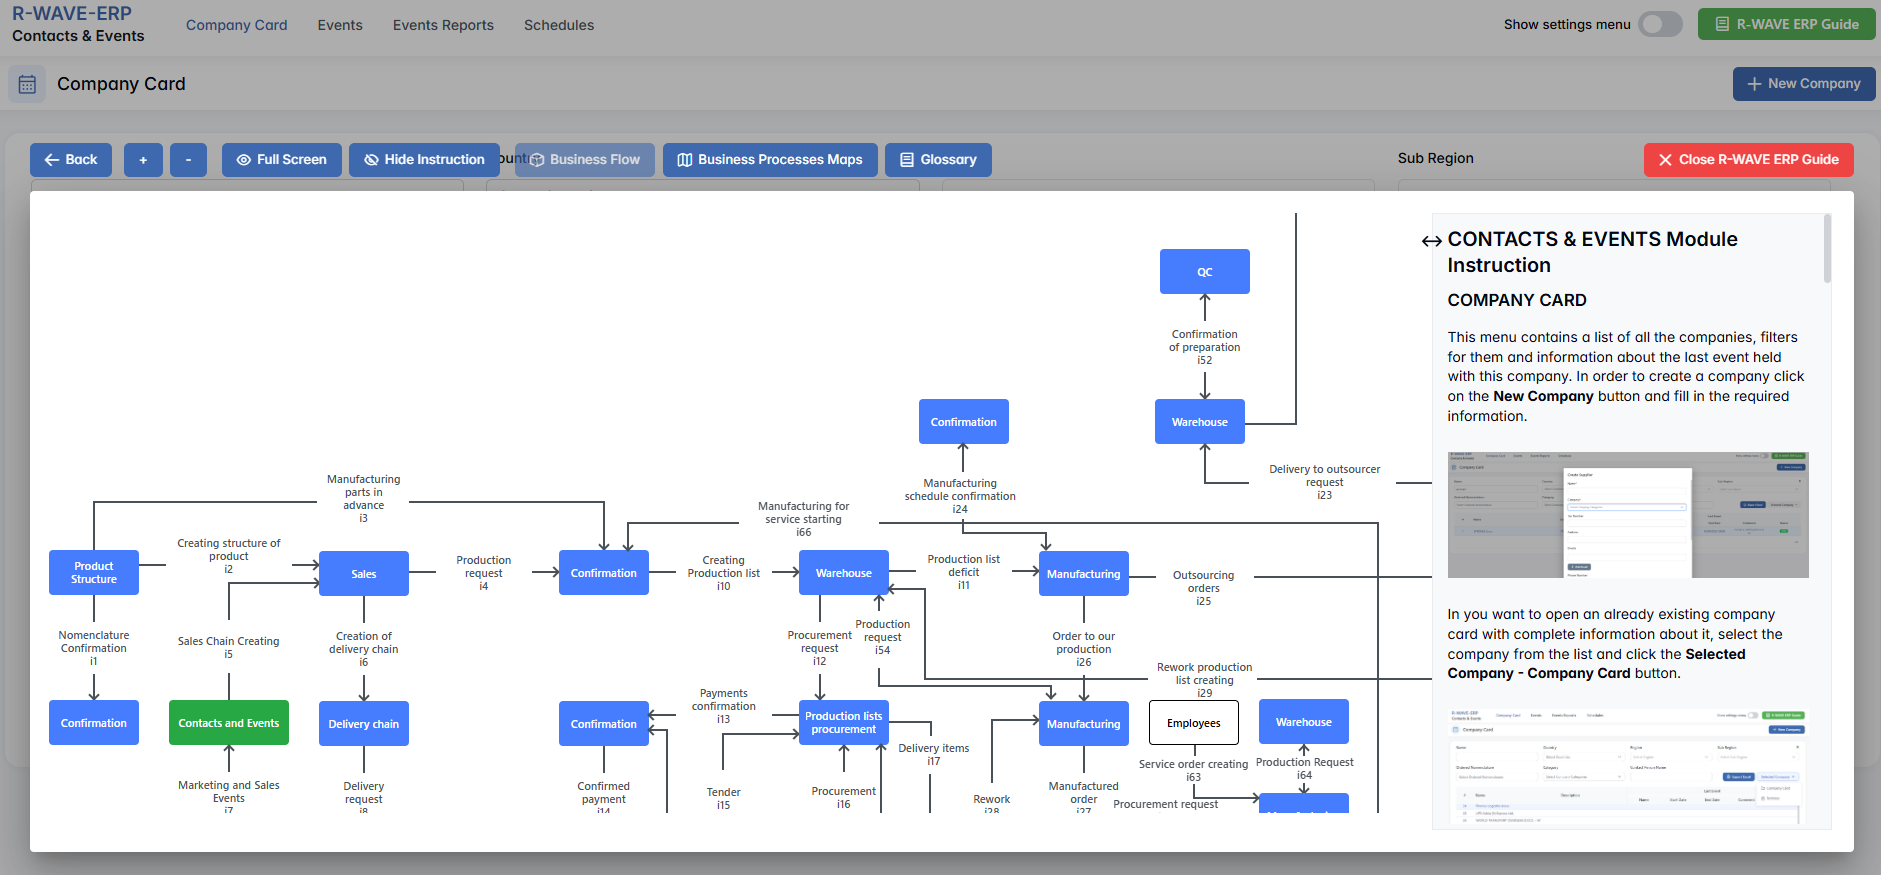
When you click the BINU ERP Guide book icon, you land on the Business Flow map. It has two main sections: the left panel displaying the business flow map and the right panel showing the functional overview.
- Left panel — Business Flow Map — displays a visual diagram of the business processes. It shows how each module is interconnected; for example, you can see how Sales, Manufacturing, Procurement, CRM, QC, and Warehouse are interconnected.
- Right panel — Functional Overview — provides a concise, bullet-style instruction list describing the key operations available in the current module/tab.
Top Bar Options
At the top of the ERP Guide window, you'll find optional tools for deeper understanding: Business Processes Maps, Accounting Flow, and Glossary. The Accounting Flow is meant for financial departments.
Business Processes Maps
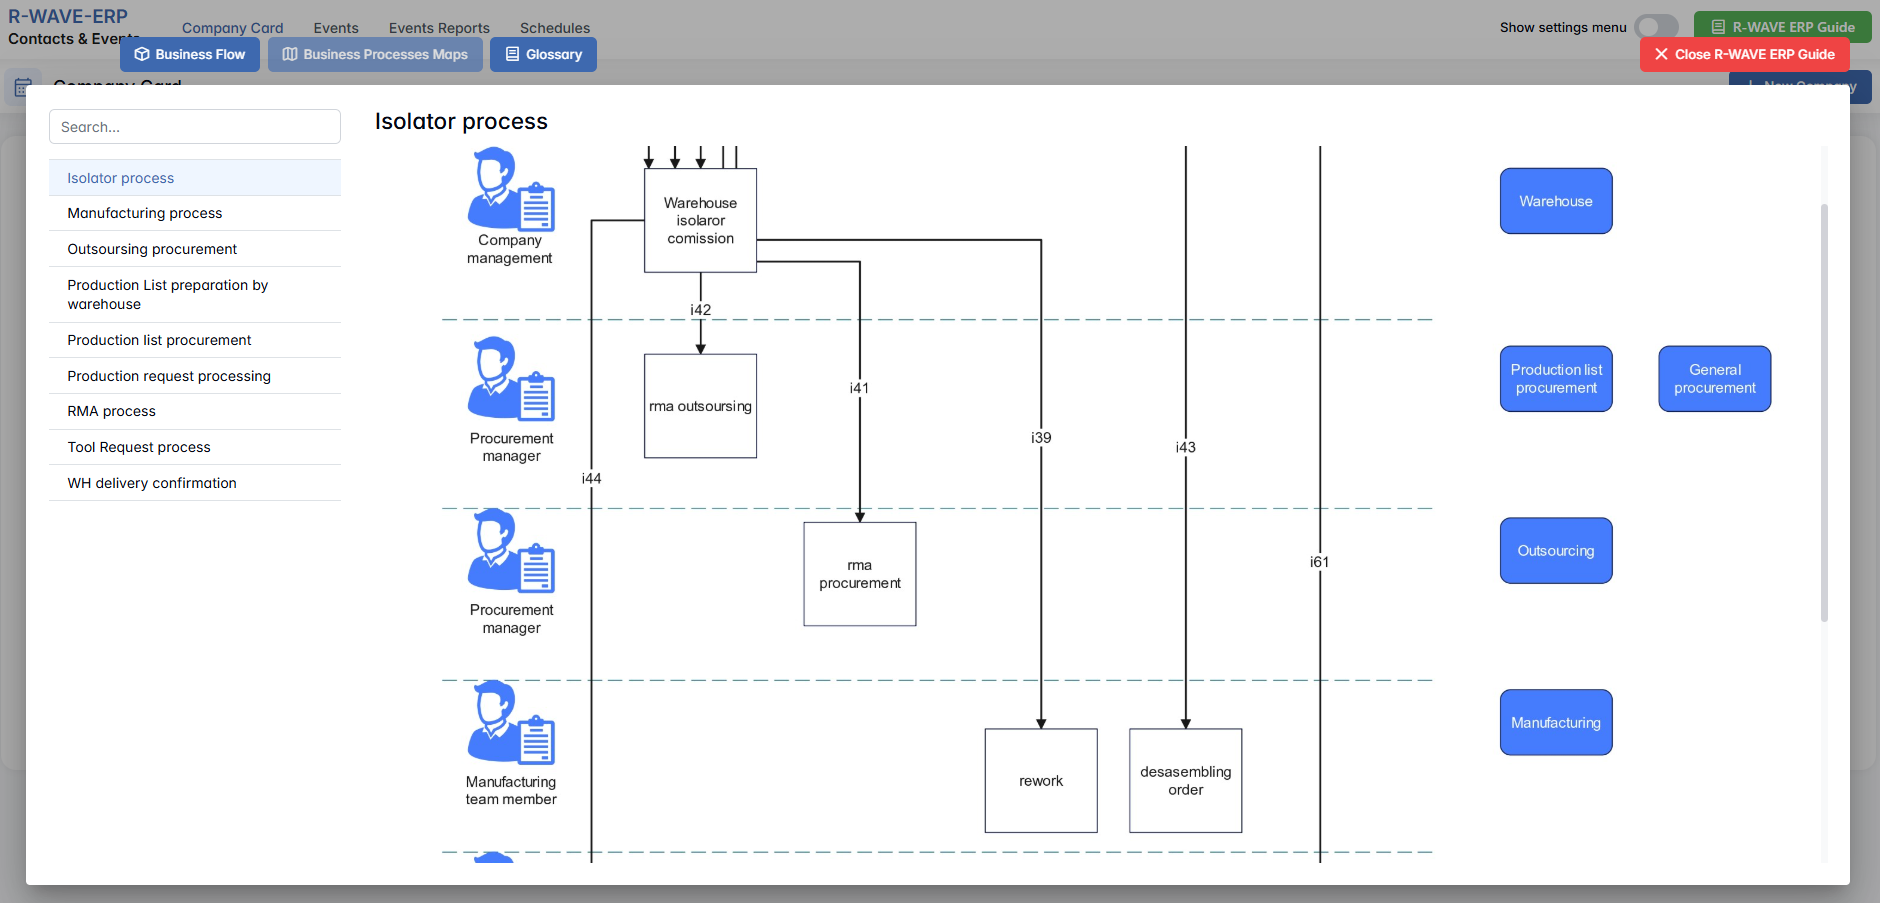
Business Processes Maps provides a visual representation of the company's operational structure and business flow. It helps the user understand how the current module fits into the larger operational structure and makes it easy to grasp the upstream and downstream dependencies within the business processes. The Business Processes Maps can be accessed from various modules.

Accounting Flow: Data Flow Graph and Responsibility Matrix
Accounting Flow is a tool designed for the finance department; it shows where the data originates and defines responsibilities. For this purpose, it consists of two parts: a Data Flow Graph and a Responsibility Matrix.
The Data Flow Graph displays the movement of items from departments to the warehouse and from the warehouse to the departments. Based on these movements, the system tracks the flow of goods entering and leaving the company. The Dashboard section, planned for a future release, will allow users to view real-time data (in, out, balance, product costs).
If you hover over a diagram block, the system highlights the corresponding movement chain.
If you click a block in the diagram, you fix the highlighted chain. To narrow the selection further, click a block in the second, third, or fourth column.
The Responsibility Matrix identifies the department accountable for the selected process.
Glossary
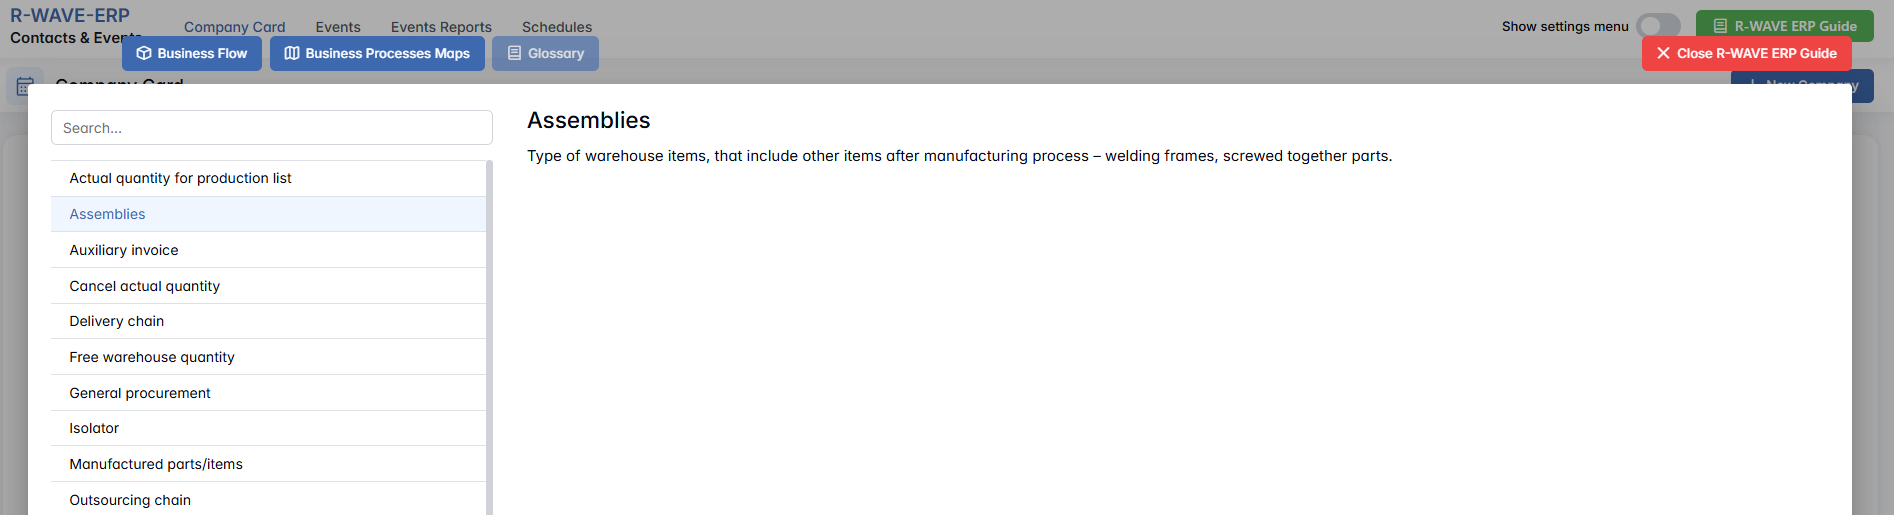
Glossary provides definitions and descriptions of key terms and functionalities used throughout the system. The Glossary can be accessed via the BINU ERP Guide, which is available on any page of the system.
The BINU AI Assistant: Quick Overview
The BINU AI Assistant is specifically designed to help the user with ERP documentation questions. It provides information and assistance related to the BINU ERP system. The BINU AI Assistant understands fifteen (15) languages. It is available on every page as a non-intrusive help tool.

The Purpose of the BINU ERP Guide and BINU AI Assistant Tools
The BINU ERP Guide and BINU AI Assistant help users by:
- Showing where they are within the system (module context and current section).
- Providing a visual schema of the business flow, helping them understand how the current module fits into the larger operational structure.
- Offering a quick-reference instruction panel with the main actions and functions available in the current tab (e.g., creating companies, filtering, scheduling events).
- Offering quick access to the relevant documentation (AI-powered ERP documentation helper).
1. Company Card
1. Company Card
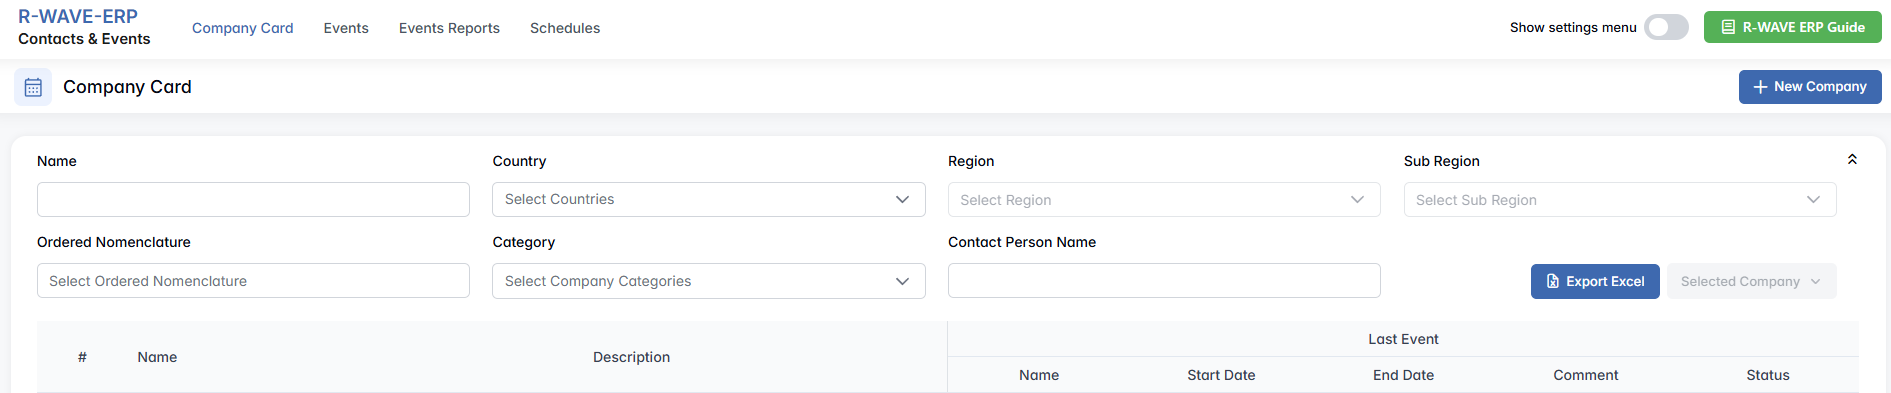
The Company Card tab is the central area for managing all companies that your organization interacts with — such as clients, suppliers, potential leads, or partners. Each company card can contain detailed information including region, category, and associated contacts. You can also track the latest events related to each company directly from this view.
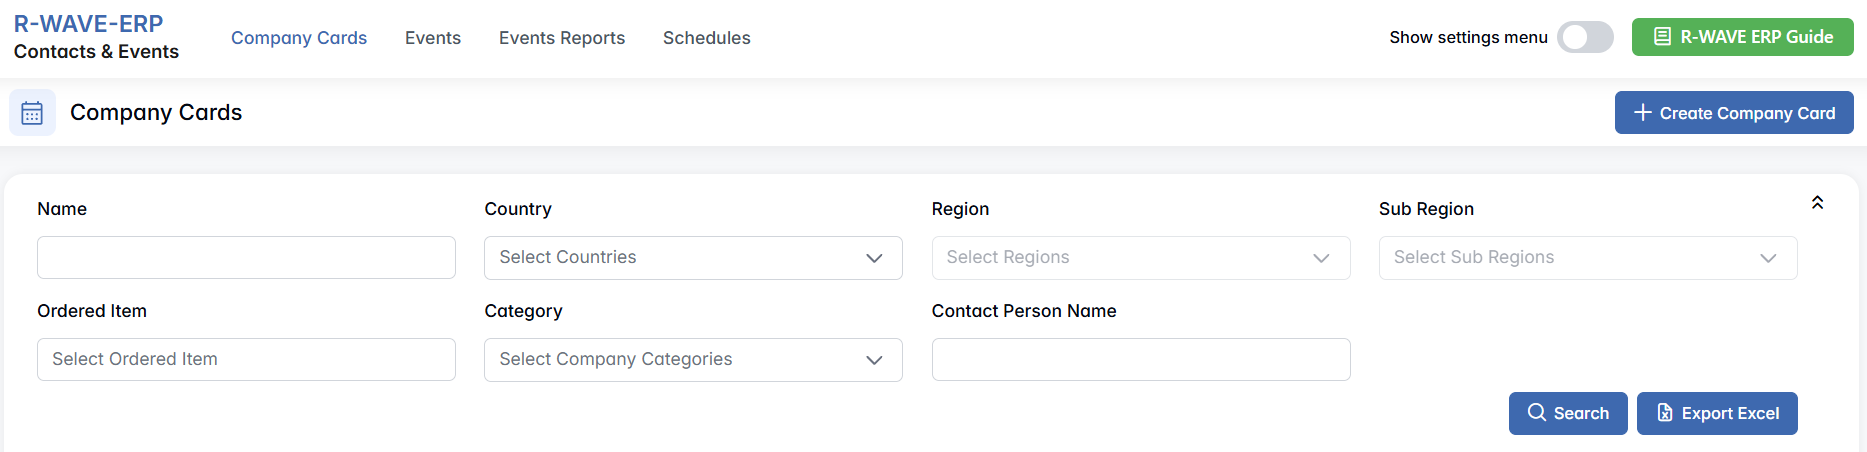
At the top of the page, you'll find a comprehensive filter panel that allows you to search and refine the list of companies based on multiple parameters.
Filtering Options
- Name – Enter a full or partial company name to search.
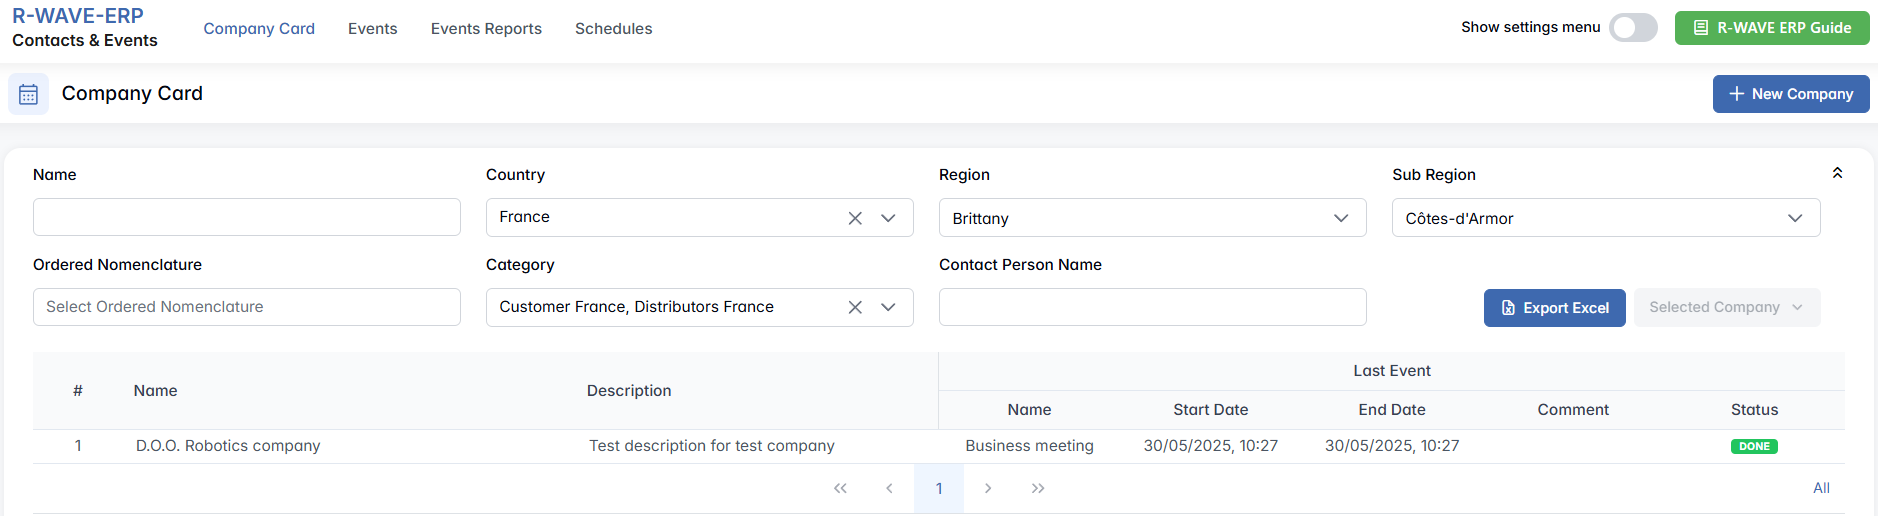
- Country – Select one or more countries. This is a multi-select field.
- Region and Sub Region – These fields are dependent on the selected country and become active only after at least one country is selected.
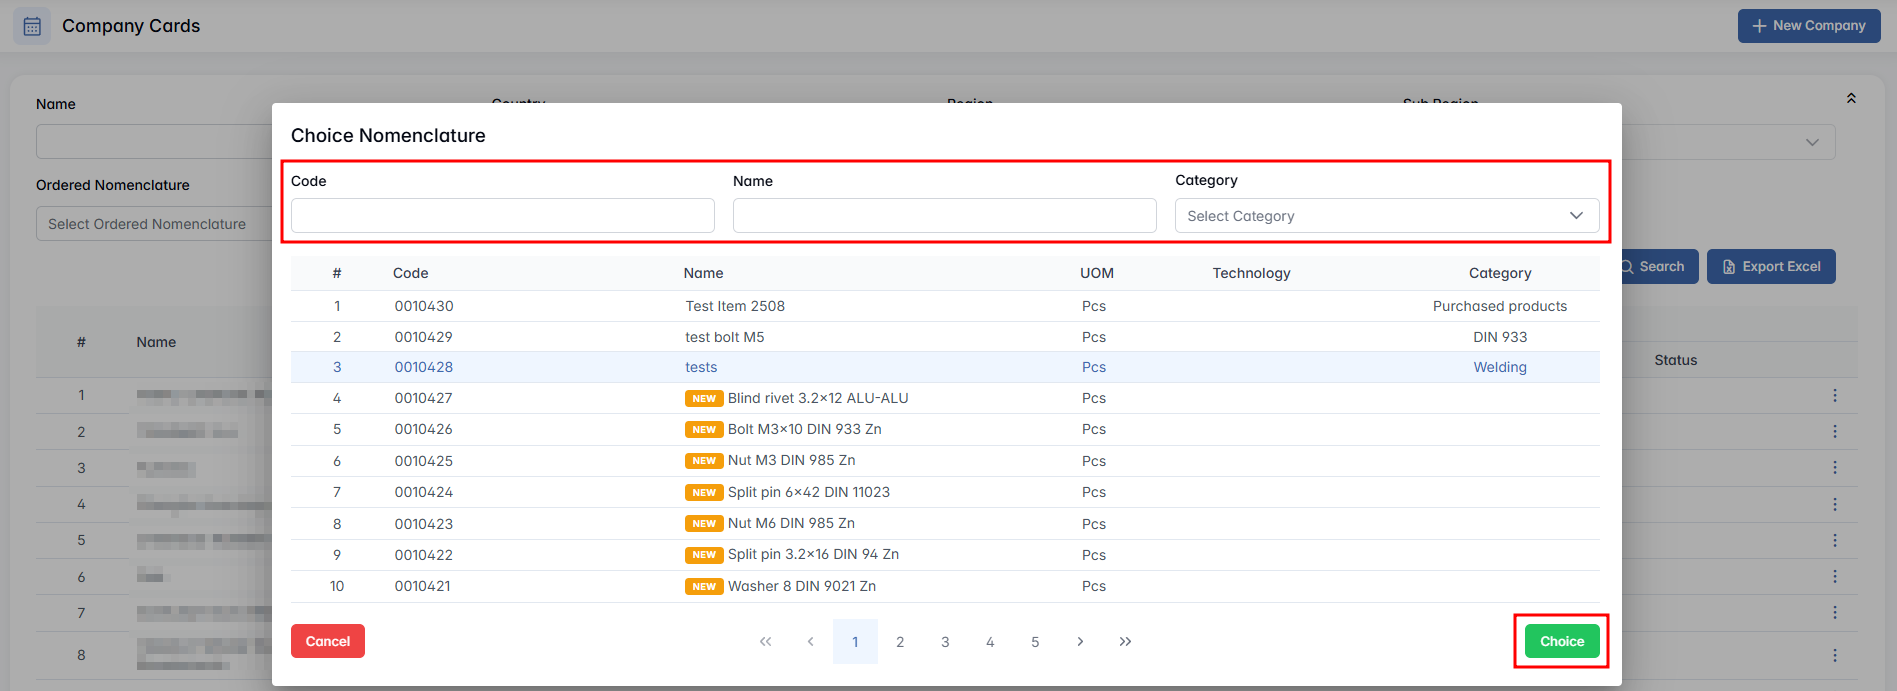
- Ordered Nomenclature – Classify companies based on internal nomenclature structure. When clicked, a detailed selection panel opens with the search fields Code, Name, and Category. You can also select a nomenclature directly from the list displayed below the filter.
Note: Nomenclatures marked with the "NEW" label are not available for selection, as they still require confirmation.
- Category – A multi-select field where you can assign companies to more than one category (e.g., "Supplier" and "Partner"). The list of categories is fully customizable by the user.
- Contact Person Name – Search by the name of a person associated with any company.
Company List Table
Once filters are applied, the matching companies are displayed in a structured table below. Each row provides a summary of the company and its recent interaction history:

- Name – The name of the company.
- Description – A brief internal description or note.
- Last Event – Displays key information about the most recent event associated with this company, including Event Type, Start Date, End Date, Comment (additional notes or context), and Status (such as "Done" or "Not Done").
Add & Export
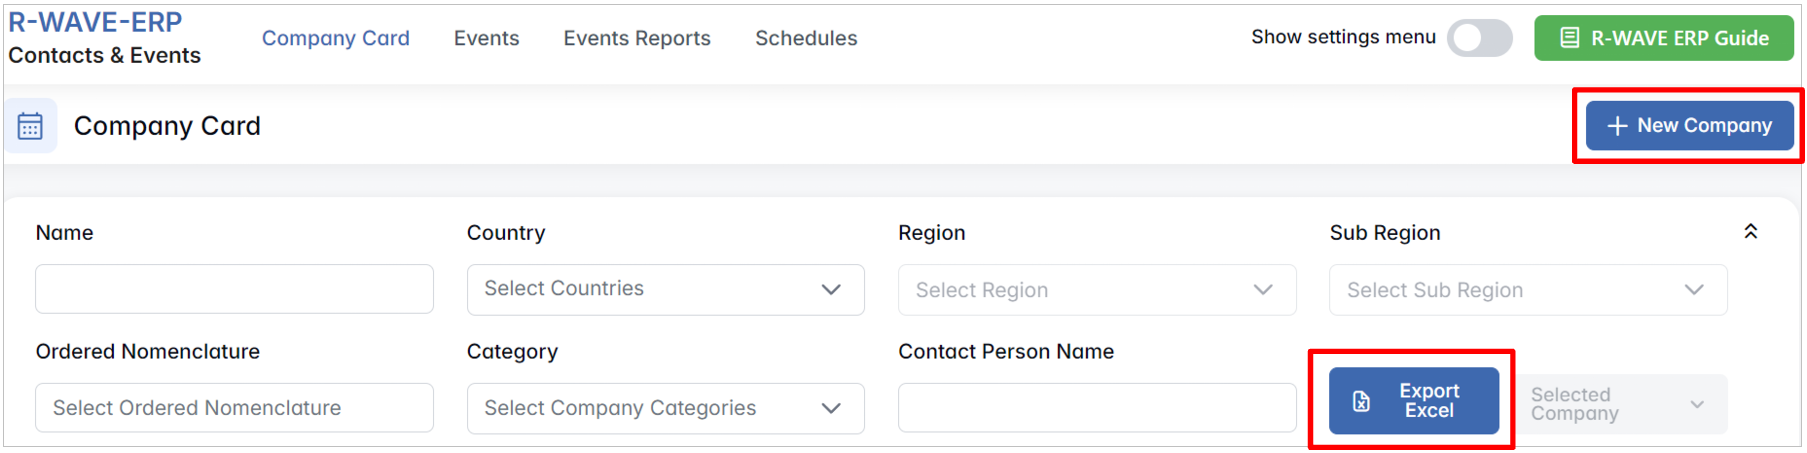
- + New Company – Add a new company card manually.
- Export Excel – Export the filtered list of companies for offline use or reporting.

2. Creating and Editing a Company Card
2. Creating and Editing a Company Card
In the Contacts & Events module of BINU ERP, you can easily add new companies to your system and manage their profiles over time. Each company is stored as a Company Card, which includes contact information, categorization, event history, linked data, and more.
How to Create a New Company
- Click the + Create Company Card button.
- A pop-up form titled Company Card will open, where you can input the company's details.
Mandatory fields:
- Name * – Enter the full name of the company.
- Category * – Select one or more categories (e.g., Supplier, Customer, Business Partner). This is a multiple-choice field.
Additional (optional) fields:
- Code – Internal identifier or reference code, contains numbers only.
- Tax Number – Official tax ID or VAT number.
- Registration Number – Legal business registration identifier.
- Address – Physical or legal address.
- Emails – One or multiple email addresses.
- Phone Number – Contact phone.
- Website – Official website URL.
- Country – Select the country. Once selected, this enables the Region and Sub Region fields (which depend on the selected country).
- Nomenclature – Choose a classification using internal nomenclature (opens a searchable pop-up with Code, Name, and Category).
- Description – Any additional notes or summary about the company.
- Don't Have VAT – Check this box if the company is not VAT-registered.
After completing the form, click Create to create the company card.
Viewing and Managing a Company Card
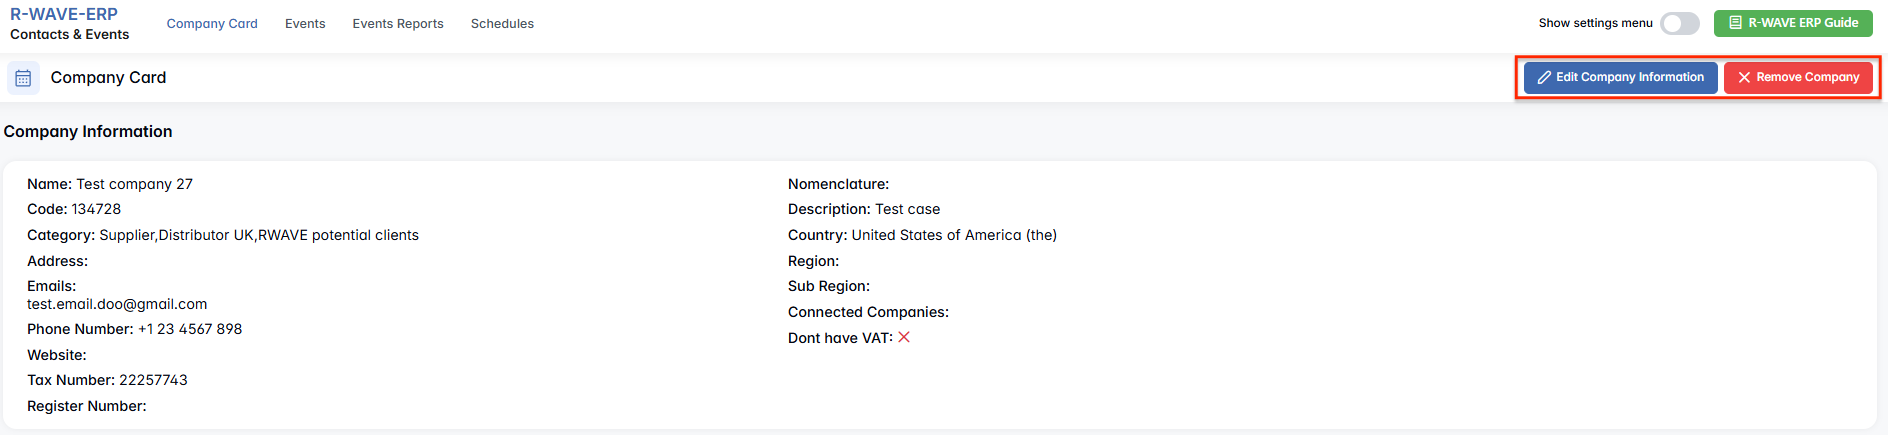
Once the company is created, the Company Card Profile window will open. This contains several sections and actions:
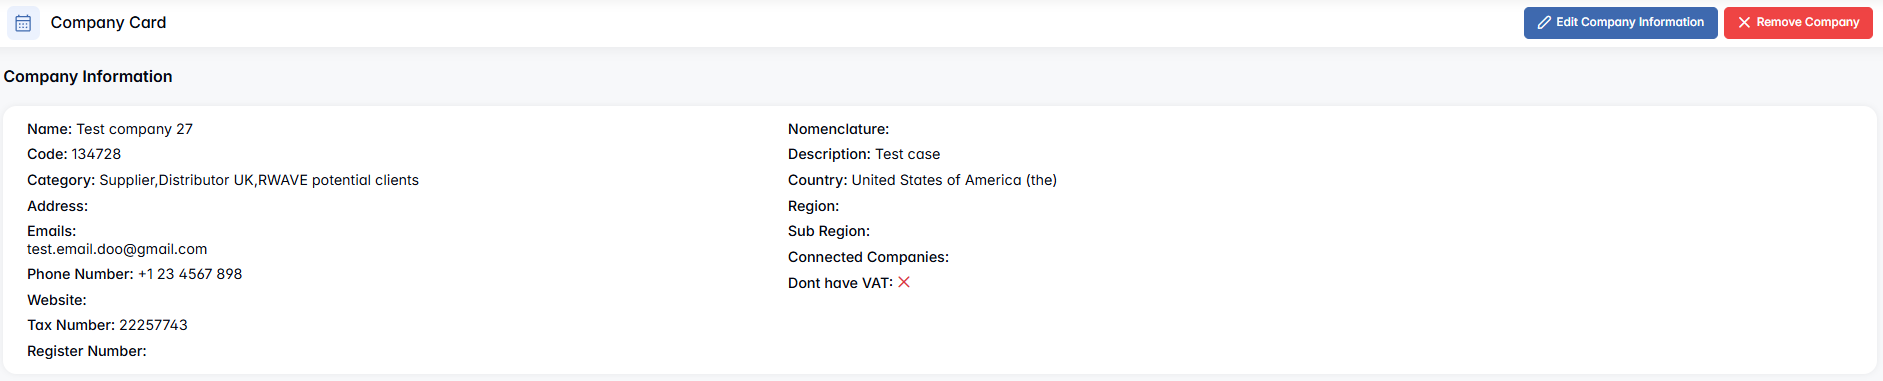
- Company Information – Basic profile data (editable).
- Contact Persons – List of associated individuals with roles and contact info.

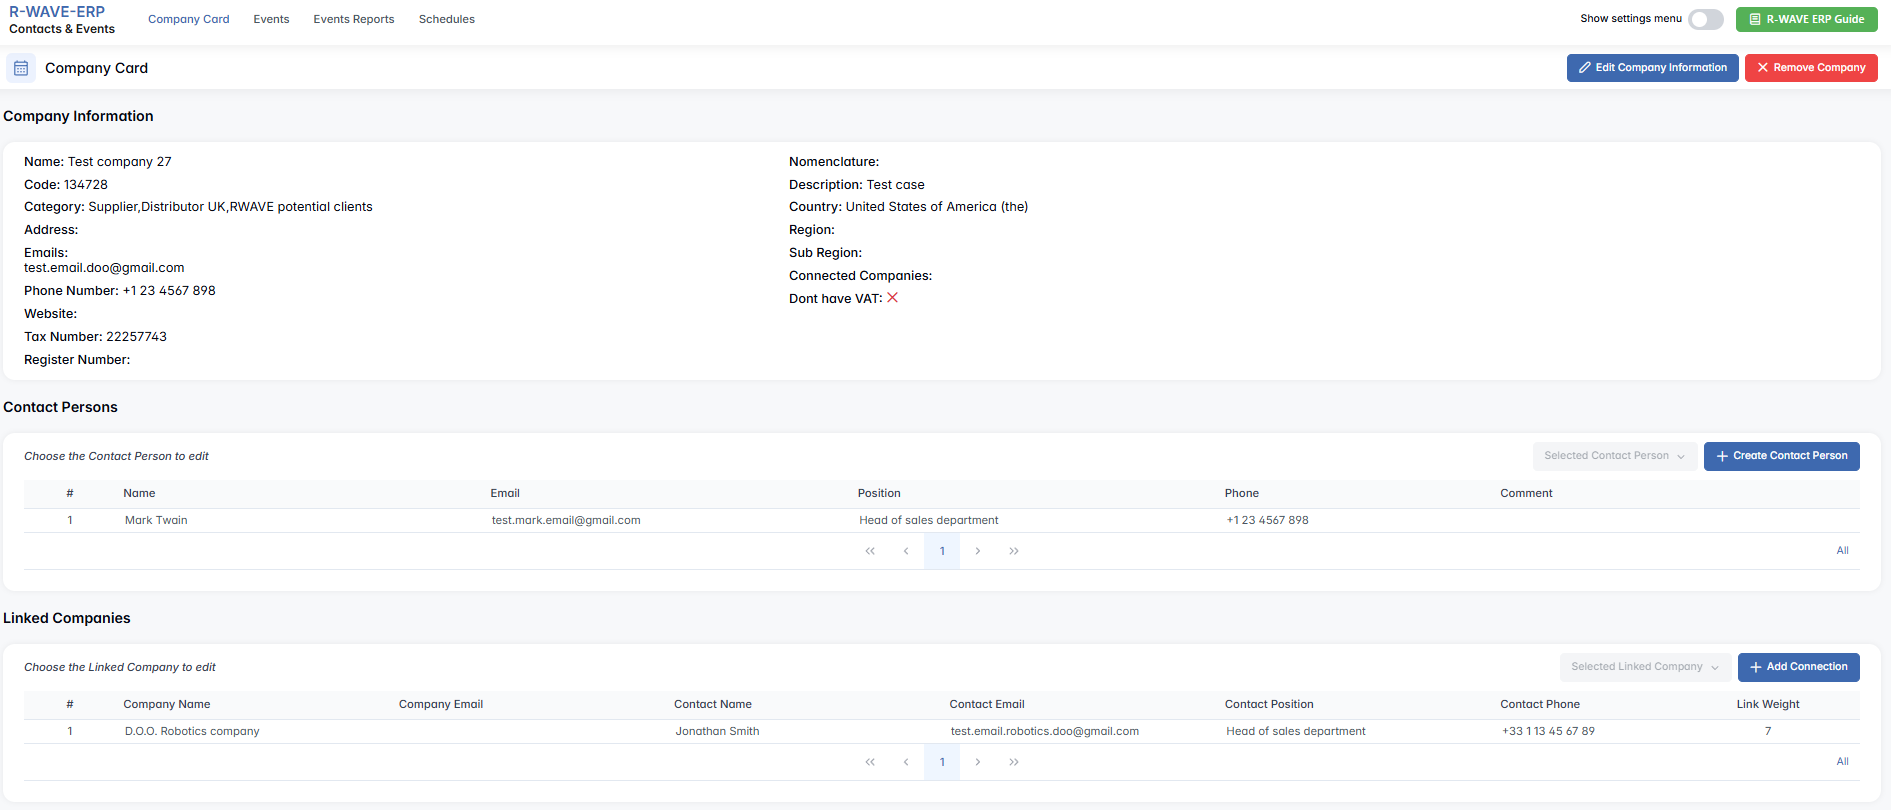
- Linked Companies – Displays connections to other companies in the system.
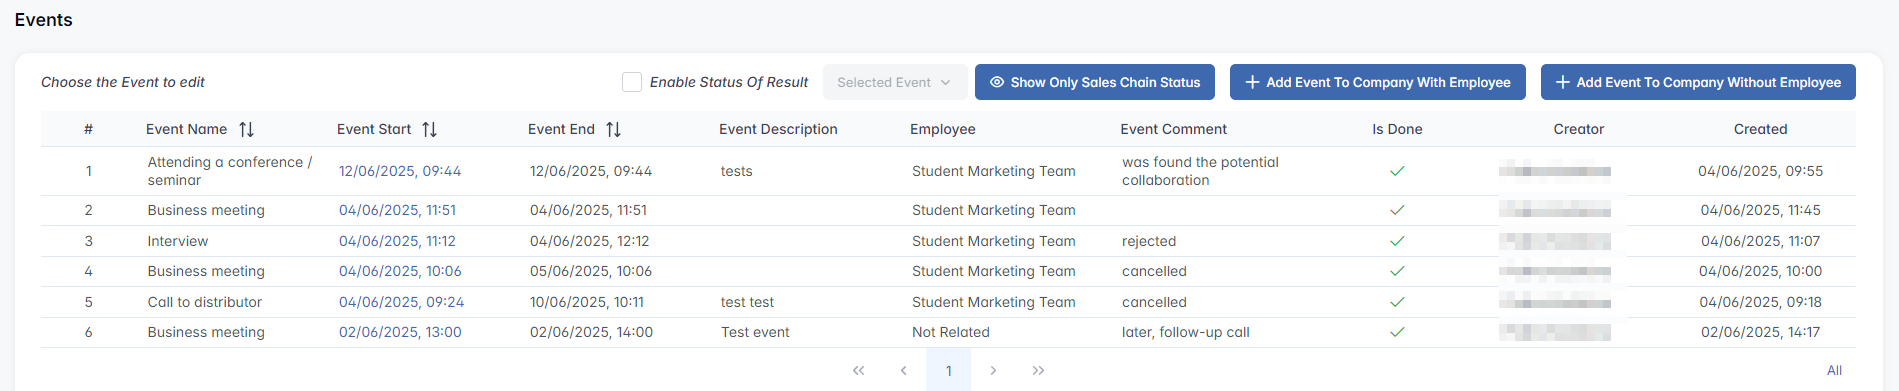
- Events – Log of interactions, meetings, and activities related to this company.

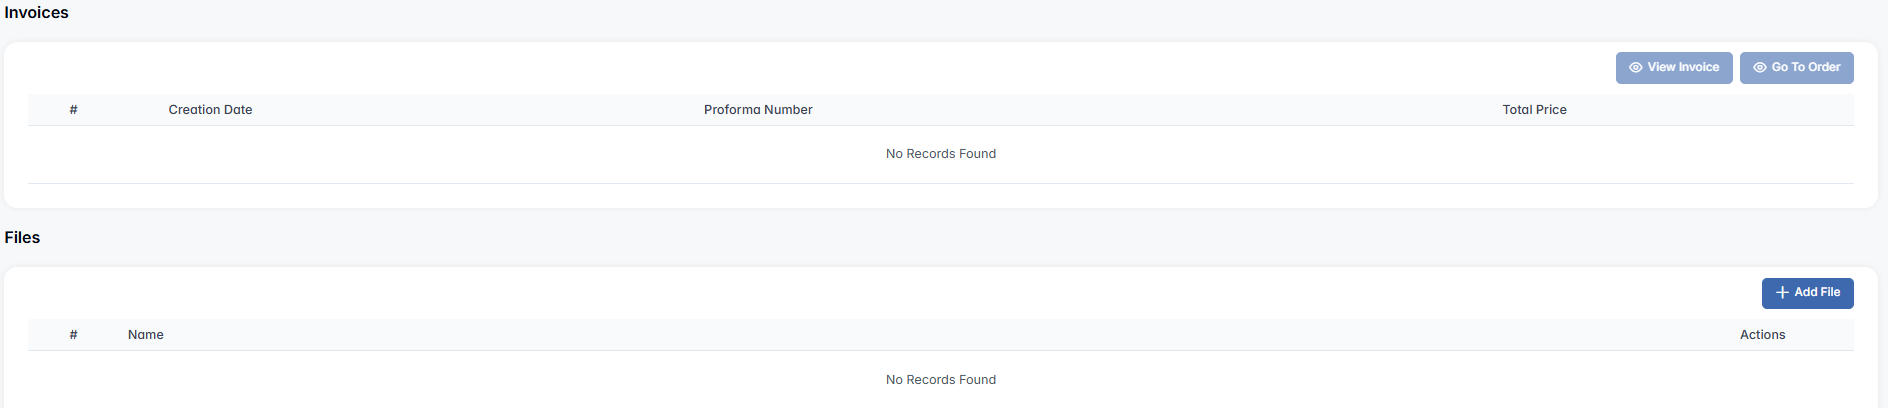
- Invoices – Associated financial documents.
- Files – Uploaded files such as contracts, documents, or notes.
Available actions:
- Edit Company Information – Opens the editable form to update company details.
- Remove Company – Deletes the company from the system (permissions may apply).
Opening an Existing Company Card
To view or edit an existing company's profile:
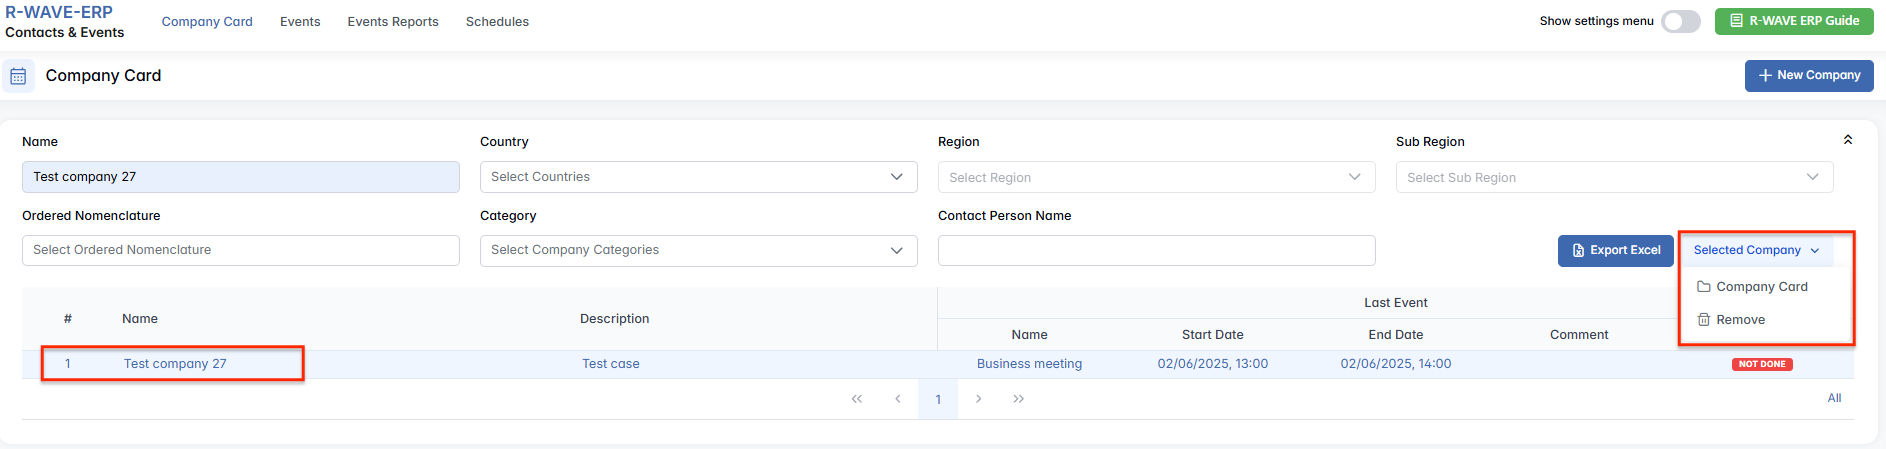
- Search or filter the company. In the Company Card tab, use the filter panel at the top of the screen to narrow down the list.
- Select the company from the list. Click once on the row of the company you want to open.
- Open the company card. After selecting the row, click the Selected Company button, then click Company Card to open the full profile of the selected company, or Remove to delete the company from the system.

3. Contact Persons
3. Contact Persons
In each Company Card, you can manage the individuals who represent or communicate on behalf of that company. These are the people you contact for operations, sales, support, negotiations, and other business interactions.
Creating a Contact Person
To add a new contact person:
- Open the relevant Company Card from the list.
- Navigate to the Contact Persons section.
- Click Create Contact Person.
This action opens a form where you can enter the individual's details.

Contact Person Fields
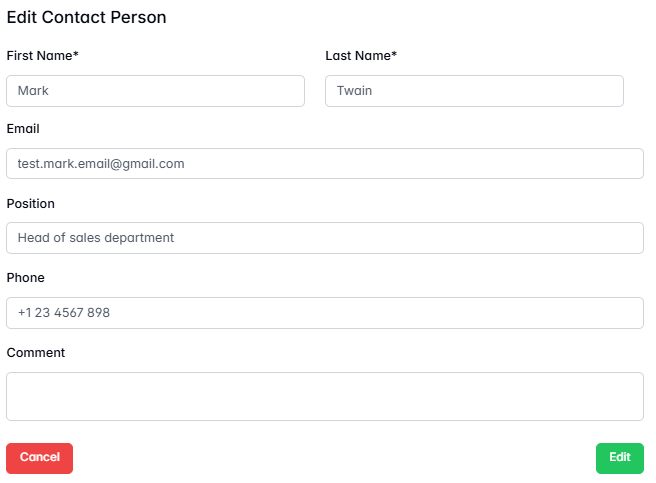
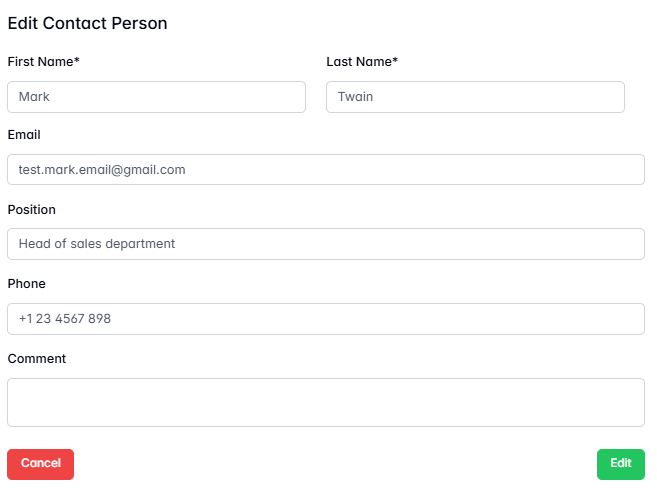
- First Name – the first name of the contact person (mandatory).
- Last Name – the last name of the contact person (mandatory).
- Additional Information – optional details such as Email Address, Phone Number, Position, and Comments.

After saving, the contact will be added to the list associated with this specific company.
Opening, Editing, or Removing a Contact Person
The Contact Persons section displays a list of all individuals associated with the company. To manage an existing contact:
- Click on the row of the contact person you want to access. This activates the Selected Contact Person button.
- Click Selected Contact Person to open a dropdown menu with three available options:

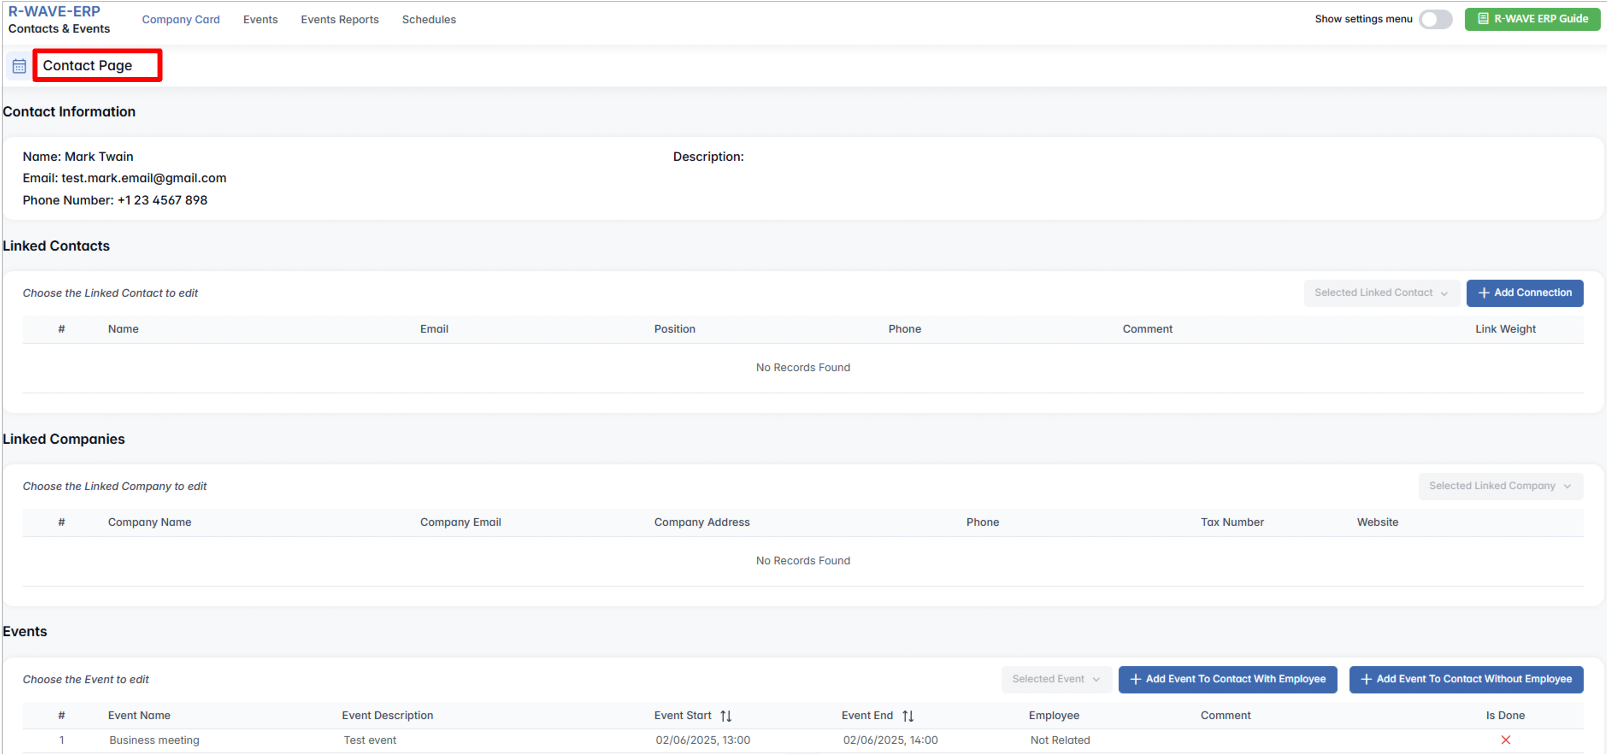
- Contact Person Page – Opens the Contact Page of the selected person.

- Edit – Opens the form to update their information.

- Remove – Deletes the contact from the company profile (based on user permissions).
Viewing and Managing a Contact Person Page
You can navigate through different tabs and sections on this page:
- Contact Information – Basic profile data.
- Linked Contacts – Displays connections to other contacts in the system.

To add a new contact, click the Add Connection button. To edit or remove a linked contact, select the desired row and click the Selected Linked Contact button.

- Linked Companies – Displays connections to other companies in the system.

- Events – Log of interactions, meetings, and activities related to this contact.

Here, the user can add an event to a contact, select the desired event row, click Selected Event, and mark it as Done (if not already completed). They can also Edit the event to add or update a comment, or Remove the event from the list if needed.
4. Linked Companies
4. Linked Companies
In BINU ERP, you can define and manage relationships between different companies in your database using the Linked Companies feature. This allows you to reflect real-world connections such as partnerships, client-vendor relationships, subcontractors, affiliates, and more — directly inside each Company Card.
A linked company is another company within your system that has a meaningful connection with the current company. These connections are useful for understanding business networks, managing collaboration, and supporting internal workflows.
Viewing Linked Companies
To see which companies are linked to the one you're currently viewing:
- Open the Company Card of the company.
- Navigate to the Linked Companies section.
You'll see a list showing:
- Linked company's name
- Contact person (if assigned)
- Position, email, and phone
- Assigned connection weight (relationship strength)

Creating a Linked Company Connection
To create a new link between companies:
- Open the Company Card where you want to add a connection.
- Go to the Linked Companies section.
- Click the Add Connection button.
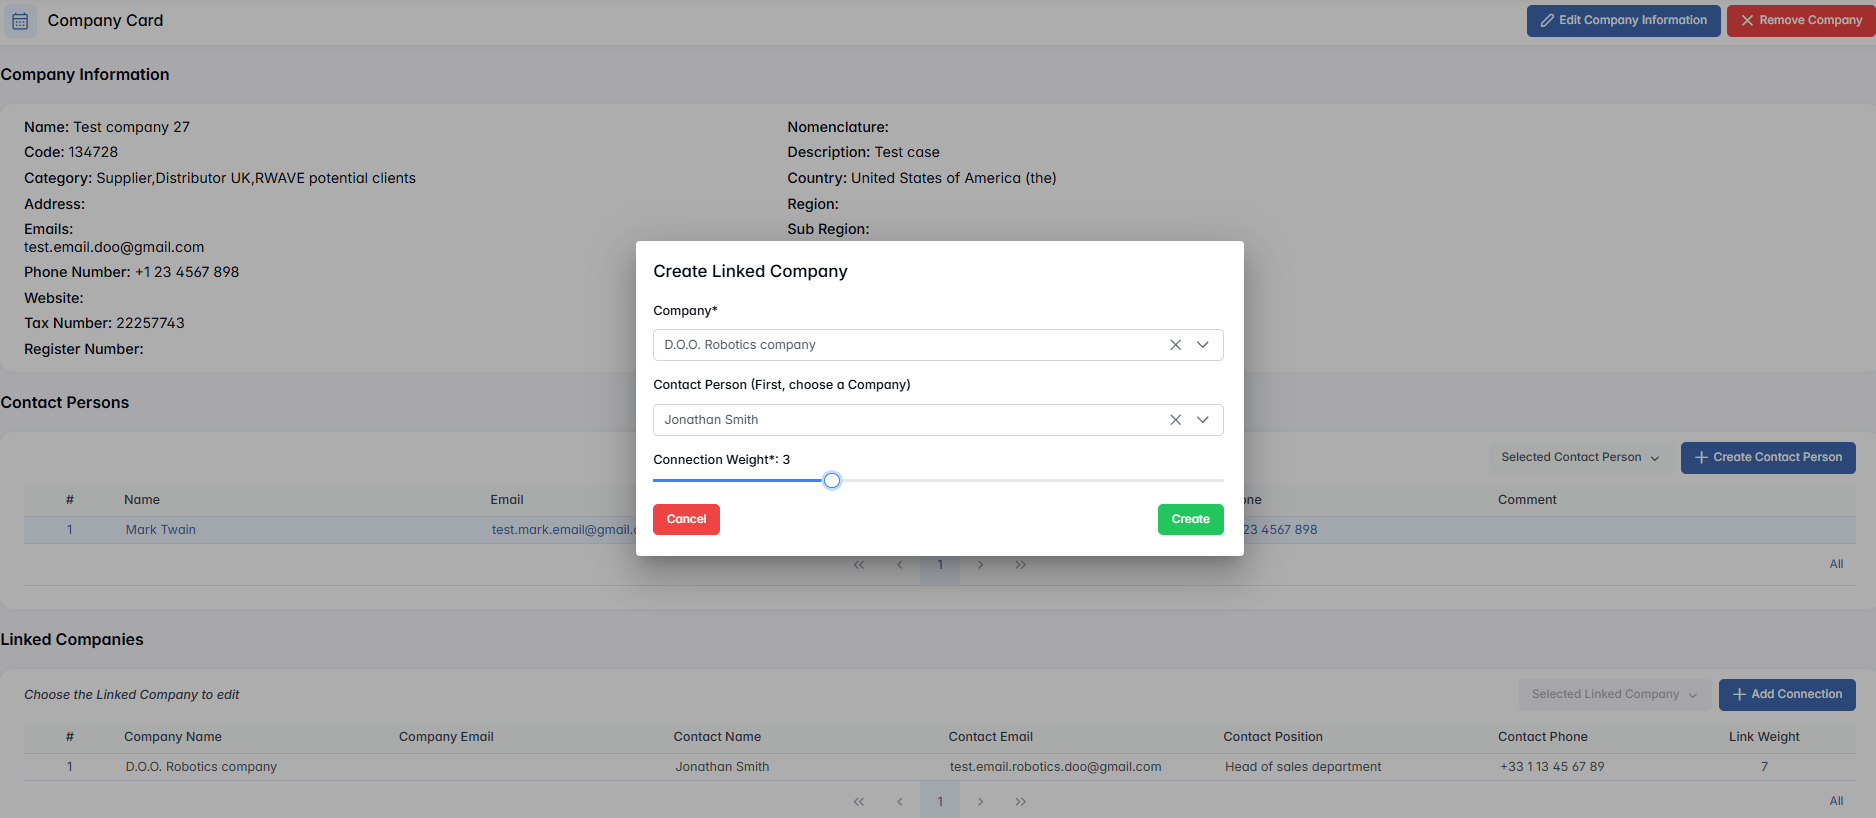
A pop-up window will appear. In this window, follow these steps:
- Search & select the company. Browse the list or use search to find the company you want to link to. You can filter by name or category.
- Choose contact person(s) (optional). If relevant, you can associate specific individuals from that company to make the connection more detailed (e.g., key account manager, sales representative).
- Assign a connection weight. Use the range slider (0 to 10) to define the strength of the connection. A score of 0 indicates no strong connection; a score of 10 indicates a critical or strategic relationship.
- Click Create to finalize and save the connection.
Managing Linked Company Connections
Once connections are created, you can manage them directly from the Linked Companies section:
Click on a row to highlight it. This will enable the Selected Linked Company button. After clicking it, you will see options to:
- Open Contact Person Page (if available)
- Open Company Page (if available)
- Edit – update the connection weight or change associated contact persons.
- Remove – if the relationship is no longer relevant, you can delete the link at any time.
5. Events: Tracking Activities with Companies
5. Events: Tracking Activities with Companies
The Events feature in BINU ERP allows you to log, monitor, and evaluate all types of business interactions — from internal meetings and sales calls to customer presentations and follow-ups. By documenting each activity and its outcome, your team gains insight into relationship progress and the effectiveness of each engagement.
Events can be created from three locations in the system:
- From the main Events module in the Contacts & Events section.
- From a Company Card — with the company pre-filled.
- From a Contact Person's profile — with both the person and their company pre-filled.
Where to Create Events
There are three ways to create an event:
- From the main menu:
- Go to Contacts & Events > Events
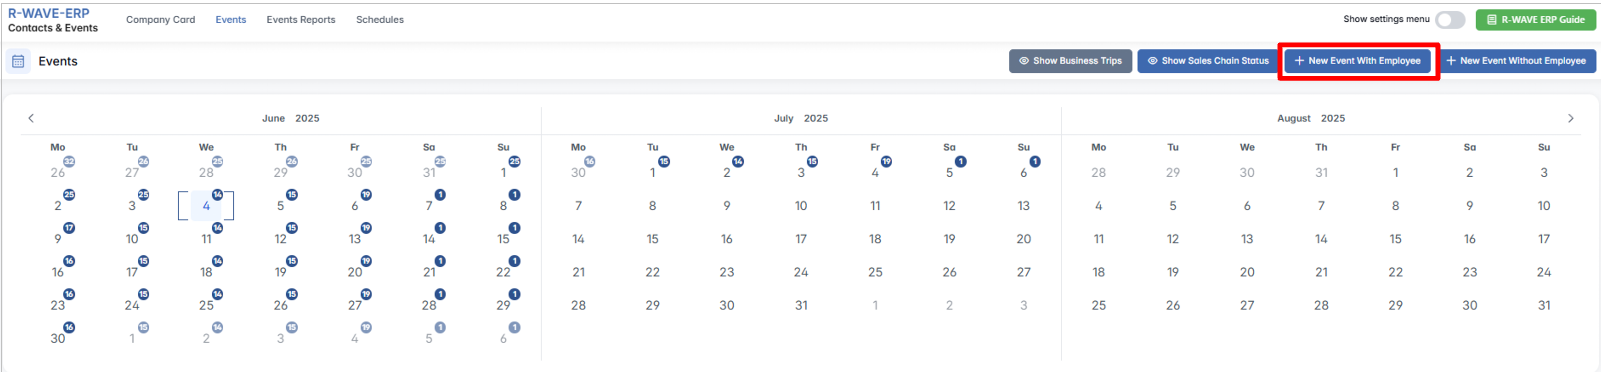
- Click + New Event With/Without Employee

- From a Company Card:
- Open the Company Card
- Click + Add Event To Company With/Without Employee from the event section
- From a Contact Person page:
- Open a contact's profile
- Click + Add Event To Contact With/Without Employee from the event section

Creating a New Event
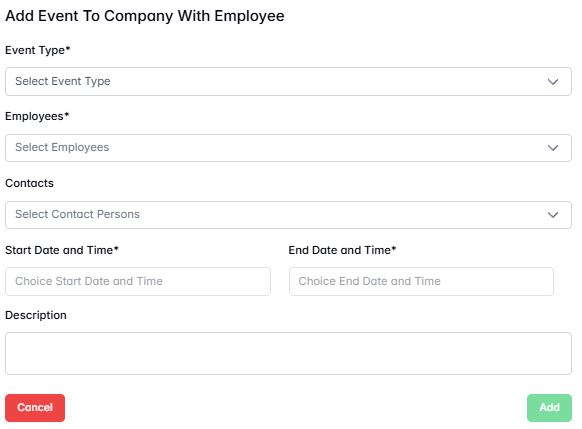
Clicking + Create Event opens a pop-up titled Add Event.
Required fields:
- Event Type * – Select the type of interaction (e.g., Business Meeting, Customer Visit, Interview).
- Employees * (if the With Employee box is checked) – Select one or more employees who are involved in the event.
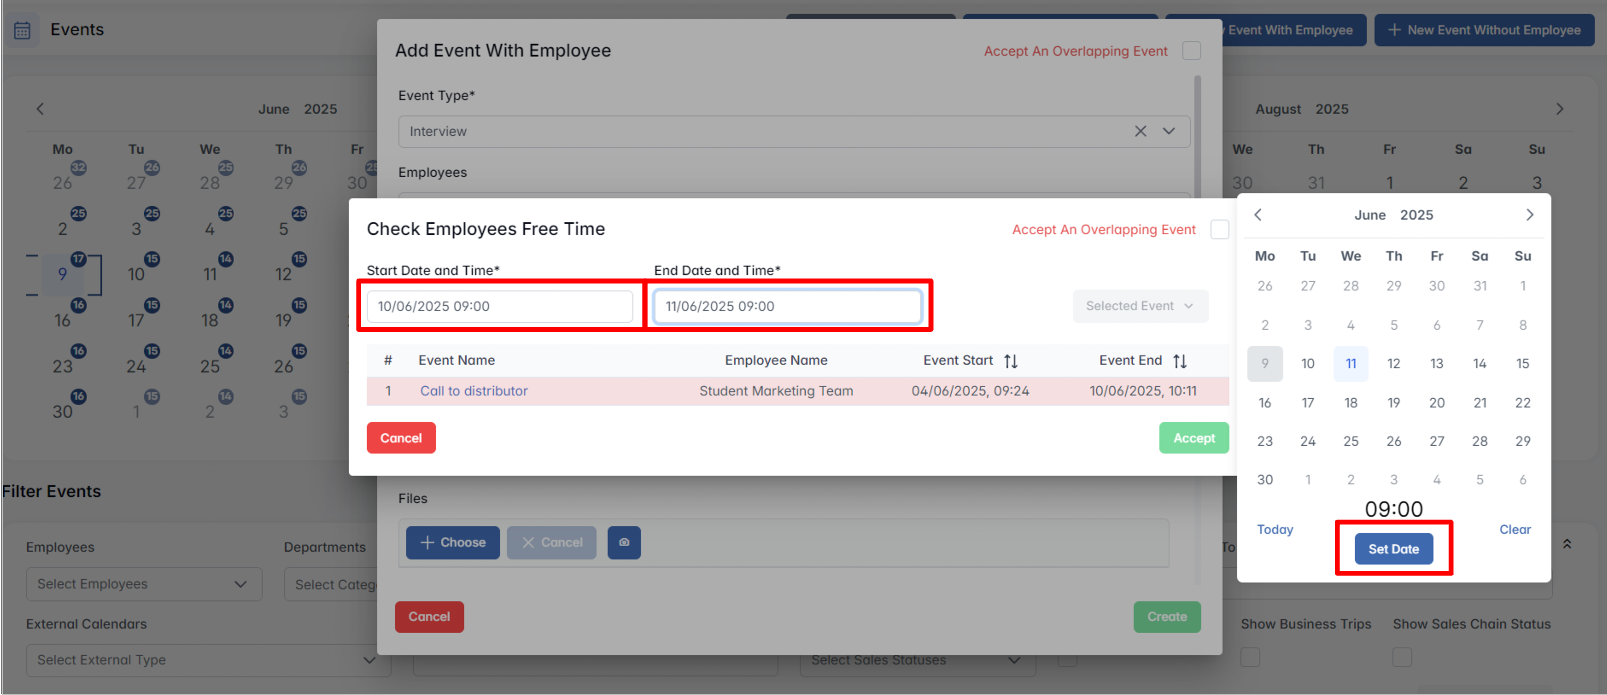
- Start / End Date and Time * – After choosing a date in the calendar, be sure to click Set Date to confirm.

Optional fields:
- Companies – Link one or more companies involved in the event.
- Contacts – Select contact persons (if relevant).
- Description – Provide context, goals, or planned outcomes.
- Files – Upload any documents relevant to the event.
- Repeatable Event – Use the toggle to mark this event as part of a repeating schedule.
When creating an event from a Company Card or Contact Person page, the corresponding company/person is pre-filled automatically.
Completing and Tracking an Event
Once the event has taken place, it should be marked as Done. This finalizes the event — it becomes read-only (except for result color, which can still be updated).
Outcome tracking fields:
- Event Comment – Describes the outcome, next steps, or client feedback.

- Activity Status – Marks the event as completed.
Once set, the event becomes read-only — you can no longer edit its fields, but you can still change the result color.
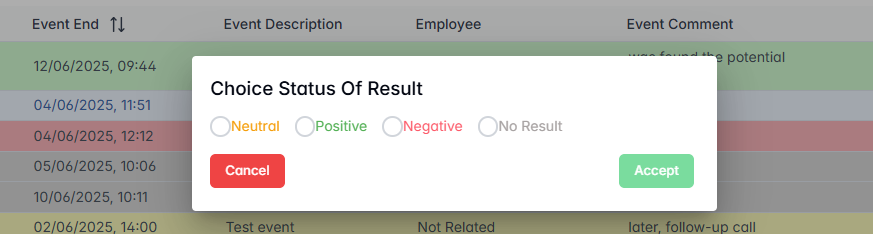
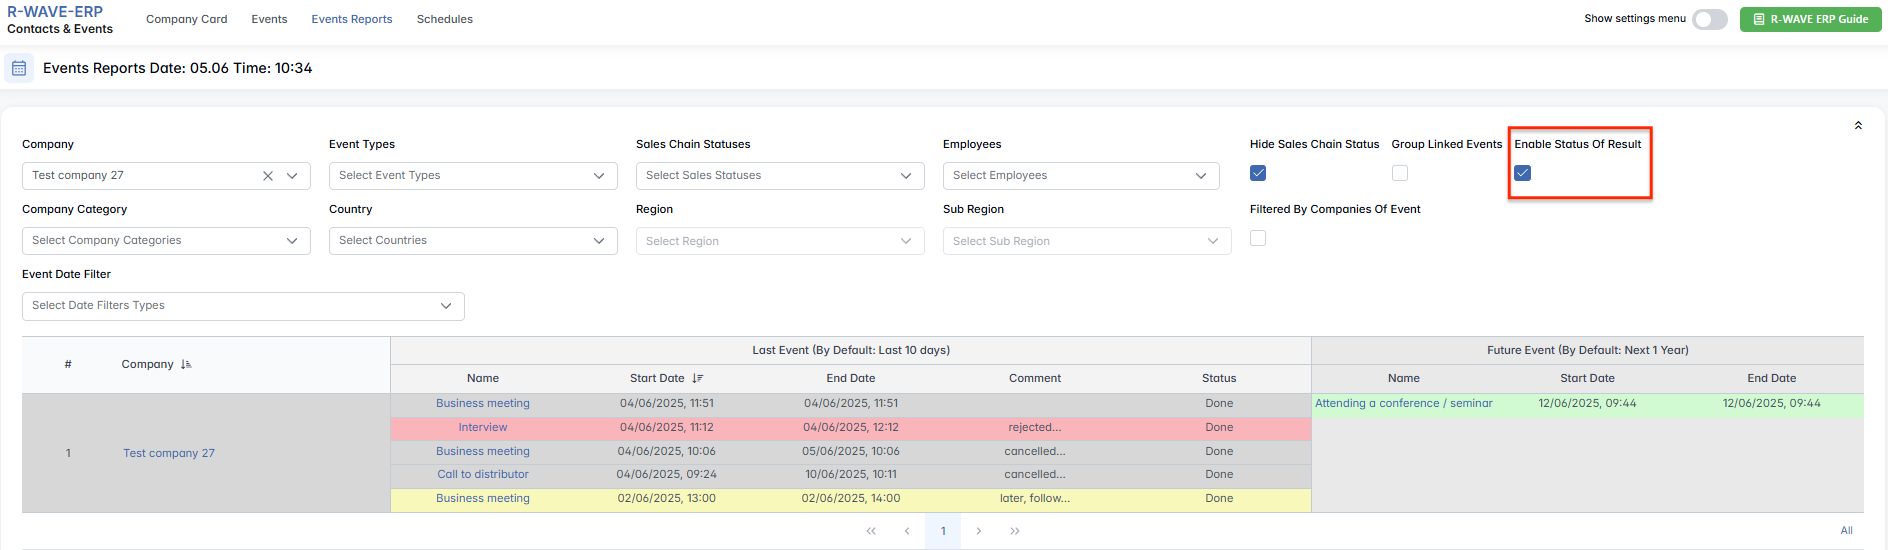
- Result Color – Indicates the quality of the outcome:

| Color | Meaning |
|---|---|
| Green | Positive result — success, interest, agreement. |
| Yellow | Neutral result — no clear outcome, follow-up needed. |
| Red | Negative result — no interest, failed attempt. |
| Grey | No result — unclear or not evaluated. |
Scheduling an event and handling conflicts
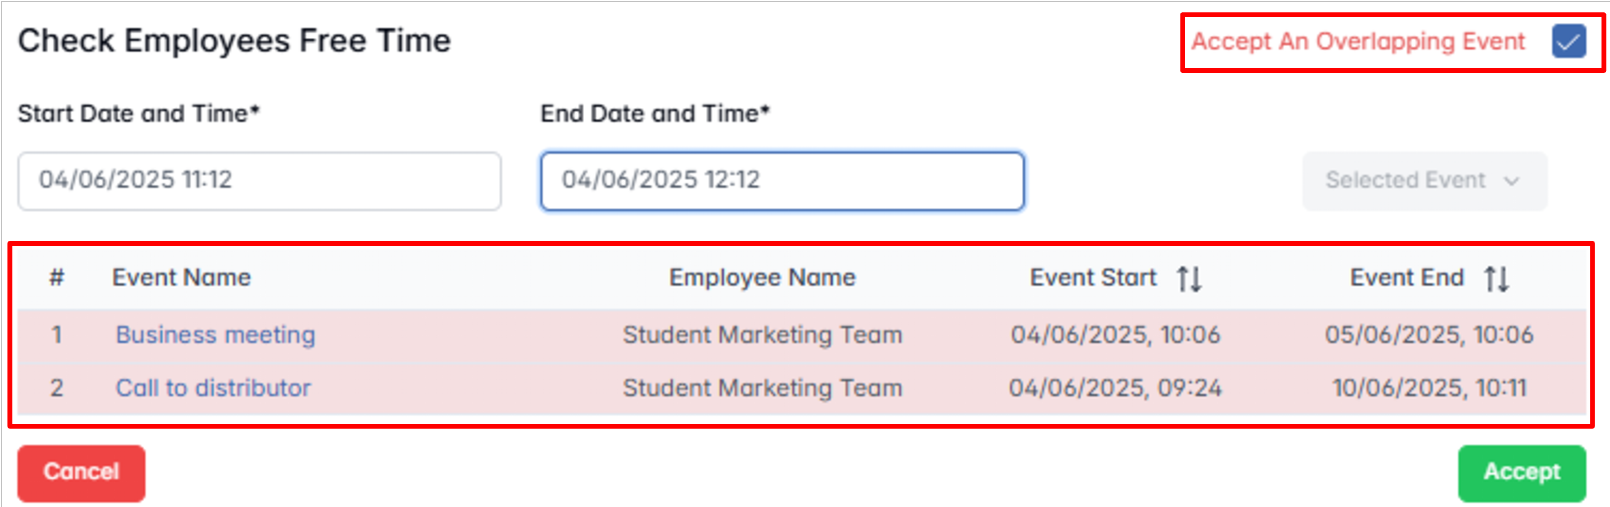
When defining the Start and End Time, BINU checks for overlapping events involving the same employees.
If a conflict is detected, a message appears showing conflicting activities. You can allow the overlap by confirming the new time, or change the date/time to avoid the conflict. Don't forget to click Set Date after selecting the date from the calendar — otherwise, the time won't be saved.
Example of Event Result Tracking
Event: Call to Customer
- Situation 1: Positive Result (Green) – You made the call, and the customer showed interest in your product or services. This indicates a successful interaction and potential for further collaboration.
- Situation 2: Negative Result (Red) – The customer clearly stated they are not interested and will not proceed. This outcome suggests the lead is no longer viable, and effort should be redirected.
- Situation 3: Neutral Result (Yellow) – The customer said they are not ready yet but may consider it later. This case calls for follow-up and tracking over time.
- Situation 4: No Result (Grey) – You attempted to call the customer, but no one picked up, or the meeting was cancelled without rescheduling. Since the interaction did not happen, there's no outcome to evaluate.
Interpreting Result Patterns in the Event Table
Each company profile contains an Event Table, where you can view the color-coded outcomes of all activities. This visual summary provides valuable insight into the health of the business relationship.
- All Green – Indicates strong engagement and successful progress. Next step: prioritize this lead and continue nurturing the relationship.
- All Red – Indicates repeated failures or rejection. Next step: consider discontinuing outreach or changing strategy.
- Mixed Results – Shows inconsistent outcomes across different activities. Next step: identify what works and focus on improving specific weak points.
Using Event Results for Strategic Planning
By reviewing the Event Table regularly, you can answer critical business questions:
- Which companies are worth pursuing further?
- Which employees or activities generate the best outcomes?
- Which leads require a new approach or can be deprioritized?
This makes the Events module not only a tracking tool, but a strategic asset for improving marketing and sales performance.
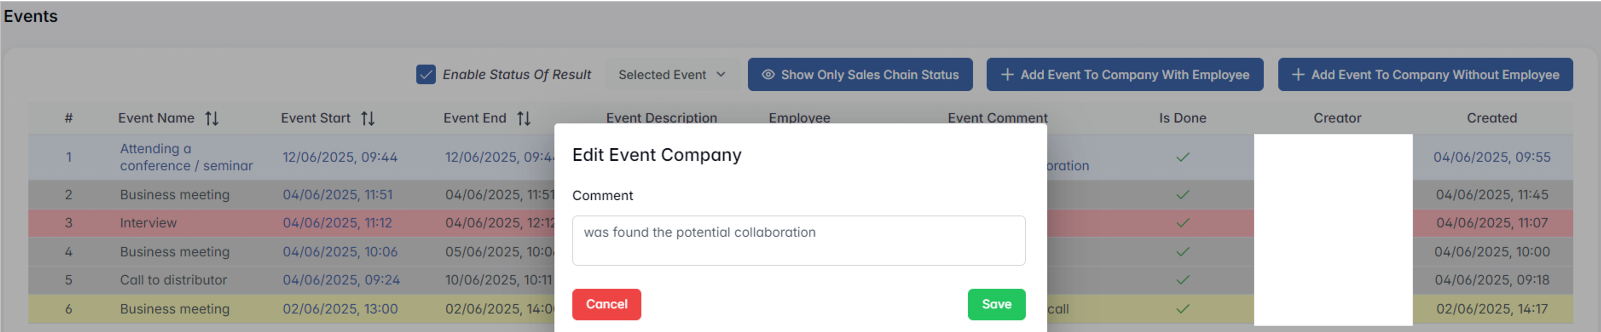
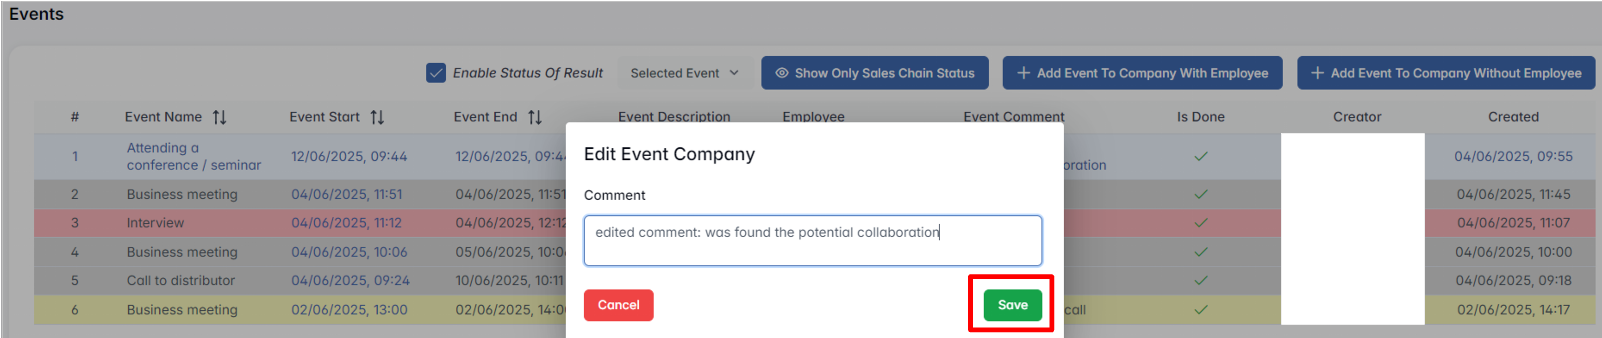
Editing Event Comments
Once an event has been created and marked as Done, you may still need to clarify or update the comment describing the interaction — for example, to add missing details or reflect the final outcome more precisely.
- Open the event. Navigate to the event in the Event Table or from the Company Card > Events section.
- Click "Edit". Select the event row and click the Edit button to open the editing window.
- Update the comment. Scroll to the Event Comment field and make the necessary changes.
- Save changes. Click Save to apply your updates. The event status and color (if already marked Done) will remain unchanged.
Viewing and Managing Events in the Calendar
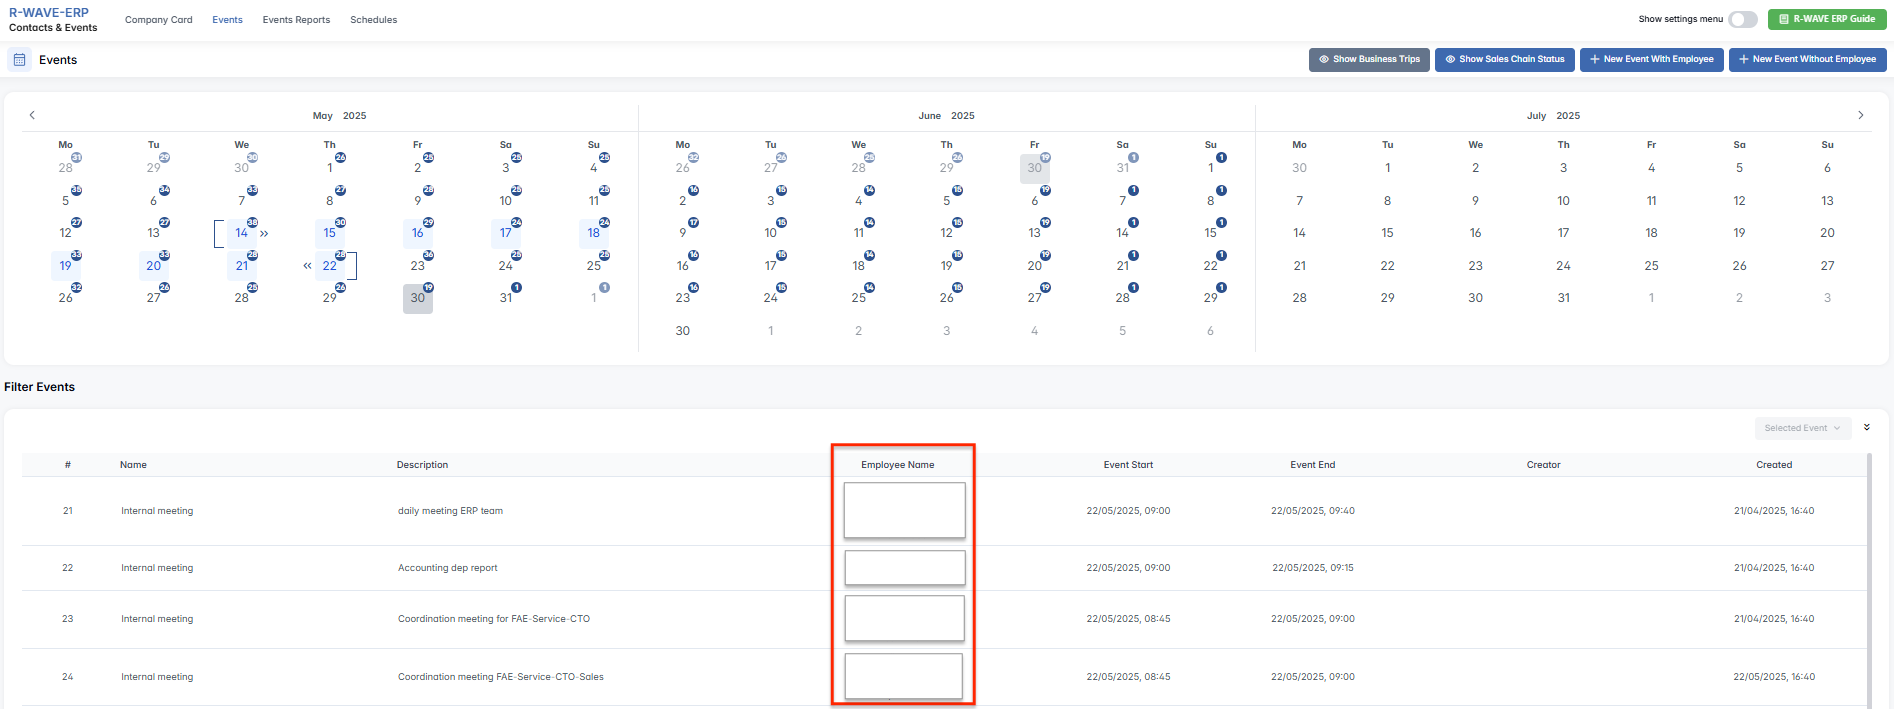
In addition to company-based event tracking, the Events tab of the Contacts & Events module provides a centralized calendar interface. This view allows users to visualize scheduled activities across the organization, access event details, and manage interactions in a structured and timely way.
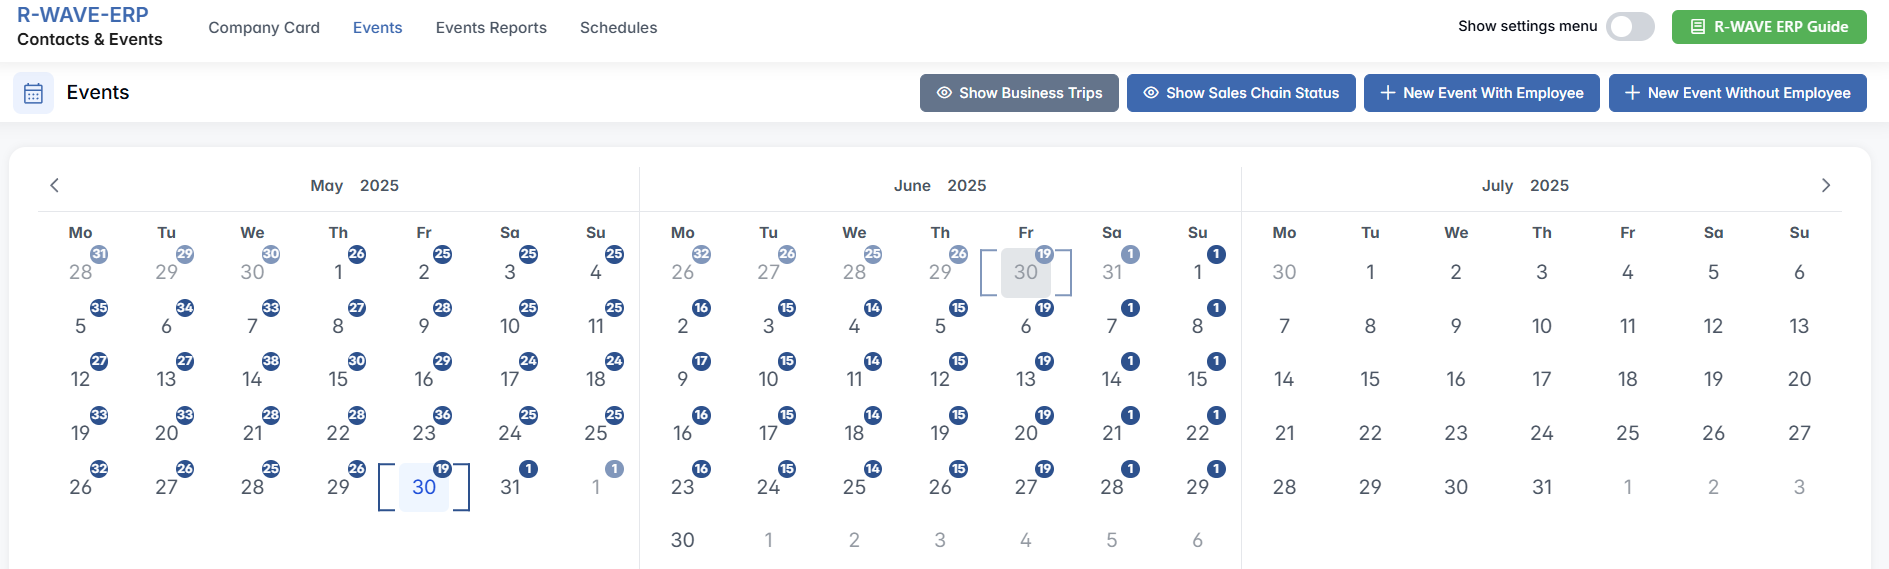
1. Calendar View
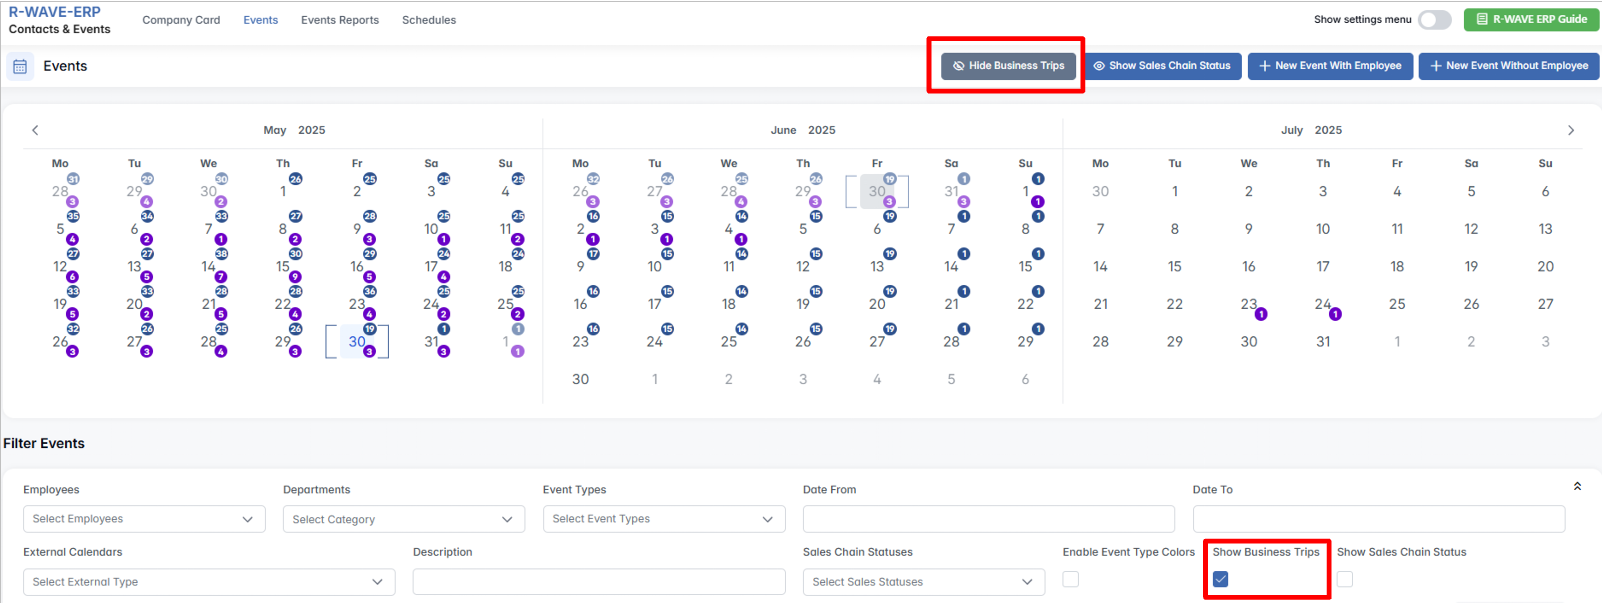
The calendar view is located in the Contacts & Events > Events tab. It displays all scheduled activities in a structured monthly layout:
- Each event is shown on the corresponding date.
- If multiple events fall on the same day, the total count is displayed.
- You can navigate between months or specific days using standard calendar controls.
- Hovering over a date reveals quick information about that day's events.
- For full event data and actions, users should refer to the filtered list below the calendar.
This layout enables quick access to daily and monthly overviews of business activity.
2. Filtering and Managing Events
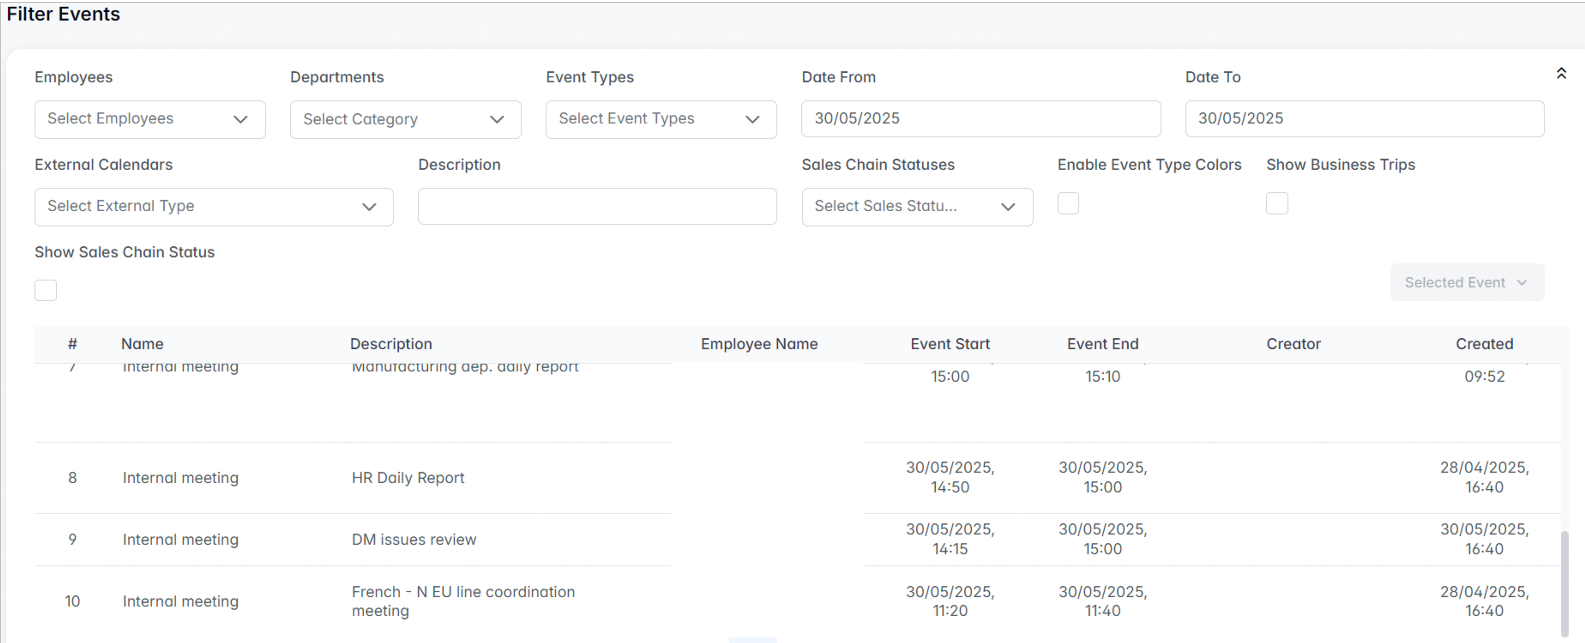
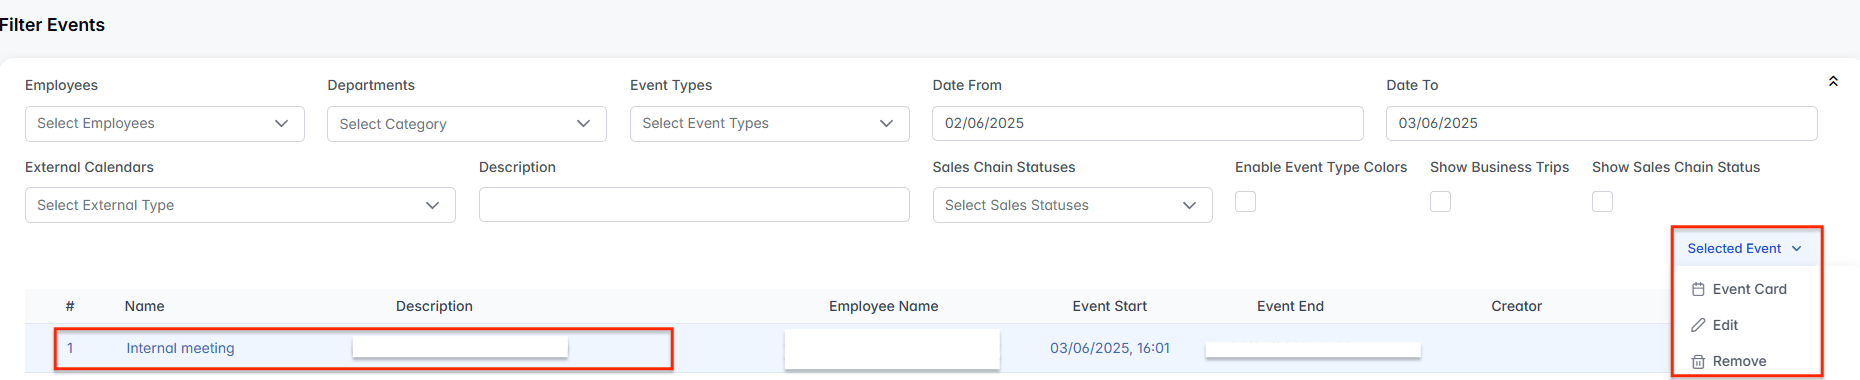
Under the calendar, there is a Filter Events panel that allows users to search and refine the list of events displayed in the table below.
Available filters include:
- Employees – select one or more involved employees (multi-select with search)
- Departments – filter by department to narrow by team
- Event Types – categorize events
- Date From / To – define a custom date range
- External Calendars – sync events from other sources
- Description – keyword search by event content
- Sales Chain Statuses – filter by sales pipeline stages
- Enable Event Type Colors (checkbox) – shows color-coding by type
- Show Business Trips (checkbox) – includes travel-related activities
- Show Sales Chain Status (checkbox) – adds sales context to event list
After applying filters, the matching events appear in a structured table format, with each row representing one event.
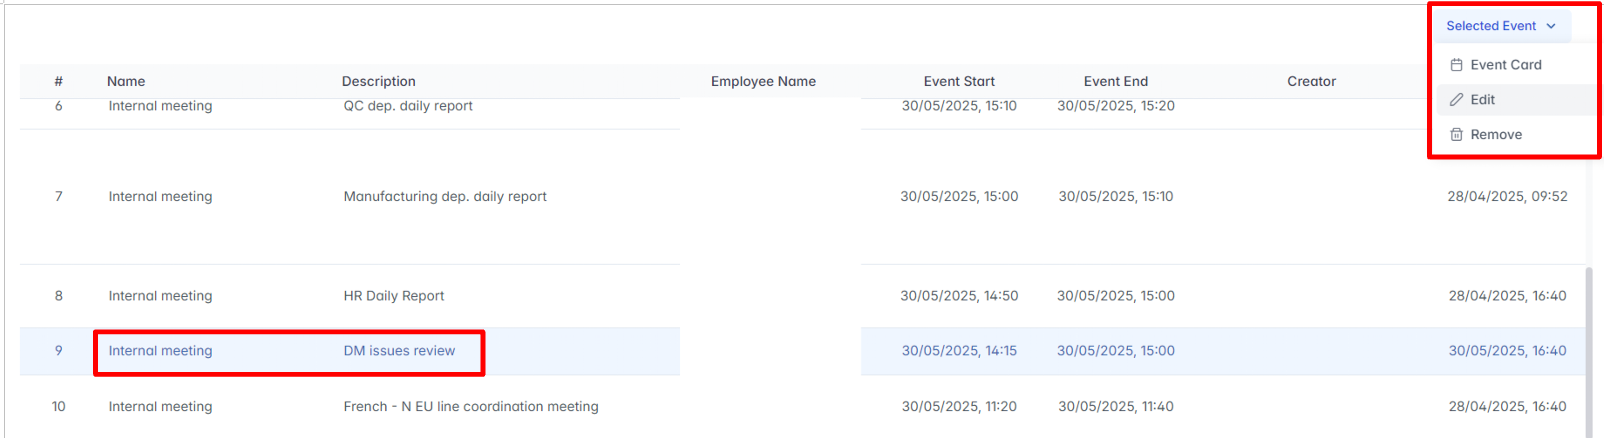
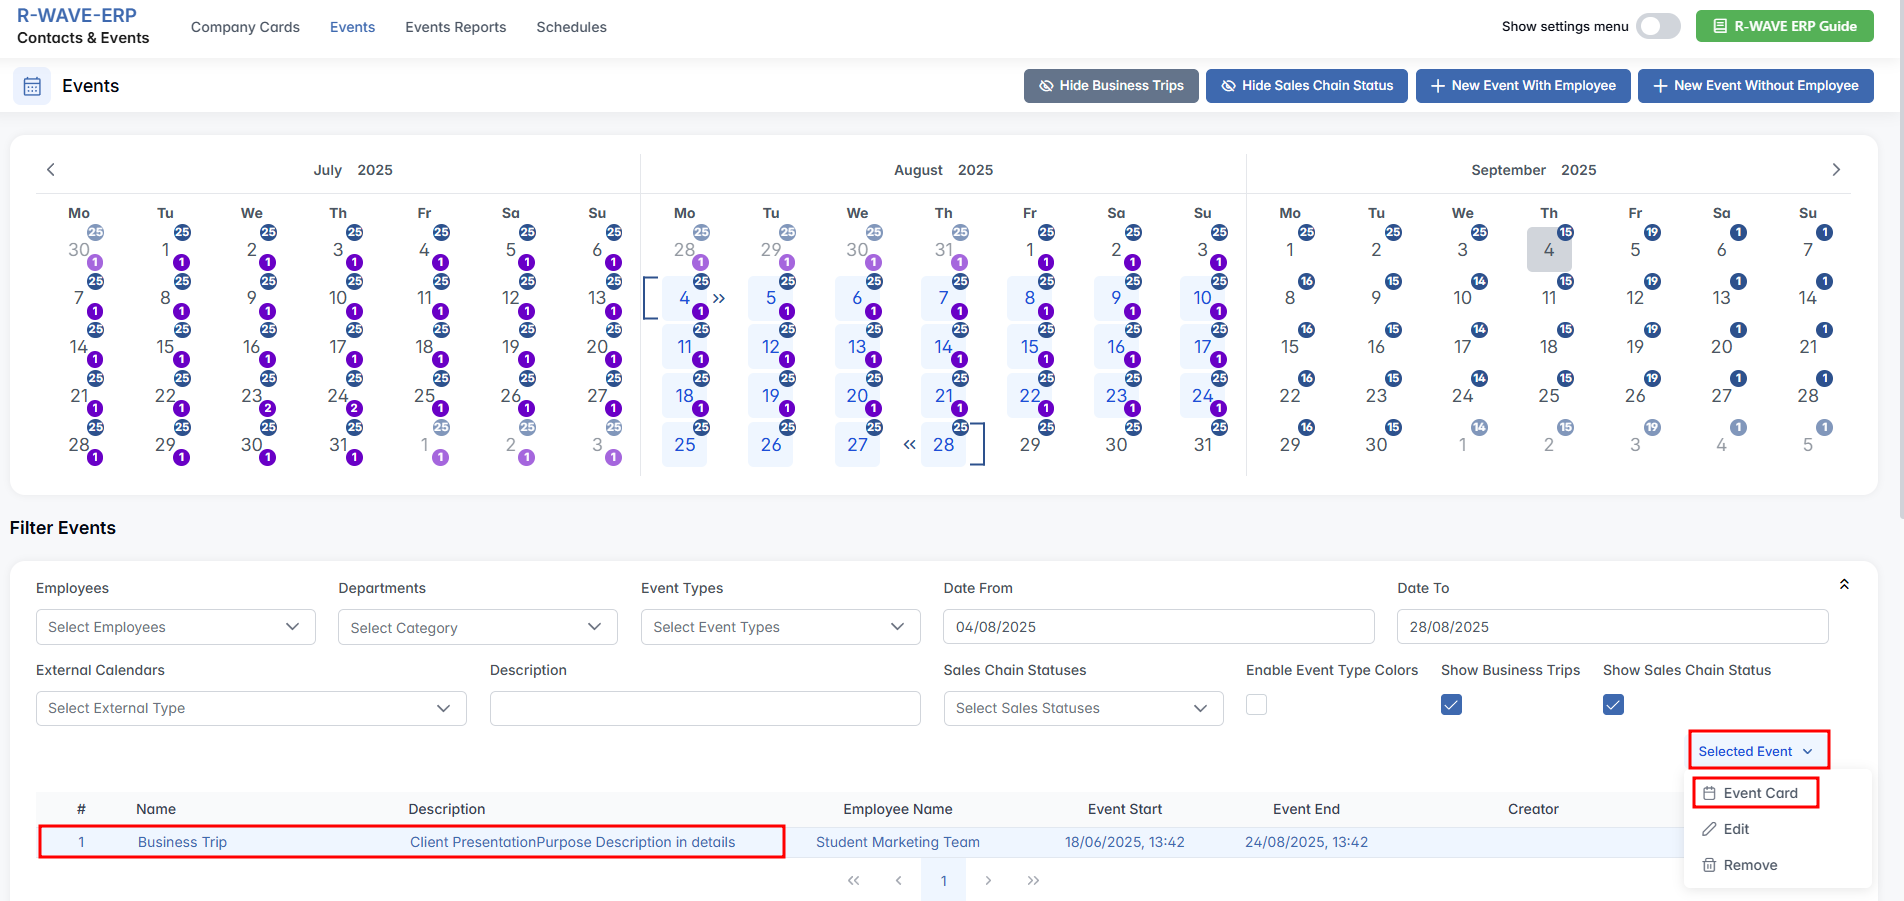
Each row represents a single event. You can click Selected Event to open the Event Card, or edit or remove the event.

Tip: Filtering by Employees is especially useful for viewing individual workload and availability, identifying team members involved in key business chains, and coordinating schedules to avoid conflicts.
3. Understanding Event Origin and History
Each event includes metadata about its creation:
- If the Creator field is filled, the event was manually created by a user.
- If the field is empty, the event was auto-generated — for example, from predefined schedules or external system integrations.
This helps administrators and managers trace the source of scheduled activities and maintain accountability across departments.
Tracking Events in the Calendar and Event History
Each event includes metadata about its origin. This helps users trace who created the event and when it was entered into the system — essential for accountability and time management.
1. Identifying Event Creators
In the event list under the calendar, each record contains a Creator field:
- If the field contains a name, the event was manually created by a user.
- If the field is empty, the event was auto-generated — for example, through synchronization with an external calendar or automated schedule.
2. Interactive Calendar Timeline
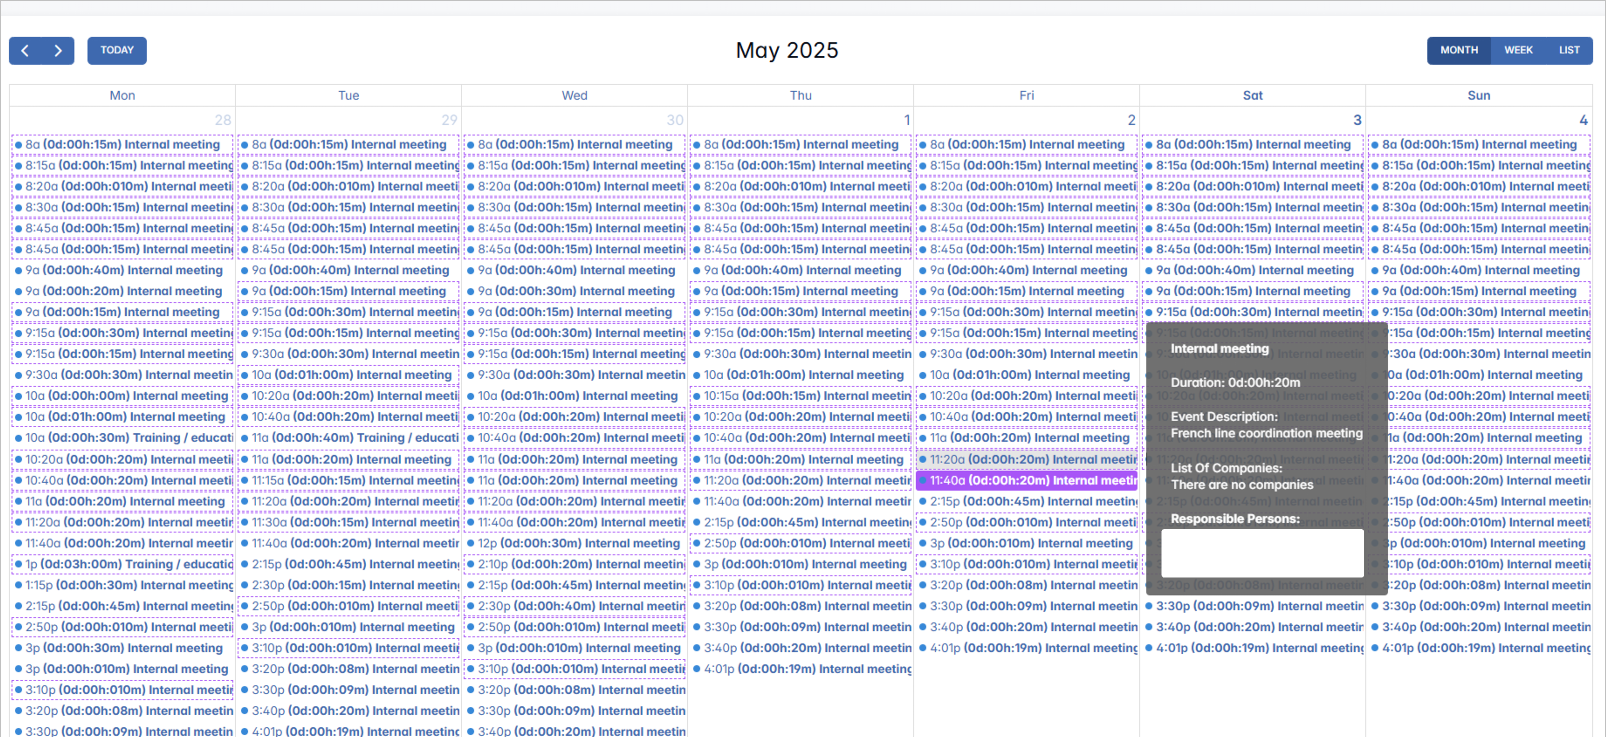
Below the list of events, there is an interactive calendar timeline that visually displays all filtered events by date. This view provides a visual sequence of events based on the chosen time frame, and the ability to hover over individual events to view a brief summary.

Event Card and Company Connection
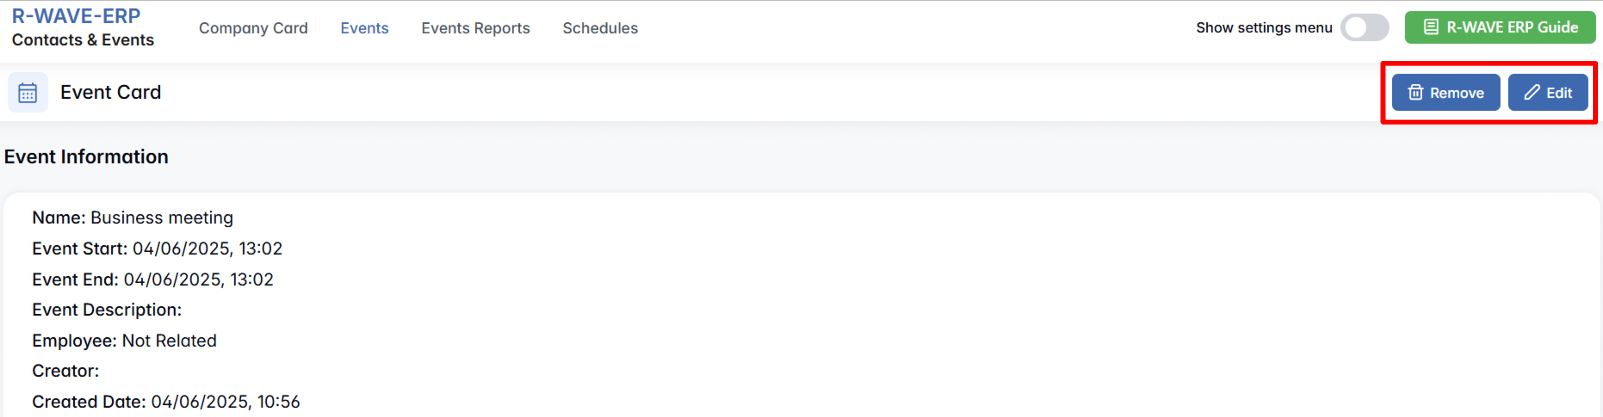
When an event is selected in the event list, users can manage all of its key details using the Event Card. This card is accessed by selecting the relevant row in the table and clicking Selected Event > Event Card.
1. Event Card Overview
The Event Card provides a structured view of all key event information, split into sections:
Event Information
- Event Type
- Start and End Date/Time
- Event Description
- Assigned Employees
- Creator and Created Date
You will also see buttons for Edit (even if the event is marked Done) and Remove.

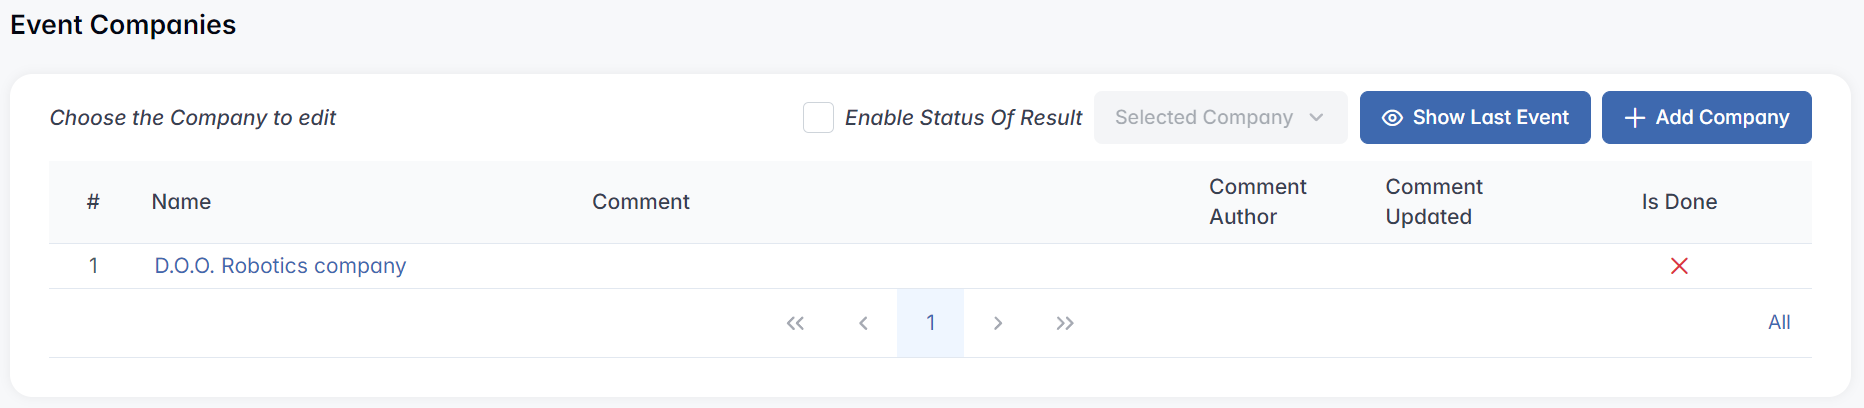
2. Event Companies
The Event Companies section lists all businesses connected to the event.
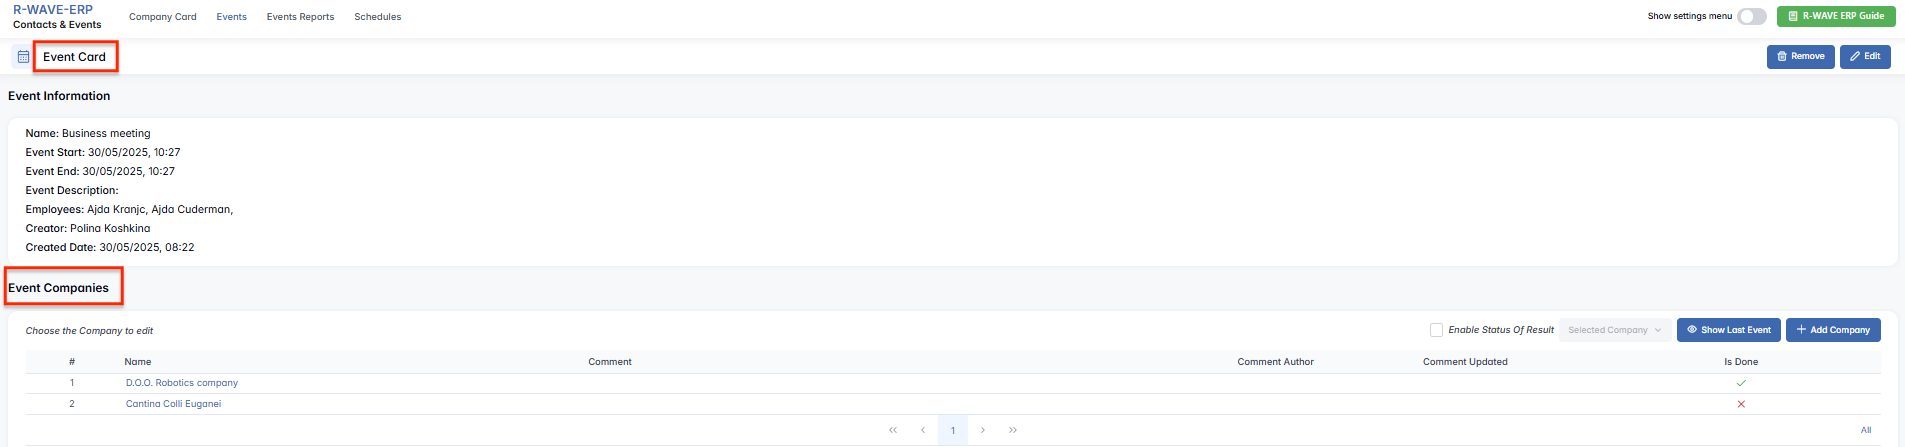
The table includes:
| Column | Description |
|---|---|
| Name | Linked company name |
| Comment | Feedback or summary for this company |
| Comment Author | Who entered the comment |
| Comment Updated | Last update timestamp |
| Is Done | Whether the activity with this company is completed |
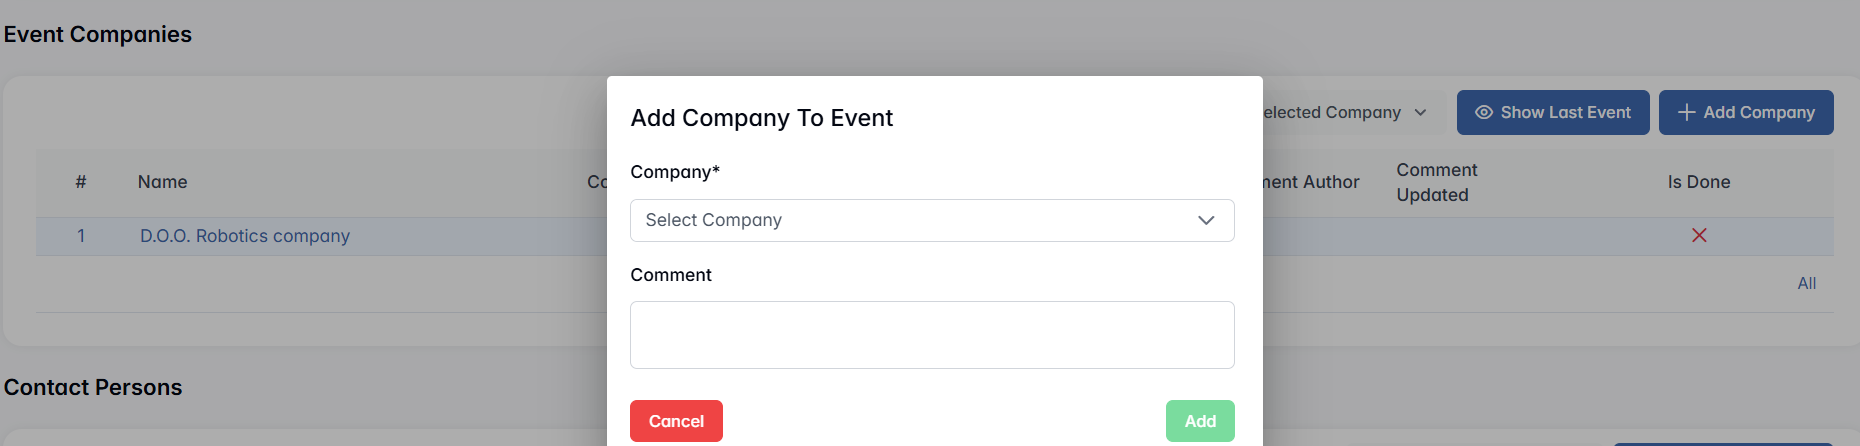
You can add new companies to the event.
Use the Enable Result Status checkbox to highlight the events in the list with the appropriate status colour, to simplify tracking of outcomes per company.

You can also edit or update comments by selecting a company row and choosing the appropriate action. This structure allows granular outcome tracking for multi-company events.
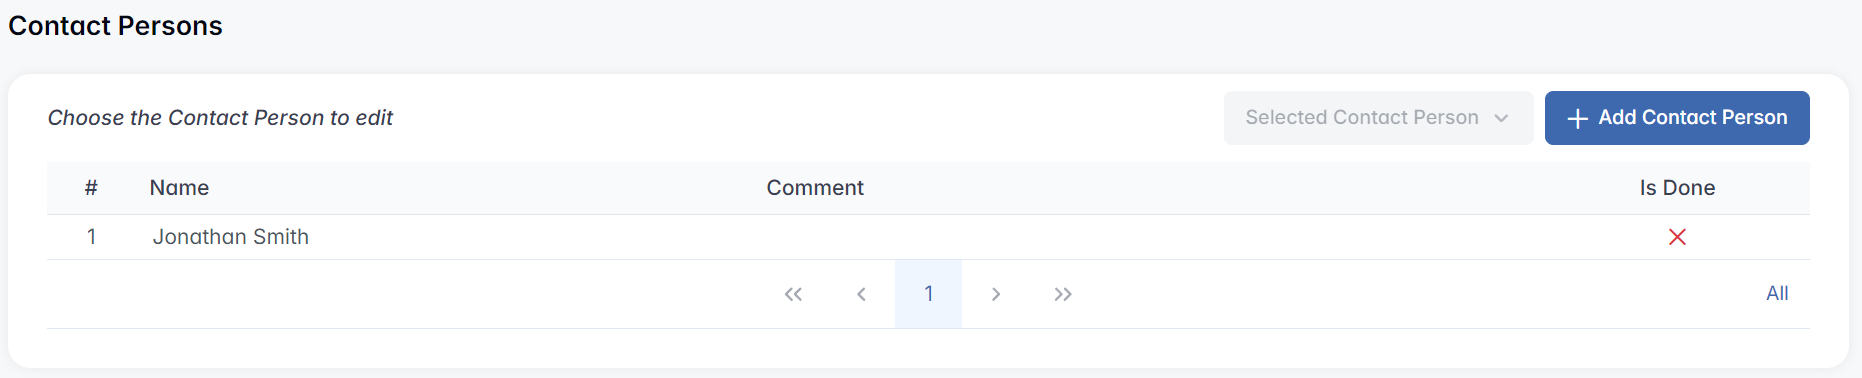
3. Contact Persons
If contact persons are associated with the event, they will appear in the Contact Person section.

The table includes:
| Column | Description |
|---|---|
| Name | Full name of the contact person |
| Comment | Interaction summary or notes |
| Is Done | Whether the individual interaction was completed |
If no contacts have been added, the table will show "No Records Found." You can also use the Add Contact Person button to link additional individuals.
4. Event Files
This section shows documents associated with the event.

The table includes:
| Column | Description |
|---|---|
| Name | Filename of the uploaded document |
| Created | Date the file was added |
| Actions | Options to download or delete the file |
If no files have been uploaded, the table will display "No Records Found."
Connecting Companies to the Event and Viewing in Company Card
After marking the event as done and assigning a status, the next step is ensuring that the connected companies are properly linked to the event.
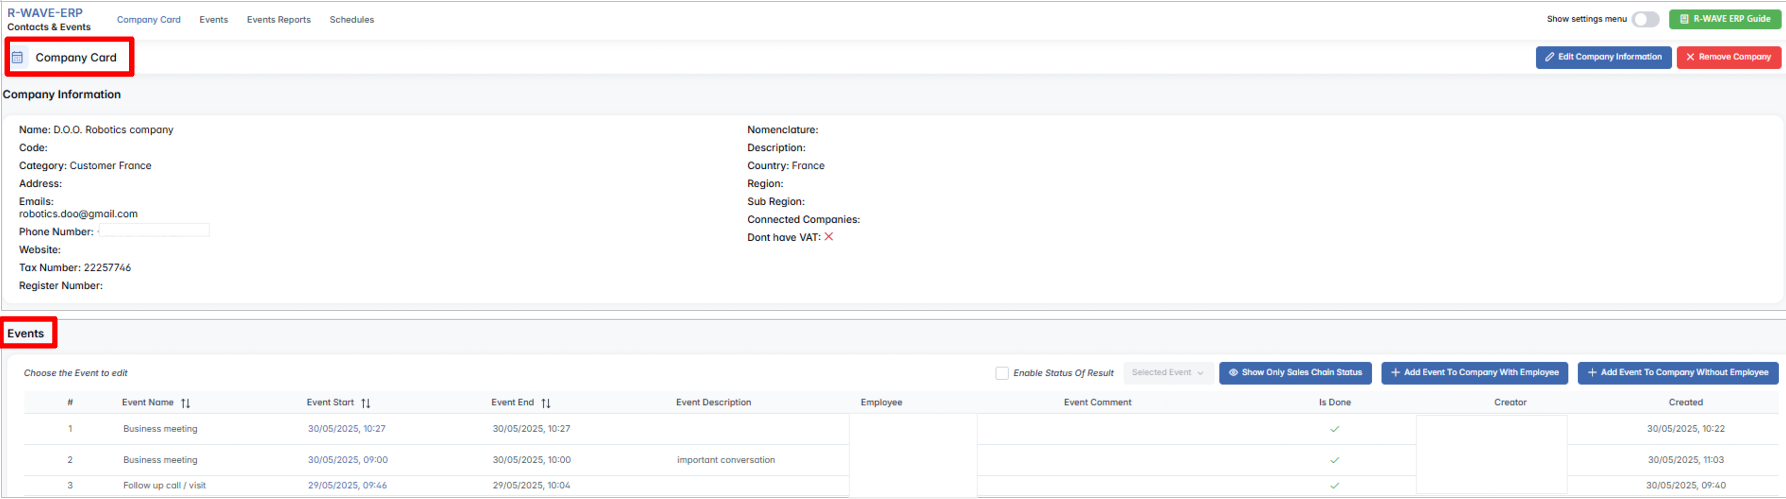
- Companies are connected to the event. After adding companies to the event, these companies will be officially connected to the event. This means that the event is now linked to the respective companies, reflecting the interaction or activity that took place with them.

- Viewing the event in the Company Card. Once the event is linked to the company, you can navigate to the Company Card of any involved company. Inside the Company Card, under the Events section, you will see a list of all events associated with this company. The event you just completed will now appear in this list.
This functionality ensures that all the details about the event and its associated companies are easily accessible and can be tracked directly within the company's profile, enhancing overall organization and follow-up.
Business Trips: Planning and Calendar Integration
Business Trips: Planning and Calendar Integration
BINU ERP includes a dedicated Business Trips module that allows you to manage and visualize employee travel across the organization. These trips are also seamlessly integrated into the Events calendar, enabling comprehensive planning and workload coordination.
Creating a Business Trip
To create a business trip, follow these steps:
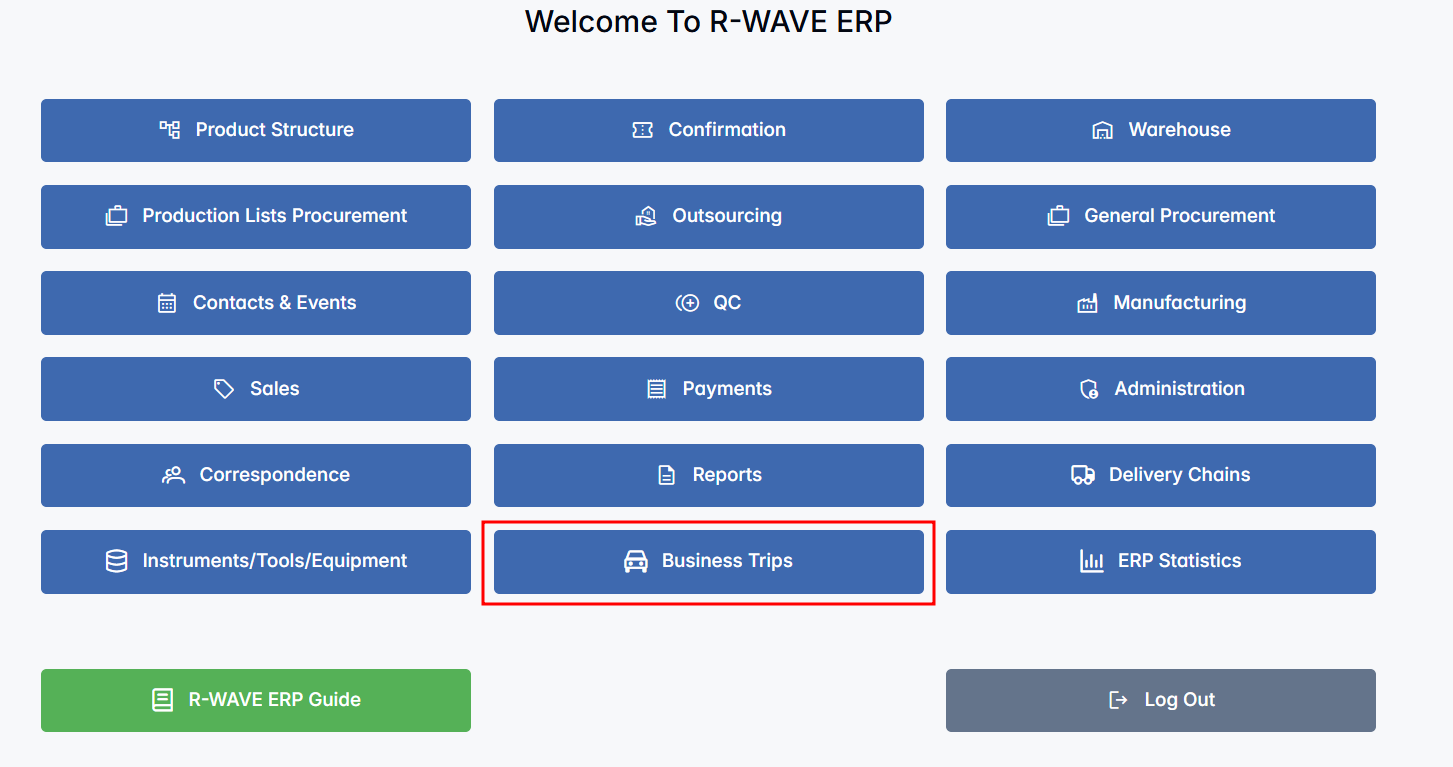
- Open the Business Trips module. Go to the main menu > Business Trips.
- Create a new business trip. Click on the New Business Trip button to initiate the creation of a new trip.
- Fill in employee details. Choose the employee who will be traveling from the list.
- Set start and end dates. Specify the start date and end date of the business trip.
- Add additional details. You can fill in additional information such as the destination, purpose of the trip, and any specific comments related to the trip (e.g., Hotel, Vehicle).
- Save the trip. Once all details are filled in, click Save to register the business trip. It will now appear in both the Business Trips module and the calendar.
Tracking Business Trips in the Calendar
Business trips are visualized directly in the Events calendar, making it easier to align them with other activities and team availability.
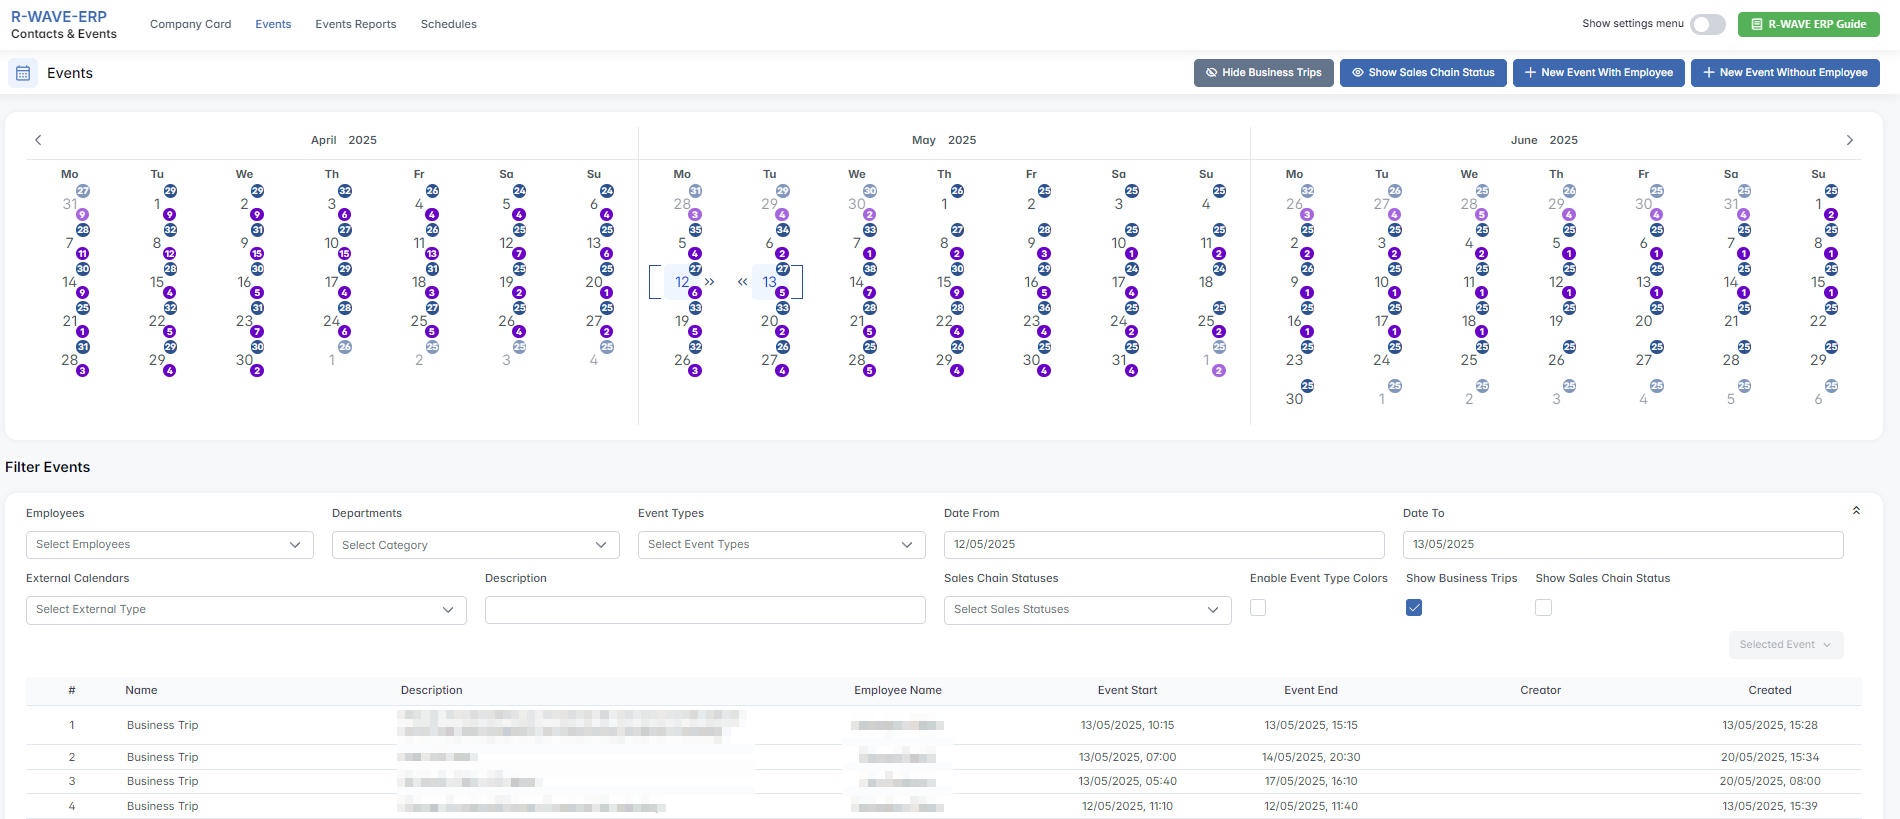
- Enable Business Trips on the calendar. In the Events tab, check the box Show Business Trips in the top-right corner or in the filtering section below the calendar. Once enabled, business trips appear as purple blocks on the corresponding dates.
- Select date range to view details. First, select the date range to see the full list of business trips during that period. Use the Date From and Date To filters below the calendar, or click on the start date in the calendar and then the end date (the selected period will be shown in square brackets). After applying the filters, scroll down to the event list below to see the full list of business trips.
- Viewing business trips. Once business trips are enabled, you can easily track and view them within the module. Each trip shows a short description, the employee name, and the event start and end dates. To see more details about a business trip, select it in the list and click Selected Event > Event Card.
By using the Business Trips module, you can ensure that all business-related travel is organized and well-documented, helping your team stay on top of employee travel schedules.
Viewing Sales Chain Statuses in the Calendar
Viewing Sales Chain Statuses in the Calendar
In addition to events and business trips, the BINU ERP calendar allows you to track Sales Chain Statuses — key indicators of where each sales opportunity currently stands. This integration helps teams coordinate timelines and align operational work with sales pipeline activities.
Enabling Sales Chain Status Display
To activate the calendar display for sales chain statuses:
- Go to Contacts & Events > Events.
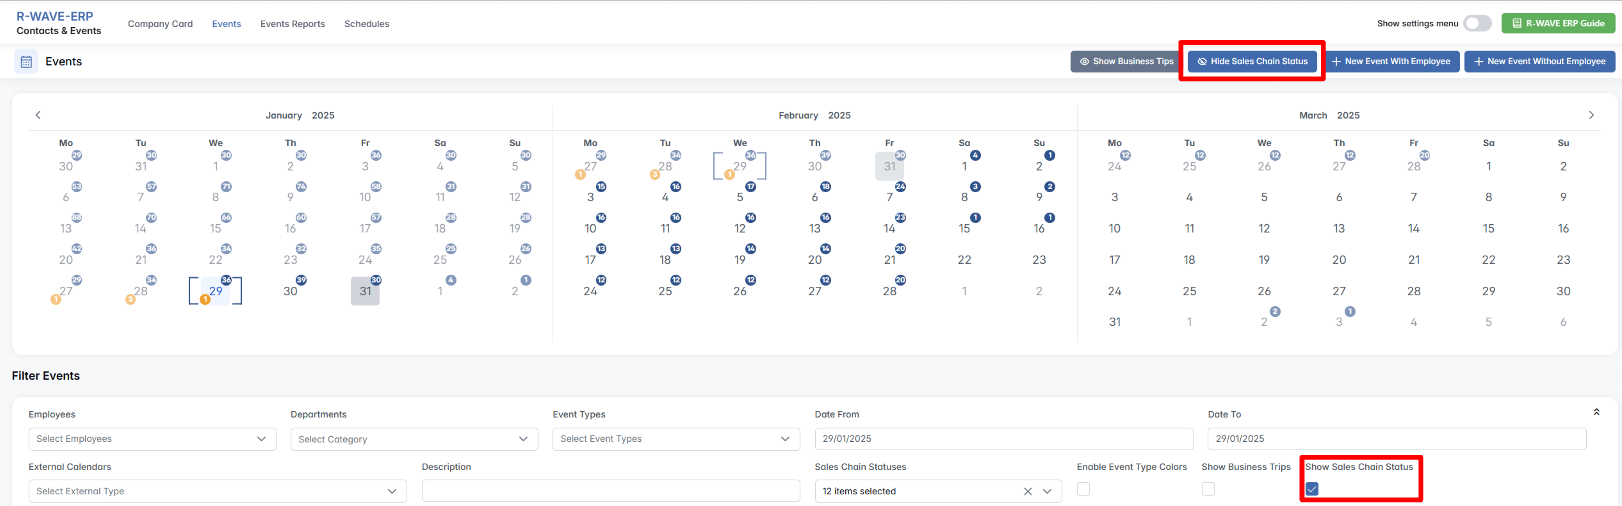
- Check the box labeled Show Sales Chain Status in the top-right corner or in the filtering section below the calendar.
Once enabled:
- Sales chain statuses will be marked in orange on the calendar.
- The number of updates per day will be shown in each relevant date cell.
Viewing Sales Chain Status Updates
To view detailed information about the sales chain status changes:
- Select a date range. Use the Date From / To filters below the calendar to define the period of interest.
- Scroll down to the event list. Each status entry in the list includes a clickable element (e.g., a link or button).
- Open the sales chain from the list. By selecting a row and using Selected Event > Open Sales Chain, you can view the full sales chain details and analyze progress, history of activities, and next planned steps.
Calendar as a Central Overview Tool
Calendar as a Central Overview Tool
Using the calendar with both Business Trips and Sales Chain Statuses enabled provides significant operational benefits:
| Benefit | Description |
|---|---|
| Improved Scheduling | Avoid overlap between critical sales milestones and employee travel. Coordinate meetings and follow-ups based on full team availability. |
| Unified Visibility | Gain a complete picture of internal operations and external sales progress — all in one interface. |
| Better Planning & Reporting | With filtered data below the calendar, you can quickly assess upcoming tasks, completed actions, and current focus areas across your team. |
By integrating Sales Chain Statuses directly into the calendar, BINU ERP allows sales and operations teams to stay aligned, act on time-sensitive opportunities, and maintain clarity over pipeline performance.
Event Management in BINU ERP
Event Management in BINU ERP
In BINU ERP, events represent key activities within a company's operations, with each event falling into one of two categories: internal or external.
- Internal Activities – internal meetings, team trainings, and other internal company events that help maintain smooth operations. Internal events are scheduled on the calendar, and once planned, they provide visibility into employee availability, allowing you to effectively coordinate these activities without disrupting other responsibilities.
- External Activities – events involving partners, clients, distributors, or other external entities. These events are mostly related to marketing, business development, and collaboration with other businesses. Examples include product presentations, distributor meetings, marketing exhibitions, and partnership activities. External activities are scheduled and tracked similarly, but with the added layer of company connections, where you assign and track partner companies and relevant contacts associated with each event.
Once the activities are scheduled in the calendar, companies and contacts are linked to the respective events. This helps monitor the progress and results of the activity, ensuring transparency and accountability. Additionally, by analyzing the outcomes of the activities — whether marketing, training, or collaboration — you can assess the effectiveness of your actions and make informed decisions on next steps.
Through detailed tracking, analysis, and the ability to connect events to companies and employees, BINU ERP ensures that you can successfully manage both internal and external activities with precision.
Event Reporting and Analysis in BINU ERP
Event Reporting and Analysis in BINU ERP
BINU ERP offers robust event reporting capabilities to give you clear insights into both past and future events, helping to track and evaluate your company's activities.

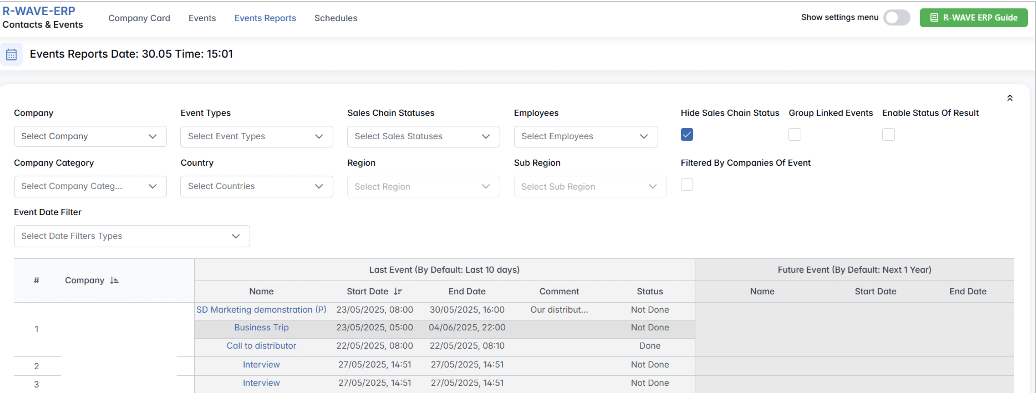
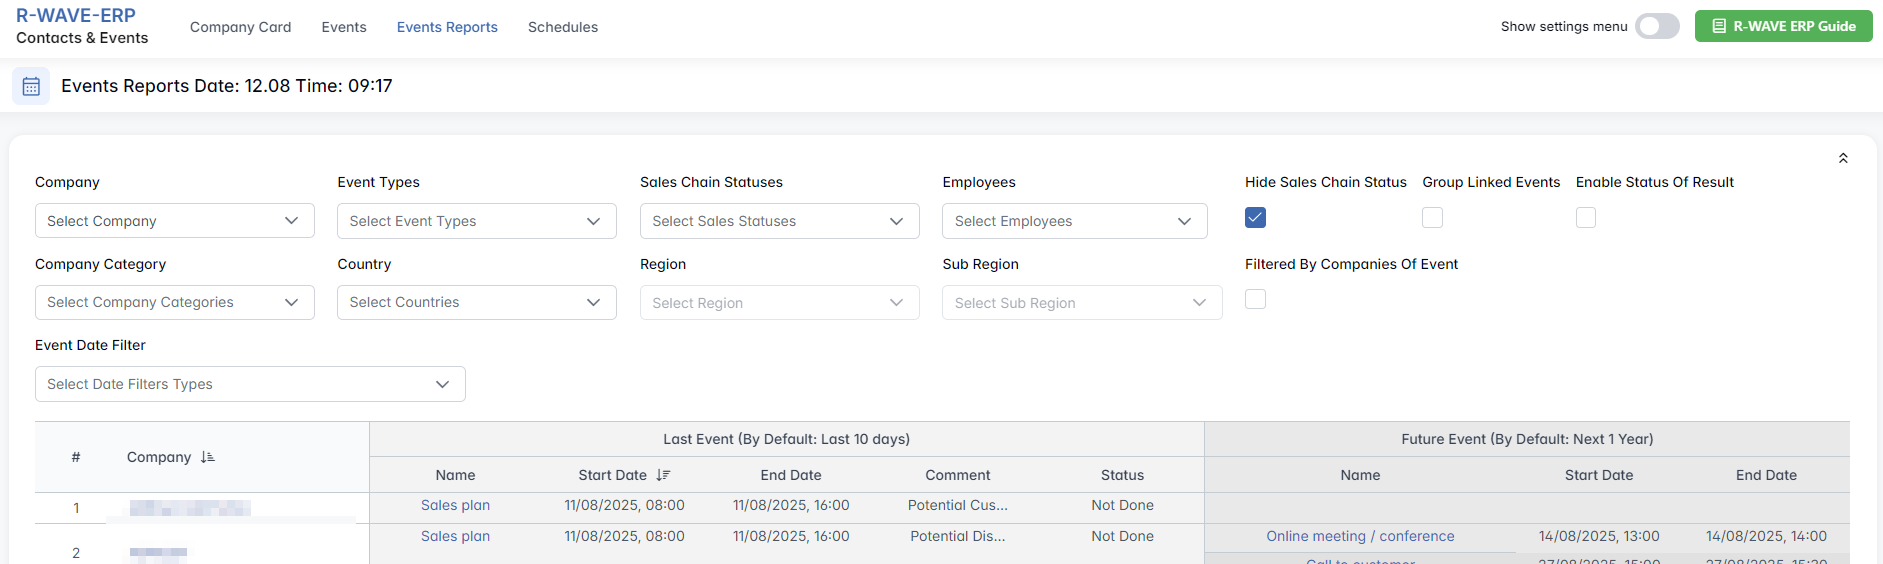
- Event Reporting Overview – You can analyze the last events from the past 10 days (default setting) and future events in one place. This gives you a comprehensive overview of what has been done and what is planned. The event report card shows details like company categories and allows you to analyze performance by these categories.
- Extended Periods for Analysis – The report can be extended over a longer period if needed. Set the desired date range using the Event Date Filter and set either the Last Events Date Start/End for past events or Future Events Date Start/End for future events.
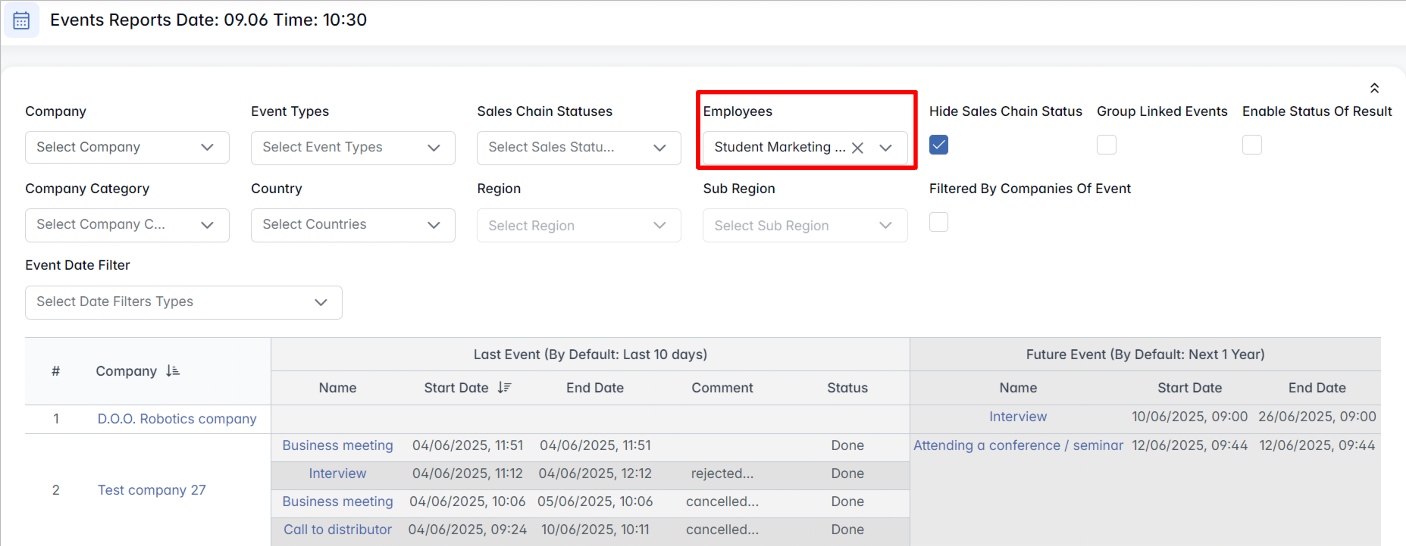
- Employee Performance – You can analyze the work of specific employees (multiple choice) and see what events they have handled over a specific period. This helps in tracking employee accountability and performance in managing events.

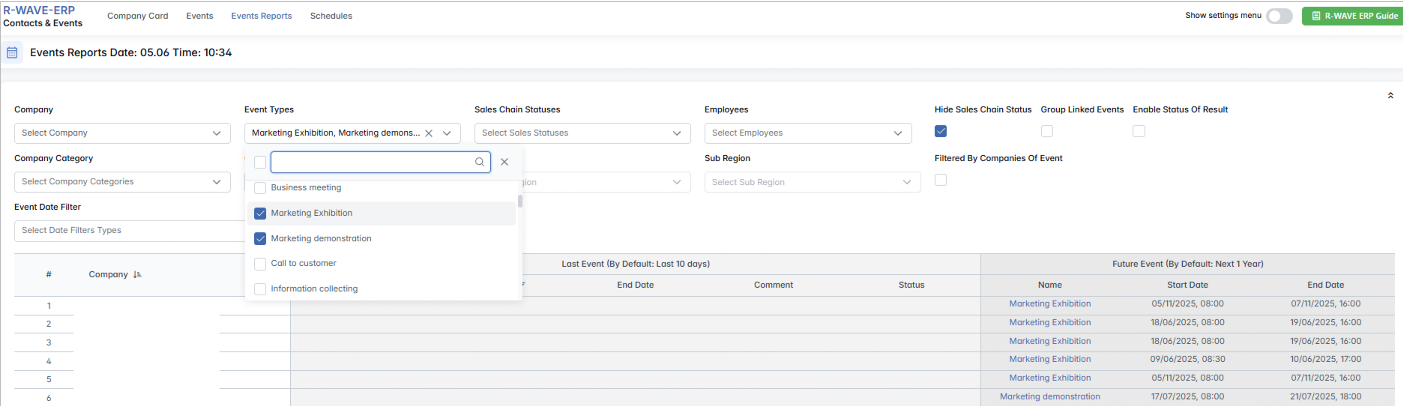
- Tracking the Event Types Activities – The Events Report allows you to view the activities of your event types over the last 10 days, helping you track and analyze recent interactions — such as meetings, interviews, and customer calls — for better planning and coordination.

- Analyzing Event Outcomes – In the report, you'll see the status of each event (e.g., completed or upcoming), its result, and any feedback on the activity, such as color-coded event results that visually show the effectiveness of each action.

- Best Practice for Scheduling Events – Once an event is completed, schedule the next step immediately. For example, if a customer requests a presentation for next month, the next logical step is to schedule the presentation as an event for the following week.
- Centralized Calendar System – Instead of relying on external tools like notepads to keep track of appointments, use the calendar within BINU ERP. Every event, whether internal or external, should be recorded in the system, so you never forget key activities and tasks.
Scheduling Repeating Events
Scheduling Repeating Events
BINU ERP allows you to efficiently manage events such as meetings, interviews, and calls directly within the internal calendar. Scheduling repeating events helps teams stay organized and reduces the need for manual updates.

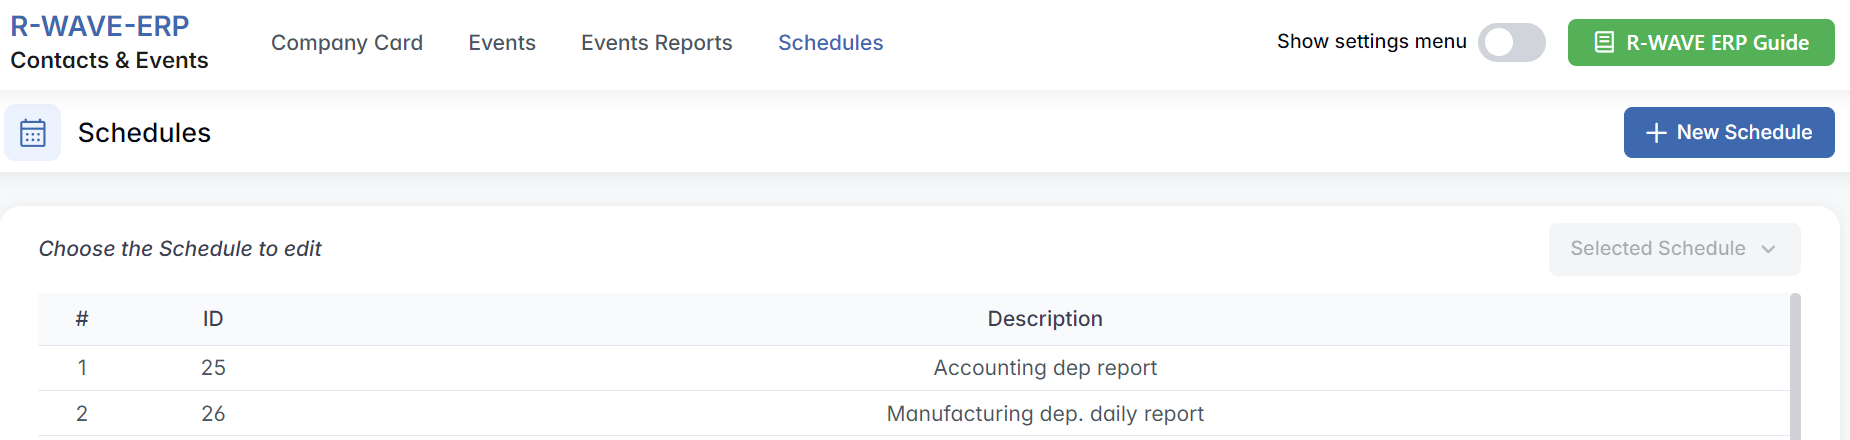
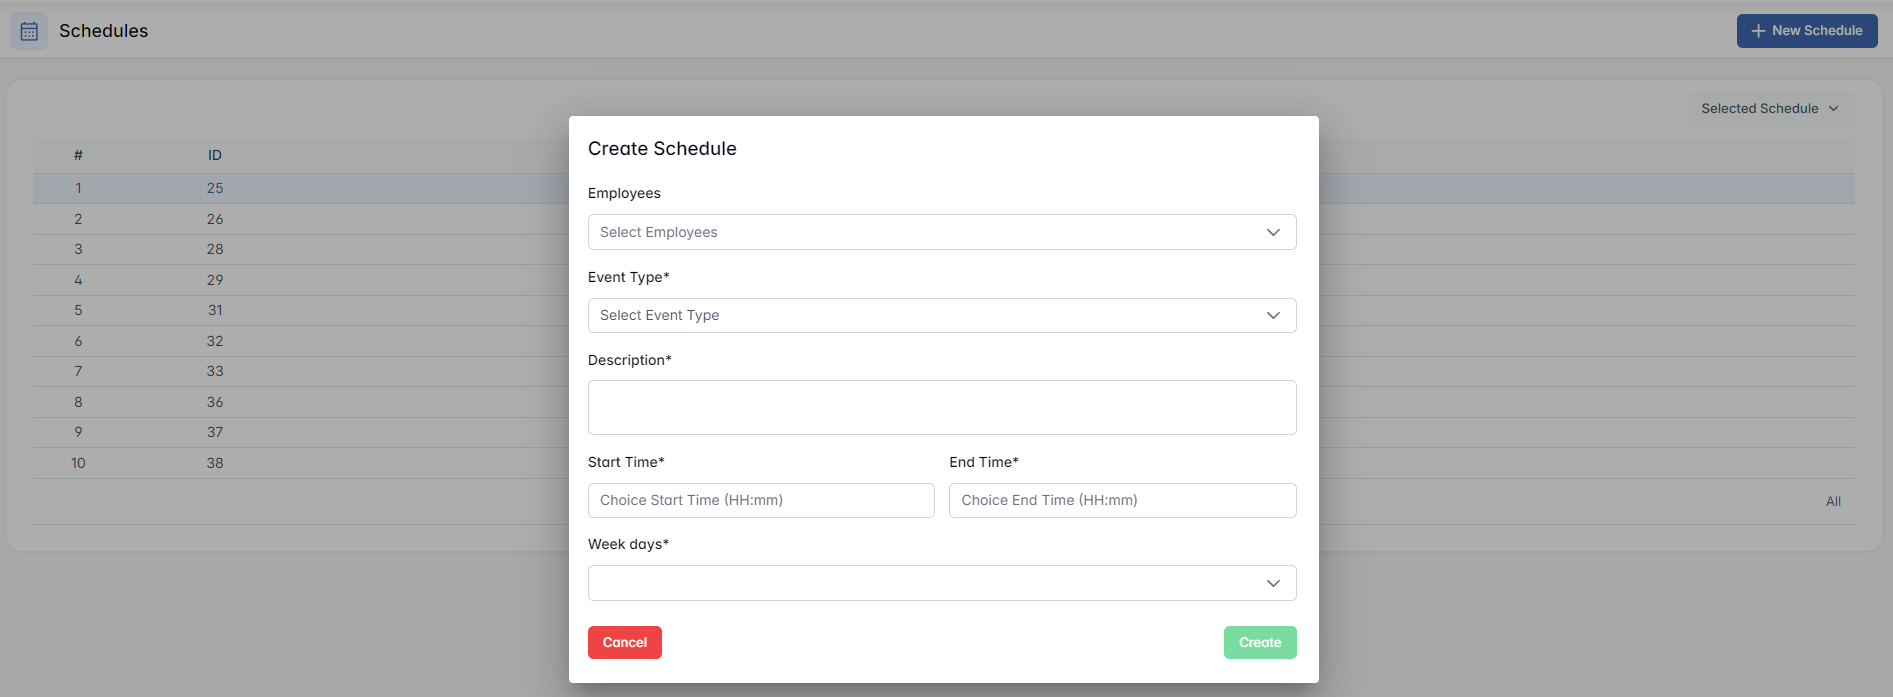
Event scheduling is useful for tasks that need to occur on a regular basis. For example, you can schedule a weekly meeting with department heads every Friday. Click the + New Schedule button:
- Choose the employees involved in the event.
- Select the event type (e.g., "Department Head Meeting").
- Set the event description (e.g., "Daily Meeting with Head of Department").
- Pick the time and the weekday when the event will recur (e.g., every Friday).
- Click Create to save and activate the repeating event.
Once configured, the event will automatically repeat on the set dates within the internal calendar. This reduces the need for manual updates, ensuring that the event always occurs at the right time.
Hidden Settings Menu
Hidden Settings Menu
The Hidden Settings Menu in the Contacts & Events module of BINU ERP provides access to configuration panels that influence how events, schedules, and user roles are managed across the system. These settings are crucial for customizing the behavior of your system to match your company's workflows.
By default, some configuration options are hidden to avoid cluttering the interface. To access advanced settings such as Company Categories, Event Types, and more, you need to manually enable the Settings Menu.
How to Show the Hidden Settings Menu
To reveal the hidden configuration tabs:
- Navigate to the Contacts & Events module.
- In the top-right corner of the screen, locate the slider toggle labeled Show Settings Menu.
- Click the slider to activate it.

Once enabled, additional settings sections will appear in the sidebar under the main tabs (Company Card, Events, Event Reports, etc.). You can hide these settings again at any time by toggling off the same slider.
Company Categories
The Company Categories tab allows you to define and manage classifications for companies in your database, such as "Supplier," "Outsource Partner," or "Internal Client." These categories help group and filter companies across different modules of the ERP.
Viewing the List
The main table displays all existing company categories with the following columns:
- Name – The label of the category.
- Module(s) – Where this category is used (multiple modules possible).
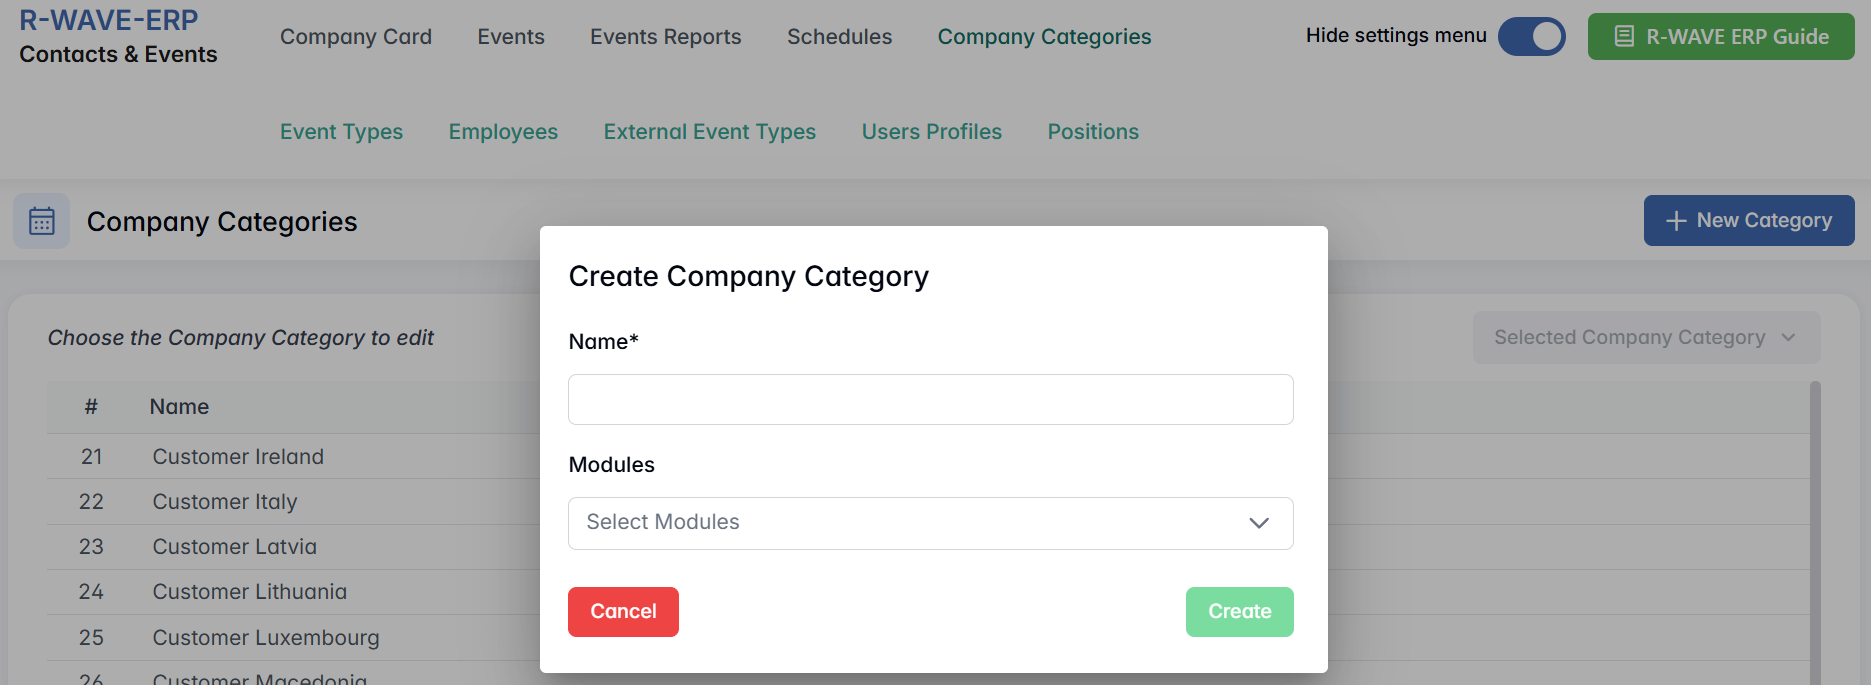
Creating a New Company Category
- Click the + New Company button in the top-right corner.
- A pop-up titled Create Company Category will appear.
- Fill out the following fields:
- Name * – Required. For example, "Business Partner".
- Modules – Optional. Select one or more modules where this category should apply. Multiple selection is allowed (e.g., "Outsource", "Purchasing").
- Click Create to save the new category.
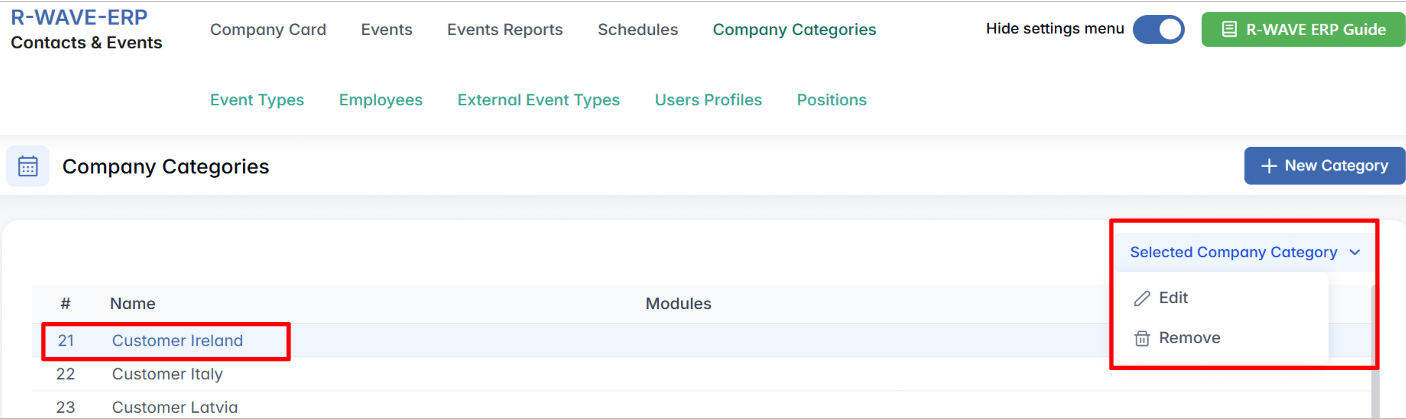
Editing or Removing an Existing Company Category
- Select a row in the list by clicking on it. The button Selected Company Category becomes active.
- Click this button and choose either:
- Edit – Opens the Edit Company Category window, where you can update the Name and Modules.
- Remove – Permanently deletes the category (confirmation required).

Event Types
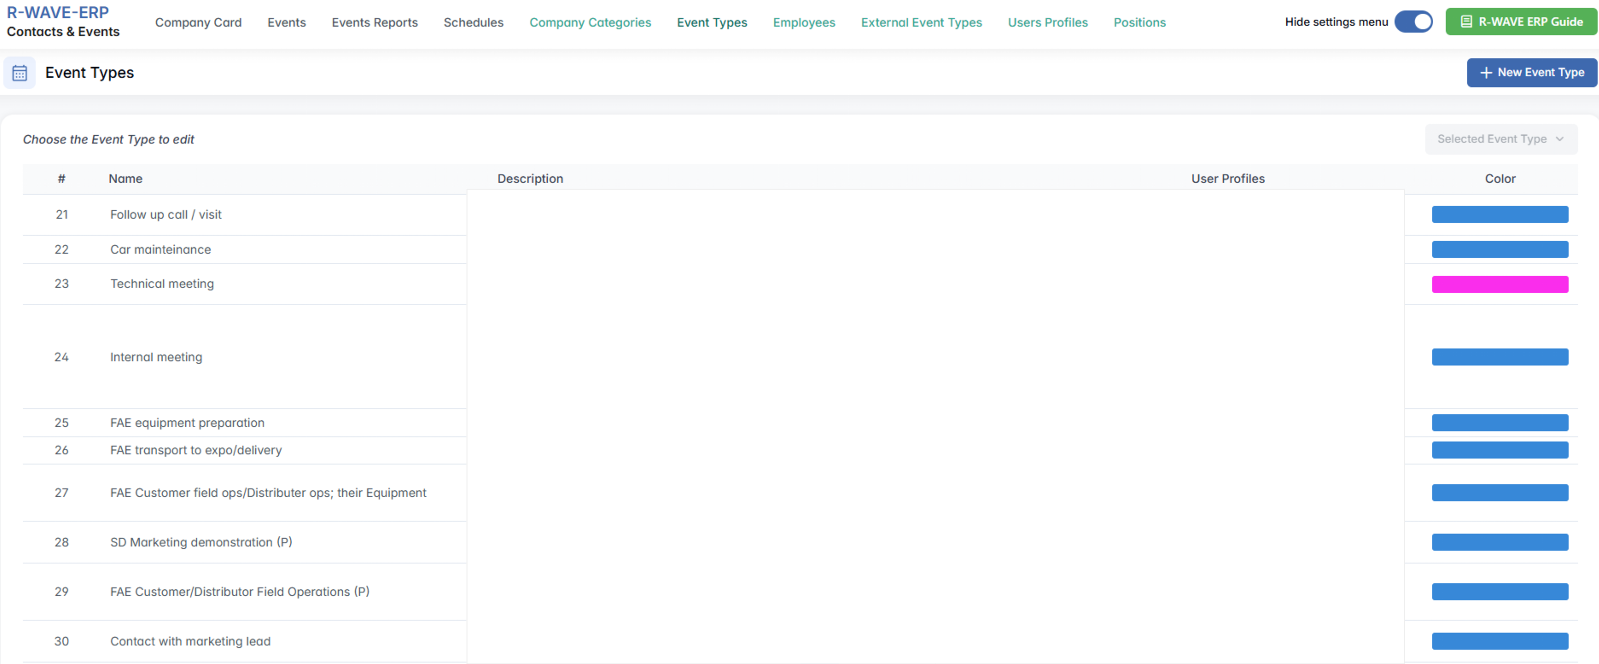
The Event Types tab lets you configure standardized categories of events used across the system — such as interviews, meetings, presentations, and more. Each event type can include color-coding for calendar visibility and synchronization rules for external Google Calendars.
Viewing List
You will see a table with the following columns:
- Name – The label of the event type.
- Description – Optional field describing the context or purpose.
- User Profiles – Gmail addresses of users whose Google Calendars will be synchronized with this event type.
- Color – The background color that will appear in the calendar for this event type.
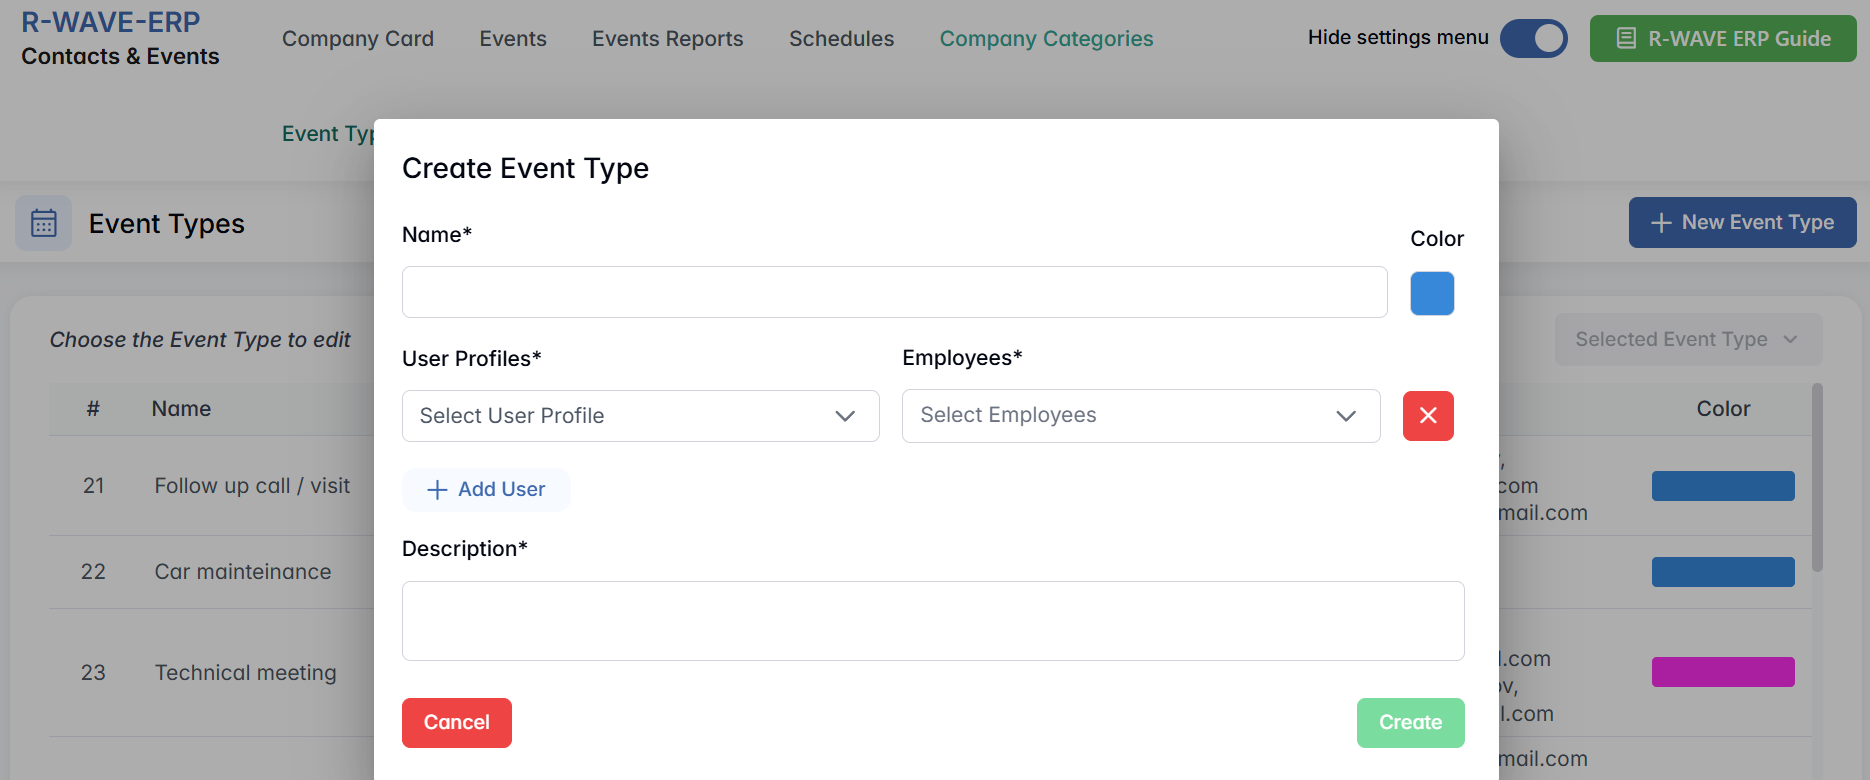
Creating a New Event Type
- Click the + New Event Type button in the top-right corner.
- A pop-up window appears titled Create Event Type.

- Fill in the required fields:
- Name * – Example: "Customer Visit"
- Description – Optional. Add context or internal notes about the event type.
- User Profiles – (Optional) Select Gmail-based profiles whose Google Calendars should be synced with events of this type.
- Color – Pick a calendar color to visually distinguish this event type.
- Click Create to add the new event type.
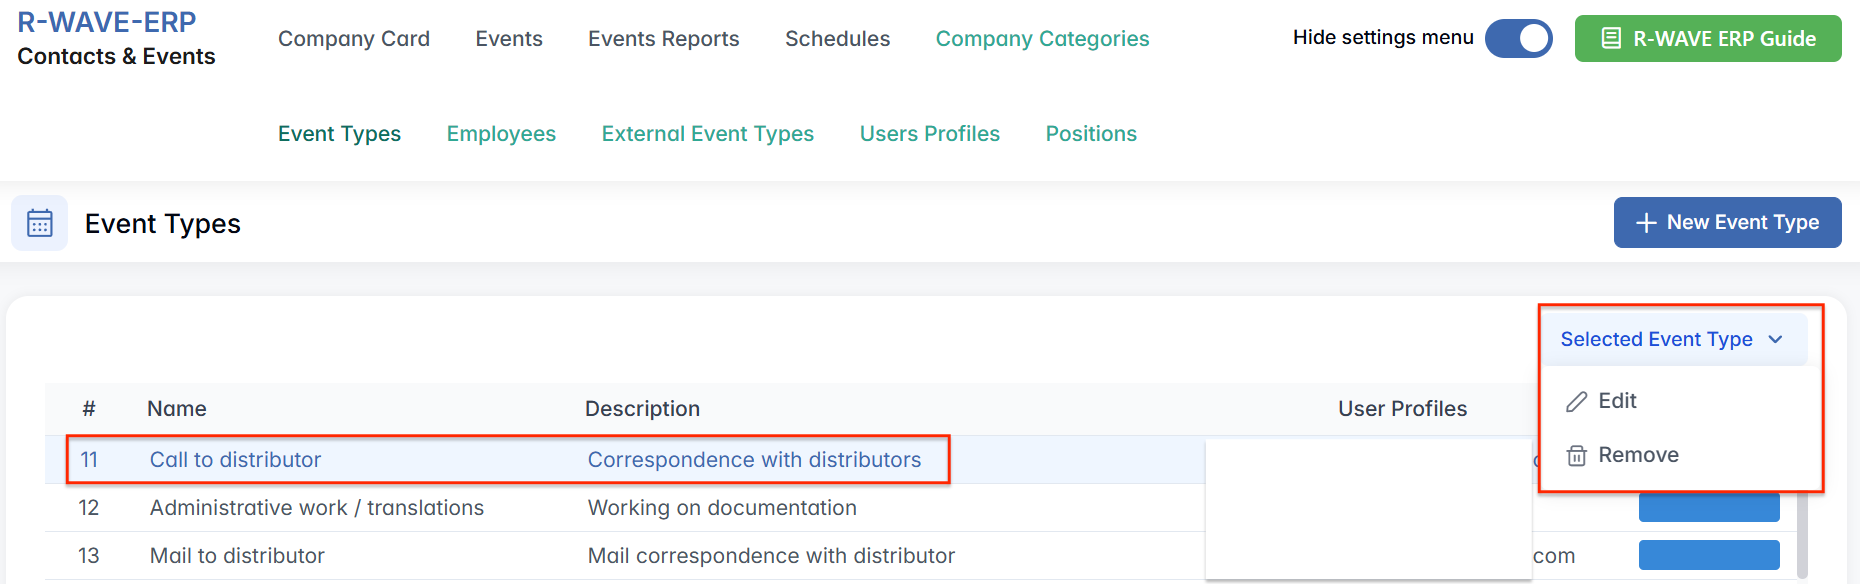
Editing or Removing an Event Type
- Click to select the desired row in the Event Type table. The Selected Event Type button becomes active.
- Click this button and choose:
- Edit – Opens the Edit Event Type window where you can modify any of the fields.
- Remove – Deletes the selected type after confirmation.

Employees
The Employees tab in the hidden settings menu of the Contacts & Events module allows you to manage internal users of the system — those who participate in events, business trips, and sales chains. Employees are displayed in a structured format that mirrors your organization's internal departments, but flexibility is also supported for non-categorized users.
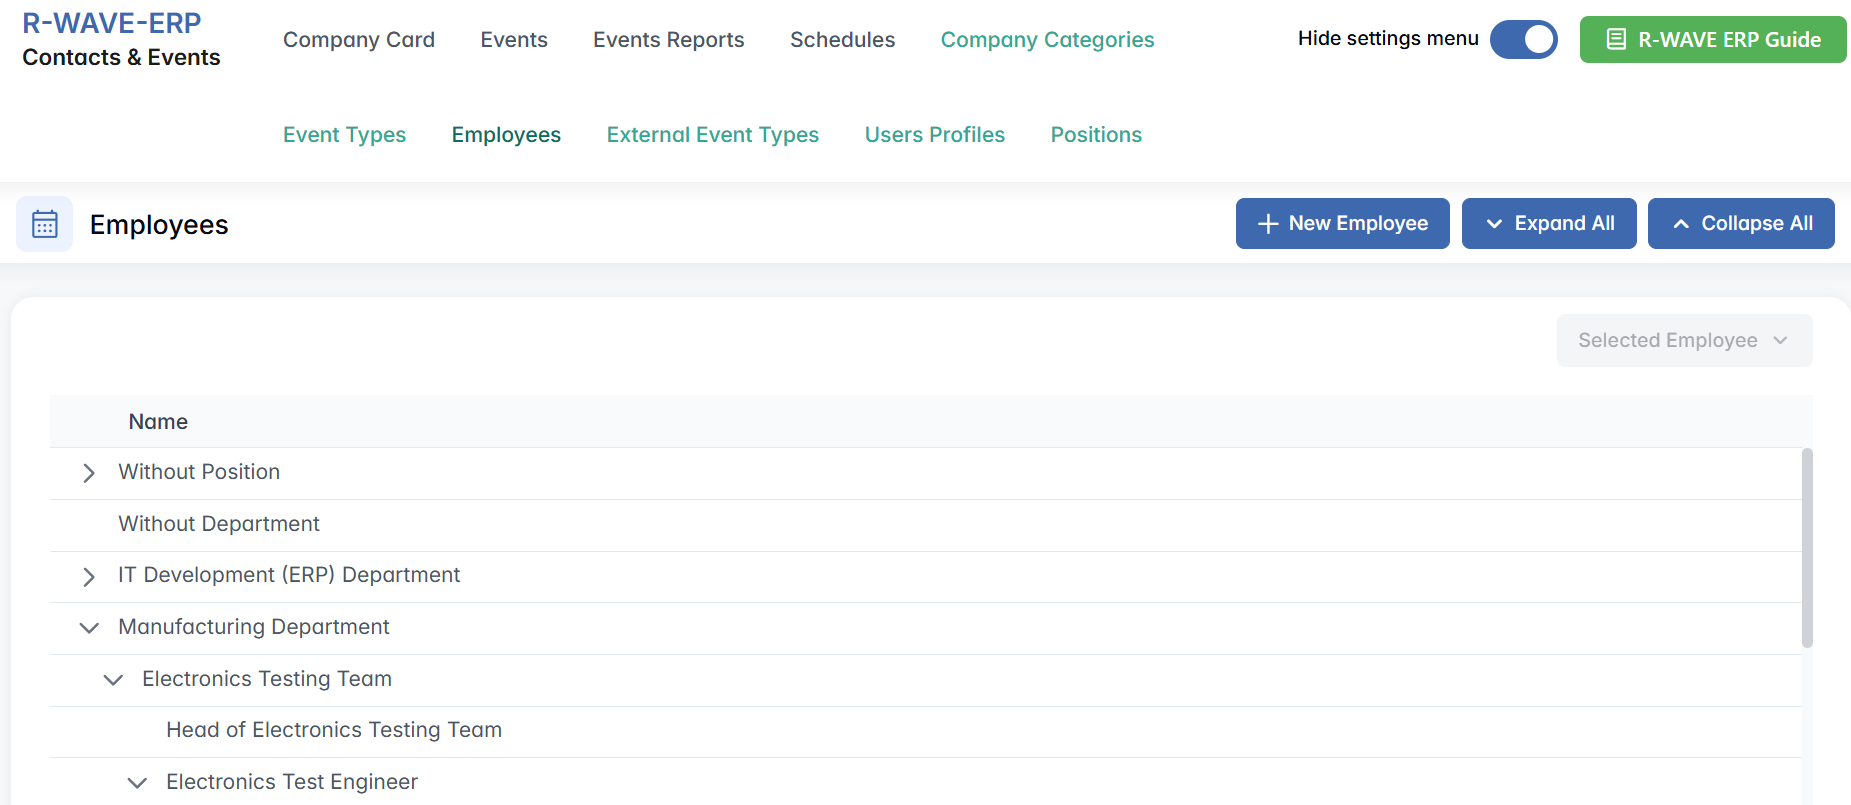
Department-Based Tree View
When you open the Employees tab:
- You will see a tree view of departments: each department appears as a folder.
- By expanding a folder, you can view the list of employees associated with that department.
- The structure supports nested subdepartments, allowing for detailed organizational mapping.
Not all employees must be assigned to a department. The system allows having a folder for employees without a department or position — a flexible space for users who don't yet belong to a formal organizational group.
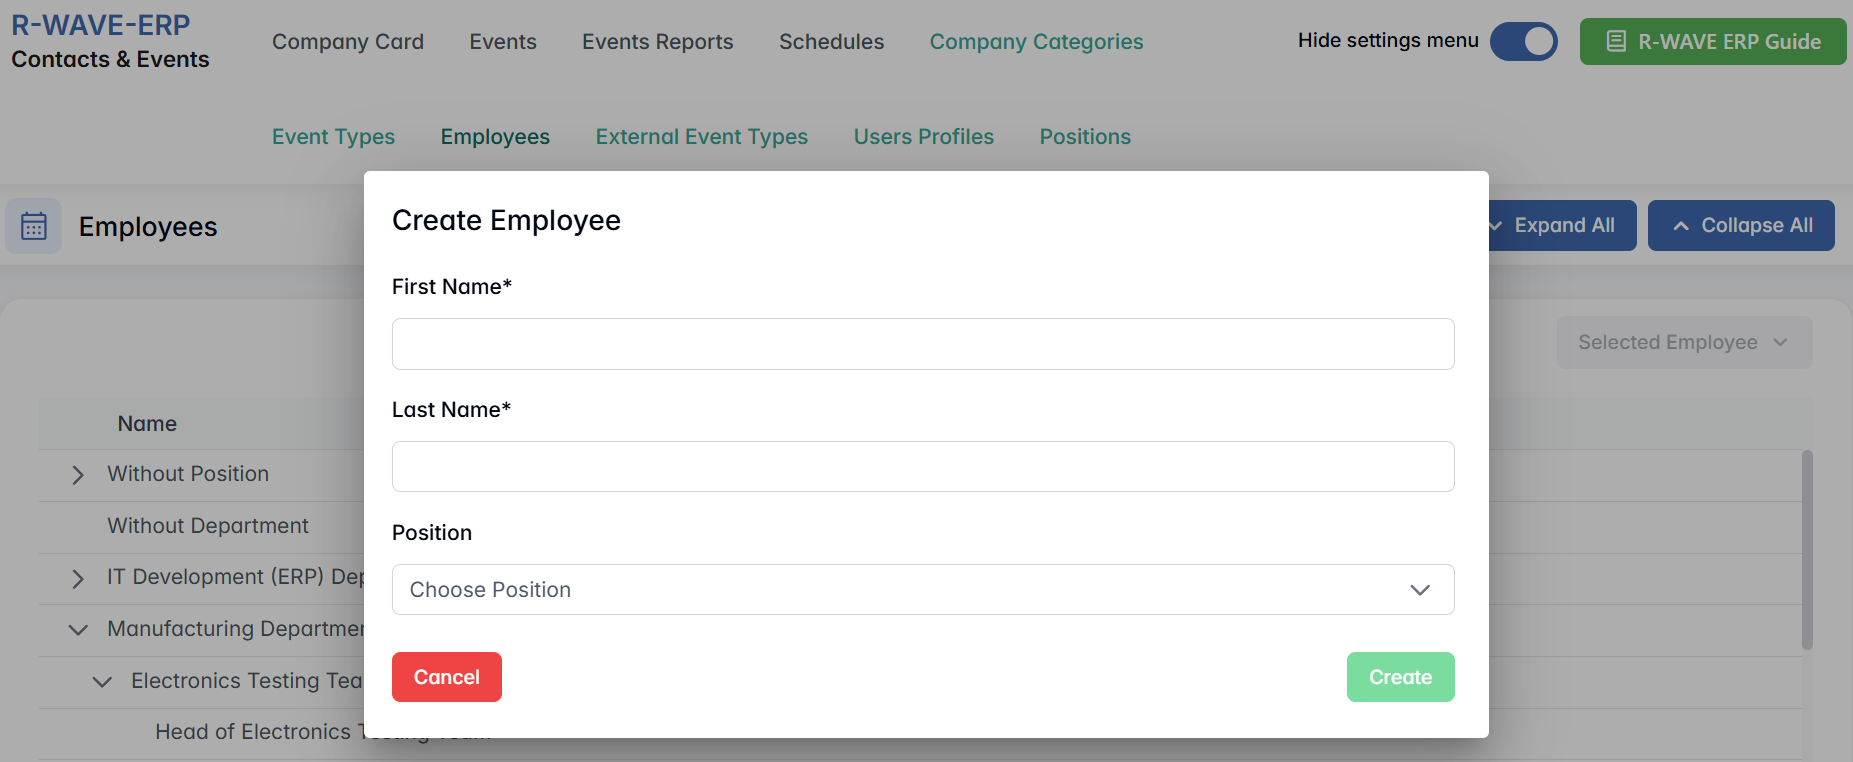
Creating a New Employee
To add a new employee:
- Click + New Employee in the top-right corner.
- A pop-up window titled Create Employee will appear.
- Fill in the following fields:
- First Name * – Required
- Last Name * – Required
- Position – Optional; select from existing positions
- Click Create to save.
If Position is not selected, the employee will be placed in the general folder without a department. This is especially useful when onboarding new team members or system users whose role or department hasn't been finalized yet.
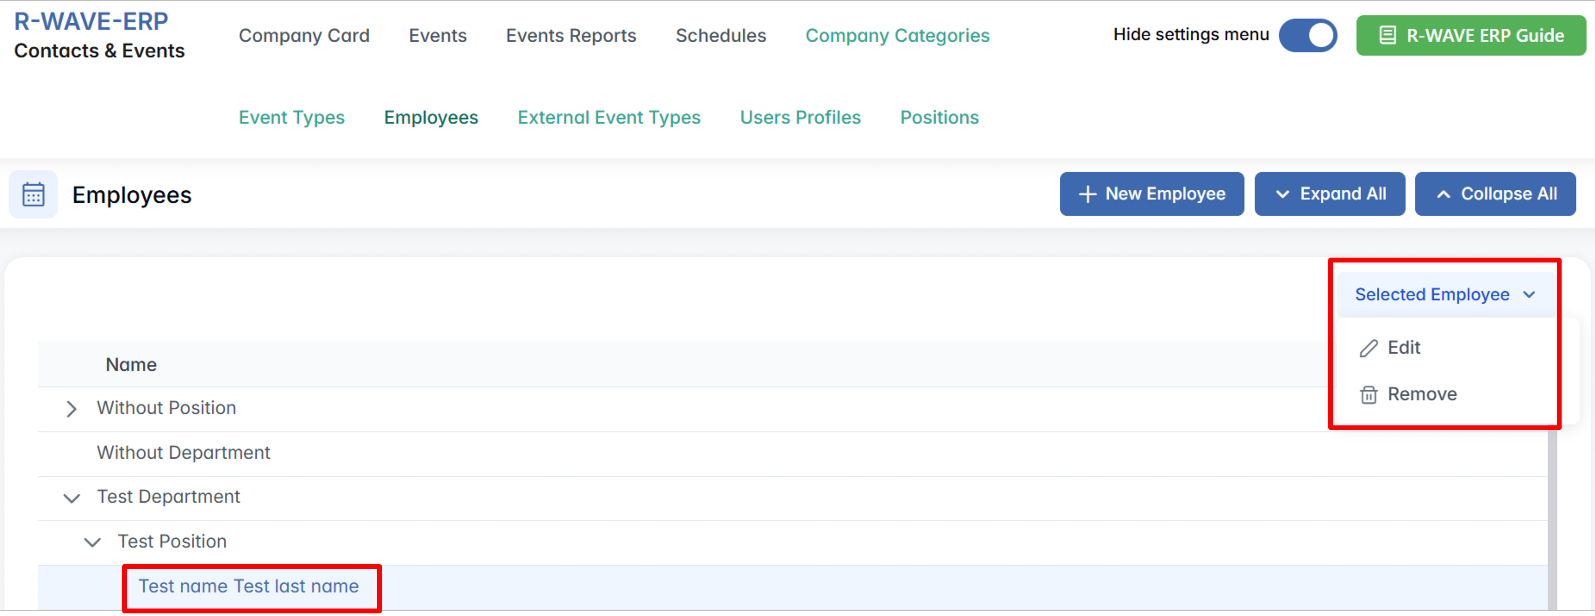
Editing or Deleting an Employee
- Expand the relevant folder (department or general list).
- Select the employee row. The Selected Employee button will become active.
- From this menu, choose:
- Edit – Update first name, last name, or position (which can change the department automatically).
- Remove – Delete the employee record from the system (confirmation required).

Customizing Departments and Positions
If you need to create a new department, it should be done via the Positions tab. A department is automatically created or assigned based on the position linked to the employee. If you need a new position, create it in the Positions tab first — it will become available in the dropdown list when adding or editing an employee.
The system allows you to manage employees with or without a department or position, offering flexibility while preserving structure where needed.
External Event Types
The External Event Types tab allows you to manage external calendar integrations — particularly with Google Calendar — by registering specific users whose Google events can be imported into the internal ERP calendar.
Overview Table
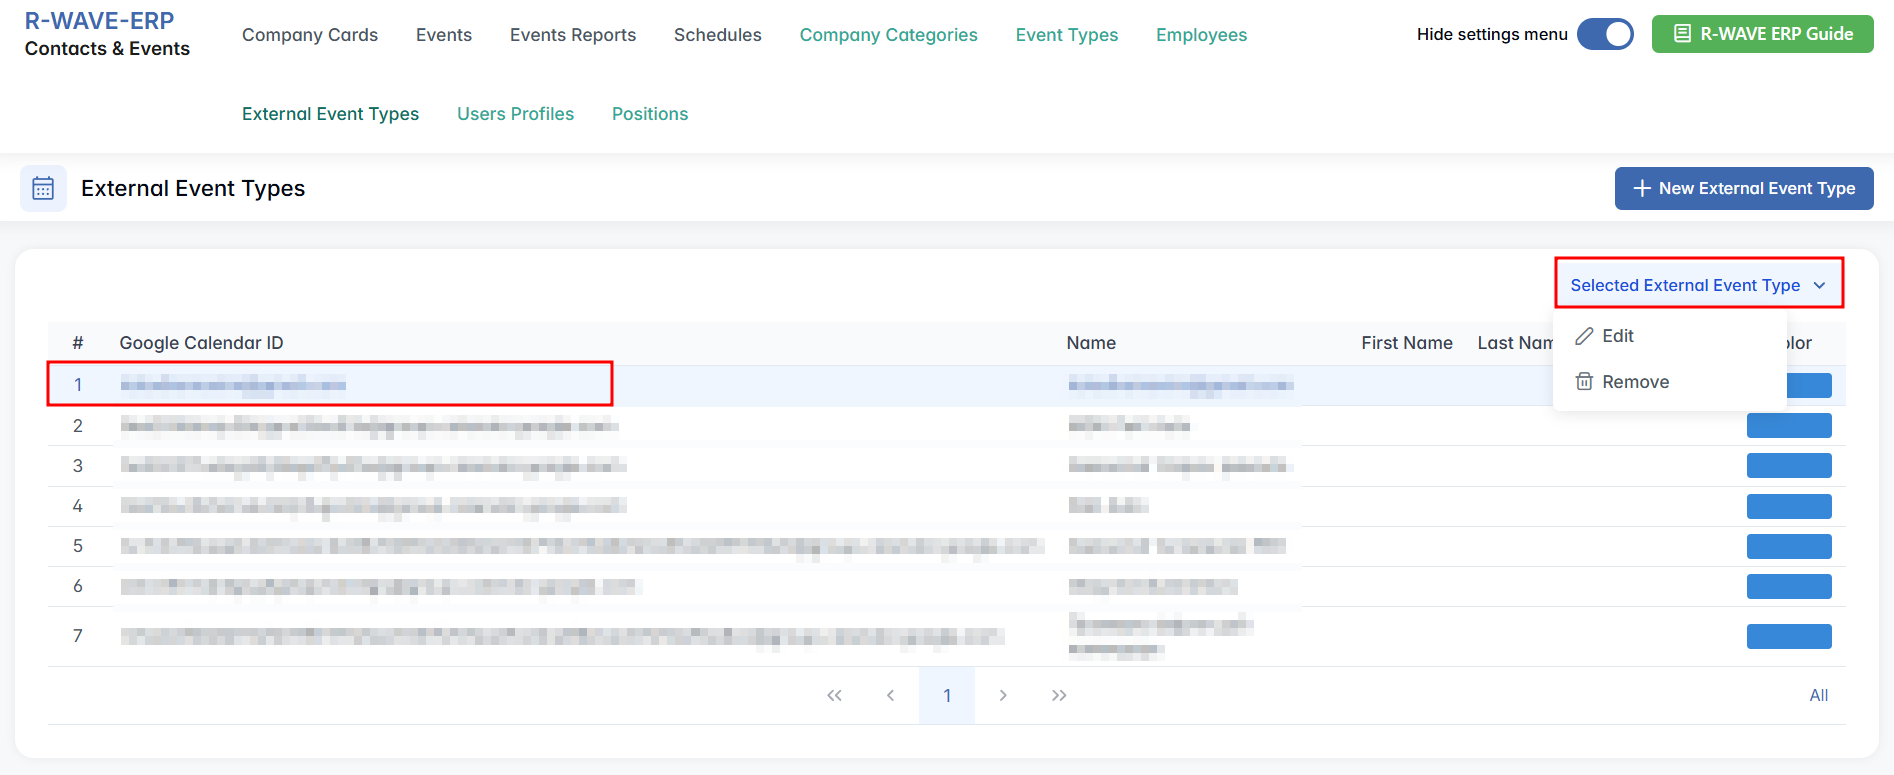
When you enter the External Event Types tab, you will see a list of already registered external calendar sources. The table includes the following columns:
- Google Calendar ID – A unique identifier used to link to a specific user's calendar.
- First Name and Last Name – User's identity associated with the calendar.
- Gmail – The email address connected to the calendar.
- Color – The color that will be used to display this calendar's events in the ERP system for easy visual identification.
Creating a New External Event Type
To connect a new external calendar source:
- In Google Calendar, copy the calendar's unique Calendar ID:
- Open Google Calendar in a browser.
- On the left, under My calendars, hover over the calendar → click ⋮ (Options) → Settings and sharing.
- Scroll to Integrate calendar and copy the Calendar ID. For a primary calendar, the ID is the user's Gmail address. For additional calendars, it looks like
abc123@group.calendar.google.com.
- In the same settings page, under Share with specific people, add your ERP work email and grant at least See all event details permission.
- Go back to ERP → open the Contacts & Events module, then the External Event Types tab.
- Click + New External Event Type in the top-right corner.
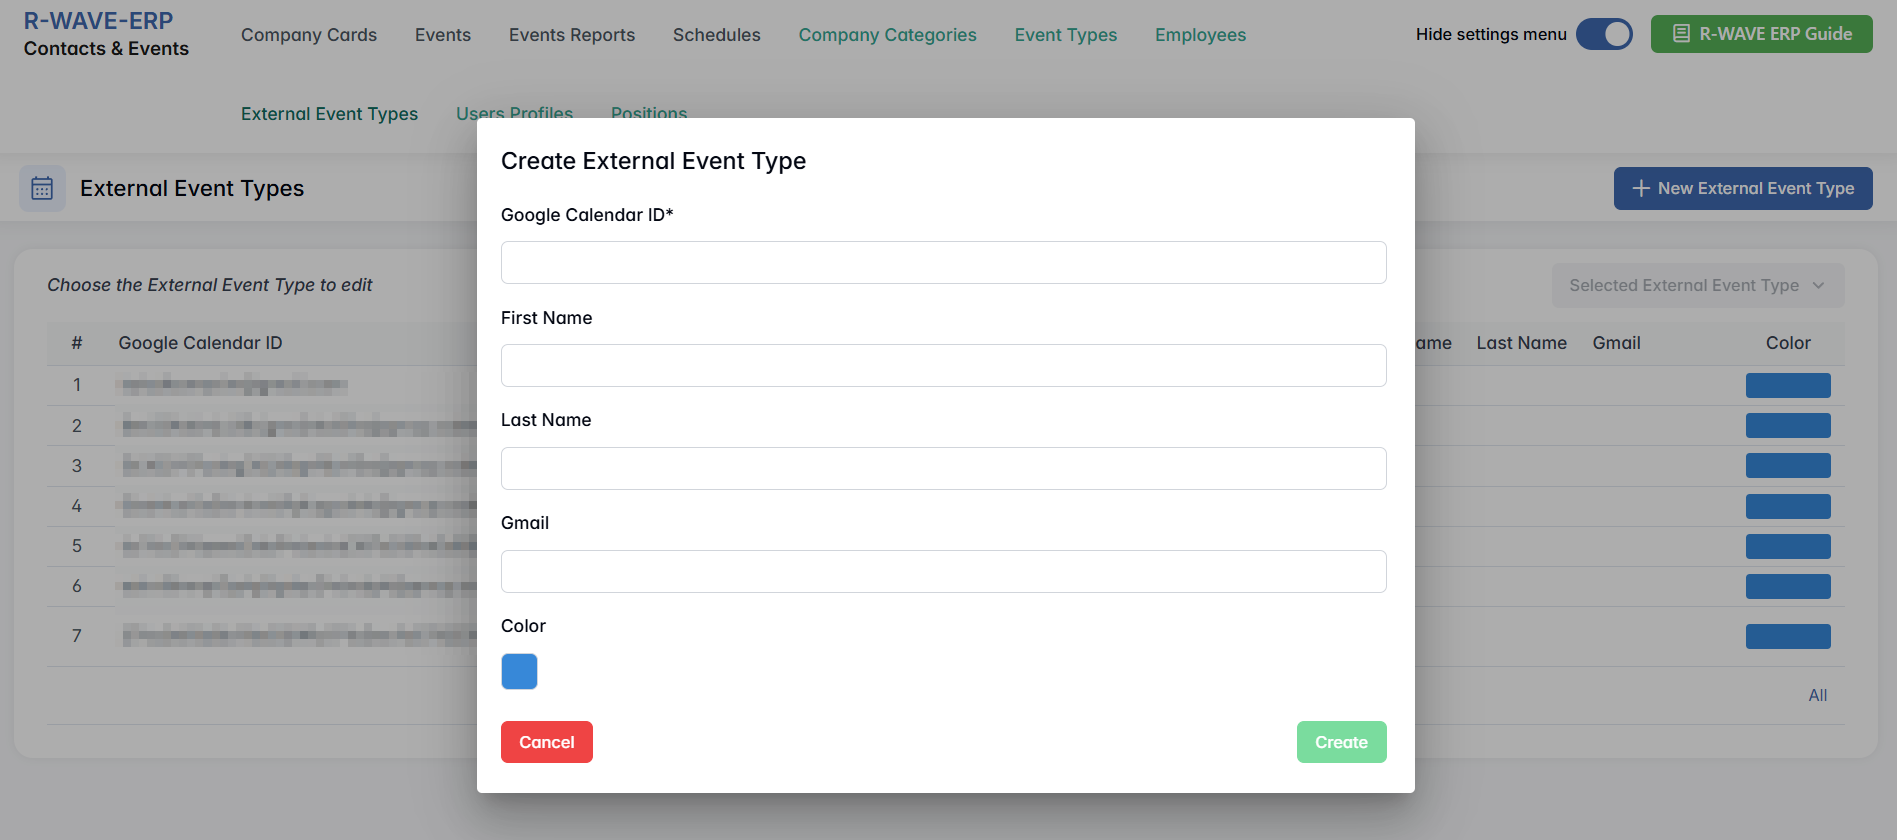
- In the pop-up window titled Create External Event Type, fill in:

- Google Calendar ID * – Required; paste the unique ID for the Google Calendar.
- First Name and Last Name – Optional; the calendar owner's first and last name.
- Gmail – Optional; the email address associated with the calendar.
-
Color – Optional; pick a display color to visually mark this calendar's events.
-
Click Create to register the external event type.
Editing or Deleting External Event Types
To modify or remove an existing record:
- Select the desired row in the table. The Selected External Event Type button will become active.
- Choose:
- Edit – Update any of the fields (e.g., calendar ID, color, or name).
- Remove – Delete the entry; this will stop importing events from that calendar.

User Profiles
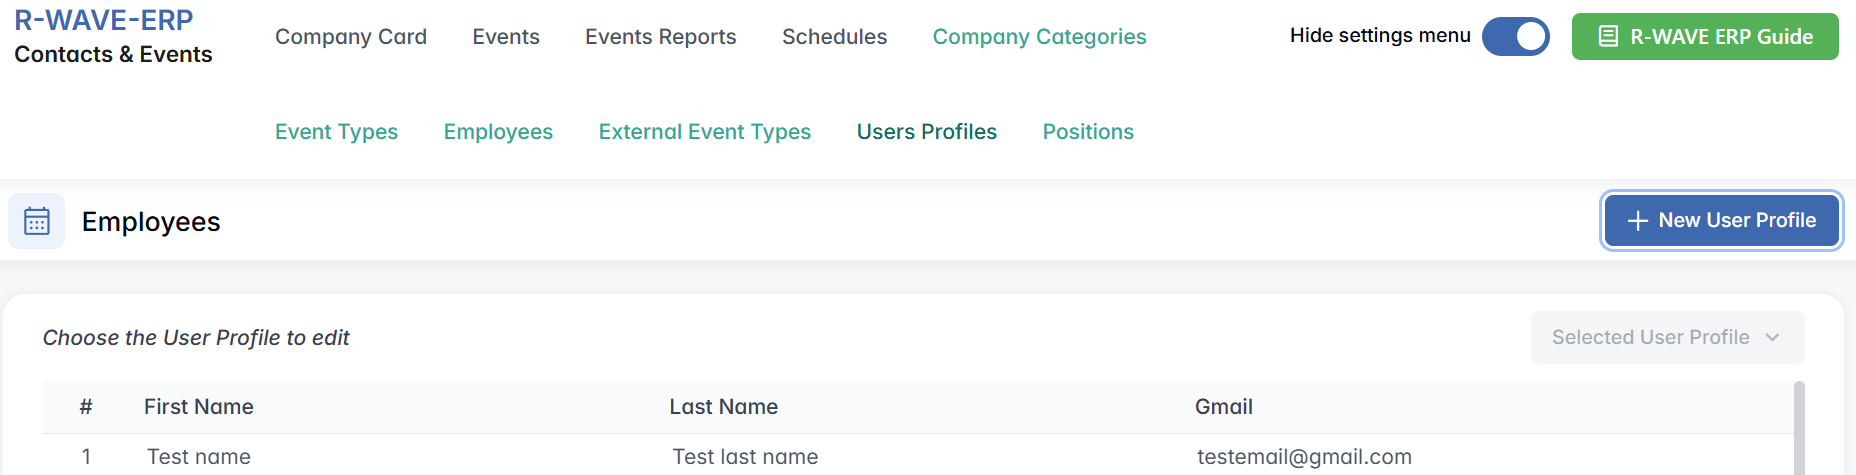
The User Profiles tab allows you to register users whose Gmail accounts are used for internal ERP calendar synchronization. These profiles are primarily used to enable automated integration between BINU ERP and external Google Calendars for specific event types.
Overview Table
Upon entering the Users Profiles tab, you will see a table displaying all previously created user profiles with the following columns:
- First Name / Last Name – Personal details of the user.
- Gmail – Email address associated with the user, typically used for calendar synchronization or identification purposes.
Creating a New User Profile
To add a new user profile to the system:
- In the User Profiles tab, click the + New User Profile button in the top-right corner.

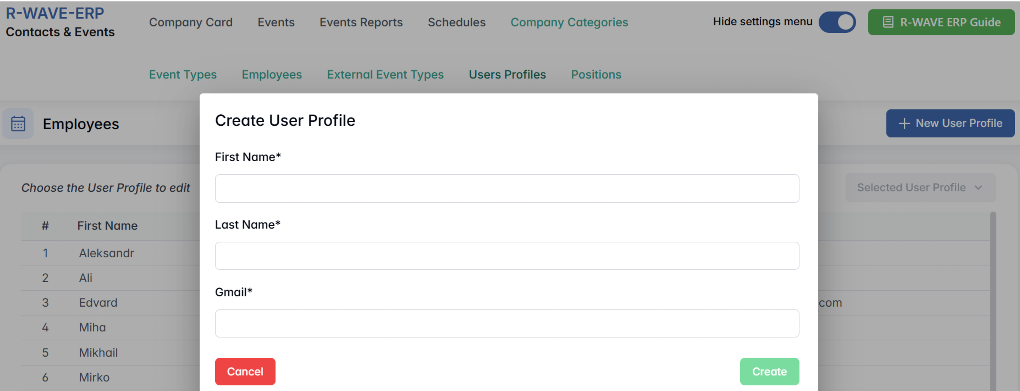
- A pop-up window titled Create User Profile will appear.
- Fill in the required fields: First Name, Last Name, Gmail.
- Click Create to save the profile.
Once created, a user profile can be referenced in other modules. In the Event Types tab, a user profile can be assigned to define which Google account is linked to specific events. For example, an HR user profile may be assigned to access all interview events.
Editing or Deleting User Profiles
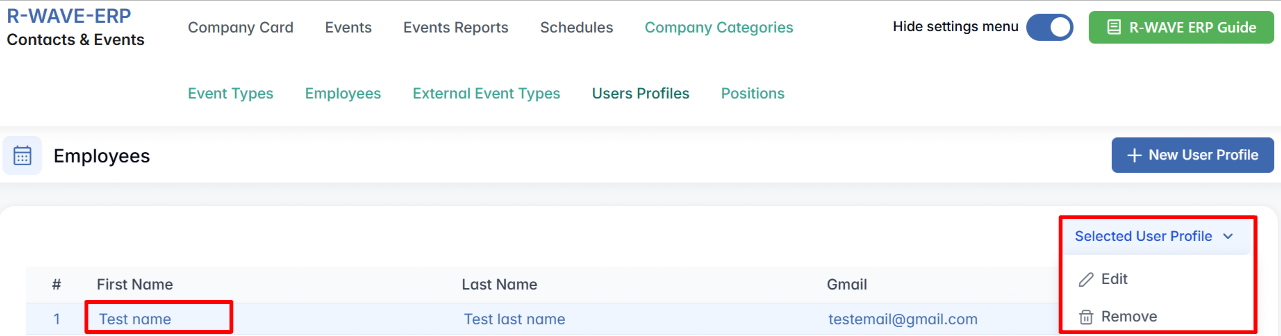
- Select a profile from the list. The Selected User Profile button will become active.
- Choose one of the options:
- Edit – Update the user's first name, last name, or Gmail.
- Remove – Delete the profile from the system.
Deleting a user profile may affect any references to this person in external calendar configurations or event records.
Positions
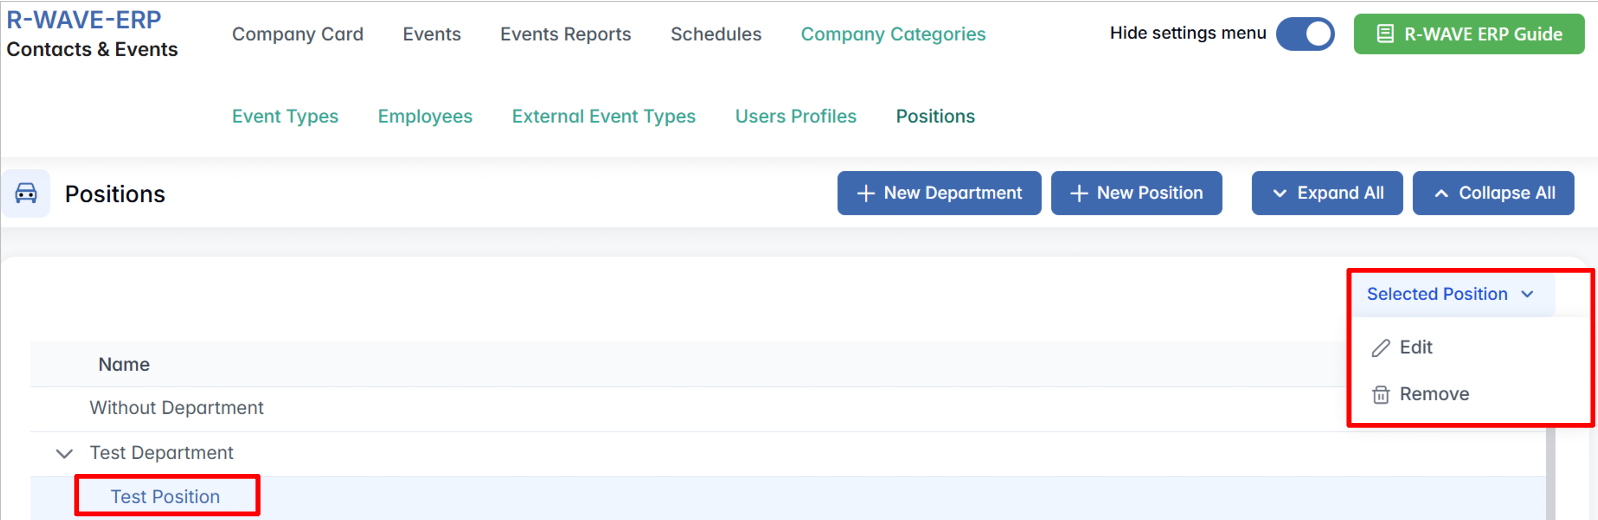
The Positions tab in BINU ERP allows you to manage your company's organizational structure by creating and maintaining departments, sub-departments, and individual job positions. This structure supports assigning employees to the right roles and departments across the system.
When you open the tab, you will see a hierarchical folder view, similar to what is used in the Employees tab:
- Departments appear as top-level folders.
- Each folder can contain positions and sub-departments, allowing for a structured view of your company.

Creating Departments and Positions
At the top right of the page, you will find two action buttons:
+ New Department

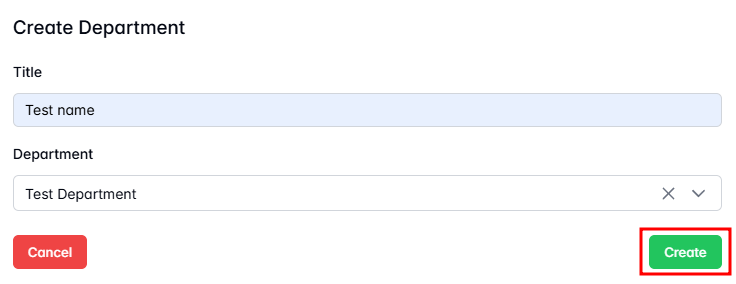
Clicking this opens the Create Department window:
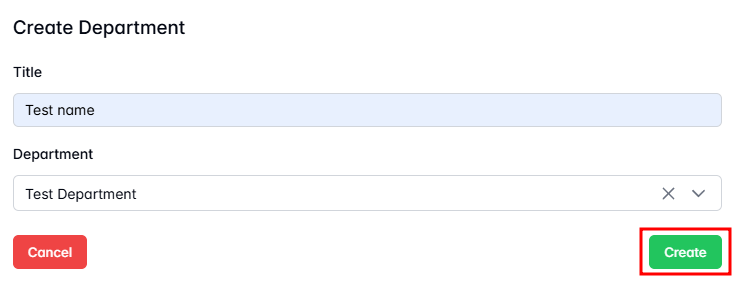
- Title – Name of the department (optional).
- Department – If you want to create a sub-department, select the parent department here.
All fields are optional, so you can add flexible department structures as needed.
+ New Position

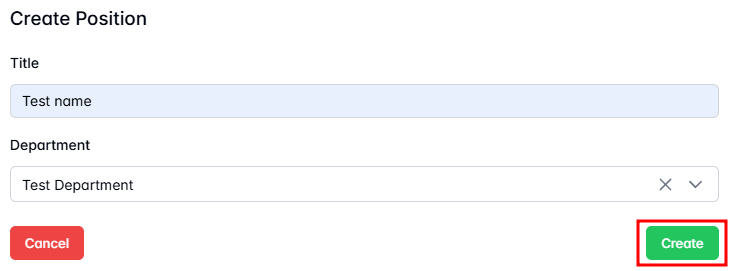
Clicking this opens the Create Position window:
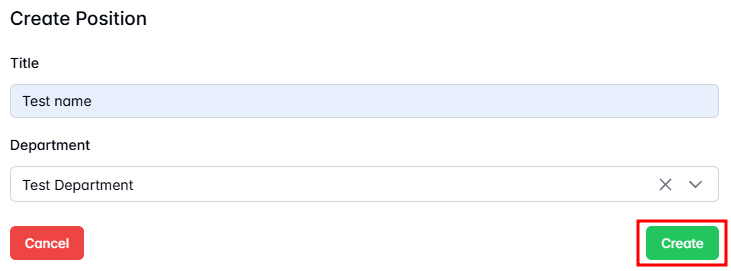
- Title – Name of the position (e.g., Sales Manager, Developer).
- Department – Select where this position belongs (can be a main or sub-department).
Positions created here will appear in the dropdown menu when assigning roles to employees.
Editing or Deleting Departments and Positions
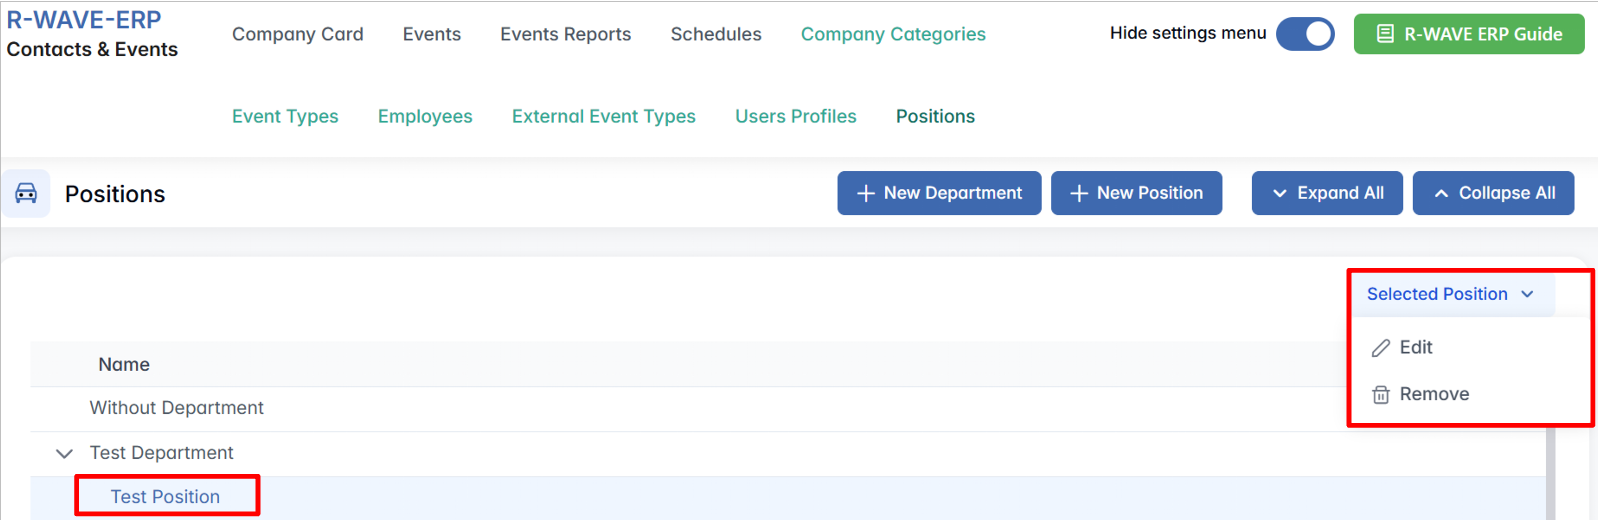
- Select a department or position from the tree view. The Selected Position or Selected Department button will become active.
- Choose one of the options:
- Edit – Update the title, department, or category.
- Remove – Delete the selected item from the structure.
Departments can be created without any positions, and positions can exist without being tied to a specific department. This ensures flexibility in organizing roles across the company.