Instruments/Tools/Equipment Module
This module acts as a central hub for managing all physical assets related to technical operations — from individual tools and instruments to complex equipment sets. It allows teams across departments to locate, request, allocate, and monitor usage of items in real time, ensuring operational readiness and reducing downtime due to misplaced or unavailable resources.
Beyond inventory tracking, the module supports structured categorization of tools, assignment to specific areas and locators, and transparency over movement, write-offs, and tool-related requests. It also integrates tightly with procurement and manufacturing processes by reflecting usage and tool requests in related modules.
The BINU ERP Guide and AI Assistant Tools
The BINU ERP Guide and AI Assistant Tools
The BINU ERP system provides tools to support users in navigating and understanding the processes and functionalities of the system. These tools — the BINU ERP Guide and the BINU AI Assistant — include a built-in contextual help. They are non-intrusive and can be closed or reopened as needed, allowing users to remain focused on their current workflow without interruption.
When you click the BINU ERP Guide icon in the upper-right corner of the screen, the pop-up guide window opens. This feature is available across different modules and is designed to help users understand where they are in the system and how to use the current section effectively.

When you click the BINU AI feature on the side of the screen, the chat window opens, where users can choose their language of conversation. The supported languages are: English, Bulgarian, Croatian, French, German, Hungarian, Italian, Romanian, Russian, Serbian, Slovenian, Spanish, Turkish, and Ukrainian.
The BINU AI Assistant provides explanations and documentation for all topics related to the BINU ERP system. Users can ask about specific terms, business processes, system functionalities, or request documentation on a particular topic. To begin, type your question in the input field at the bottom of the chat window.
The BINU ERP Guide: Quick Overview
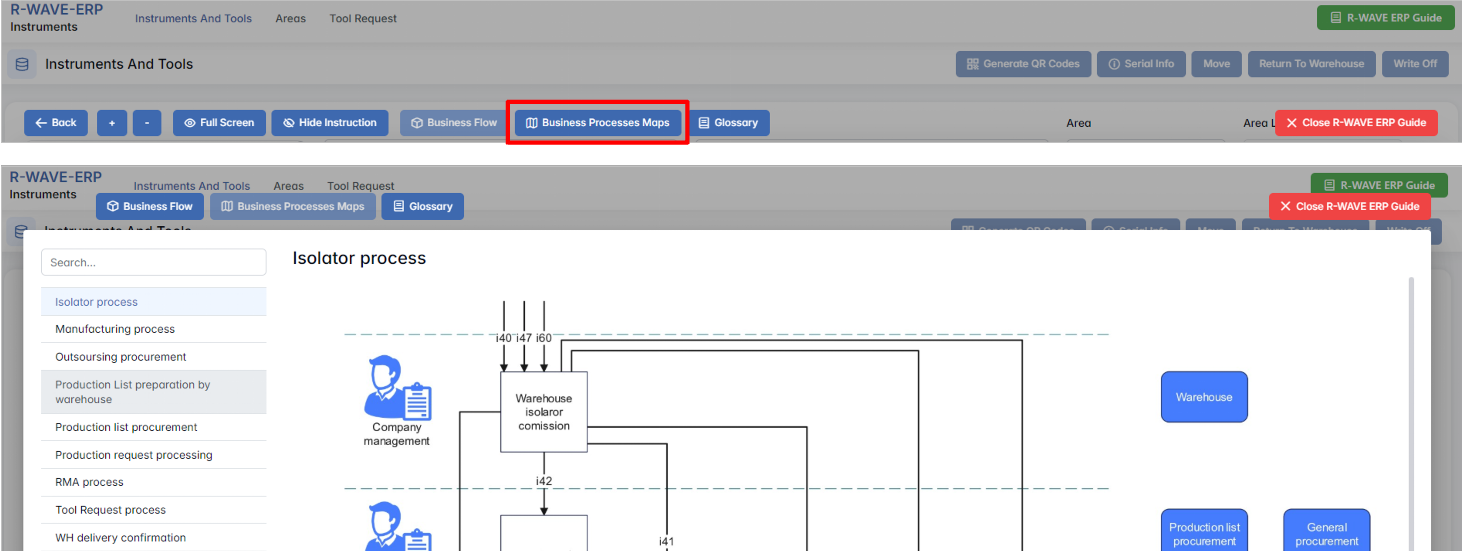
When you click the BINU ERP Guide book icon, you land on the Business Flow map. It has two main sections: the left panel displaying the business flow map and the right panel showing the functional overview.
- Left panel — Business Flow Map — displays a visual diagram of the business processes. It shows how each module is interconnected; for example, you can see how Sales, Manufacturing, Procurement, CRM, QC, and Warehouse are interconnected.
- Right panel — Functional Overview — provides a concise, bullet-style instruction list describing the key operations available in the current module/tab.
Top Bar Options
At the top of the ERP Guide window, you'll find optional tools for deeper understanding: Business Processes Maps, Accounting Flow, and Glossary. The Accounting Flow is meant for financial departments.
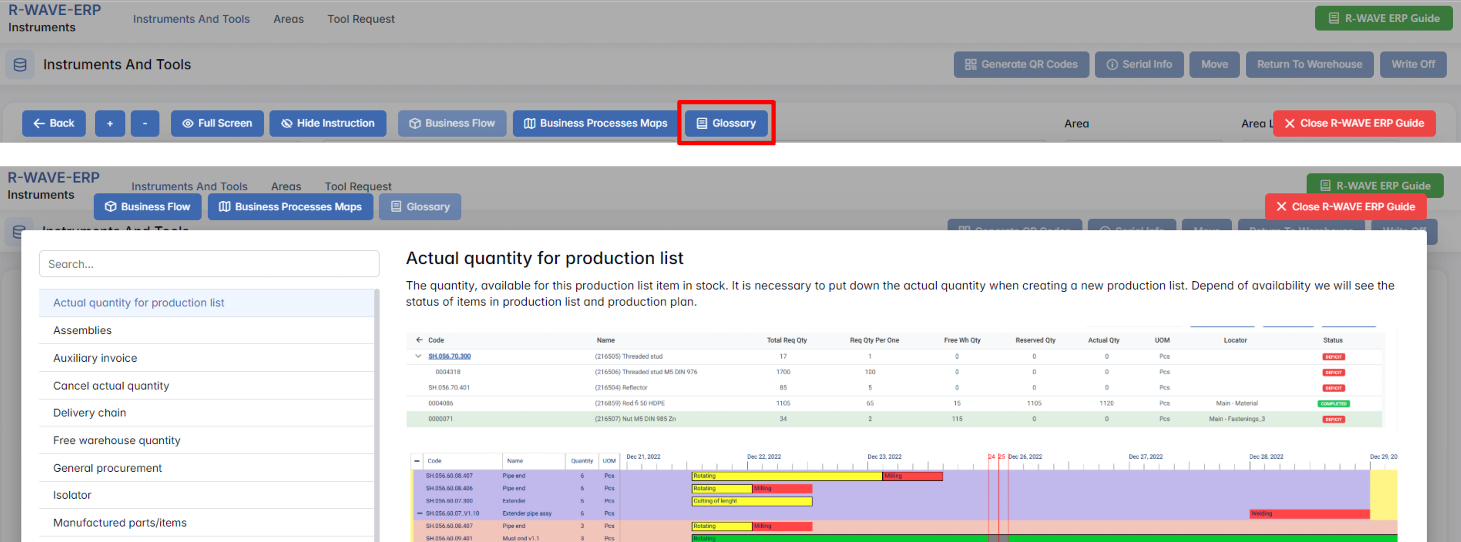
Business Processes Maps
Business Processes Maps provides a visual representation of the company's operational structure and business flow. It helps the user understand how the current module fits into the larger operational structure and makes it easy to grasp the upstream and downstream dependencies within the business processes. The Business Processes Maps can be accessed from various modules.

Accounting Flow: Data Flow Graph and Responsibility Matrix
Accounting Flow is a tool designed for the finance department; it shows where the data originates and defines responsibilities. For this purpose, it consists of two parts: a Data Flow Graph and a Responsibility Matrix.
The Data Flow Graph displays the movement of items from departments to the warehouse and from the warehouse to the departments. Based on these movements, the system tracks the flow of goods entering and leaving the company. The Dashboard section, planned for a future release, will allow users to view real-time data (in, out, balance, product costs).
If you hover over a diagram block, the system highlights the corresponding movement chain.
If you click a block in the diagram, you fix the highlighted chain. To narrow the selection further, click a block in the second, third, or fourth column.
The Responsibility Matrix identifies the department accountable for the selected process.
Glossary
Glossary provides definitions and descriptions of key terms and functionalities used throughout the system. The Glossary can be accessed via the BINU ERP Guide, which is available on any page of the system.
The BINU AI Assistant: Quick Overview
The BINU AI Assistant is specifically designed to help the user with ERP documentation questions. It provides information and assistance related to the BINU ERP system. The BINU AI Assistant understands fifteen (15) languages. It is available on every page as a non-intrusive help tool.

The Purpose of the BINU ERP Guide and BINU AI Assistant Tools
The BINU ERP Guide and BINU AI Assistant help users by:
- Showing where they are within the system (module context and current section).
- Providing a visual schema of the business flow, helping them understand how the current module fits into the larger operational structure.
- Offering a quick-reference instruction panel with the main actions and functions available in the current tab (e.g., creating companies, filtering, scheduling events).
- Offering quick access to the relevant documentation (AI-powered ERP documentation helper).
Instruments/Tools/Equipment Overview
This module provides a complete overview and management of all instruments, tools, and technical equipment used within the organization. It ensures real-time tracking of tool location, availability, usage history, and requests. It consists of three main tabs: Instruments And Tools, Areas, and Tool Request.

Instruments and Tools
Instruments and Tools
This tab displays a list of all physical items (tools, instruments, technical devices) that have been issued to employees through tool requests. It serves as the primary registry for tracking current location, quantity, and availability.
Interface and Filters

Located on the left side:
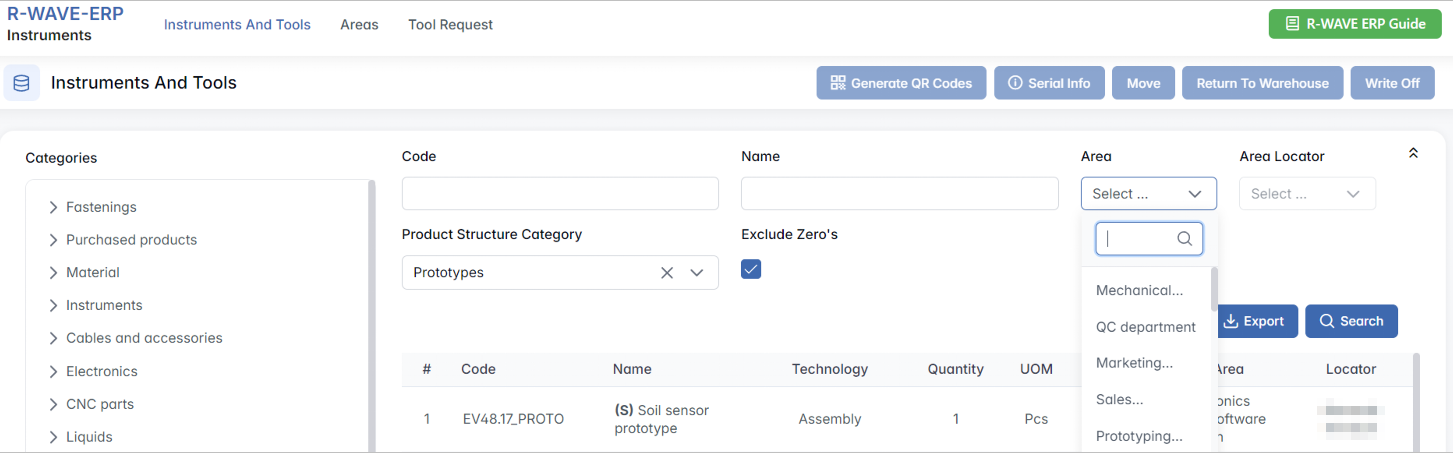
Category Panel – Displays a custom hierarchical structure of tool categories (e.g., "Prototypes," "Electronics," "Assemblies"). These can be defined manually and grouped logically for convenient navigation.
Main Filter Panel:
- Categories – Select one or more product categories.
- Code / Name – Text search fields to quickly find a tool by its unique code or label.
- Area – Filters by physical storage or usage area (e.g., "FAE department").
- Area Locator – Appears after selecting an Area; allows filtering by a specific locator within that area.
- Product Structure Category – Defines the hierarchical role of a component in the production process, indicating its position and dependency within the overall product assembly.
- Exclude Zeros – When checked, hides tools that have zero quantity in the warehouse.
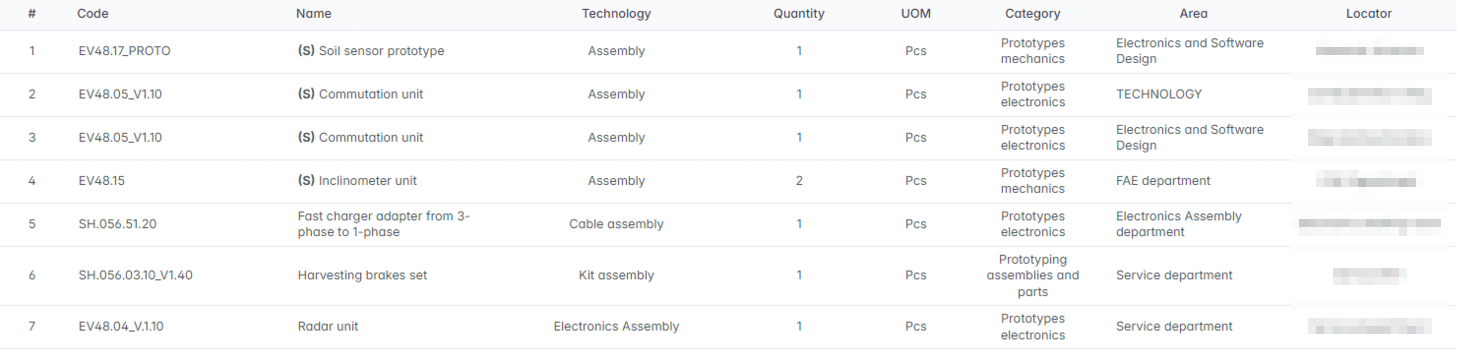
Table Columns
This table provides real-time visibility into what tools are available, where they are located, and in what quantity.
Available Actions
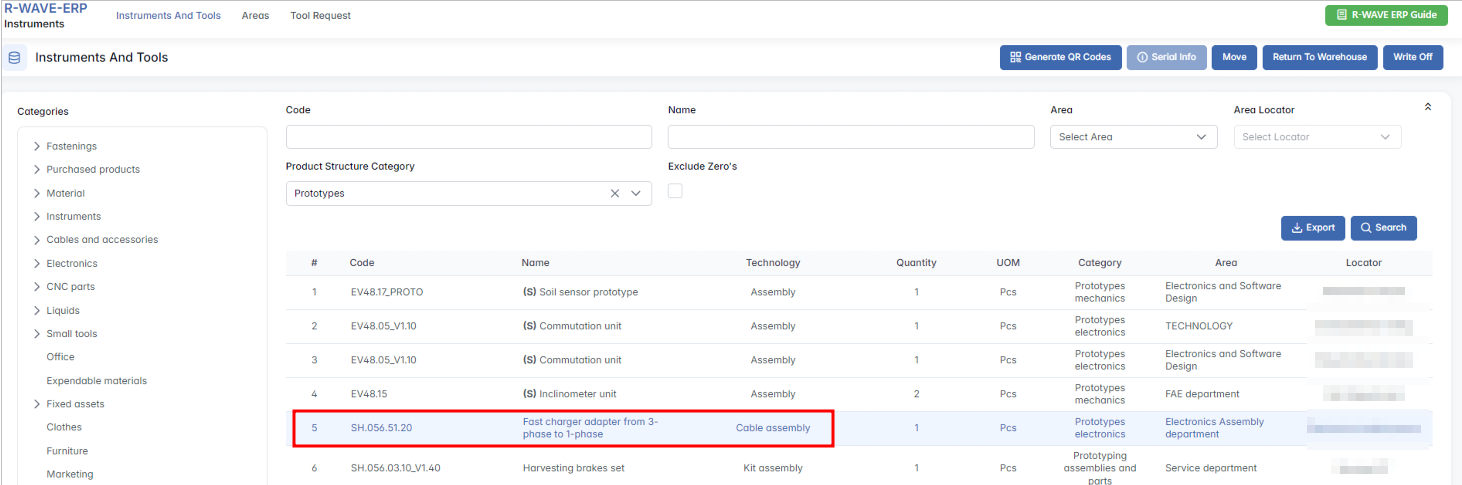
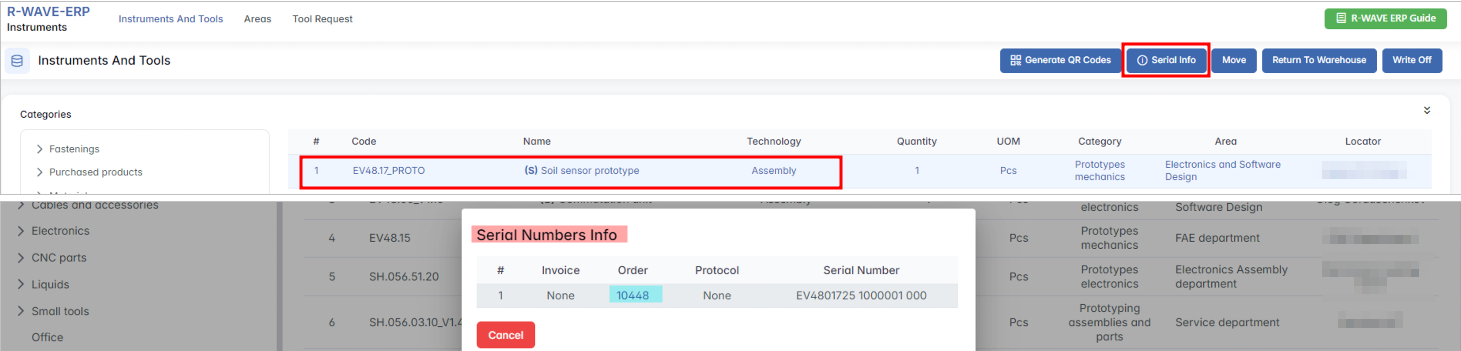
When a row is selected, additional action buttons become available: Generate QR Codes, Serial Info, Move, Return to Warehouse, and Write Off.

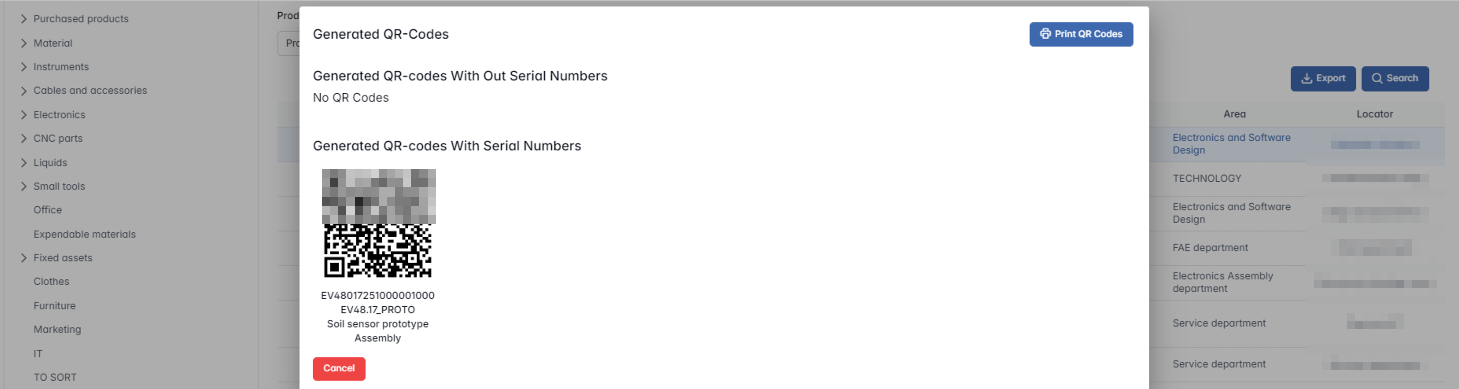
- Generate QR Codes – Generates printable QR codes to stick onto items for fast scanning and tracking.
Purpose: Used for warehouse automation, audits, and tool tracking via scanner.
- Serial Info – Available only for items marked with "(S)" in their name; opens a list of serial numbers. The Order column shows a number that is clickable and linked to the manufacturing order.
- Move – Transfers a tool from one locator to another within the same area or to a new one.

Purpose: Reorganizing storage or reallocating tools between departments.
- Return to Warehouse – Returns items currently in use to their assigned warehouse stock.
Purpose: Completes the tool usage cycle and updates availability.
- Write Off – Permanently removes items from stock due to damage, consumption, or obsolescence.

Purpose: After a tool is broken, outdated, or used irreversibly, it is written off.
Areas
Areas
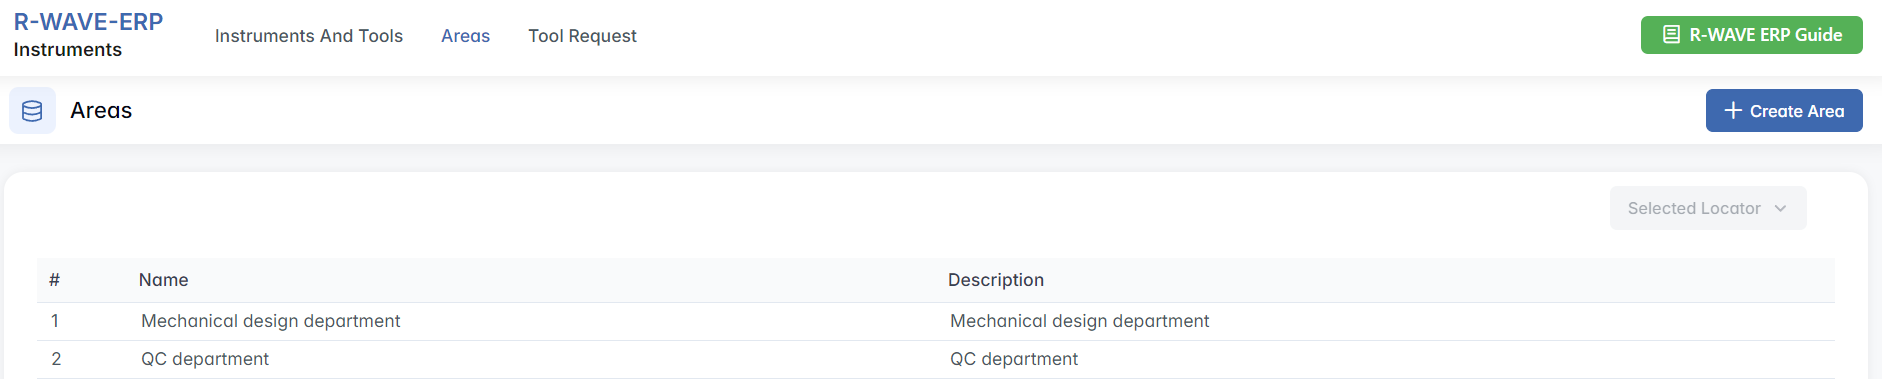
This tab allows users to define physical storage or usage areas across the organization. Areas can correspond to departments, labs, warehouses, or even mobile workspaces.
Area Table Columns

Actions
In Areas you can create areas and, for a selected area, manage its locators (create, edit, and remove).
- Create Area – Opens a form to define a new area (Name, Description).

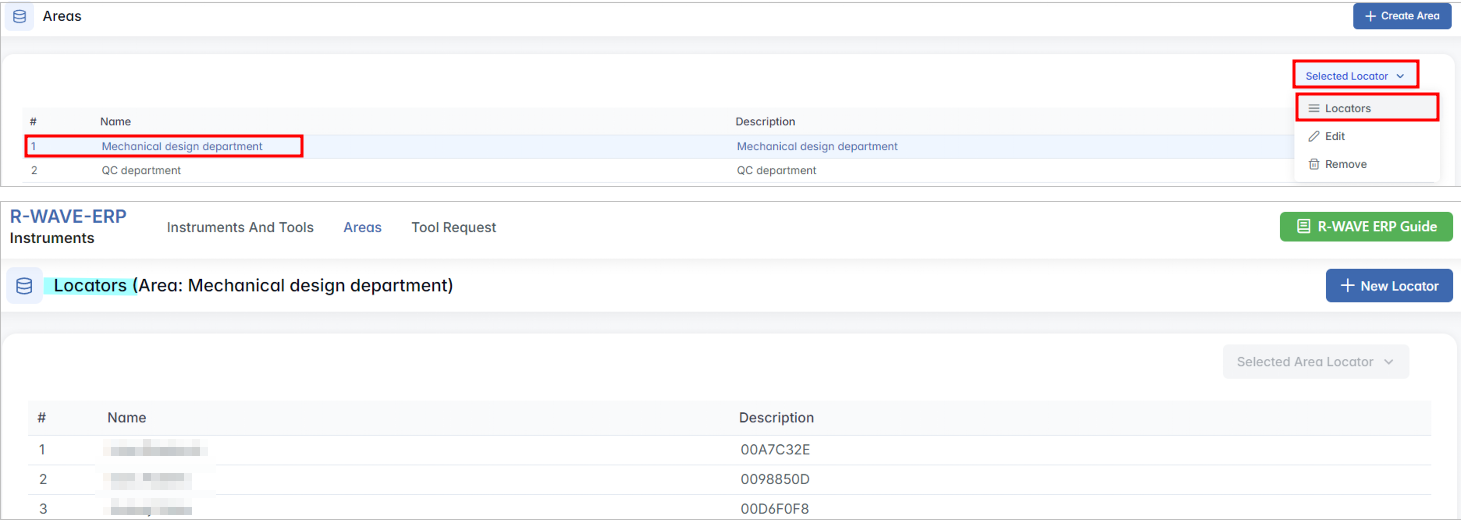
- Selected Locator – Click the row of a chosen area and open the Selected Locator menu, which offers Locators, Edit, and Remove.

Locators Page
For the selected area, you can define the exact locations where tools are stored. Open the area row, use the Selected Locator menu, and choose Locators.
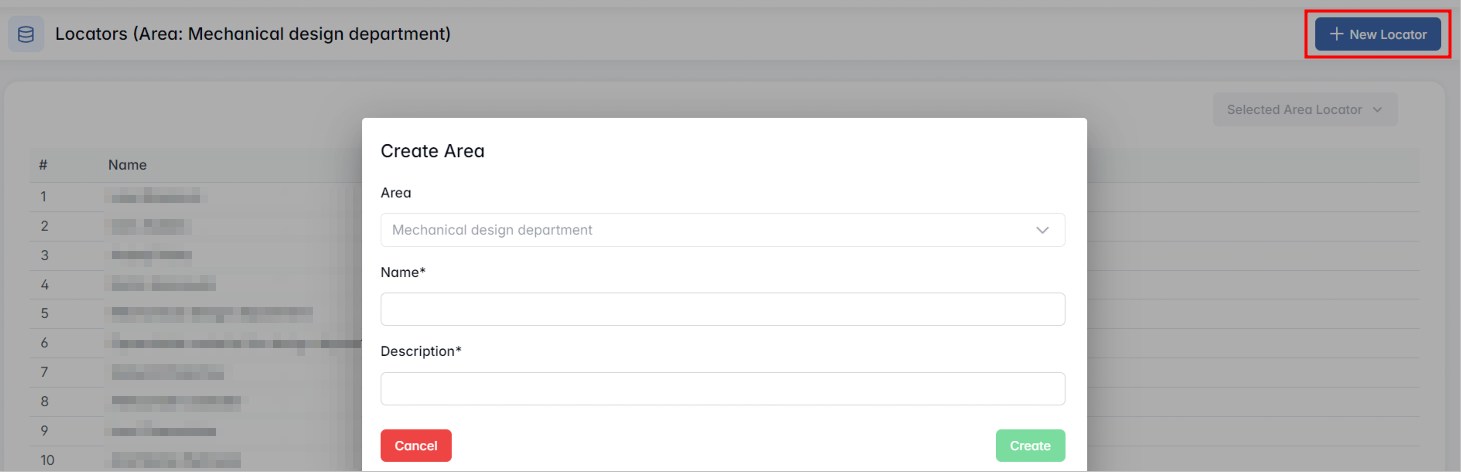
- New Locator – Adds a specific locator to the area.
- Edit – Adjust the locator name or description.

- Remove – Delete the locator if it is no longer used.

Purpose: Locators support accurate physical tracking of tools, prevent misplacement, and enable fast tool retrieval.
Tool Request
Tool Request
This tab manages warehouse requests submitted by employees for specific tools. Each tool request includes information on the Area and Locator, and when it was created and completed (if applicable).
Actions
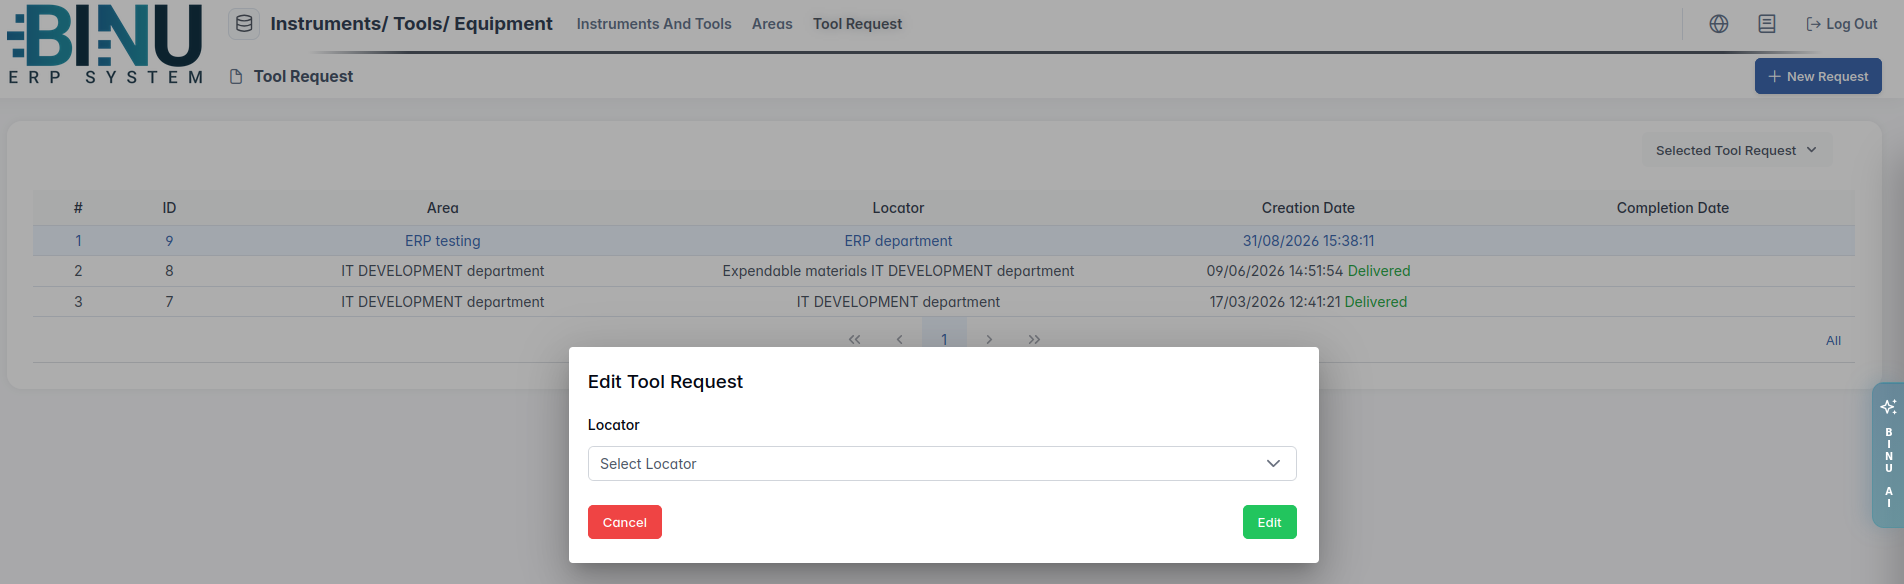
To add a new request, click the New Request button in the upper-right corner. This initiates a new tool request. A pop-up window appears where the user must select a Locator (which area/location needs the tools).
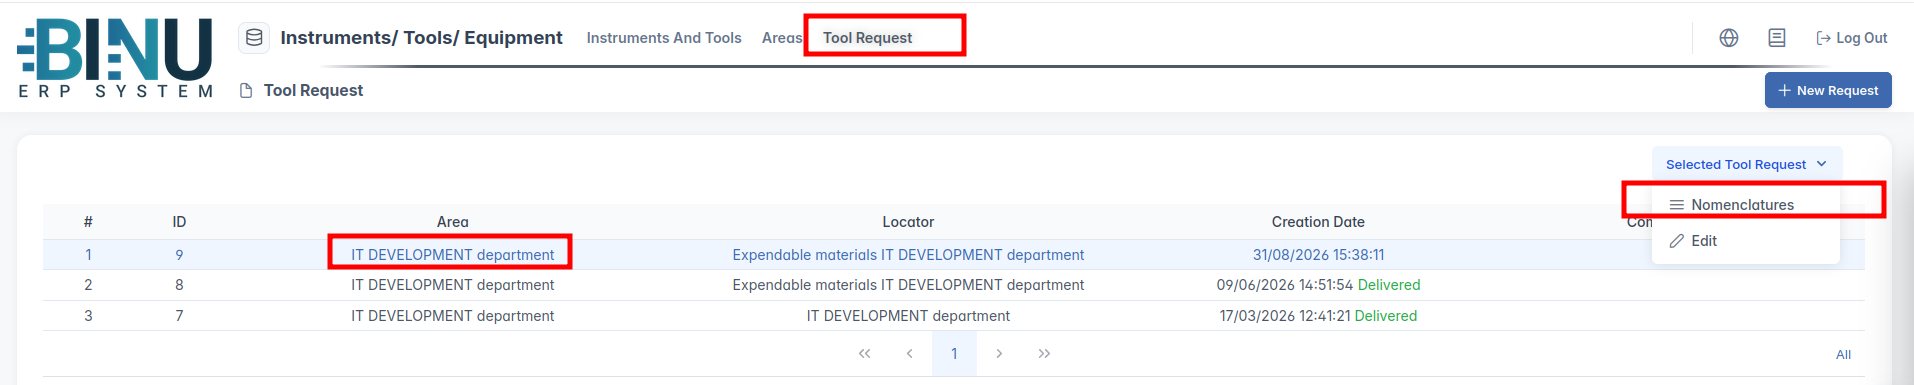
If you would like to see details about an existing request, click on the request and then Selected Tool Request in the upper-right corner. To view the list of items requested within a specific request, click Nomenclatures.

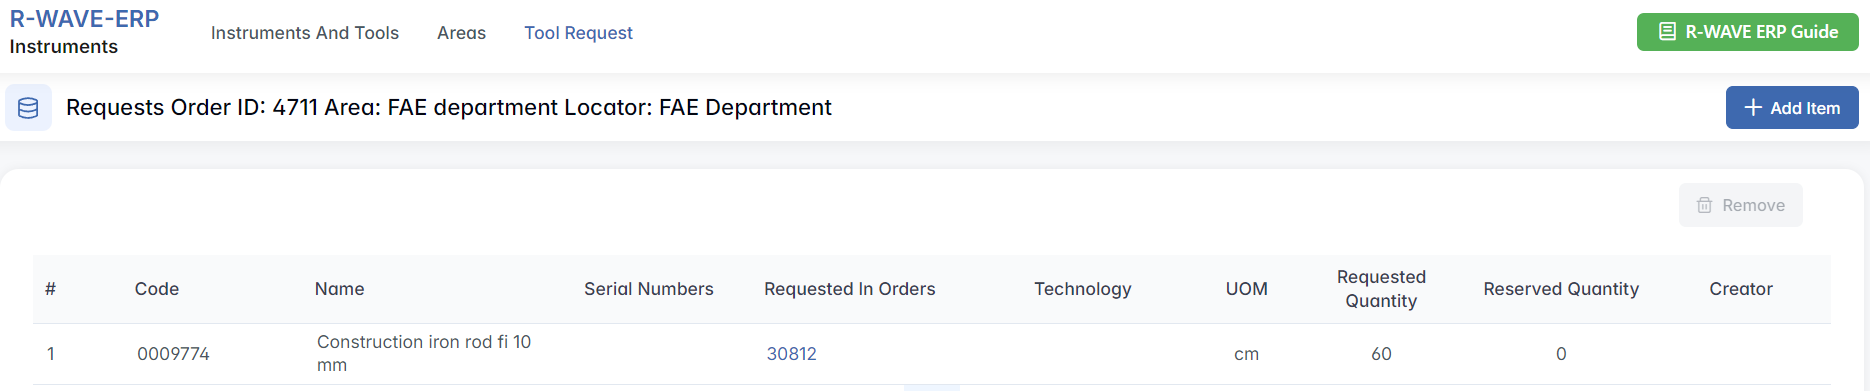
This opens a separate page with information on the materials/tools/equipment requested in this order.

The Requested in Orders value is clickable and opens the related order.
- Edit – Allows changing the Locator (e.g., if tools are needed elsewhere).

Request Order Page
You can add new items to an existing tool request. In the Tool Request tab, choose the Area, then in Selected Tool Request choose Nomenclatures.
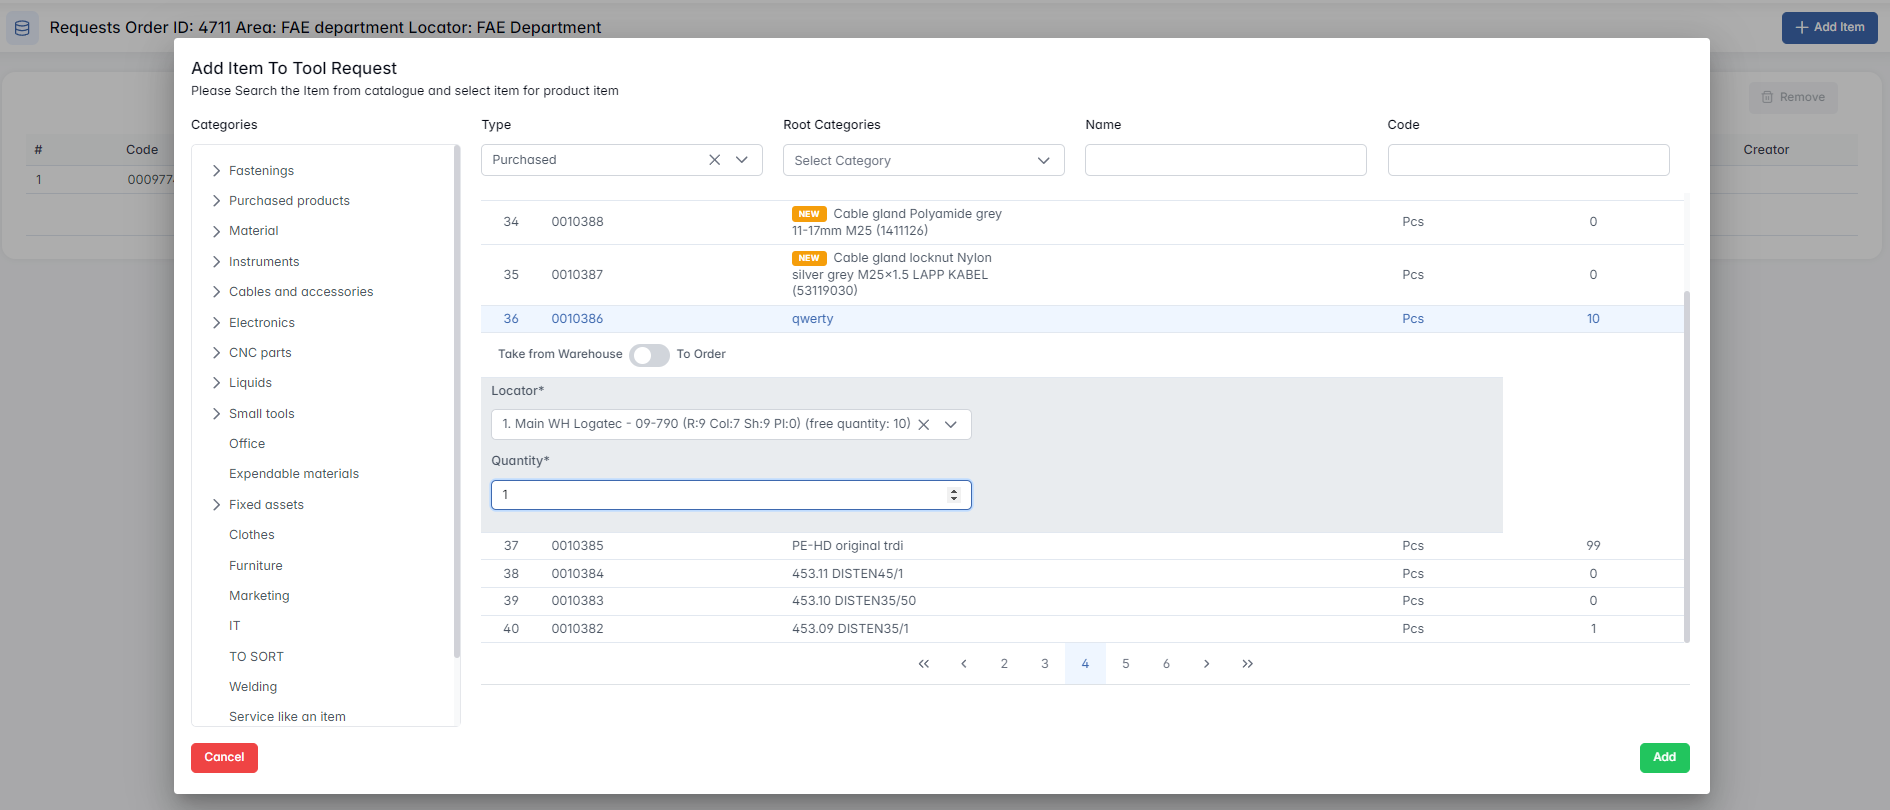
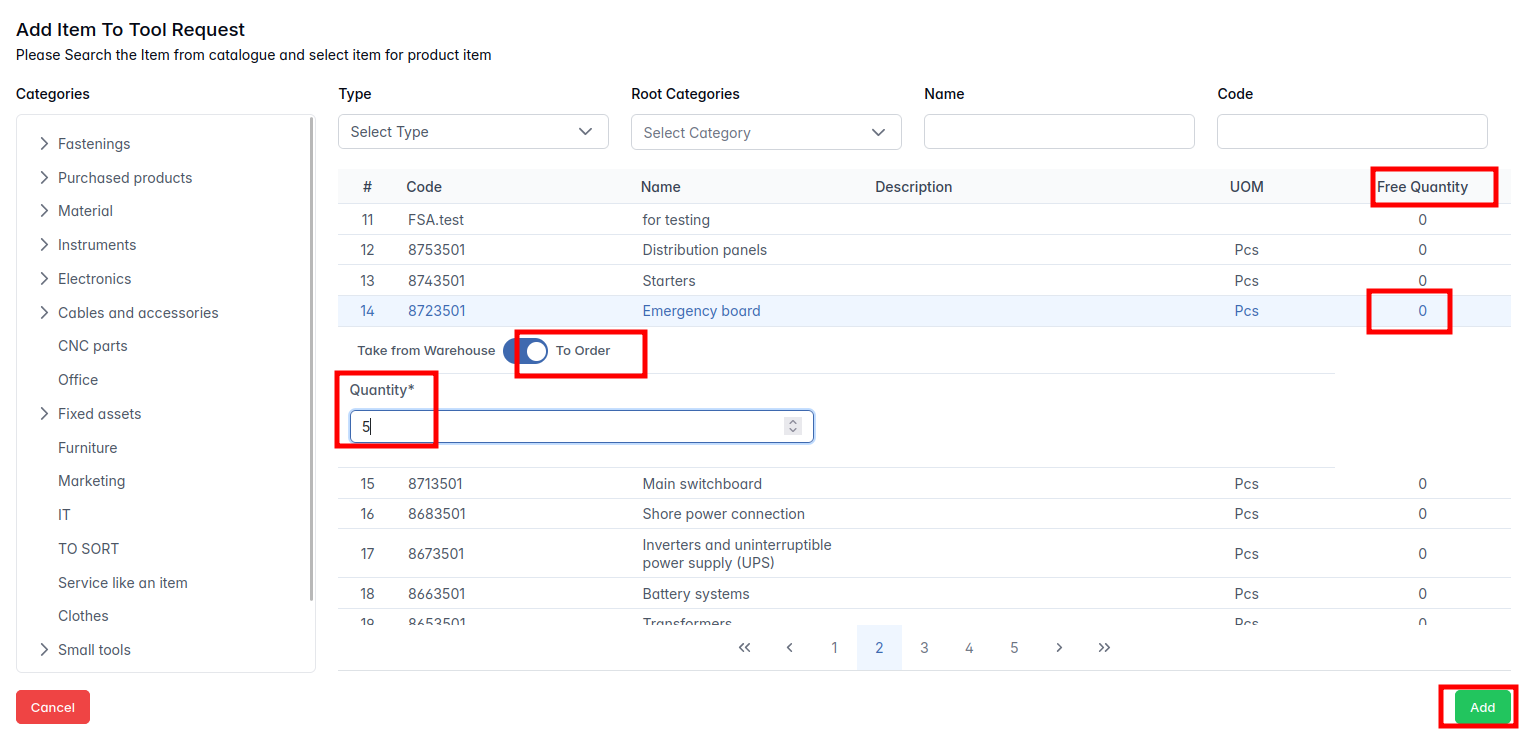
The Tool Request page opens, where the user clicks the Add Item button in the upper-right corner. This opens a catalog search window where tools or materials can be selected. Within the catalog, users can search items by Category, Type, Root Category, Name, or Code.
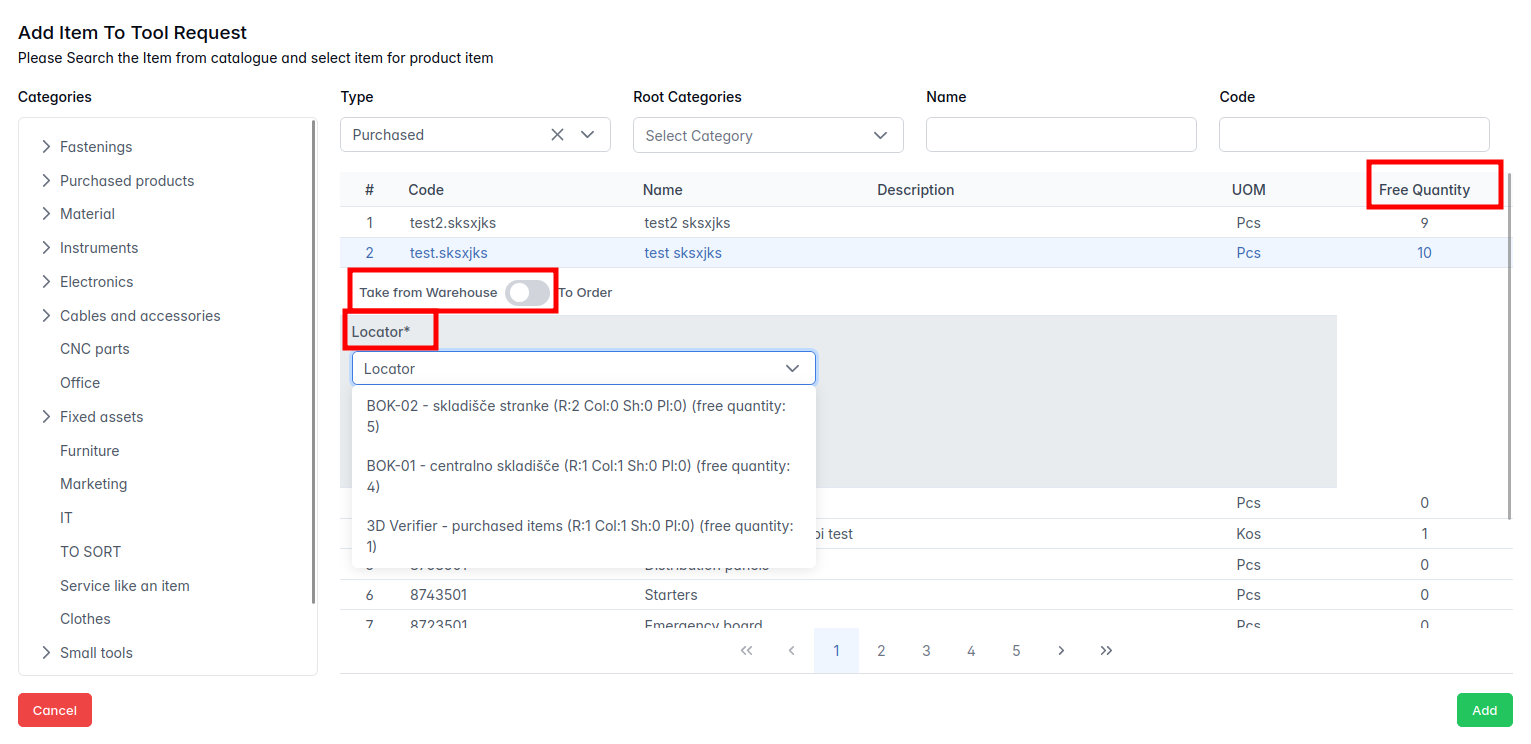
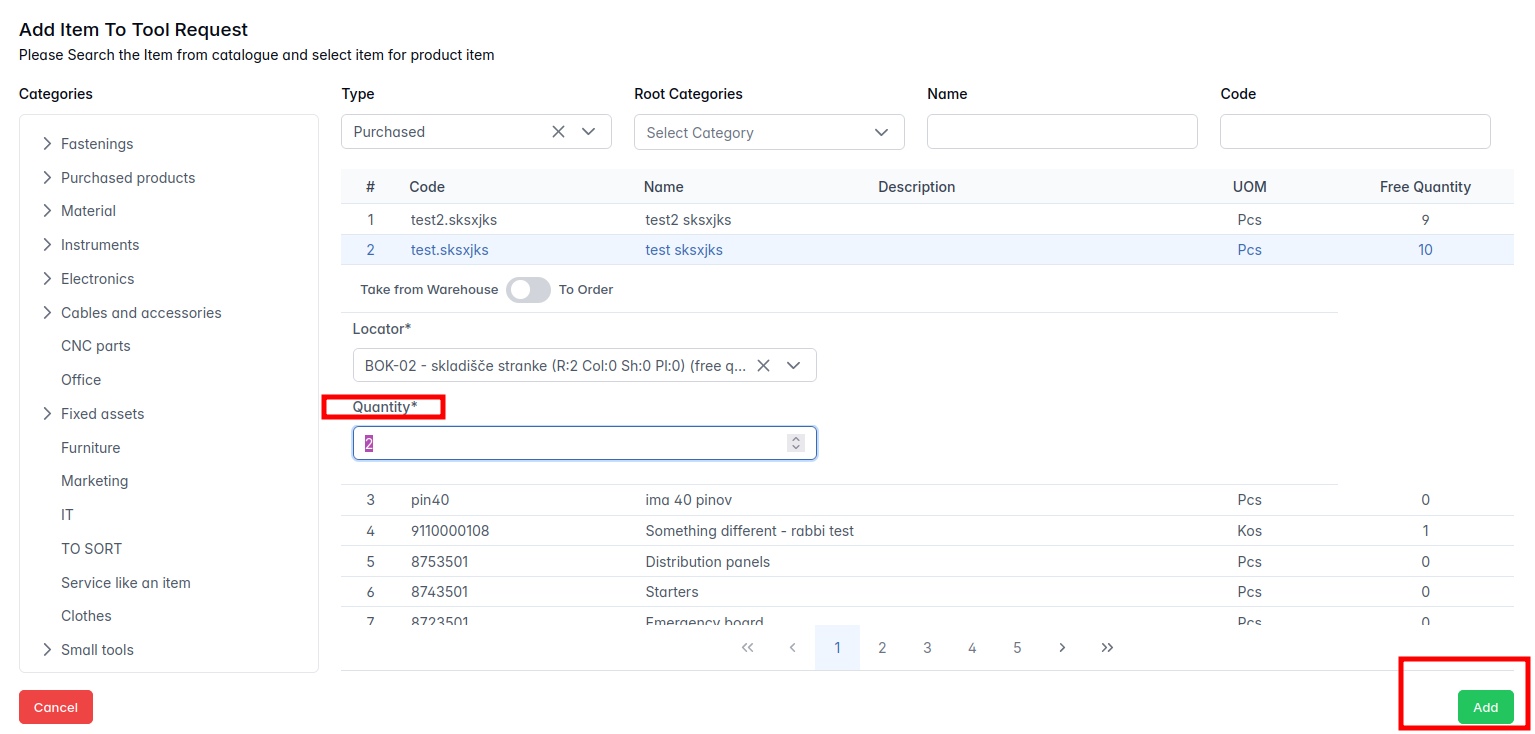
- If the item is available in stock (its Free Quantity is greater than 0), leave the toggle set to Take from Warehouse, choose the appropriate Locator, and enter the required Quantity.
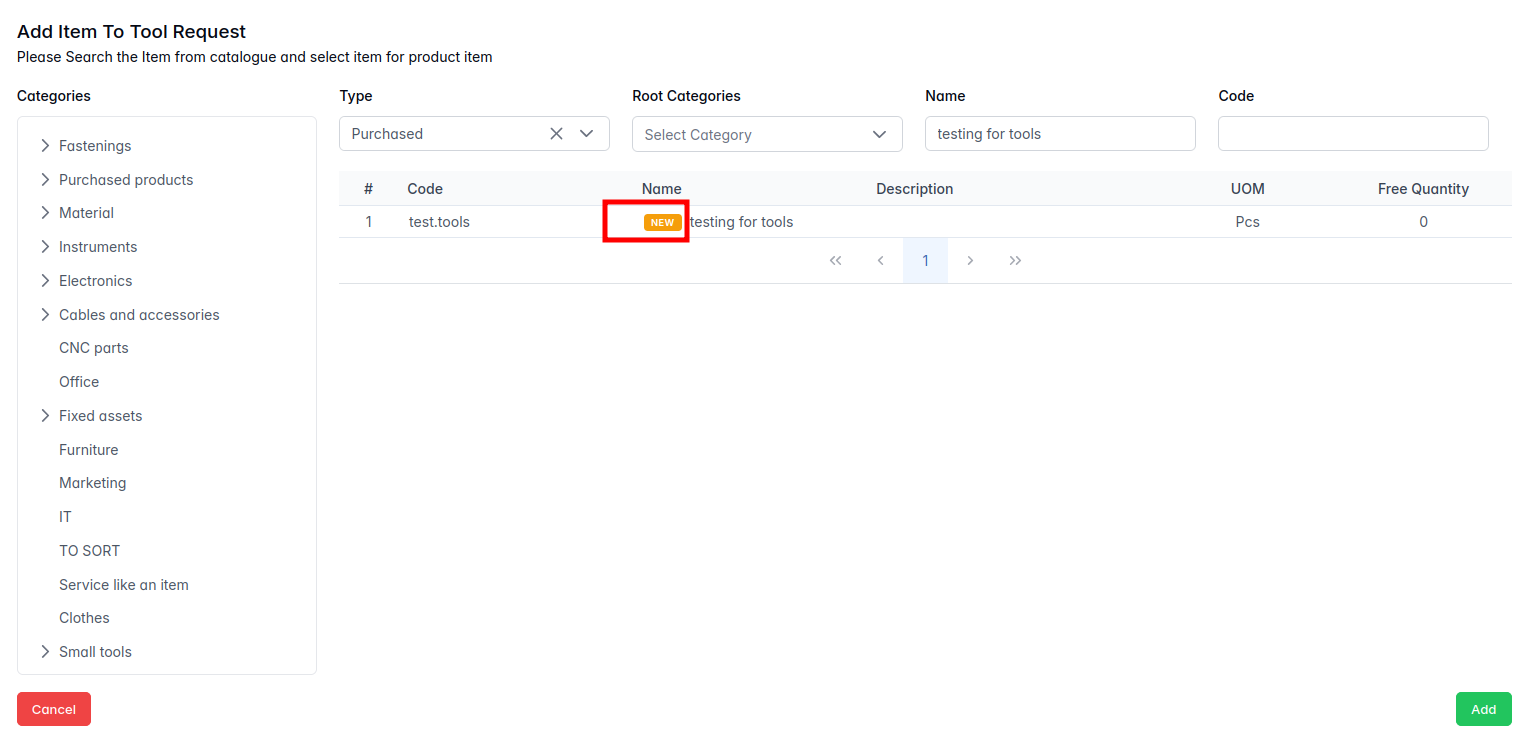
Items marked as "new" in the system cannot be added to a tool request. Their nomenclature must first be confirmed in the Confirmation module in order to be eligible in the catalog.
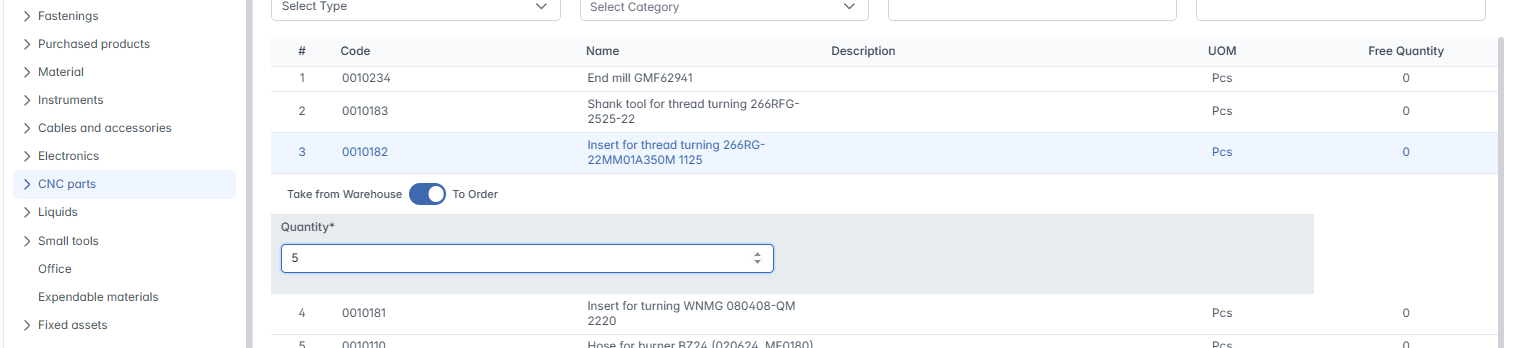
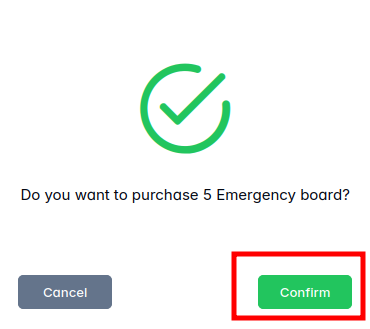
- If the item is not available in stock, switch the toggle to To Order and specify the desired quantity. In this case, the request is forwarded to the procurement department, and once the item is delivered to the warehouse, it is assigned to the tool request.
The overview of the Tool Request page, where two items have been added, now looks like this:

The first and second items await procurement (they are not reserved from the warehouse because there was no available quantity), and the third (last) item is reserved as the tool from the warehouse for the ERP department.
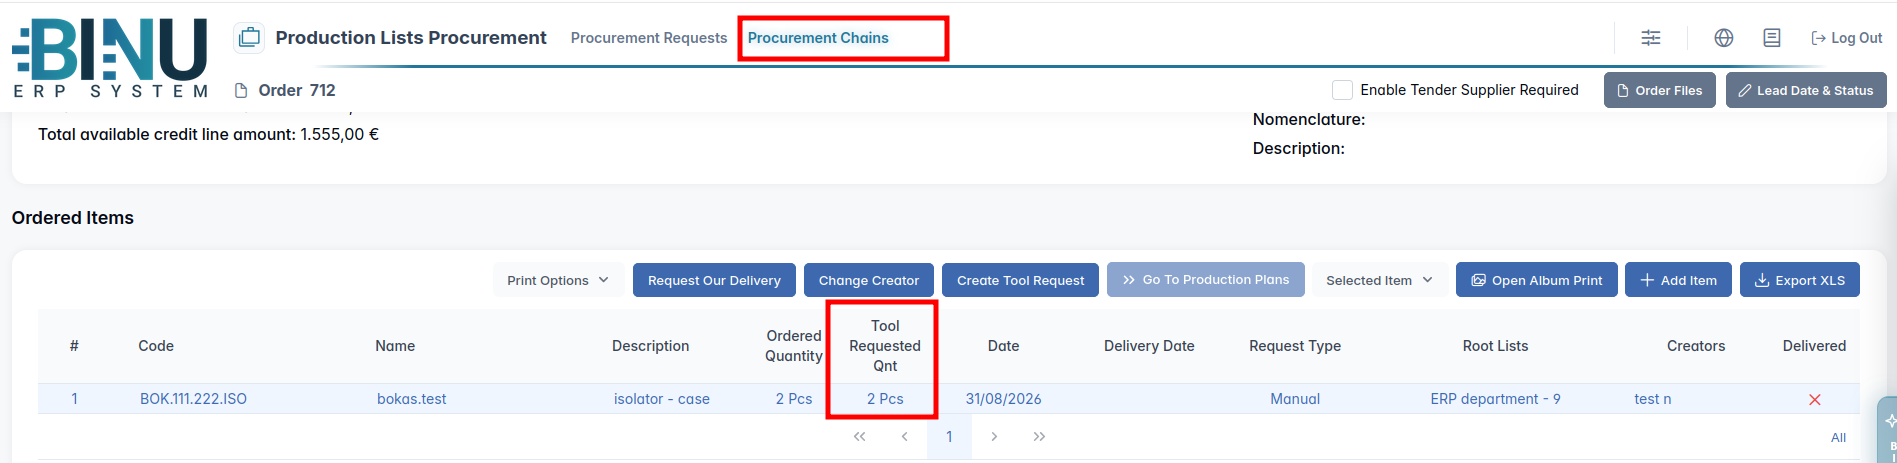
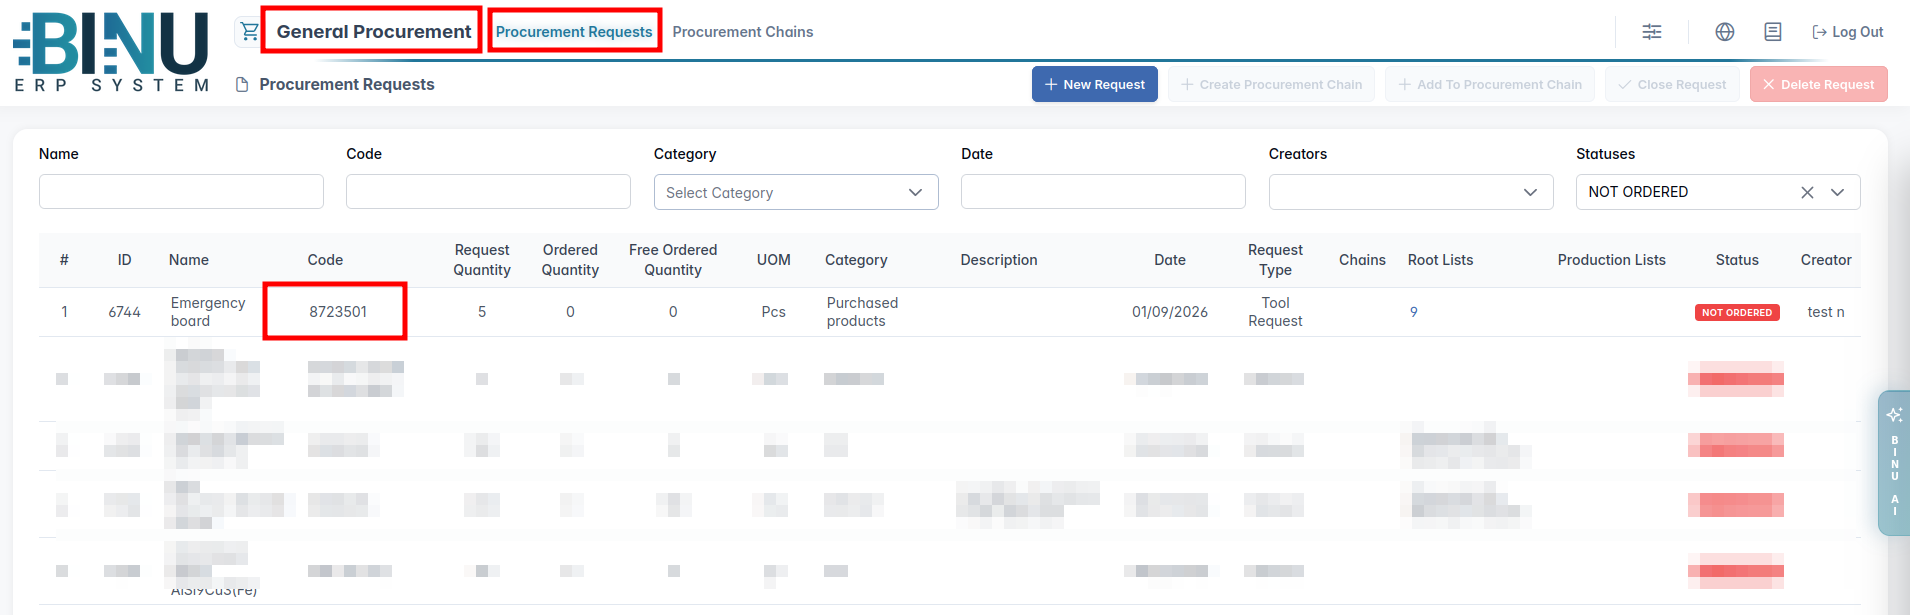
The item to be procured appears in the General Procurement module, where it waits for the procurement department to take it into a procurement chain (new or existing). The other item will be procured when order 712 is completed.
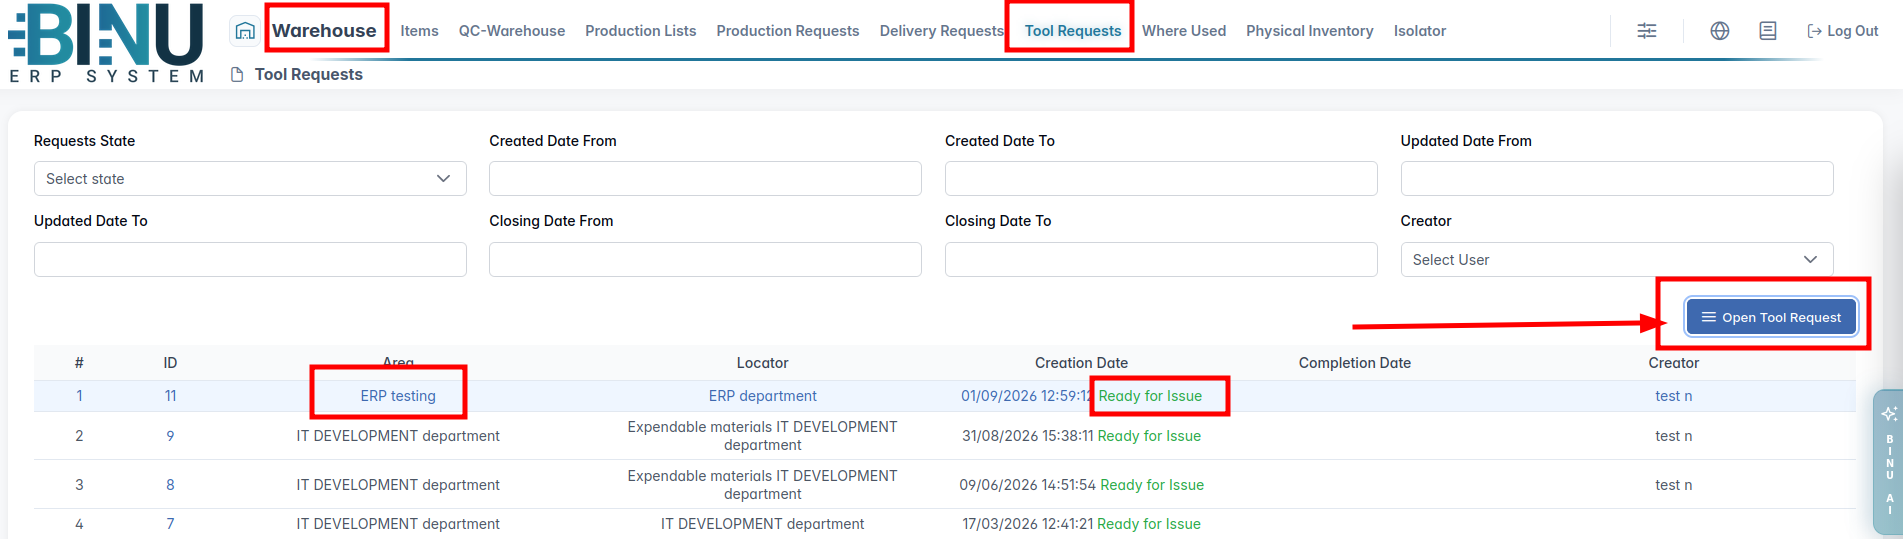
If you reserve the instrument/tool/equipment from stock, it becomes immediately available in the Warehouse module, Tool Requests tab, with the status Ready for Issue. This means someone in the warehouse needs to hand over the instrument/tool/equipment by signing that they released it, and the person who receives it must sign that they received it.
In the Warehouse module, Tool Request tab, click the row of the department that ordered the instrument/tool/equipment, then click the Open Tool Request button.
A new page opens, where the signatures are exchanged.
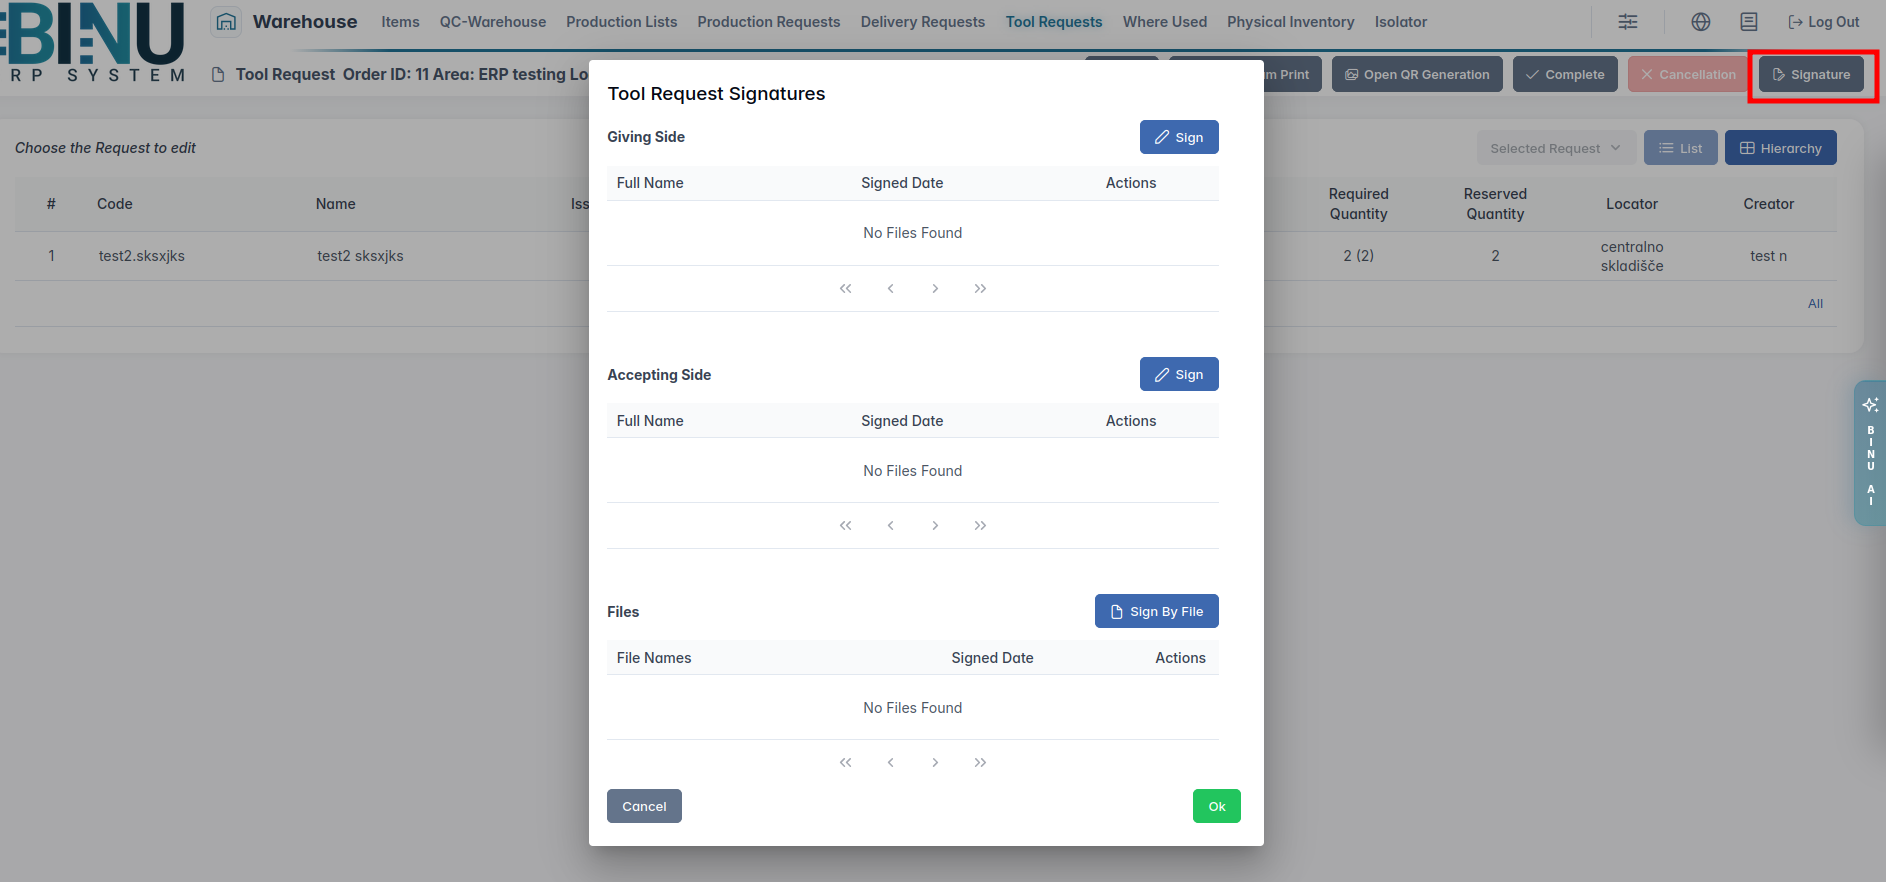
You can read more about the signatures in the Production and Procurement guide.