Product Structure Module
The Product Structure module in BINU ERP is designed to help users define and manage the hierarchical structure of products. This structure reflects the full breakdown of components, assemblies, and technological operations required to manufacture a final item.
By using this module, users can build multi-level product structures, track the flow of production steps, and ensure that all necessary parts and processes are defined before production begins. Whether components are purchased, manufactured, or assembled, this module supports precise planning and seamless integration with other areas like Procurement, Manufacturing, Production Lists, and Warehouse.
The BINU ERP Guide and AI Assistant Tools
The BINU ERP Guide and AI Assistant Tools
The BINU ERP system provides tools to support users in navigating and understanding the processes and functionalities of the system. These tools — the BINU ERP Guide and the BINU AI Assistant — include a built-in contextual help. They are non-intrusive and can be closed or reopened as needed, allowing users to remain focused on their current workflow without interruption.
When you click the BINU ERP Guide icon in the upper-right corner of the screen, the pop-up guide window opens. This feature is available across different modules and is designed to help users understand where they are in the system and how to use the current section effectively.

When you click the BINU AI feature on the side of the screen, the chat window opens, where users can choose their language of conversation. The supported languages are: English, Bulgarian, Croatian, French, German, Hungarian, Italian, Romanian, Russian, Serbian, Slovenian, Spanish, Turkish, and Ukrainian.
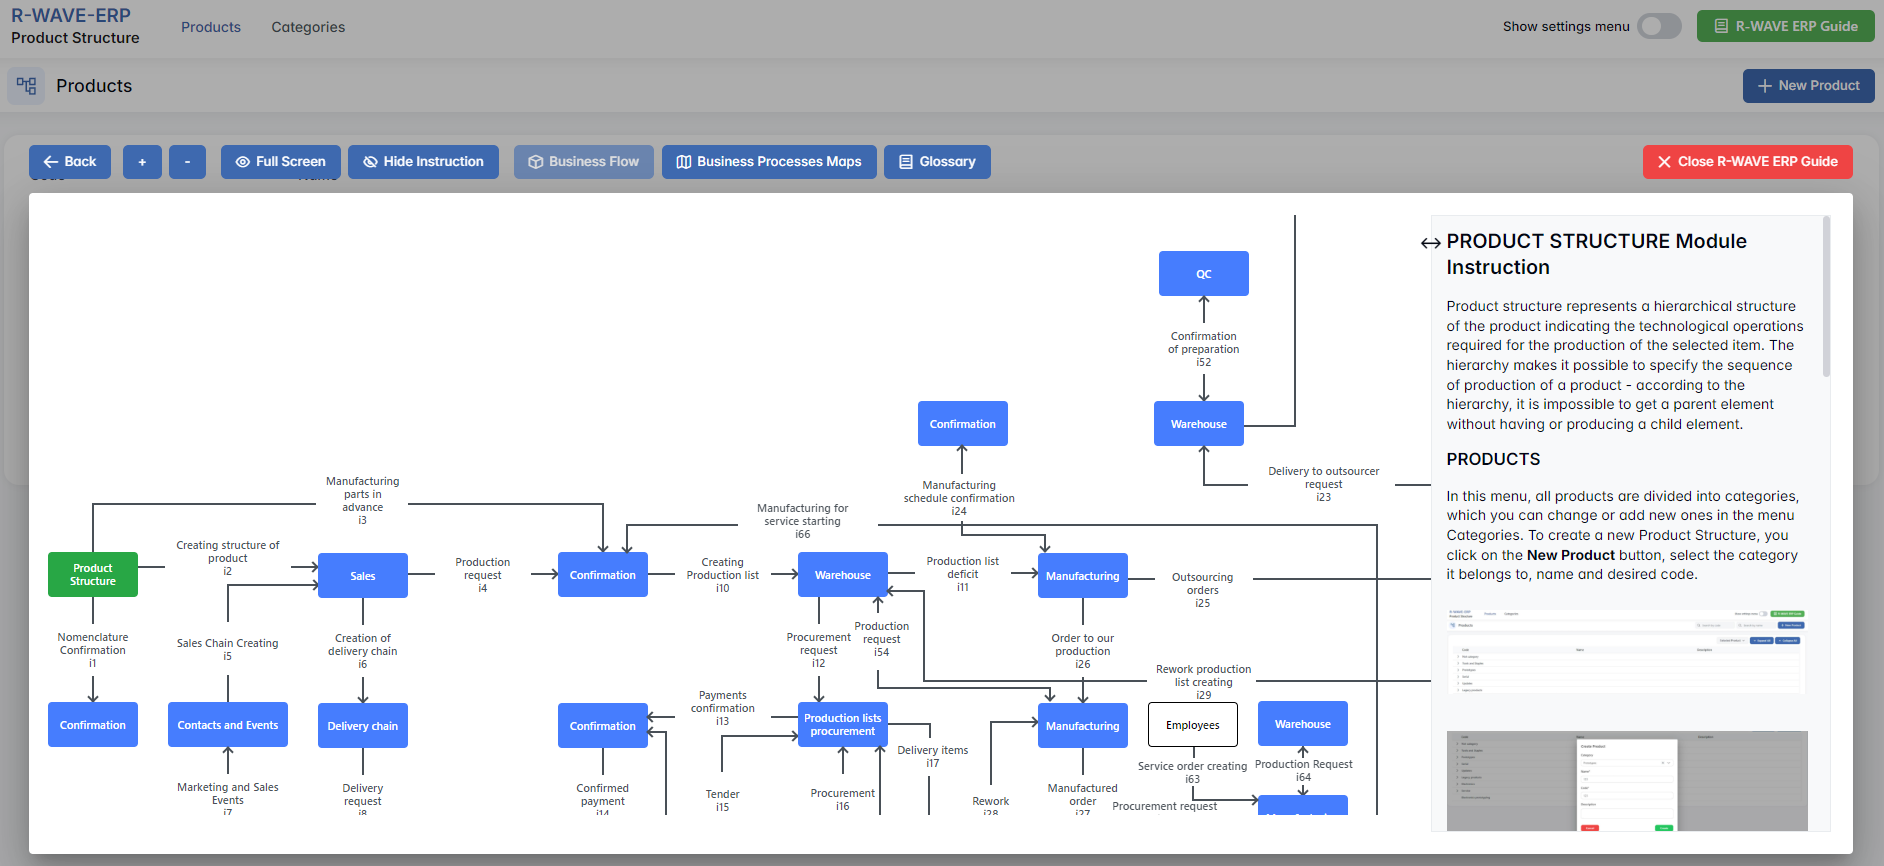
The BINU AI Assistant provides explanations and documentation for all topics related to the BINU ERP system. Users can ask about specific terms, business processes, system functionalities, or request documentation on a particular topic. To begin, type your question in the input field at the bottom of the chat window.
The BINU ERP Guide: Quick Overview
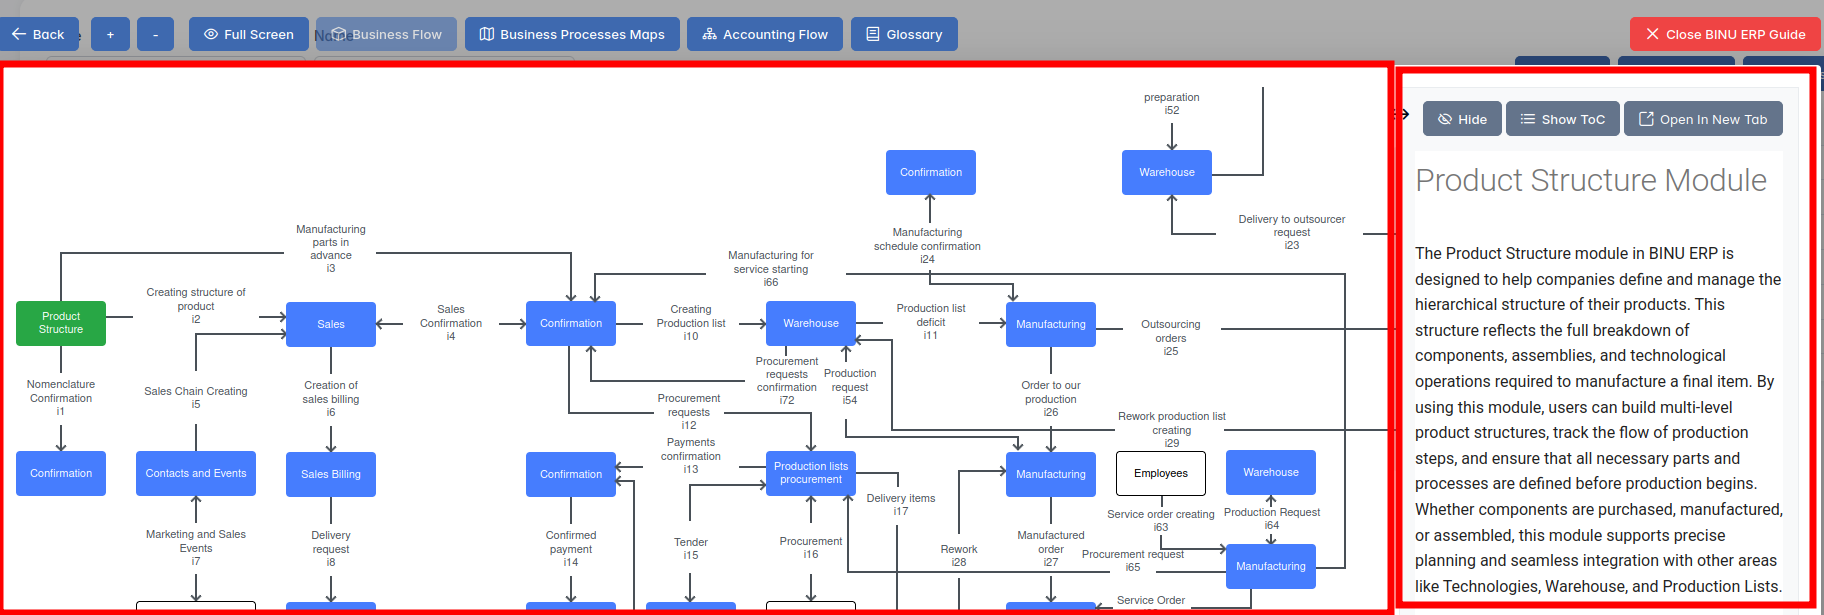
When you click the BINU ERP Guide book icon, you land on the Business Flow map. It has two main sections: the left panel displaying the business flow map and the right panel showing the functional overview.
- Left panel — Business Flow Map — displays a visual diagram of the business processes. It shows how each module is interconnected; for example, you can see how Sales, Manufacturing, Procurement, CRM, QC, and Warehouse are interconnected.
- Right panel — Functional Overview — provides a concise, bullet-style instruction list describing the key operations available in the current module/tab.
Top Bar Options
At the top of the ERP Guide window, you'll find optional tools for deeper understanding: Business Processes Maps, Accounting Flow, and Glossary. The Accounting Flow is meant for financial departments.

Business Processes Maps
Business Processes Maps provides a visual representation of the company's operational structure and business flow. It helps the user understand how the current module fits into the larger operational structure and makes it easy to grasp the upstream and downstream dependencies within the business processes. The Business Processes Maps can be accessed from various modules.

Accounting Flow: Data Flow Graph and Responsibility Matrix
Accounting Flow is a tool designed for the finance department; it shows where the data originates and defines responsibilities. For this purpose, it consists of two parts: a Data Flow Graph and a Responsibility Matrix.

The Data Flow Graph displays the movement of items from departments to the warehouse and from the warehouse to the departments. Based on these movements, the system tracks the flow of goods entering and leaving the company. The Dashboard section, planned for a future release, will allow users to view real-time data (in, out, balance, product costs).
If you hover over a diagram block, the system highlights the corresponding movement chain.

If you click a block in the diagram, you fix the highlighted chain. To narrow the selection further, click a block in the second, third, or fourth column.
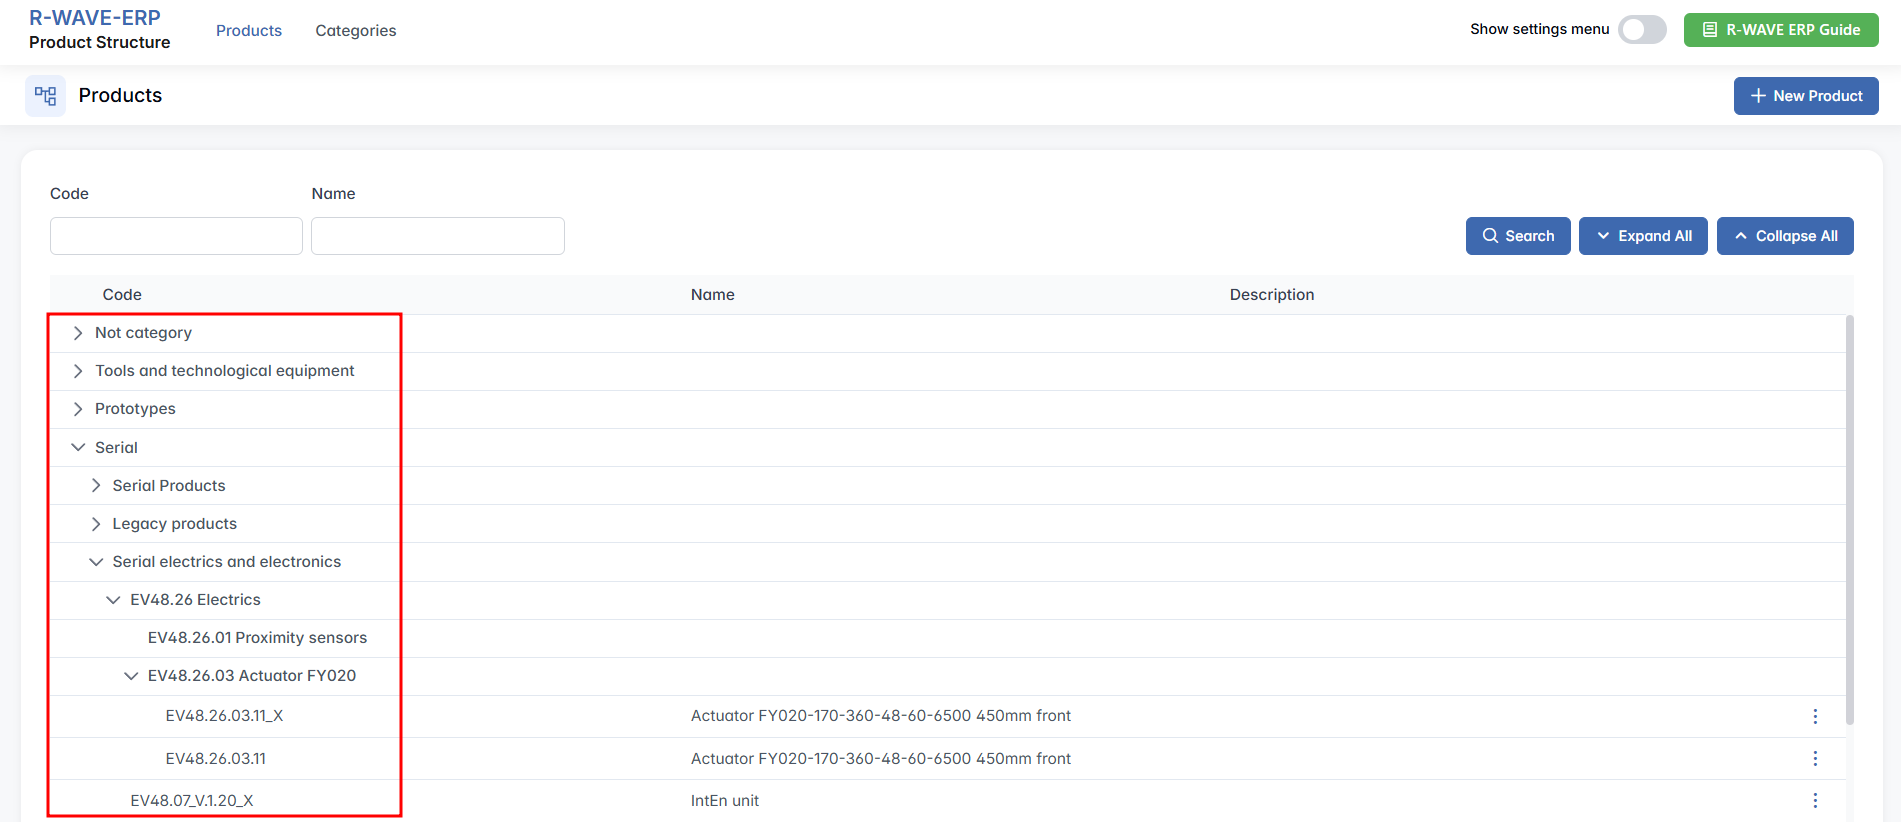
The Responsibility Matrix identifies the department accountable for the selected process.
Glossary
Glossary provides definitions and descriptions of key terms and functionalities used throughout the system. The Glossary can be accessed via the BINU ERP Guide, which is available on any page of the system.
The BINU AI Assistant: Quick Overview
The BINU AI Assistant is specifically designed to help the user with ERP documentation questions. It provides information and assistance related to the BINU ERP system. The BINU AI Assistant understands fifteen (15) languages. It is available on every page as a non-intrusive help tool.

The Purpose of the BINU ERP Guide and BINU AI Assistant Tools
The BINU ERP Guide and BINU AI Assistant help users by:
- Showing where they are within the system (module context and current section).
- Providing a visual schema of the business flow, helping them understand how the current module fits into the larger operational structure.
- Offering a quick-reference instruction panel with the main actions and functions available in the current tab (e.g., creating companies, filtering, scheduling events).
- Offering quick access to the relevant documentation (AI-powered ERP documentation helper).
Product Structure Overview
Products Tab
Products Tab
The Product Structure module in BINU ERP allows users to define and manage the hierarchical structure of any product that needs to be manufactured. This structure, commonly referred to as a Bill of Materials (BoM), outlines all components, assemblies, and production operations required to build a finished item.
This module offers a clear and systematic way to define how each part of a product is sourced — whether it is purchased from suppliers, assembled, or manufactured, either in-house or through outsourced partners. Users can build the product structure manually within the ERP.
Navigating the Product Structure Interface
When you open the Product Structure module from the main ERP menu, you are taken to the primary dashboard where all products and their structures are listed. At the top of the page, you will see two main navigation tabs:
- Products – the active tab, displaying all existing products and their internal structure.
- Categories – a separate tab where you can manage product categories used for organization and classification.
In the upper-right corner of the screen, several important tools are available:
- Show Settings Menu – opens access to advanced configuration options (e.g., technology settings).
- BINU ERP Guide – opens a built-in help window with contextual instructions and business flow diagrams.
- + New Product – opens a form to create a new product entry and begin building its structure.
Below this top bar, you'll find two input fields:

- Code – search products by their unique internal code.
- Name – search by the product name or part of it.
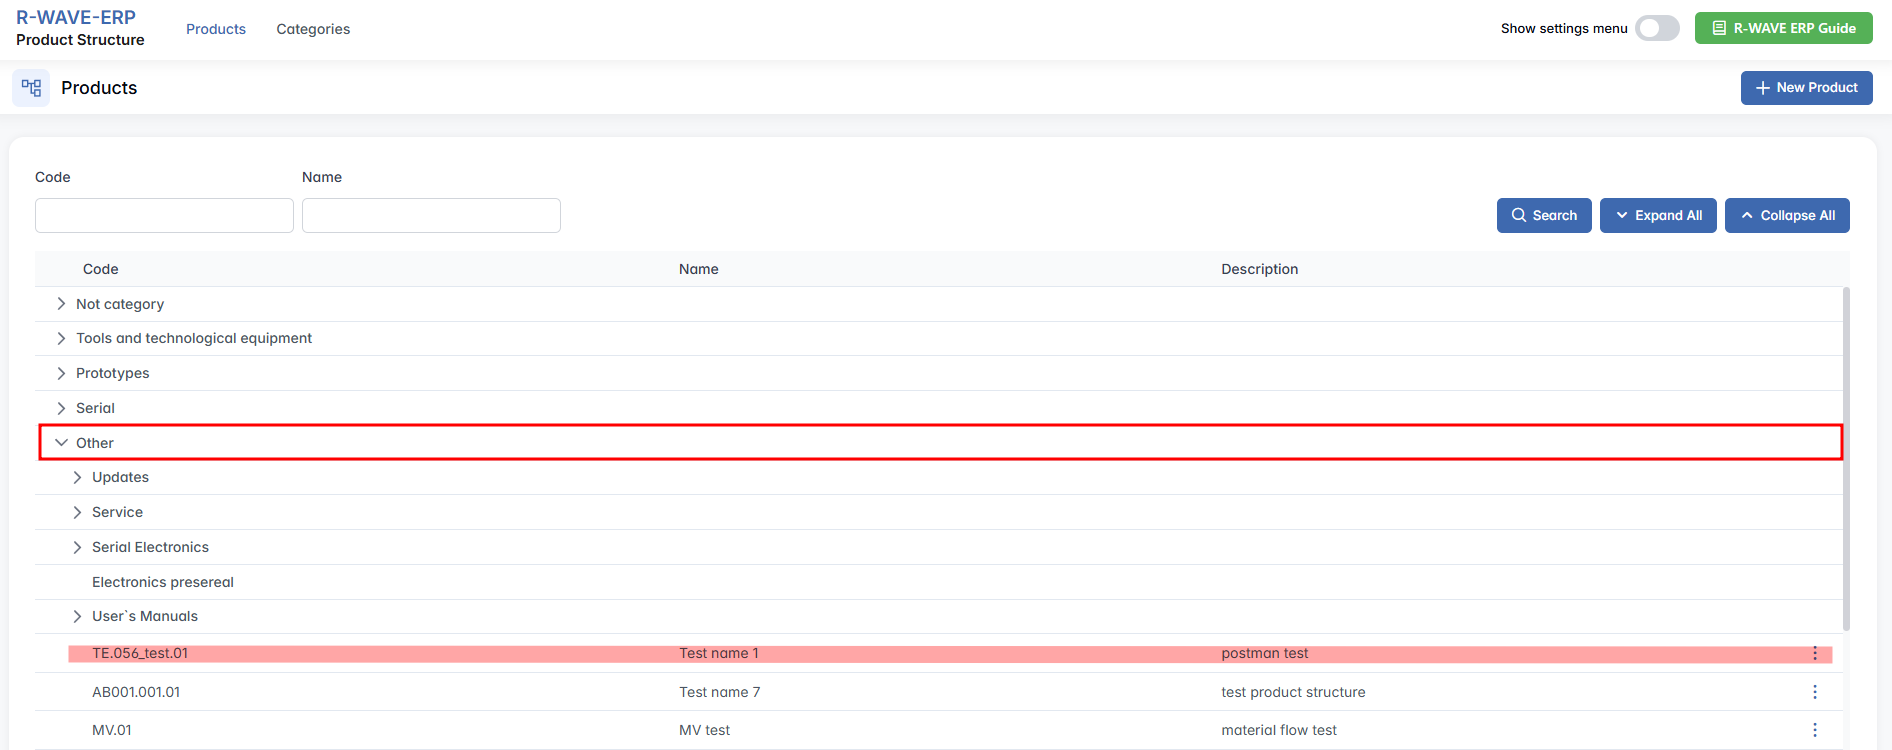
Use the Search button to apply filters and update the product list. Expand All / Collapse All buttons show or hide the full products hierarchy in one click.
Product Components
The main content area displays a hierarchical table of all existing products and their structures. Each row represents a product or a component, showing the following columns:
- Code – internal product or component code.
- Name – the product name or part of it.
- Description – optional field for additional context or notes.
This hierarchical view allows you to see the subcomponents, making it easy to trace the full structure of any product at a glance. To expand or collapse parts of the hierarchy, click on the corresponding expanding/collapsing icons to the left of each item.
Viewing and Managing Product Components
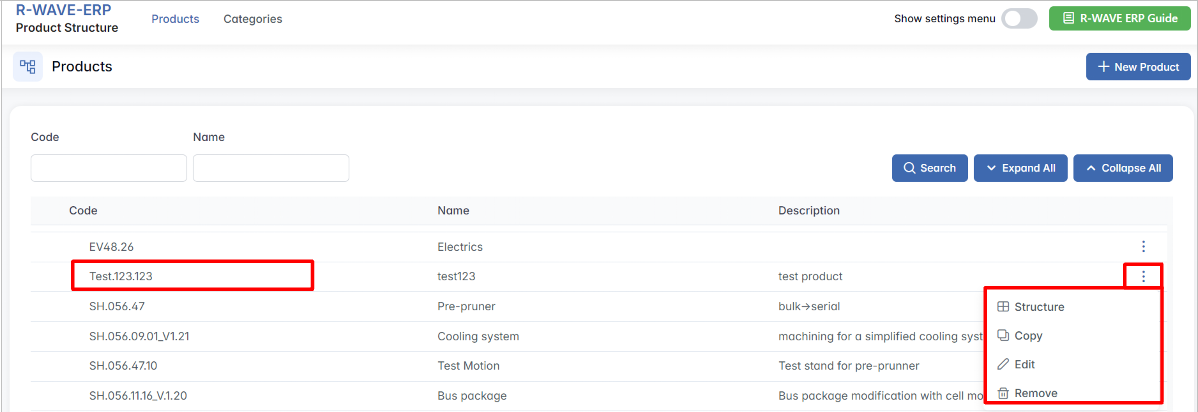
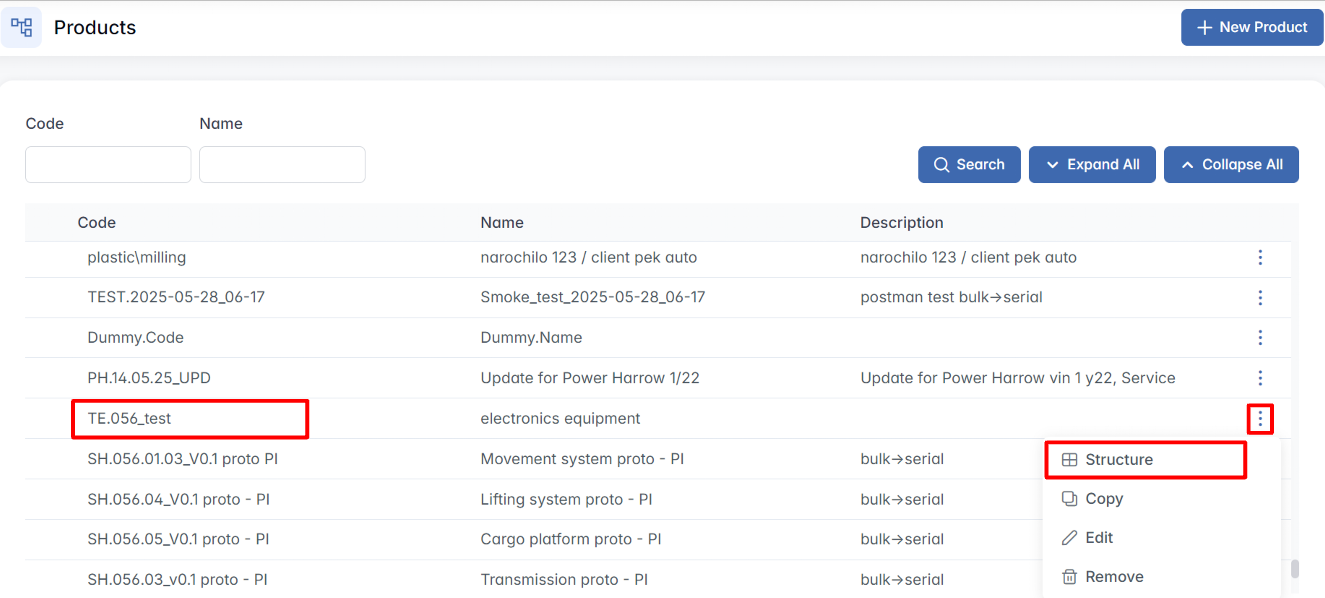
Once the Product Structure module is opened and the list of existing products is displayed, users can interact with individual products by using the contextual three-dot menu located on the right side of each row.
Step-by-step instructions:
- Locate the product. Use the Code and Name filter fields at the top of the page to search for a specific product. Once located, find it in the hierarchy table below.
- Open the action menu. On the right side of the row, click the three-dot icon (⋯). This reveals the available actions for the selected product.
The following four options will appear:
- Structure – Opens the detailed hierarchical structure of the selected product. Here, you can view its full Bill of Materials (BoM), including assemblies, manufactured parts, and purchased components. From this view, you can begin building or editing the component tree.
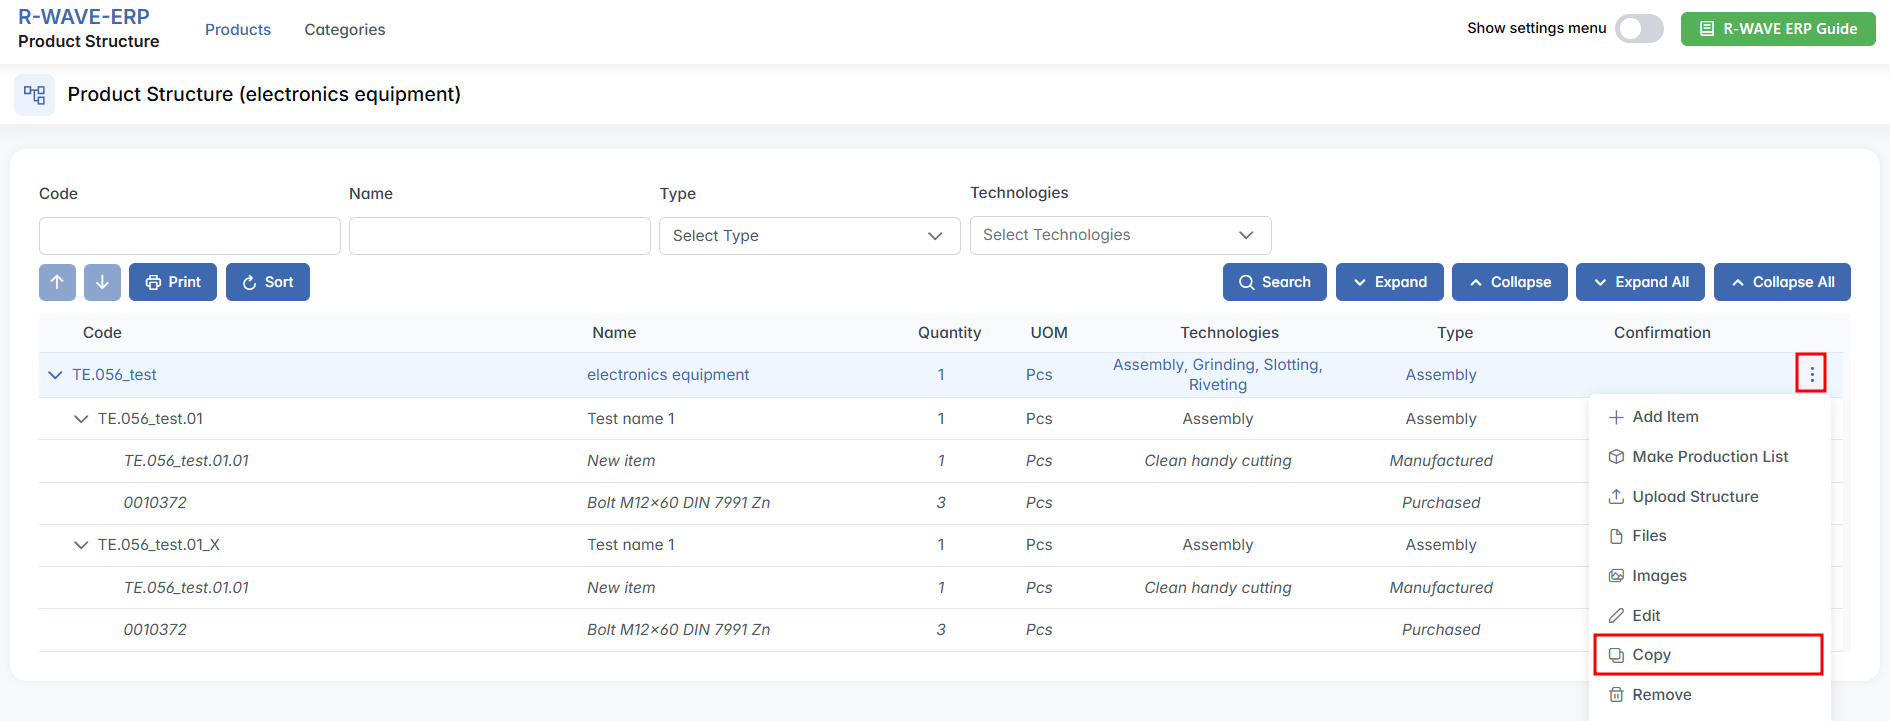
- Copy – Allows you to duplicate the entire product structure, including its existing components and their relationships. This is especially helpful when creating a similar product with only minor adjustments.
- Edit – Opens the Edit Product window, where you can update the product's basic information such as name, code, category, or description.
- Remove – Permanently deletes the selected product from the system. This action cannot be undone. Deletion is only possible if the product exists only as a structure — meaning it serves as a top-level structure (e.g., "Vehicle") but does not contain any subcomponents.
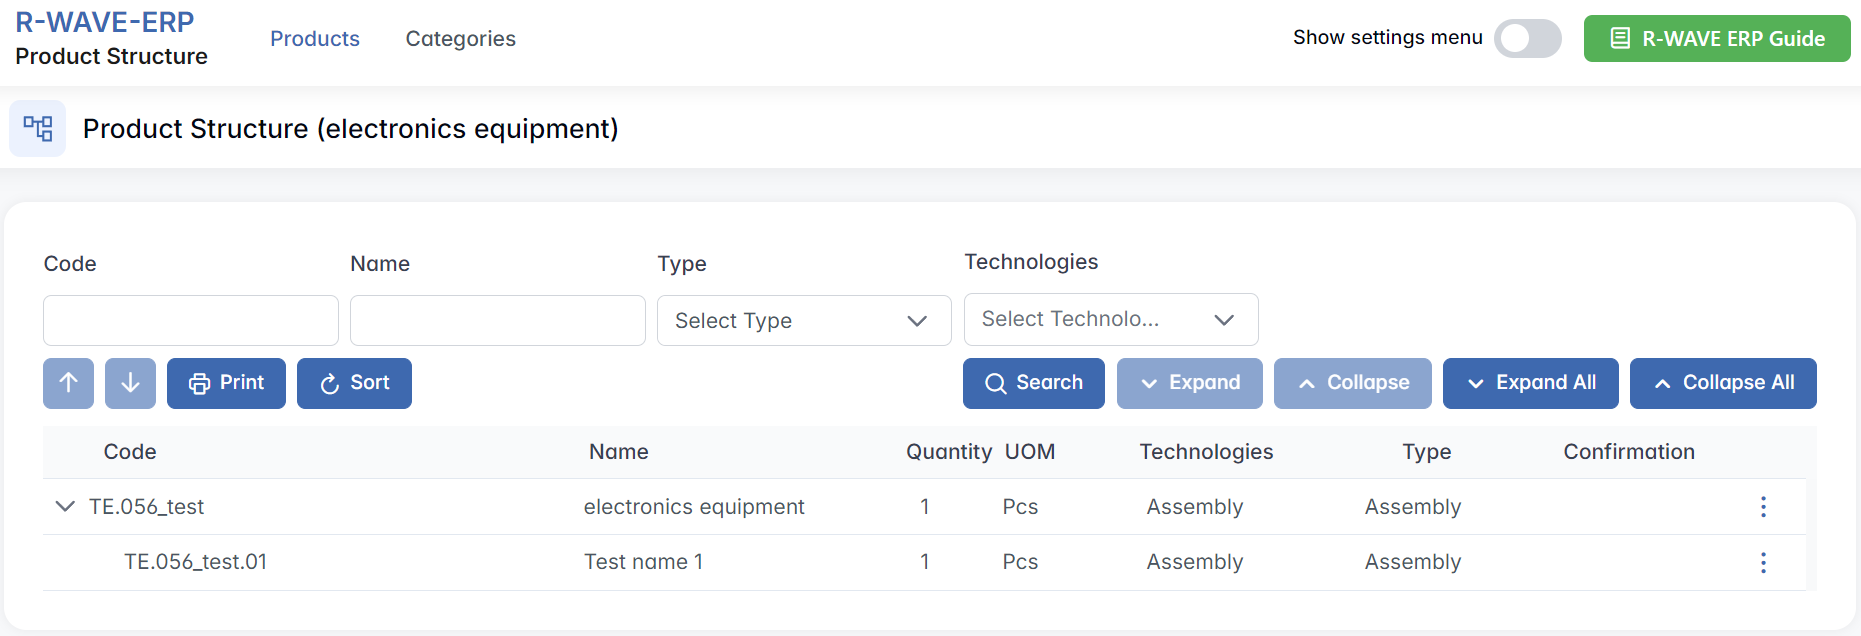
When opening a product structure, the hierarchical organization of components becomes visible. The structure displays key details such as:
- Code – unique identifier of each component
- Name – name of the component or subassembly
- Quantity – number of units required
- UOM – unit of measurement (e.g., Pcs)
- Technologies – technologies or operations associated with the component (e.g., Welding)
- Type – indicates whether the component is Assembly (composed of subcomponents), Manufactured (requires in-house or outsourced production), or Purchased (sourced externally)
- Confirmation – status indicating whether the item is confirmed for production
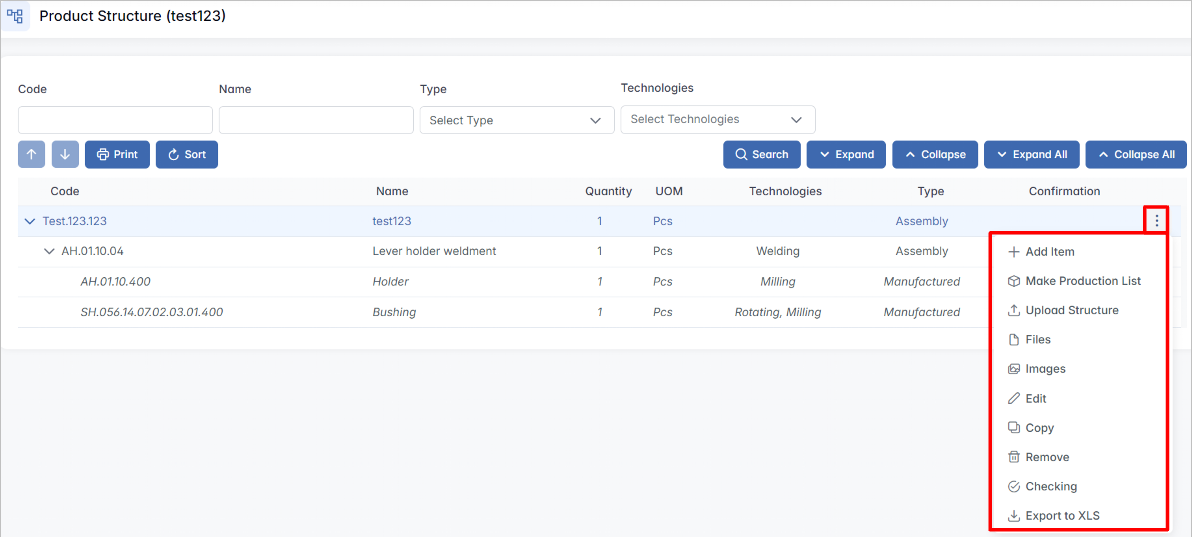
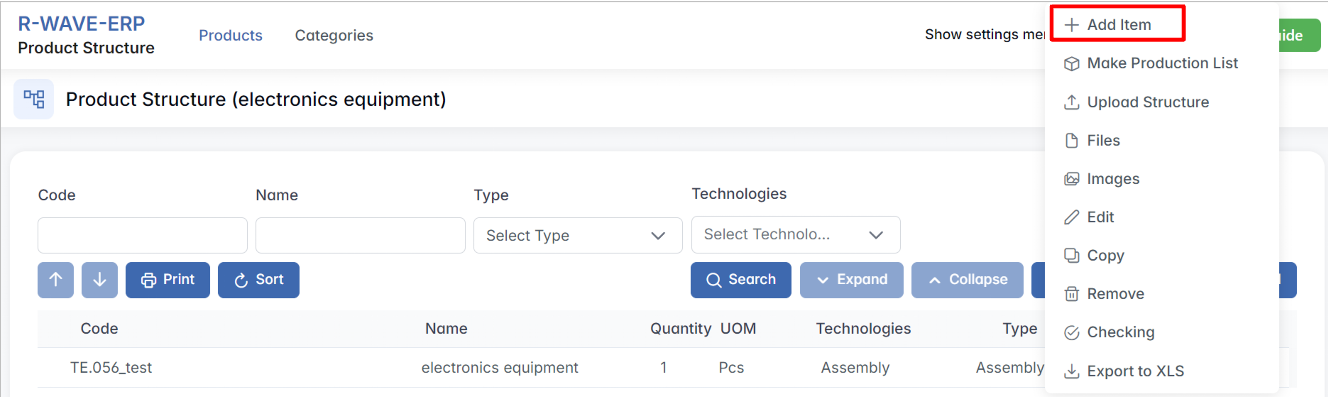
Each row in the table has a three-dot menu (⋯) on the right. By clicking this icon, you access the available actions for the selected component:
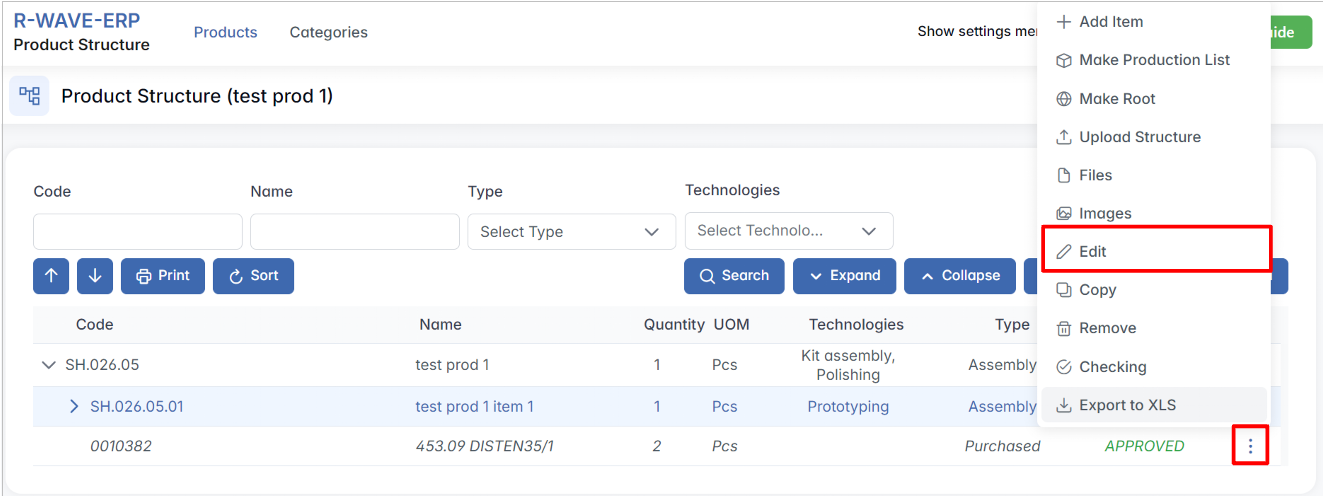
- Add Item – adds a new item (assembly, purchased, or manufactured item) under the selected item in the product structure. This option is only available for items that are assemblies.
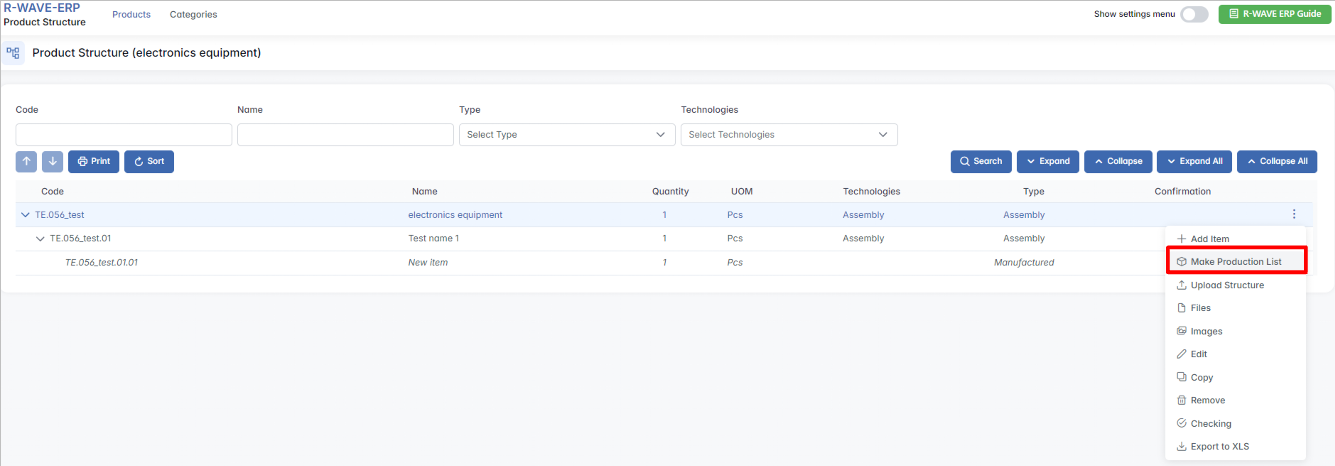
- Make Production List – begin the process of sending the structure into production by setting a quantity and group option.
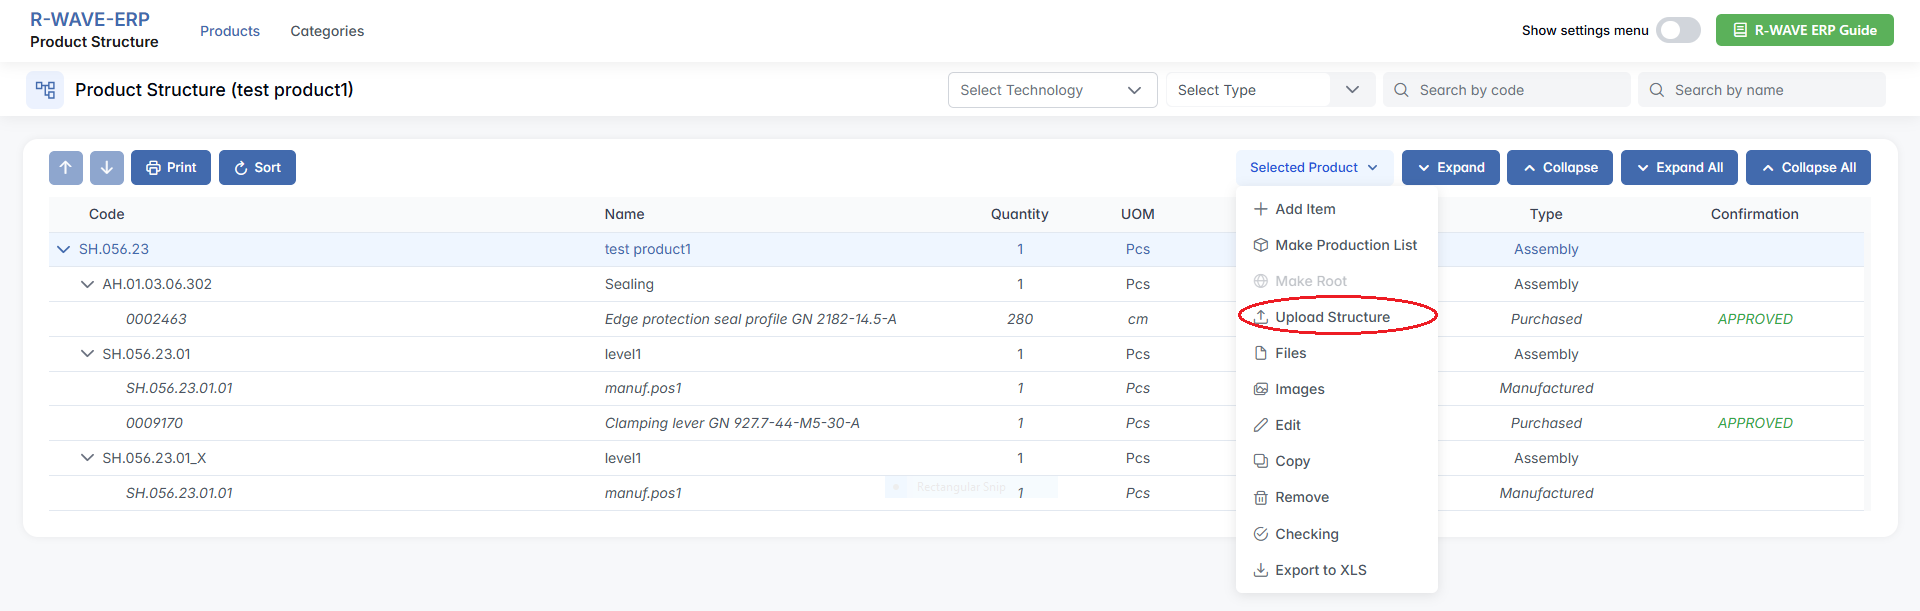
- Upload Structure – import a structure (e.g., from Excel).
- Files – attach supporting documents or manufacturing files.
- Images – upload or view reference images.
- Edit – modify the component's properties.
- Copy – duplicate the component and its structure.
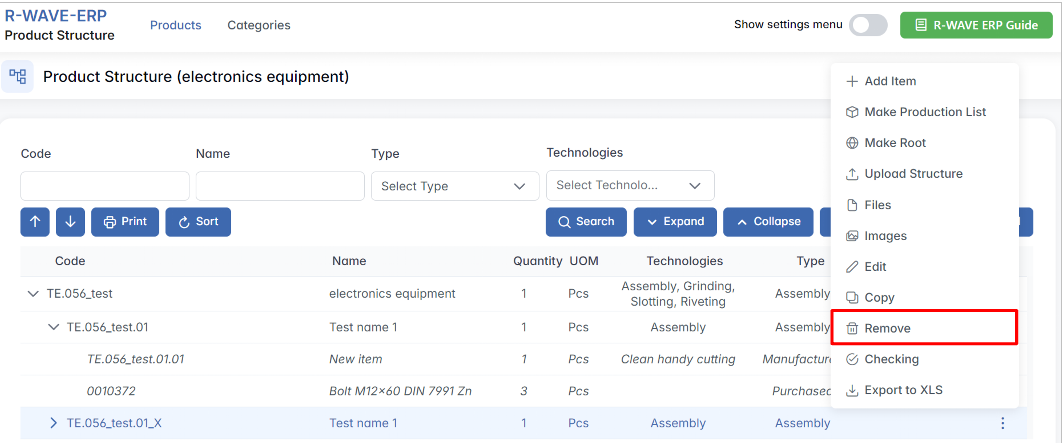
- Remove – delete the component from the structure.
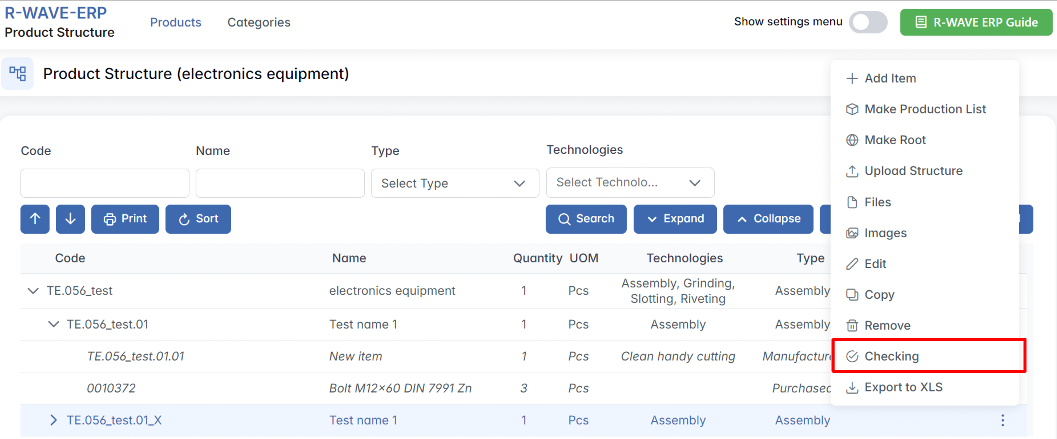
- Checking – run a structure verification (e.g., completeness check).
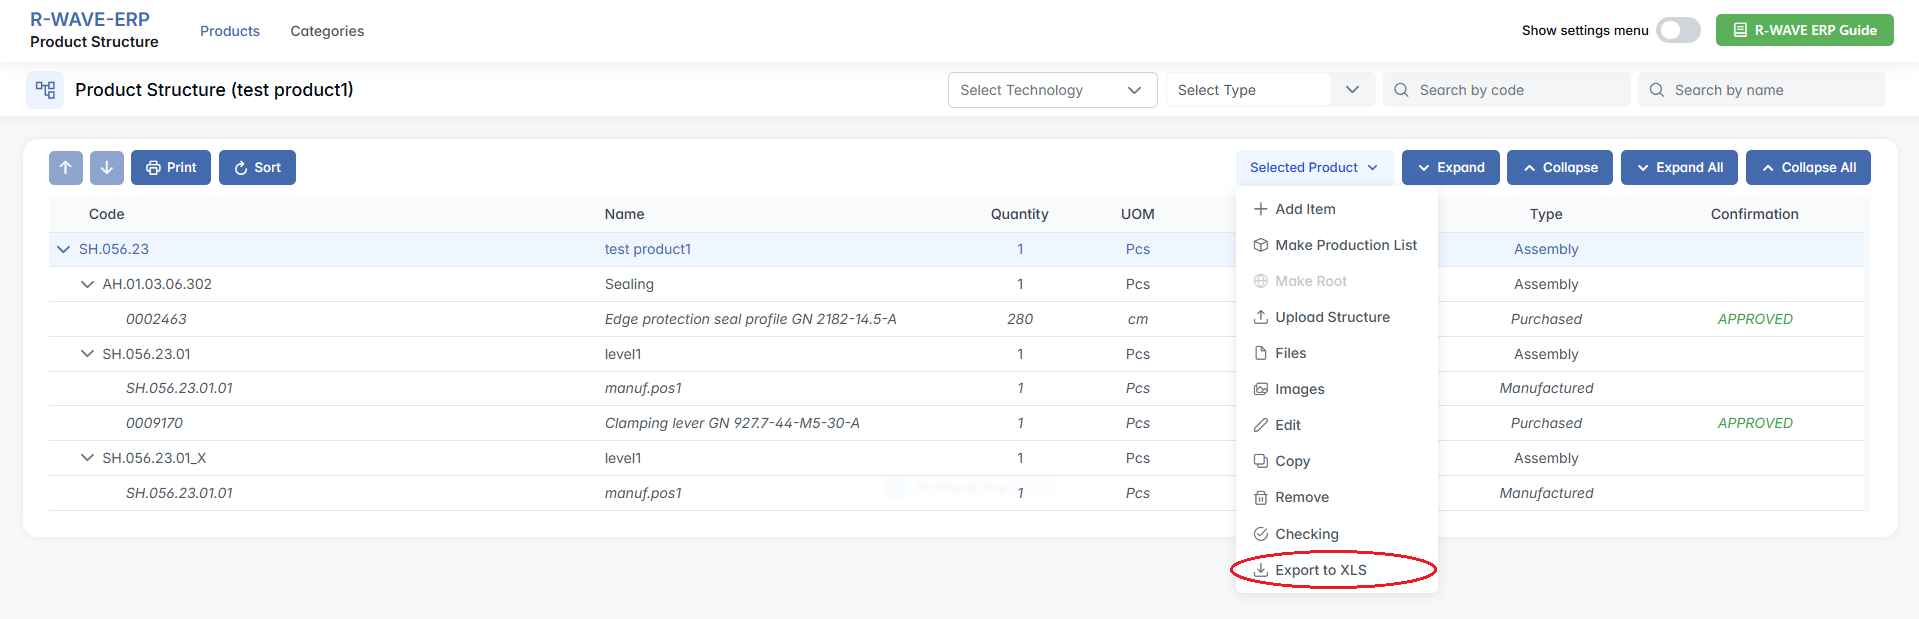
- Export to XLS – export the structure to an Excel spreadsheet.
Creating a Product Structure
Creating a Product Structure
To create a new product structure, follow these steps:
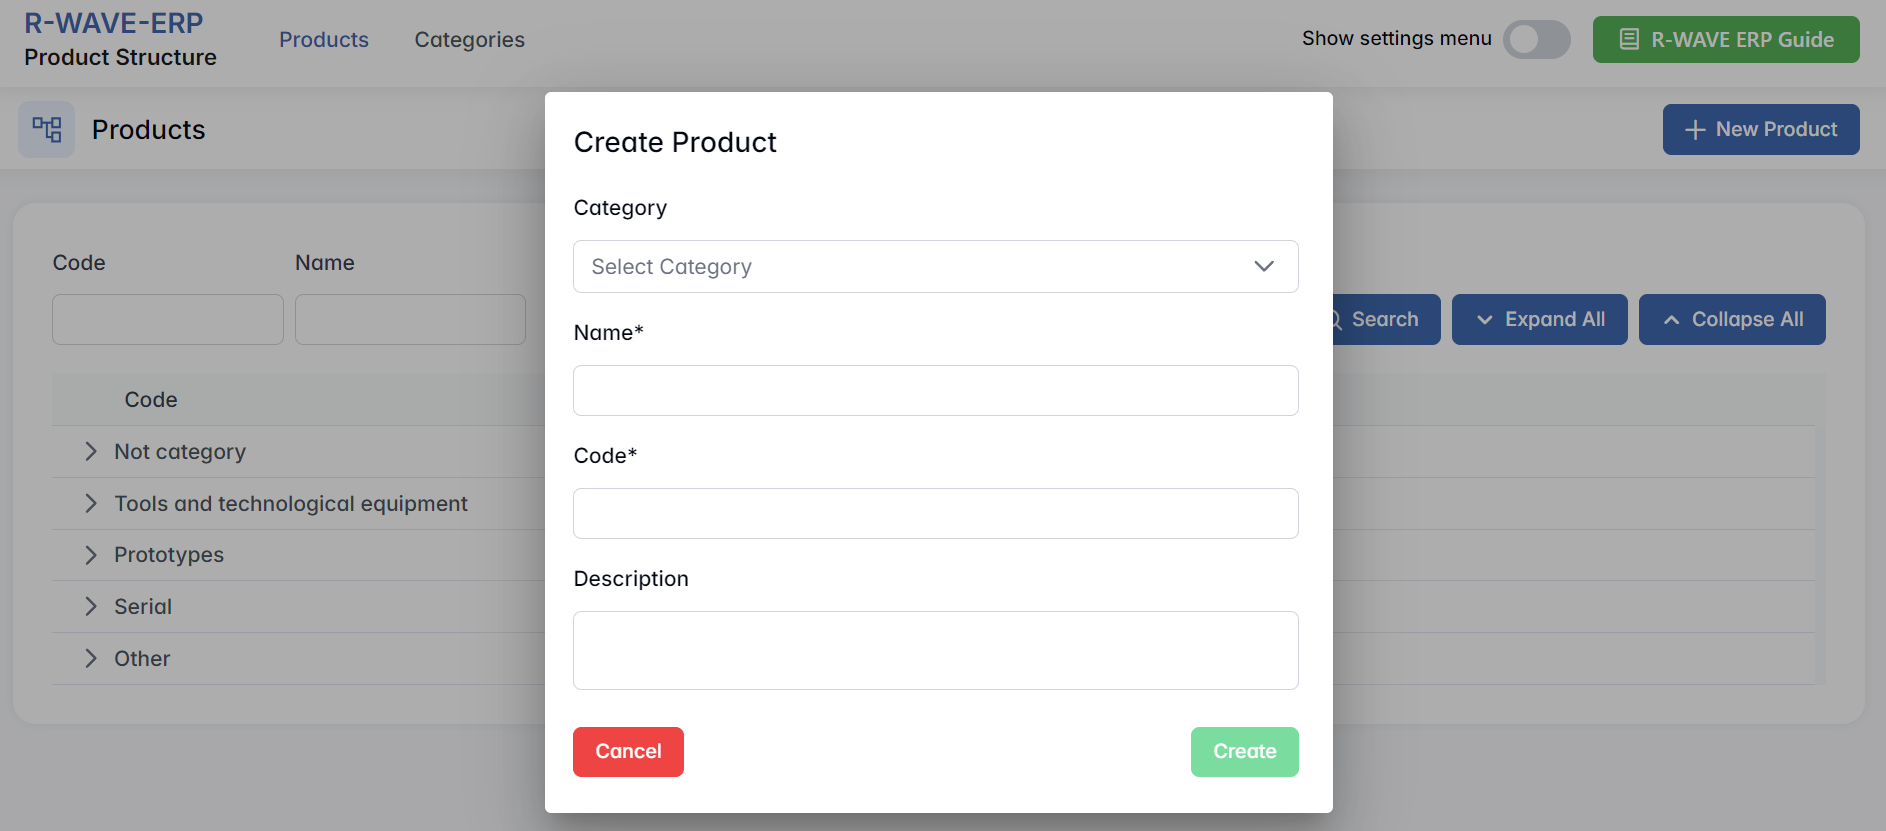
- Click the New Product button to initiate the creation process.
- Select a category that best fits the new product.
- Enter the product name in the designated field.
- Assign a unique product code to ensure proper identification within the system.
Product Structure – Page Overview
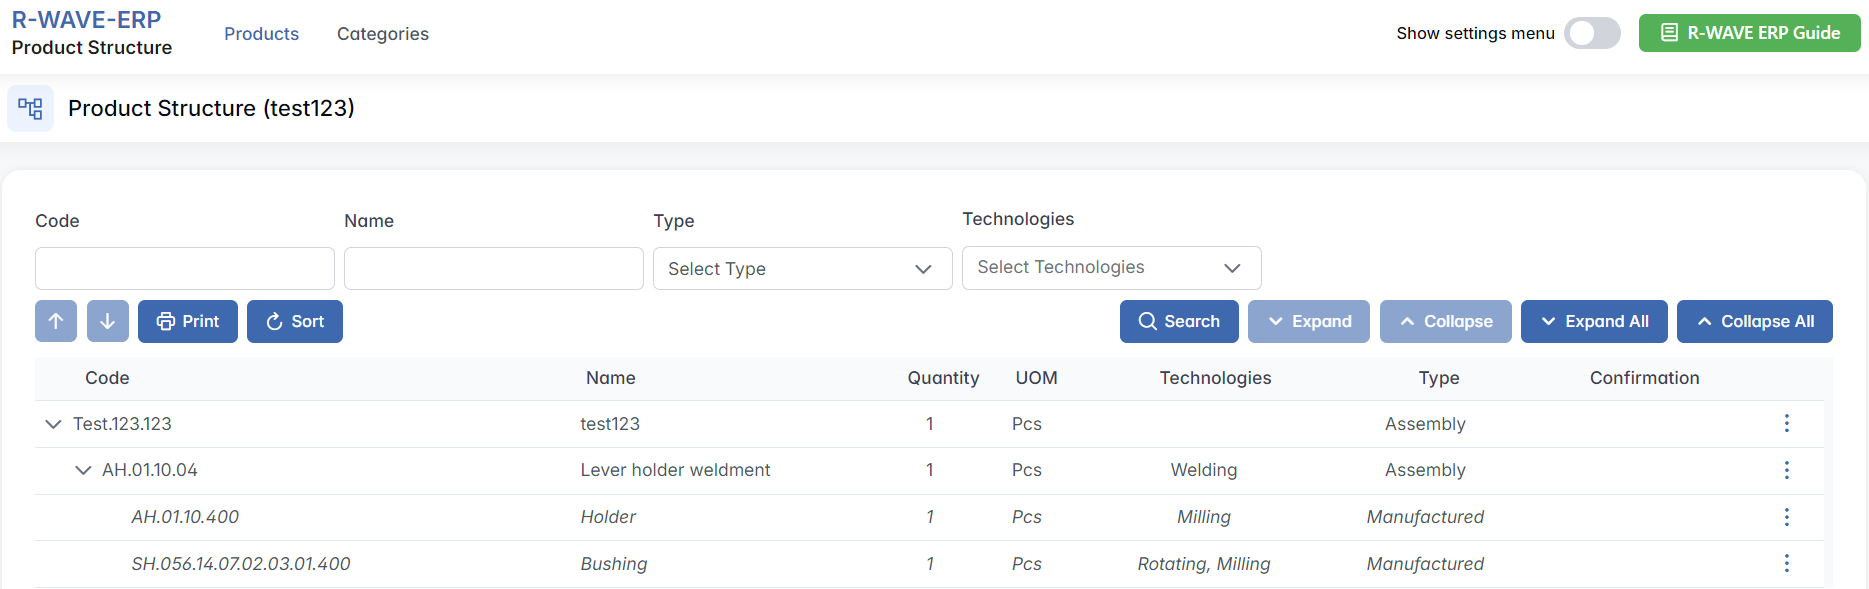
When a user opens the structure of a product, the Product Structure page displays a full overview of its hierarchical components. The page title includes the name of the selected structure in brackets.
Filter Panel
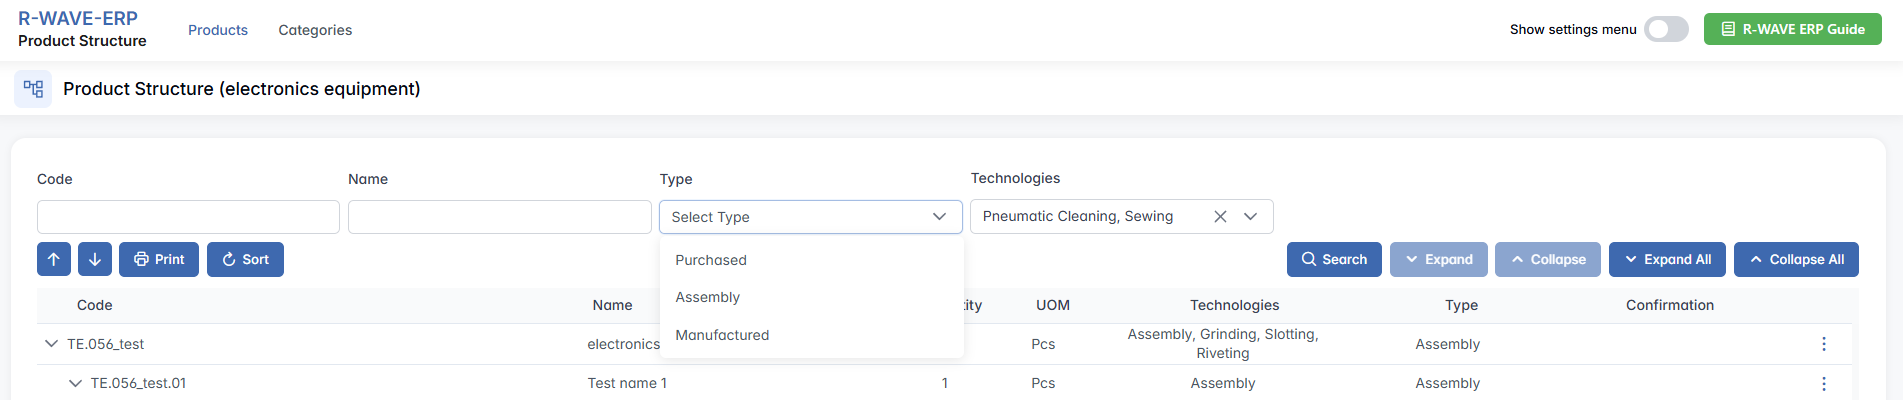
At the top of the page, users will find a filter panel that helps narrow down the displayed components. Available filters include:
- Code – Free text input field to search by item code.
- Name – Free text input field to search by item name.
- Type – Dropdown selector to filter by item type: Purchased, Assembly, Manufactured.
- Technologies – Dropdown selector to filter items by applied technologies.
After filling in the desired criteria, click the Search button to apply the filters and display matching results in the structure table.
Structure Table
Below the filters, the main Structure Table displays all items included in the product structure. The columns include: Code, Name, Quantity, UOM (Unit of Measure), Technologies, Type, and Confirmation (e.g., status for purchased items like APPROVED/NEW).
This table follows a hierarchical structure, meaning:
- Each Assembly acts as a parent that can contain sub-components.
- Sub-items may be other assemblies (nested), manufactured, or purchased components.
- The hierarchy reflects the real-life production logic, where subassemblies group related components.
Table Controls and Actions
Between the filter panel and the table, several important action buttons are available:
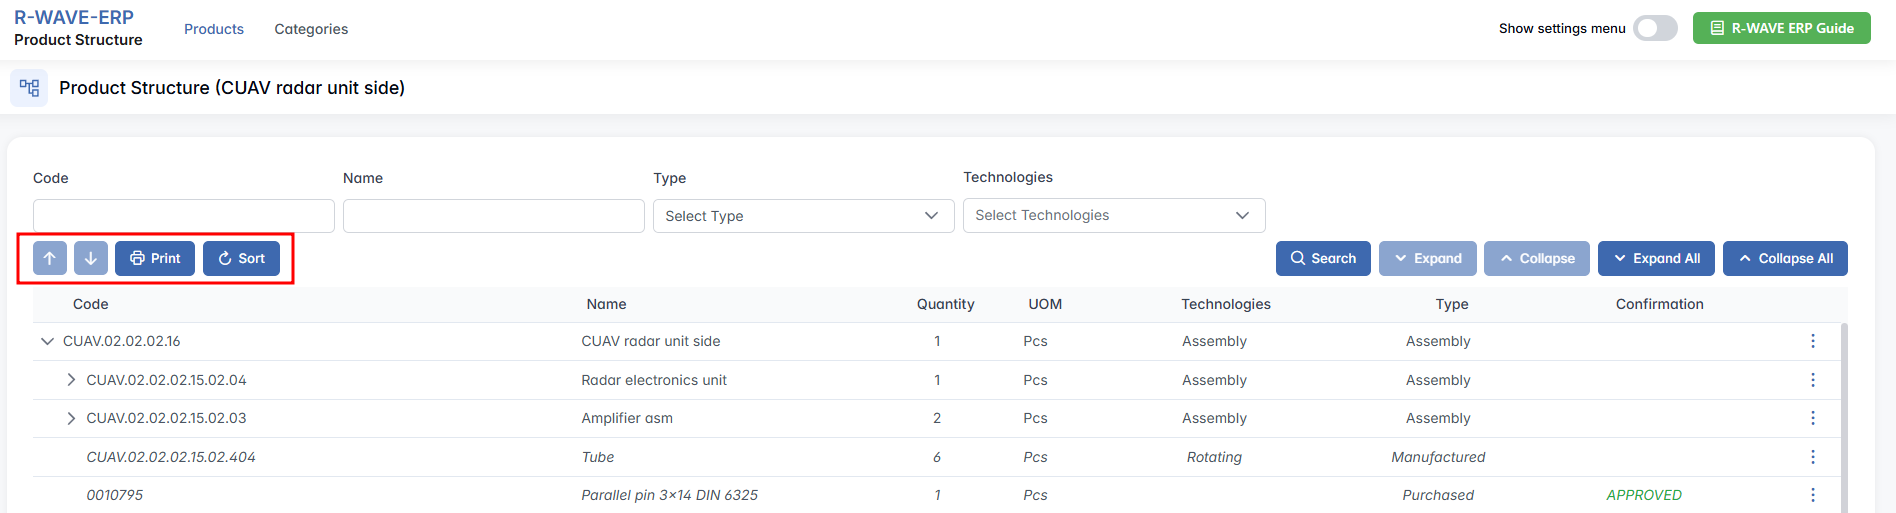
- Reorder Arrows (↑ / ↓) – become active when a row is selected; allow users to manually reorder items between assemblies at the same level, or within assemblies (reorder manufactured or purchased items under a single parent).
- Print – prints the current product structure, preserving the visual hierarchy.
- Sort – automatically sorts the items in the order: Assemblies – Manufactured – Purchased. Helps organize the view in a consistent and logical layout.
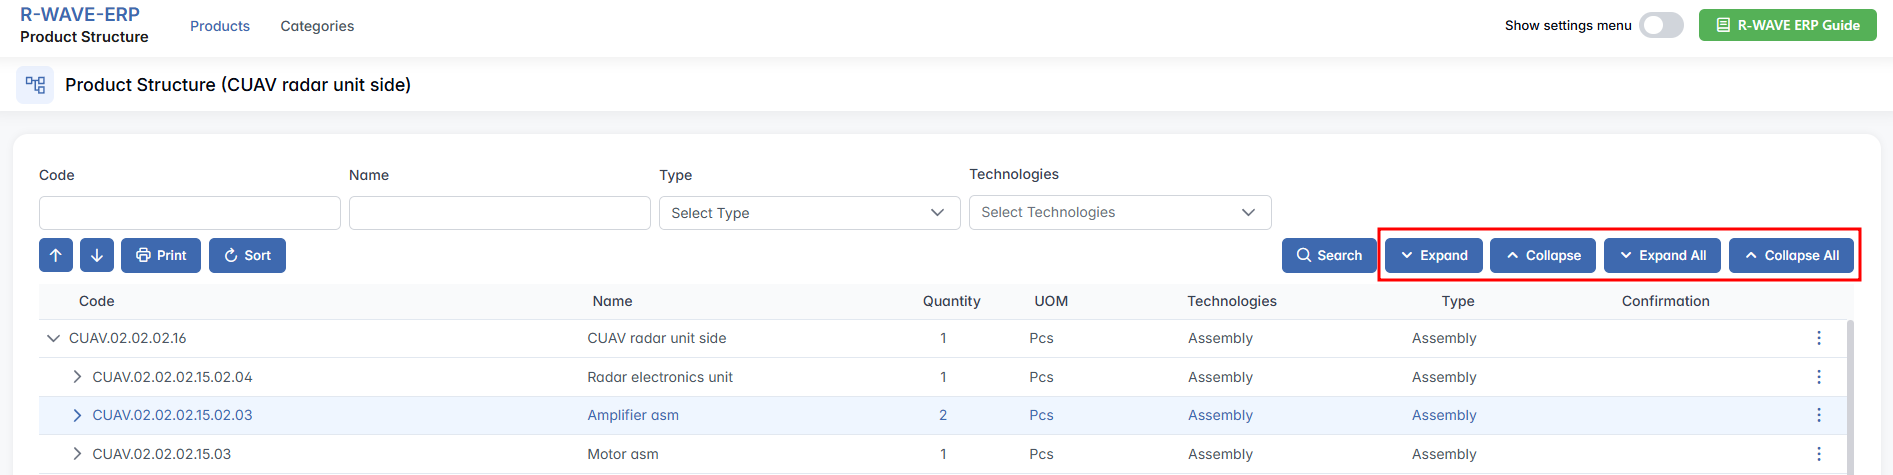
- Hierarchy Expansion Controls
- Expand / Collapse – require an assembly row to be selected. These buttons expand or collapse the selected assembly's components.
- Expand All / Collapse All – instantly expands or collapses all assemblies in the structure, regardless of selection.
Generating a Test Product
Once you generate your test product and open it by clicking the three-dot menu > Structure, you will notice that the product structure is initially empty. The next step is to populate this structure with the necessary components and operations.

Filling the Product Structure
There are two ways to add elements to the product structure:
- Manual Entry – Each component can be added manually by specifying its details within the ERP system.
- Importing Data – The product structure can be imported from external files, such as
.XLSfiles.
Naming Subitems According to Internal Code Structure
When working with the product TE.056_test, this code represents a parent item — typically the top-level assembly or main product structure.
According to the internal naming convention in BINU ERP, every subitem added to this product must follow a logical extension of the parent code. This reflects its position in the product hierarchy and helps maintain consistency across all components.
How to name subitems:
TE.056_test– top-level productTE.056_test.01– first direct subcomponentTE.056_test.01.01– subcomponent inside.01, and so on.
This system mirrors a tree structure — each dot (.) indicates a deeper layer, and the numbering reflects the order of components at each level.
Following this structure ensures clarity in large product assemblies, makes it easier to trace parts back to their parent assemblies, and helps standardize documentation, production, and planning. The product code follows a structured format, as defined in PRM (Partner Relationship Management).
Manually Adding Items to the Product Structure
To populate the product structure via manual entry:
Adding a new position:
- Select the desired level within the product structure.
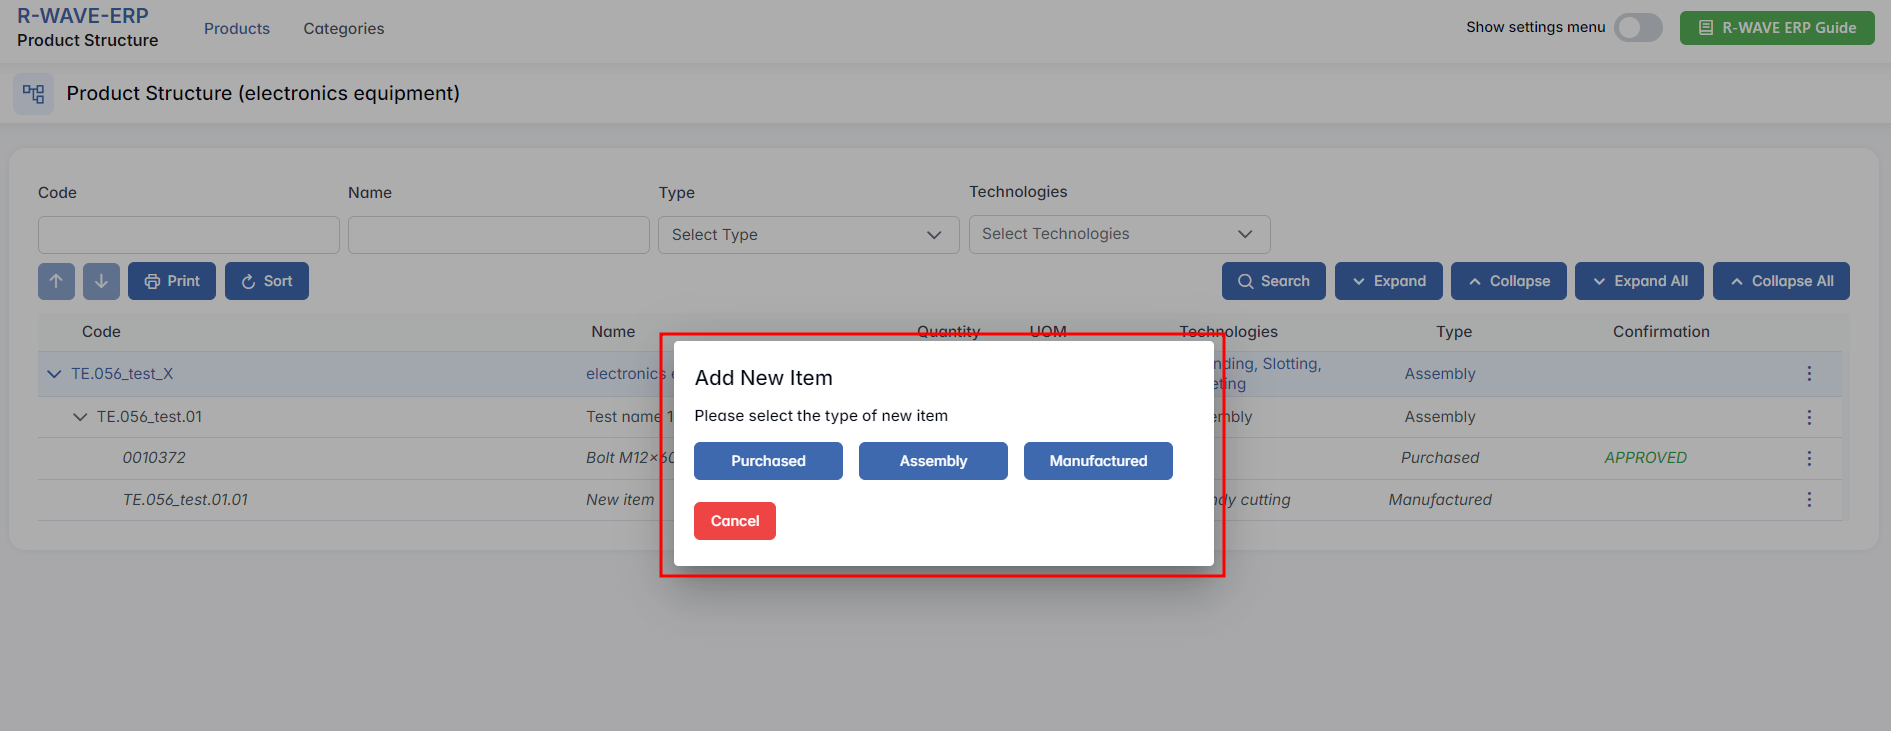
- Click on Add Item.
- Choose the type of item to be added. There are three available types: Assembly (composed of subcomponents), Manufactured (requires in-house or outsourced production), and Purchased (sourced externally).
Step-by-step: add a new item
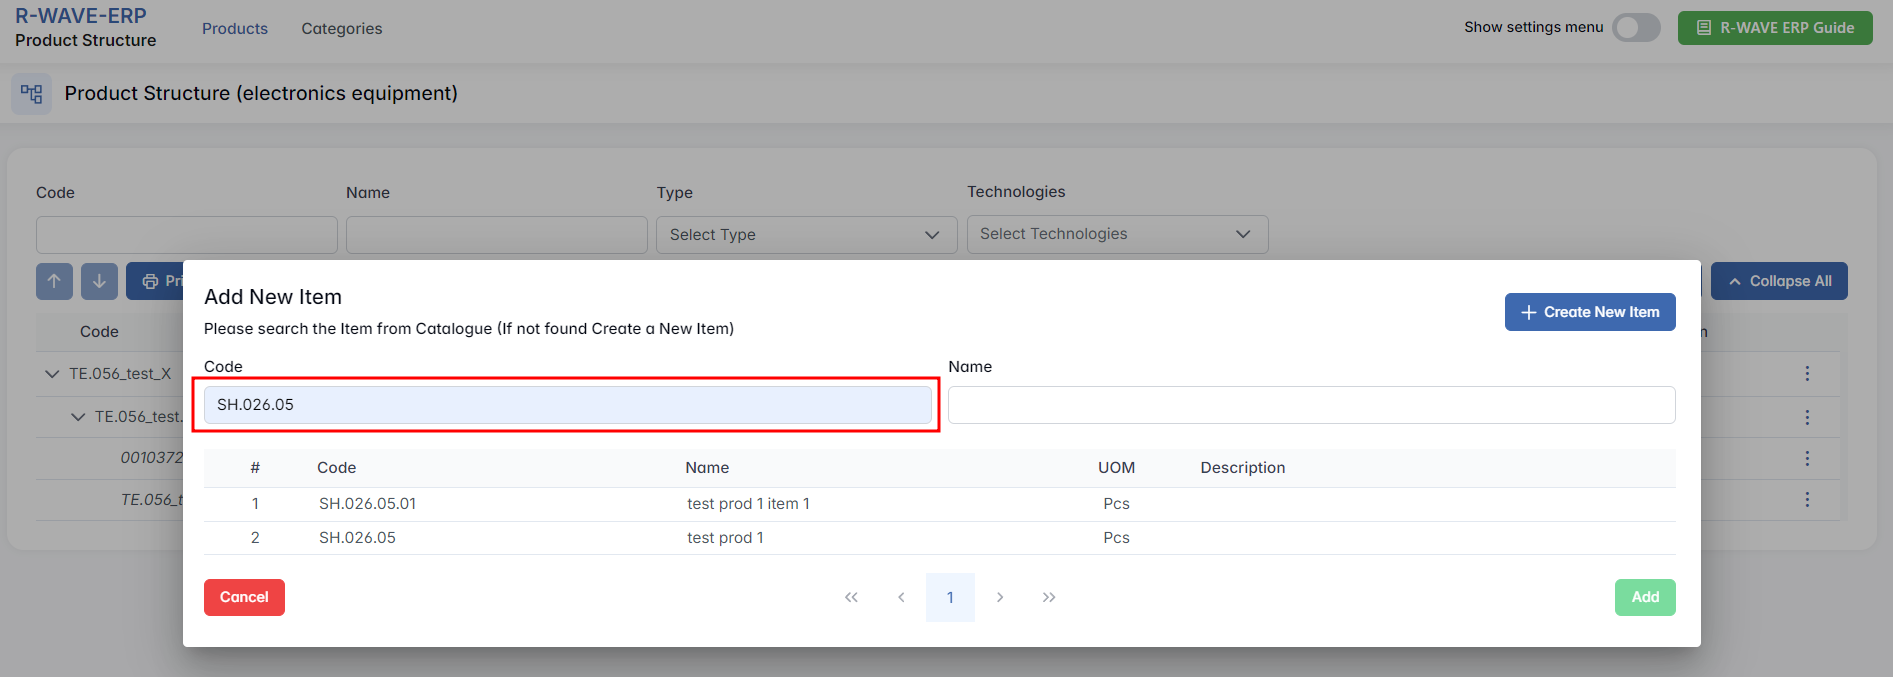
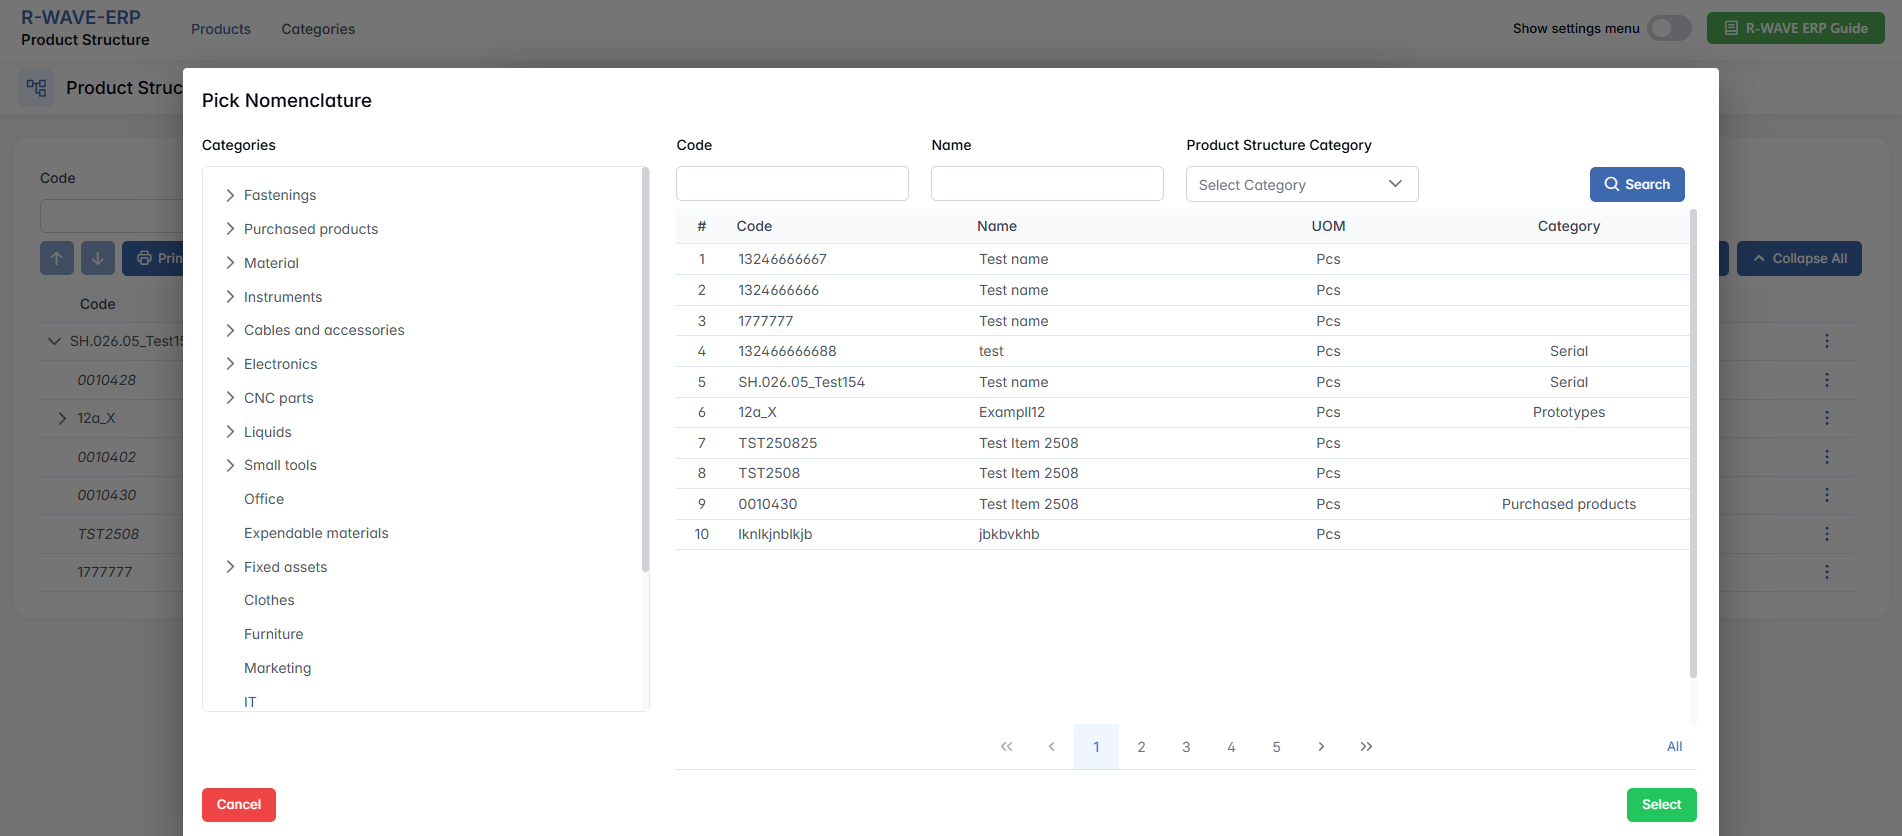
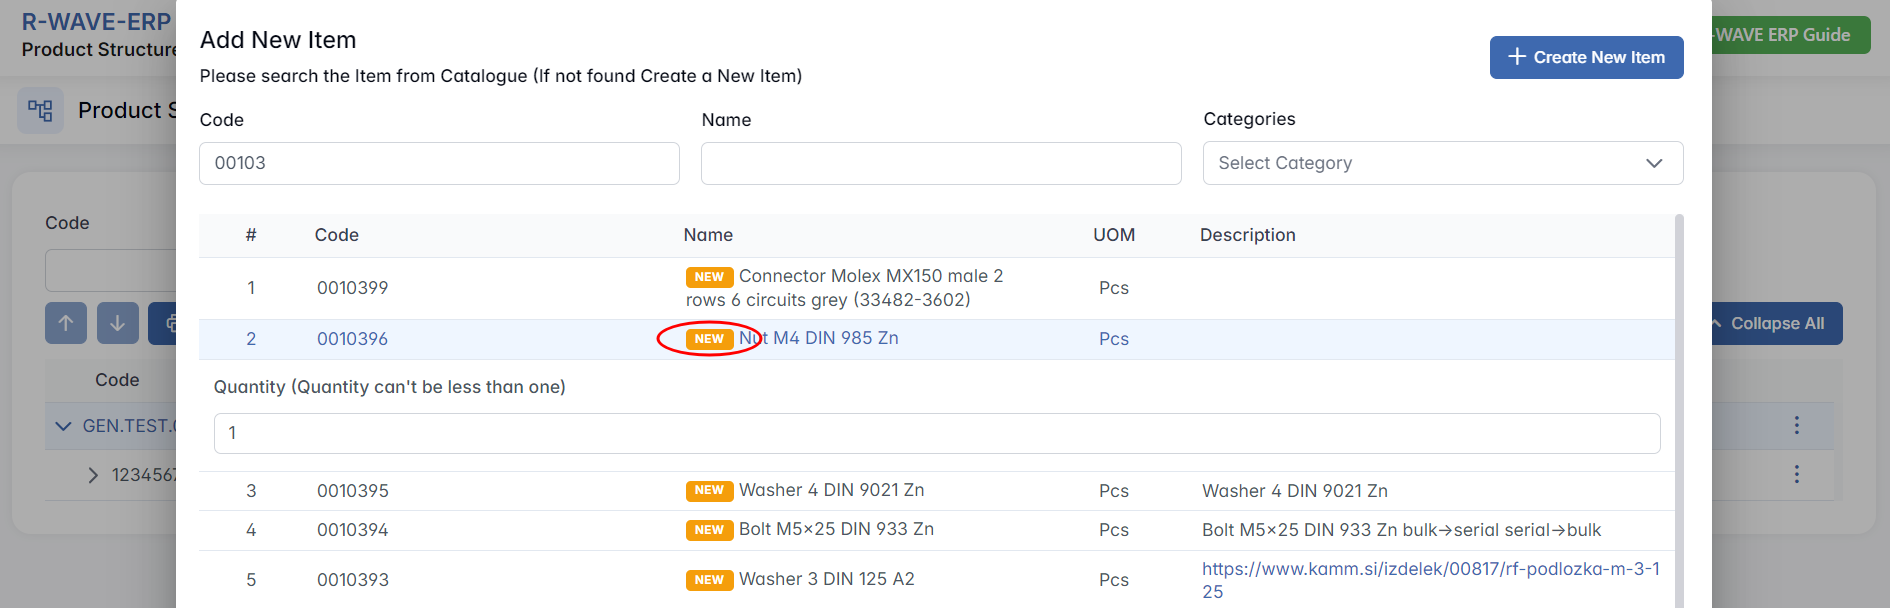
- Search for an existing item. After selecting the type, a searchable table appears with existing items of the selected type. Use the filters (Code, Name) to find the desired item.
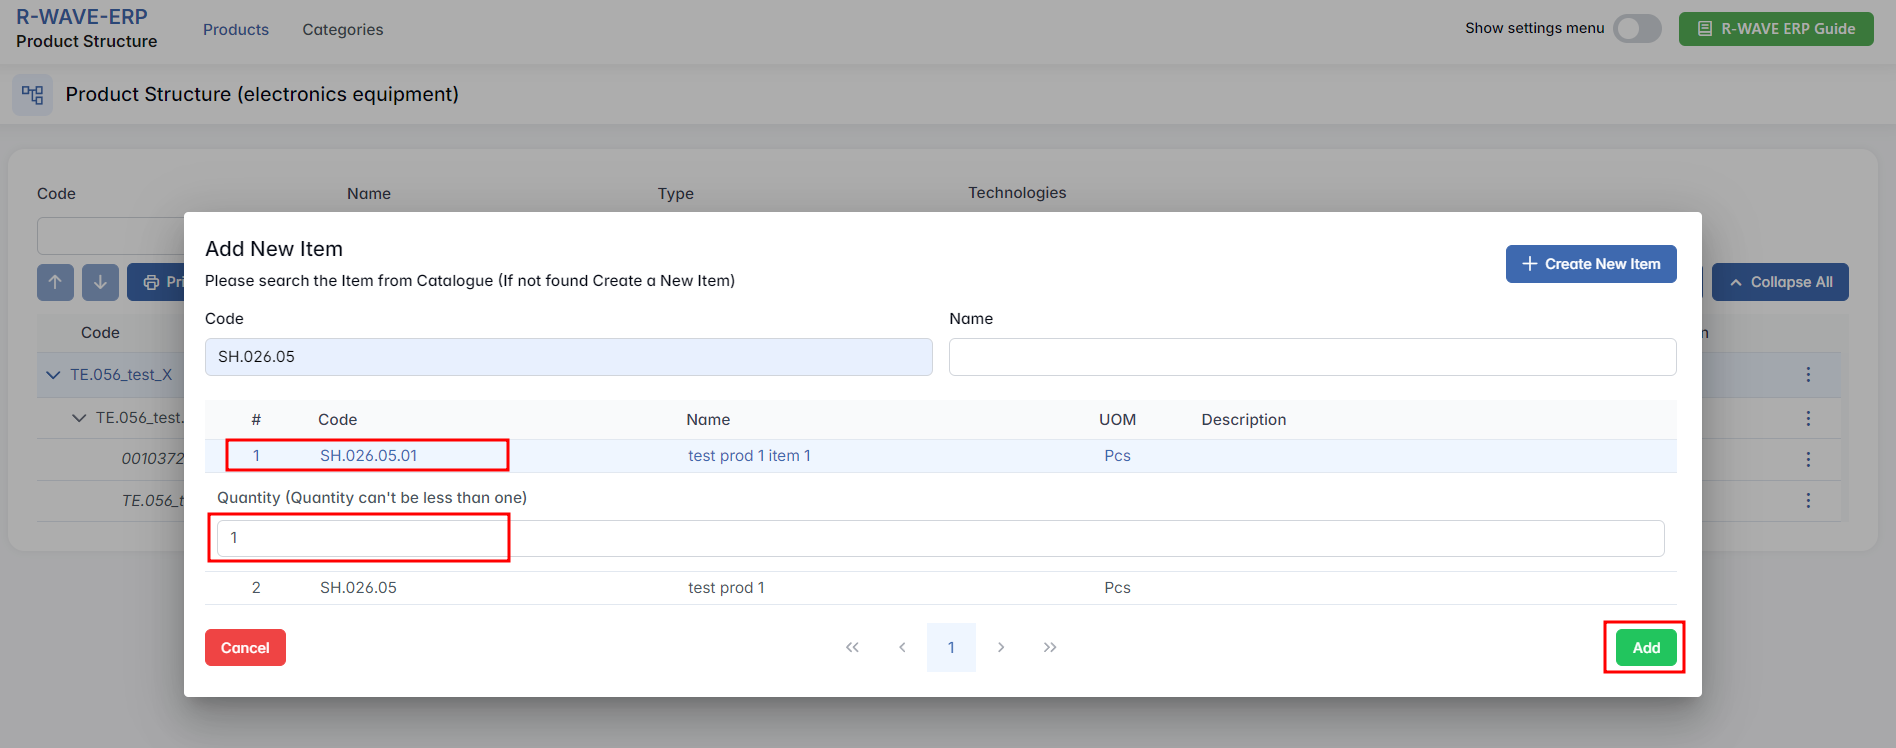
- Select and add. Click on a row to select the item, then click Add at the bottom-right. The item is now part of your structure under the selected parent.
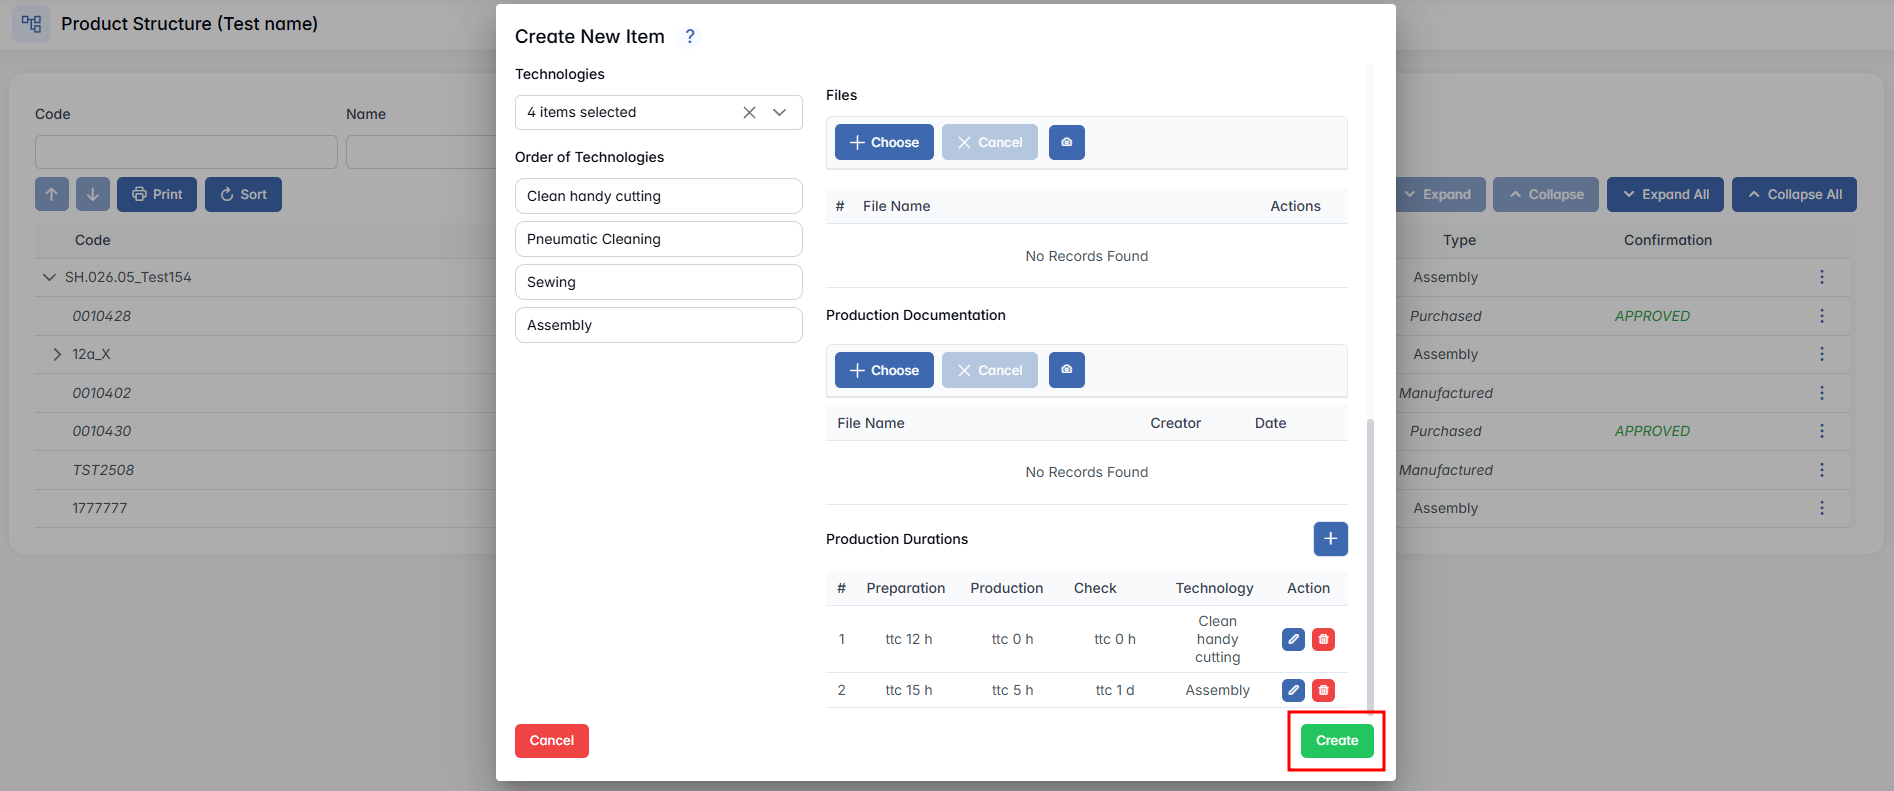
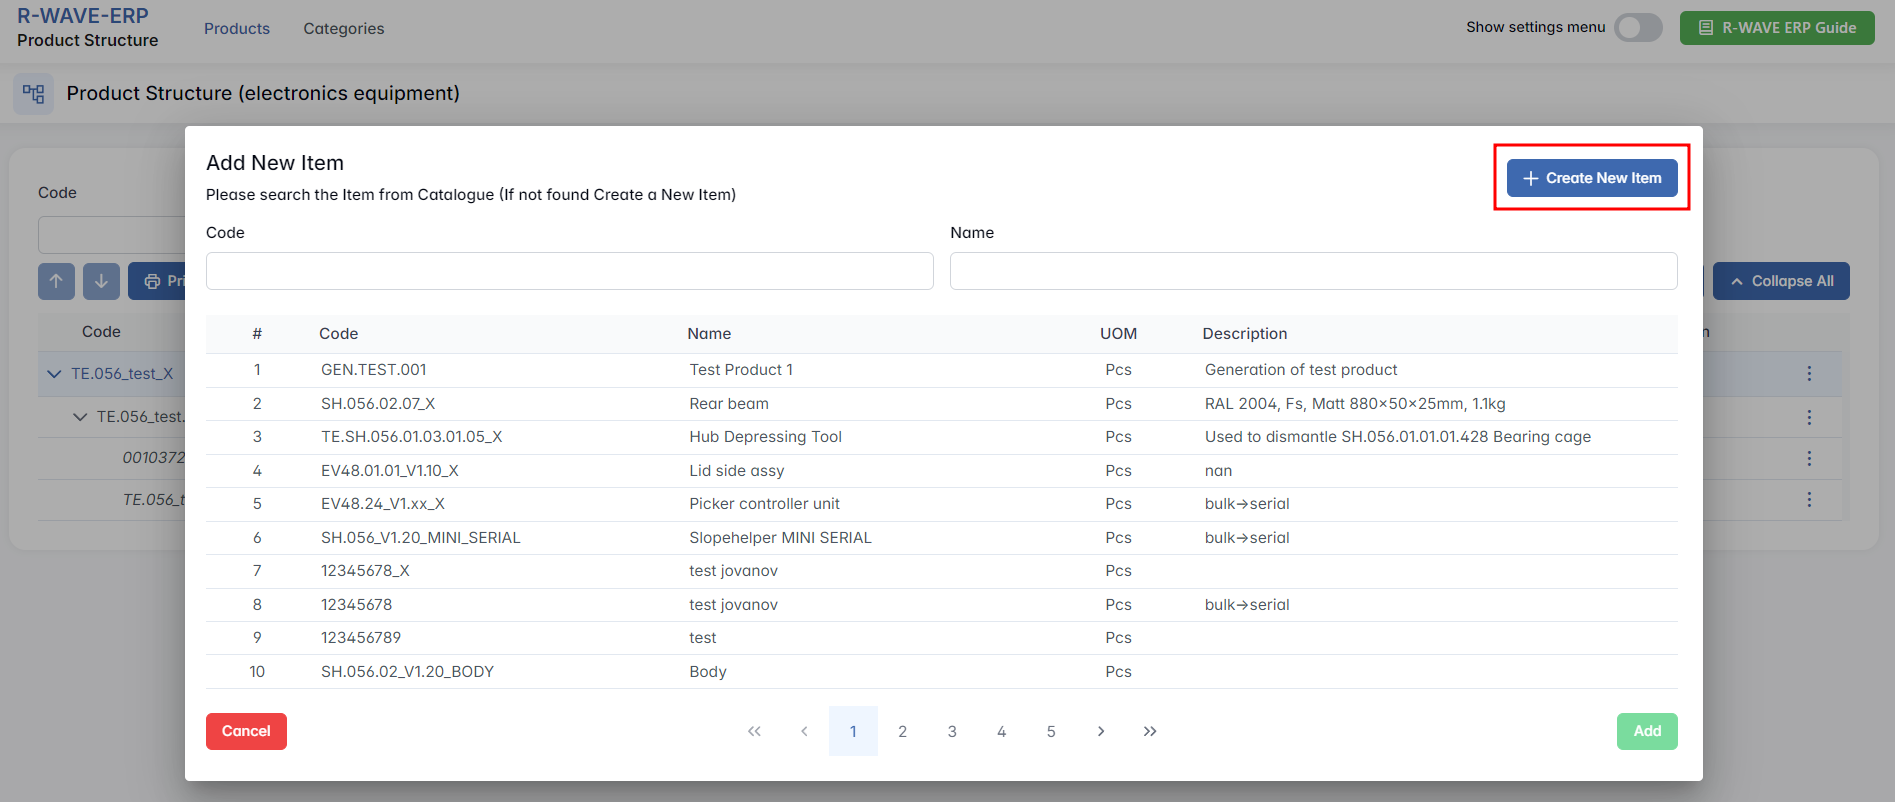
- Create a new item. If the required item is not available, click + Create New Item in the top-right corner.
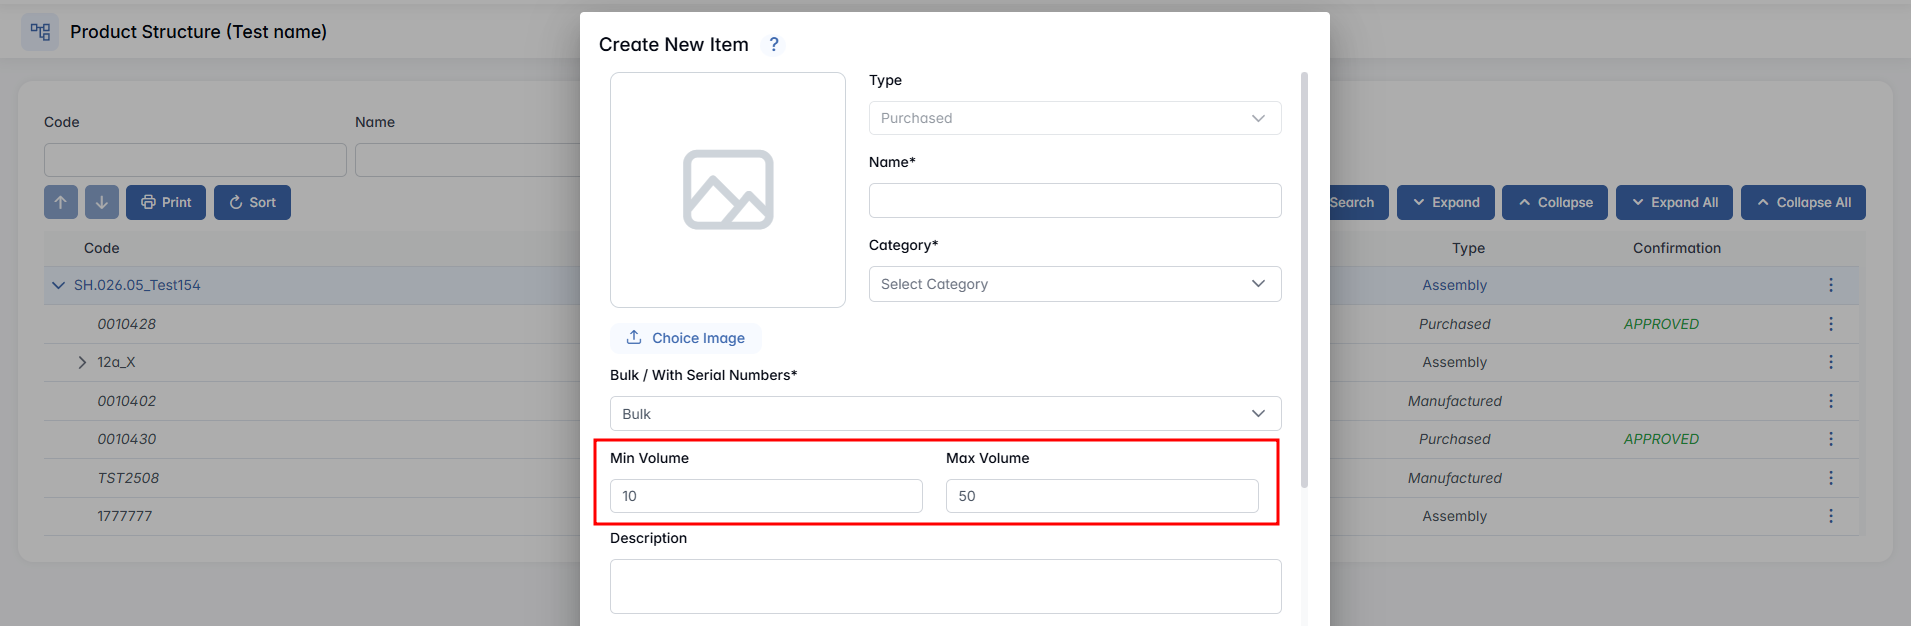
There are several characteristics you can choose from when creating a new item, based on the type:
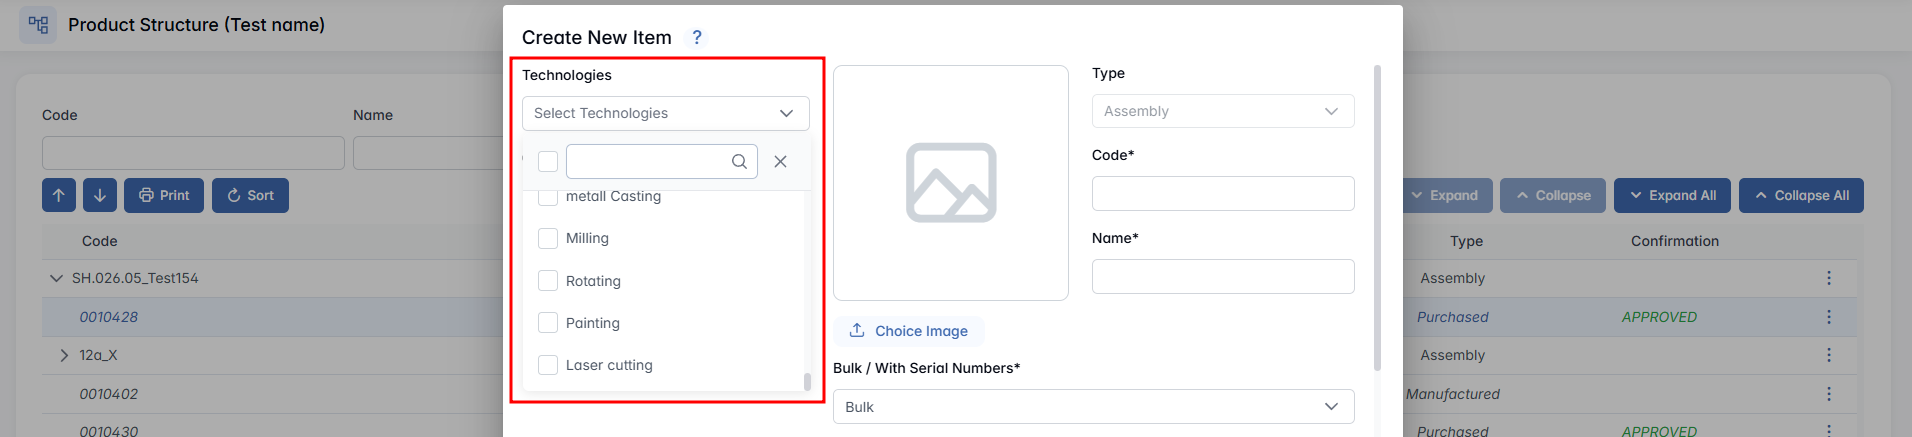
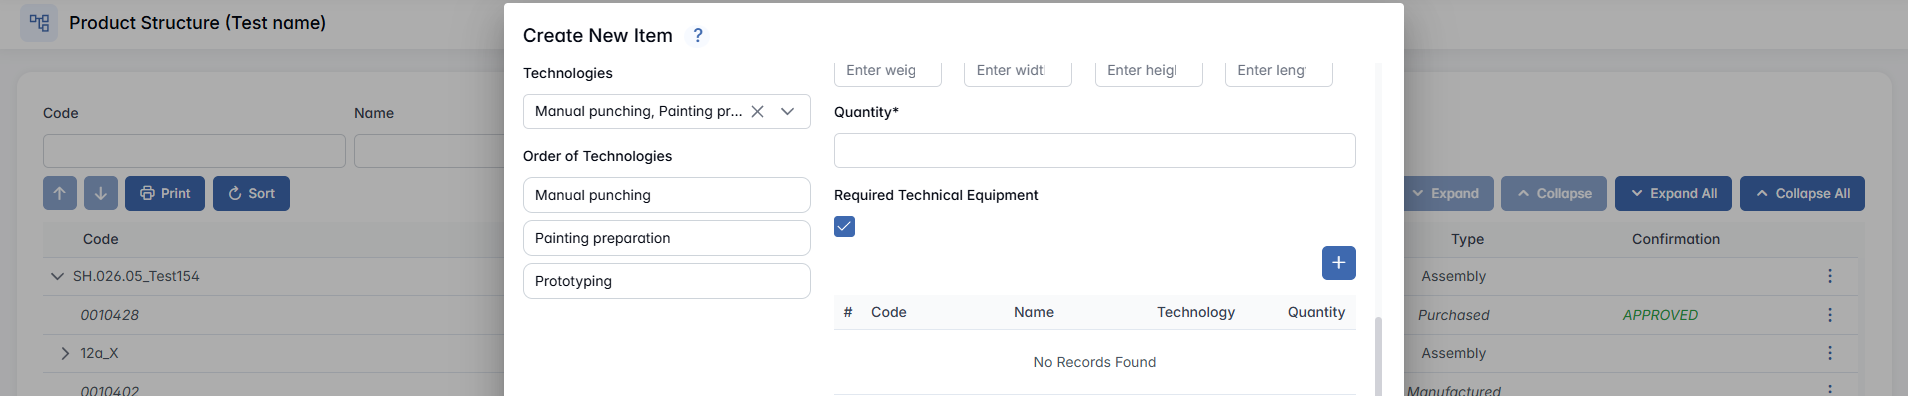
- Technologies (not for Purchased) — Select one or more technological operations for producing the manufactured item (e.g., welding, laser cutting, painting). The system makes sure that all necessary technological operations are specified so the item can be produced correctly.
- Order of Technologies (not for Purchased) — If you selected multiple technologies, you can drag and drop them into the right order.
- Image — Upload an image of the item by clicking Choose Image, or paste it directly from your clipboard.
- Type — Predefined based on your choice when creating a new item.
- Code (not for Purchased) — Enter a unique code following the established rules. The system will alert you if the code is not unique ("Warning: This code already exists.").
- Name — Provide a name for the item.
- Bulk / With Serial Numbers — Choose whether the item is in bulk or comes with a serial number.
- Min / Max Volume (only for Purchased) — Defines the minimum and maximum stock levels. When stock falls to the Min Volume or lower, the system automatically triggers procurement to refill it up to the Max Volume.
- Description — Provide a short description of the item.
- Material Type — Select the material type. If the desired type is not available, add it via Warehouse module > Hidden Settings > Material Type tab.
- Area / Weight / Width / Length / Height — Fill in the measurements.
- Quantity — Specify the quantity needed to produce the final product.
- Required Technical Equipment (not for Purchased) — Tick the checkbox if production requires technical equipment, then click the + button to select the appropriate equipment from the list.
- Files — Upload any relevant files by clicking + Choose or by taking a photo (camera icon).
- Production Documentation (not for Purchased) — Upload any relevant files by clicking + Choose or by taking a photo.
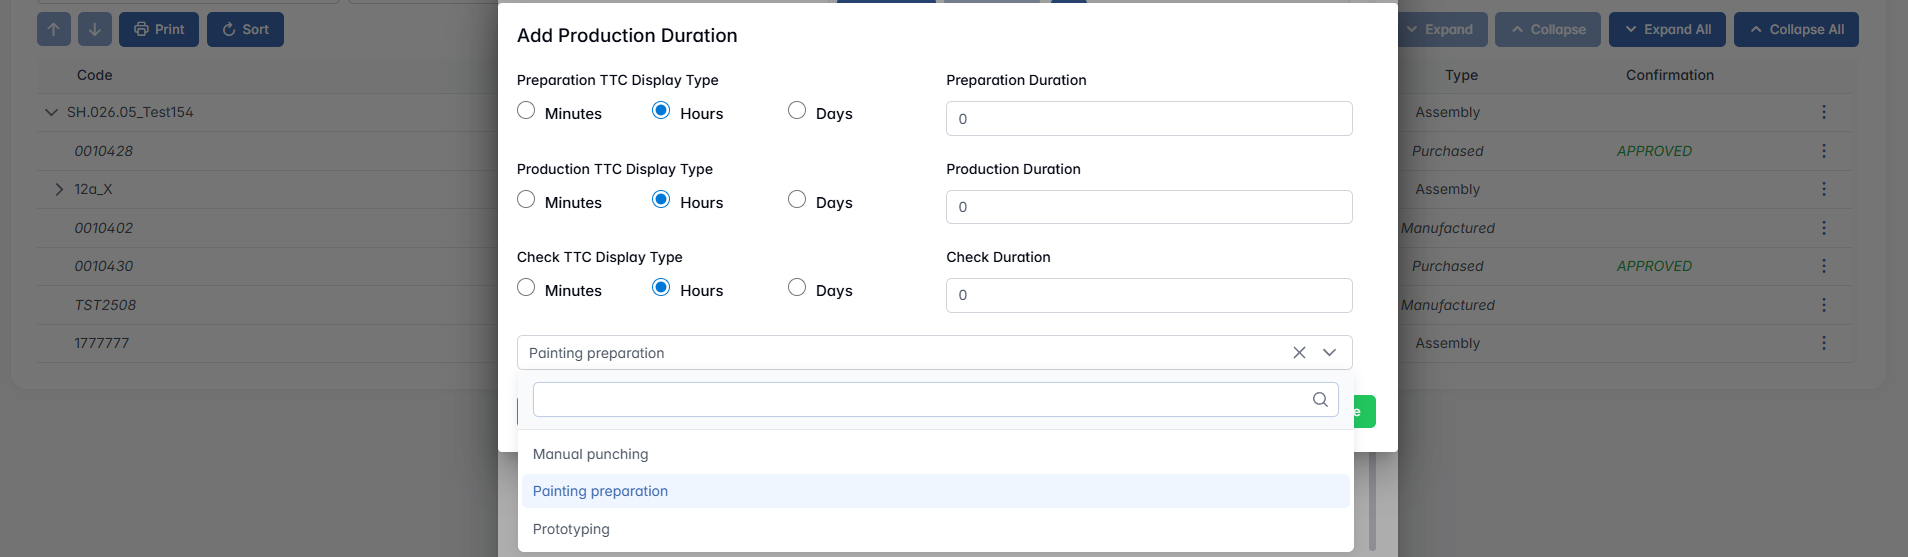
- Production Durations (not for Purchased) — Defines how long each Technology step is expected to take. Note: Technologies must be defined beforehand for this function to be available. Click the + icon to open the Add Production Duration pop-up, where you configure the estimated durations for each step (Preparation, Production, Check). For each step, select a TTC (Time To Complete) and enter the corresponding duration.
Fill in all required fields, then click the Create button to complete the item creation process.
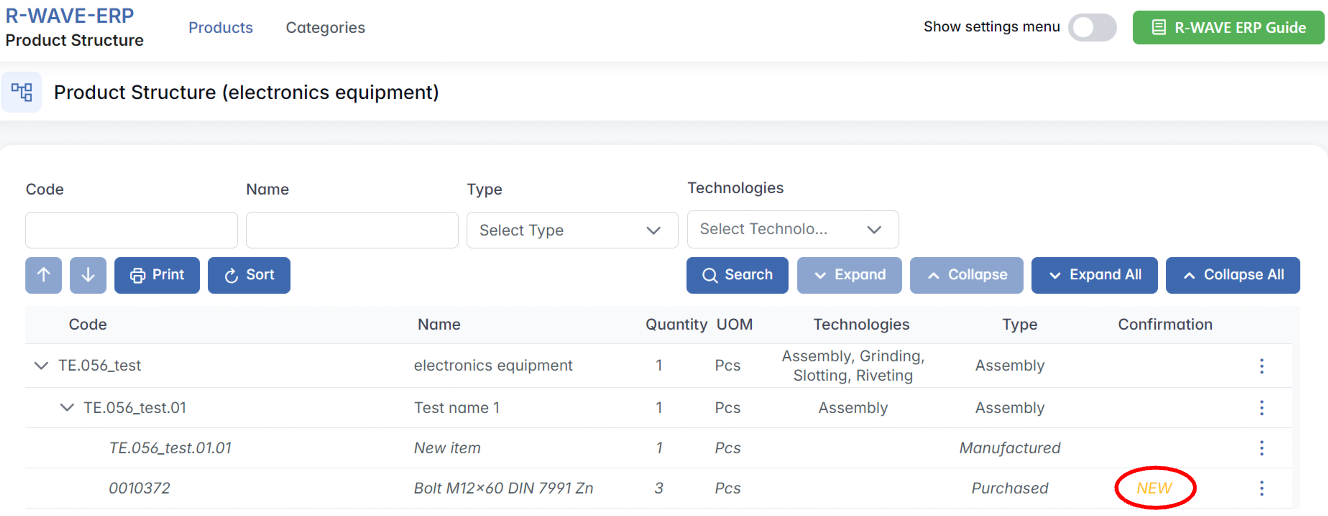
Confirmation of New Purchased Positions
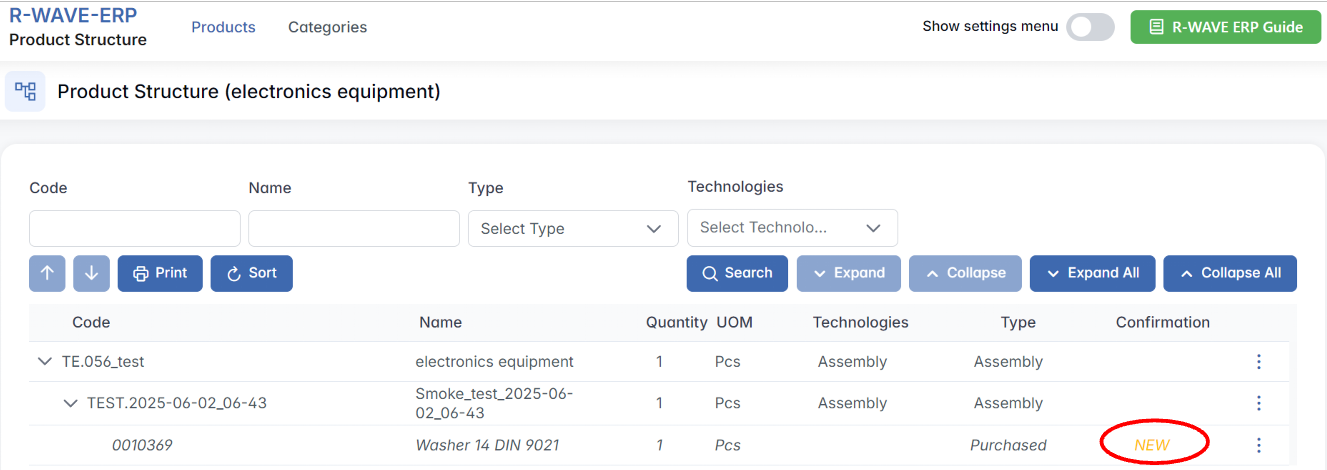
Some of the positions in the list are marked as NEW. This indicates that they have been recently created and still require confirmation.
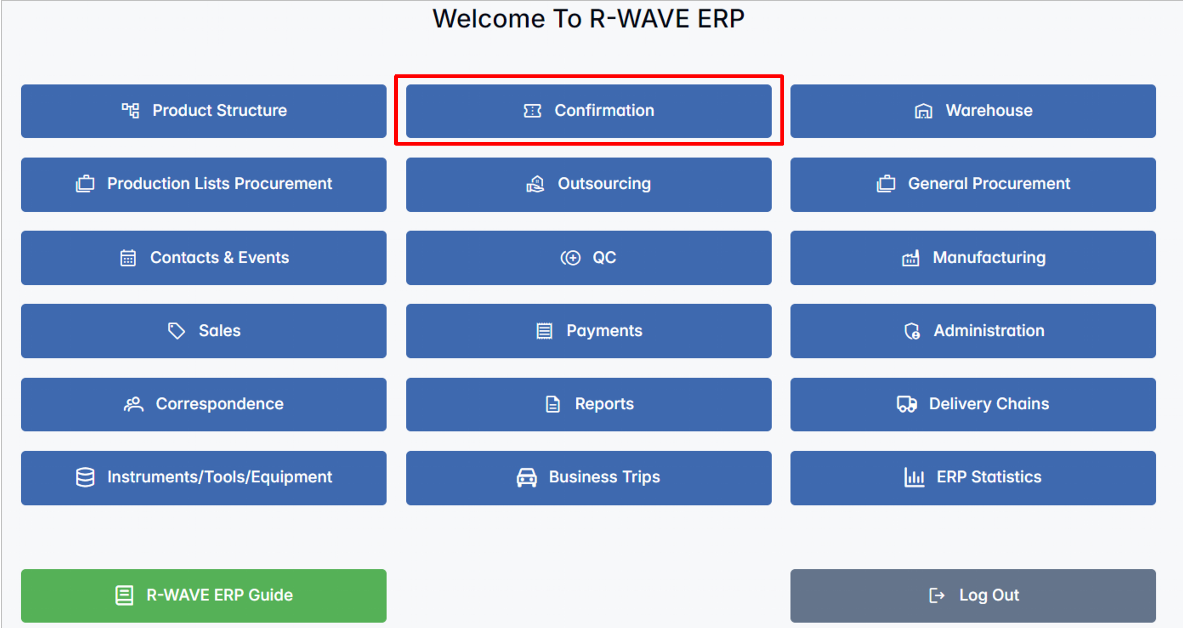
1. What happens when we create a new purchased position?
When a new purchased position is added, it is automatically assigned the NEW status. This means the item is not yet fully integrated into the system.

2. The confirmation process
Every new purchased position must go through a confirmation step before it can be used in production. The confirmation is necessary to validate the item and approve it for procurement.
Starting the Manufacturing Process
Once the product structure is completed, you can proceed with manufacturing. Although this is not the responsibility of mechanical designers, it is important to understand the process.
Creating a Production List
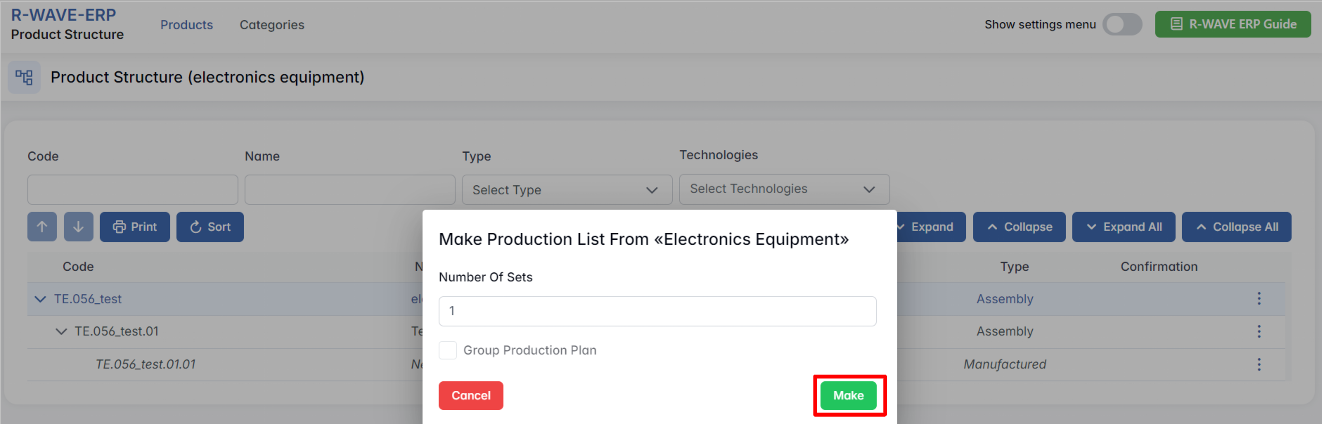
There is a button labeled Make Production List that initiates the process. You can make production lists only for parent items.
Clicking this button allows you to specify how many units of the product you want to manufacture.

From this point, you can decide whether to:
- Produce all units together in a single batch. If so, tick the box Group Production Plan and click Make.
- Produce them separately, creating individual production groups. Each set will then be handled individually in production. Do not select the separate option if all sets must be produced together — if produced as one batch, each production step will be executed simultaneously for all defined sets.
Technology Setup Requirement for Assemblies and Manufacturing Positions
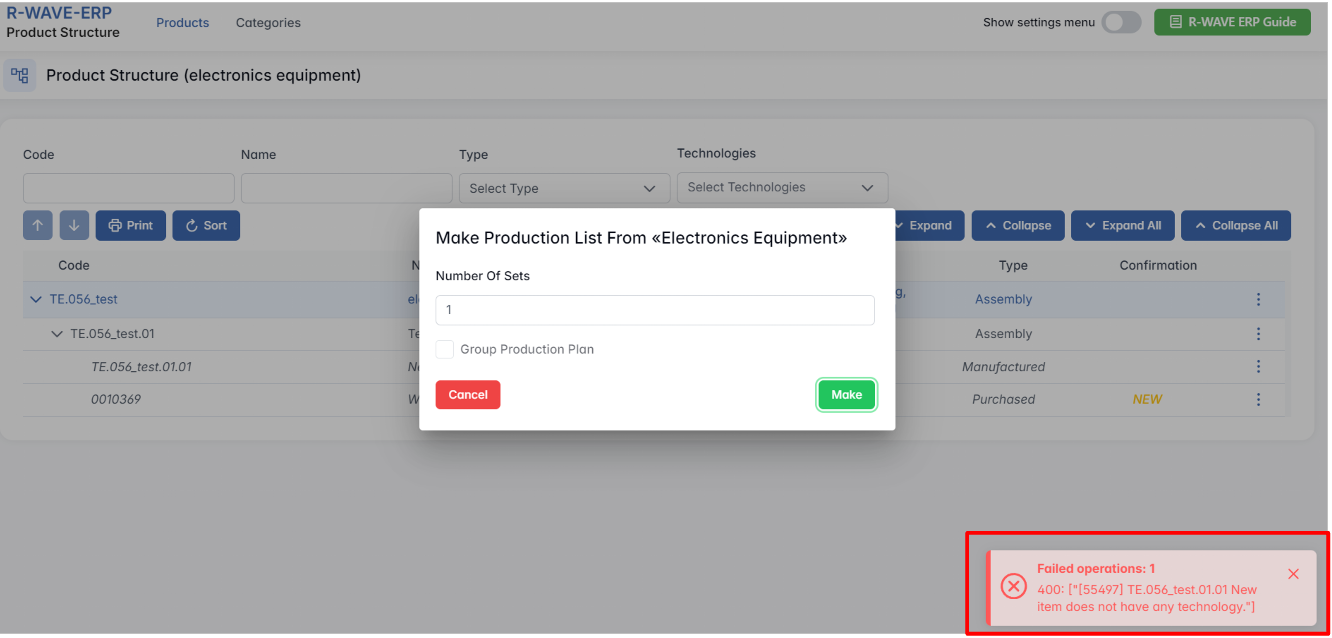
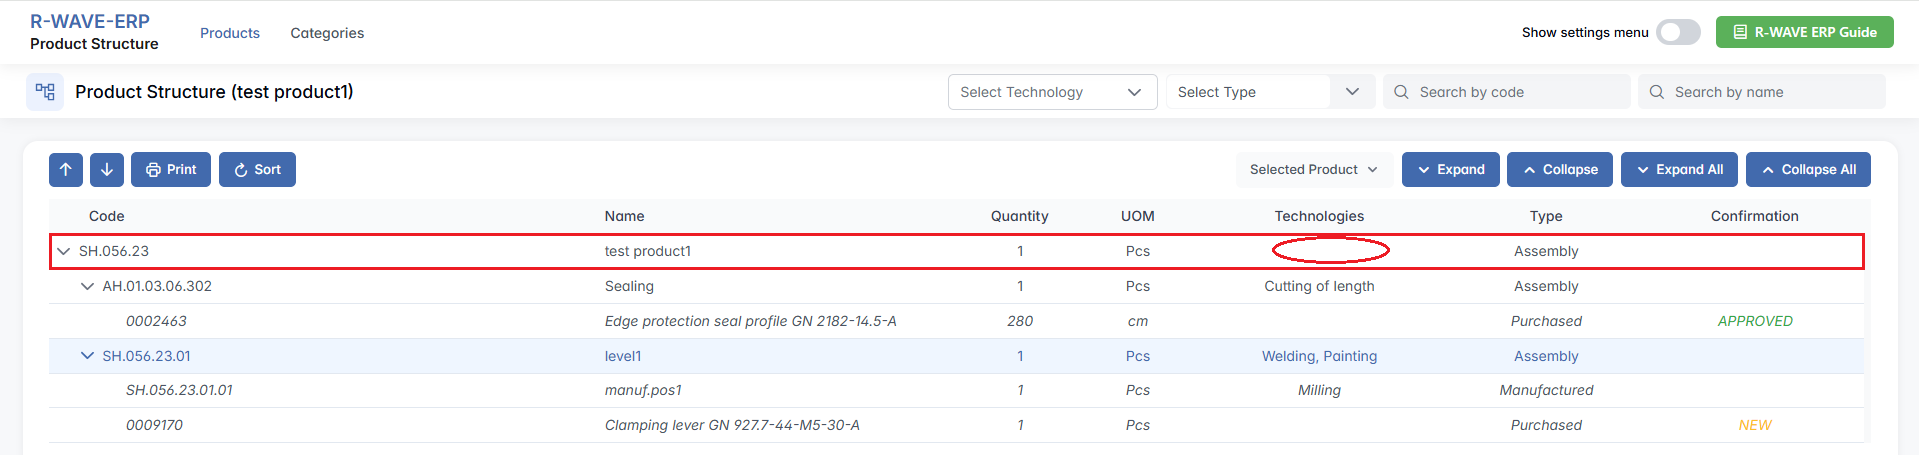
In the ERP system, every manufacturing position and assembly must have defined technologies before production can begin. If any position lacks a technology setup, the system will notify the user and prevent the start of a new production order.
1. System notification for missing technologies
- If an assembly or manufactured position does not have a technology assigned, the system displays a warning indicating that some positions lack the required operations.
- The system ensures that no production begins without clearly defined manufacturing steps.
2. Importance of defining operations
- Each manufacturing position must have a designated operation (e.g., welding, painting) before production starts.
- Without these definitions, production planning is incomplete, and the system will block further progress.
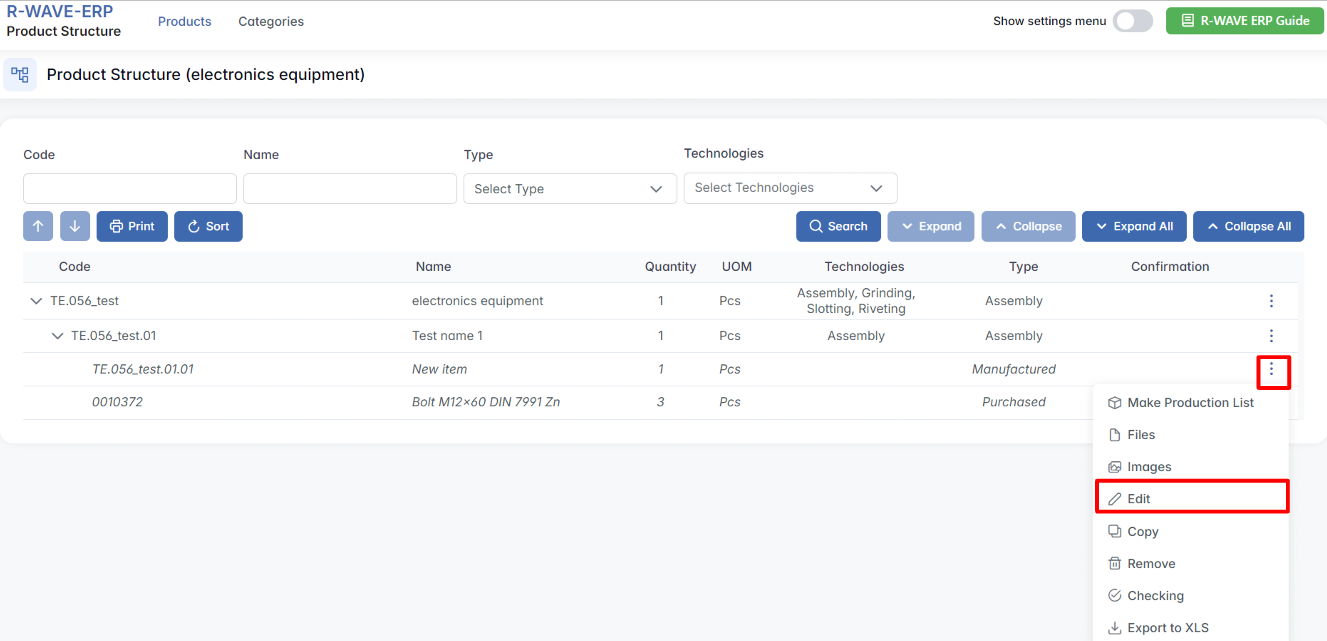
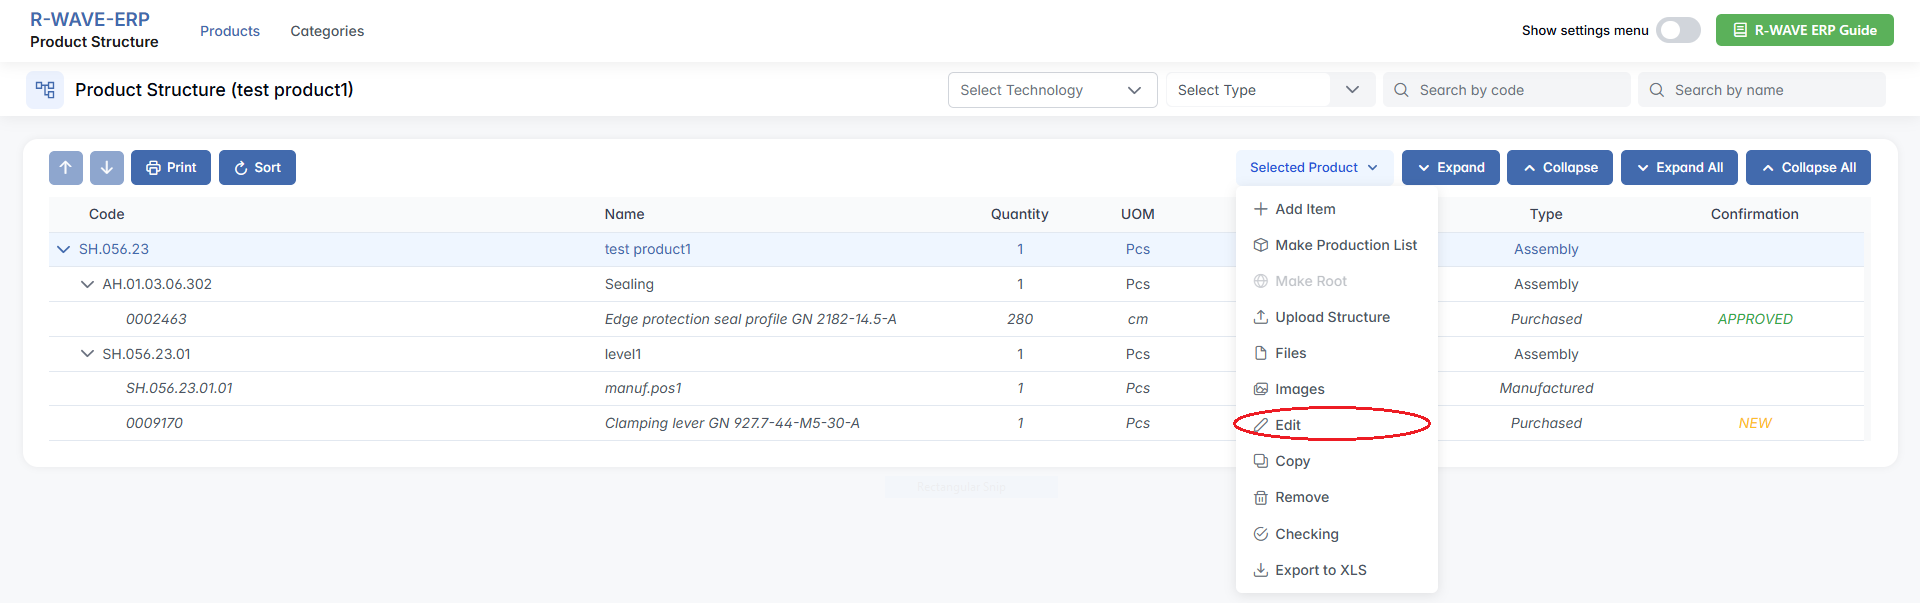
To set up the technology, click the required row and select Edit from the three-dot menu.
Resolving the "NEW" Label on Purchased Positions
When working with assemblies, you may come across certain purchased positions marked with the label NEW in the Confirmation column. This indicates that the item has been recently created and still awaits official confirmation before it can be used in production. Until this confirmation is completed, the system will block any manufacturing processes involving this item.
To resolve this, follow the proper confirmation procedure using the Confirmation module. This step is essential to ensure that all purchased items are properly reviewed and approved by the responsible teams before entering production.
How to Confirm a New Purchased Position
If you see the NEW label next to an item in the product structure:
- Navigate to the Confirmation module. Open the main menu of BINU ERP and select the Confirmation module from the list. This is the central hub where all new nomenclature items are reviewed and processed.
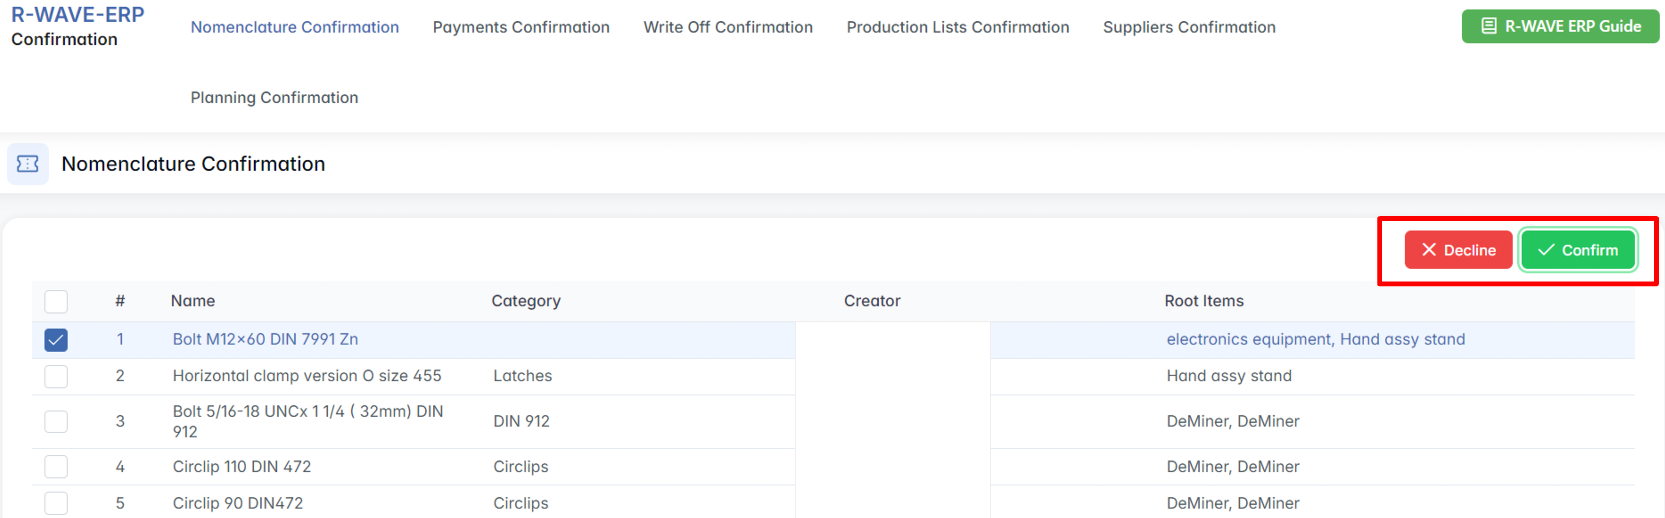
- Access the Nomenclature Confirmation tab. Within the Confirmation module, locate the Nomenclature Confirmation tab. This section displays all purchased positions that are currently awaiting validation.
- Select and confirm the position. Find your item in the list and check the box next to it. Once selected, click the Confirm or Decline button in the upper-right corner of the screen.
- A confirmation window will appear — verify your choice, then proceed by confirming it.
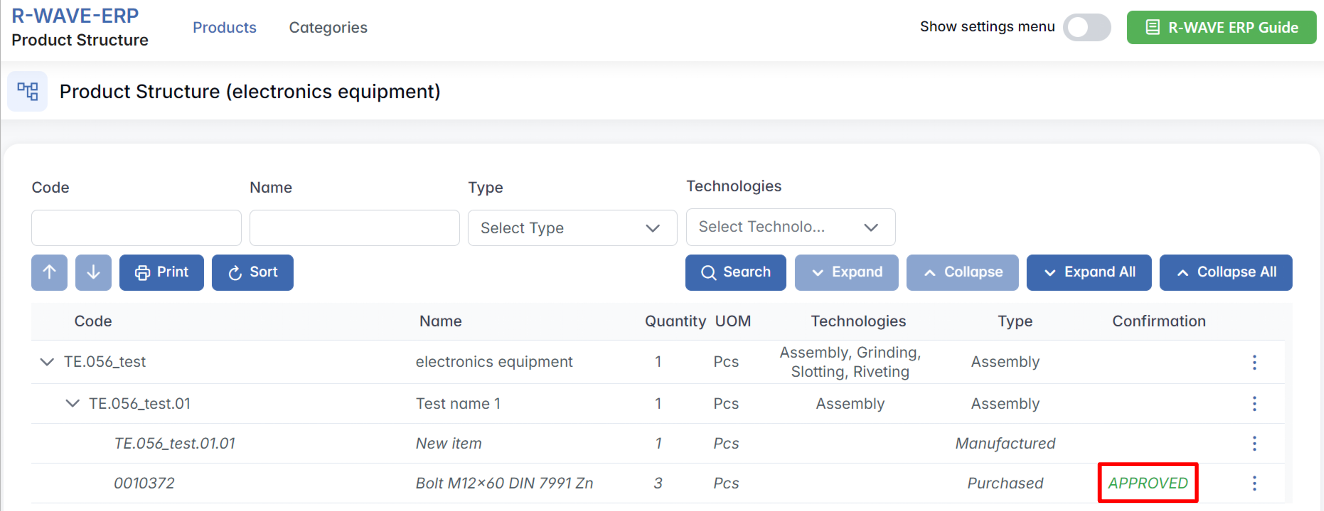
Once the item is confirmed, the NEW label will automatically disappear, and the position will be marked as approved. From this moment, the item is considered validated and fully available for use in the product structure. You can now proceed with production planning that includes this item, without encountering system blocks or warnings.
Understanding Nomenclature and Nomenclature Card in the ERP System
In the ERP system, nomenclature refers to every new position created within the program. It includes assemblies, manufactured positions, and purchased positions, forming the foundation of the product structure.
1. Definition of nomenclature type
- Assemblies – Structured components that contain sub-components.
- Manufactured Items – Items produced through manufacturing processes in-house or outsourced production.
- Purchased Items – Items sourced from external suppliers.
2. Nomenclature cards and editing
- Every position or item has a unique item card containing key details.
- To open and edit an item's nomenclature card: select the desired position, click the three-dot menu and then the Edit button.

Editing the Nomenclature Card and Adding Documentation
The nomenclature card in the Product Structure module is a central workspace where you define and manage all essential technical and production details for any item — assembly, manufactured, or purchased. It acts as a detailed technical passport of a product, combining classification, technological requirements, and production metadata in one place.
Through the nomenclature card, users can:
- Assign technologies and define their execution order,
- Specify physical properties (like dimensions, area, and weight),
- Indicate whether the item is produced in bulk or tracked via serial numbers,
- Upload production files and documentation,
- Set up required equipment, QC control points, and duration estimates for each production step.
In addition to general technical data, the nomenclature card also defines the required documentation for each type of position. For example, assemblies must include production instructions, manufactured items require technical drawings or STEP files (e.g., for laser cutting), and purchased items may require supplier documentation or approval forms.
To update the technical details of a product, assembly, or component, you need to access and edit its nomenclature card:
- In the Product Structure module, locate the item you want to edit in the hierarchical structure.
- On the right side of the item's row, click the three-dot menu (⋯).
- Select Edit from the dropdown menu.
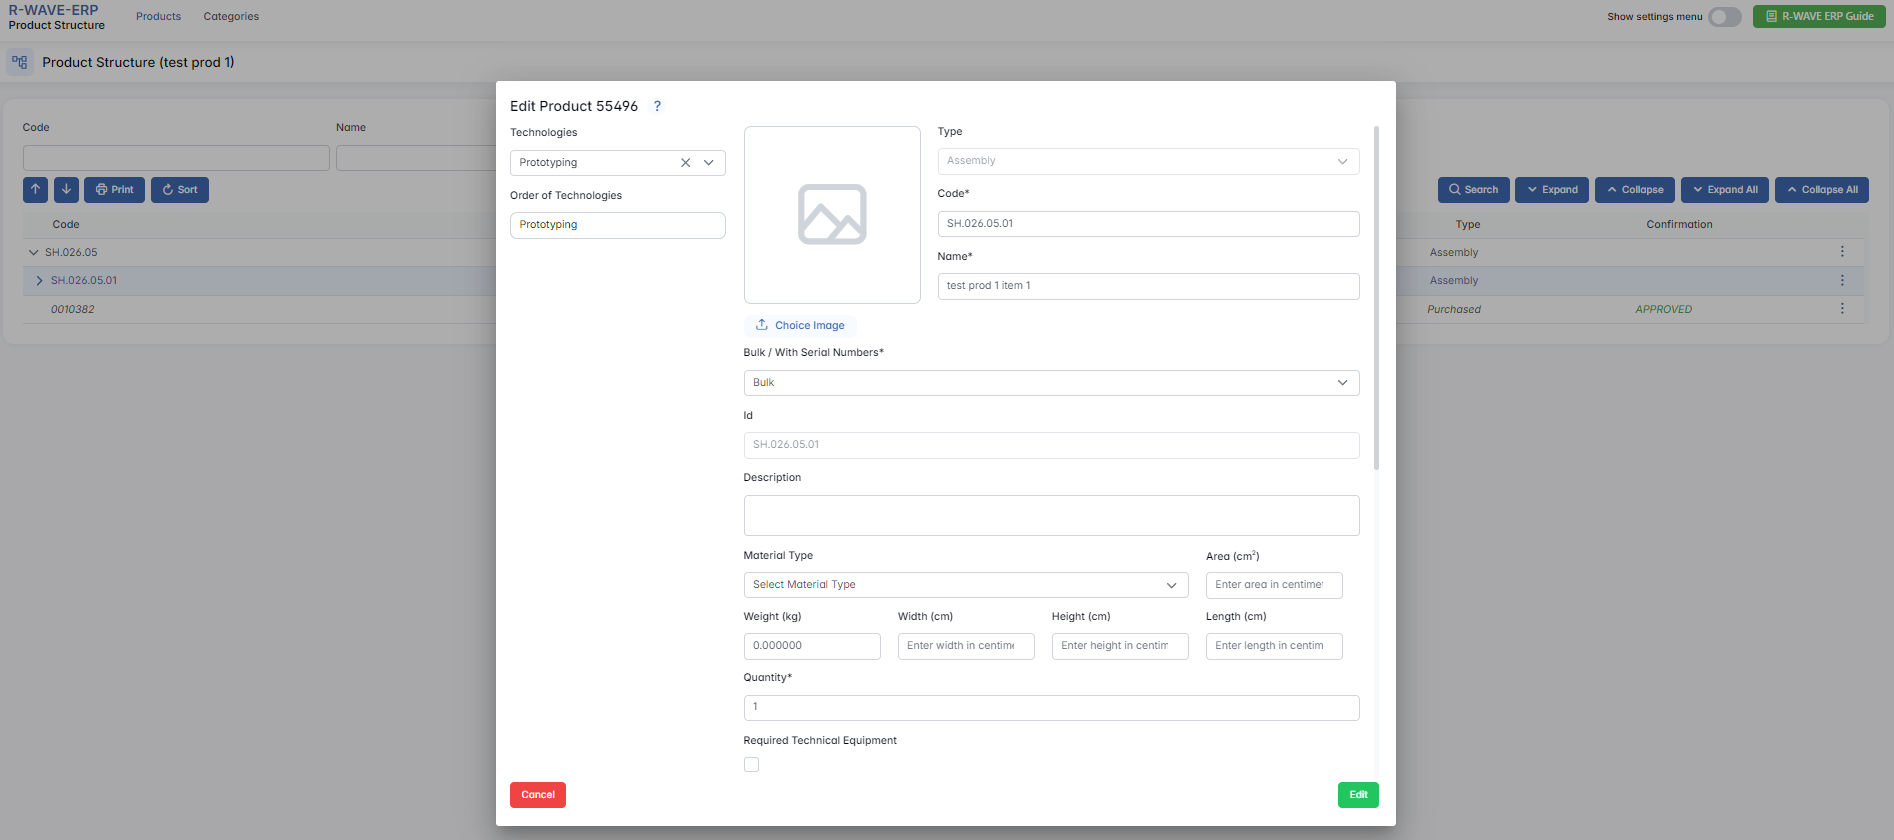
A popup window will appear with all editable fields of the nomenclature card:
- General information (code, name, type, description)
- Production technologies and their order
- Dimensions, weight, area
- Associated documentation and required equipment
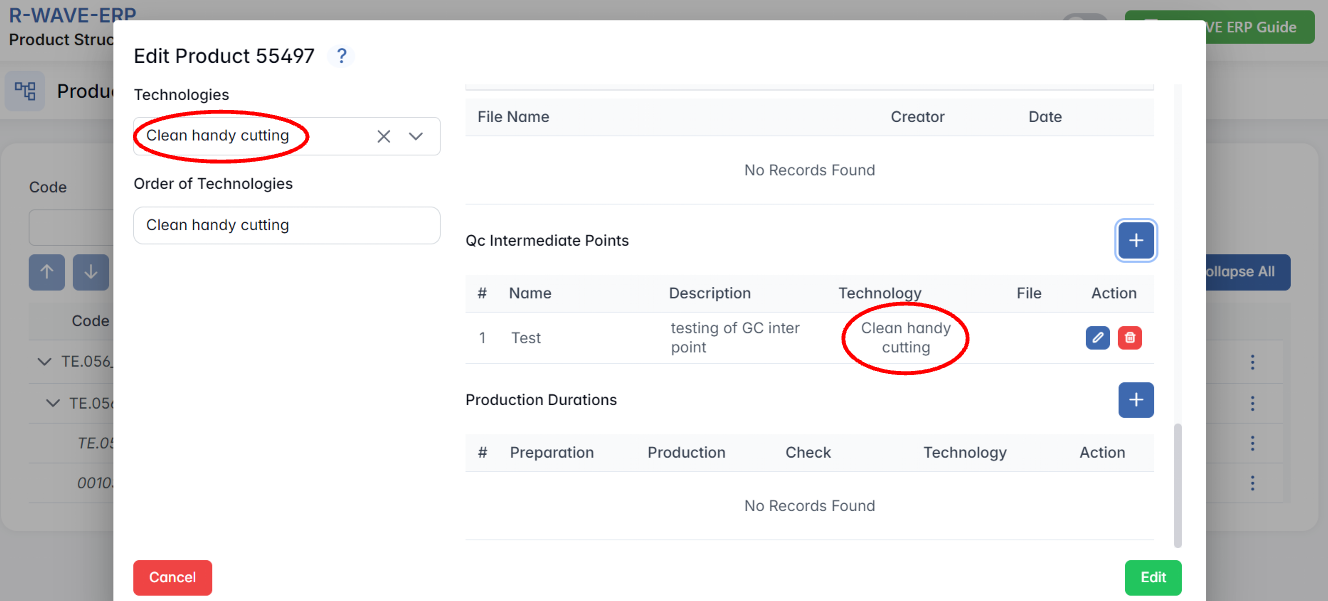
- Optional: QC points and production durations
Make the necessary changes and click Edit to apply the updates. The changes will immediately update the product structure and affect production or procurement workflows where this item is used.
Quality Control (QC) Intermediate Points in Manufacturing
In the ERP system, QC intermediate points ensure that critical steps in manufacturing are verified before production continues. This process helps maintain quality by catching errors early, especially in complex assemblies where internal steps cannot be checked after final completion.
1. Purpose of QC intermediate points
- Prevents undetectable errors in finished products.
- Ensures each critical step is verified before proceeding.
- Involves the Quality Control Manager in the manufacturing process.
2. Setting up QC intermediate points
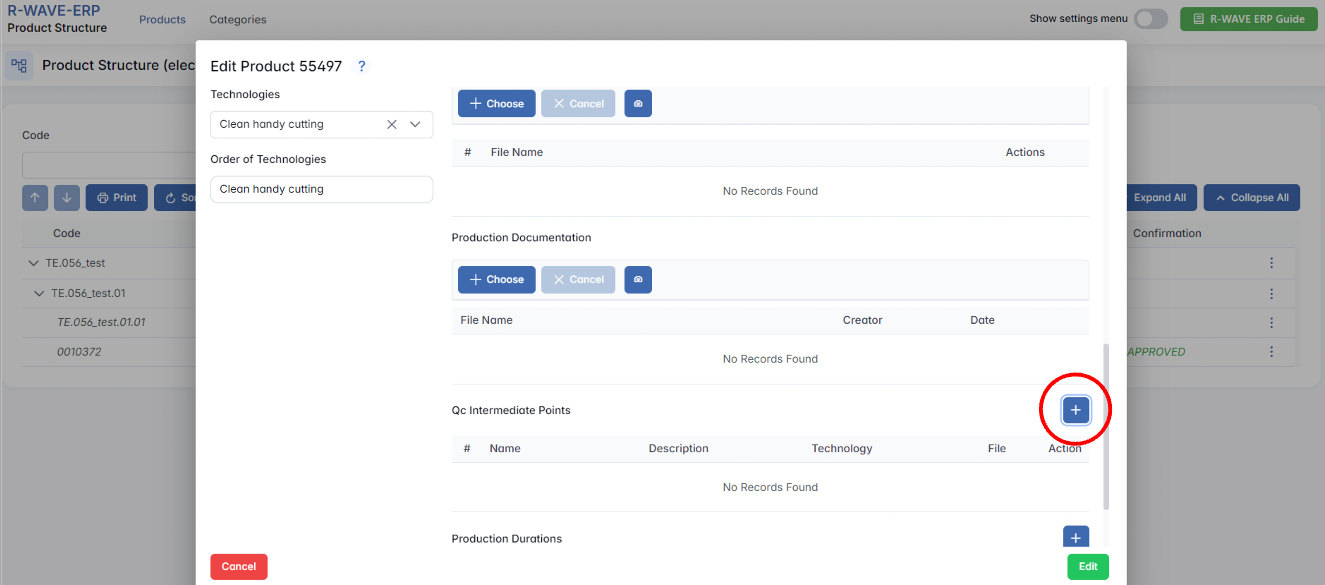
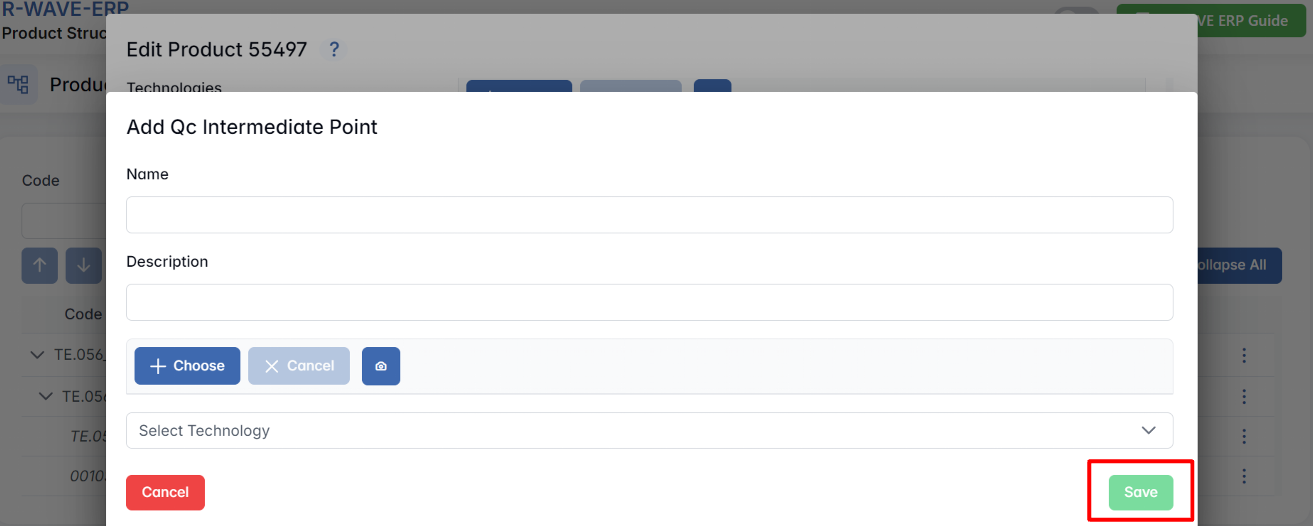
To add a QC intermediate point, users must:
- Define the QC checkpoint within the production sequence.
- Enter a description of what needs to be checked.
- Provide detailed instructions for quality control verification.
- Specify the relevant technology where QC is mandatory.
3. Enforcing quality control in production orders
- When a production order is created, required QC points are automatically listed in the order.
- The system will not allow production to continue until each QC checkpoint is approved.
- Manufacturing cannot complete an order unless all mandatory QC points are verified.
Visual Representation in the Nomenclature Card
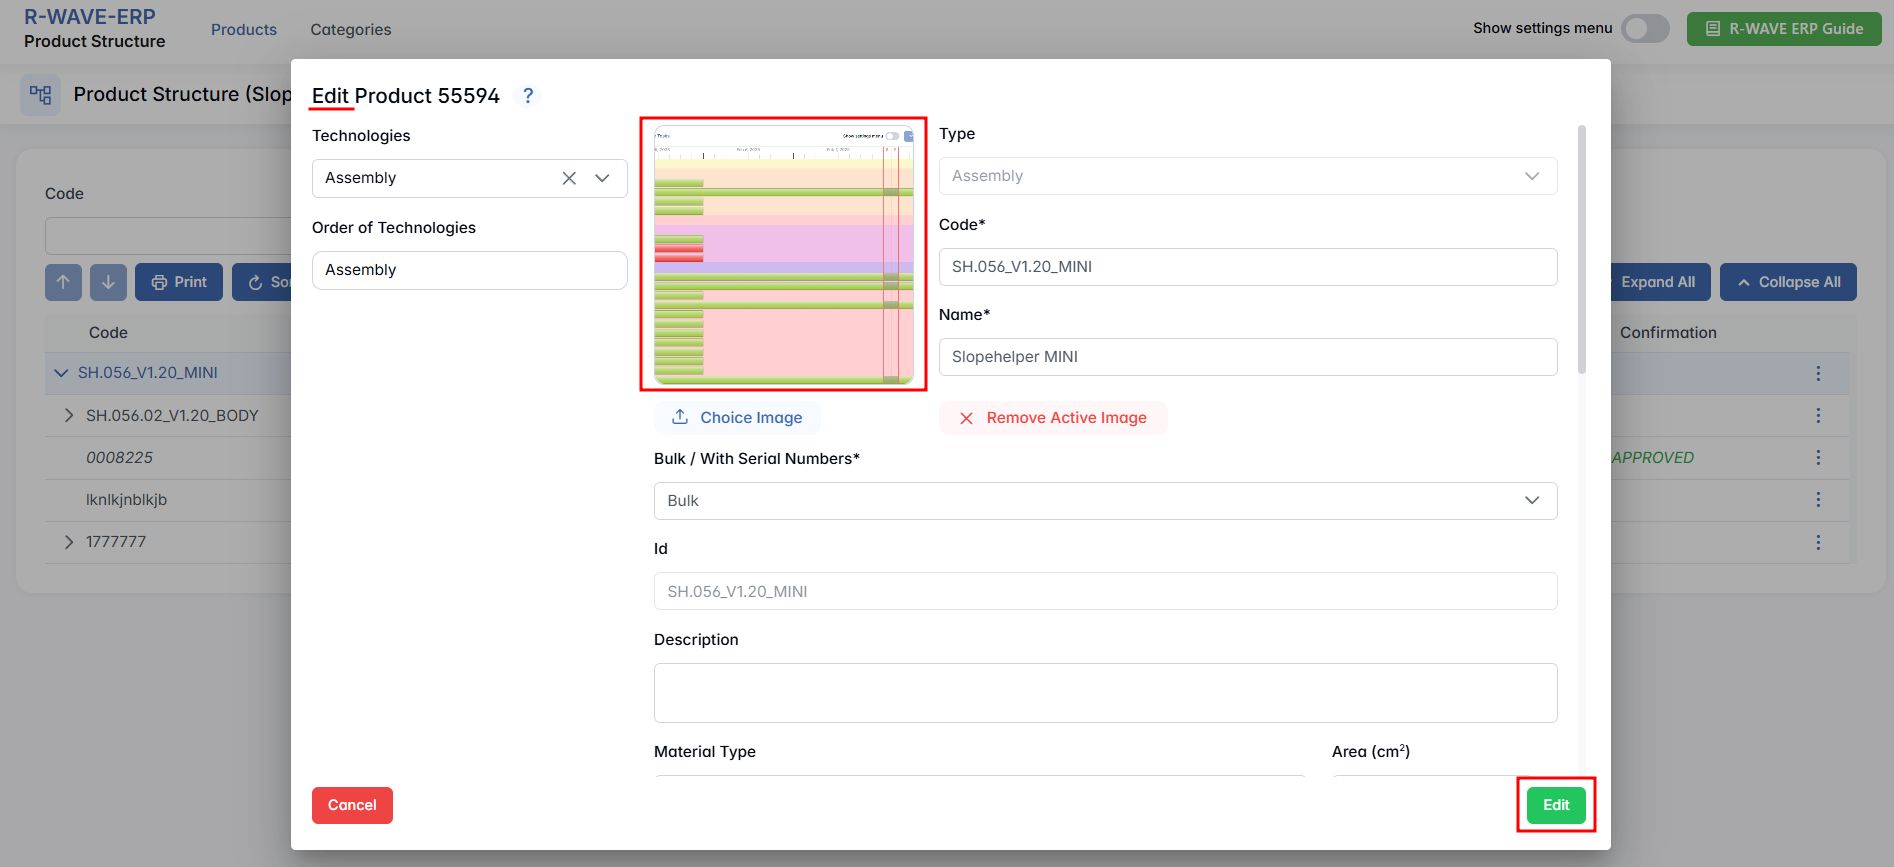
To enhance position recognition in the ERP system, users can attach images or documents directly to the nomenclature card. This feature simplifies identification for warehouse staff and production teams.
1. Purpose of adding visuals
- Allows quick visual identification of items without opening additional files.
- Helps the warehouse team recognize purchased and manufactured items faster.
- Reduces errors in picking, assembling, and production.
2. Types of visual attachments
Users can attach:
- Images (for purchased, manufactured items, and assemblies).
- Technical drawings (for in-house manufactured items and assemblies).
- Screenshots or PDFs (alternative formats for easy viewing).

3. How it works
- The image or file is visible directly in the module, without the need for downloading.
- This ensures the fastest and most efficient recognition method for warehouse and production teams.
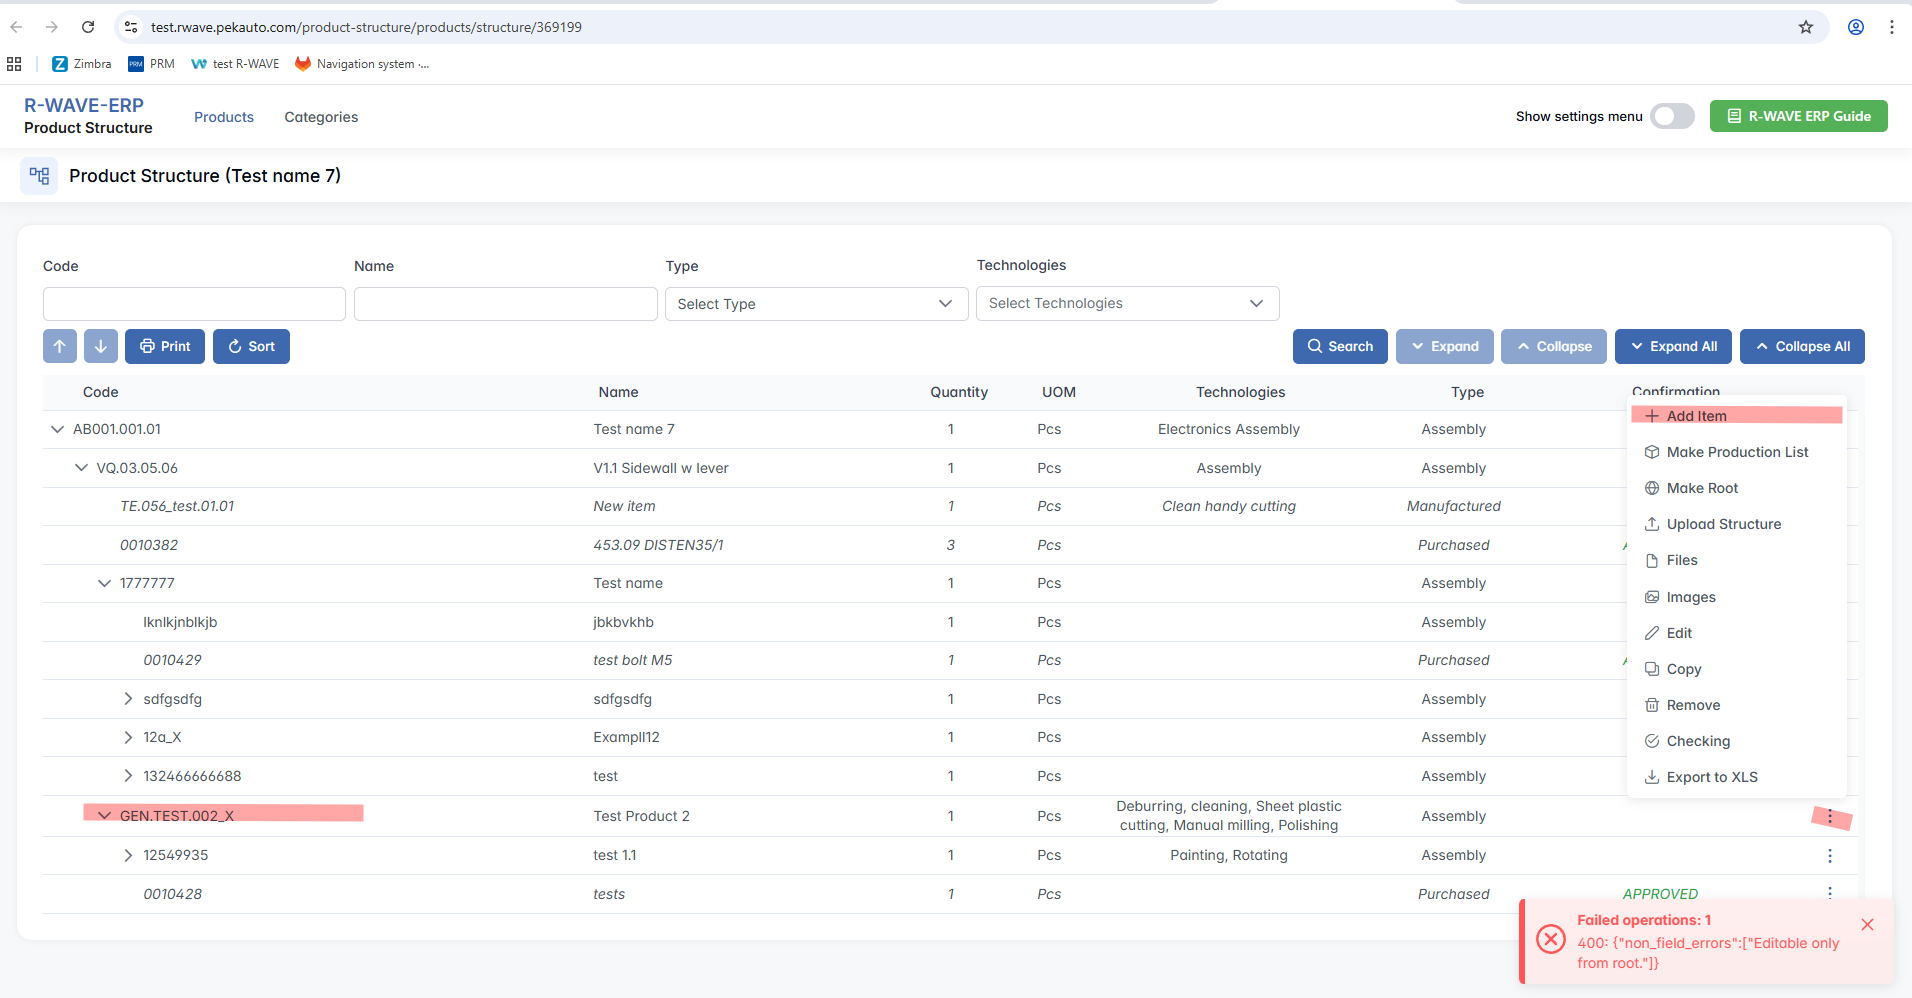
Make Root Option
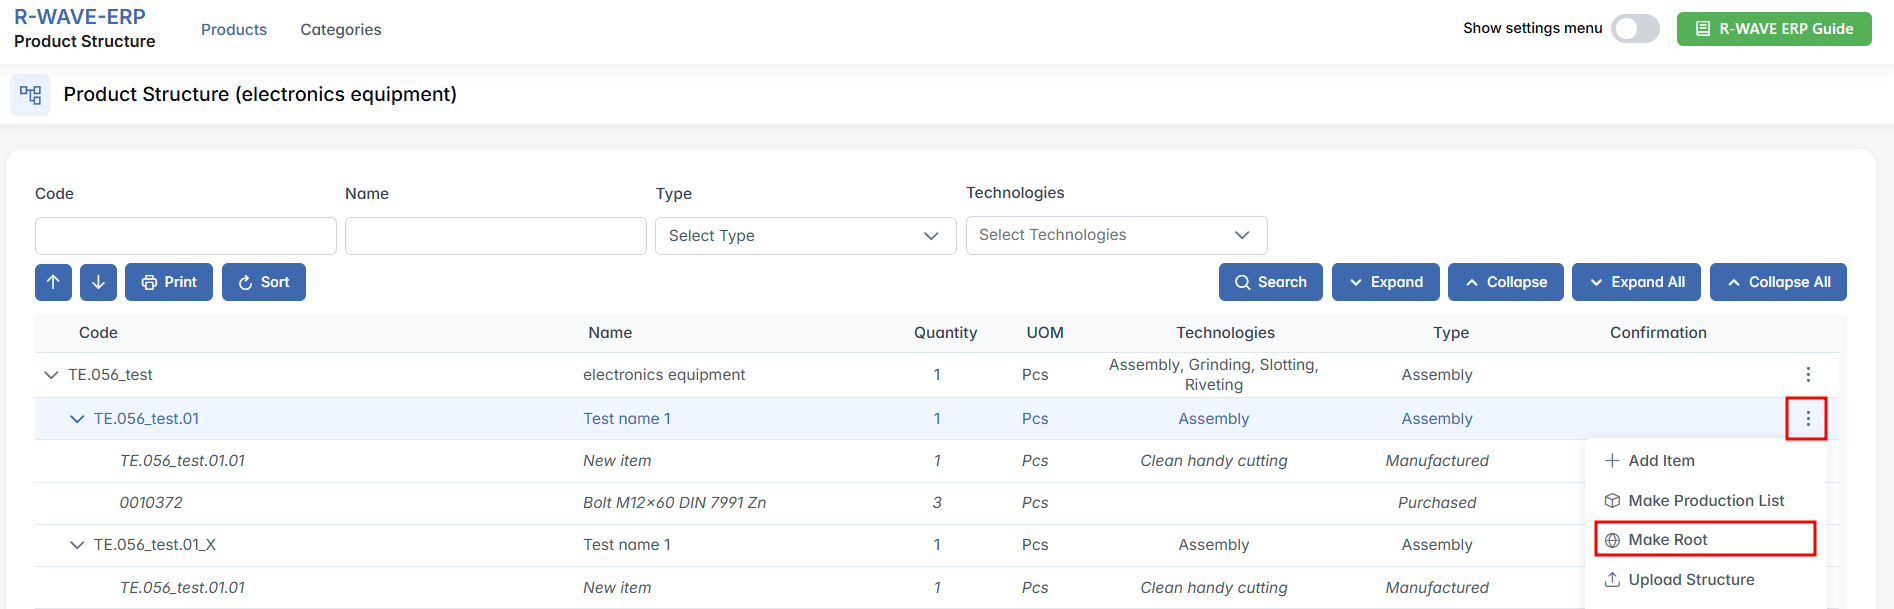
The Make Root option is used to convert an existing Assembly item into a new root product structure. After this action, the assembly will appear in the Products list under the chosen hierarchical category, functioning as an independent product structure while still remaining part of the current parent structure.
1. When it's available
- Only Assembly type items can be made root.
- The selected item must not already be a root structure (i.e., it should currently exist as a subcomponent within another structure).
2. How it works
- Select the desired Assembly item from the structure tree, click the three-dot menu.
- From the action menu, click Make Root.
- A dialog will appear prompting you to choose a hierarchical category.
- Once the category is selected, the chosen assembly becomes a new separate product structure under the selected category.
Copy Option
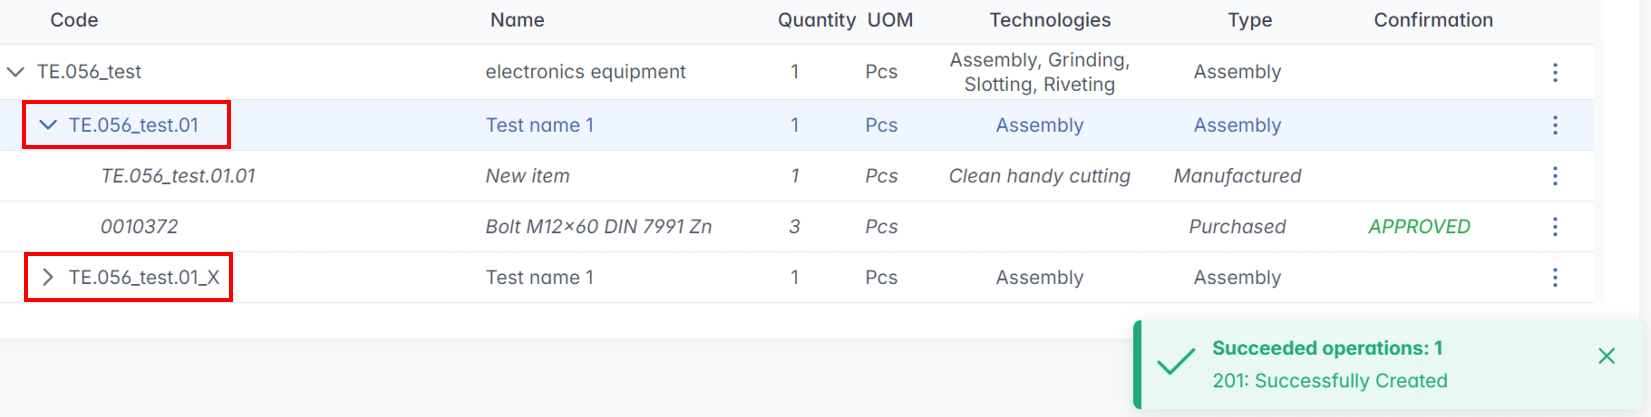
The Copy function allows users to quickly create a duplicate of an existing assembly while making minor modifications. This feature significantly speeds up the design and manufacturing process, especially when dealing with similar product variations.
1. Purpose of the Copy function
- Saves time by duplicating an existing assembly instead of creating it manually.
- Ensures internal structure and positions remain consistent.
- Helps with product variations that require small changes, such as left-hand and right-hand versions.
2. How it works
- Select the original assembly that needs to be copied.
- Click the Copy option.
The system creates a new assembly with identical internal positions as the original and a new automatic code assigned to the duplicate. Make the necessary modifications to the new assembly without affecting the original.
Removing a Position or Assembly from the Product Structure
The ERP system allows users to remove any position or assembly from the product structure when necessary.
1. Purpose of removing a position or assembly
- To eliminate outdated or unnecessary components from the structure.
- To correct mistakes if an incorrect position was added.
- To modify an assembly when replacing components with better alternatives.
2. How it works
- Select the position or assembly that needs to be removed.
- Click the Remove option.
- Confirm the action to prevent accidental deletion.
The system updates the structure, and the removed element is no longer part of the BOM (Bill of Materials).
3. Important considerations
- Manufactured positions and assemblies can be removed at any time before production starts.
- Purchased items should be removed before procurement approval to avoid unnecessary stock orders.
- If a position is linked to active production orders, the system may restrict deletion or require additional approval.
- If you remove or modify an assembly that is used in multiple products, those other product structures will also be affected. Assemblies in BINU ERP have a unique structure, and any change to their components or configuration will automatically apply to all parent products where the assembly is reused.
Checking Before Starting Production
Before initiating production, the ERP system provides a Checking function to ensure that all necessary setup requirements are met.
1. Purpose of the Checking function
- To validate that all nomenclature is confirmed.
- To ensure that all technologies required for production are properly set up.
- To prevent errors and delays in manufacturing by catching missing information early.
2. How it works
- Click the Checking button before starting production.
- The system runs a verification process to check for missing nomenclature confirmation (all positions must be properly defined) and technology setup (every manufacturing step must be assigned).
- If any issues are found, the system displays a warning message indicating what needs to be fixed.
3. Important considerations
- Production cannot start until all missing elements are corrected.
- The system ensures that procurement positions are approved and manufactured positions are properly structured.
- Once everything is verified, the production order can proceed smoothly.

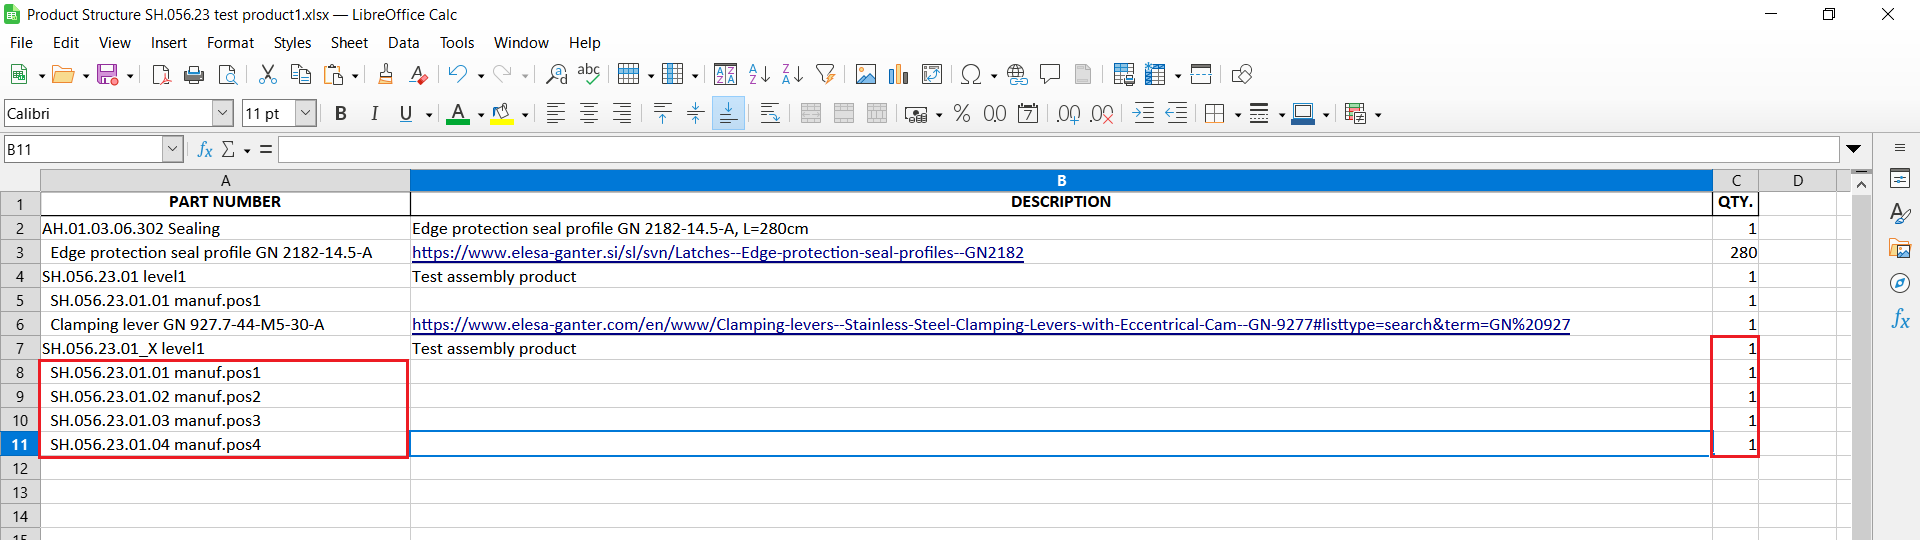
Importing and Updating Product Structures via Excel
To support efficient and accurate updates of product structures, BINU ERP offers flexible integration with Excel files (.XLS). These options allow users to manually edit structures in Excel, ensuring consistency between design and manufacturing data.
1. Exporting the product structure (.XLS format)
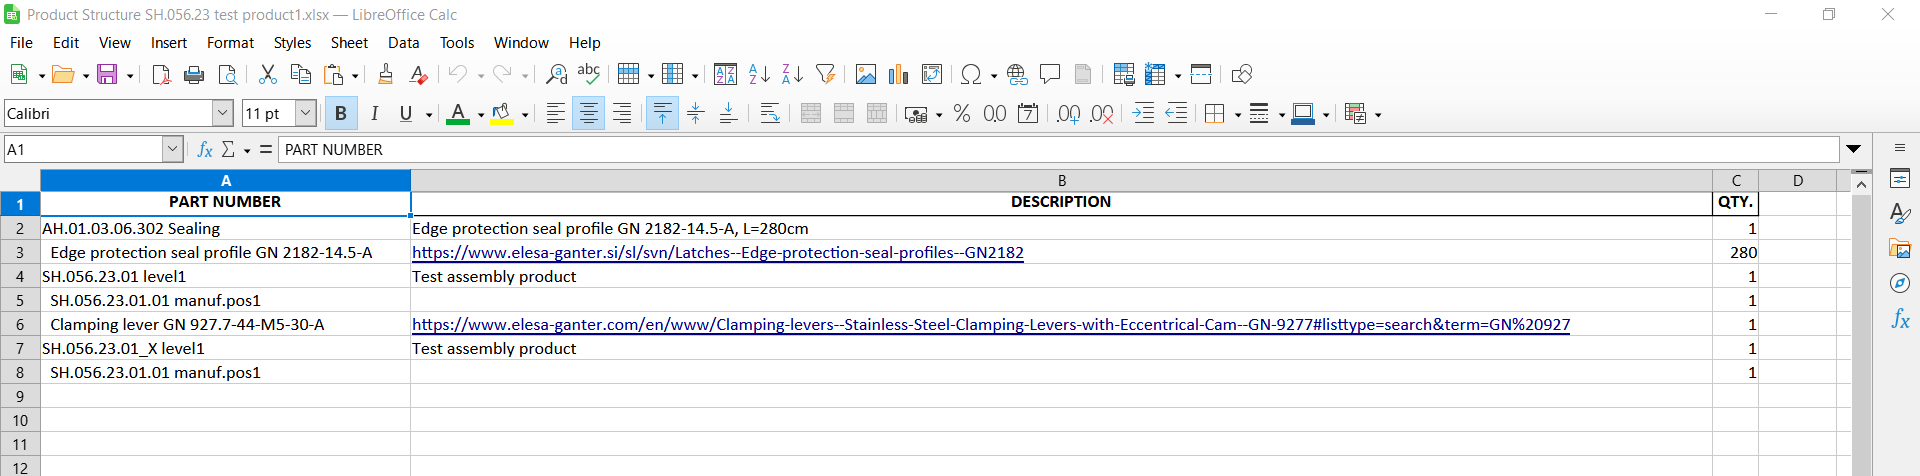
You can export an existing product structure into a .XLS file to review or modify it outside the ERP system. The exported file includes the full list of positions (assemblies, manufactured and purchased components), quantities and technical descriptions, and the hierarchical structure in a compatible format.
How Prefixes Work in Structure Import
Prefixes define how the ERP system interprets each row of your uploaded Excel file. They ensure the system correctly distinguishes between assemblies, manufactured items, and purchased items. The system applies the following logic during upload:
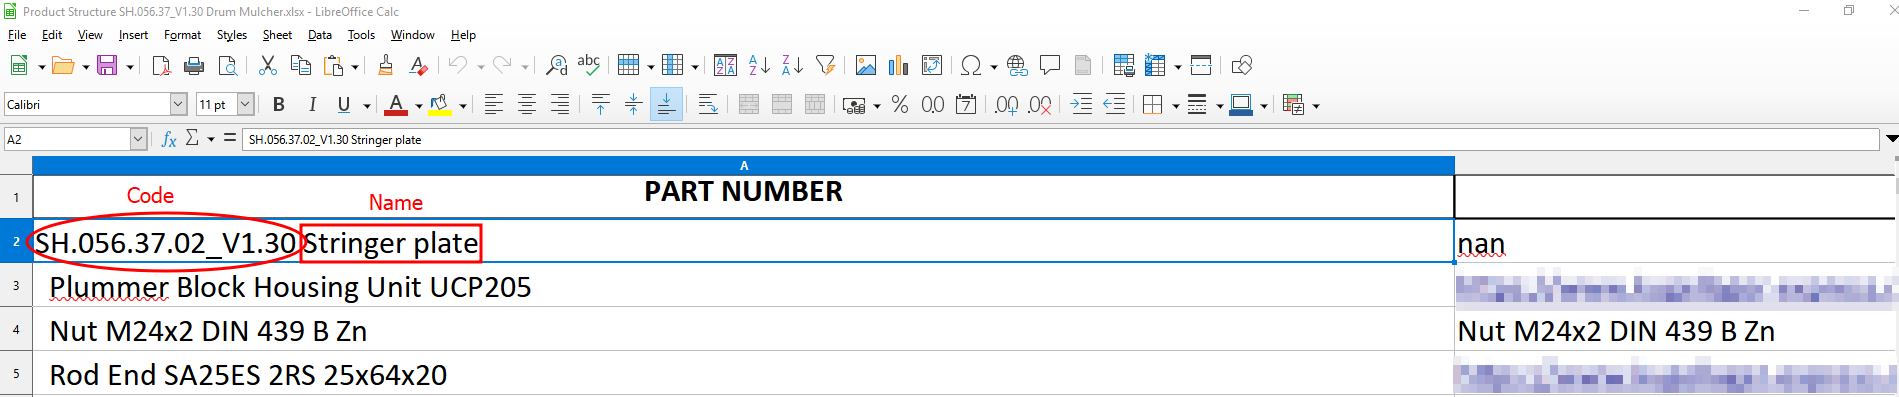
- Code and Name separation – In the Excel file, the Code is everything before the first space in the "Part Number" cell. Everything after the first space is the Name of the item. Example:
SH.056.37.02_V1.30 Stringer plate.

- Assembly recognition – Only assemblies can contain nested structures. If a row's Code starts with a space, the system interprets it as a sub-component of the previous row, which is therefore treated as an assembly.
- Manufactured vs. purchased items – For non-assembly rows, the ERP checks the prefix in the Code to determine if the item is manufactured or purchased. Prefixes must be preconfigured in Product Structure > Prefixes tab. If a prefix is not defined, the system may misclassify the item.
Correctly configured prefixes ensure that assemblies are recognized and their sub-structures are properly built, that manufactured and purchased items are correctly classified at the base level, and that the product structure is imported accurately without misinterpretation.
2. Uploading the updated structure to ERP
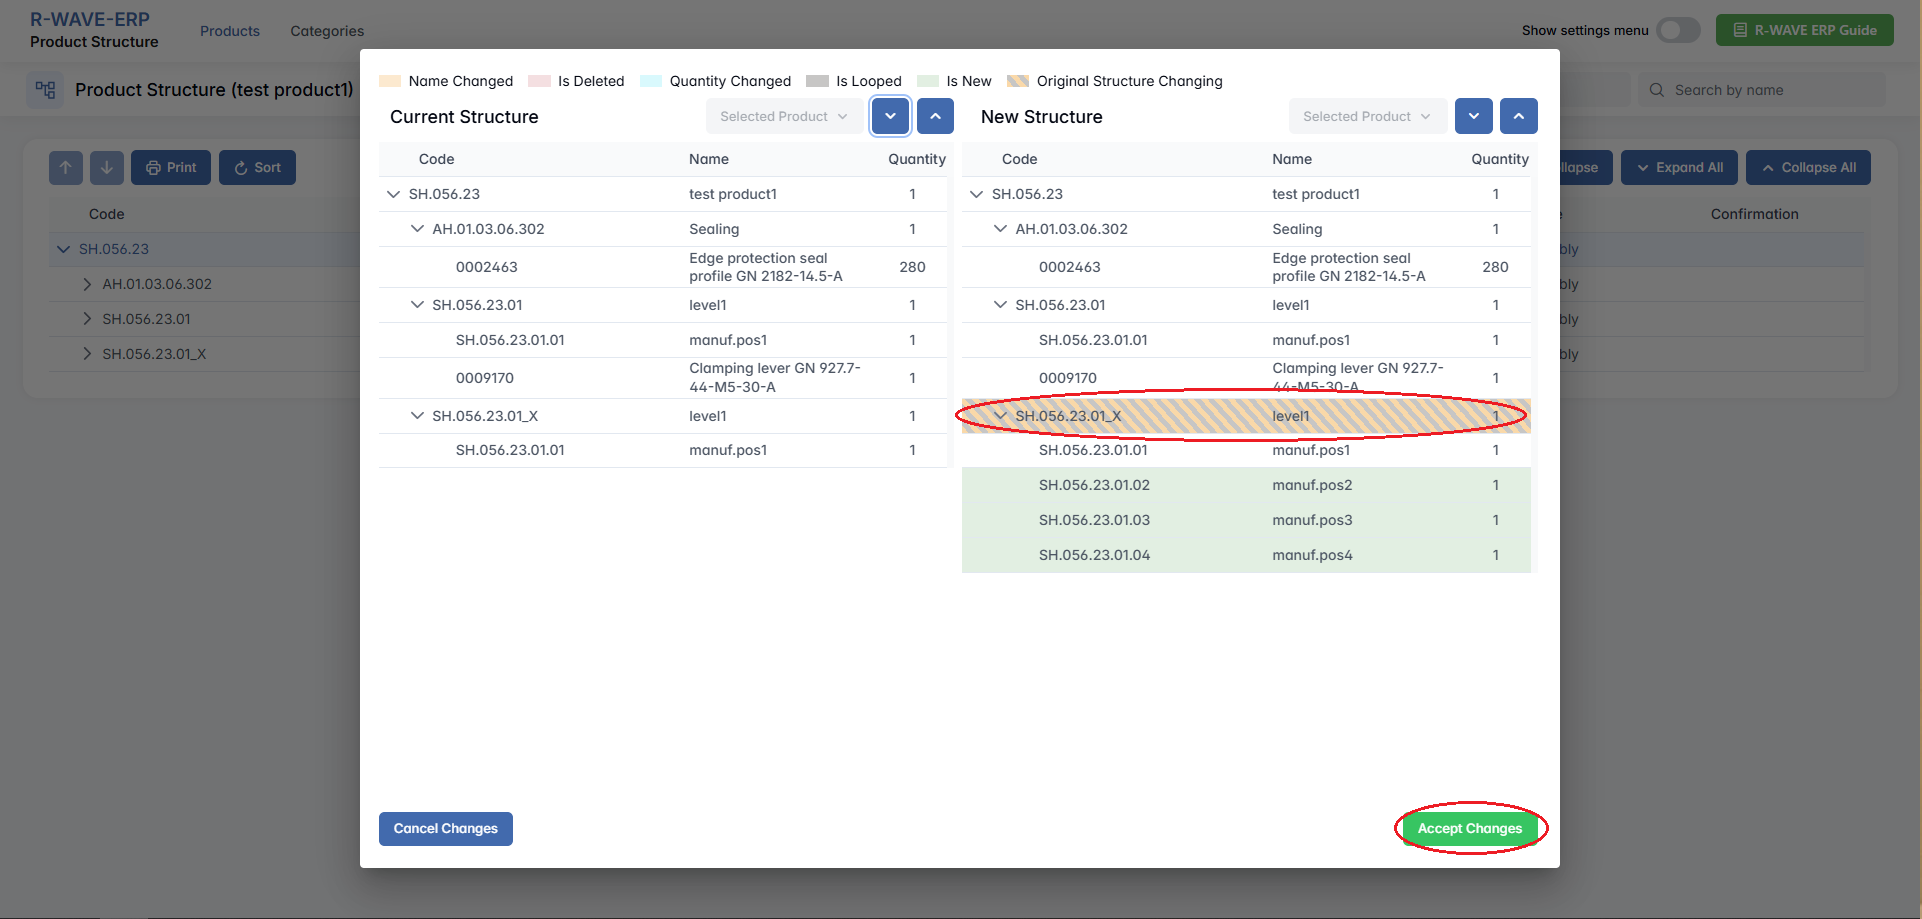
After edits are made, the modified .XLS file can be imported back into BINU ERP. During the upload, the system automatically compares the uploaded file with the existing structure, and a visual interface highlights added components, removed items, and changes in quantity, hierarchy, or descriptions. After reviewing the comparison, the user can confirm and save the updated structure.
3. Uploading structures

You can export the structure directly from the CAD tool in .XLS format and upload it to ERP without additional edits. When uploading a CAD-generated file, the system performs the same visual comparison between the current and new structure, clearly identifying new or missing parts, structural changes, and updated quantities or assembly relationships.
4. Benefits of Excel integration
- No manual data entry — quick updates for large or complex structures
- Full compatibility with CAD formats
- Visual comparison to prevent mistakes during update
- Streamlined product data alignment across engineering and production

Categories Tab
Categories Tab
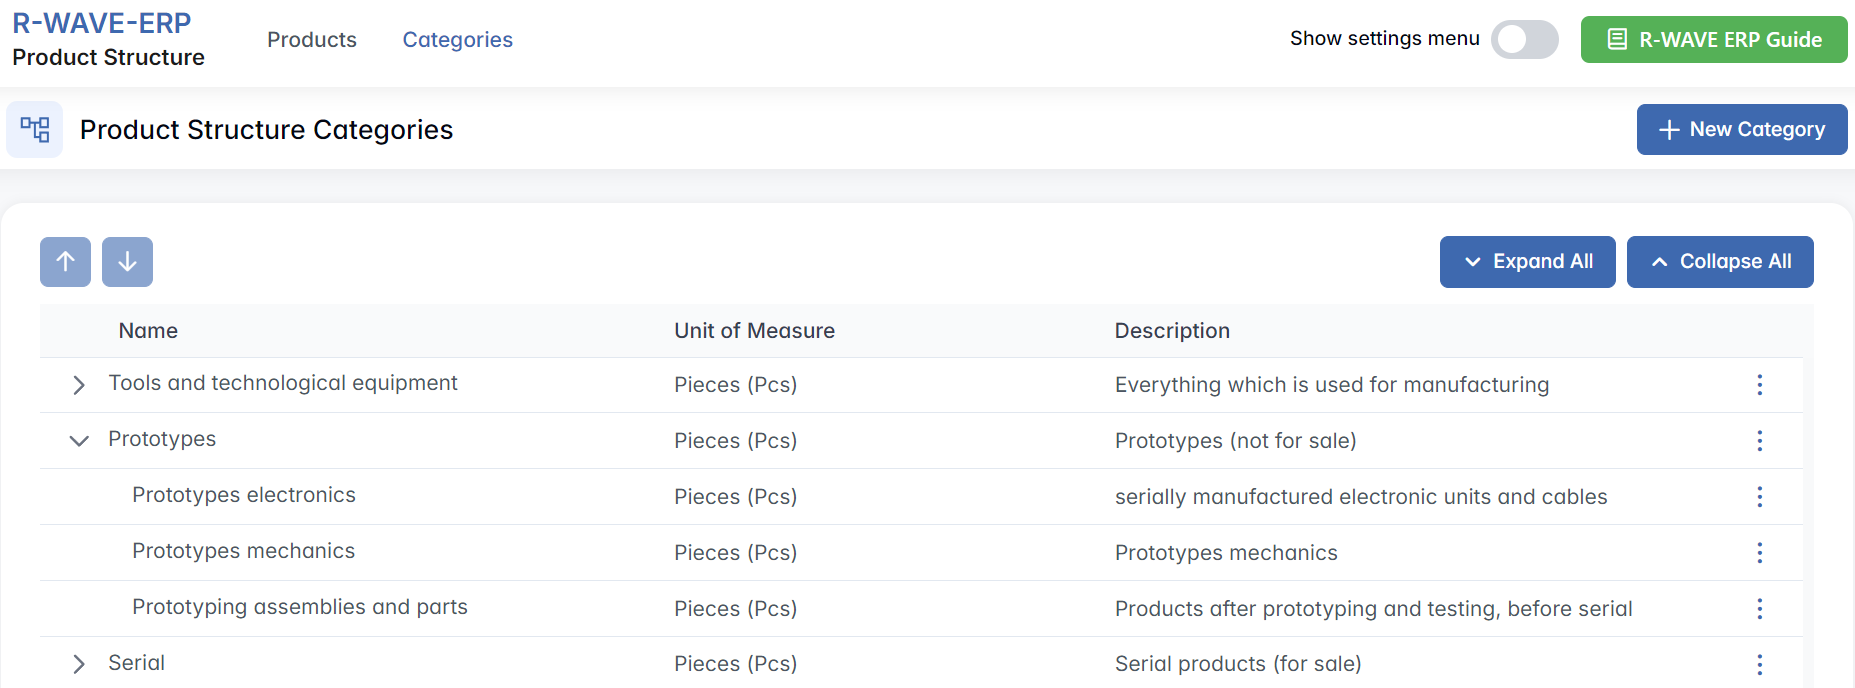
The Categories tab in the Product Structure module allows you to manage the hierarchical organization of product categories. Unlike the Products tab, this page does not display individual items — it focuses solely on how categories and subcategories are structured, grouped, and maintained.
Proper category management helps maintain a clean and logical product organization, making it easier to filter, classify, and plan production across the ERP system.
Overview of the Categories Interface
When you switch to the Categories tab, you will see a dedicated view listing all product categories and their subcategories in a collapsible tree format. Each entry in the tree represents a category node — either a top-level group or a subcategory. These categories are used throughout the system to organize products during creation, planning, and reporting.
Navigating the Categories Tree
The interface includes the following features:
- + New Category — create a new parent or subcategory and add it to the Product Structure hierarchy.
- Expand All / Collapse All – show or hide the full category hierarchy in one click.
- Tree Icons – click the small arrow next to each category to expand or collapse just that branch.
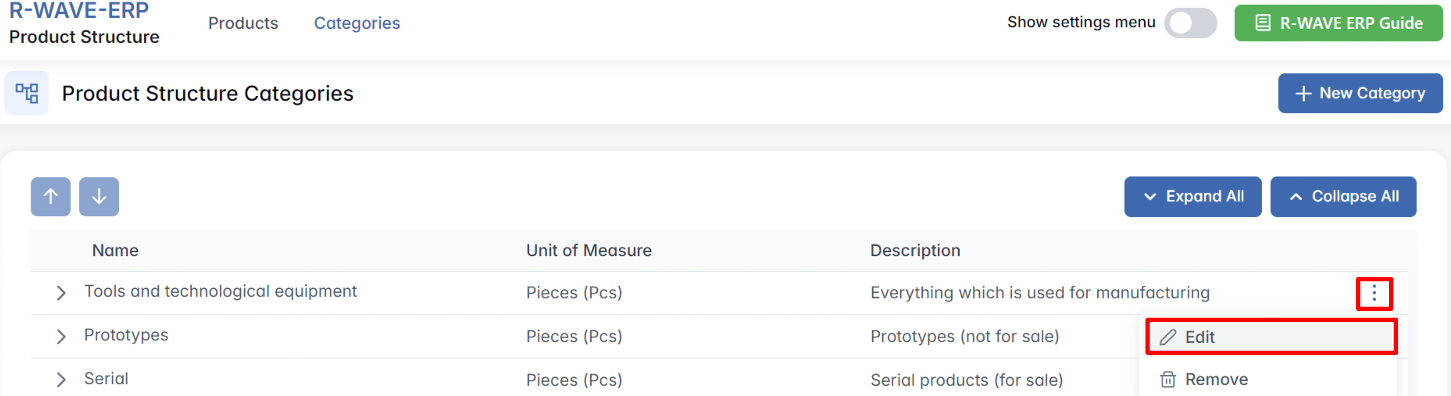
- Three-dot Menu (⋯) – available for every category and subcategory, offering two actions:
- Edit – opens a form where you can change the category name or reassign it to a different parent category.
- Remove – deletes the selected category. This action is only available if the category is not in use.
Creating a New Product Category
To build or expand the hierarchical classification system for your products, use the Create Product Structure feature in the Categories tab. This allows you to define new parent or subcategories that can later be assigned to individual products.
Follow these steps to create a new product category:
- Go to the Categories tab in the Product Structure module.
- Click the + New Category button in the top-right corner.

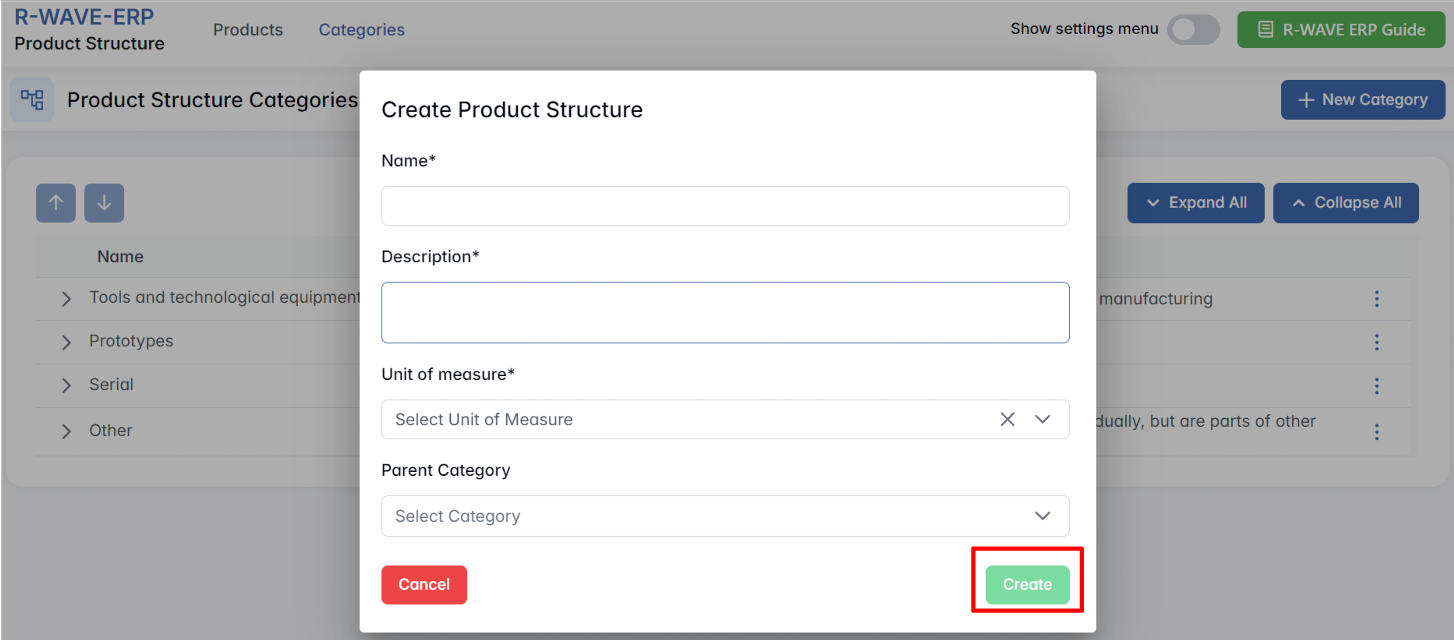
- In the pop-up window titled Create Product Structure, fill out the following fields:
- Name * – the required name of the new category (e.g., "Electric Motors").
- Description – optional field where you can add notes or context for internal use.
- Unit of Measure * – defines the measurement unit typically used in this category (e.g., "Pcs", "m", "kg"). This unit will be preselected for all new items added under this category.
- Parent Category – optional. Select a parent if you're creating a subcategory under an existing group. If left empty, the category will be placed at the top level.
- Click Create to confirm and add the new category to the system.
Editing Categories for Products and Subcategories
In BINU ERP, product categories define how items are grouped, filtered, and managed within the system. You can edit a category — whether it's a main category or a subcategory — in two ways: directly from the Products tab or via the Categories tab.
Changing Parent Category for Subcategories (from the Categories tab)
If you need to reorganize the category tree itself — for example, by assigning a subcategory to a different parent — you can do this from the Categories tab.
- Open the Categories tab from the top navigation.

- Locate the subcategory you want to move.
- Click the three-dot menu (⋯) next to it and select Edit.

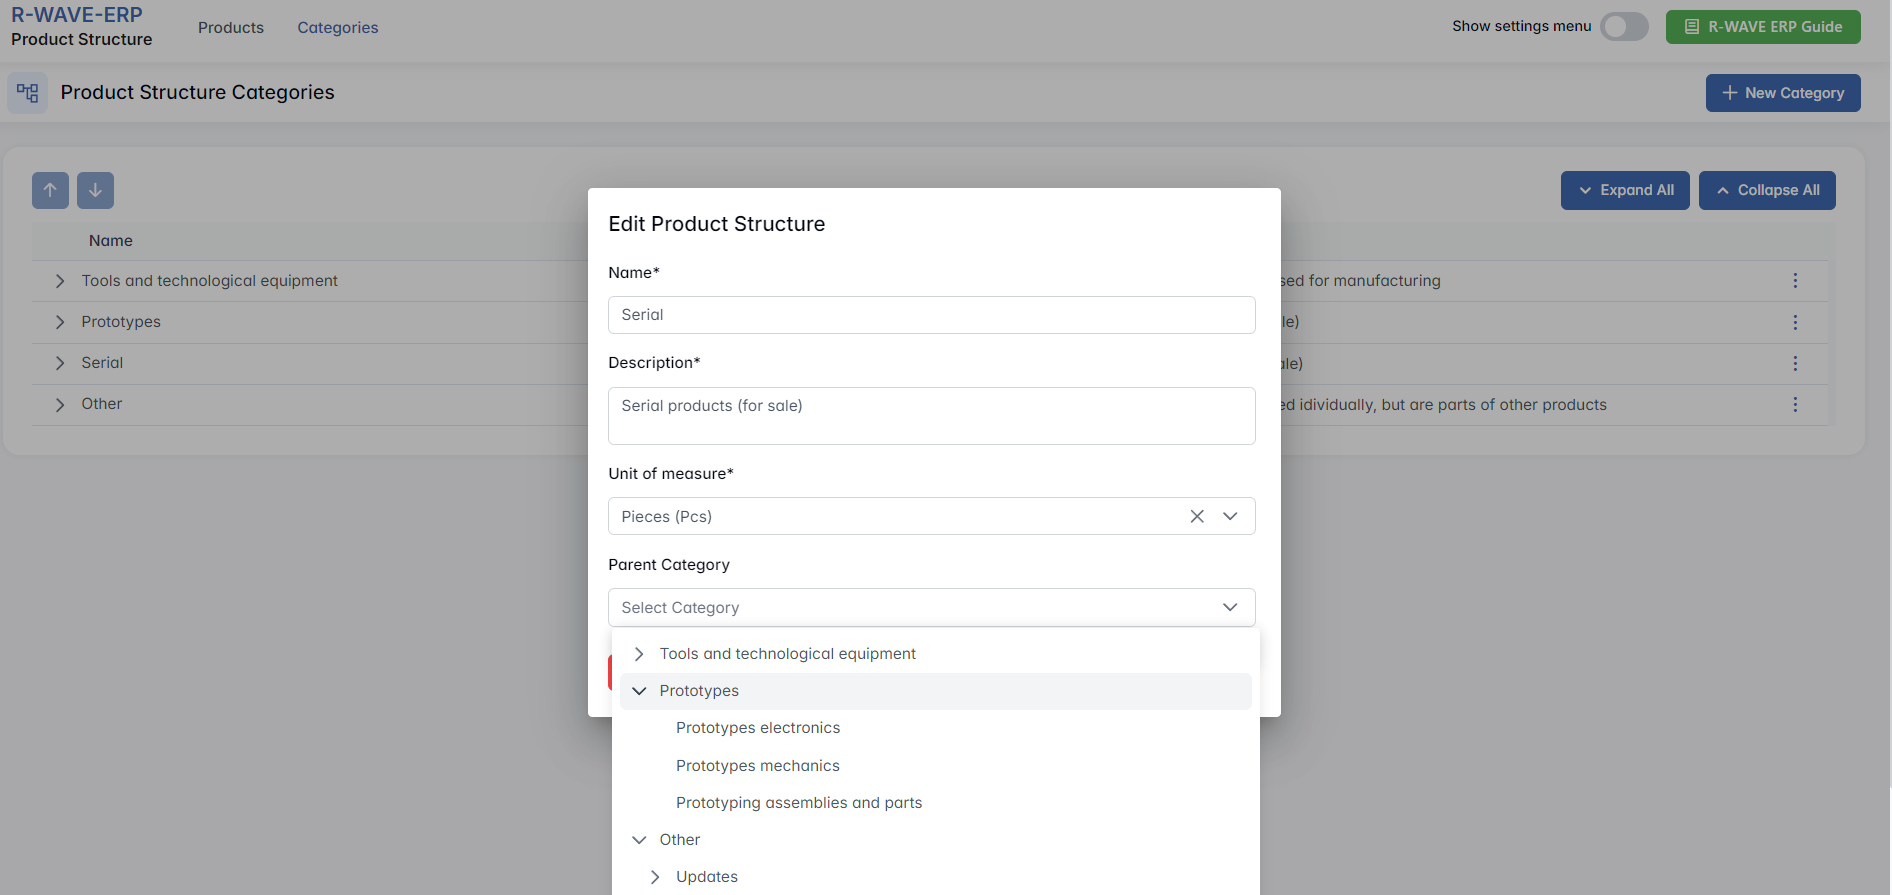
- In the edit form, find the field Parent Category.
- Select a new parent category from the list.
- Click the Edit button to save your changes.
Changing the parent category affects all products assigned to the subcategory. Their classification and filtering behavior will follow the updated structure.
Hidden Settings in the Product Structure Module
Hidden Settings in the Product Structure Module
To support deeper configuration and better standardization of your manufacturing logic, the Product Structure module in BINU ERP includes a hidden settings menu. This page allows you to manage critical reference data: Technologies, Prefixes, and Serial Number Types — all of which are used when creating or importing complex product structures.

Technologies
Technologies define production operations required for manufacturing components and assemblies (e.g., welding, laser cutting, 3D printing). Each technology has a name, description, and a type — used to classify the operation as either a Service or Material-based process. These technologies are later assigned to manufactured positions and assemblies as mandatory steps before production can begin.
Viewing and Managing Technologies
Technologies are listed in a table format with the following columns:
- Name – the operation title (e.g., "3D printing (SLA)")
- Description – a short explanation of the process
- Type – either Material or Service
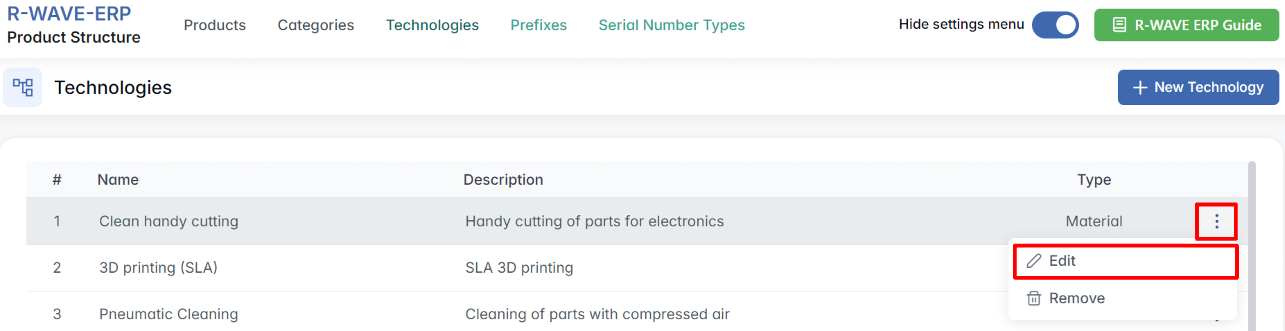
Each row includes a three-dot menu (⋯) with the following options:

- Edit – modify the name, description, or type
- Remove – delete the technology
Creating a New Technology
To add a new technology:
- Click + New Technology.
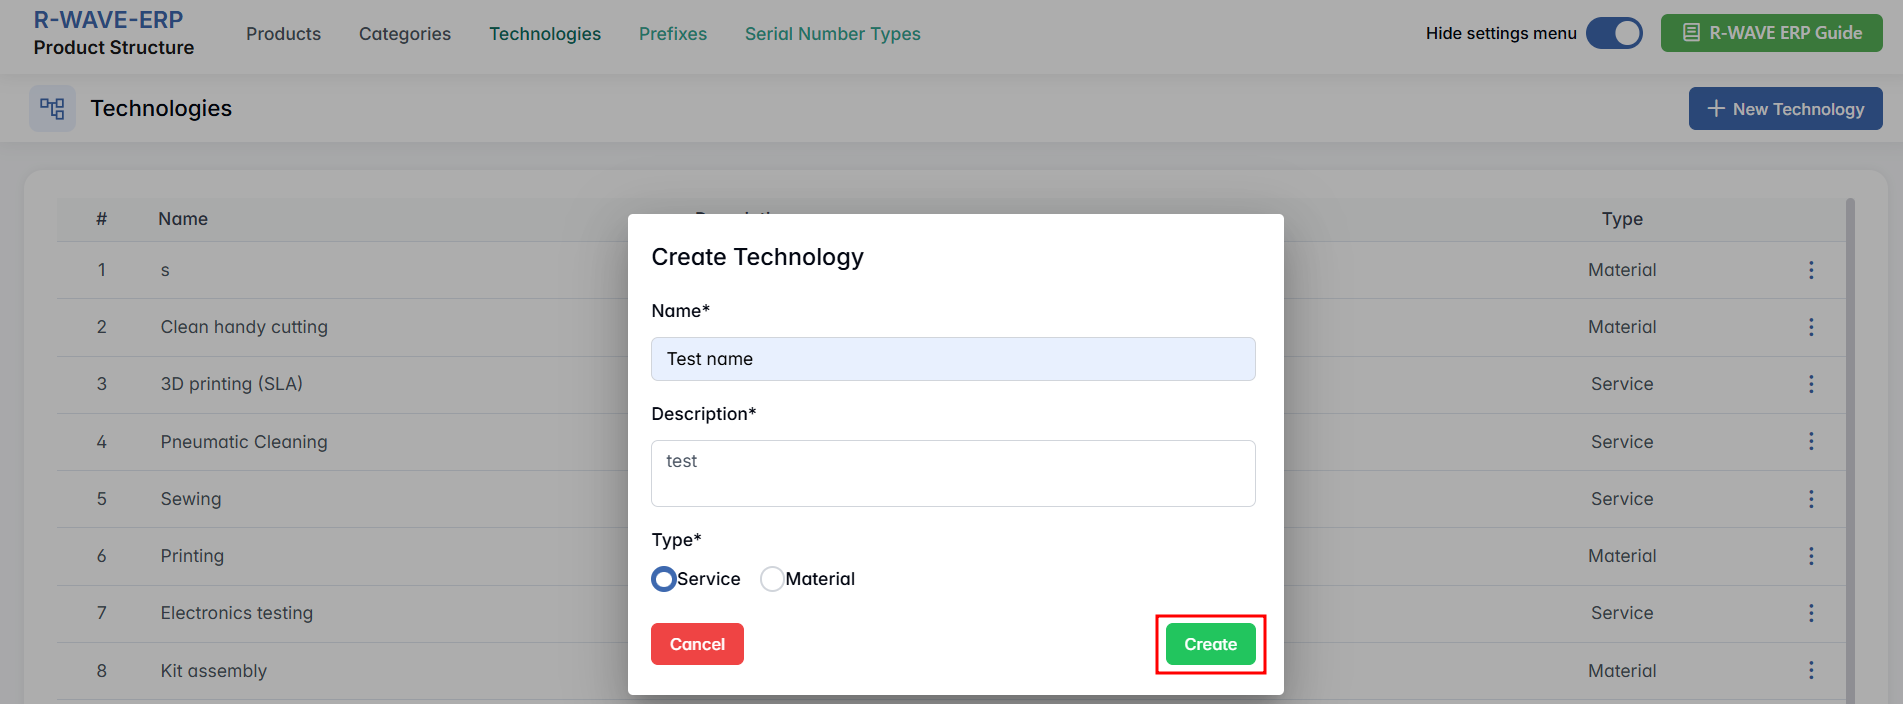
- In the pop-up window Create Technology, fill in:
- Name * – required field (e.g., "Pneumatic Cleaning")
- Description * – short explanation of the process
- Type * – choose between Material or Service
- Click Create to save the technology.
Technologies must be assigned to all manufactured and assembly positions before production can be initiated. The system will block production if any required step is missing.
Prefixes
Prefixes represent the initial part of a product code, helping the system automatically recognize and classify the type of position during product structure creation or import (from Excel). If a prefix is recognized in the system, it will be interpreted correctly as manufactured, assembly, or purchased. If a prefix is missing, the system may assign the wrong classification.
Viewing and Managing Prefixes
You will see a list of all configured prefixes with:
- Name – the prefix itself (e.g., SH., TST.)
- Description – explanation or associated product line
Each prefix has a three-dot menu (⋯) with:

- Edit – change the prefix or its description
- Remove – delete the prefix if no longer used
Creating a New Prefix
- Click + New Prefix.

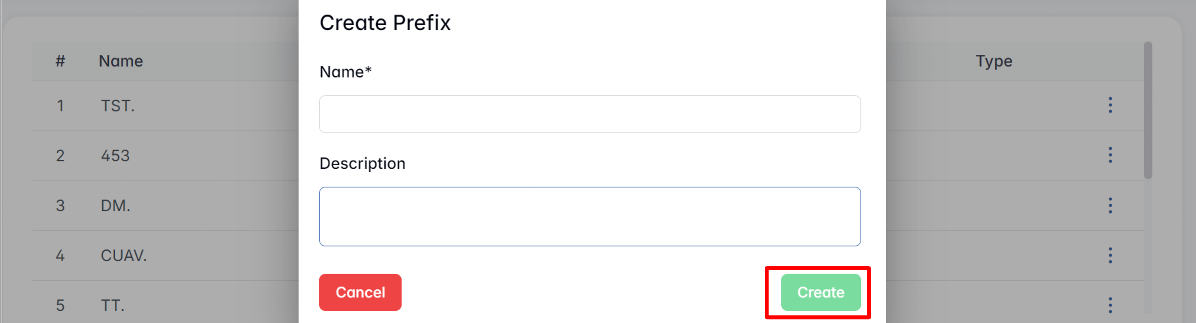
- In the Create Prefix popup:
- Name * – required prefix code (e.g., VQ., TE.)
- Description – optional context (e.g., "Custom vanquisher components")
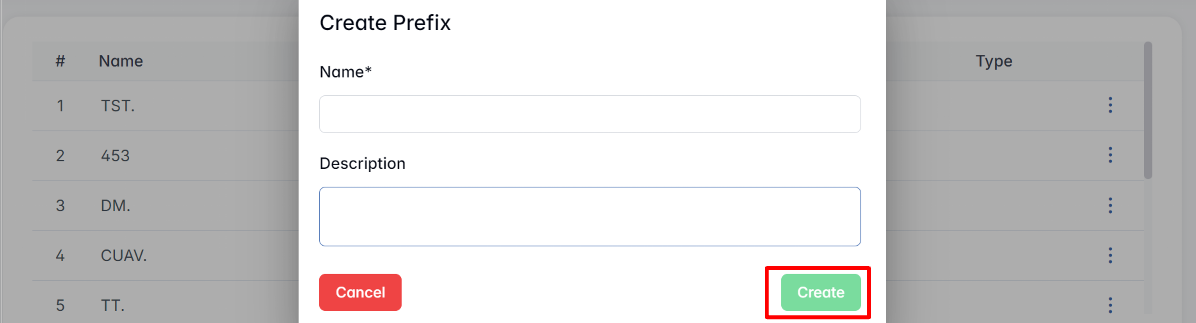
- Click Create to save the new prefix.
Make sure all prefixes used in your imported structures are added here first. Otherwise, components may be misclassified during upload.
Serial Number Types
Serial Number Types allow you to define automated serial numbering schemes for different product groups. These are especially useful for tracking serialized components across production and service processes. Each type includes a Prefix, a Start Number, and an optional Suffix — which together form the base pattern of a serial number.
For all new products assigned to a serial number type, the system will automatically generate a serial number that includes the configured prefix and suffix (both required), and increment the counter starting from the defined Start Number.
Viewing and Managing Serial Number Types
To manage existing serial number types, click the Serial Number Types tab under the Show Settings menu.

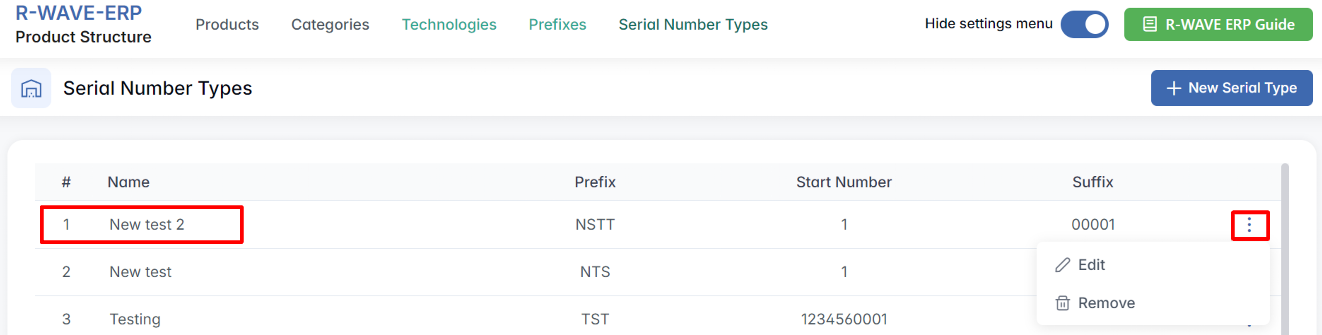
All configured types are displayed in a structured list with the following columns:
- Name – internal label used to identify the serial type (e.g., "Testing")
- Prefix – beginning part of the serial number (e.g., TST)
- Start Number – initial counter value (e.g., 1)
- Suffix – ending digits (e.g., 00001)
Each row in the list has a three-dot menu (⋯) offering two actions:
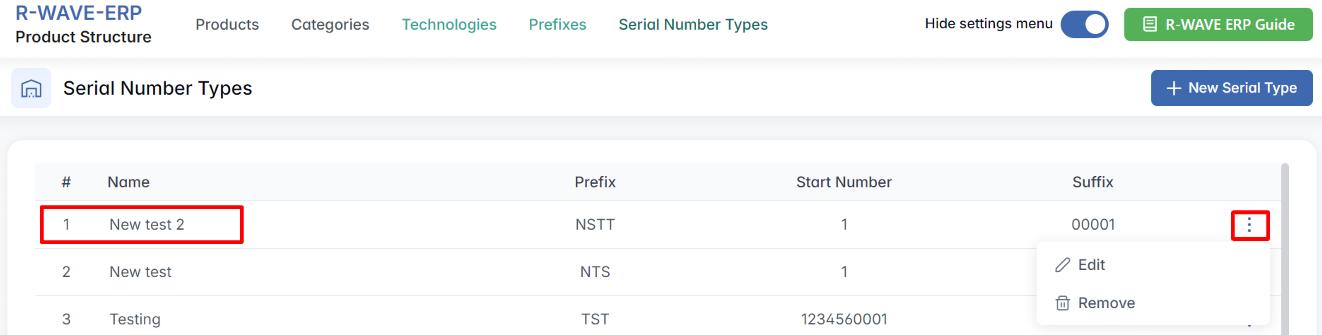
- Edit – opens a form where you can update the prefix, suffix, or numbering logic.
- Remove – deletes the serial type from the system (if not already in use).
Be cautious when editing existing serial types — especially those already linked to products — as it can affect numbering continuity.
Creating a New Serial Type
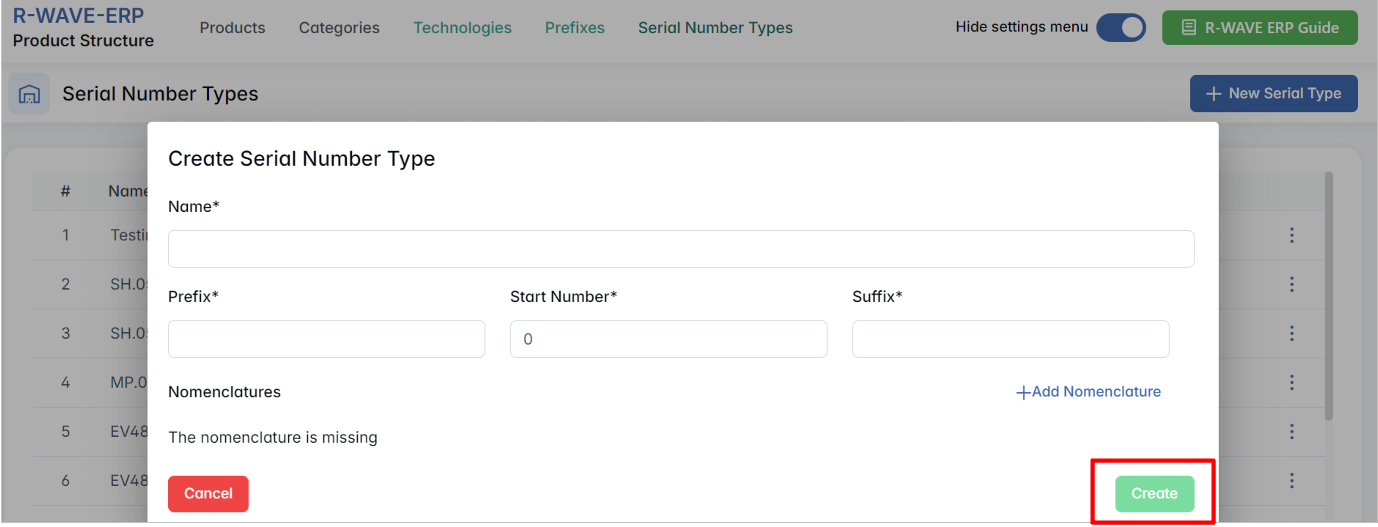
- Click + New Serial Type.

- In the pop-up Create Serial Number Type, enter: Name, Prefix, Start Number, Suffix.
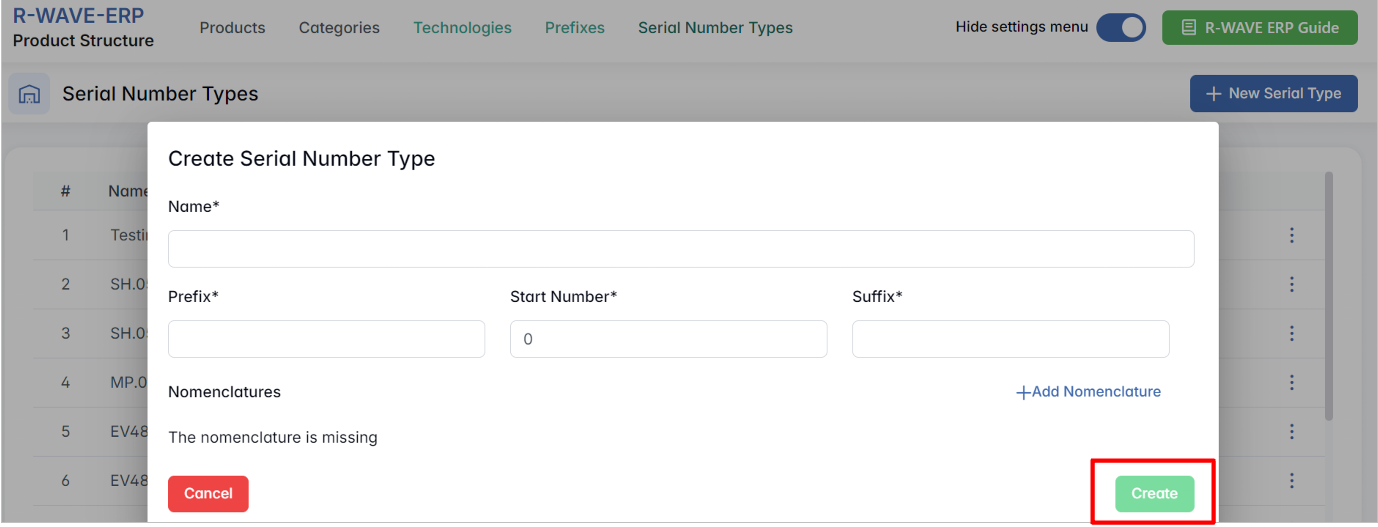
- Click Create to apply.
Once created, serial types can be assigned to components via the nomenclature card or manufacturing setup.
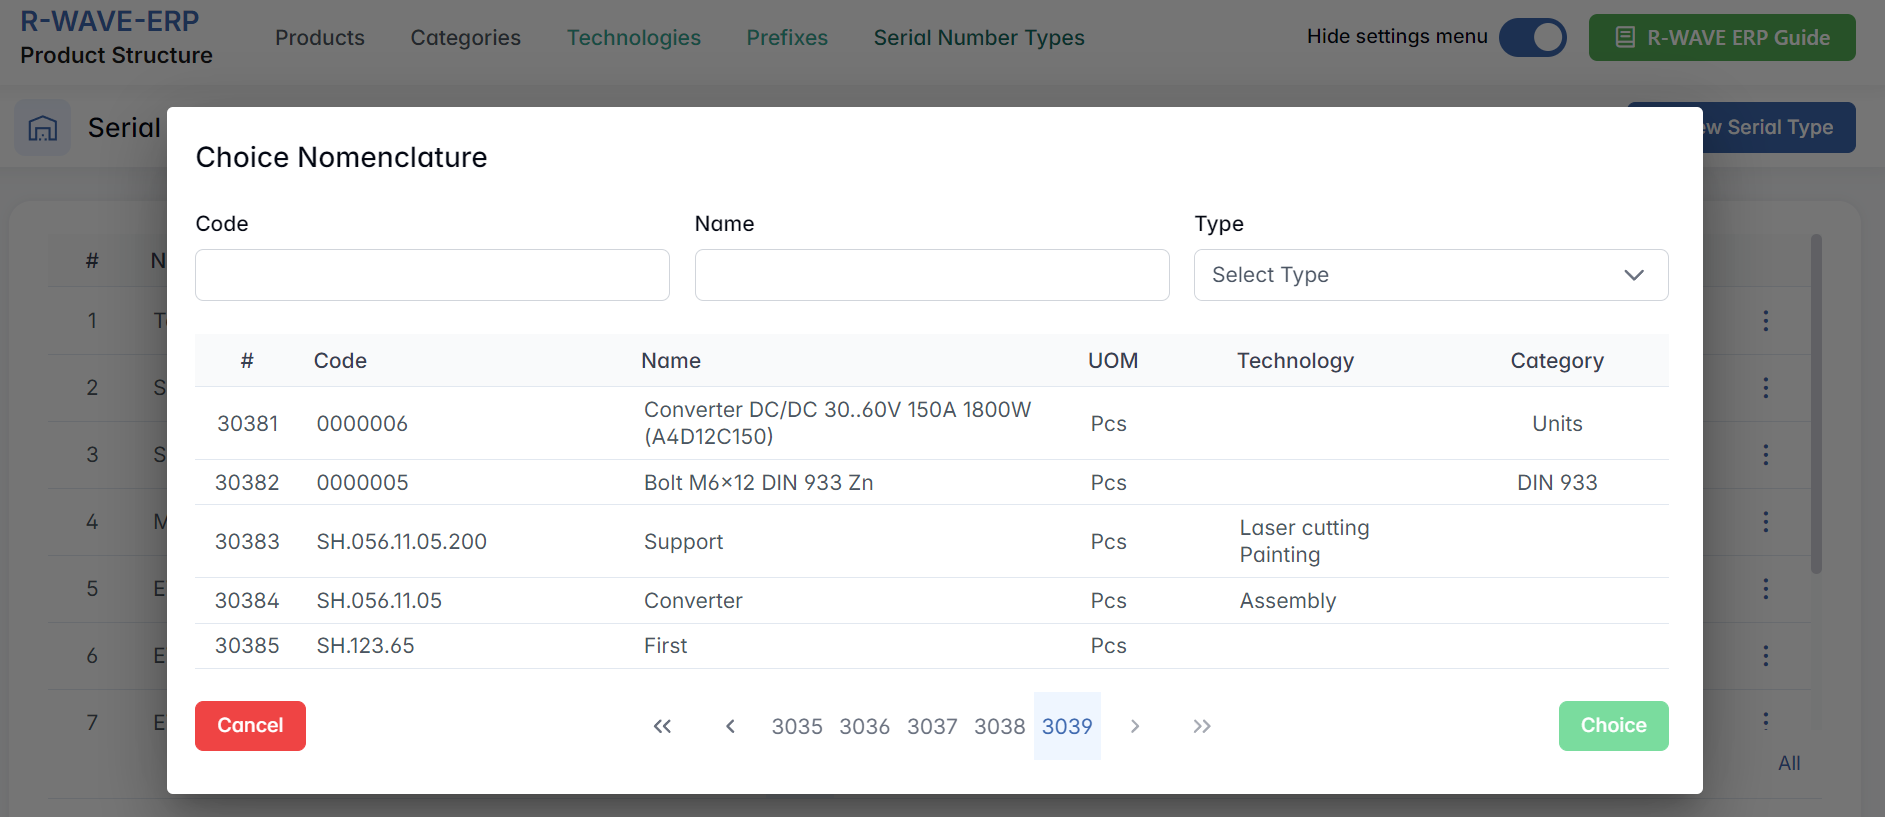
Adding Nomenclature
- Click + Add Nomenclature.
- In the Choose Nomenclature popup, use the Code, Name, or Type fields to filter the list.
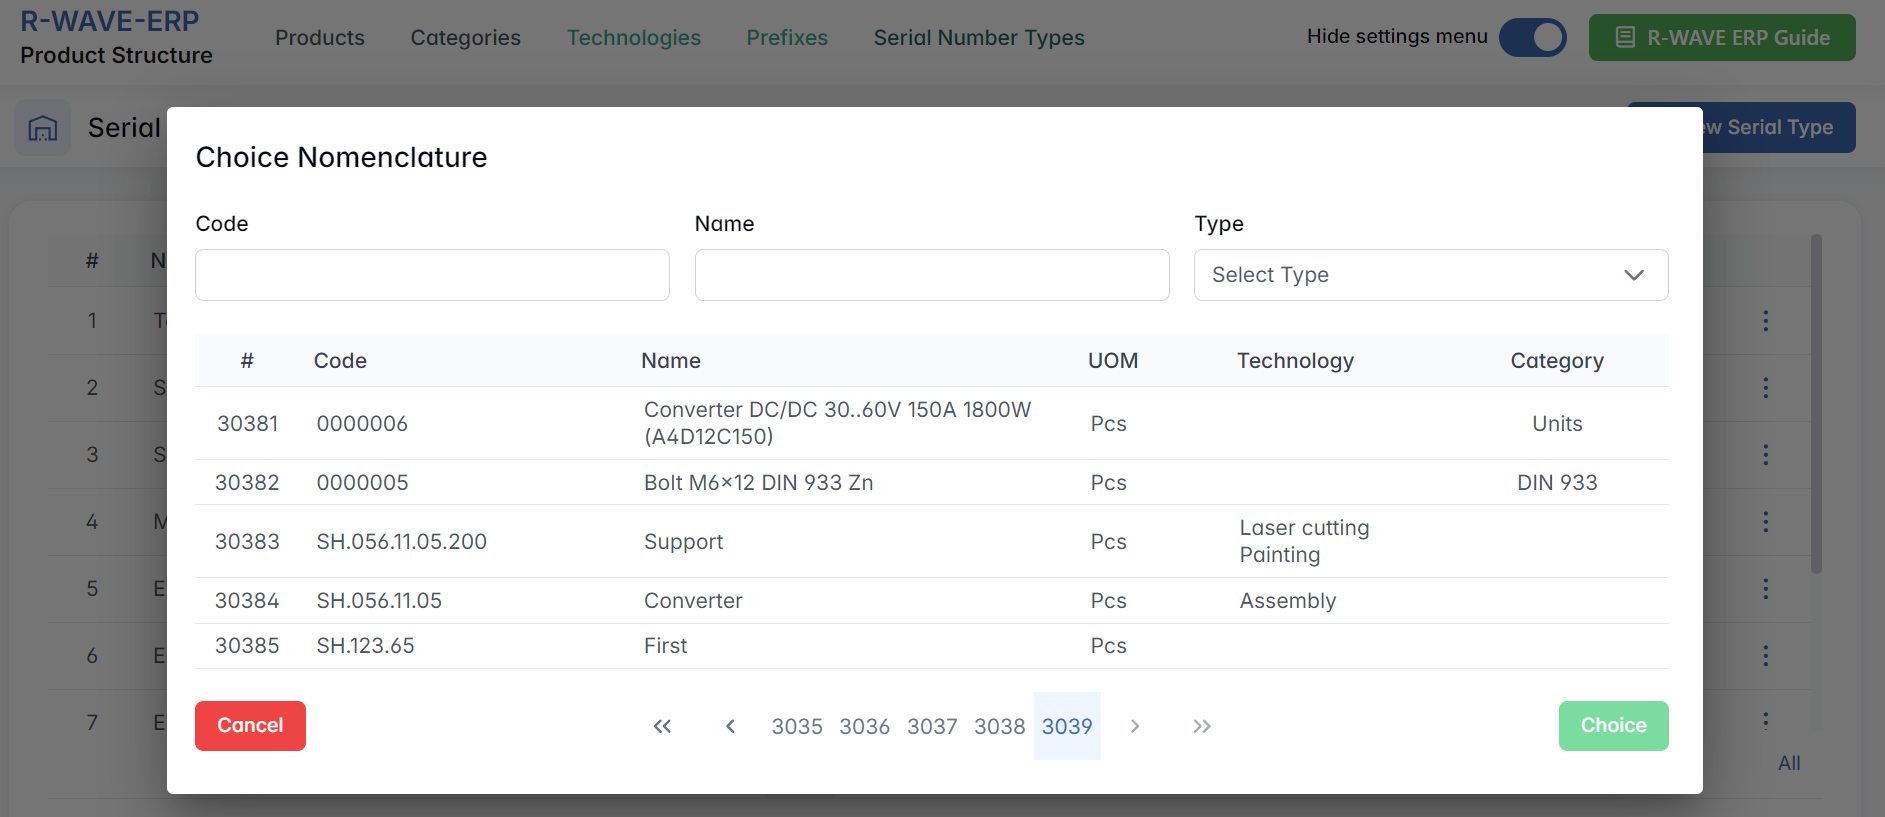
- Select the desired position.
- Click Choice to confirm.
This links the nomenclature (product/component) to the selected serial number type.