Manufacturing Module
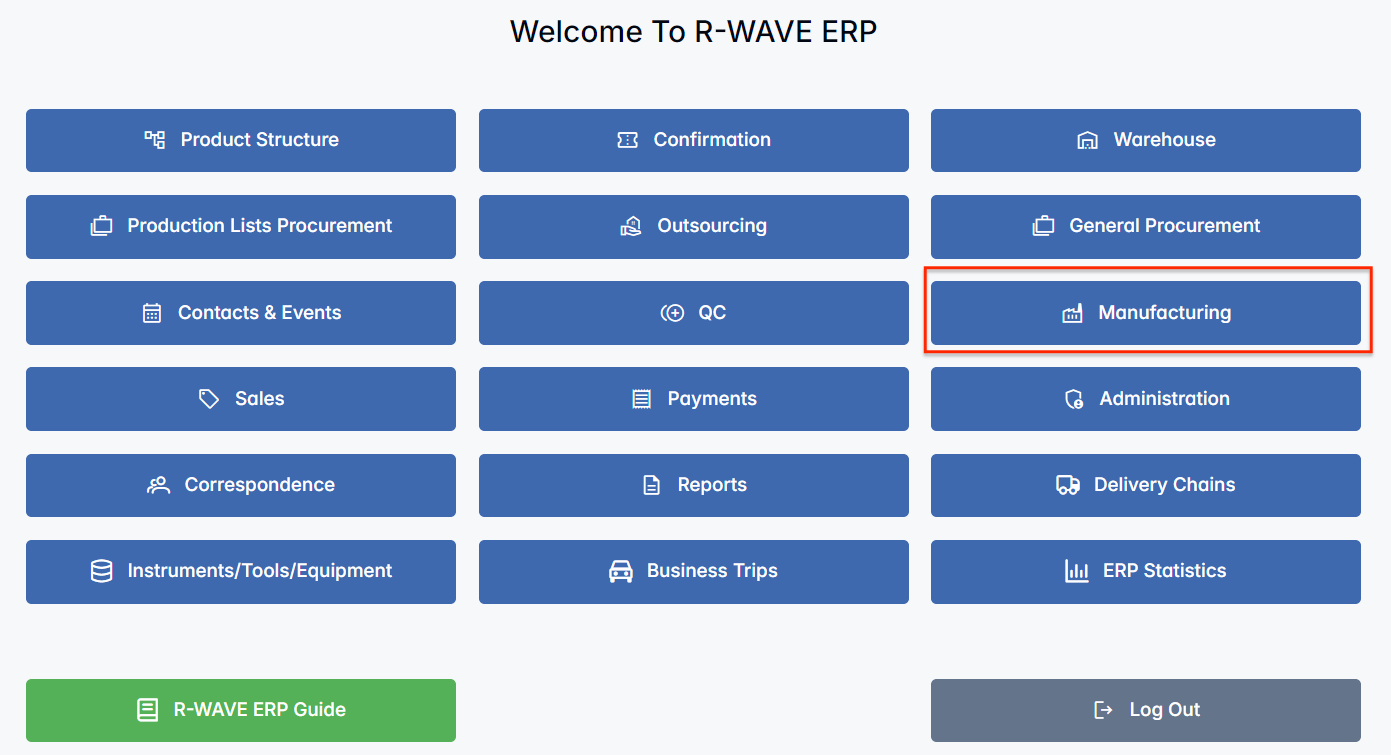
The Manufacturing module in BINU ERP is designed to manage and monitor production planning processes. It provides a structured workspace where users can organize production plans, track ordered items, manage production-related tasks, and review workload across manufacturing operations.
The module includes several key sections: Plans, Orders to Own Production, Ordered Items List, and Slice Tasks. These sections help users manage different stages of the production process, from initial planning and order preparation to task assignment, execution tracking, and progress monitoring.
In the Plans section, users can view and manage all active production plans and organize them by product category. The Orders to Own Production section allows users to manage in-house production orders, while the Ordered Items List section helps track all items and components connected to those orders. In the Slice Tasks section, users can monitor the progress of production tasks and follow their execution status.
The Manufacturing module enables teams to manage key manufacturing processes in one hub, including task assignment, employee and machine allocation, progress monitoring, and coordination between production, procurement, and warehouse activities.
The BINU ERP Guide and AI Assistant Tools
The BINU ERP Guide and AI Assistant Tools
The BINU ERP system provides tools to support users in navigating and understanding the processes and functionalities of the system. These tools — the BINU ERP Guide and the BINU AI Assistant — include a built-in contextual help. They are non-intrusive and can be closed or reopened as needed, allowing users to remain focused on their current workflow without interruption.
When you click the BINU ERP Guide icon in the upper-right corner of the screen, the pop-up guide window opens. This feature is available across different modules and is designed to help users understand where they are in the system and how to use the current section effectively.

When you click the BINU AI feature on the side of the screen, the chat window opens, where users can choose their language of conversation. The supported languages are: English, Bulgarian, Croatian, French, German, Hungarian, Italian, Romanian, Russian, Serbian, Slovenian, Spanish, Turkish, and Ukrainian.
The BINU AI Assistant provides explanations and documentation for all topics related to the BINU ERP system. Users can ask about specific terms, business processes, system functionalities, or request documentation on a particular topic. To begin, type your question in the input field at the bottom of the chat window.
The BINU ERP Guide: Quick Overview
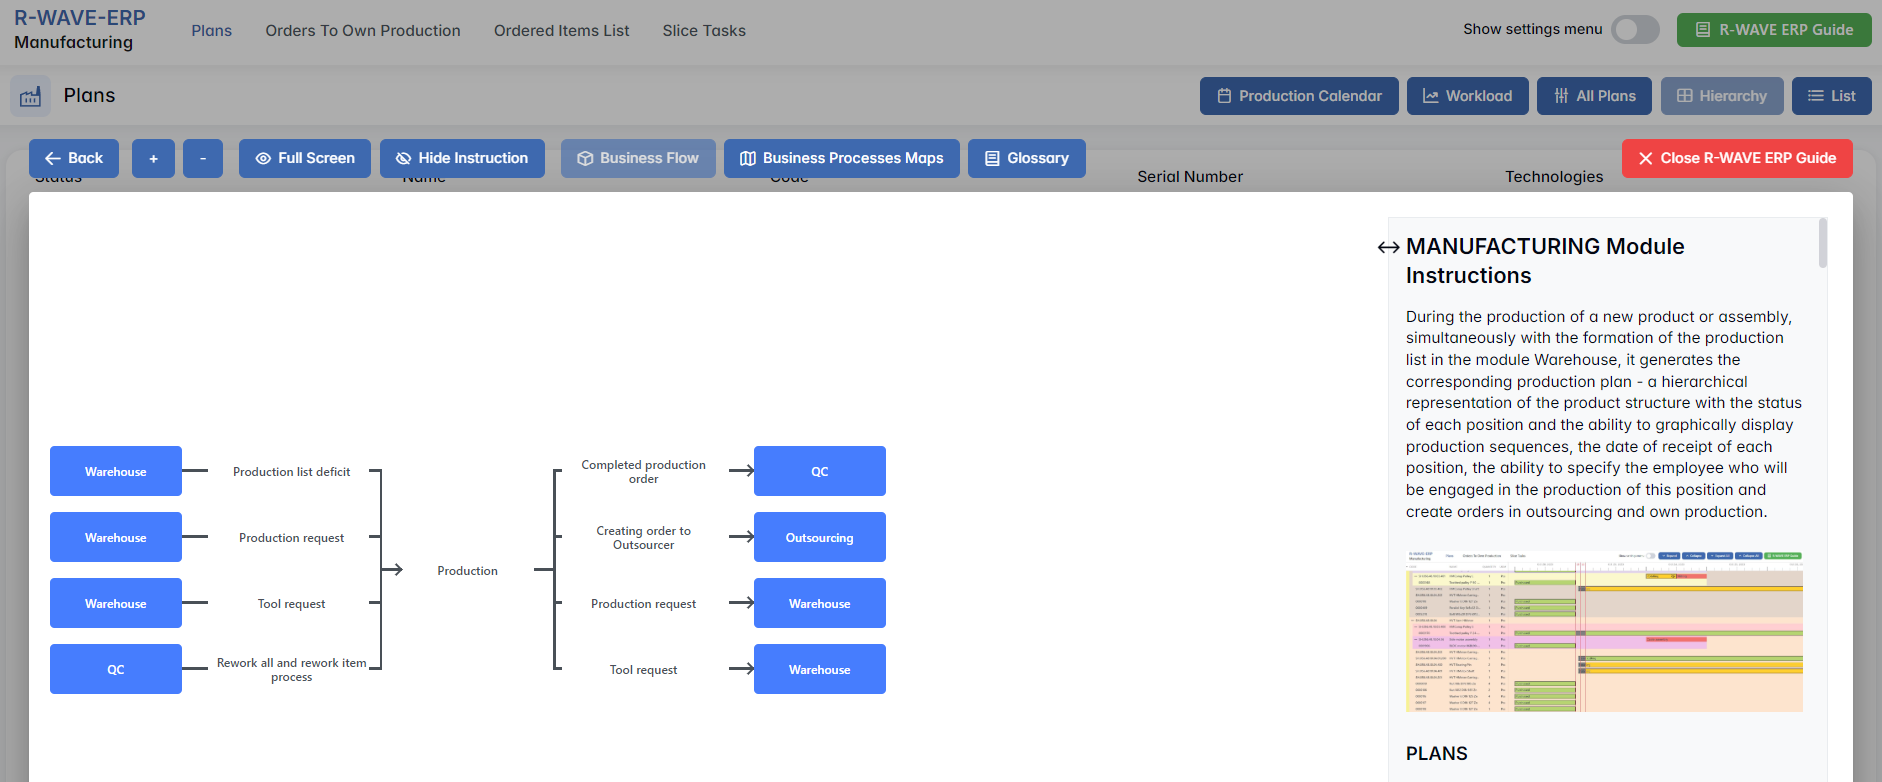
When you click the BINU ERP Guide book icon, you land on the Business Flow map. It has two main sections: the left panel displaying the business flow map and the right panel showing the functional overview.
- Left panel — Business Flow Map — displays a visual diagram of the business processes. It shows how each module is interconnected; for example, you can see how Sales, Manufacturing, Procurement, CRM, QC, and Warehouse are interconnected.
- Right panel — Functional Overview — provides a concise, bullet-style instruction list describing the key operations available in the current module/tab.
Top Bar Options
At the top of the ERP Guide window, you'll find optional tools for deeper understanding: Business Processes Maps, Accounting Flow, and Glossary. The Accounting Flow is meant for financial departments.
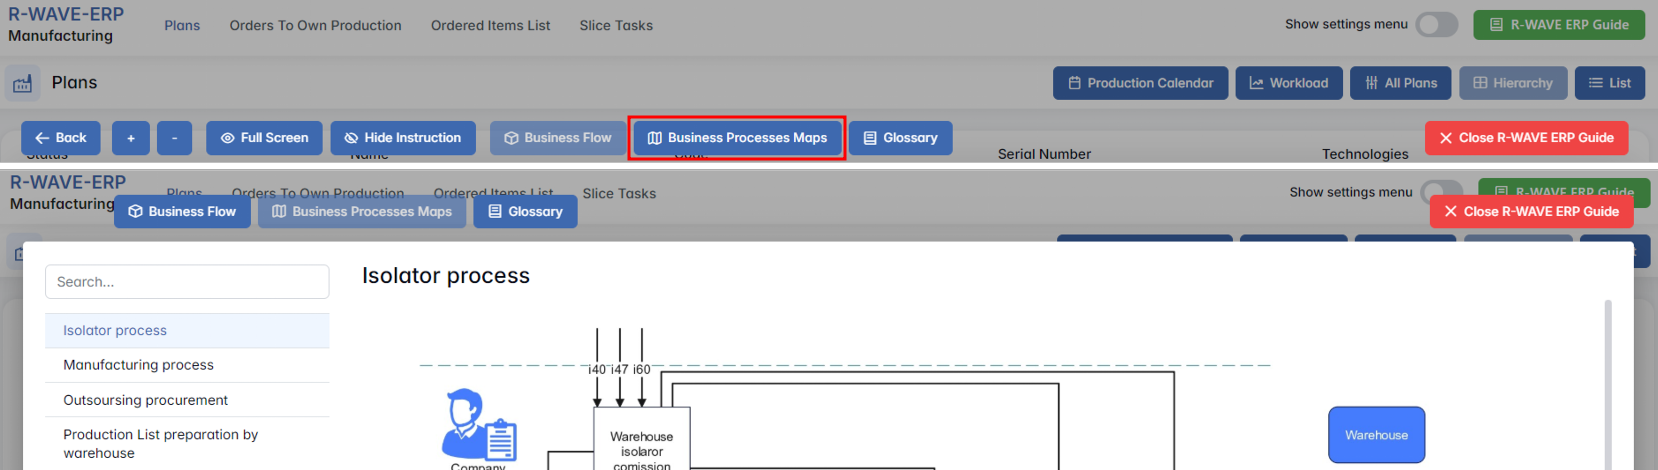
Business Processes Maps
Business Processes Maps provides a visual representation of the company's operational structure and business flow. It helps the user understand how the current module fits into the larger operational structure and makes it easy to grasp the upstream and downstream dependencies within the business processes. The Business Processes Maps can be accessed from various modules.

Accounting Flow: Data Flow Graph and Responsibility Matrix
Accounting Flow is a tool designed for the finance department; it shows where the data originates and defines responsibilities. For this purpose, it consists of two parts: a Data Flow Graph and a Responsibility Matrix.

The Data Flow Graph displays the movement of items from departments to the warehouse and from the warehouse to the departments. Based on these movements, the system tracks the flow of goods entering and leaving the company. The Dashboard section, planned for a future release, will allow users to view real-time data (in, out, balance, product costs).
If you hover over a diagram block, the system highlights the corresponding movement chain.
If you click a block in the diagram, you fix the highlighted chain. To narrow the selection further, click a block in the second, third, or fourth column.
The Responsibility Matrix identifies the department accountable for the selected process.

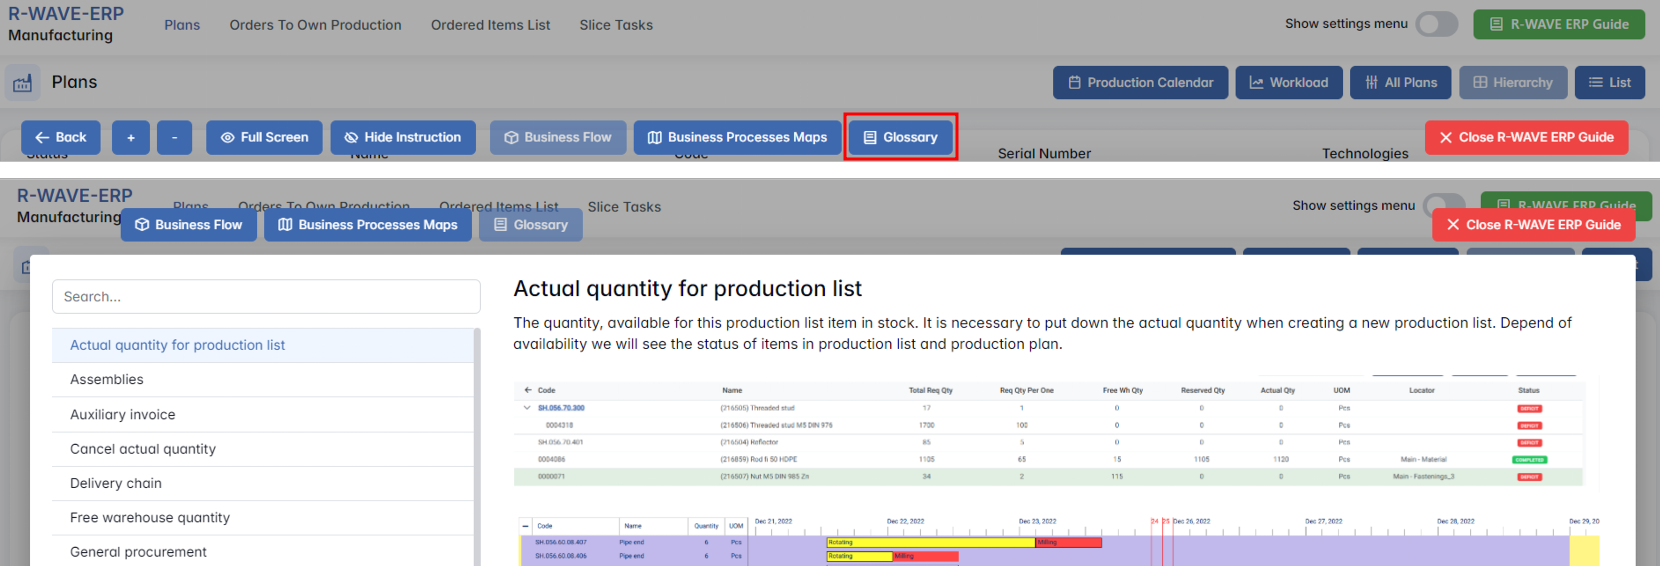
Glossary
Glossary provides definitions and descriptions of key terms and functionalities used throughout the system. The Glossary can be accessed via the BINU ERP Guide, which is available on any page of the system.

The BINU AI Assistant: Quick Overview
The BINU AI Assistant is specifically designed to help the user with ERP documentation questions. It provides information and assistance related to the BINU ERP system. The BINU AI Assistant understands fifteen (15) languages. It is available on every page as a non-intrusive help tool.

The Purpose of the BINU ERP Guide and BINU AI Assistant Tools
The BINU ERP Guide and BINU AI Assistant help users by:
- Showing where they are within the system (module context and current section).
- Providing a visual schema of the business flow, helping them understand how the current module fits into the larger operational structure.
- Offering a quick-reference instruction panel with the main actions and functions available in the current tab (e.g., creating companies, filtering, scheduling events).
- Offering quick access to the relevant documentation (AI-powered ERP documentation helper).
Manufacturing Module Overview
Plans
Plans
The Plans tab in the Manufacturing module displays all currently active production plans. Each plan represents a structured and visualized version of a product structure sent to production. These plans are generated automatically based on the corresponding production structure.
Purpose of the Plans Tab
This tab allows users to:
- View, filter, and manage current production plans;
- Monitor the production status of each position in the hierarchy;
- Visually schedule tasks and assign employees or machines;
- Create production orders (Own or Outsourced);
- Add or remove positions from the plan and track their warehouse status;
- Manage changes and rework requests dynamically.
Interface Overview
Upon entering the Plans tab, the user sees:

Production Calendar
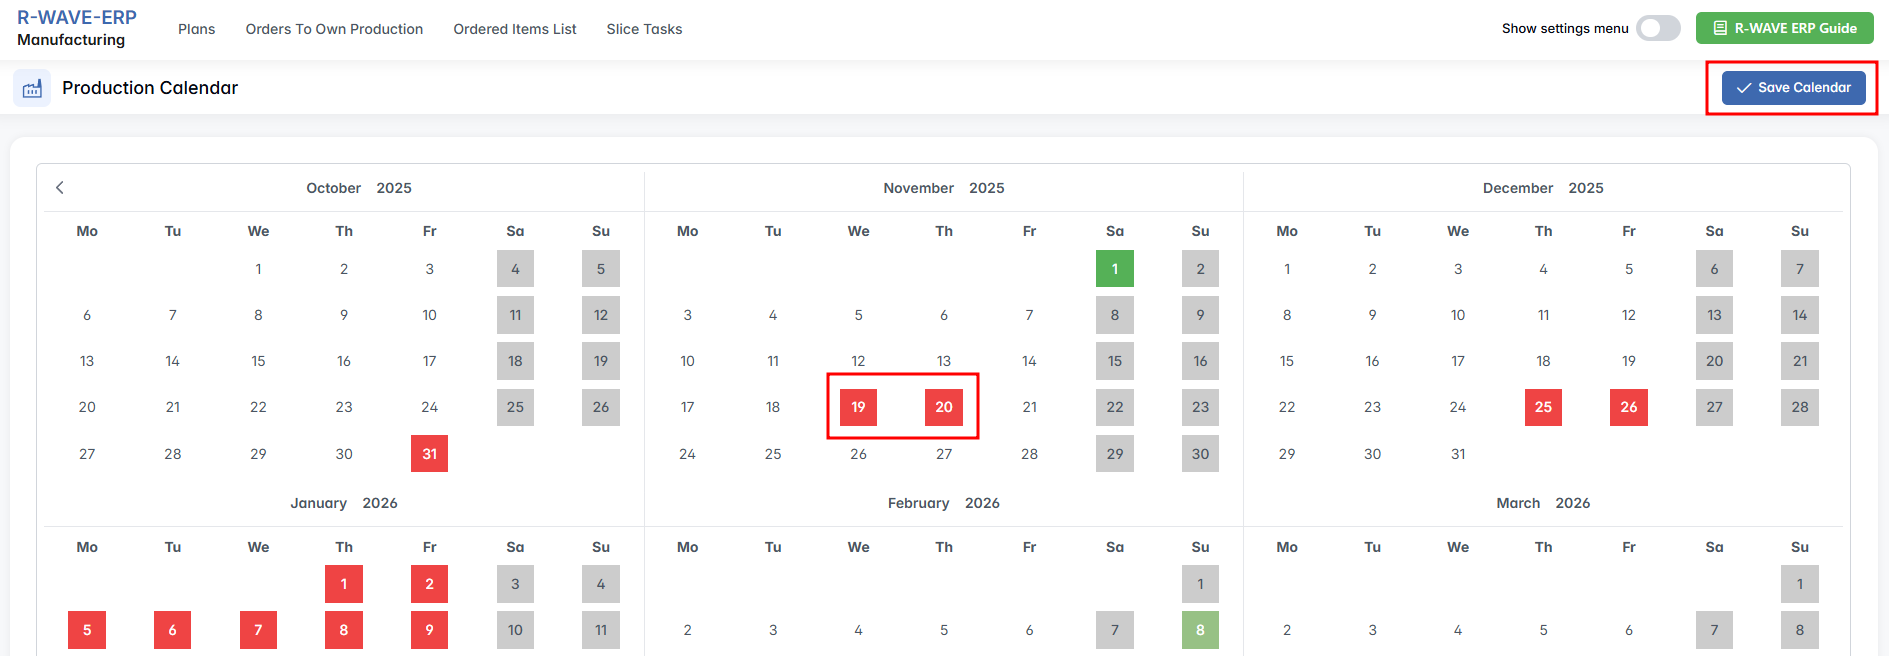
Opens a separate calendar interface where you can mark holidays and non-working days. After making changes, click the Save Calendar button to apply them to the system.
Workload
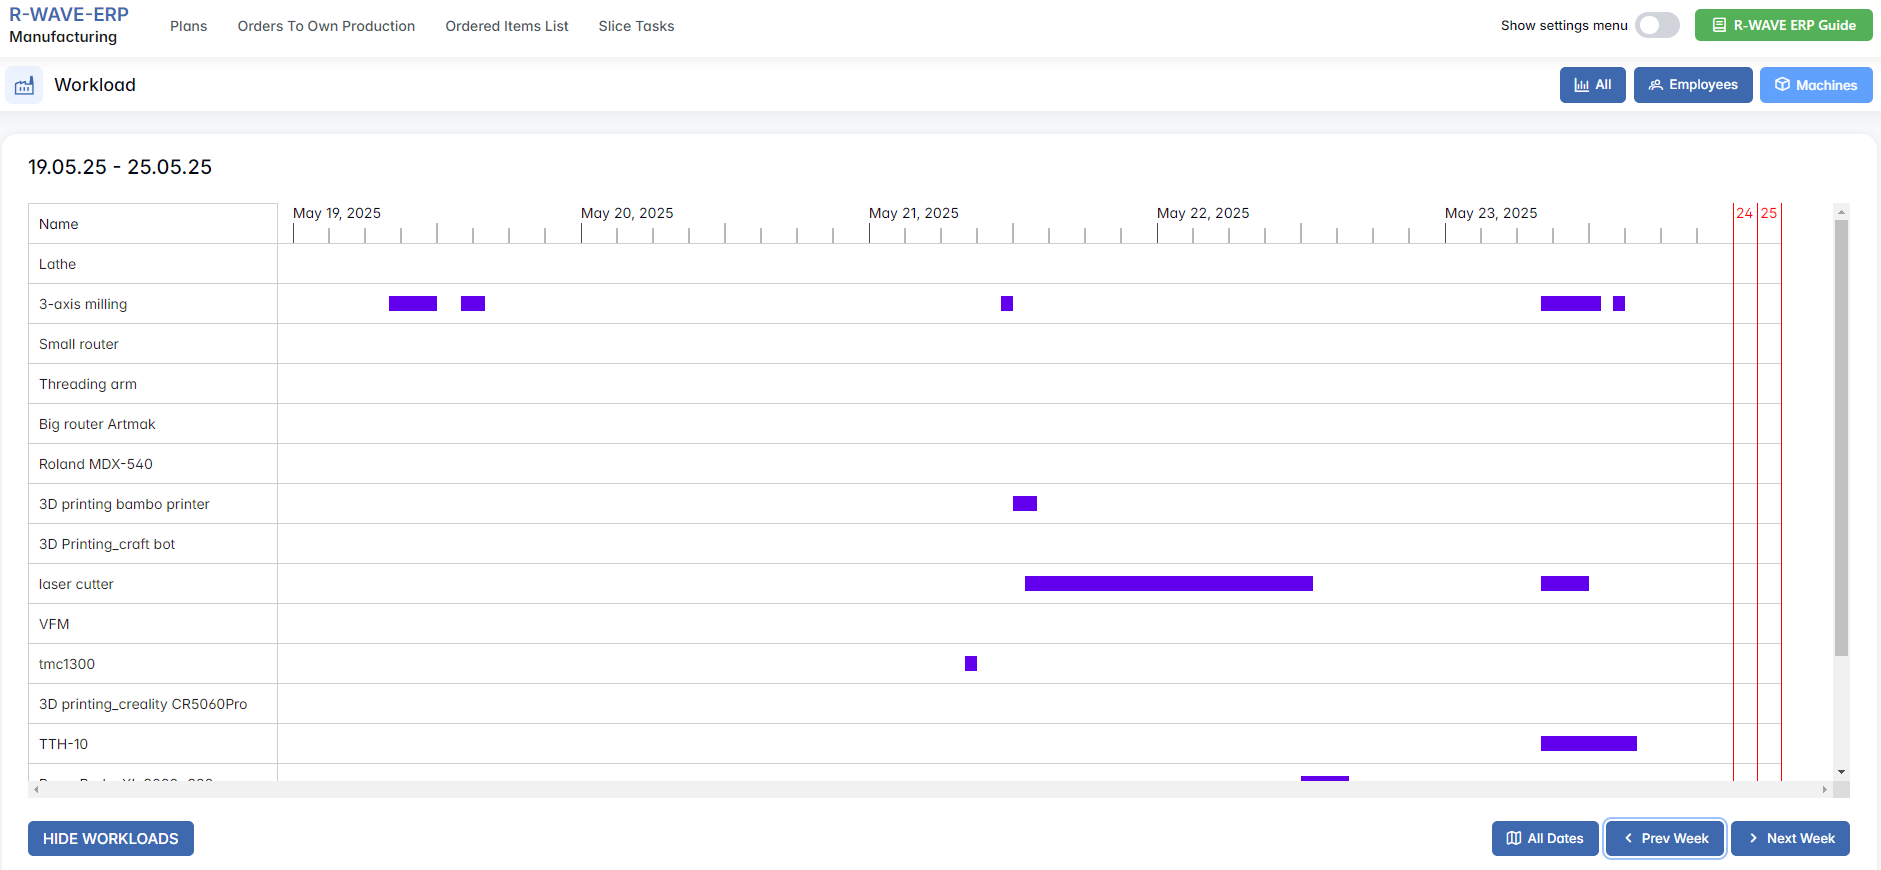
Displays a weekly or full-range timeline showing how tasks are distributed across Employees, Machines, or All.

Rows list employees/machines, columns represent time. Controls:
- Prev / Next Week – scroll the timeline
- Slider – jump to a specific time frame
- Hide Workloads – activates checkboxes to manually hide irrelevant rows
All Plans View
A consolidated color-coded view of all production plans in the system.

- Hierarchy – switches to a hierarchical tree view of the plan, showing the product structure categories and levels.
- List – switches to a flat list view of all plans.
Filter Panel
At the top of the module, the Filter Panel allows you to narrow down plans based on specific criteria:
- Status – Select the current status of the plan. Options include: Not Processed, Deficit, On Stock, Ordered, Reserved, Rework.
- Name, Code, Serial Number – Search for plans by their name, unique code, or associated serial number.
- Technologies – Choose one or more technologies applied to the plan, such as Assembly, Welding, Compounding, or Rotation.
- Start/End Created Date – Specify the date range when plans were created.
Once the desired filters are selected, pressing Search will refresh the table with matching results.
Below the table, the following buttons are available:
- Expand All / Collapse All – Toggle between hierarchical and compact views of the plans.
- Selected Plans – Becomes active when one or more rows are selected. Opens the selected plan(s) in a separate window for detailed inspection. Multi-selection is supported.

The main table displays all plans that meet the applied filter criteria. Key columns include:
- Serial Numbers – Associated serial numbers for each plan item.
- List ID – Internal identifier for the plan list (clickable – redirect to Production List).
- Code / Name – Plan code (clickable – redirect to Plan) and descriptive name.
- Technology – Technology used in the plan.
- Created – Date when the plan was created.
- Expected End Date – Planned completion date for the plan.
- Status – Current state of the plan.
- Comment – Additional notes entered by the creator.
- Creator – User who created the plan.
- Quantity – Total quantity included in the plan.
At the end of each row, click the ⋮ icon to access available actions for that plan.

Actions Explained
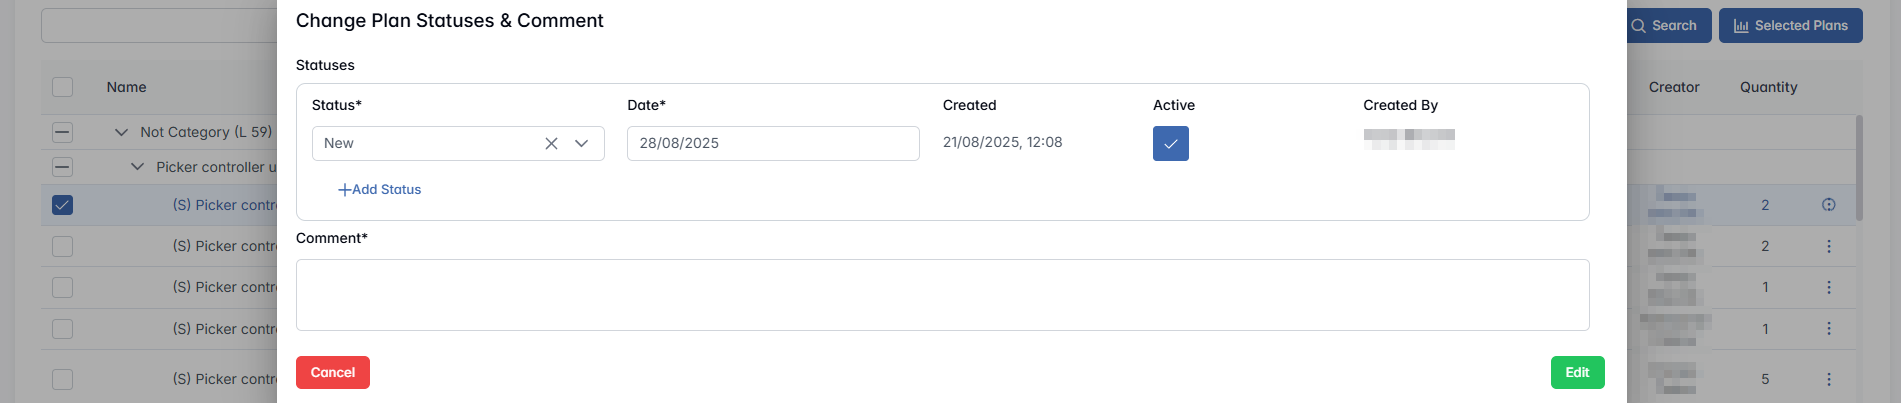
- Statuses & Comment – opens a modal where you can track or update the progress. You can add multiple statuses by clicking + Add Status, but only one can be marked as Active at a time. The Comment field is optional.

- Add Split – available if quantity > 1; allows splitting into separate plans, but the total amount must be equal to the initial quantity. For example, if the total quantity is five, the split can be 2, 2, 1.
- Delete Plan – allows you to remove the plan at any stage. If the plan includes positions linked to open orders or warehouse requests, those connections will be automatically removed during deletion.
- Go to plan – opens the detailed plan page.
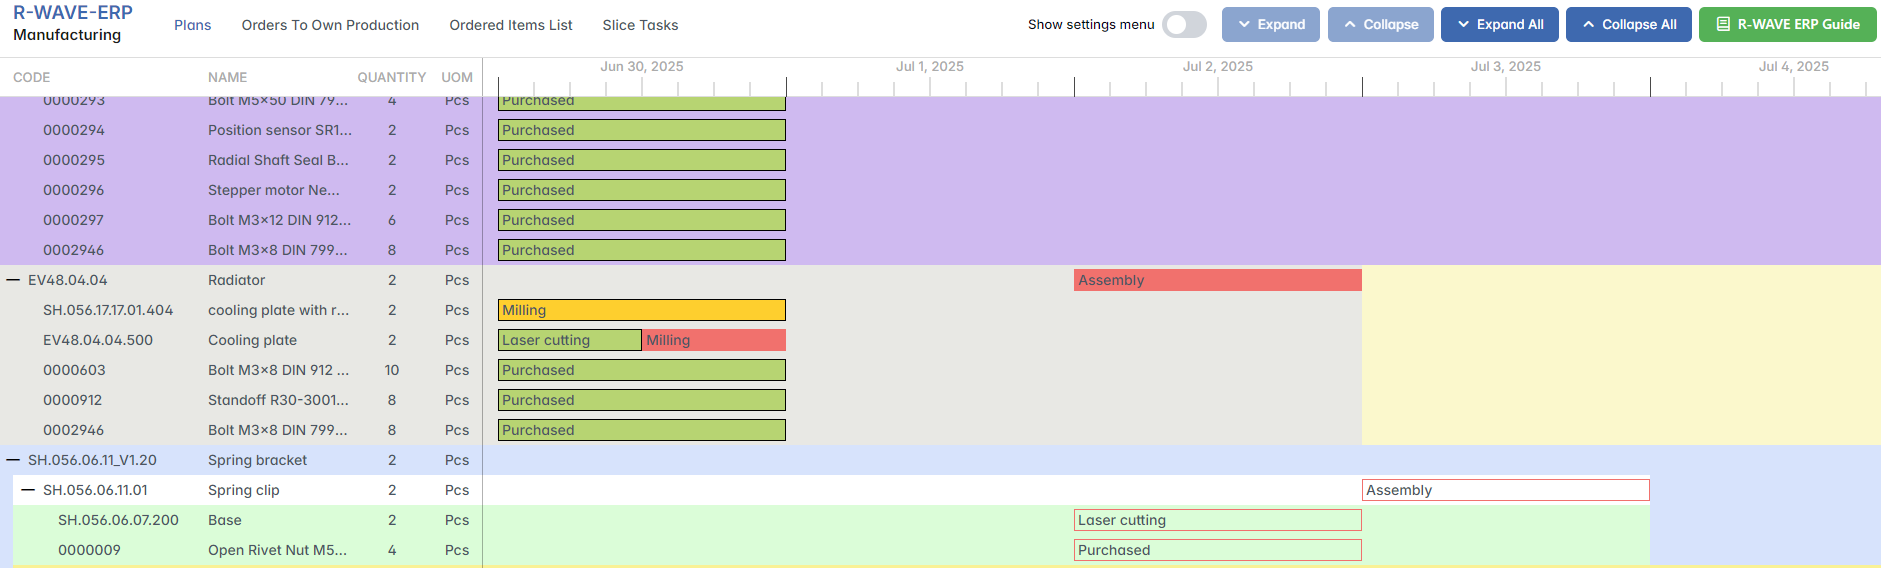
Here, you see a hierarchical tree, showing all positions, their statuses, and production tasks.
Colored graphical markers next to each position:
- Green – in stock and reserved
- Red – out of stock (purchase or production required)
- Yellow – ordered or in process
- White – not processed yet
- Gray striped – delivery date changed, needs confirmation

You can also access the plan page by clicking the Code value in the table on the main Plans page — it is clickable and leads to the same detailed view.

Calendar & Gantt Area
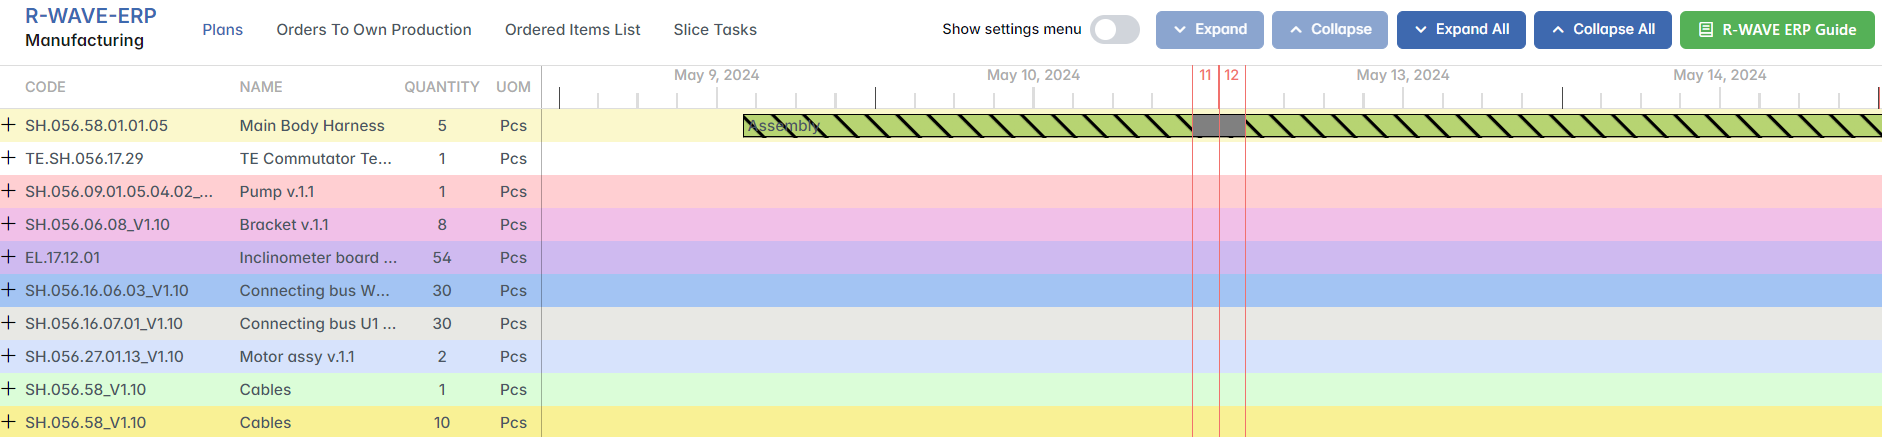
At the top of the plan view is the production calendar, which shows a timeline of expected delivery dates and manufacturing stages. The Gantt-style chart lets users drag bars left or right to change expected start/end dates of tasks.

When the delivery date of a child item is changed, the parent item's delivery schedule shifts accordingly. The schedule always respects the hierarchy.
View Functions (Top of the Plans Page)
At the top right of the page, there are a couple of possibilities regarding the view preference:
- Expand / Collapse – Toggle between hierarchical and compact views of a position.
- Expand All / Collapse All – Toggle between hierarchical and compact views of the plans.
- Generate XLS – Generates an Excel file of the whole plan, including information on Code, Name, Quantity, UOM, and Technology of all items in the plan.

Filter Panel (Bottom of the Plans Page)

- Status – Not processed, Deficit, On Stock, Ordered, Reserved, Rework
- Order Type – Own Production, Outsourcing, Purchased
- Nomenclature Type – Assembly, Manufactured, Purchased
- Technologies – Filters by technology (e.g., Assembly, Welding, Compounding, Rotation)
Filter Interaction Principles
Filters work combinatorially. The more filters you apply, the narrower the visible result. Some examples:
- If you select Order Type: Purchased + Status: Deficit — you might see nothing, because the purchased item wasn't ordered.
- If you select Technologies: Welding + Nomenclature: Manufactured — you'll get only those manufactured items that include welding.
- If you select Order Type: Own Production and filter Status: On Stock — you'll see only manufactured items that were produced internally and are now ready.
Some filters are context-sensitive. For example, if no positions are using the "Rotation" technology, the filter will show zero results.
Actions in the Bottom Panel
In addition to filtering, the bottom panel also includes action buttons:

- Order Creation — Starts the order creation flow for selected tasks
- Add Items — Allows adding new items to the plan from stock
- Procurement Requests — allows confirming or declining procurement requests directly from the plan page
- Confirmation – sending a request for planning confirmation/correction to confirm the existing or the changed plan
Task Interaction: Editing and Assignment
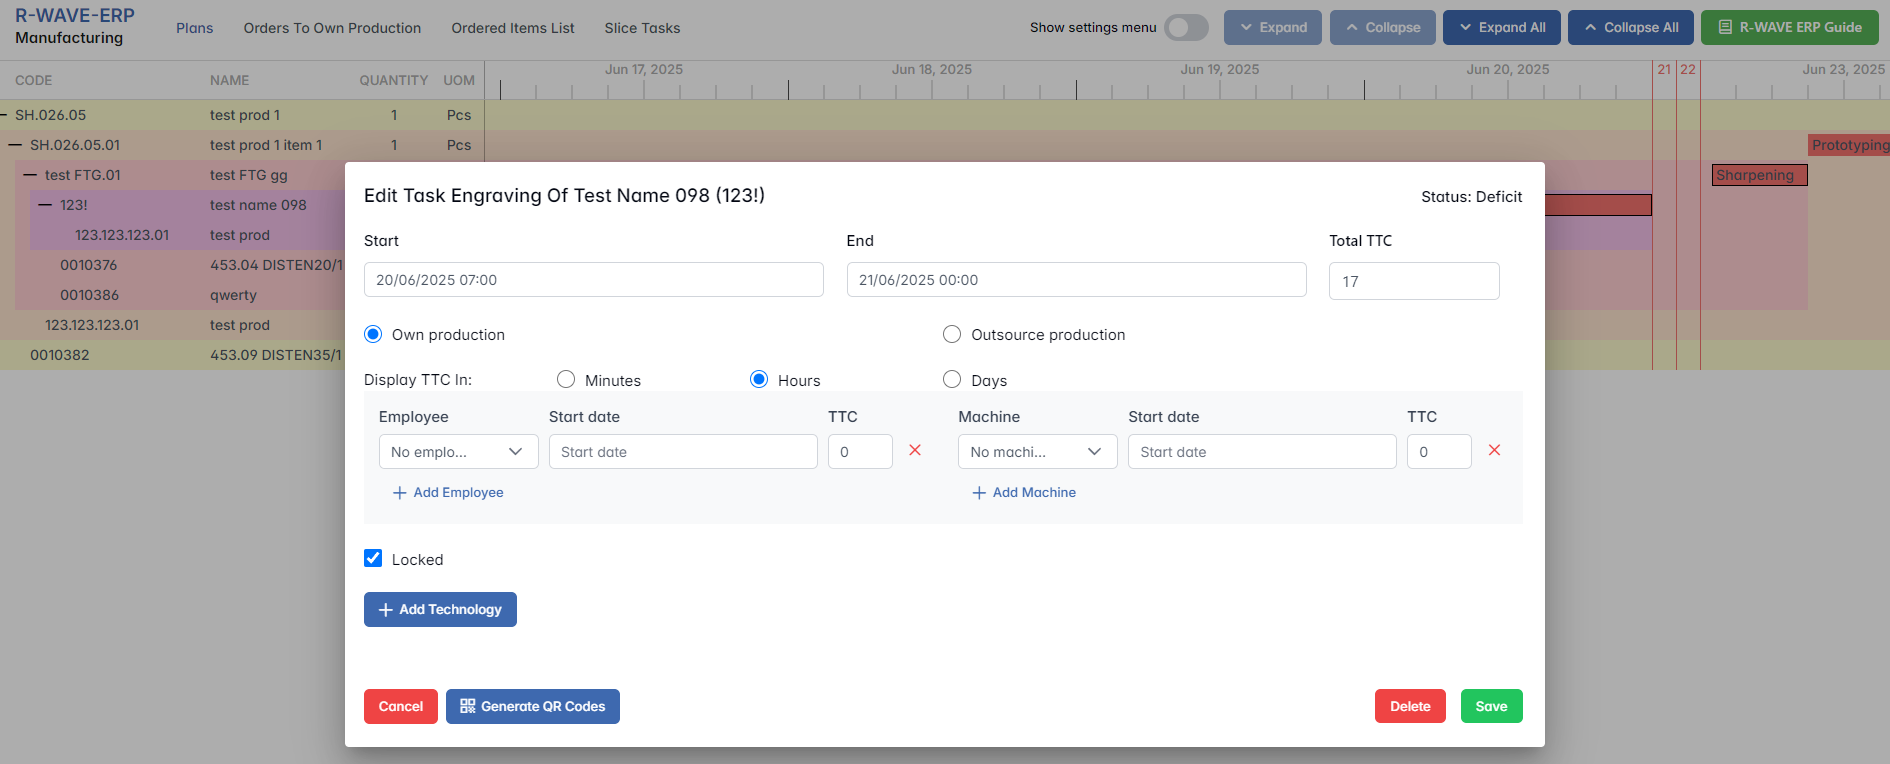
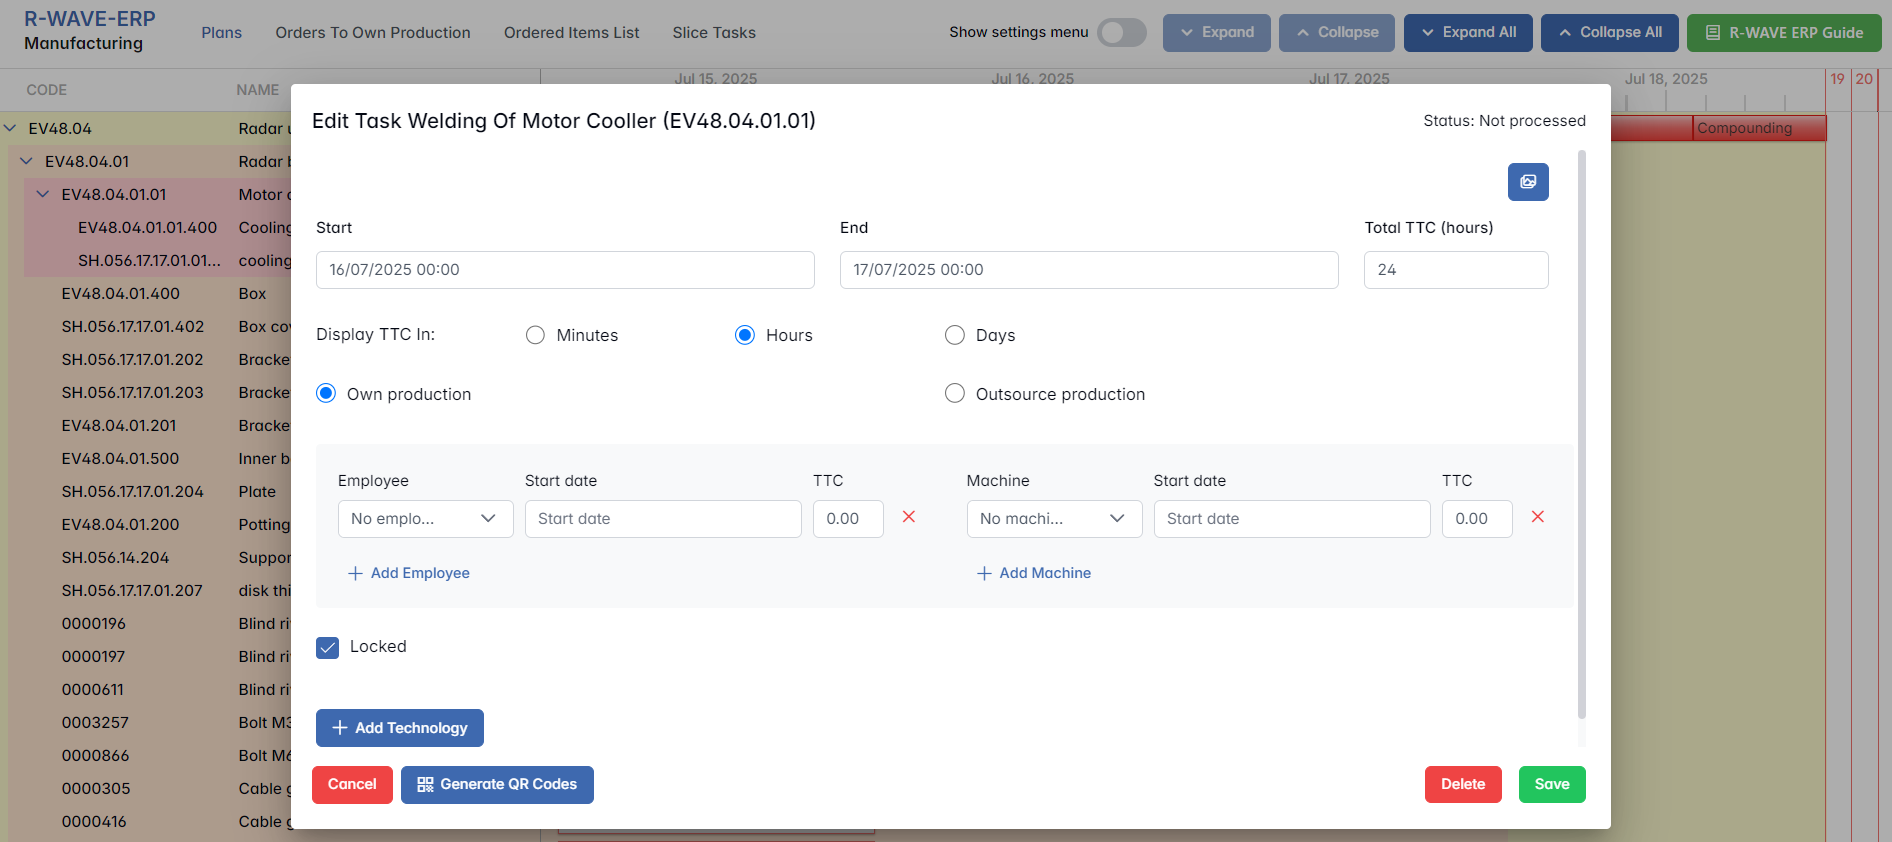
When clicking on a specific task in the Gantt chart, a pop-up window opens. Here the user can:


- Drag to reschedule OR manually enter Start/End date and time
- Insert TTC (time to complete)
- Choose the type: Own production or Outsource
- Assign Employees (and their time allocation) and Machines
- See if the task is Locked or Unlocked (or (un)lock it manually)
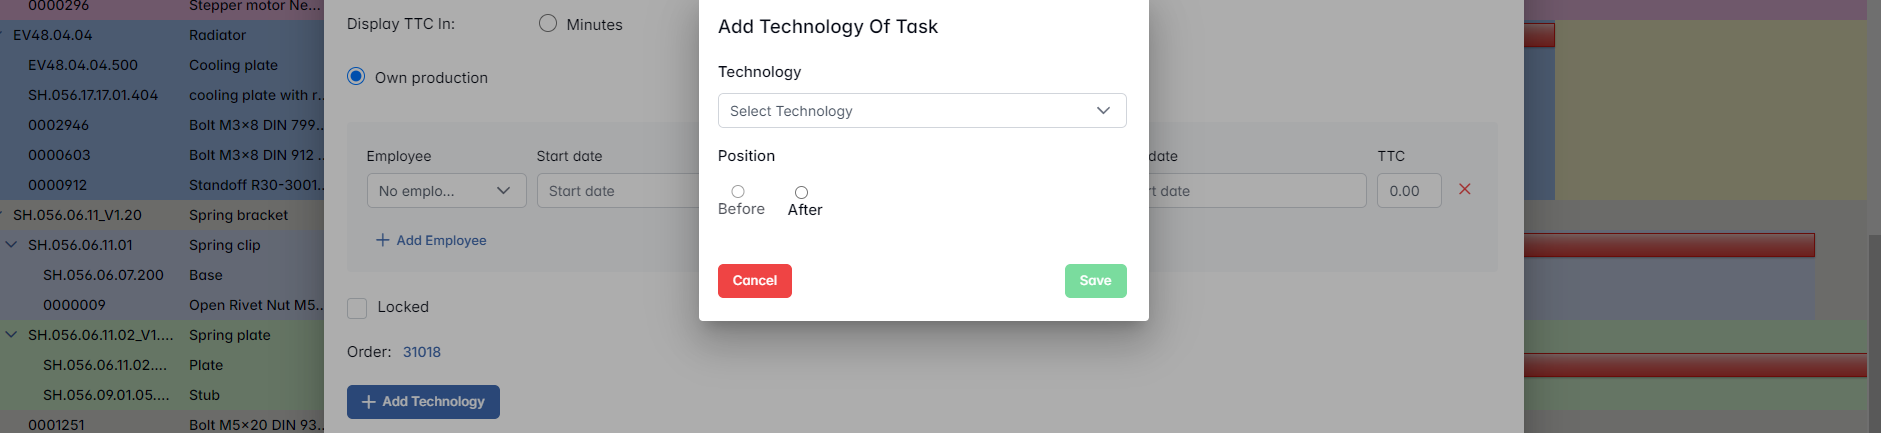
- Add Technology
Employee and machine assignments are only available for Own Production orders.
Creating Orders from the Plan
Once unlocked, tasks can be selected and included in a production order:
- Click Order Creation

- Choose technologies from the 1st and 2nd filters (only sequentially)

- Click Create Order
The system generates a new order and also a Production Request (for Own) or Delivery Request (for Outsourcing).
Restrictions:
- Order can include only DEFICIT and Unlocked tasks
- Cannot mix Own and Outsource in one order
- Tasks must follow the technology sequence
Adding Items to the Plan
You can add items to an existing plan without changing the original Product Structure. Steps:
- Click Add Items

- Choose item type (Assembly / Manufactured / Purchased)

- Purchased:
- Assembly:

- Manufactured:
- Search in Warehouse/Assembling/Manufactured items or add a new item
- Enter quantity per item
- Click Add Items
When you click Add Items, the selected materials or components are added to your production plan:
- Status Assignment – Every new item is automatically assigned the status Not Processed. The system recognizes the item as pending action — either to be picked from the warehouse, purchased, or manufactured — but no sourcing process has started yet.
- Warehouse Check Required – Availability of each item must be checked manually in the warehouse. The system will not automatically reserve or check inventory levels.
- How to Proceed After Adding – Once the items appear in the plan with the status Not Processed, it's up to you or the warehouse team to check if the item is available in stock. If it's not available, initiate one of the following manually via the Production List module: for purchased items, create a purchase request; for manufactured items, create a manufacturing task.
Quantity per assembly is automatically multiplied by the number of assemblies in the plan.
Deleting Positions
To delete a position:
- Click the task bar of the position
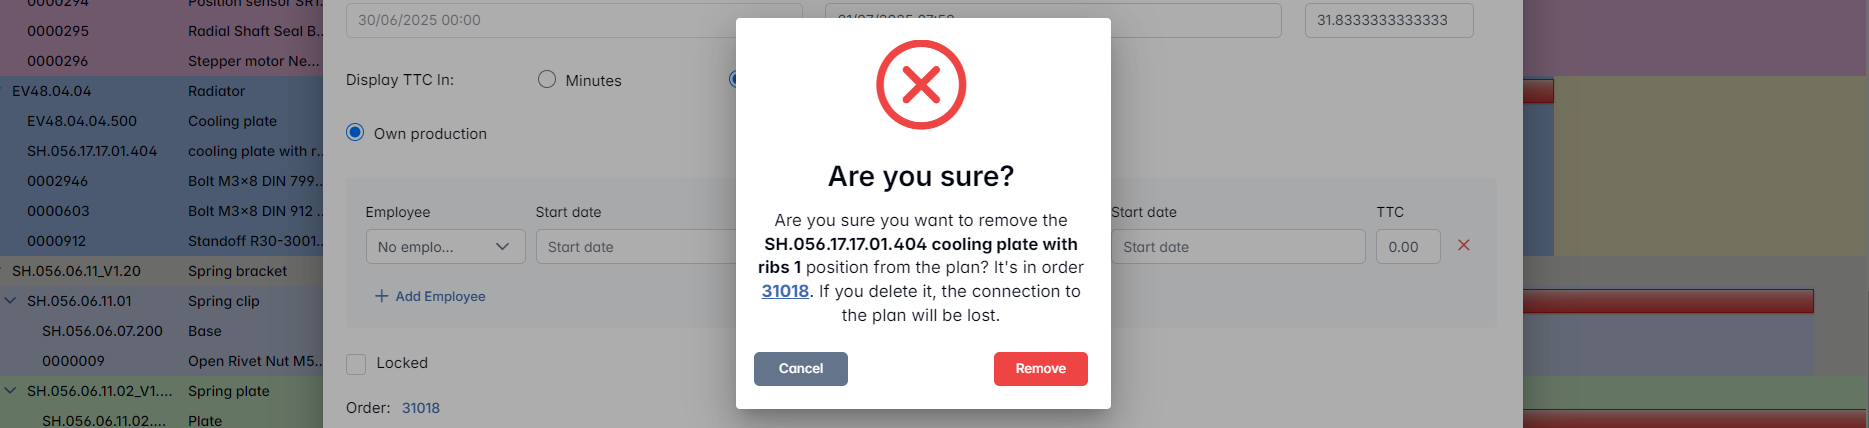
- Click the Delete button in the pop-up
Behavior:
- If the position is not linked to any open order or warehouse request: a confirmation modal appears asking the user to confirm deletion.
- If it's linked to an open order: the system asks for confirmation and unlinks the order (order remains in system).

- If the warehouse request is already closed: deletion is blocked — action denied.
Deleted positions are returned to Warehouse – Items.
Order Dependencies
- If a new item is added to a position that is already included in an order: the added item will appear in that order's Parts/Materials List and in the Warehouse – Production Requests menu for preparation.
- If an item is deleted from a position that has already been sent to an order: the item will be removed from both the order's Parts/Materials List and the associated warehouse request — but only if the production request has not yet been closed.
- If the related warehouse request is already closed: the item cannot be deleted from the plan, and the system blocks the action.
- If a user attempts to delete a plan that contains ordered items: a confirmation modal appears listing the affected items (for example: "Are you sure? The assembly you want to delete contains the ordered items: 1. 0000371 Connector Molex MX150 male 2 rows 20 circuits black (33482-2101)"). If the user confirms, the plan is deleted, and the related order is unlinked — but the order itself remains in the system and can be managed independently.
These mechanisms ensure that production and warehouse data remain aligned with real-time changes in the plan.
Unlocking and Manual Order Creation
In the Manufacturing module, tasks in the production plan can only be included in an order if they are unlocked. Unlocking signifies that a task is eligible for ordering and meets specific readiness requirements. Tasks can then be unlocked — either automatically or manually — based on the production needs.
Automatic Unlocking
A task becomes unlocked automatically when one of the following conditions is met:
- All direct child tasks (components or subassemblies) are in ON STOCK status (available in the warehouse and reserved).
- The previous technology in the sequence (if applicable) is in ON STOCK status.
Tasks that meet these conditions are automatically marked as unlocked in the plan and are eligible for ordering.
Manual Unlocking
If not all materials or dependencies are ready, but production must proceed, the user can manually unlock a task to enable partial order creation. This is useful for starting production based on currently available materials and avoiding delays caused by missing or delayed subassemblies.
Manual unlocking overrides dependency checks — use only when partial readiness is acceptable.
Order Creation Logic
Once a task is unlocked, the user can initiate the order creation process by clicking the Order Creation button.
Preconditions for Order Creation:
- Task status must be DEFICIT.
- Task must be unlocked (either automatically or manually).
- Technologies must follow the correct sequence (no skipping steps).
Technologies Selection:
- The first filter displays the next available technology for each item (based on prior steps being already ordered or completed).
- The second filter shows all valid subsequent technologies for the selected items, allowing creation of multi-step orders (e.g., Welding + Painting).
Skipping technologies is not allowed. The sequence must remain consistent.
Selection Requirements:
- At least one task must be marked with the "Add to Order" checkbox to proceed.
- Only sequential technologies can be grouped in one order.
Create Order Modal
After selecting tasks and clicking Create Order, a modal window opens for order planning. The following parameters can be adjusted:
- Order Type: Own Production or Outsourcing
- Task Schedule: Start/end time (automatically initialized but editable)
- Employee and Machine Assignment (only for Own Production orders)
Restrictions:
- Start time of any task or resource cannot be earlier than the order creation time.
- Outsource orders do not allow employee or machine assignment.
- A single order cannot mix Own and Outsource types.
- Conflicting schedules trigger a warning with options to adjust or continue.
Materials and Subassemblies Handling
The system includes components in the Parts/Materials List and Subassemblies section of the order, based on the readiness and structure of the task:
- If the task was automatically unlocked: all ON STOCK child components are added to Parts/Materials List; no further breakdown is performed — components are treated as ready-to-use.
- If the task was manually unlocked: all available materials are added to the Parts/Materials List; all deficit subassemblies are added to Subassemblies; already ordered subassemblies are listed again and await completion; the deficit child tasks of this unlocked task become blocked for separate ordering (to avoid duplication).
Special Notes:
- The system adjusts start/end dates of tasks automatically to preserve correct sequences.
- Technical Equipment (if assigned to the technology) is automatically added to the order and included in the Production Request.
- All tasks in a single order share the same status, are shown in the plan with the same color, are linked together for traceability, and if Outsourced, are marked with a handshake icon.
Orders to Own Production
Orders to Own Production
The Orders to Own Production tab in the Manufacturing module of BINU ERP is designed to manage and monitor production tasks that are handled internally, within your own facilities. It provides full visibility into the current status of each internal production order, tracks all related components and materials, and ensures alignment between planning, execution, and warehouse operations.
Each record represents an individual production order created from a plan (or several plans) and includes its progress status, associated product, materials, and responsible employees or machines. The main purpose is to:
- Track the production flow of in-house manufactured items,
- Monitor the availability and use of materials/components,
- Assign employees or machines to production orders,
- Interact with the Warehouse module (to request materials),
- Pass finished items to Quality Control (QC),
- Ensure every stage of the in-house production cycle is transparent and controllable.
Interface Overview
Upon entering the Orders to Own Production tab, users will see the following interface components:
Filter Panel
Located at the top of the page, the filter panel allows users to narrow down production orders using the following parameters:
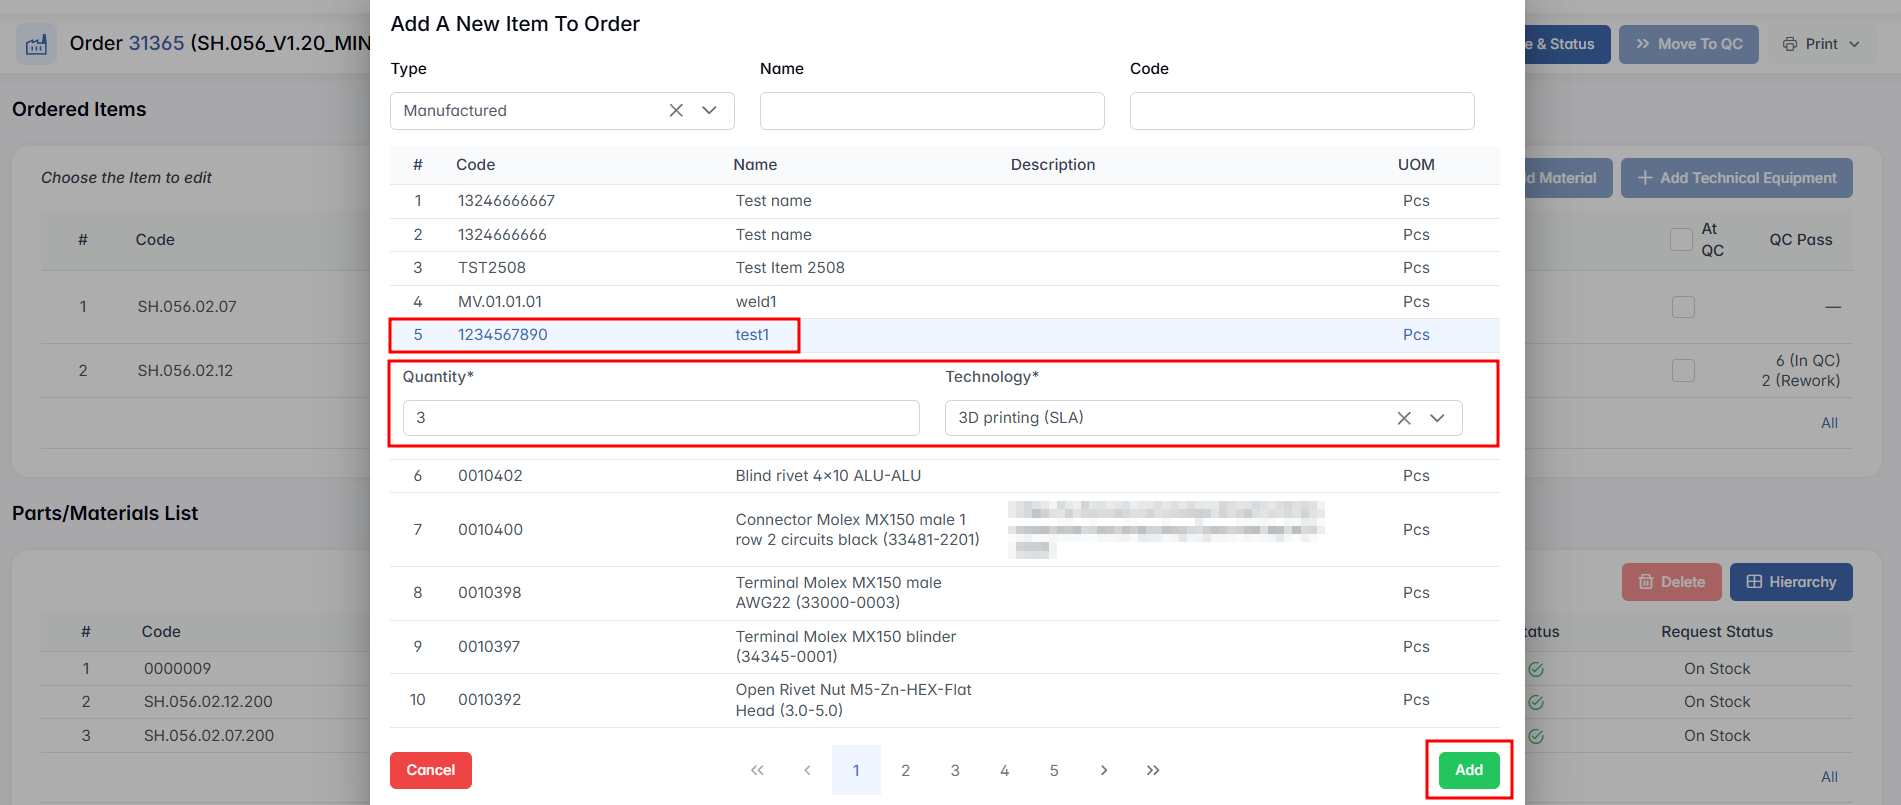
- From / To – Filter by order creation date range.
- Root List – Filter by originating production plan.
- Status – Multi-select list of order statuses.
- Technologies – Filter by associated manufacturing technologies.
- Employees – Multi-select filter for responsible employees.
- Name Ordered Item / Code Ordered Item – Search by ordered item name or code.
- Order ID – Direct search by order identifier.
- Order Creators – Multi-select list of users who created the order.
- Order Type – Filter to show all orders, only service orders, or only plain (internal) orders.
- Product Structure Categories – Filter based on product hierarchy.
- Material Type – Filter based on material classification.
- Show Postponed Orders – Tick if you want to show only postponed orders.
Orders Table
Below the filter panel, the system displays a table listing all matching production orders. Each row represents an individual order and includes the following data:

| Column | Description |
|---|---|
| List IDs | IDs of the originating production plans |
| Date / End Date | Start and end dates of the order |
| Order ID | Unique identifier of the order |
| Comment | Optional internal notes |
| Root Lists | Associated plan(s) from which the order was created |
| Technologies | Technologies involved in production |
| Status | Current state of the order |
| Creator | User who created the order |
Order Status Definitions
Each production order has a status indicating its progress:
- New – A newly created order that has not yet been processed.
- Production request completed – The warehouse has prepared the requested materials and sent them to production.
- Sent to QC – The finished items have been sent to the quality control department.
- On stock – The items have successfully passed QC and moved to warehouse stock.
- Rework – Items failed QC or need modification and have returned to production.
- Cancellation – The order was canceled and will not proceed.
Creating New Orders
In the upper-right corner of the Orders to Own Production page, two buttons are available:
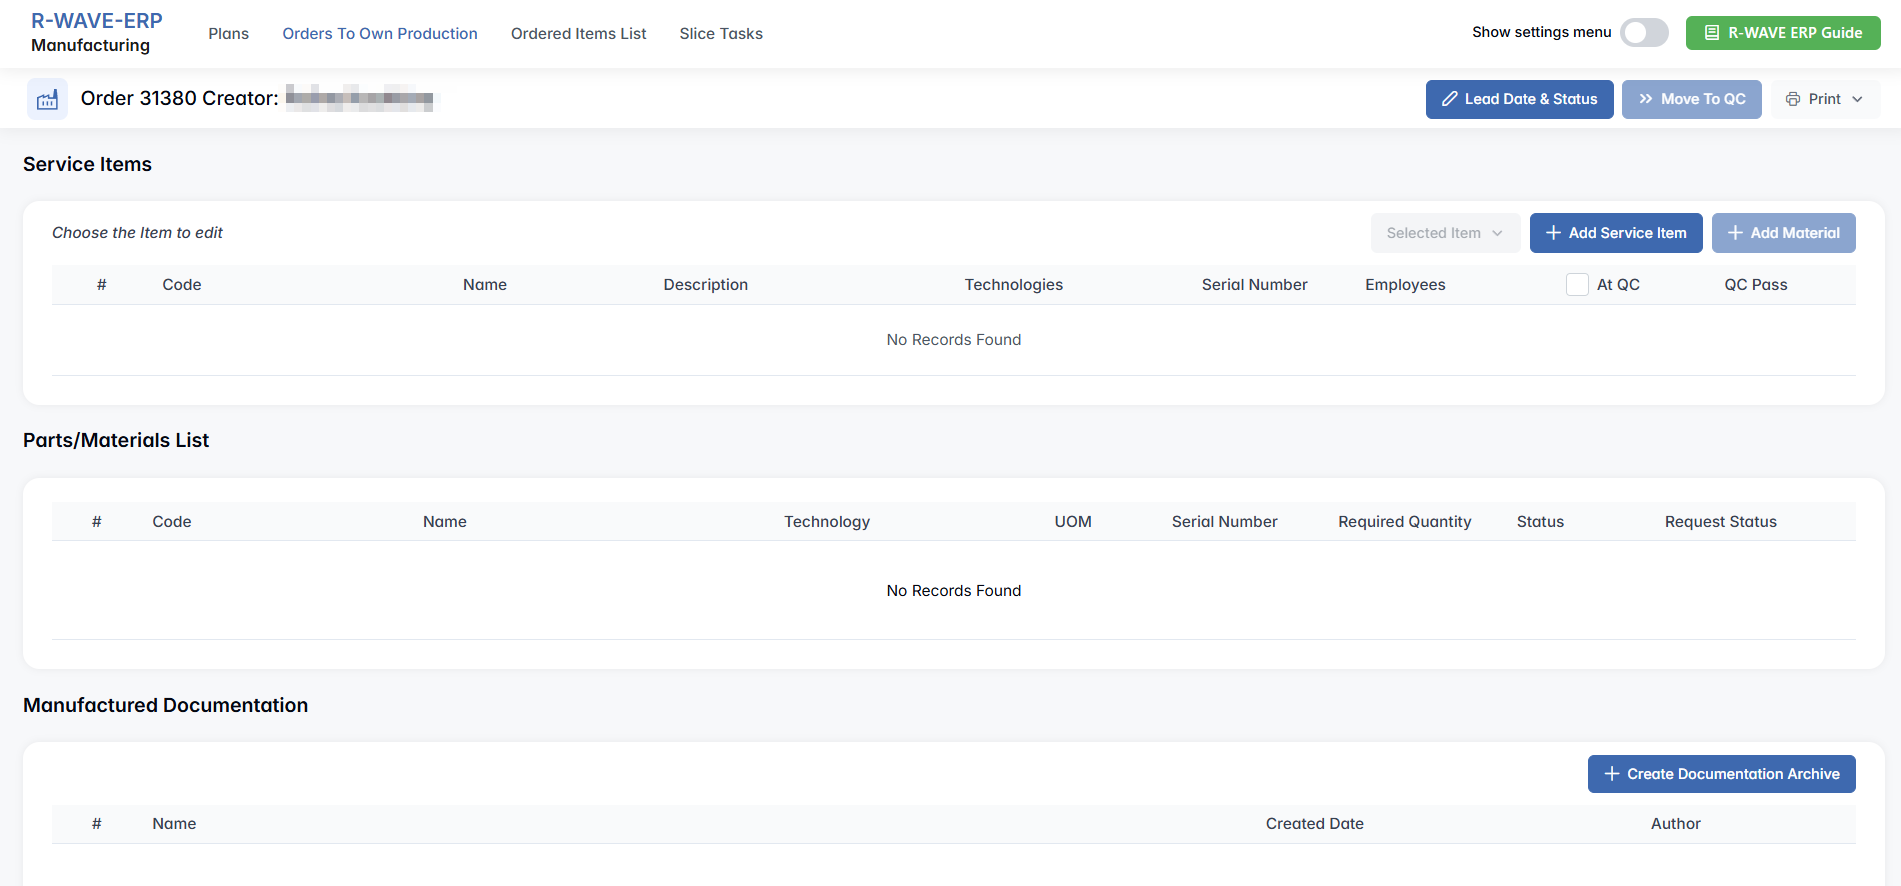
- Create Service Order – Opens a new automatically generated blank order page (e.g., Order #31026). This page allows the user to add service items, create a documentation archive, and send items to QC.

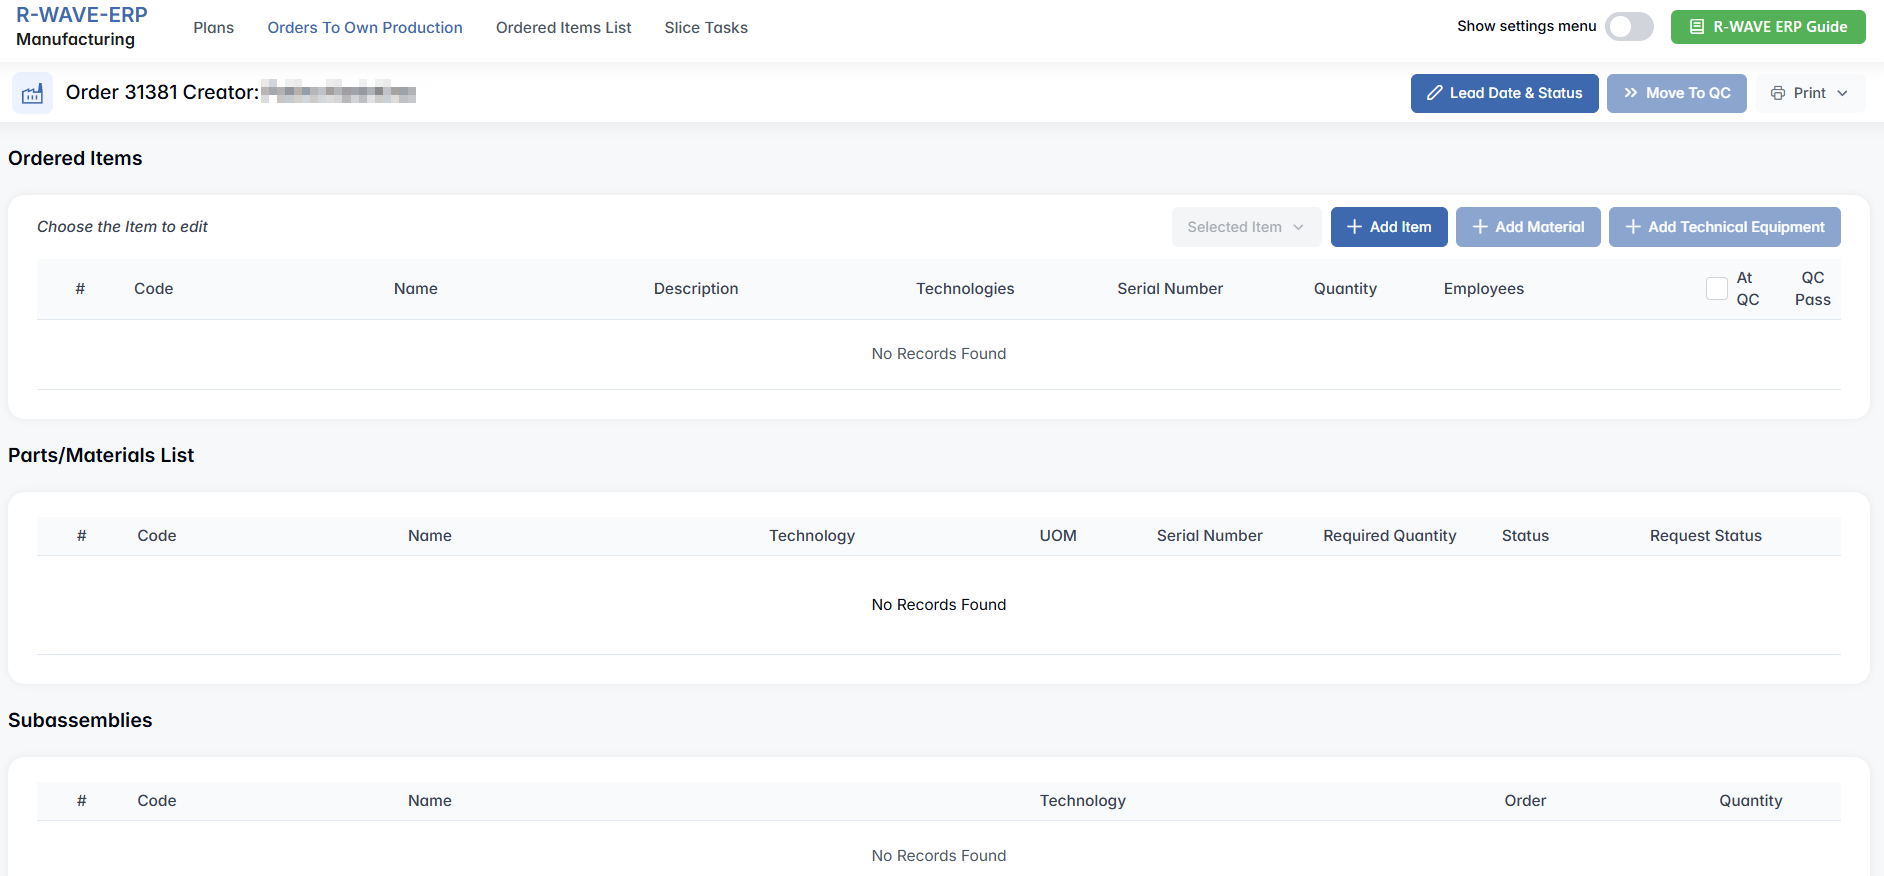
- Create Order to Own Production – Opens a new automatically generated order page similar to the service order, but more detailed. It includes the following tabs: Ordered Items, Parts/Materials List, Subassemblies, QC Intermediate Points, Machines, Technical Equipments, and Manufactured Documentation.


Order Details Page
To enter the detailed view of an order, click Selected Order (active when a row is selected) – it opens two options:
- Open Order – Opens the detailed order view.
- Remove – Deletes the order.
To view or manage a specific order, the user must select a row and click Open Order. This opens the detailed Order page.

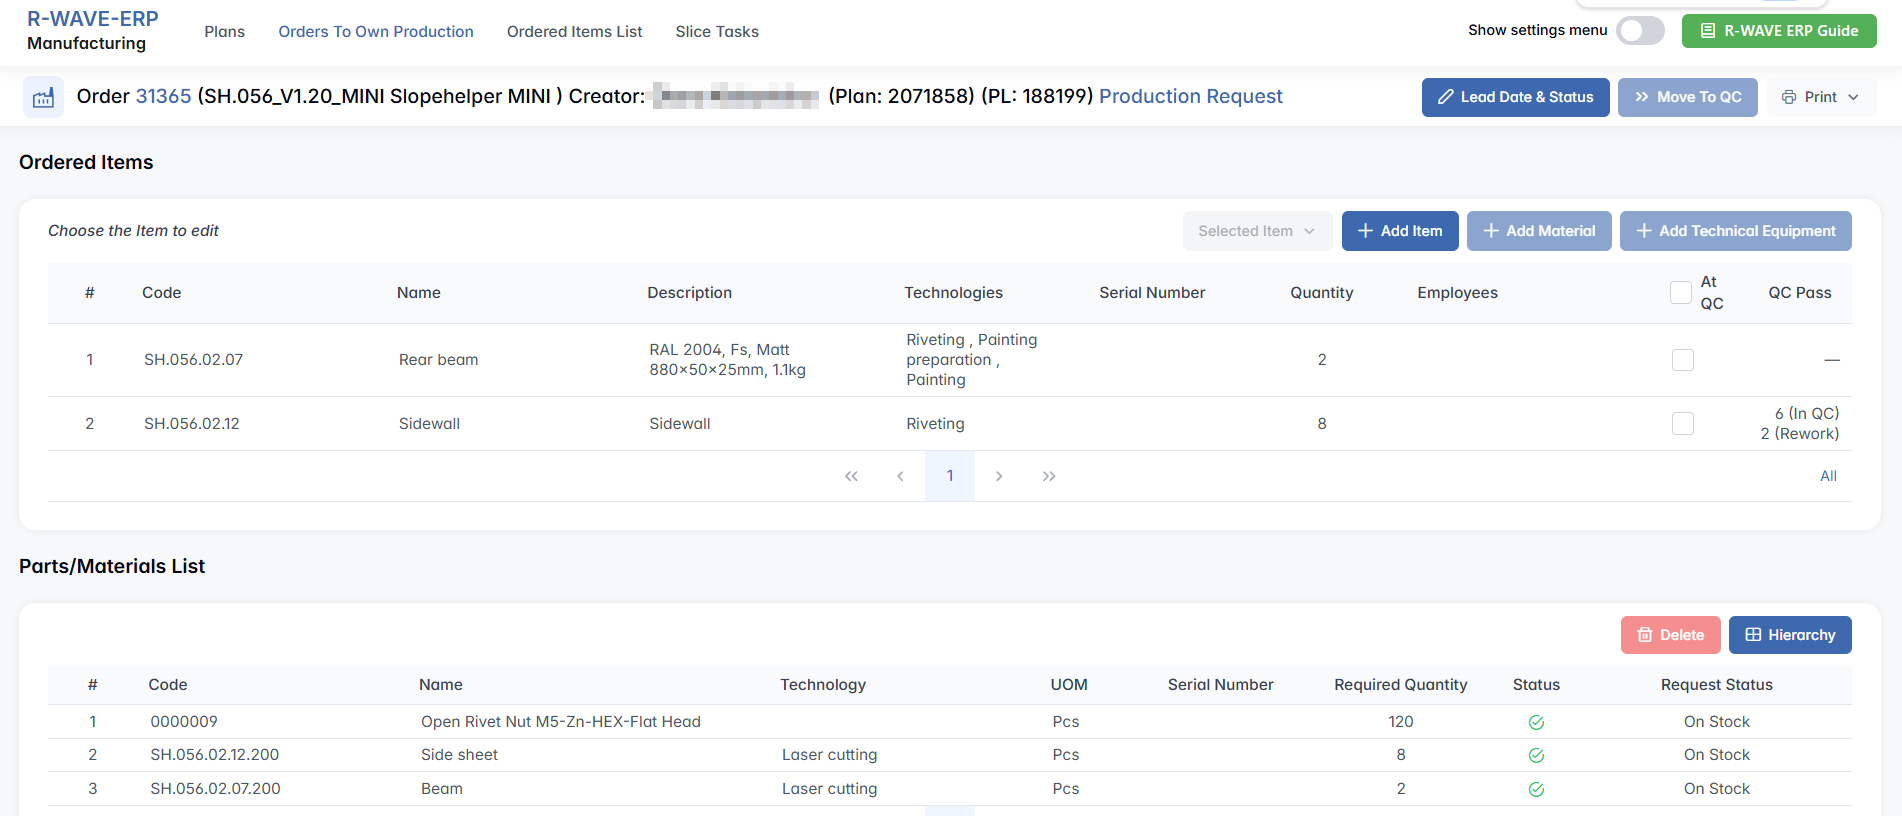
At the top of the page, a Production Request is available. Clicking it opens the corresponding material request for the warehouse, allowing quick access to what resources are needed or have already been prepared.
Ordered Items
Displays all items included in the order. Users can:
- Click Add Item to include new items in the order.


- Select an item row to activate the following actions under Selected Items:

- Edit – Modify order item quantity;

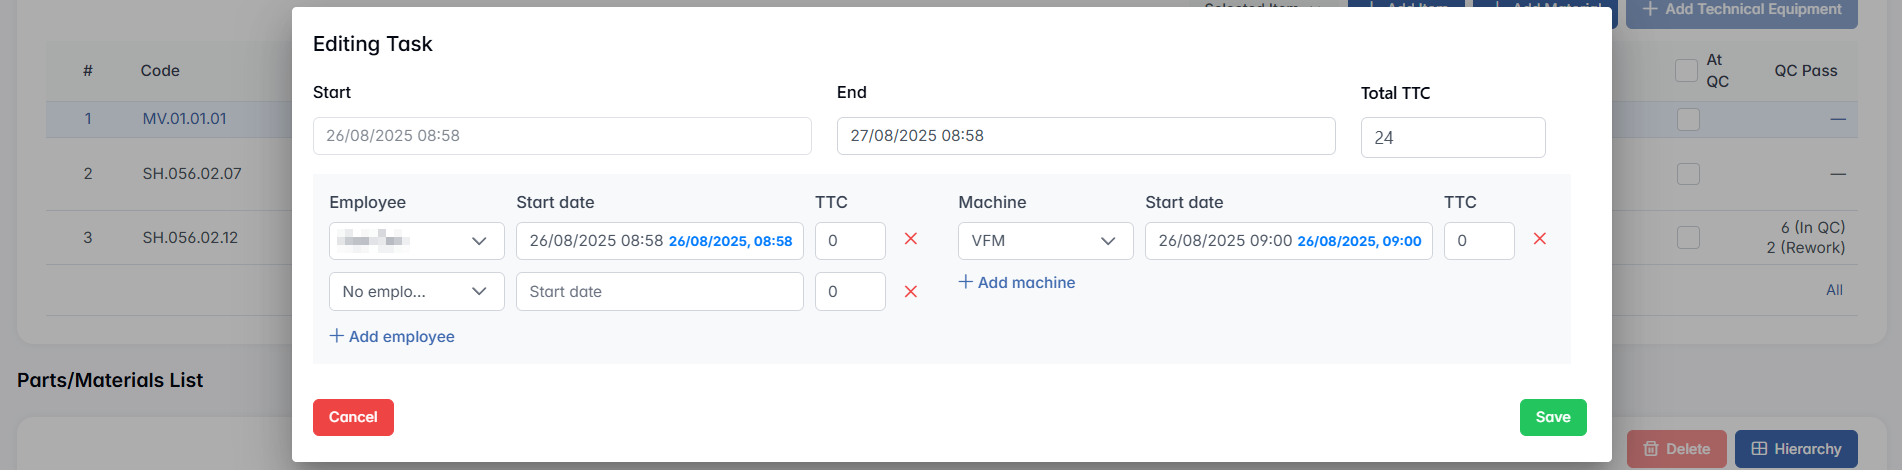
- Edit Task Planning – Opens a modal window where you can assign employees and machines to specific production tasks;

- Files – Attach related documents;
- Production Documentation – Add or review technical documents;
- Technology Documentation – Add or review documents related to used technologies;
-
Remove – Delete item from order;
-
Add Material – Add extra parts/materials required for this ordered item. This feature allows users to link warehouse materials to specific ordered items, indicating what internal components or parts will be supplied by the company rather than sourced externally.

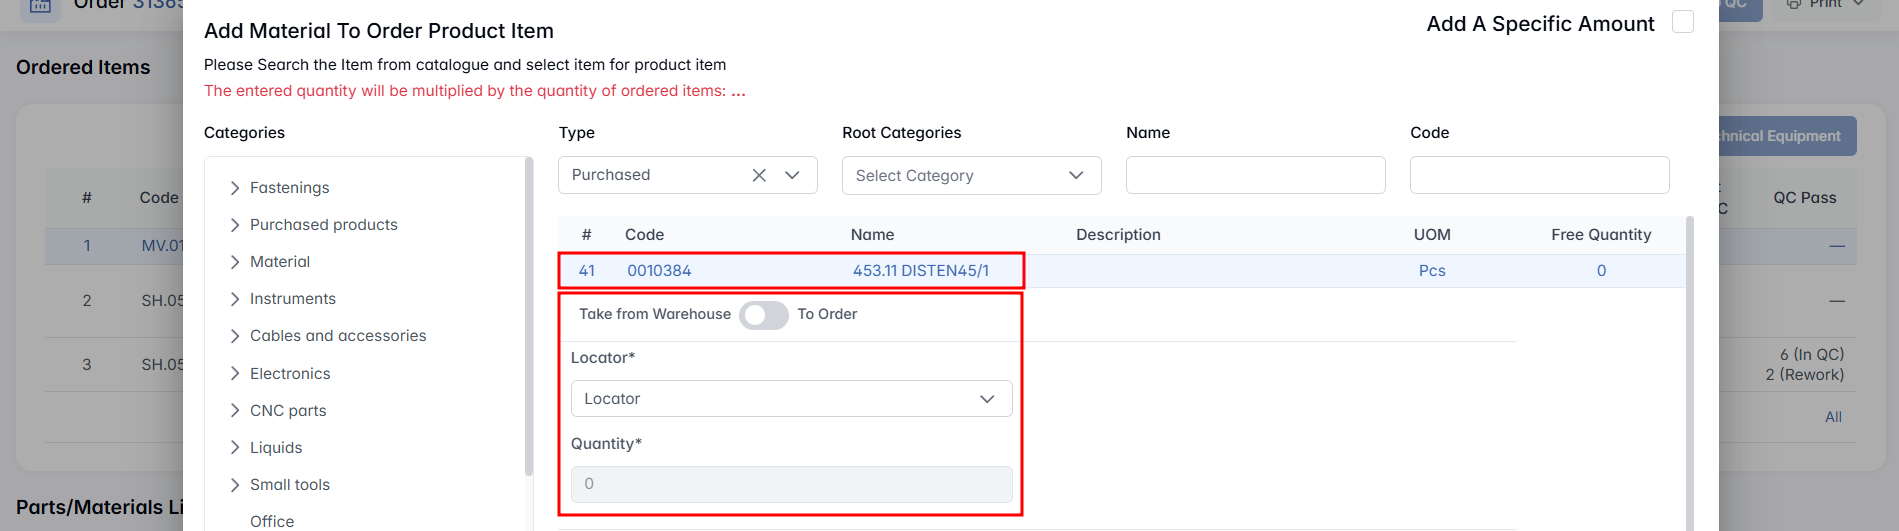
Clicking + Add Material opens a modal window:

- Add a specific amount – This checkbox allows the user to assign a fixed amount of material, regardless of the quantity of ordered items. If left unchecked, the entered quantity will be multiplied by the number of ordered items.
Search the item from the catalog (filters: Category, Type, Root Category, Name, Code). If a material is available:
- The Locator * field appears if Take from Warehouse is selected.
- The Quantity * field is always required.
Important: Items with NEW status cannot be selected.
Take from Warehouse / To Order – This toggle lets the user choose whether to take the material directly from the warehouse (if it is currently in stock) or to request it through procurement (if it is not available). When set to To Order, the request will be forwarded to the procurement department to initiate the purchase of the material. Once the material is delivered to the warehouse, it will be automatically assigned to the corresponding order.

Click Add to confirm your choice.
- Add Technical Equipment – Adds technical equipment (TE) to the production task. This button is available only for items that have predefined TE assigned for a specific process.

If you need to assign TE to an item that does not yet have it:
- Go to Warehouse > Items.
- Select the item and click Edit Item.
- Enable the checkbox Required Technical Equipment.
- Assign the necessary equipment for the corresponding technology.
When you click Add Technical Equipment:
- If no equipment is currently available in the warehouse, the system will display No Records Found.
- If equipment is in stock, it will appear in a modal window where you can select and add it.
Once added, the required TE will appear in the Technical Equipment section below. This section lists key details such as Code, Name, Technology, Locator, Quantity, and Status. From here, you can also remove the equipment if necessary.

Ordered Items Overview
The Ordered Items Overview section displays detailed information about items included in the production task. Each row represents an item with the following attributes:
- Code / Name – the unique identification code and the name of the item.
- Description – additional specification details for the item.
- Technologies – the technologies required for producing the item.
- Serial Number – the serial number if the item requires serial tracking.
- Quantity – the number of items to be produced.
- Employees – the personnel assigned to work on this item.
- At QC / QC Pass – tracks the item's progress through quality control.

To move items to quality control, select the checkbox in the At QC column and click the Move to QC button that appears in the upper-right corner.


Ordered Items List
Ordered Items List
The Ordered Items List tab provides a comprehensive view of all individual items that are scheduled for production across different orders. It allows you to:
- Review item-level details across multiple orders;
- Identify which items are missing materials;
- Group selected items into a new merged ordered items list;
- Apply filters based on product type, technology, or production status.

This tab is designed to provide a clear and manageable view of every item scheduled for production. It helps users monitor individual production items, identify material shortages early, and optimize production planning by enabling merging of items into fewer orders, improving workflow efficiency.
Filter Panel
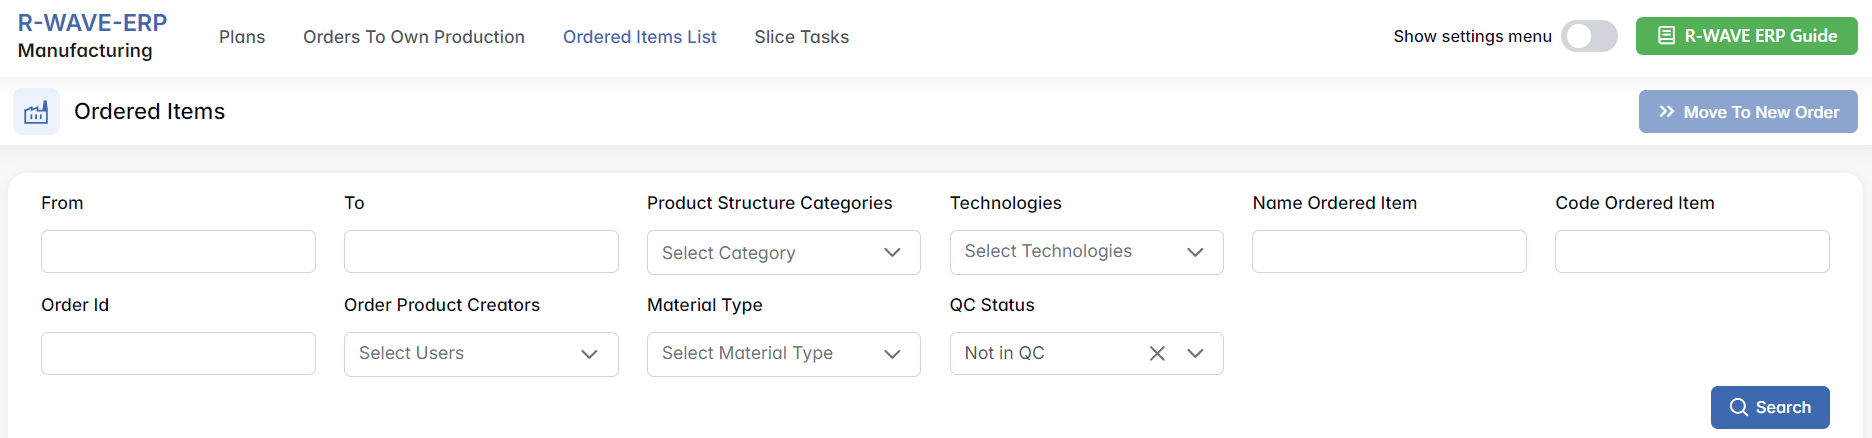
At the top of the page is a Filter Panel, which allows the user to narrow down the list of ordered items based on various criteria.

- From / To – Filter by the item's order creation date range;
- Product Structure Categories – Select relevant product structure categories;
- Technologies / Select Technologies – Multi-select list to filter by production technologies (e.g., Laser Cutting, Milling, Painting);
- Name Ordered Item – Search by item name;
- Code Ordered Item – Search by item code;
- Order ID – Enter the order number directly;
- Order Product Creators / Select Users – Filter by users who created the original order;
- Material Type / Select Material Type – Multi-select filter for material types;
- QC Status – Filter by current QC status;
At the end of the panel, a Search button applies all selected filters.
Ordered Items Table
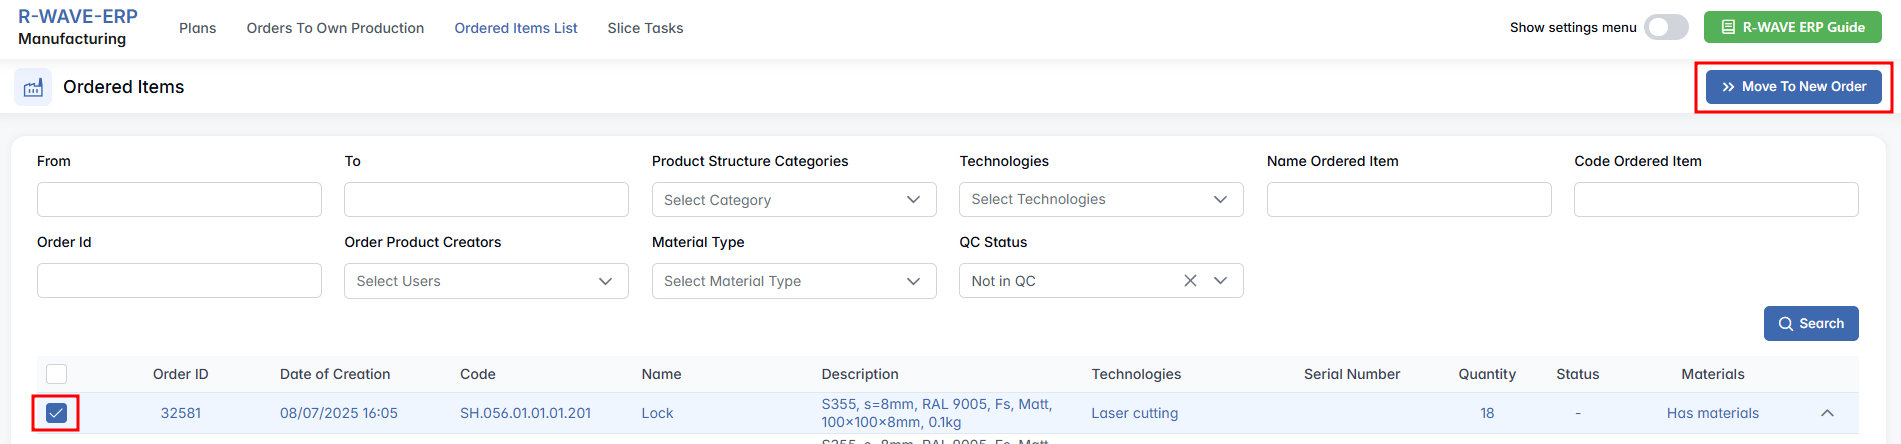
Below the filters, a table displays all matching items. Each row represents a single item scheduled for production and includes all relevant data. A checkbox appears at the beginning of each row, allowing the user to select one or more items.

- Order ID – Each value in this column is clickable, allowing the user to open the full order page.
- Expand Record – Each production record can be expanded to display the list of related materials. To do this, click the arrow icon (▾) on the right-hand side of the row.

When expanded, the section shows details such as: Code and Name of each material, Technology (if assigned), UOM (Unit of Measure), Serial Number (if applicable), Required Quantity, Status, Request Status (e.g., On Stock). This view allows users to verify whether all necessary materials are available for the task.
Move to New Order
When at least one row is selected, a Move To New Order button appears in the top-right corner of the page. Clicking this button merges all selected items into a new production order.
The system will automatically redirect the user to the newly created Order #number page (as described in detail in the previous tab: Orders to Own Production). This functionality allows for efficient grouping of scattered ordered items into a consolidated batch for production.
Slice Task
Slice Task
The Slice Task page provides a detailed overview of production tasks scheduled for a specific date or period. This tab is especially useful to monitor task assignments, track employee workload, and assess machine utilization.
- Task Planning and Assignment – Employees assigned to tasks during production planning appear here, enabling easy tracking of who is responsible for each task.
- Filtering and Sorting – Quickly locate tasks by filtering for specific employees, statuses, technologies, or production list origins. You can also sort tasks by employee or machine durations to balance workloads efficiently.
- Monitoring Status – Easily see the current status of tasks to identify which are on schedule (Ordered) and which face delays or material shortages (Deficit).
Action Buttons
At the top of the page, you will find several important buttons to customize the displayed data:

- Print – Prints the current view of the slice tasks list.
- Choice Employees Date – Opens a calendar to select a specific day to view tasks assigned to employees on that day.
- Choice Employees Period – Opens a dialog to select a start and end date, showing tasks assigned to employees within that period.
- Choice Task Date – Opens a calendar to select a specific day to view all tasks scheduled for that day.
- Choice Task Period – Opens a dialog to select a start and end date, displaying all tasks scheduled within that time frame.
Filter Tab
Below the header buttons is the Filter Tab, allowing you to narrow down the list of tasks by several criteria:
- Employees / Choose Employees – Multi-select dropdown to filter tasks assigned to one or more employees.
- Status – Filter tasks by their current status (e.g., Ordered, Deficit, Completed).
- Technologies – Filter by the production technology or process used for the task (e.g., Assembly, Cable assembly).
- Production List Origin – Filter tasks based on the origin production list associated with the task.
Slice Tasks Table
The main part of the page is a table that lists all production tasks matching the selected filters. Each row corresponds to a single task or work slice.

- Code – Item code with version (e.g., AH.01_V1.10).
- Name – Item name or description.
- Order – Production order ID linked to the task.
- Start Date – When the task is scheduled to start (date and time).
- End Date – When the task is scheduled to finish (date and time).
- Technology – Technology or production process involved.
- Qnty – Quantity of items to be produced in this task.
- Employees / Employees Start/End Duration – Employees assigned to perform this specific task and its duration. Clicking this column toggles sorting (ascending/descending).
- Machines / Start/End Duration – Machines assigned to perform this specific task and its duration. Clicking this column toggles sorting (ascending/descending).
- Status – Current task status (e.g., Ordered, Deficit).
Hidden Settings in the Manufacturing Module
Hidden Settings in the Manufacturing Module
The Manufacturing module includes a Hidden Settings menu, which can be accessed by enabling the Show settings menu toggle switch located in the top-right corner of the screen.

Once activated, additional configuration tabs become visible:
- Employees
- Positions
- Machines
- Order Statuses
- Plan Statuses
These settings allow you to configure and manage key production parameters, ensuring accurate task assignments, consistent status tracking, and organized resource data throughout all manufacturing operations.
Employees
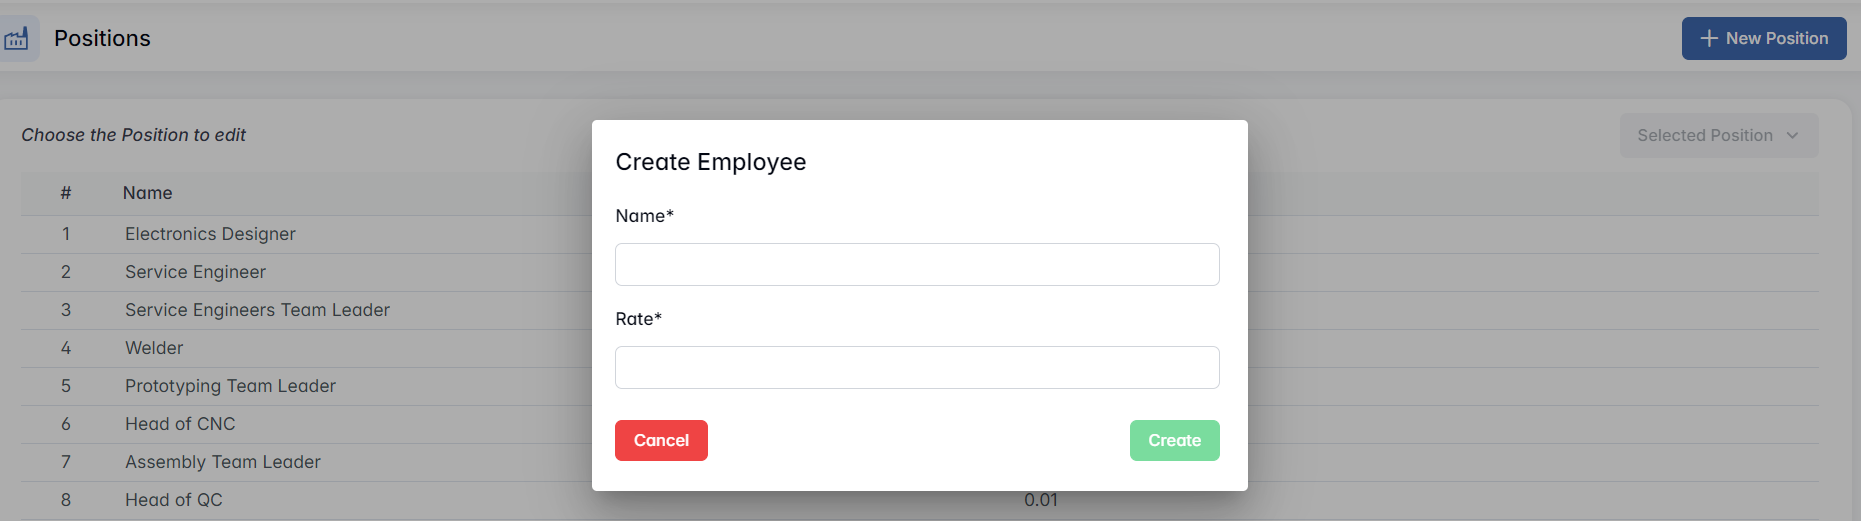
This tab allows you to manage the list of employees involved in manufacturing tasks. You can create new employee records, edit existing ones, or remove entries.

Creating a New Employee
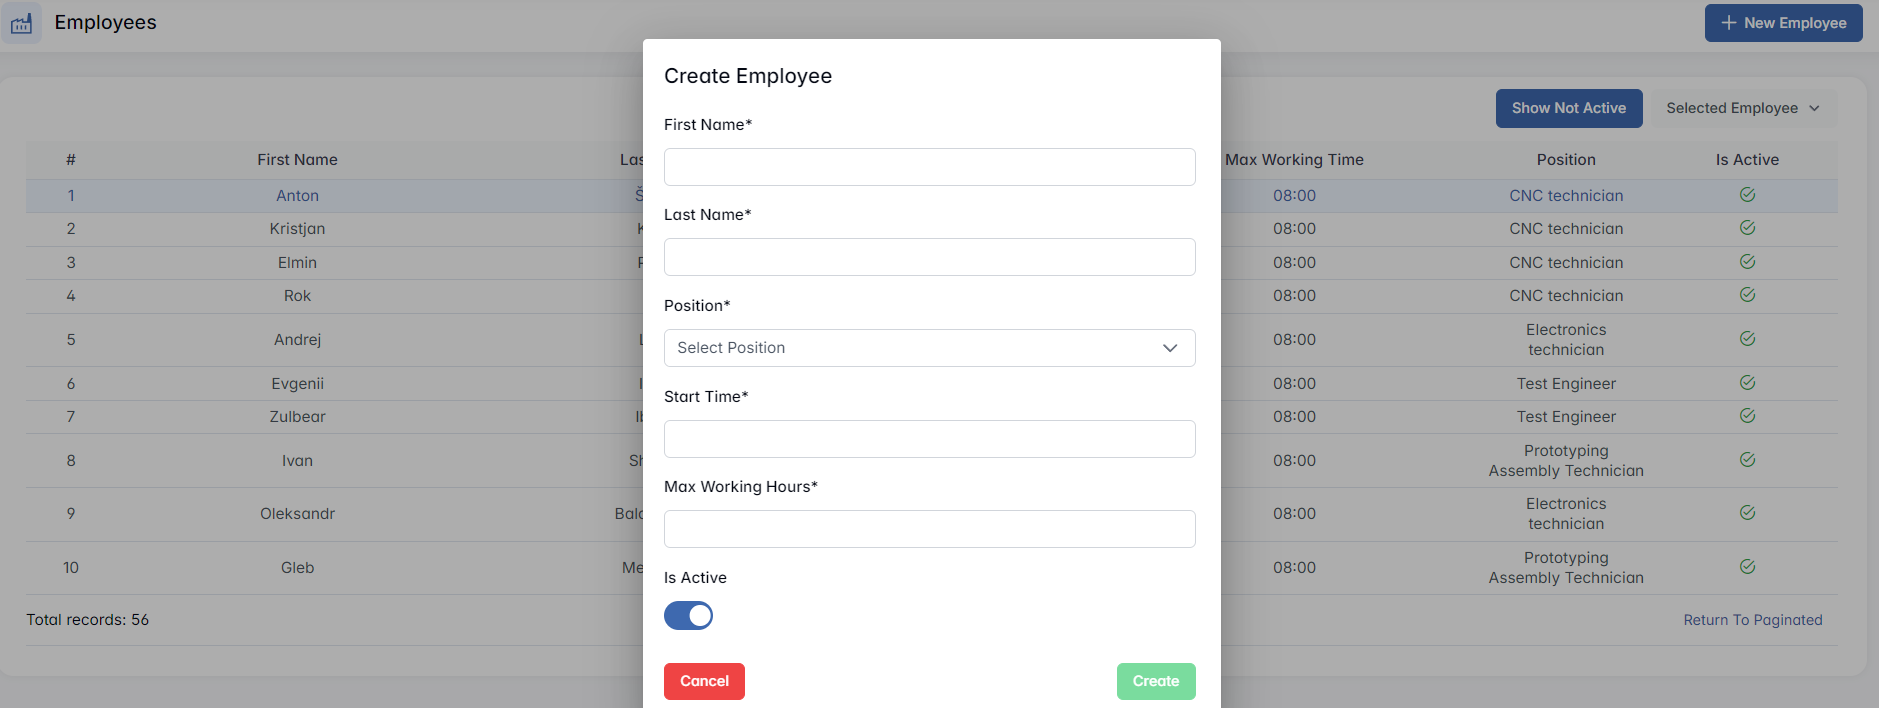
Click the + New Employee button to open the creation form. Fill in the required fields:


- First/Last Name * – first/last name of the employee
- Position * – assigned role or job title within the manufacturing process
- Start Time * – when the employee's workday begins (e.g., 08:00)
- Max Working Hours * – total daily working time (e.g., 8)
- Is Active – toggle switch to indicate whether the employee is currently active in the system
Click Create to save the new employee record.
Employee Table
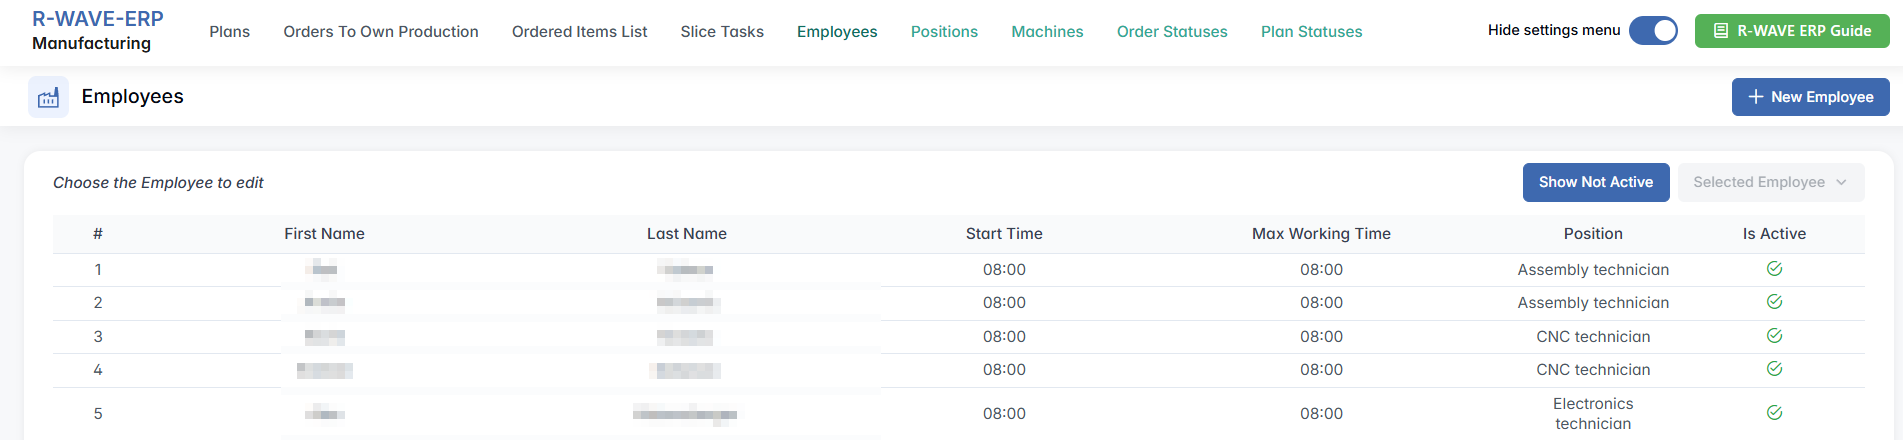
Below the form is a table displaying all active employees.

To view inactive employees, click the Show Not Active button beneath the table. This button then toggles to Show Active, allowing you to switch views.
Editing and Removing Employees
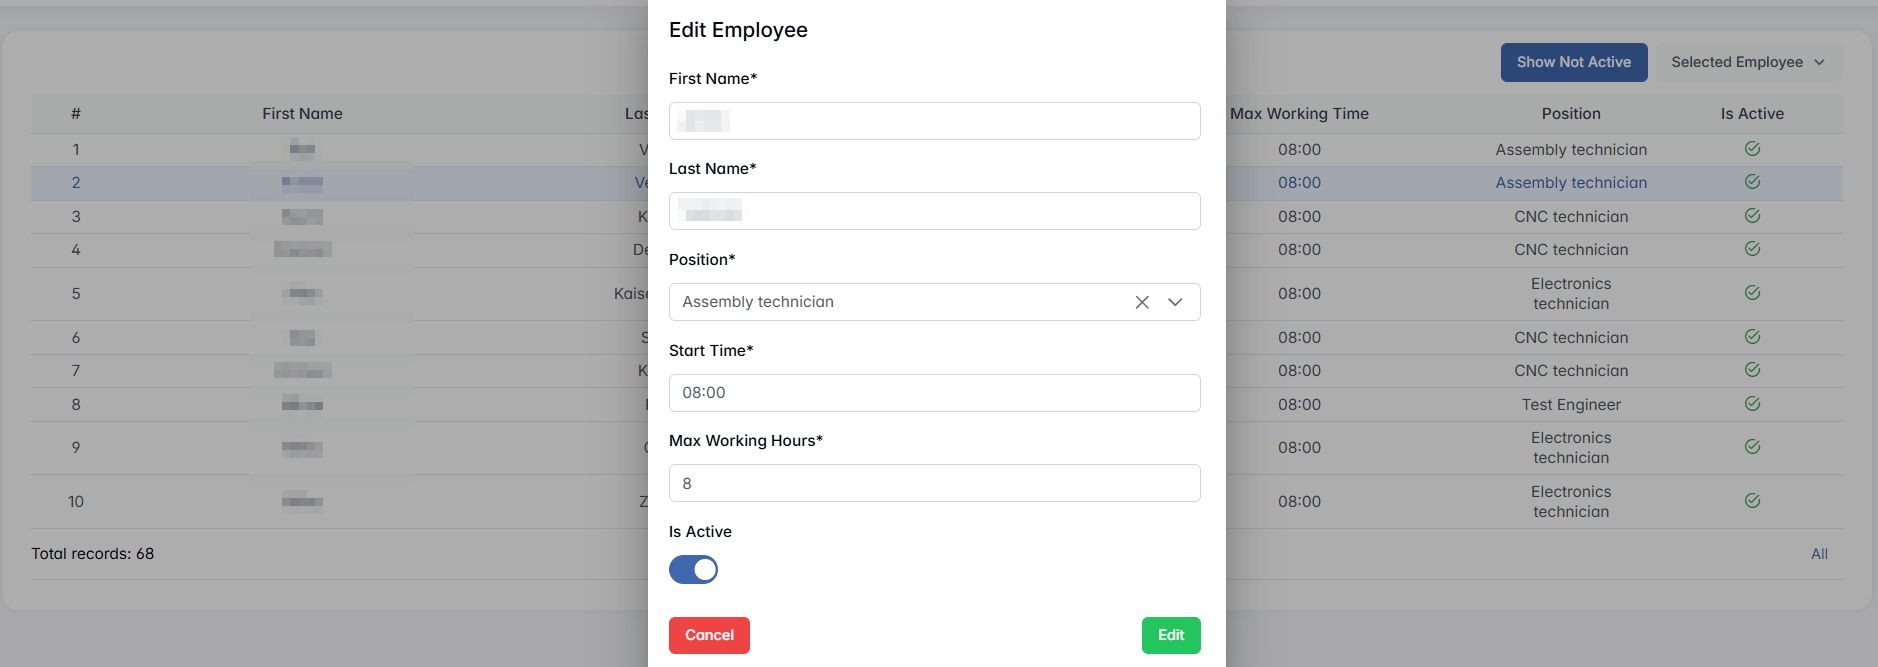
Select an employee from the table to activate the Selected Employee panel. Here, you can:

- Click Edit to update the employee's information
- Click Remove to delete the record
The Edit Employee form shows the same fields as the creation form and allows you to update the details, including activation status.
Positions
This tab is used to define and manage employee positions within the manufacturing environment. Each position has a name and an associated rate used for planning or cost evaluation purposes.

Creating a New Position
Click the + New Position button to open the creation form. Fill in the required fields:

- Name * – the title of the position (e.g., Service Engineer)
- Rate * – numerical value (e.g., 0.01) representing the hourly or cost rate
Click Create to save the position.
The table displays all created positions along with their assigned rates:

Editing and Removing Positions
Select any position from the table to activate the Selected Position button. Here, you can:
- Click Edit to update the position name or rate

- Click Remove to delete the position
Machines
This tab allows you to manage the list of machines used in the manufacturing process, including their working schedules and descriptions. Proper configuration ensures accurate task scheduling and workload distribution.

Creating a New Machine
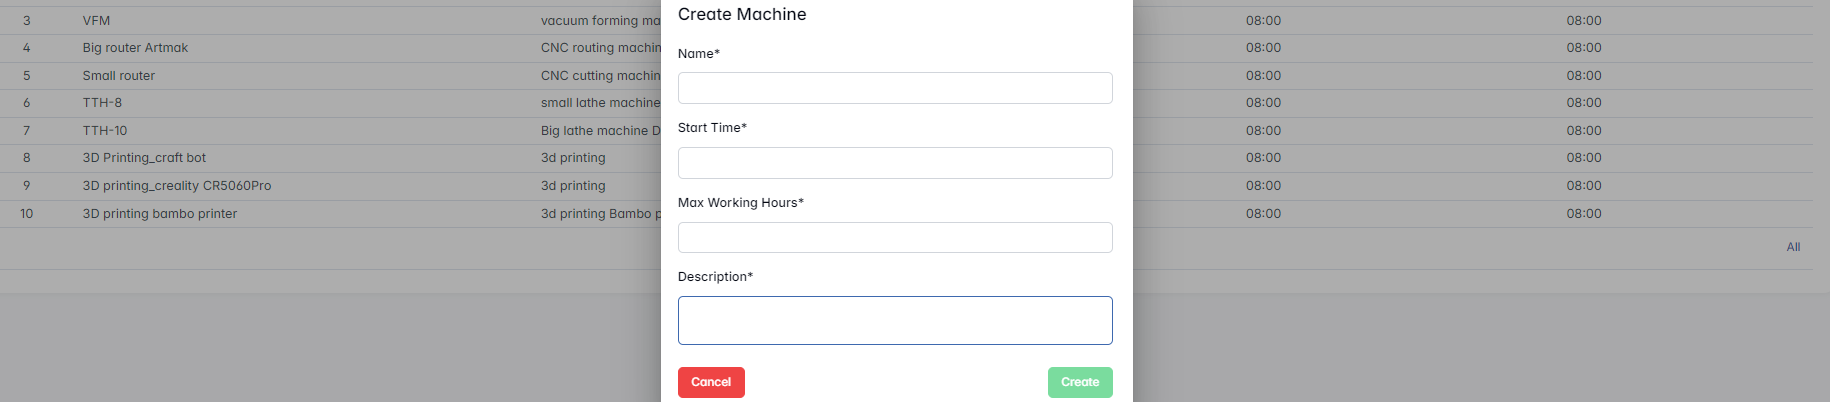
Click the + New Machine button to open the creation form. Fill in the following required fields:


- Name * – name of the machine (e.g., IMM)
- Start Time * – when the machine's workday begins (e.g., 08:00)
- Max Working Hours * – total daily working time (e.g., 8)
- Description * – short description of the machine (e.g., Injection molding machine)
Click Create to save the new machine.
Editing and Removing Machines
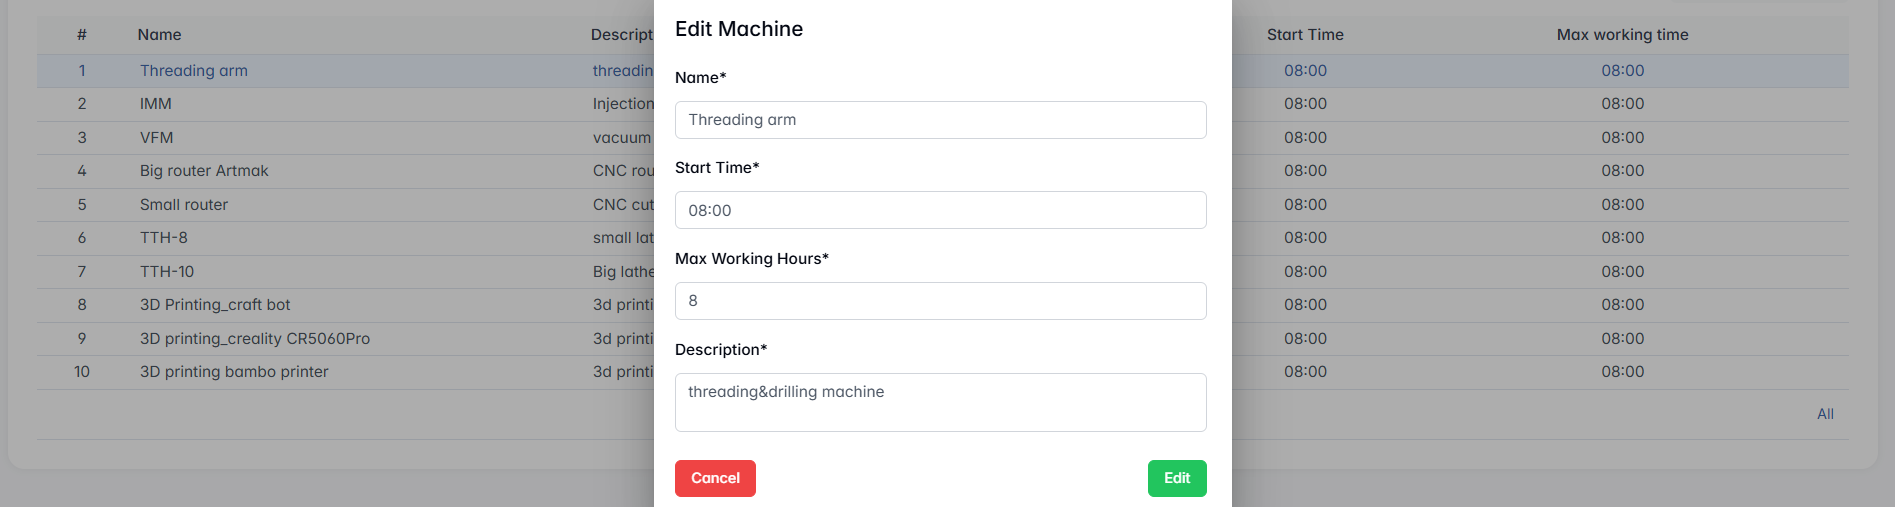
Select a machine row to activate the Selected Machine panel, where you can:
- Click Edit to update the machine details

- Click Remove to delete the machine from the list
Order Statuses
This tab allows you to manage the manual and automatic statuses used to track production orders throughout their lifecycle. Well-defined statuses help ensure consistency in communication and task flow across the system.

Manual Statuses
You can create, edit, or remove custom statuses that are manually assigned during the production process.
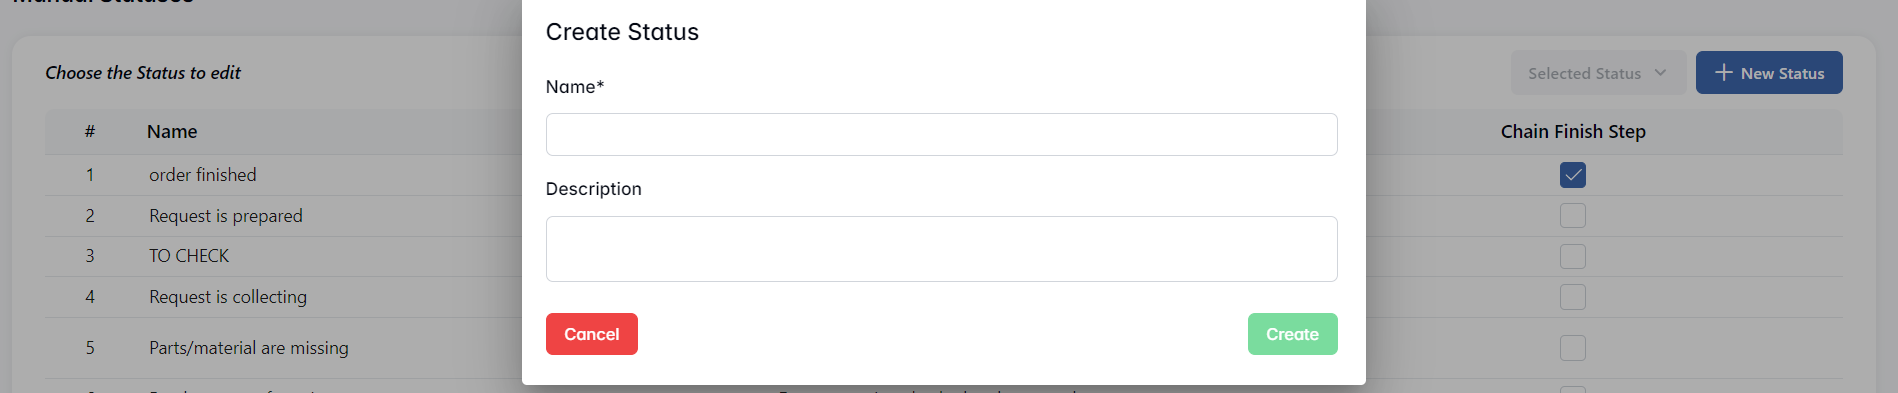
+ New Status – opens the creation form with the following fields:

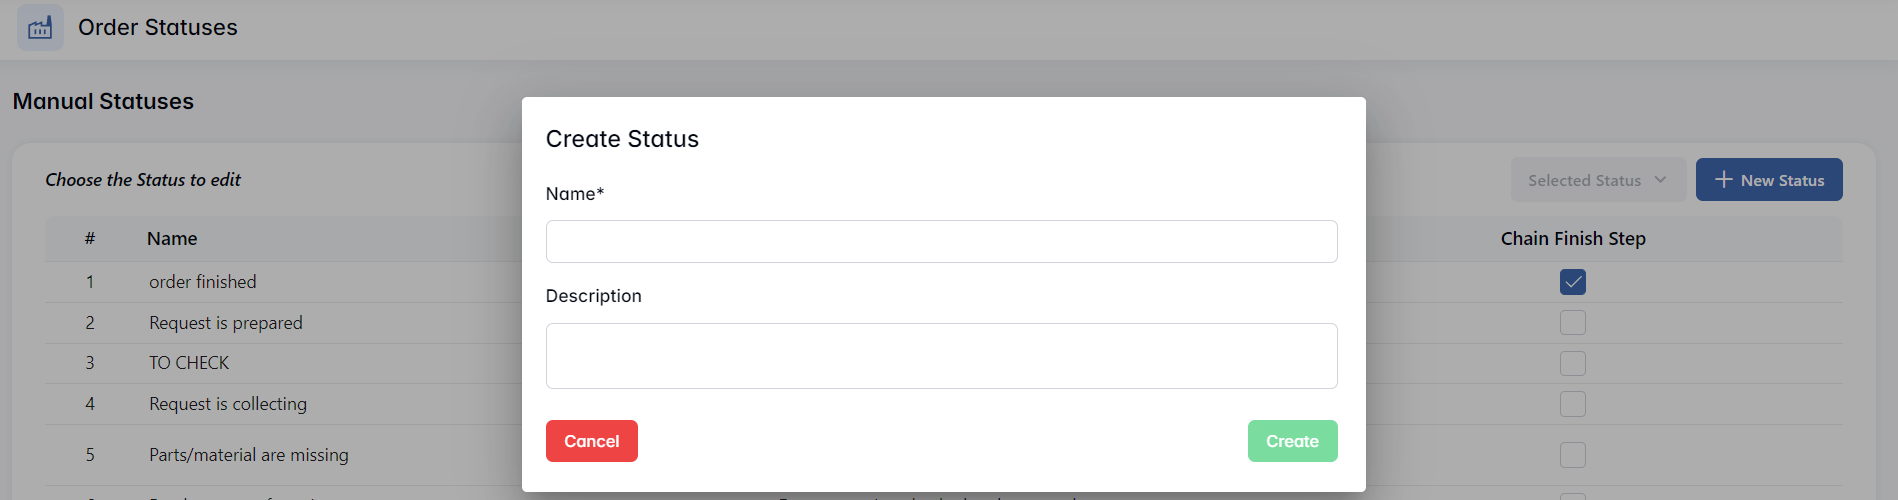
- Name * – name of the status
- Description – additional explanation or instruction
Click Create to save the new status.
Selected Status – becomes active when a status is selected from the table, allowing you to:

- Edit the status details

- Remove the status from the list
Chain Finish Step – a checkbox indicating whether the status is considered a final step in the workflow.
Automatic Statuses
These are system-generated statuses that reflect changes in production automatically. They can only be edited, not deleted or manually created.
The Edit Status button becomes active upon row selection. With this button the user can change the name of the status.

- Is Active – checkbox to enable/disable the status in the workflow
- Chain Finish Step – a checkbox indicating whether the status is considered a final step in the workflow
Plan Statuses
This tab allows you to manage the statuses used to track stages of production planning. These statuses help define and communicate progress throughout the planning workflow.

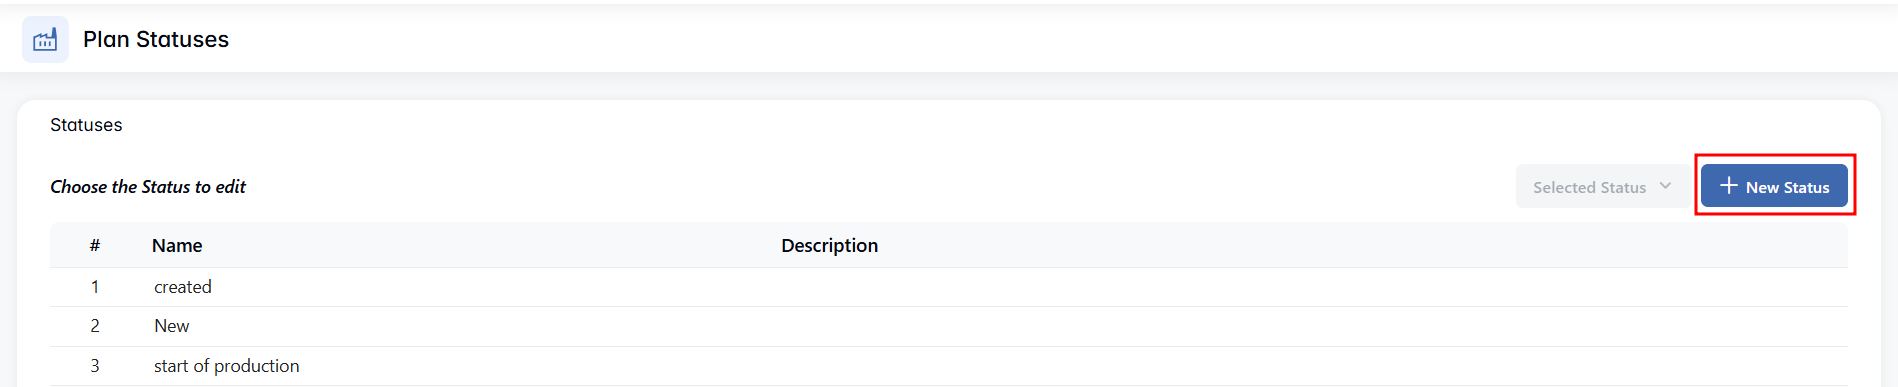
Creating New Plan Status
Click the + New Status button to open a form for adding a new status. The form includes:


- Name * – the status label (e.g., start of production)
- Description – optional details about how or when this status is used
Click Create to save the new status.
Managing Existing Statuses
Select a row in the table to activate the Selected Status button. This unlocks two actions:

- Edit – update the name or description
- Remove – delete the selected status from the list