Reports Module
The Reports module provides access to detailed financial and logistical documentation across the ERP system. It includes multiple specialized reporting sections such as Invoices, Cost Report, Products Cost, Warehouse Balance, Out, In, Item Card, Accounting Configuration, and Payments Checker. Each section offers configurable filters, data views, and exportable reports to assist with procurement, delivery, auditing, and accounting processes. Common actions you can perform in the Reports module include Apply Filter, Clear Filter, and Generate Reports.
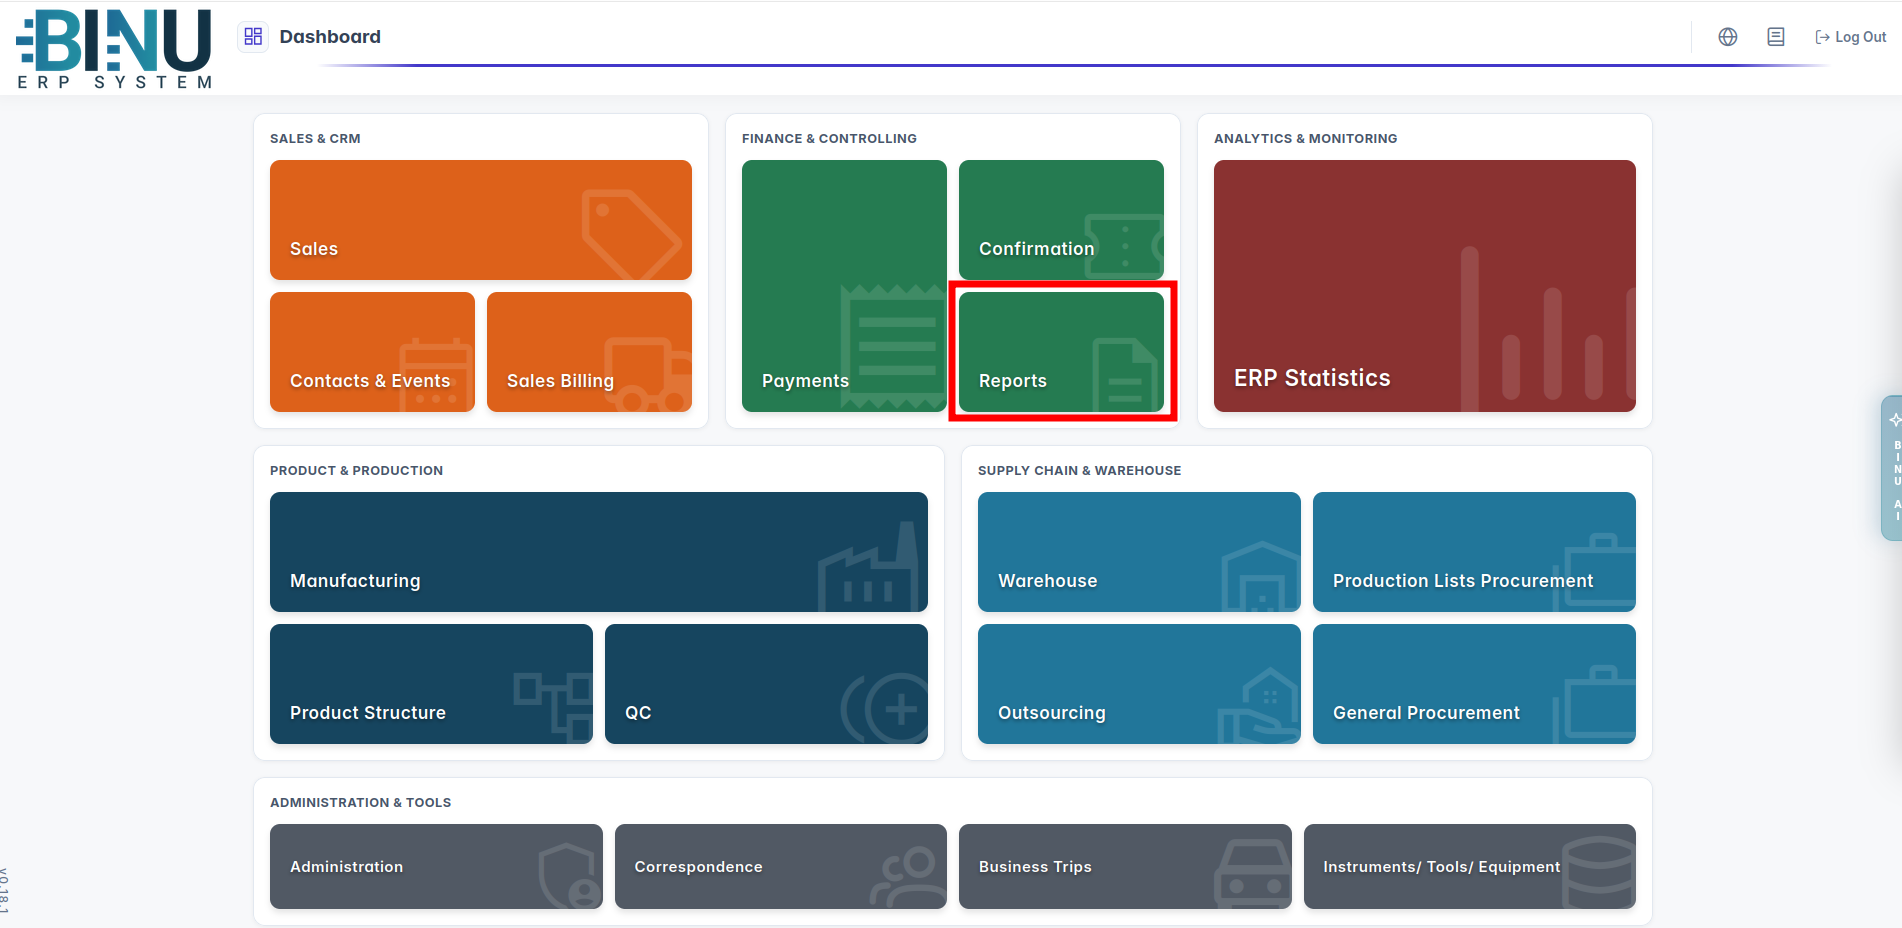
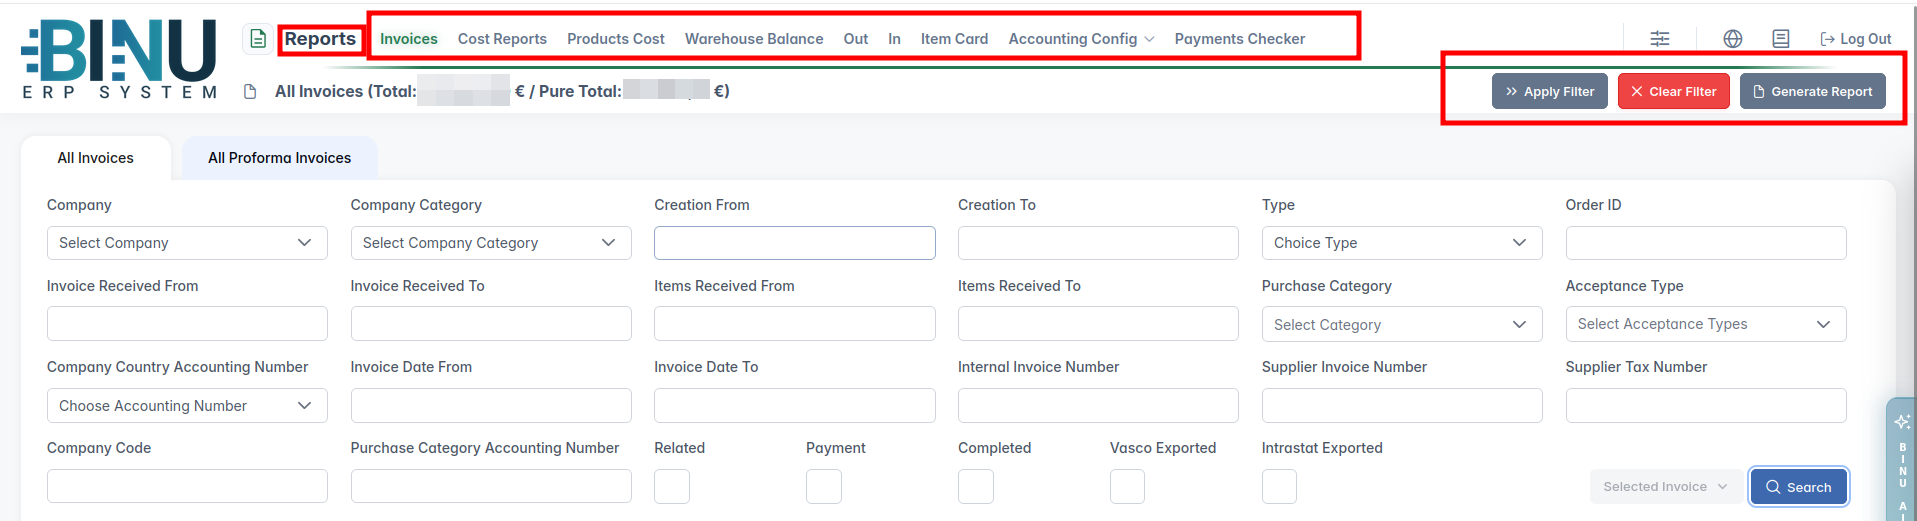
On the Accounting Configuration tab, users can configure the Company Accounting Number, Nomenclature Accounting Number, Technologies Accounting Number, Purchase Categories Accounting Number, Auxiliary Invoices Accounting Number, and Accounting Categories.
Under the Generate Reports feature, users can export data to Vasco, Intrastat, or Intrastat Excel, or directly save the filtered records as an Excel (.xlsx) spreadsheet.
The BINU ERP Guide and AI Assistant Tools {#binu-erp-guide}
The BINU ERP Guide and AI Assistant Tools
The BINU ERP system provides tools to support users in navigating and understanding the processes and functionalities of the system. These tools — the BINU ERP Guide and the BINU AI Assistant — include a built-in contextual help. They are non-intrusive and can be closed or reopened as needed, allowing users to remain focused on their current workflow without interruption.
When you click the BINU ERP Guide icon in the upper-right corner of the screen, the pop-up guide window opens. This feature is available across different modules and is designed to help users understand where they are in the system and how to use the current section effectively.
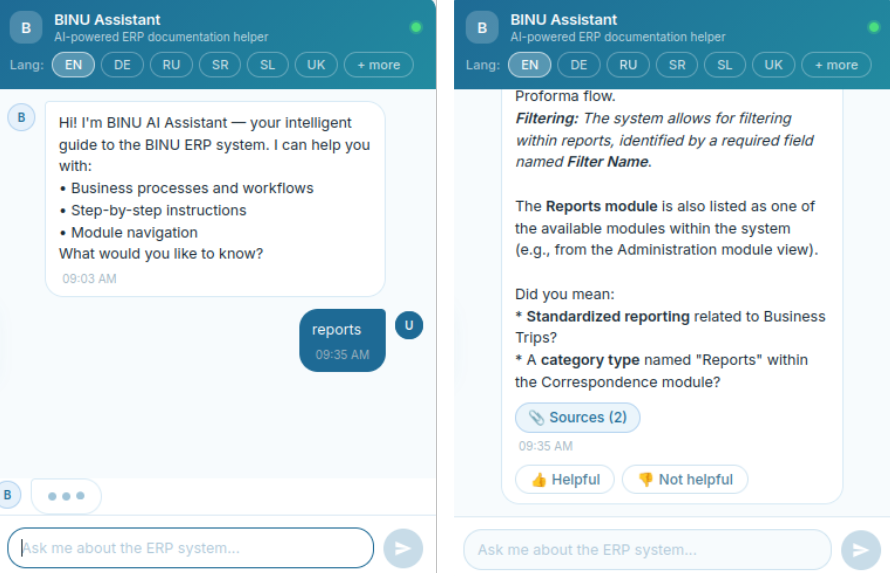
When you click the BINU AI feature on the side of the screen, the chat window opens, where users can choose their language of conversation. The supported languages are: English, Bulgarian, Croatian, French, German, Hungarian, Italian, Romanian, Russian, Serbian, Slovenian, Spanish, Turkish, and Ukrainian.
The BINU AI Assistant provides explanations and documentation for all topics related to the BINU ERP system. Users can ask about specific terms, business processes, system functionalities, or request documentation on a particular topic. To begin, type your question in the input field at the bottom of the chat window.
The BINU ERP Guide: Quick Overview
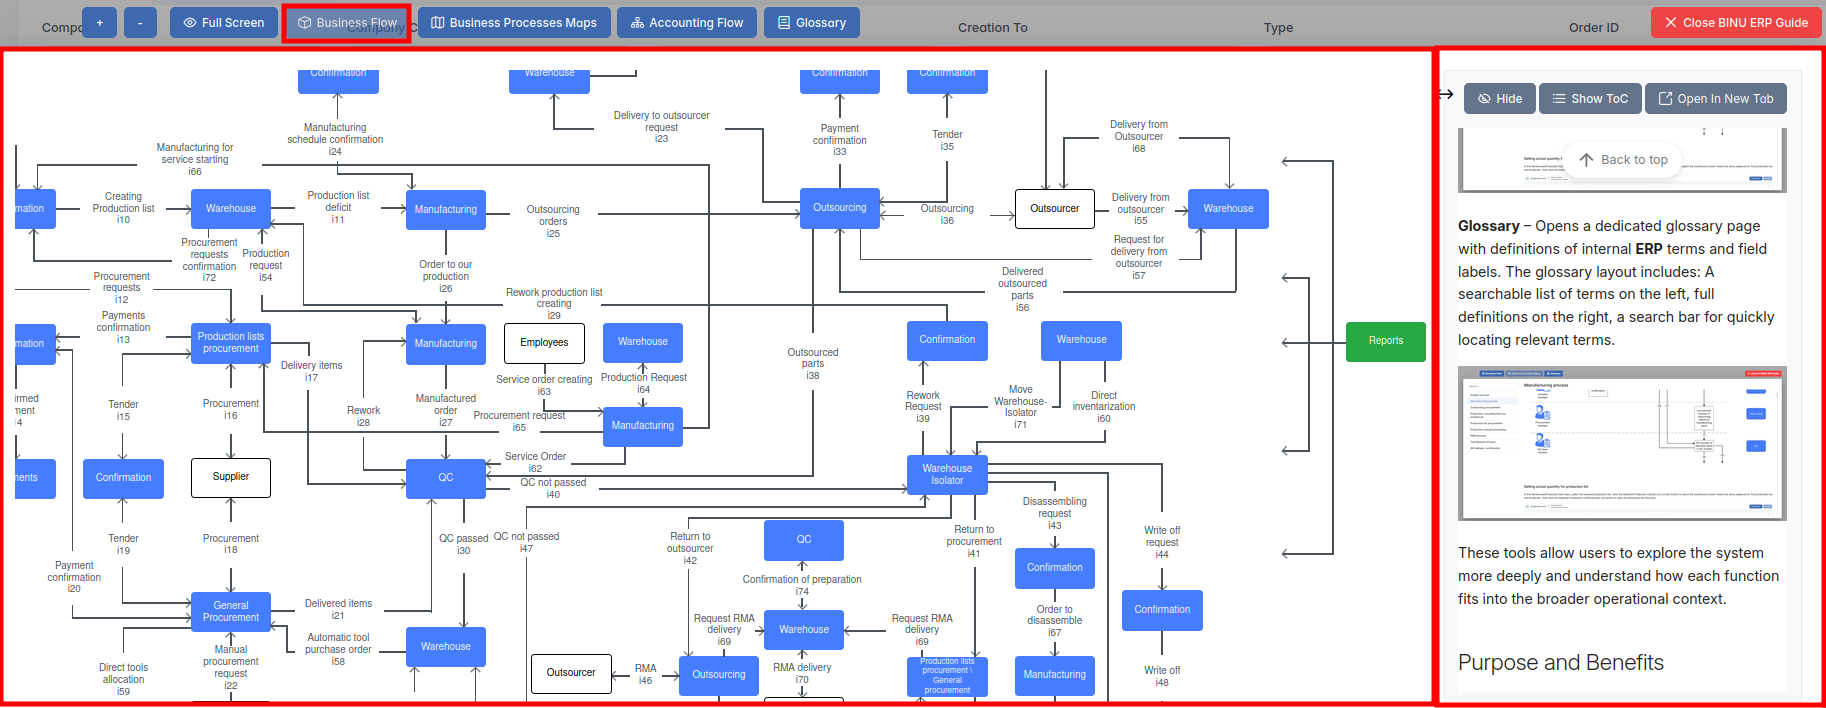
When you click the BINU ERP Guide book icon, you land on the Business Flow map. It has two main sections: the left panel displaying the business flow map and the right panel showing the functional overview.
- Left panel — Business Flow Map — displays a visual diagram of the business processes. It shows how each module is interconnected; for example, you can see how Sales, Manufacturing, Procurement, CRM, QC, and Warehouse are interconnected.
- Right panel — Functional Overview — provides a concise, bullet-style instruction list describing the key operations available in the current module/tab.
Top Bar Options
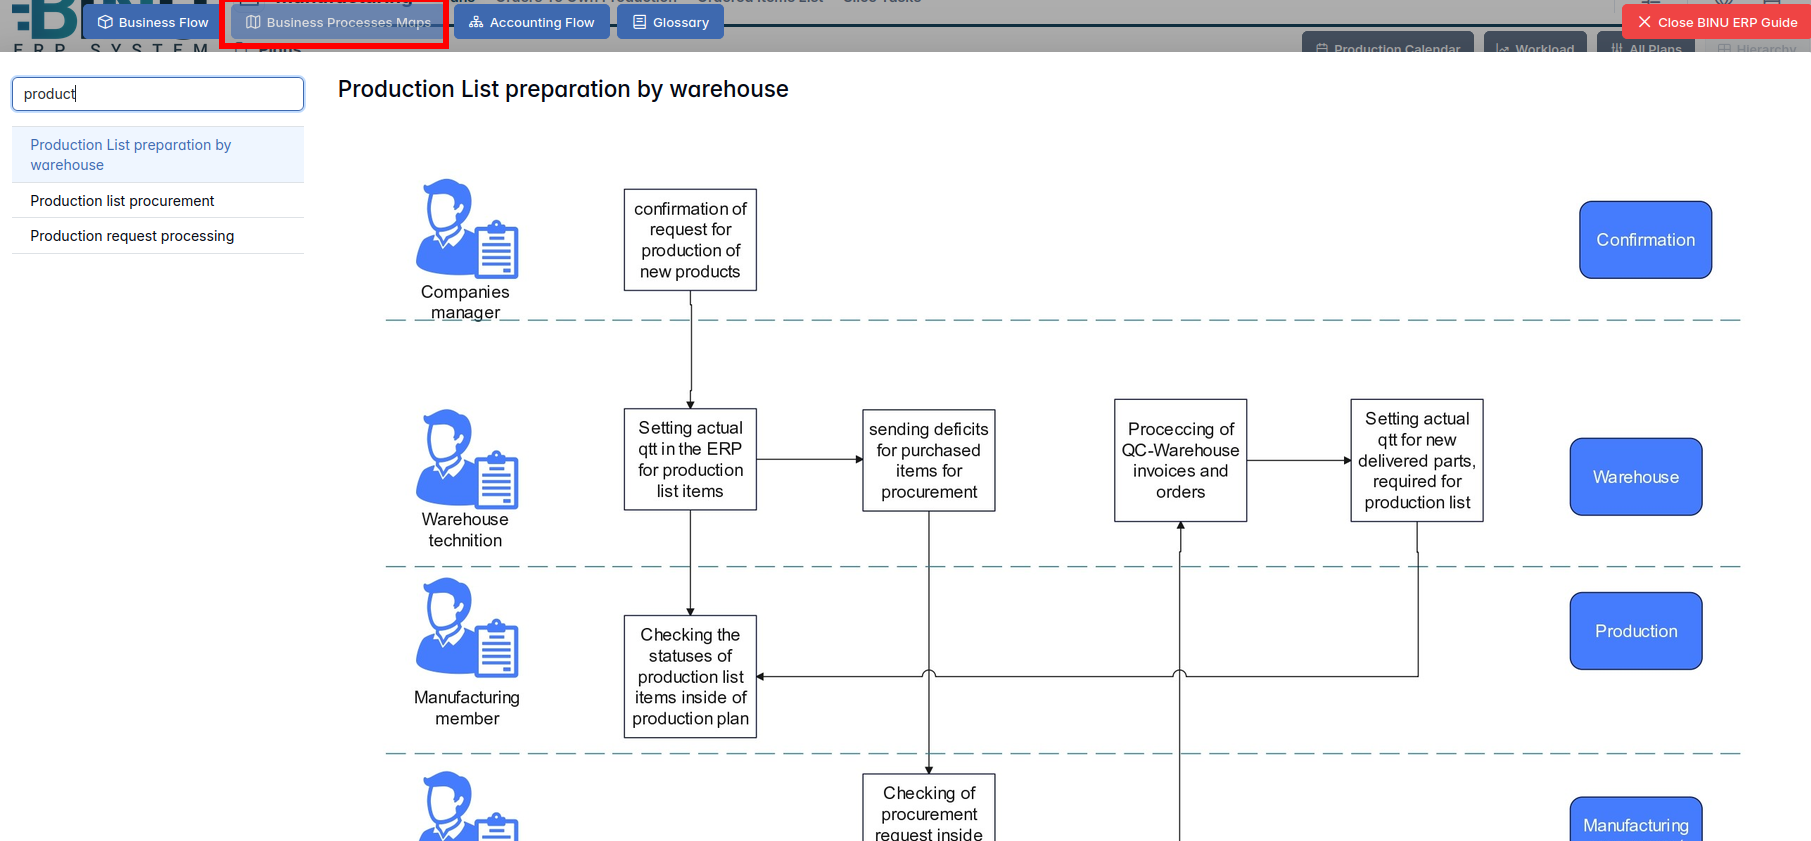
At the top of the ERP Guide window, you'll find optional tools for deeper understanding: Business Processes Maps, Accounting Flow, and Glossary. The Accounting Flow is meant for financial departments.

Business Processes Maps
Business Processes Maps provides a visual representation of the company's operational structure and business flow. It helps the user understand how the current module fits into the larger operational structure and makes it easy to grasp the upstream and downstream dependencies within the business processes. The Business Processes Maps can be accessed from various modules.
Accounting Flow: Data Flow Graph and Responsibility Matrix
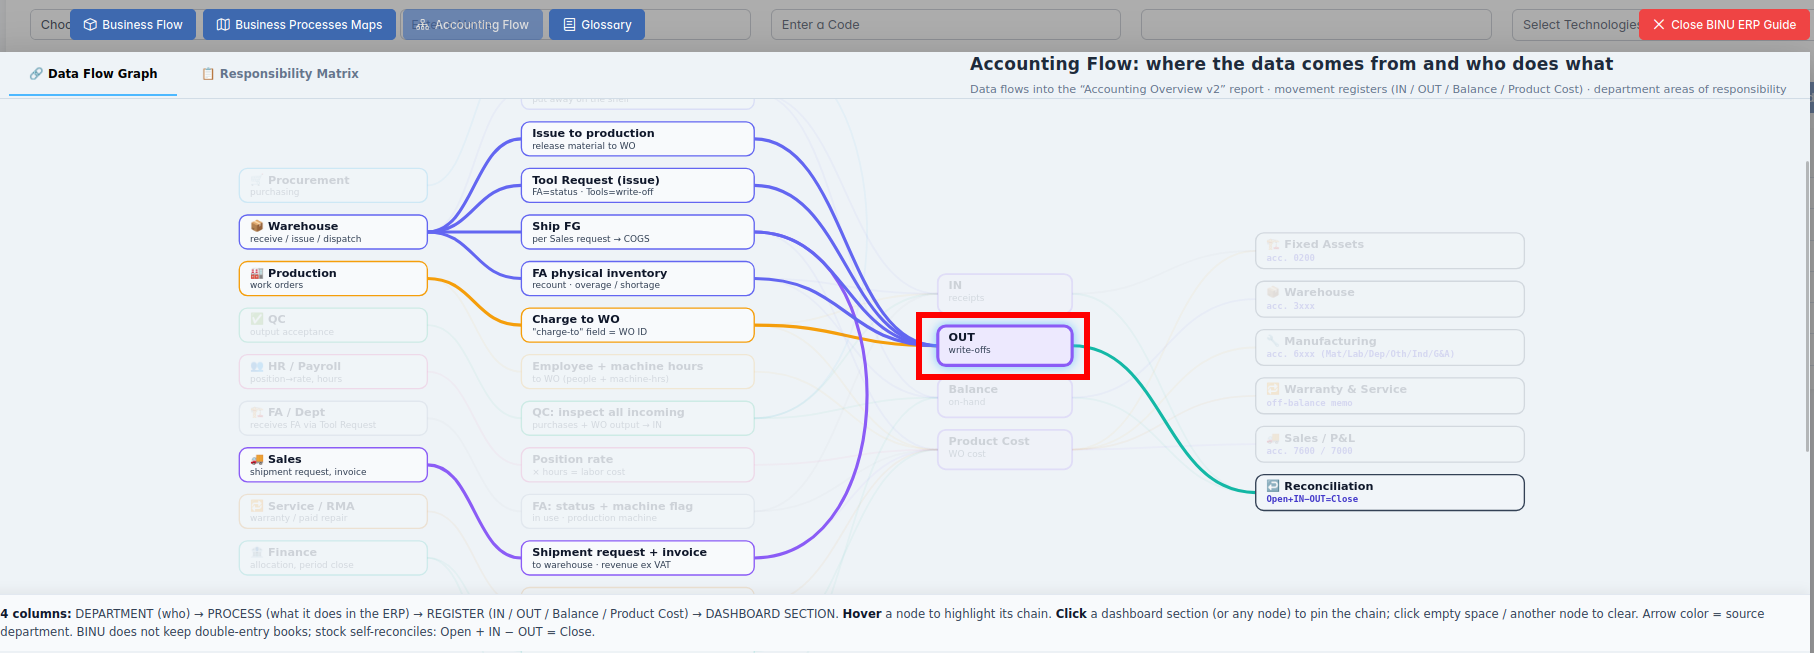
Accounting Flow is a tool designed for the finance department; it shows where the data originates and defines responsibilities. For this purpose, it consists of two parts: a Data Flow Graph and a Responsibility Matrix.
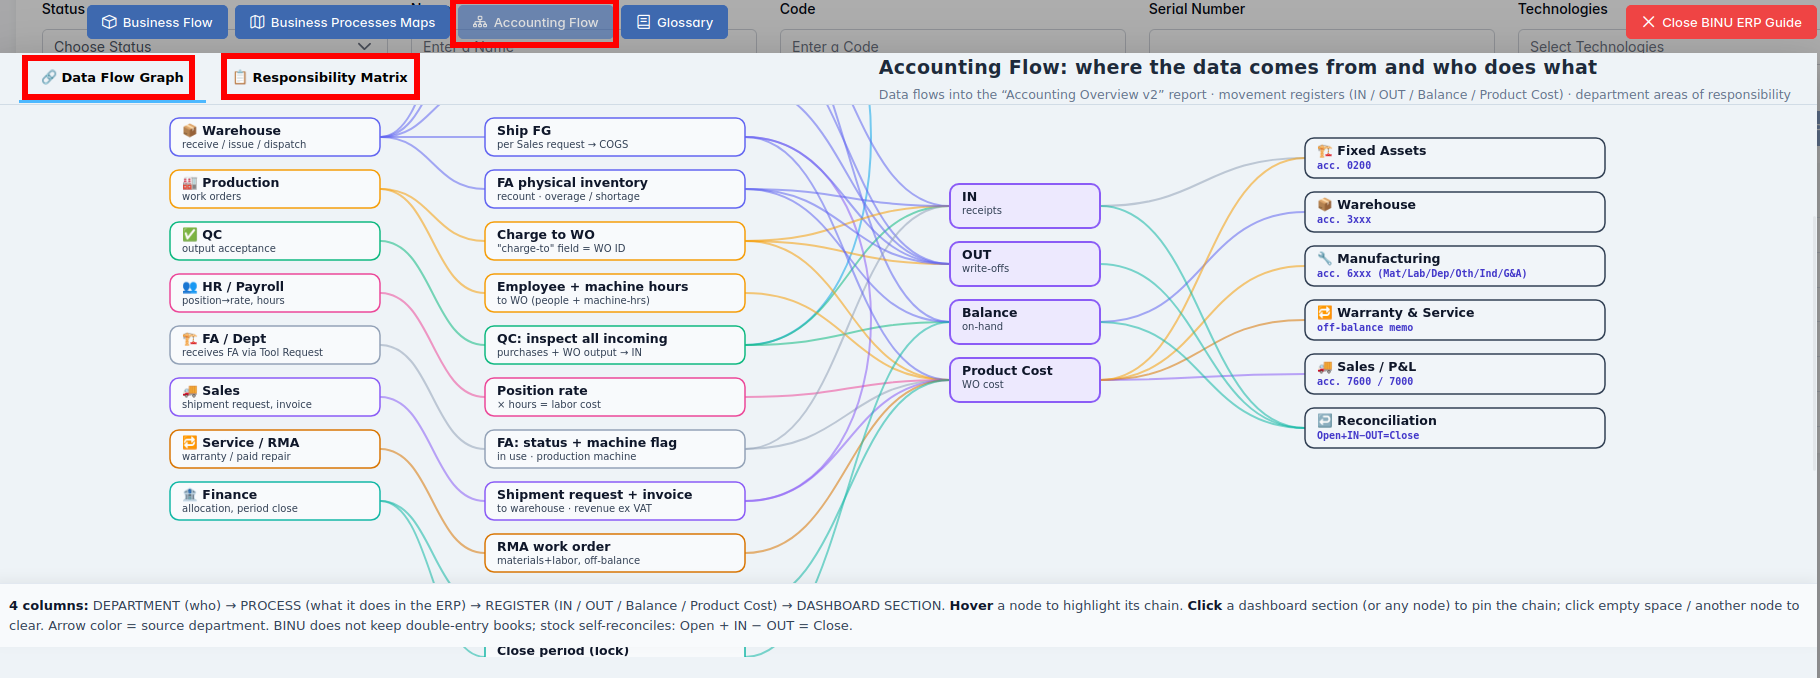
The Data Flow Graph displays the movement of items from departments to the warehouse and from the warehouse to the departments. Based on these movements, the system tracks the flow of goods entering and leaving the company. The Dashboard section, planned for a future release, will allow users to view real-time data (in, out, balance, product costs).
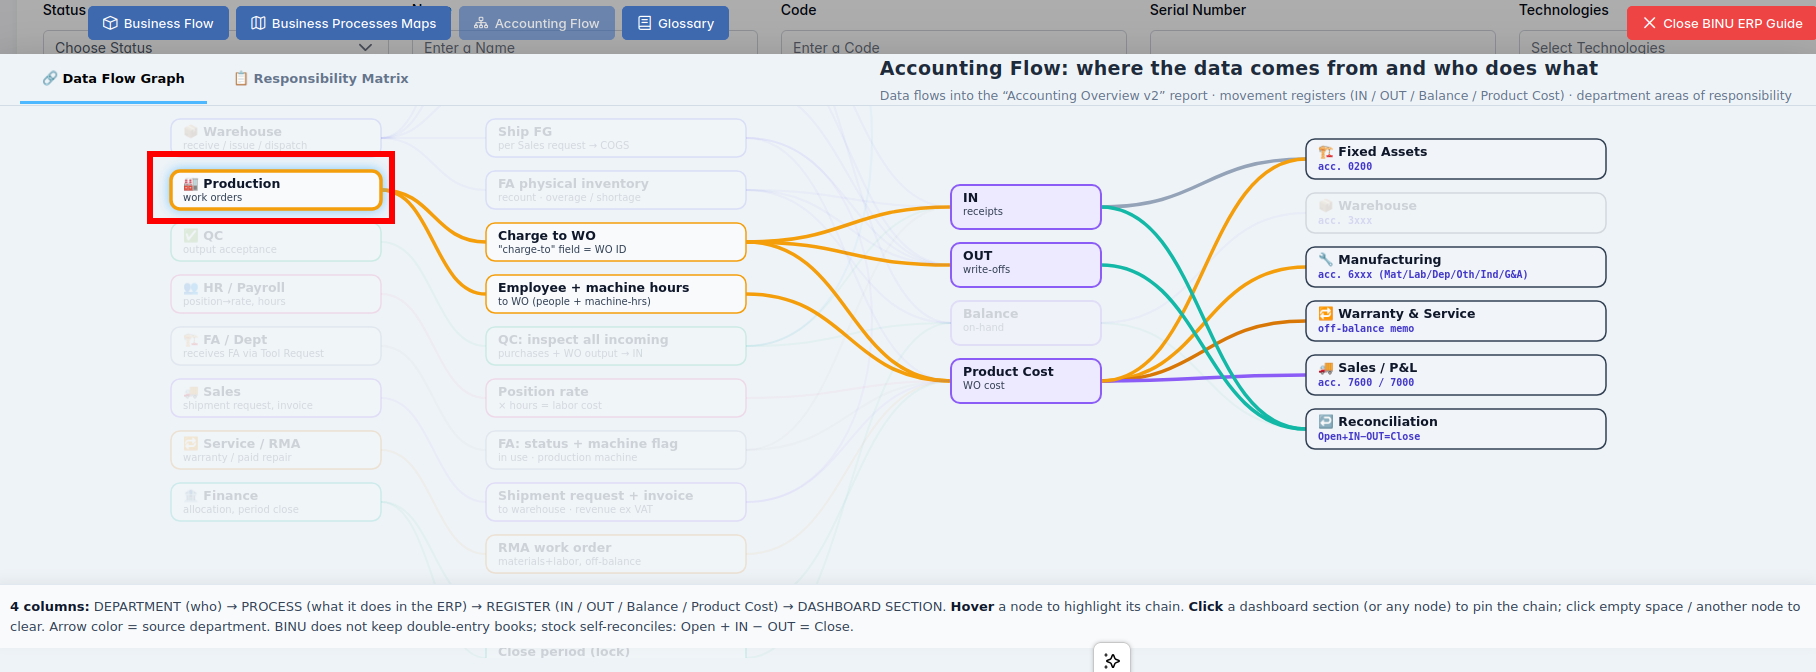
If you hover over a diagram block, the system highlights the corresponding movement chain.
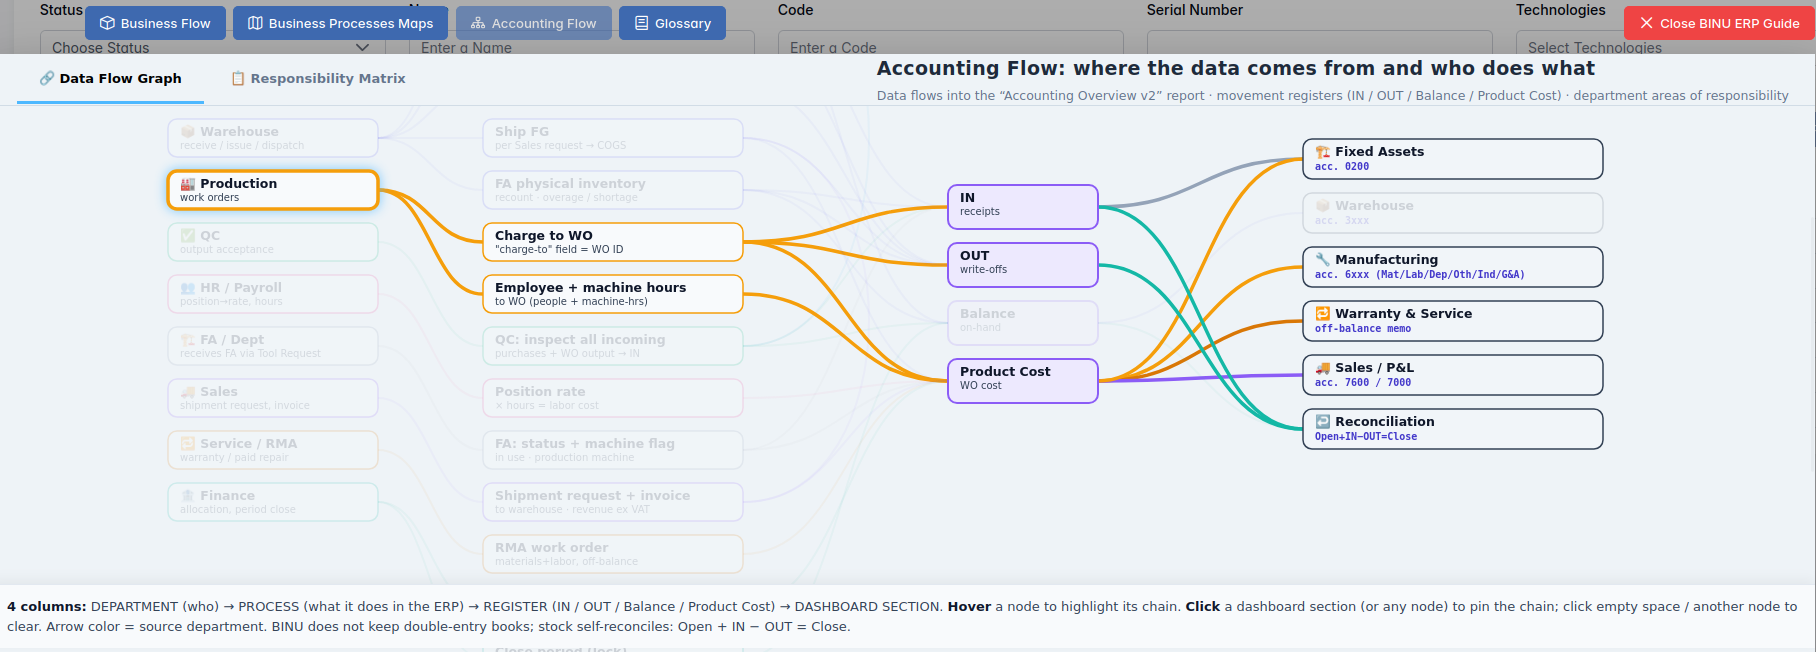
If you click a block in the diagram, you fix the highlighted chain. To narrow the selection further, click a block in the second, third, or fourth column.
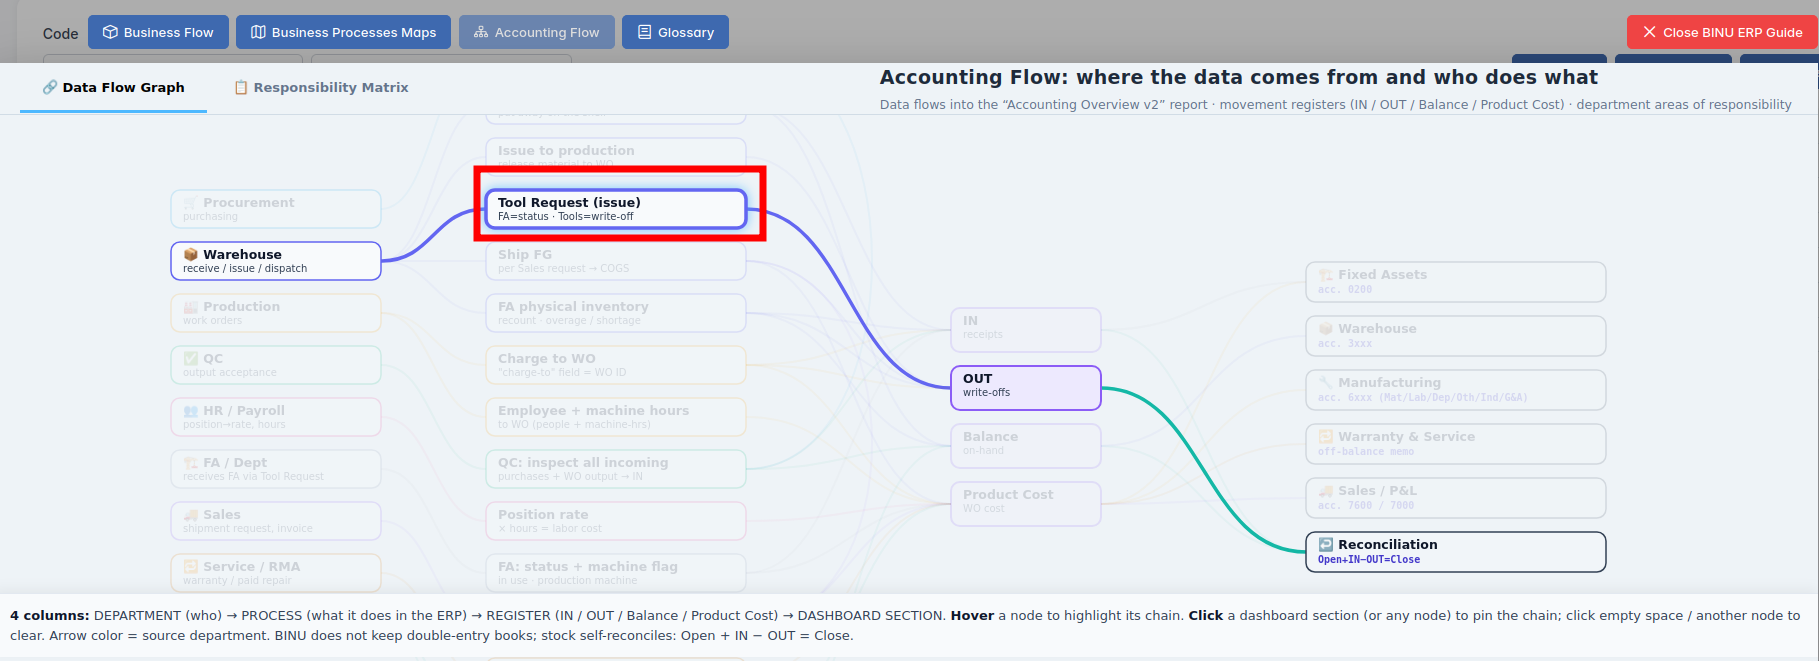
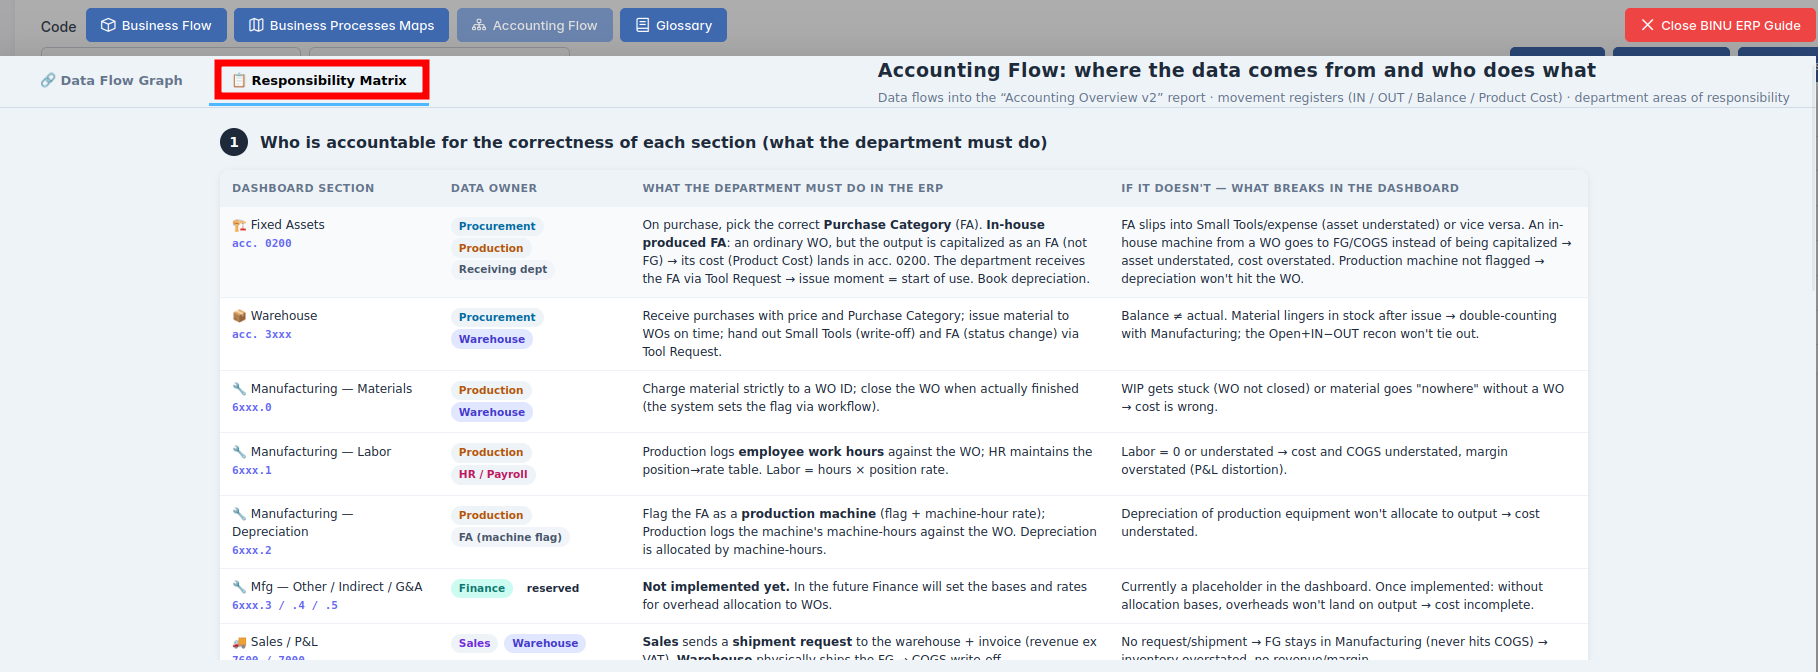
The Responsibility Matrix identifies the department accountable for the selected process.
Glossary
Glossary provides definitions and descriptions of key terms and functionalities used throughout the system. The Glossary can be accessed via the BINU ERP Guide, which is available on any page of the system.

The BINU AI Assistant: Quick Overview
The BINU AI Assistant is specifically designed to help the user with ERP documentation questions. It provides information and assistance related to the BINU ERP system. The BINU AI Assistant understands fifteen (15) languages. It is available on every page as a non-intrusive help tool.
The Purpose of the BINU ERP Guide and BINU AI Assistant Tools
The BINU ERP Guide and BINU AI Assistant help users by:
- Showing where they are within the system (module context and current section).
- Providing a visual schema of the business flow, helping them understand how the current module fits into the larger operational structure.
- Offering a quick-reference instruction panel with the main actions and functions available in the current tab (e.g., creating companies, filtering, scheduling events).
- Offering quick access to the relevant documentation (AI-powered ERP documentation helper).
Reports Module Overview
The Reports module in BINU ERP enables users to review and analyze accounting information, including invoices, materials, and the cost of production. It integrates with procurement, delivery, accounting, and warehouse systems to give a complete view of financial and operational activity.
Each report type includes:
- Customizable filters – narrow results based on predefined or user-defined criteria.
- Summary tables – view key document data in a sortable, filterable list.
- Navigation options – open related records, edit entries, or perform bulk actions.
Invoices
Invoices
An invoice is a formal financial record documenting a transaction for goods or services. It is a legally binding document outlining costs, taxes, discounts, and other contractual details. In BINU ERP, invoices are used for:
- Recording transactions – capturing product/service details and associated costs.
- Payment & tax processing – forming the basis for payments, tax reporting, and accounting exports (e.g., to Vasco).
- Auditing & traceability – ensuring every transaction is trackable for internal and external audits.
- Automation – enforcing data integrity rules (e.g., total price checks, exchange rate calculations, required payment fields).
Navigation
Open Reports > Invoices from the main menu. The page contains two main tabs:
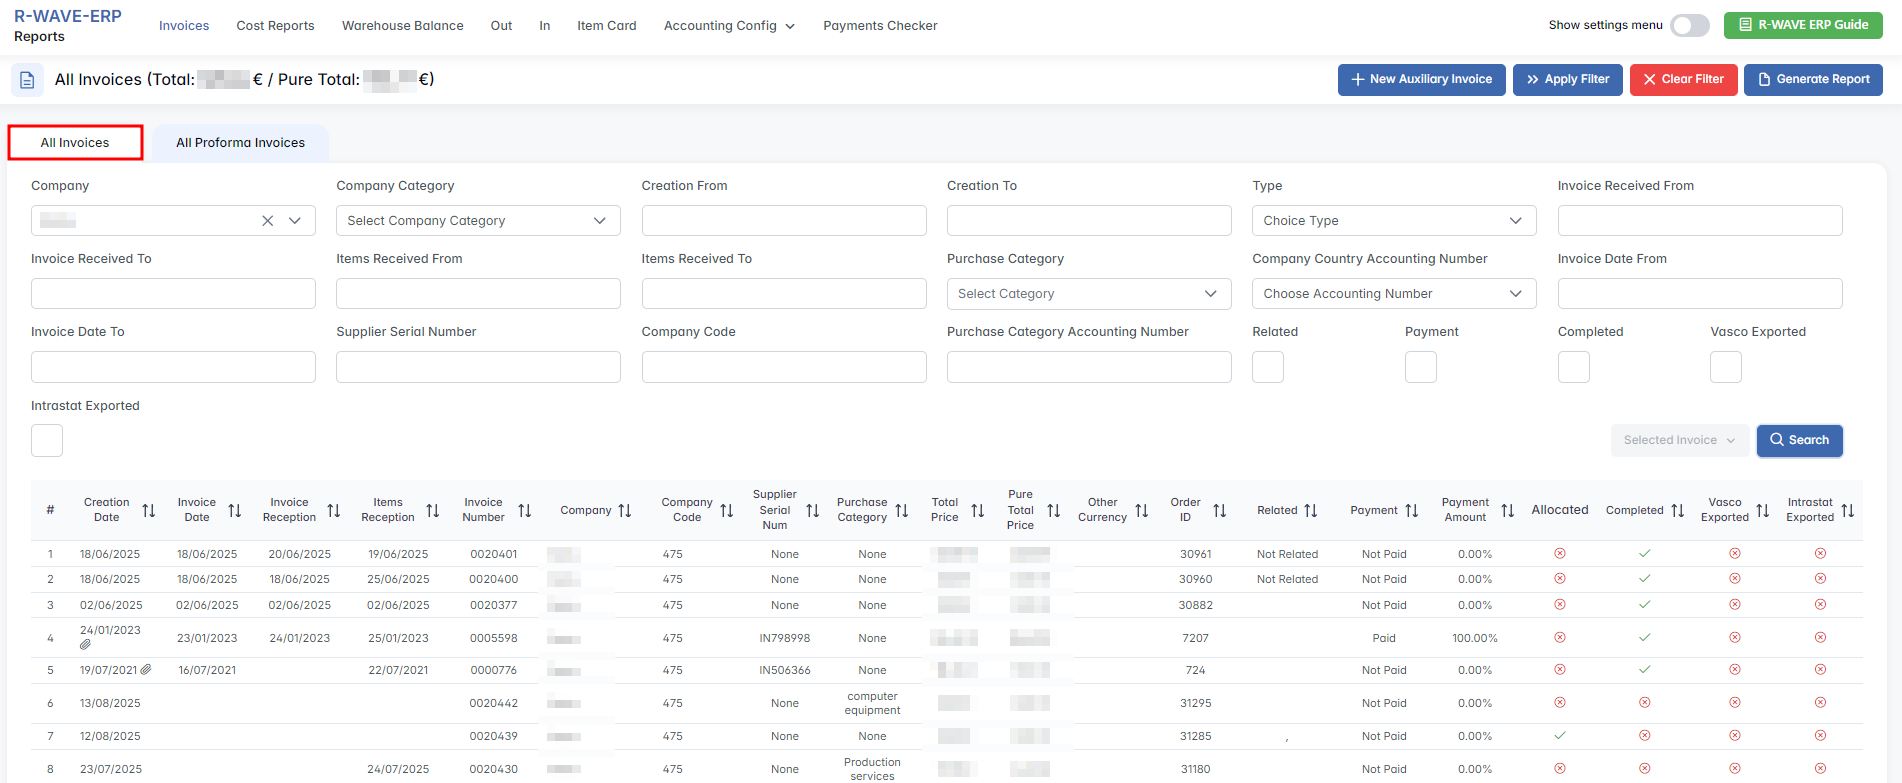
- All Invoices – shows all invoices issued by or to your company. Each record includes supplier and customer data, amounts, related documents, and export status. Used for legally binding, completed documents. Actions: search, filter, edit, upload files, delete. Selecting Edit opens the full Invoice Edit page.
- All Proforma Invoices – shows all preliminary invoices issued before final billing. Similar layout to All Invoices, but for non-binding, planning-stage documentation.

Use the tab switcher to move between finalized invoices and preliminary proforma invoices.
Action Buttons
Above the tabs, there are four main buttons:
Apply Filter – opens the Choice Invoice Filter popup with predefined configurations.


Select a filter row and click Apply Filter. Then click Search to display the results. Custom filters can be created under Settings > Menu > Filters, shown when you switch the Show settings menu toggle on.


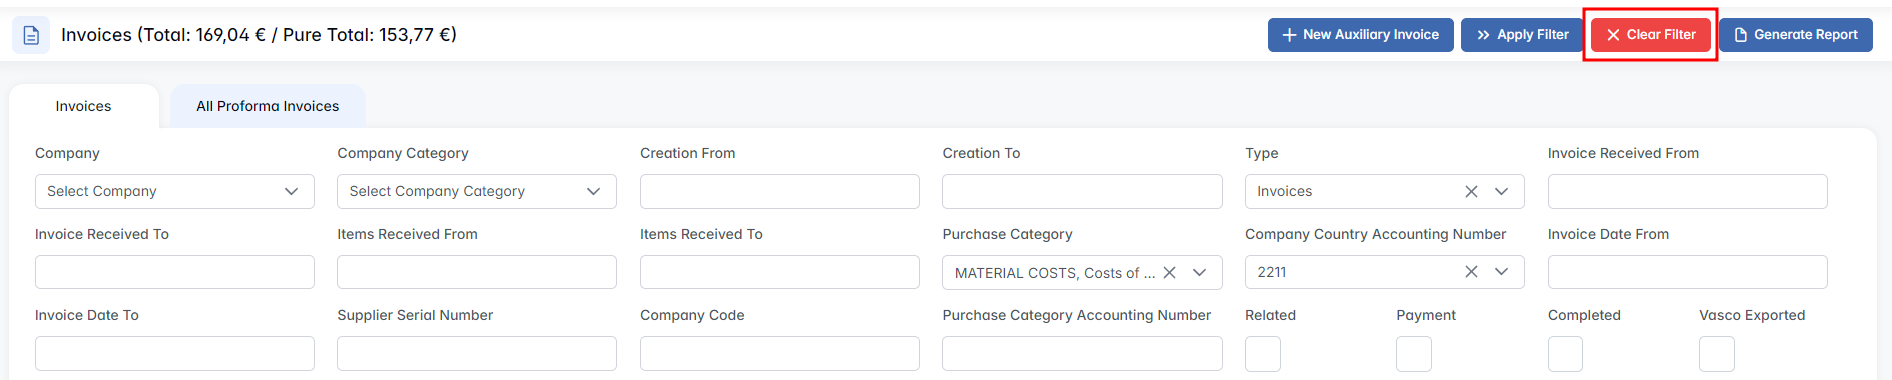
Clear Filter – removes all applied filters and restores the default table view.
Generate Report – active only when filtered results are displayed. Options:
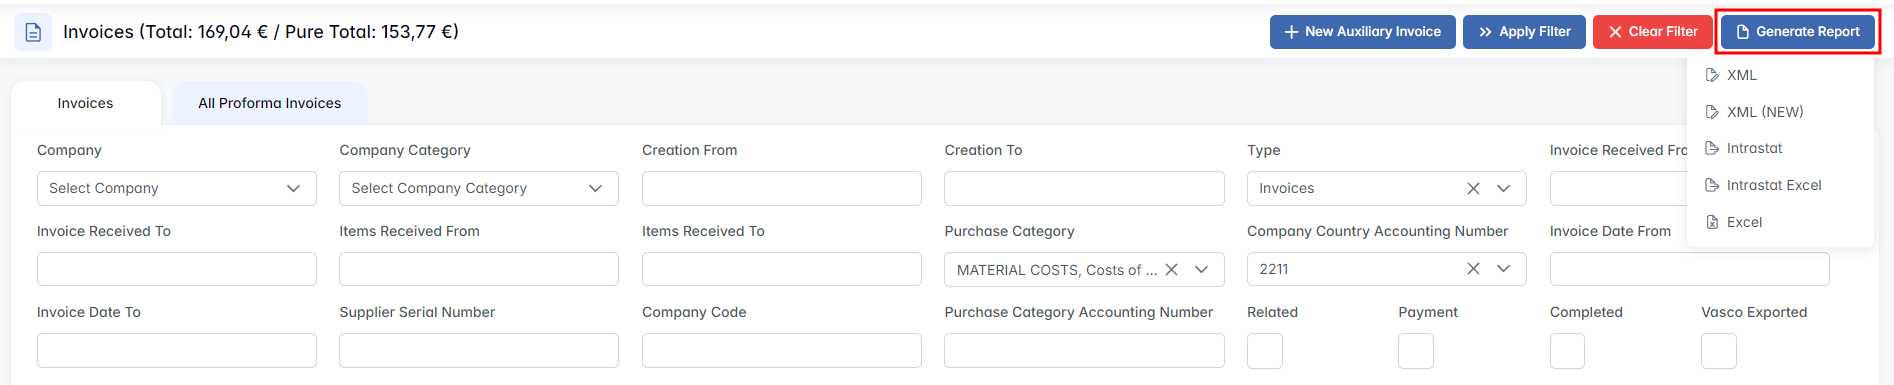
- Export To Vasco – prompts for Start Number and Document Name, then generates XML.

- Start Number * – by default set to 0. Enter a custom starting number to define from which point the numbering of exported invoices in Vasco should begin.
- Document Name – defines the prefix used for the document name of exported invoices. This value is also written into the corresponding field in the XML file.
Click Generate to create the XML.
- Intrastat – opens the EU trade statistics report form.

Fields include Supplier serial number; Date; buttons Go To Invoice, Go To Order, Go To Supplier; Item (disabled field); Weight of 1 Pcs (kg) (defaults to 1, editable); Total (calculated); Tariff Code (editable); Country of Origin (dropdown). Click Generate to create the report.
- Intrastat Excel – generates and auto-downloads an Excel file for Intrastat data.
- Excel – generates and auto-downloads a general Excel report of the filtered data.
All Invoices Section
Filter Panel
Filters let you narrow the list of invoices. Available filters:
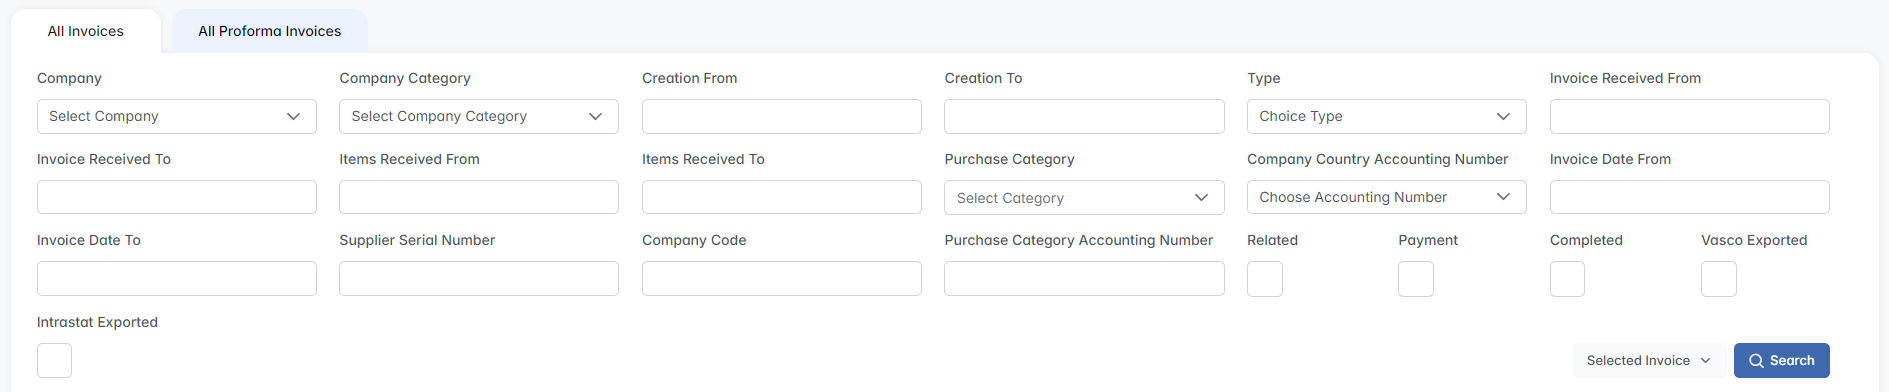
- Company – limits results to invoices associated with the selected company.
- Company Category – filter companies by their business type or classification (e.g., Supplier, Customer, Partner).
- Creation From / To – filter invoices based on their creation dates.
- Type – choose the invoice type (e.g., Invoices, Auxiliary Invoices).
- Invoice Received From / To – date range for when invoices were received.
- Items Received From / To – date range during which items related to the invoices were received.
- Purchase Category – filter invoices by types of purchases (e.g., Raw Materials, Production Materials).
- Company Country Accounting Number – the country-specific accounting number (such as VAT or tax ID) associated with the company.
- Invoice Date From / To – filter invoices by their official invoice date.
- Supplier Invoice Number – the unique supplier invoice number.
- Company Code – the company-specific code used internally for identification.
- Purchase Category Accounting Number – an accounting number related to purchase categories.
Three-state checkboxes (checkmark for yes, cross for no, empty for ignore): Related, Payment, Completed, Vasco Exported, Intrastat Export.
Apply filters and click Search to update the table.
Results Table
The table displays filtered invoices with these columns: Creation Date, Invoice Date, Invoice Reception, Items Reception, Internal Invoice Number, Company, Company Code, Supplier Invoice Number, Purchase Category, Total Price, Pure Total Price, Other Currency, Order ID, Related, Payment, Payment Amount, Allocated, Completed, Vasco Exported, Intrastat Exported.
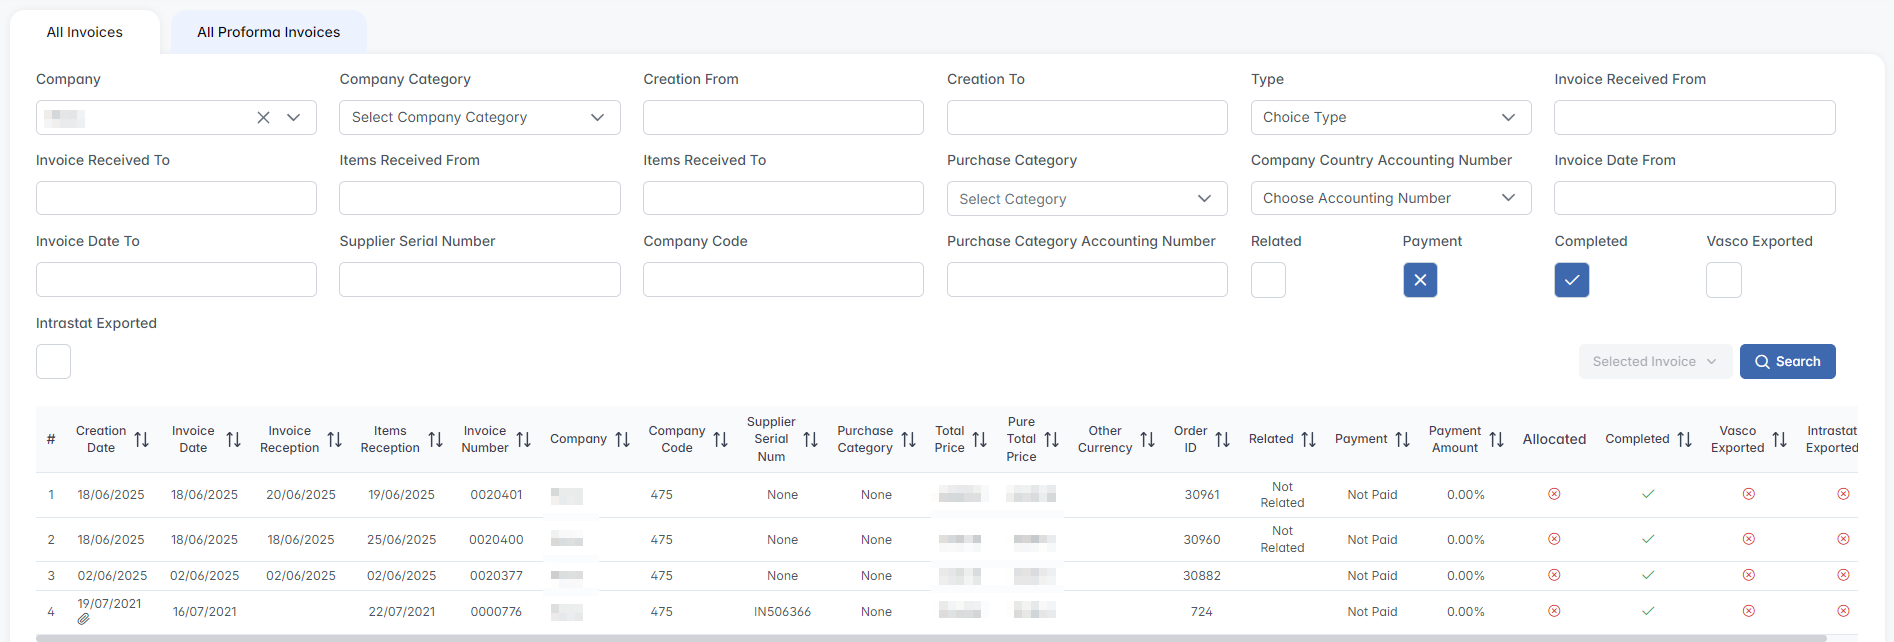
Click column headers to sort (ascending/descending), except the Allocated column.
Actions on Selected Invoices
When a row is selected:

- Go To Order – opens the related order page.
- Files – opens the file management popup (drag-and-drop upload, download, or delete).
- Edit – opens the Invoice Edit page:
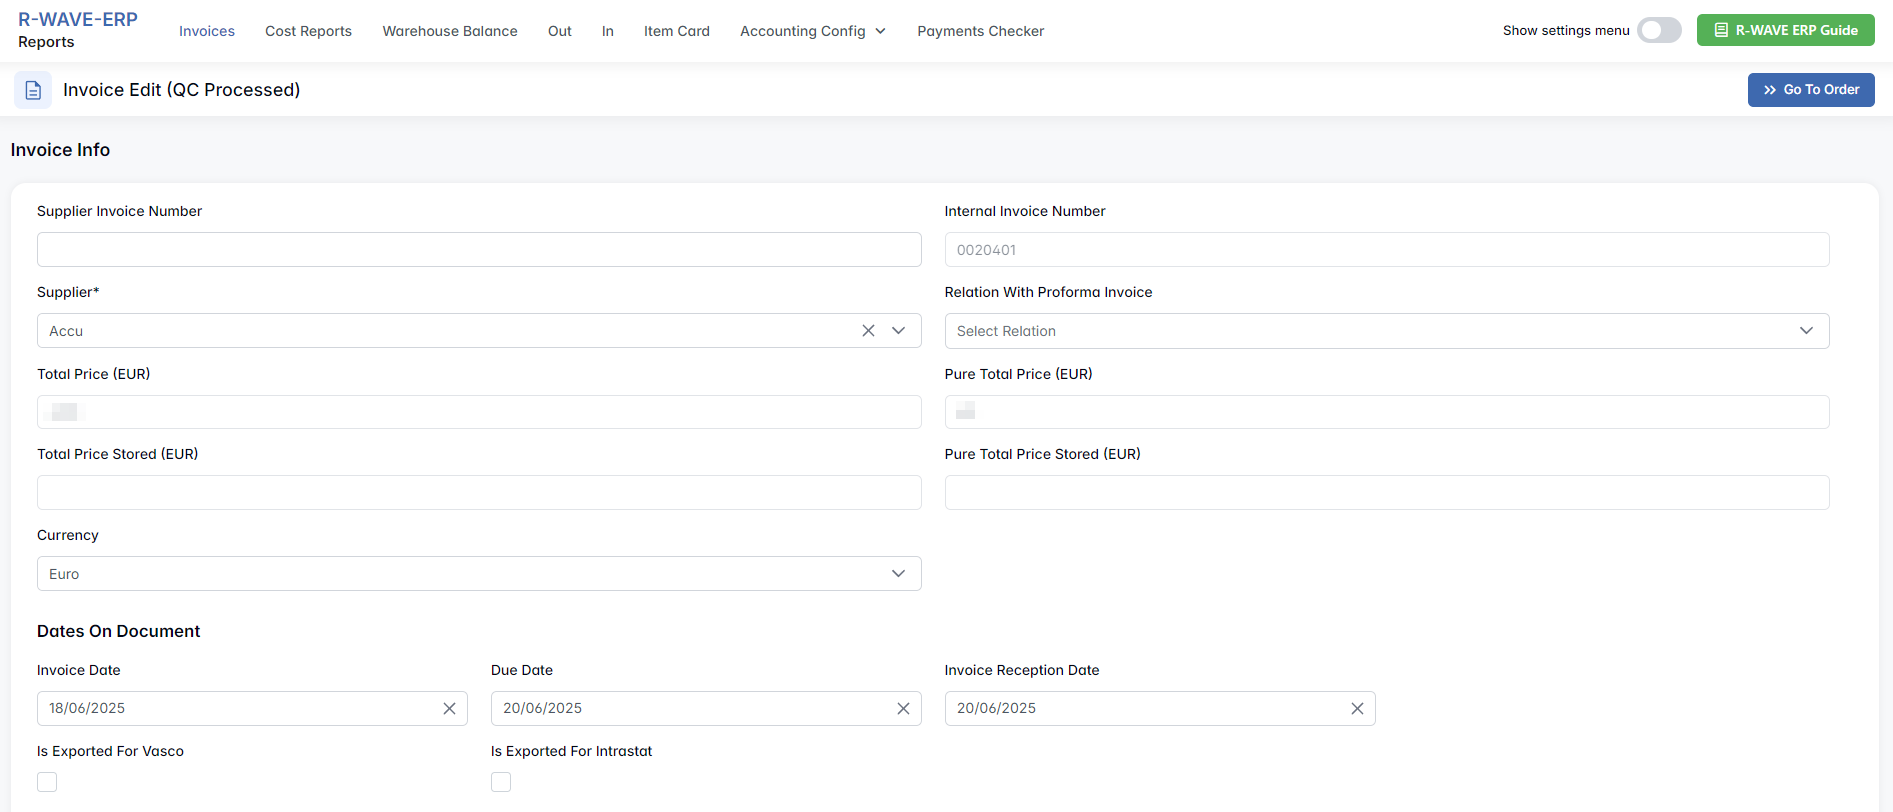
- Supplier Invoice Number – invoice number assigned by the supplier.
- Internal Invoice Number (not editable) – system-generated internal invoice number.
- Supplier * – select or search for the supplier.
- Linked Proforma Invoice – select a related proforma, if applicable.
- Total Price / Net Price / Stored Total Price / Stored Net Price (EUR) (not editable).
- Currency – defaults to Euro unless otherwise specified.
- Exported For Vasco / Exported For Intrastat – tick if applicable.

- Date , Items Received Date*.
- Set Physical Characteristics – tick if physical properties need to be recorded.
- Weight * – total weight of the invoice item(s) (mandatory).
- Width, Height, Length.
-
Description – optional internal description or notes.
-
Remove – deletes the selected invoice.
Invoice Items Section on the Invoice Edit Page
The Invoice Items section, accessible via the Invoice Edit page (Reports > Invoices > Selected Invoice > Edit), displays a list of items included in the selected invoice. This page allows users to manage items associated with the invoice, such as adding new items, editing existing ones, or performing quality control (QC) and return merchandise authorization (RMA) actions.
Adding items to an invoice
- From the order – navigate to the related order by selecting an invoice and clicking Go To Order. In the order details page, click + New Item. Items added via the order do not automatically appear on the current invoice; a new invoice must be created from the order to include them.
- From the invoice – on the Invoice Edit page, go to the Invoice Items section and click New Item. The item is added directly to the current invoice and automatically linked to the associated order.
Action buttons
- RMA Files – opens a popup to view or upload files related to RMA processes.
- RMA – initiates an RMA process for returning or replacing defective items.
- Allocate To Tool Area – assigns selected items to a specific tool area for inventory tracking. Requires a Free Quantity (items on the invoice exceeding the order's required quantity) to proceed.




Usage: click Allocate to Tool Area, select the items and click Allocate. Enter the Quantity To Allocate, select a tool area, and save. Ensure the allocated quantity does not exceed the Free Quantity.
- New Item – adds a new item directly to the invoice (automatically updates the linked order). Items labeled "NEW" are pending confirmation and cannot be added until approved.

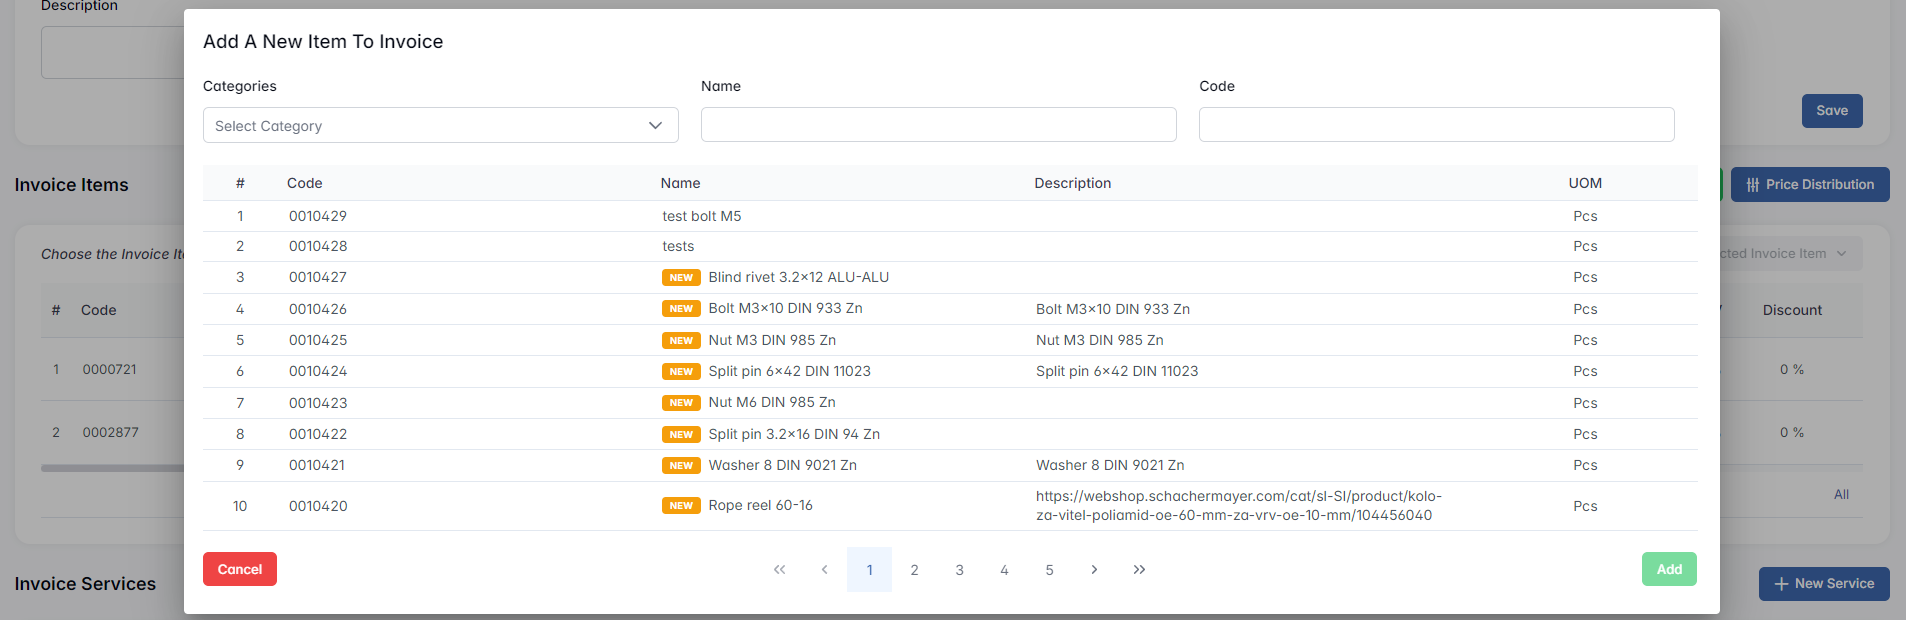
- Complete – marks the invoice as finished.
- Move To QC (All) – sends all items to quality control if they are not yet in QC. Once sent, this button changes to Return From QC (All).
- Price Distribution – enables splitting a total amount across items in the invoice. Active only if items are not yet completed or in QC.


How it works: users can allocate a total amount (e.g., 10 EUR) across items. For example, for 5 items (3 identical, 2 different), divide by total quantity (10 EUR ÷ 5 = 2 EUR per item); the 3 identical items get 6 EUR total, and each of the 2 different items gets 2 EUR.
Actions on Selected Invoice Items
Select a row in the table to activate the Selected Invoice Item button:
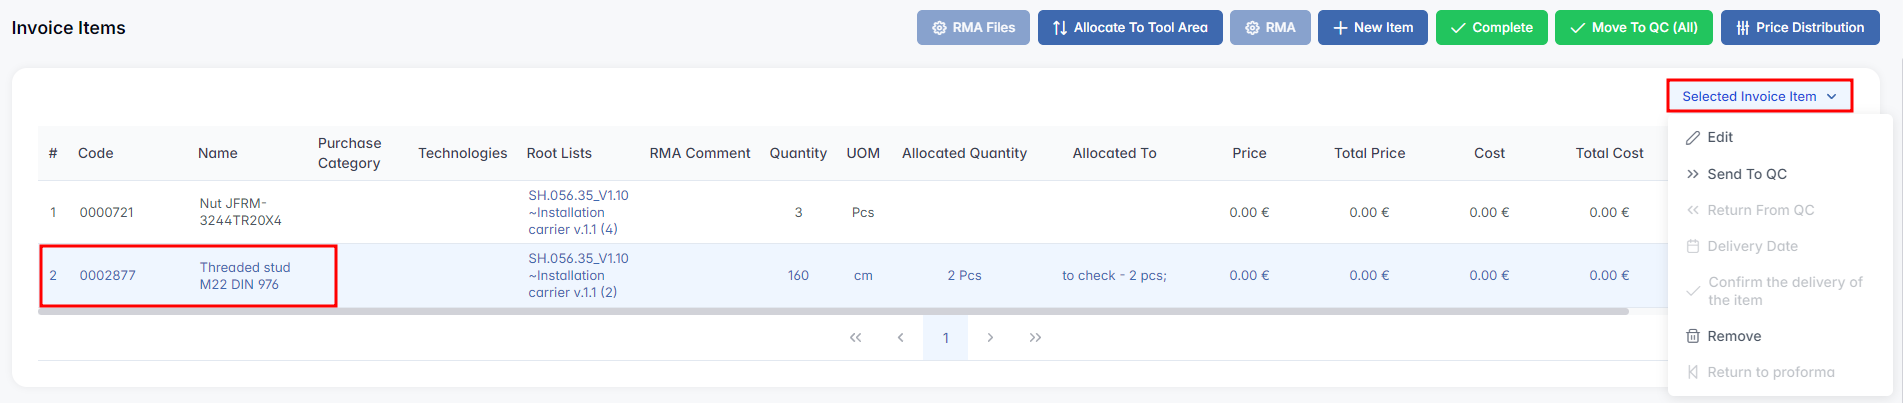
- Edit – opens a modal to edit item details. The editable fields depend on the item's status.
- For items not sent to QC, not allocated, and not completed: Price , Quantity , Discount *, Fixed Discount, DDV * (VAT rate).
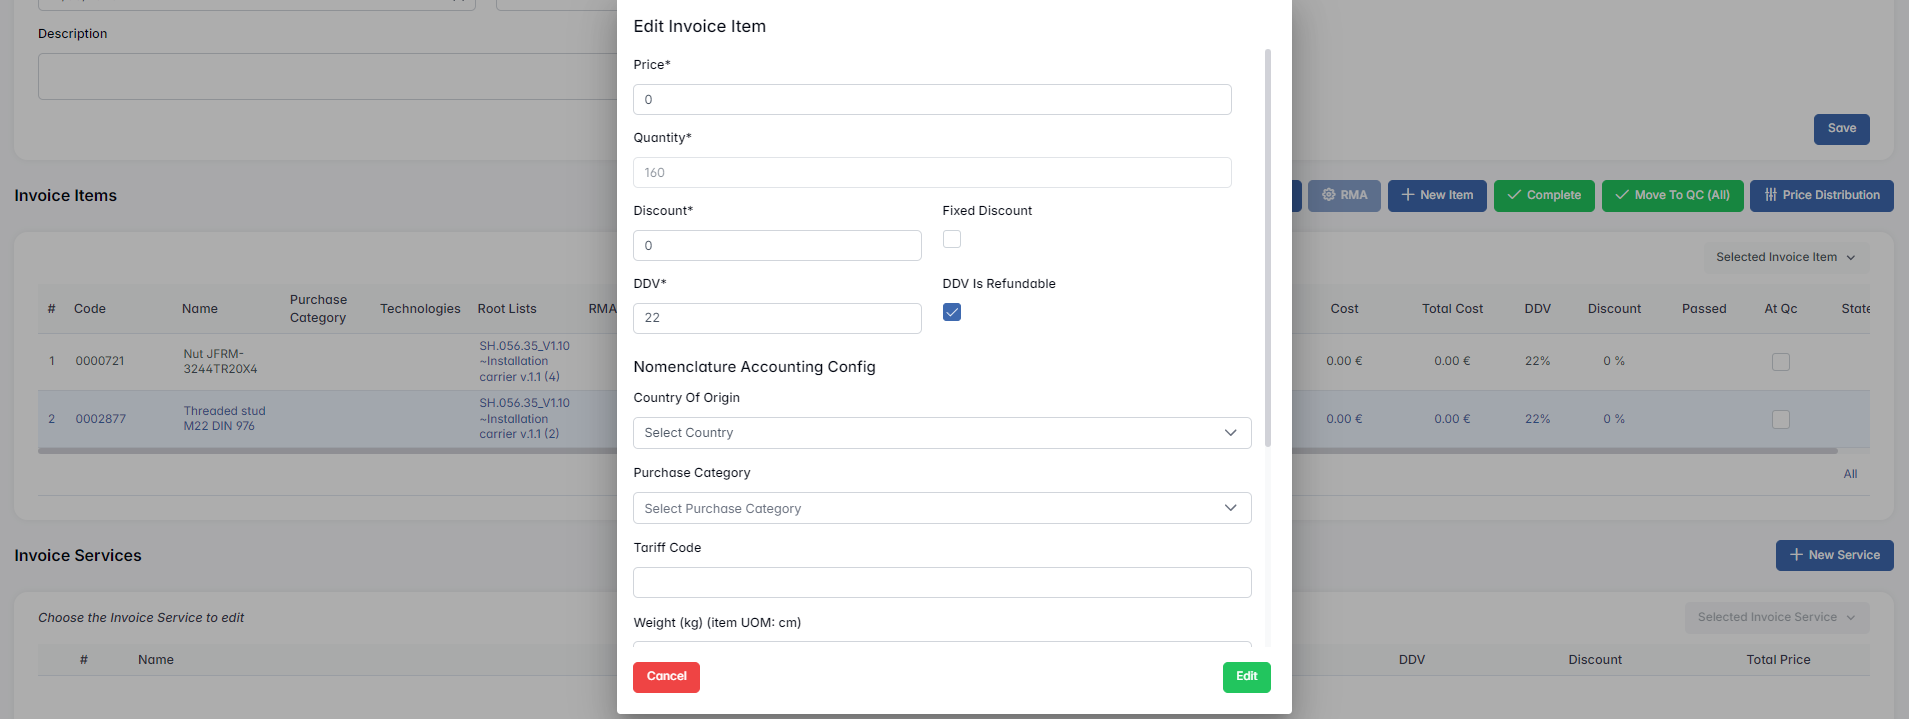
- **Nomenclature Accounting Config**: Country of Origin, Purchase Category, Tariff Code, Weight, Total Weight (calculated), Width / Length / Height.
- For items **sent to QC, allocated, or completed**: only the Nomenclature Accounting Config fields are editable.
- Send To QC (or Return From QC) – sends the selected item to QC if not yet sent.
- Remove – deletes the selected item from the invoice.
Invoice Services Section on the Invoice Edit Page
Displays service lines linked to the invoice.

Select a row to activate Selected Invoice Service:

- Edit – change service name, purchase category, price, discount, VAT/DDV, and refundability.
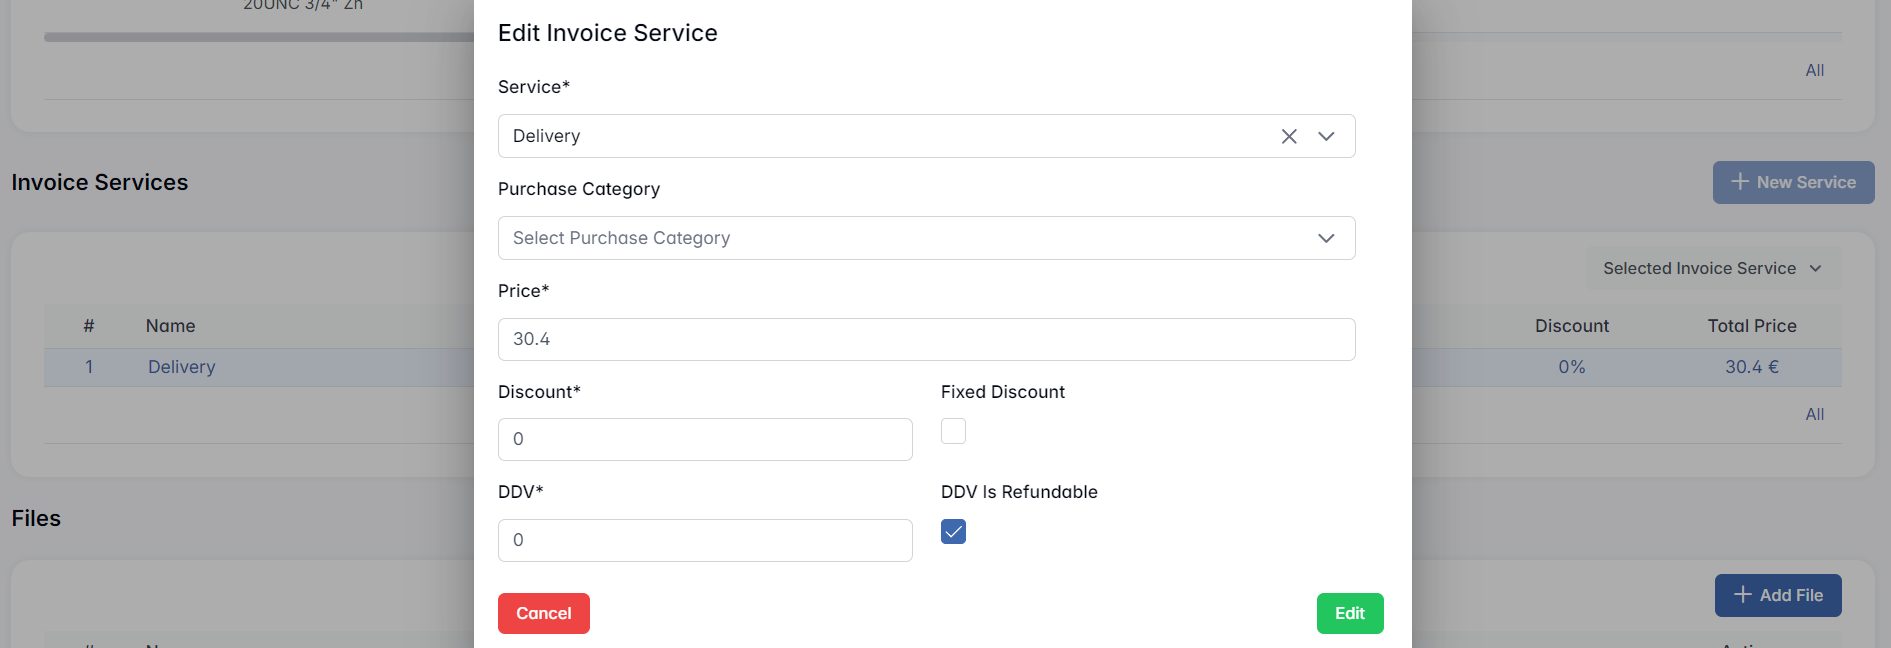
- Service * (editable dropdown, e.g., "Delivery"), Purchase Category, Price , Discount , Fixed Discount (checkbox), DDV * (VAT), DDV Is Refundable (checkbox).
- Remove – delete service line.
Files Section on the Invoice Edit Page
Manage files linked to the invoice:
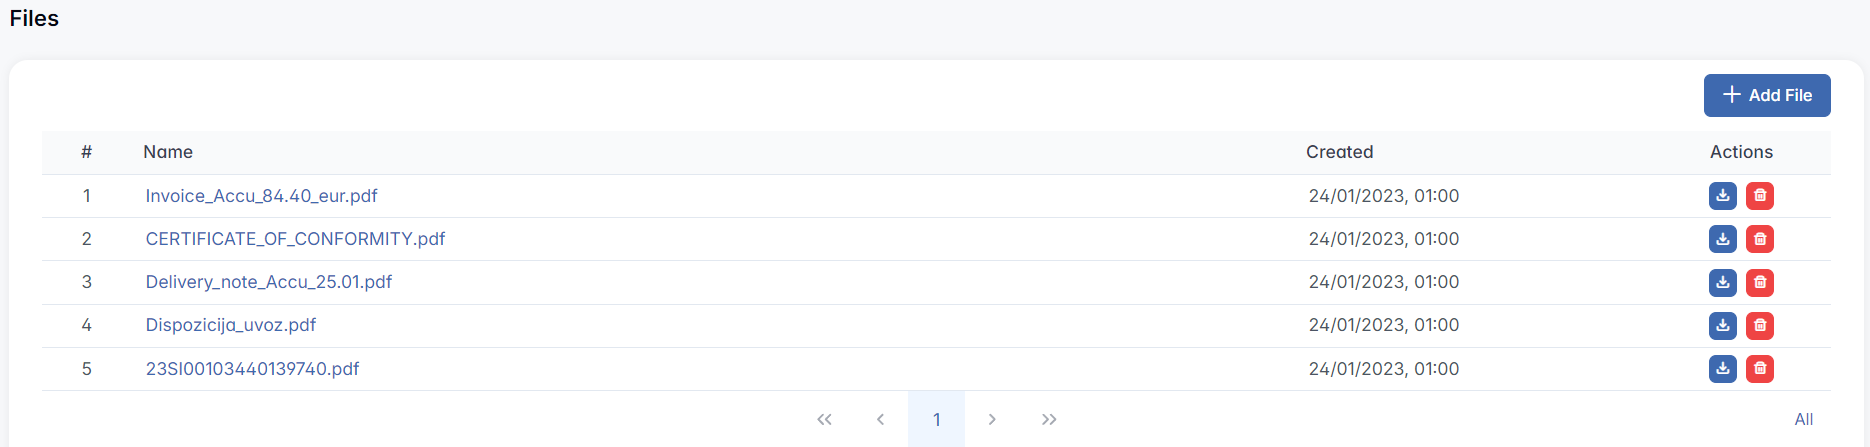
- Add File – upload via button or drag-and-drop.
- Download or Remove (icons) files from the list.
All Proforma Invoices Section
Located in Reports > Invoices > All Proforma Invoices.
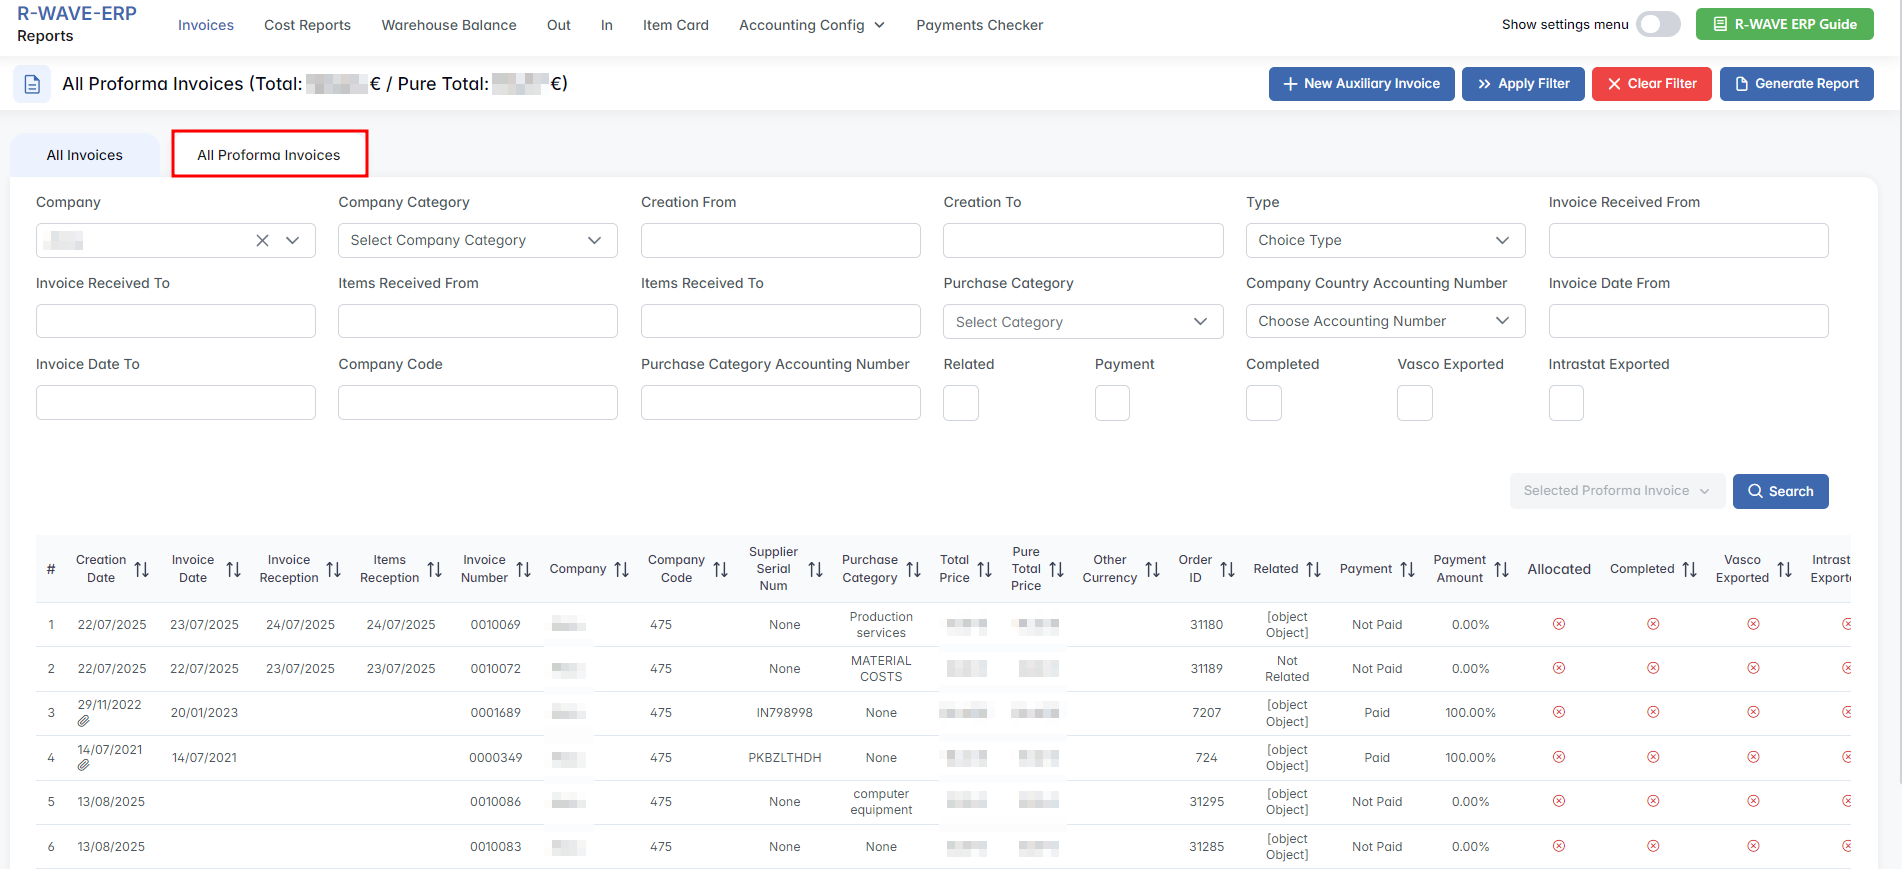
Functionality is generally the same as All Invoices (filters, actions, reports, file management). The main difference is that these are preliminary, non-binding documents used for estimates or customs purposes and do not serve as official accounting records.
Cost Reports
Cost Reports
The Cost Reports tab (Reports > Cost Reports) is used to analyze the cost and price structure of products, assemblies, or components stored in the ERP system. It allows users to review detailed breakdowns of unit prices, unit costs, material costs, and additional expenses for each item.

Filter Panel
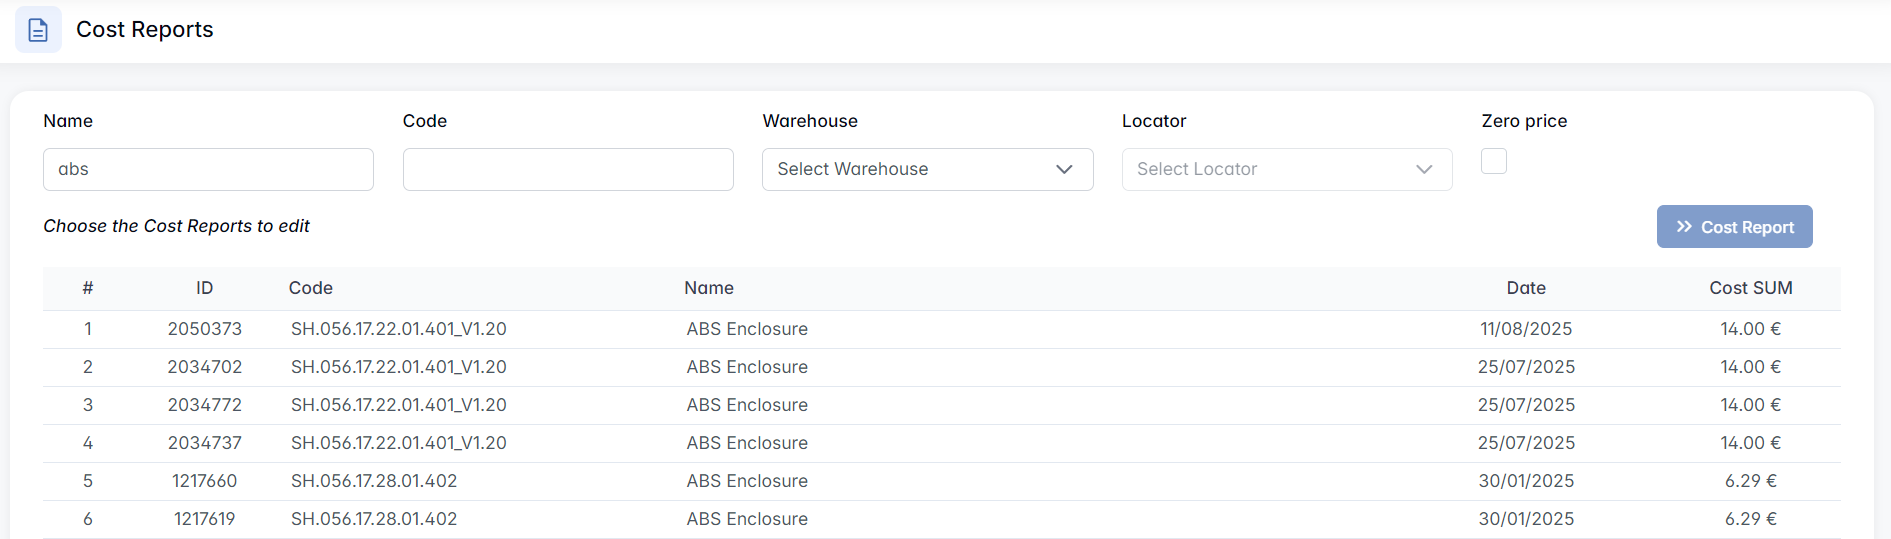
The filter panel at the top of the page allows you to narrow down the list of cost records:

- Name – searches for a product or component name (full or partial match).
- Code – searches for the internal item code.
- Warehouse – select a specific warehouse to limit results.
- Locator – enabled only after selecting a warehouse; filter by the exact storage location.
- Zero price – checkbox; shows only items with a recorded price of 0.
Results Table
The table displays all cost report entries matching the filter criteria. Columns: ID, Code, Name, Date (last update date for the cost/price data), Cost SUM (total cost value for the item, in EUR).
Actions on Selected Rows
When a row is selected, the Cost Report button above the table becomes active.
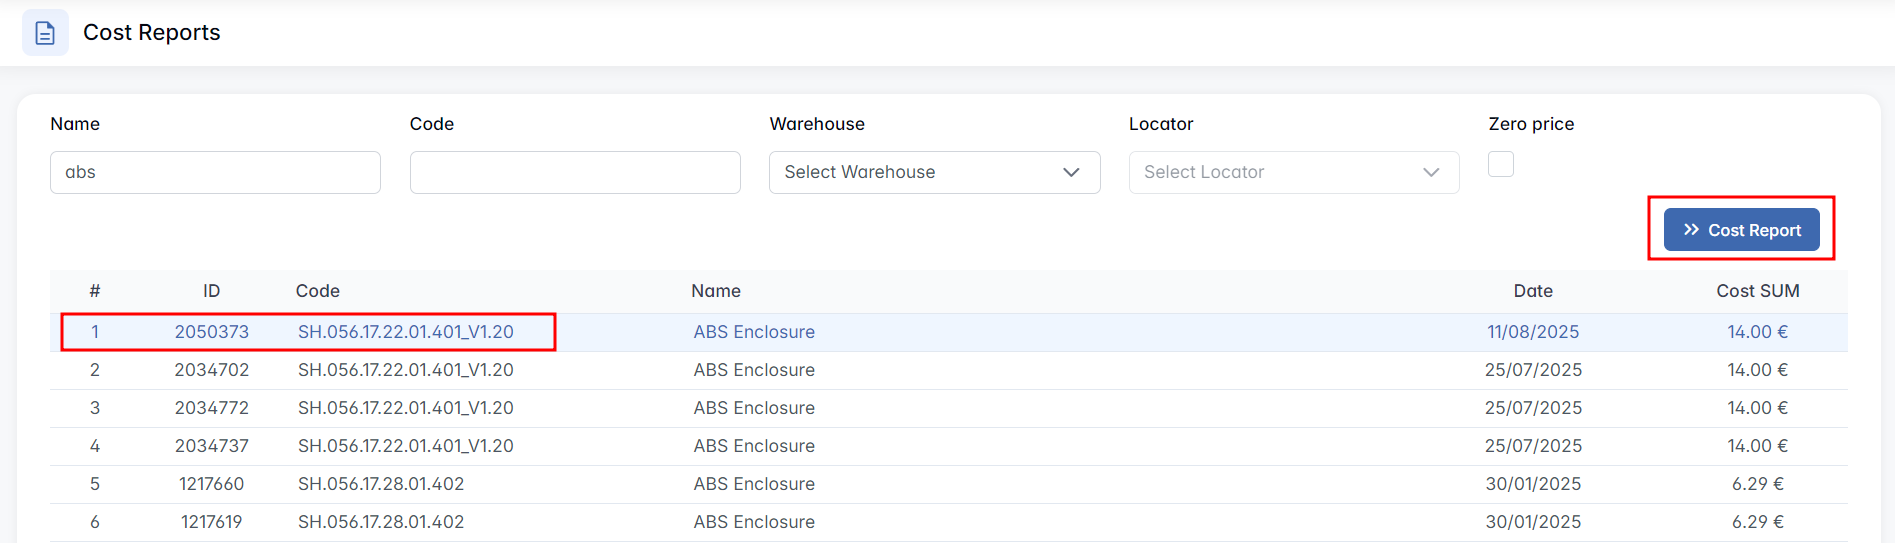
Clicking it opens the Cost Report page for the selected item.
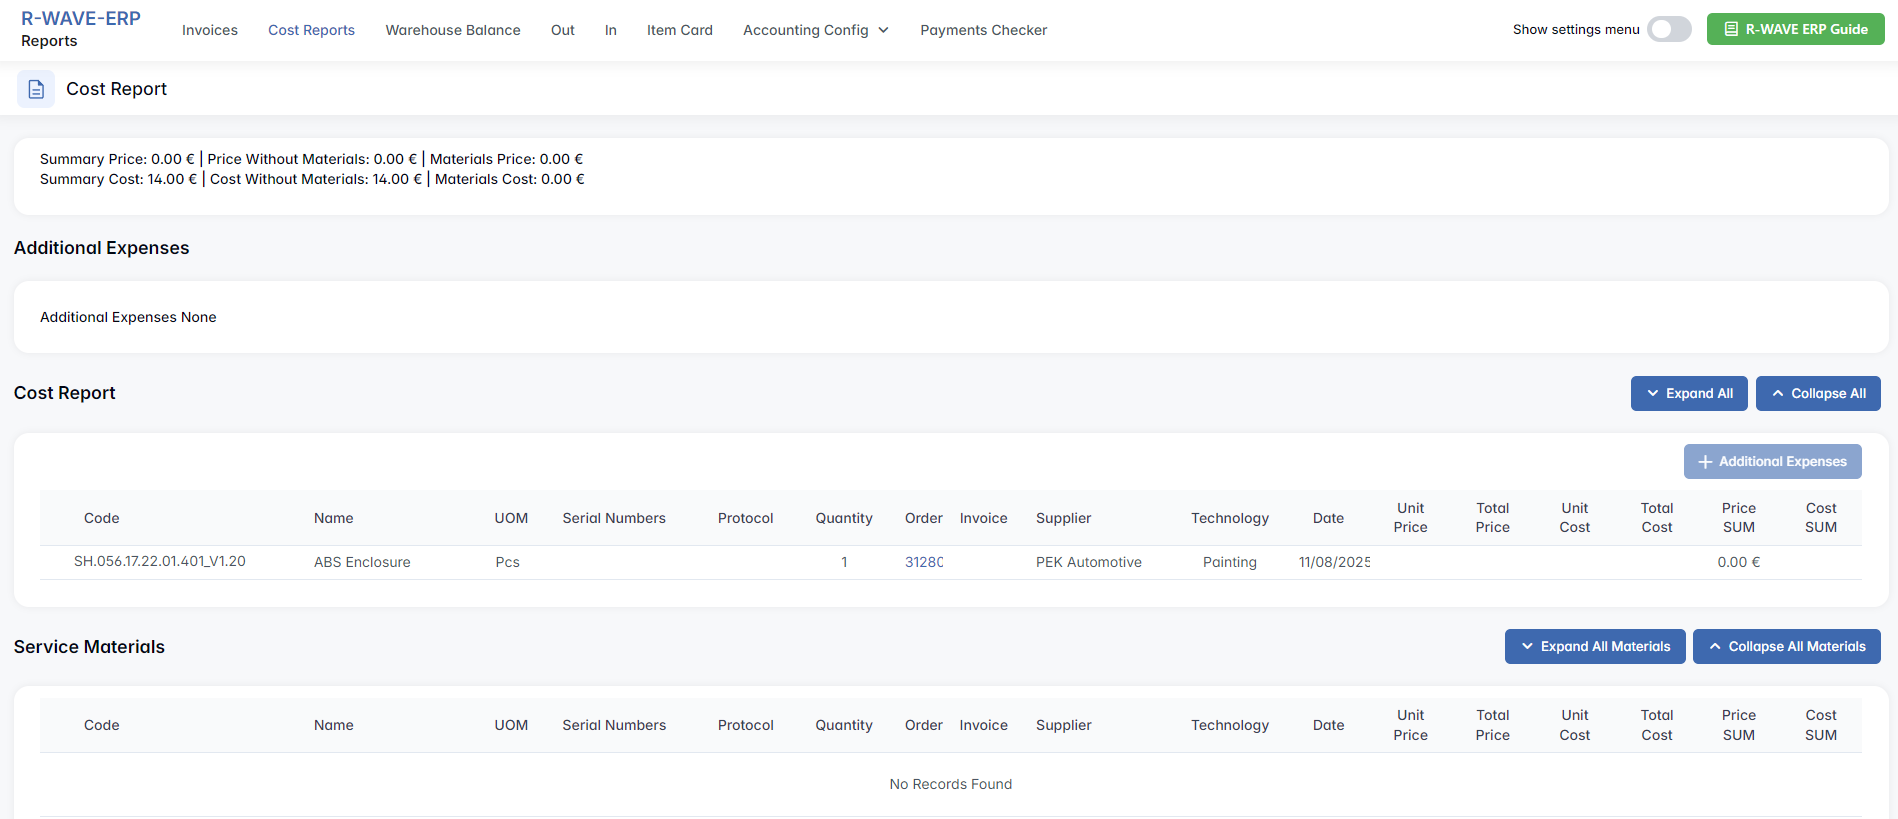
Cost Report Page
This page provides a detailed breakdown of prices, costs, and related purchase/production details.
Summary Section
At the top you'll see overall totals: Summary Price, Price Without Materials, Materials Price, Summary Cost, Cost Without Materials, Materials Cost.

Additional Expenses
Lists any extra expenses linked to the cost report. If no expenses exist, the block will be empty or display "None."

Cost Report Table
Each row represents a product, subcomponent, or material linked to the selected item.

Columns: Code / Name, UOM, Serial Numbers, Protocol, Quantity, Order (clickable), Internal Invoice Number, Supplier, Technology, Date, Unit Price / Total Price, Unit Cost / Total Cost, Price SUM / Cost SUM.
- Expand All – opens all rows to display their detailed sub-rows (if available).

- Collapse All – closes all expanded rows.

- + Additional Expenses – active only if a row is selected in the Cost Report Table and that row does not have an issued invoice.

Clicking the button opens the Additional Expenses popup:

Click Add (enabled when required fields are filled). Below the form, a table lists existing additional expenses:

The delete icon (✖) removes the expense.
Service Materials Table
If service-related materials are recorded, they appear here with the same columns as above. If no records exist, the table displays "No Records Found".

Products Cost
Products Cost
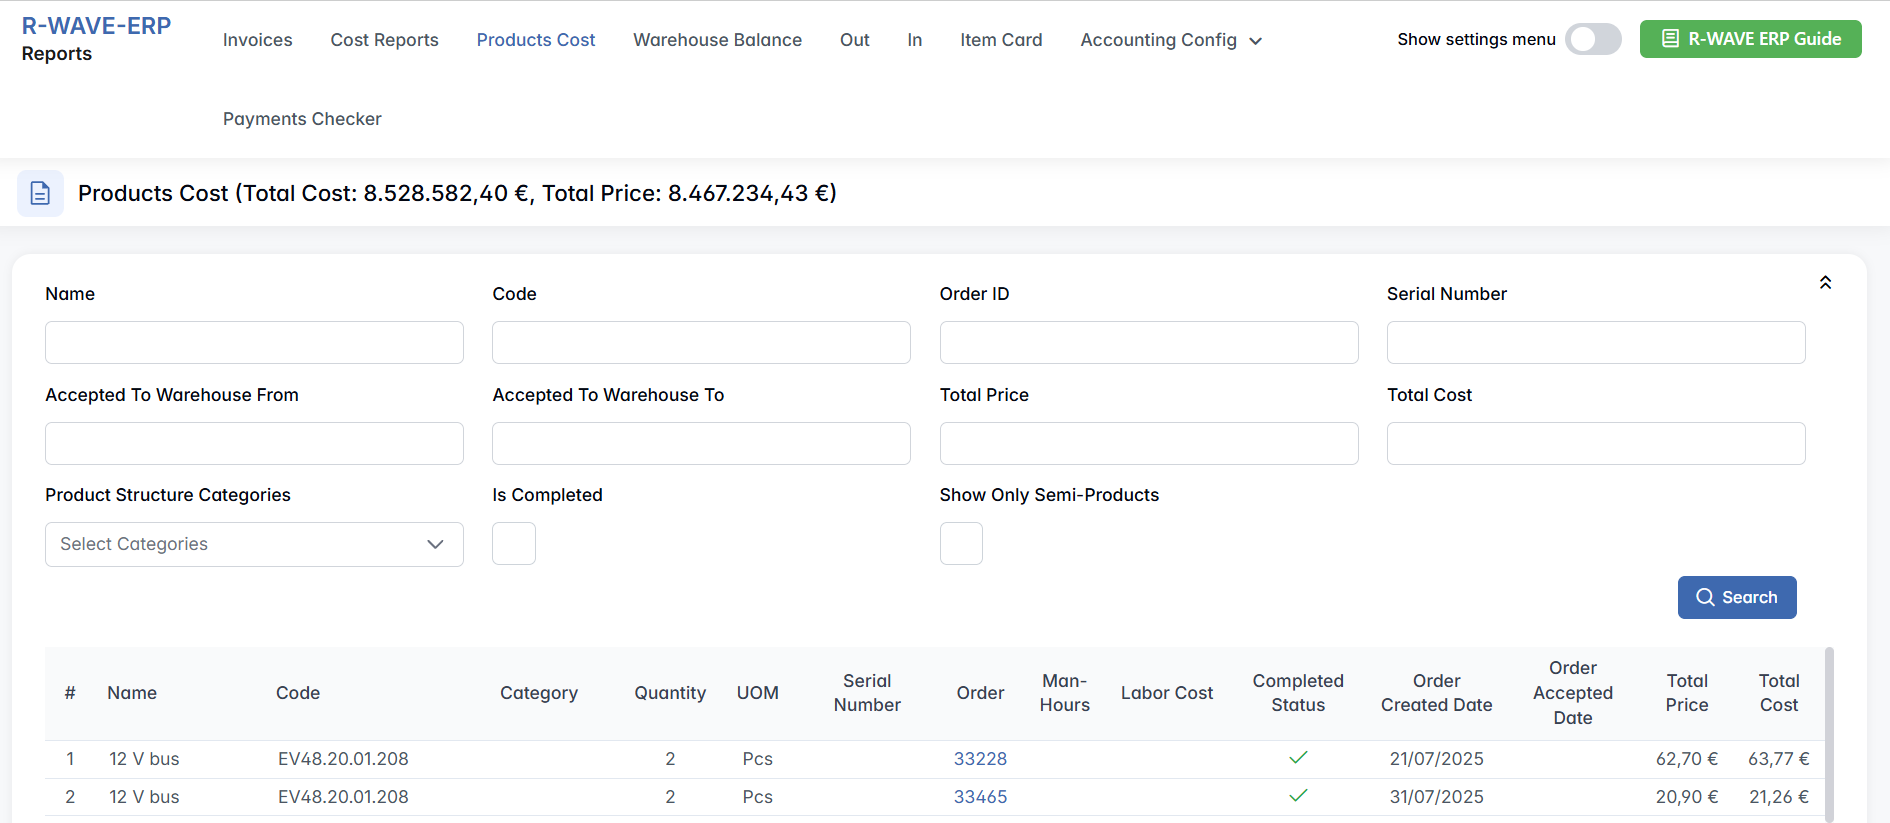
The Products Cost tab (Reports > Products Cost) provides a consolidated view of manufacturing and product cost data across production orders. It allows users to analyze total cost vs. total price, track labor and material costs, and review completion and warehouse acceptance status for finished and semi-finished products.
At the top of the tab, aggregated values are displayed: Total Cost (sum of all production costs for the filtered records) and Total Price (sum of the sales or valuation price for the same records). This tab is primarily used for cost control, margin analysis, and production tracking.

Filter Panel
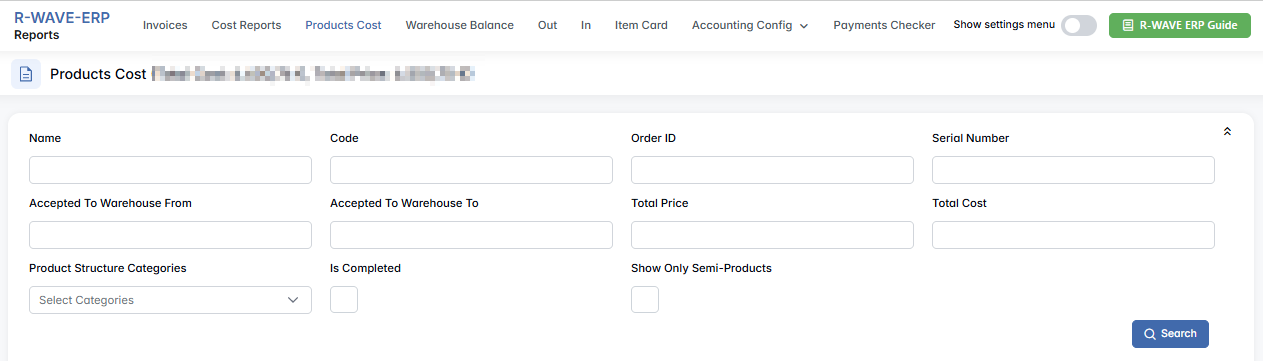
- Name – product name
- Code – product or item code
- Order ID – manufacturing or production order number
- Serial Number – serial-tracked product identifier
- Accepted to Warehouse From / To – filter by warehouse acceptance date range
- Total Price – filter by product total price
- Total Cost – filter by product total production cost
- Product Structure Categories – filter by BOM or product structure category
- Is Completed – show only completed production orders
- Show Only Semi-Products – display only semi-finished goods
Click Search to apply the selected filters.
Results Table
Each row represents a production record with detailed cost information: #, Name, Code, Category, Quantity, UOM, Serial Number, Order (clickable), Man-Hours, Labor Cost, Completed Status, Order Created Date, Order Accepted Date, Total Price, Total Cost.
Warehouse Balance
Warehouse Balance
The Warehouse Balance tab (Reports > Warehouse Balance) provides a real-time overview of the stock levels, costs, and prices of items stored across company warehouses. It allows filtering by multiple inventory attributes, reviewing total cost and price values, and exporting data for analysis or auditing purposes.

The page header shows Total Cost and Total Price for the currently filtered selection.
Filter Panel
Use the filters to narrow the results.
- Identification & naming – Name, Code.
- Company & related data – Company, Company Category, Warehouse Category.
- Dates – Creation From / To, Invoice Received From / To, Items Received From / To, Invoice Date From / To.
- Purchasing & inventory details – Purchase Category, Invoice Item Purchase Category, Locators, Areas, Area Locators, Warehouses, Acceptance Type (e.g., Physical Inventory, General/Production List Procurement, Outsource, Own Production), Finished Product Category, Finished Product Serial Number, Show Semi-Products.
- Invoice & supplier references – Supplier Invoice Number, Internal Invoice Number, Invoice Type, Accounting Number.
- Price & status – Unit Price (use the format
>20,<30,=50, etc.).
Three-state checkboxes (checkmark for yes, cross for no, empty for ignore): Paid, Is Proforma.
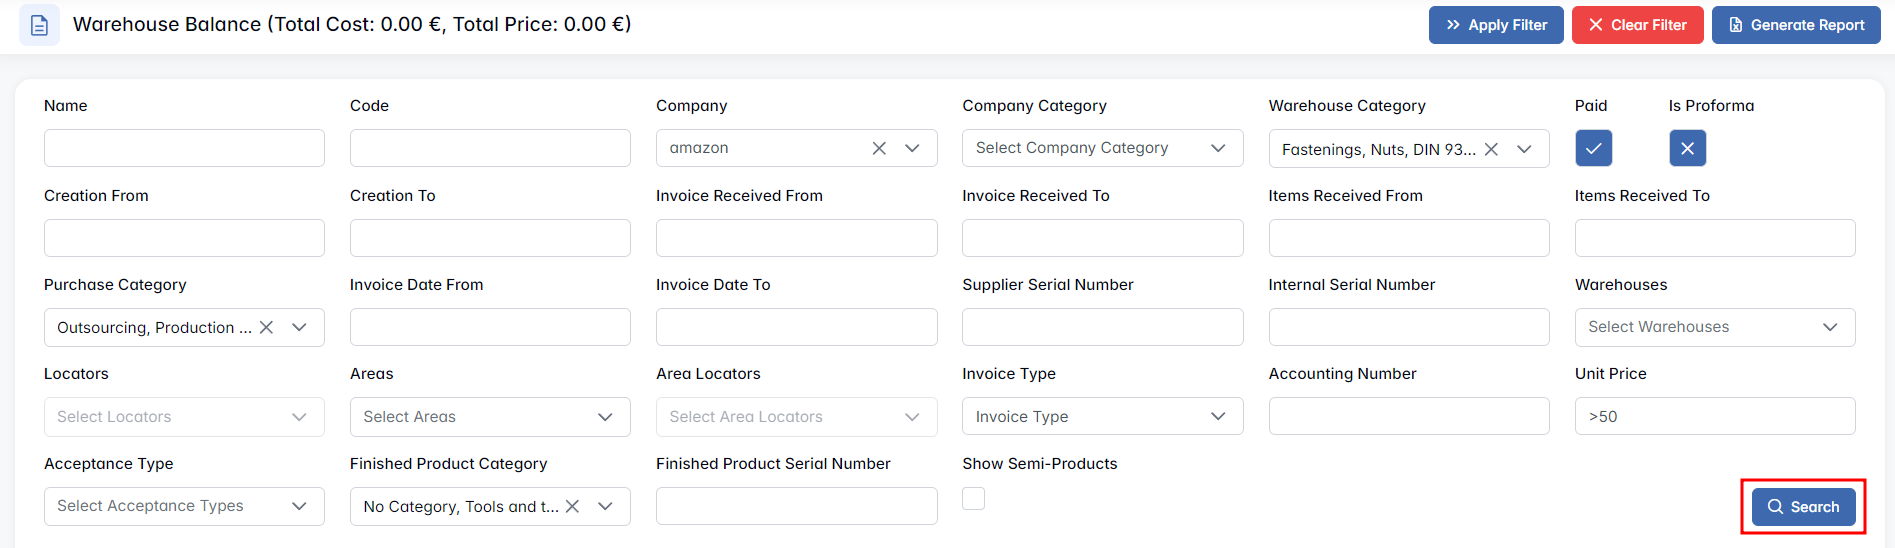
Click Search to apply the selected criteria.
Actions and Reports
- Click Apply Filter to use predefined filter configurations.
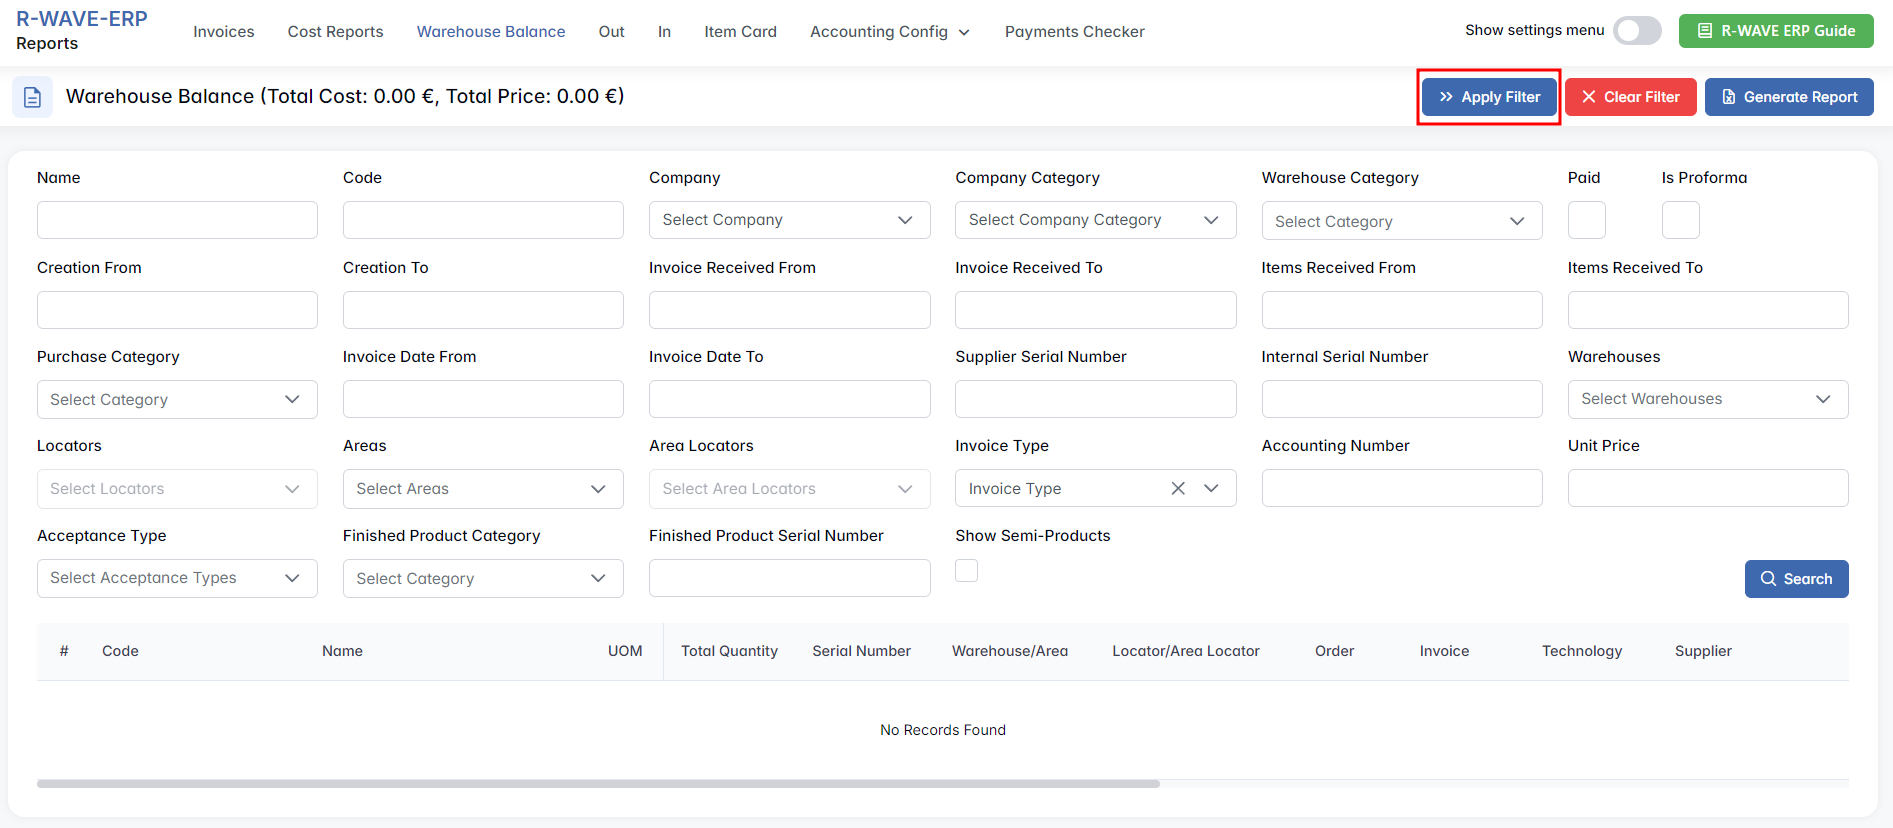

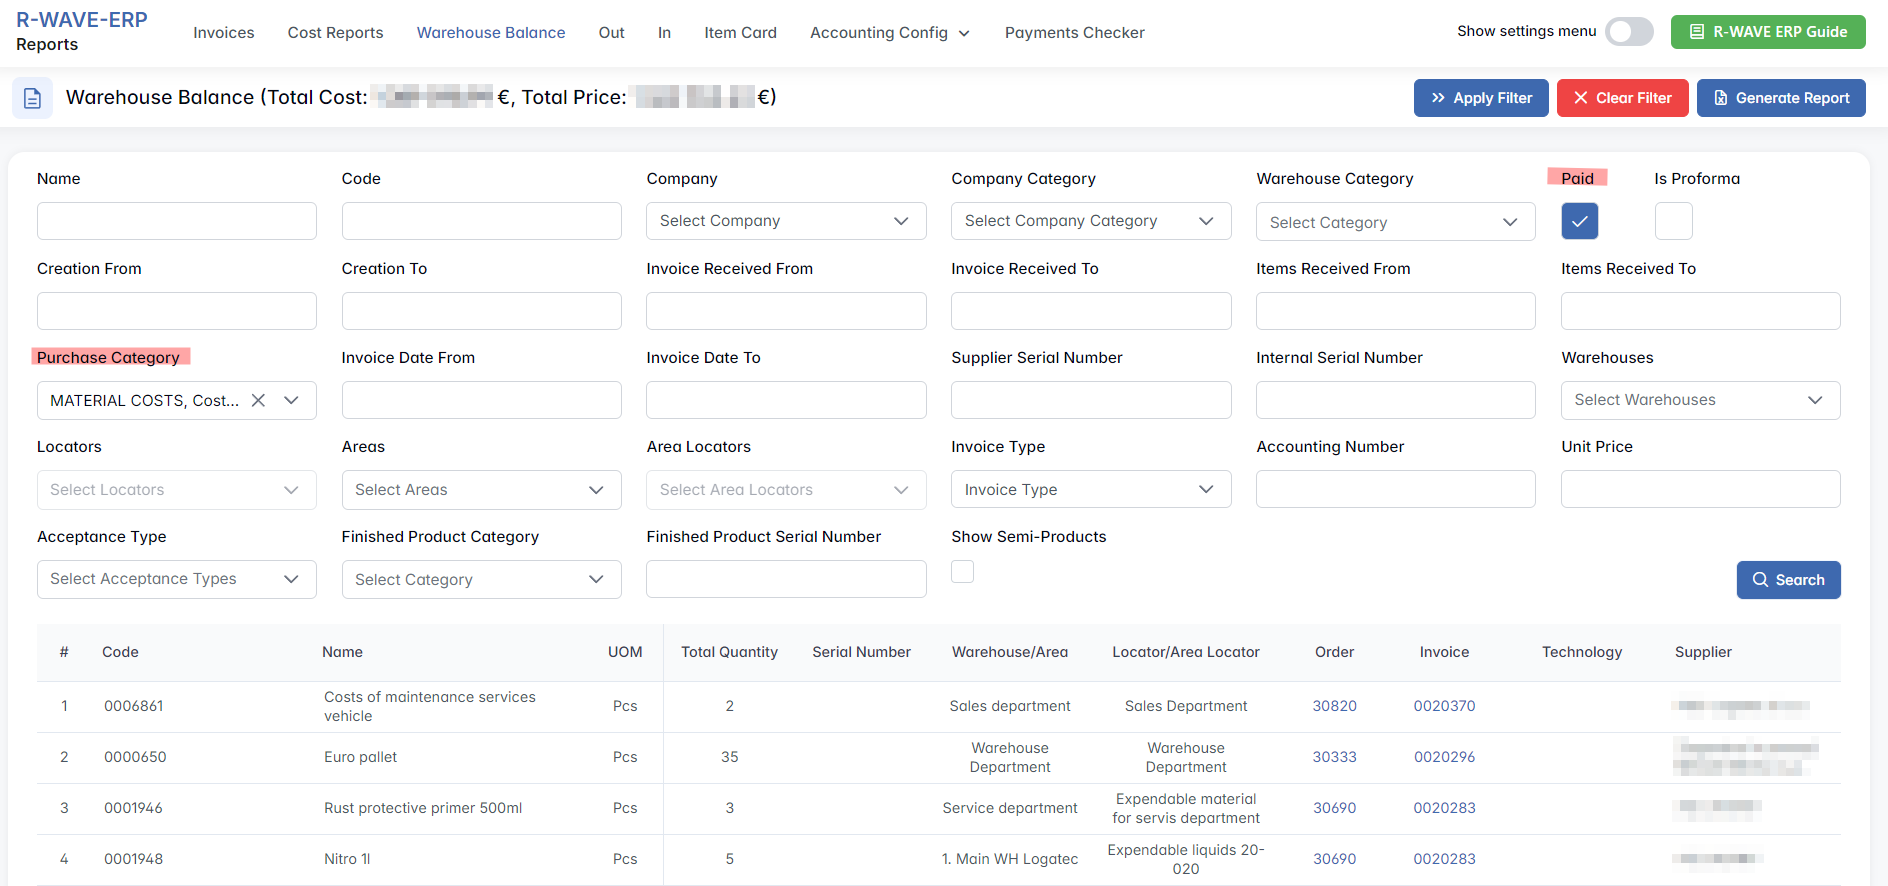
- Clear Filter to reset all.
- Generate Report – creates an Excel (
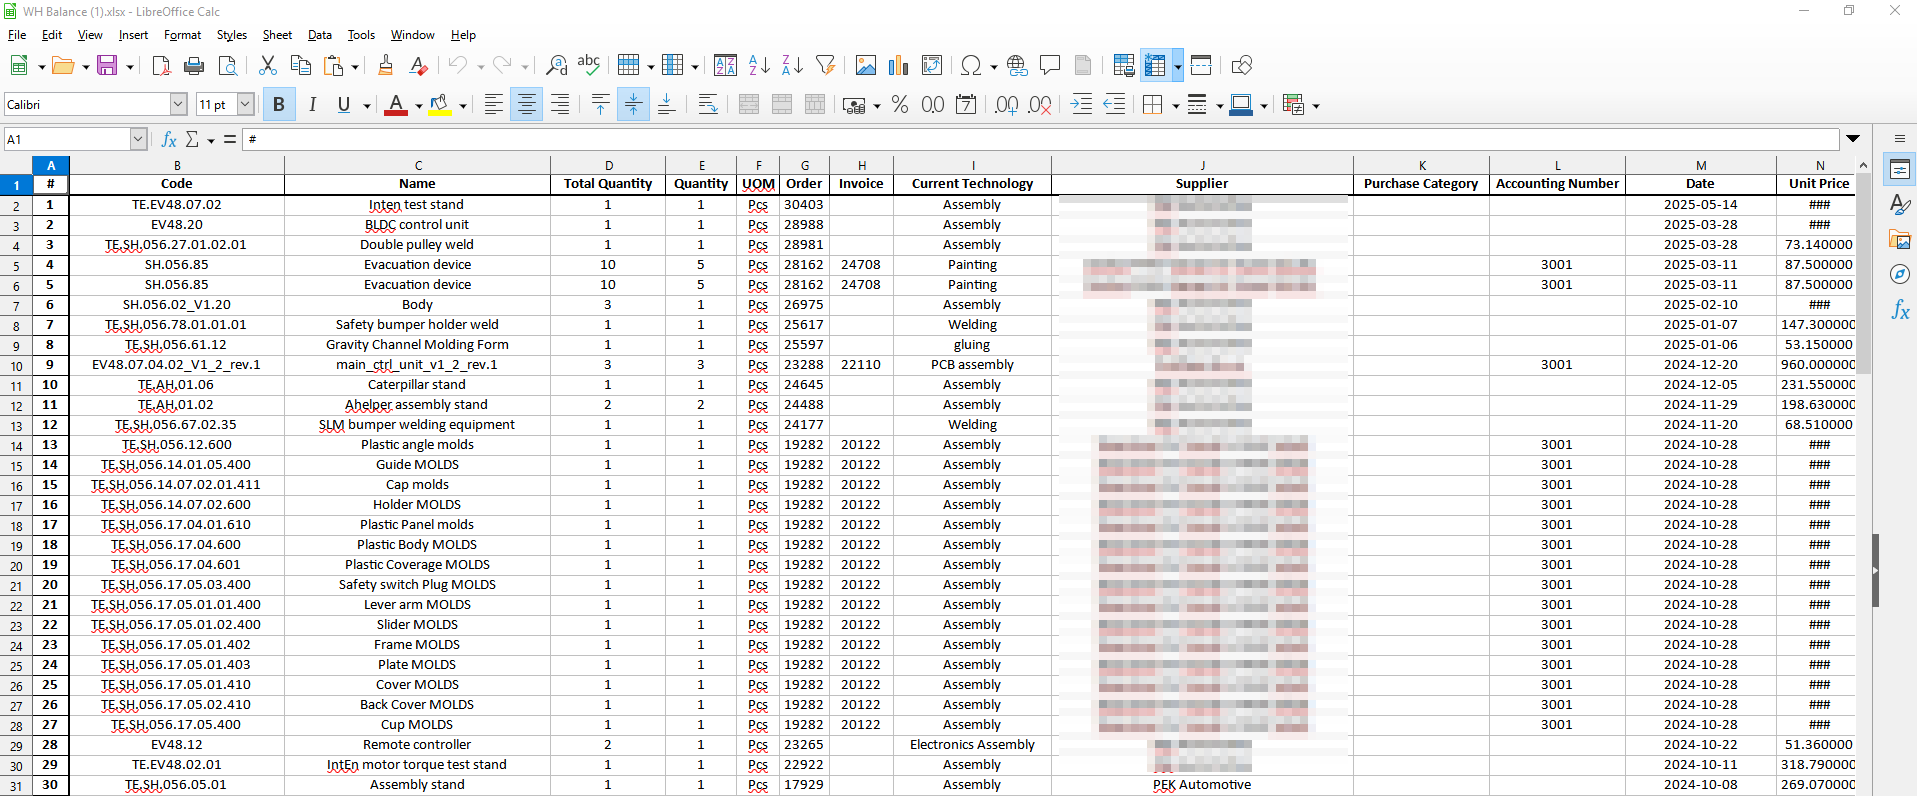
.xlsx) file containing the filtered warehouse balance data and downloads it to your device.
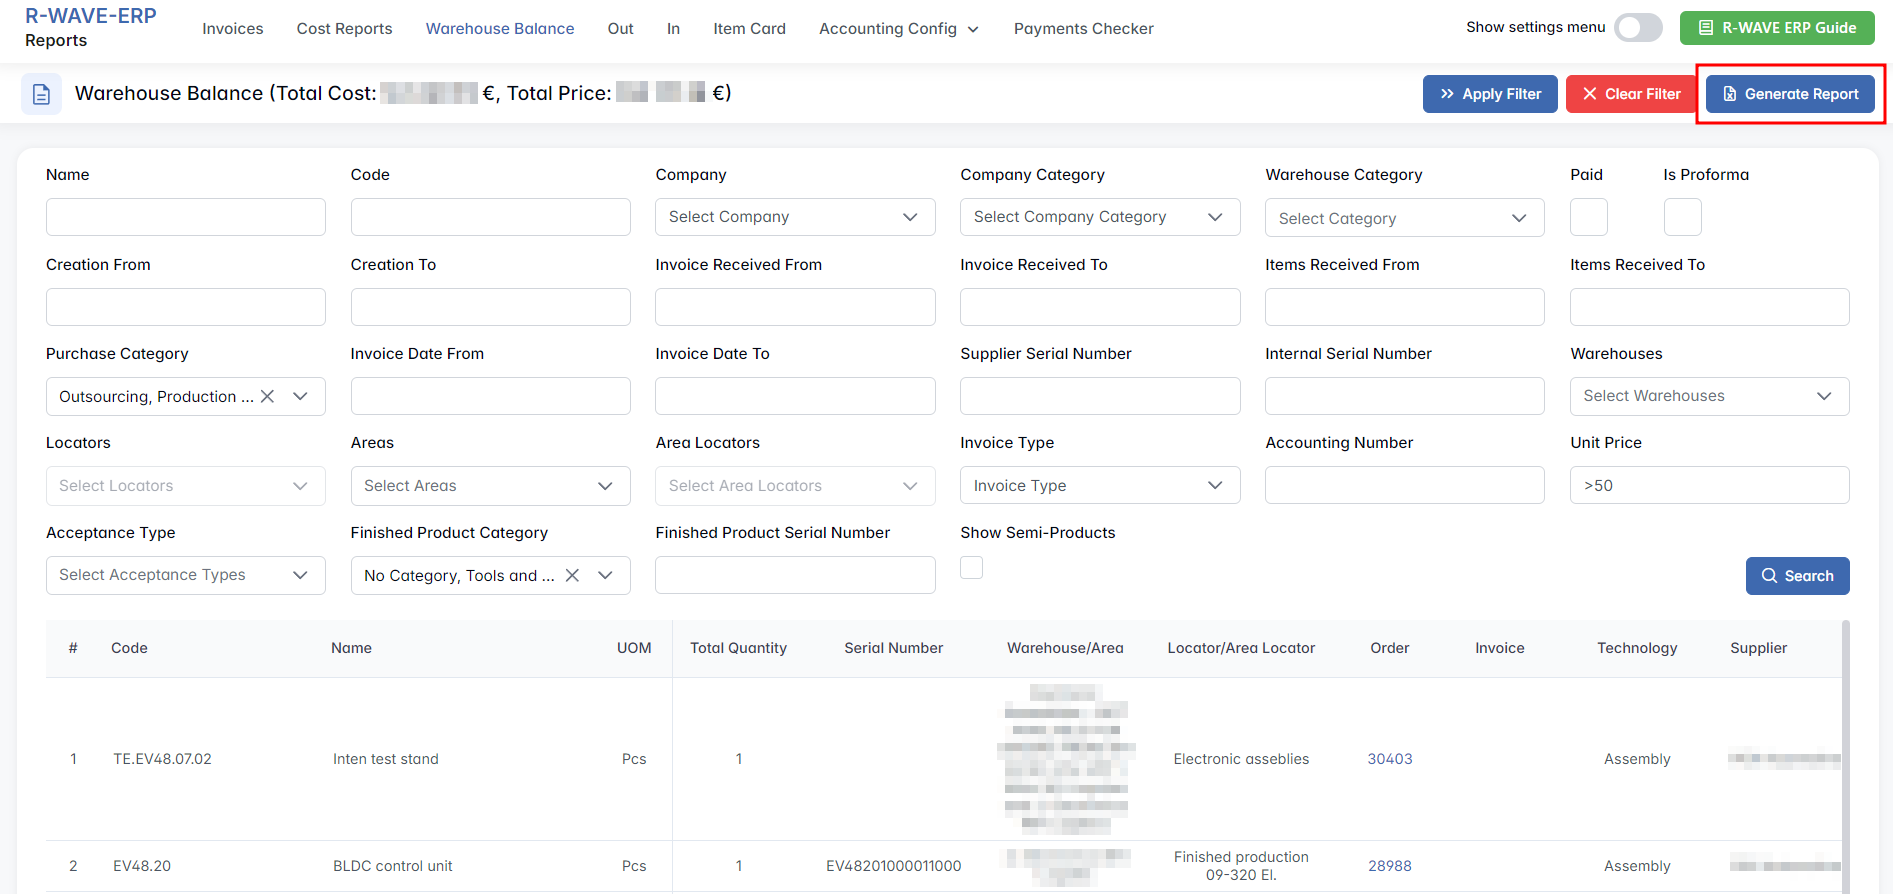
The exported spreadsheet includes the same columns as the on-screen table:
Results Table
Displays matching warehouse balance records.
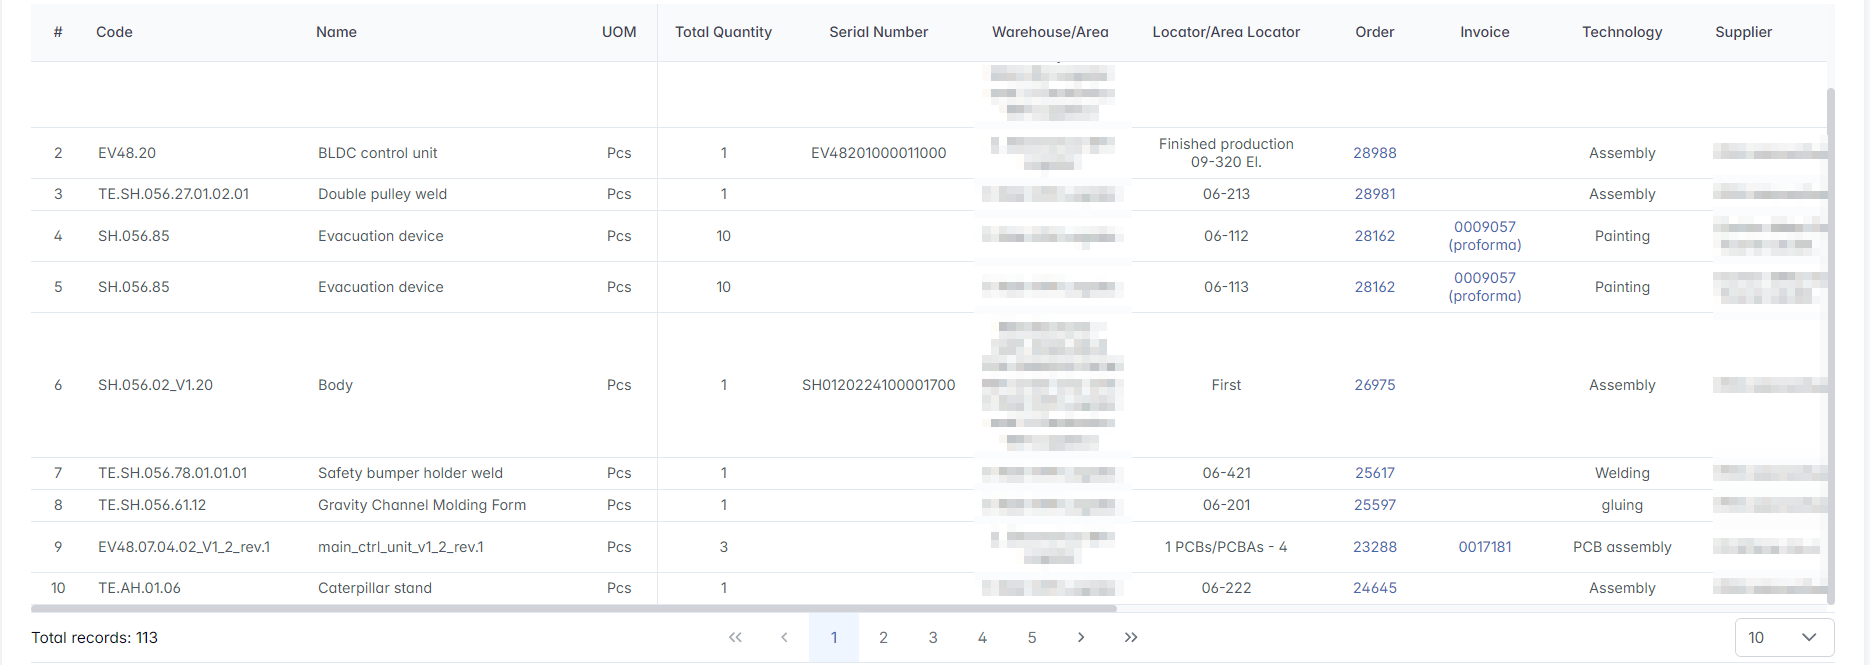
Columns: Code, Name, UOM, Total Quantity, Serial Number, Warehouse/Area Locator, Order (clickable), Invoice (clickable), Technology, Supplier, Purchase Category, Accounting Number, Creation Date, Quantity, Unit Price, Total Price, Unit Cost, Total Cost.
If no records match the filters, the table displays "No Records Found." The number of columns exceeds the screen width; a horizontal scrollbar is available at the bottom of the page.
Out
Out
The Out tab (Reports > Out) provides an overview of items that have been issued, written off, or moved out of stock for various reasons such as sales, production, or internal use.

It combines data from warehouse, procurement, and production workflows, allowing users to track each outgoing item with full reference to its orders, invoices, and suppliers.
Filter Panel
The filter panel allows narrowing the list of outgoing items based on multiple criteria.
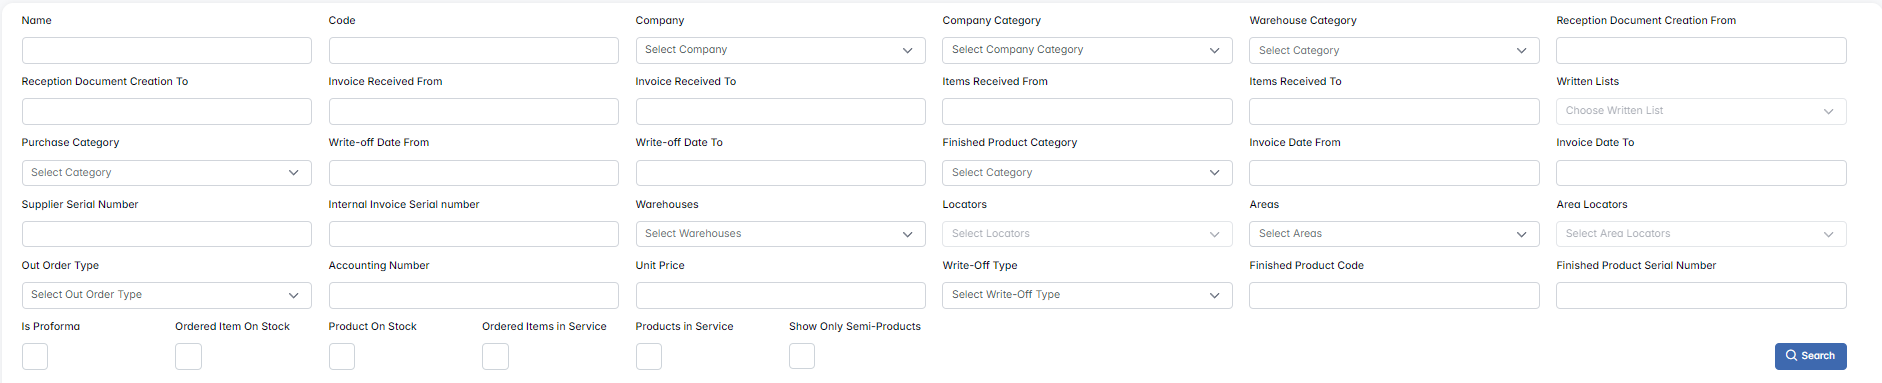
- General information – Name, Code, Company, Company Category, Warehouse Category, Purchase Category, Finished Product Category, Finished Product Code, Finished Product Serial Number, Accounting Number, Unit Price, Write-Off Type, Is Proforma.
- Dates – Reception Document Creation From / To, Invoice Received From / To, Items Received From / To, Write-off Date From / To, Invoice Date From / To.
- Invoice numbers – Supplier Invoice Number, Internal Invoice Number.
- Warehouse & location – Warehouses, Locators, Areas, Area Locators.
- Orders & stock status – Out Order Type, Ordered Item On Stock, Product On Stock, Ordered Items in Service, Products in Service, Show Only Semi-Products.
After selecting the necessary filters, click Search to update the results table.
Actions and Reports
Cancel Written
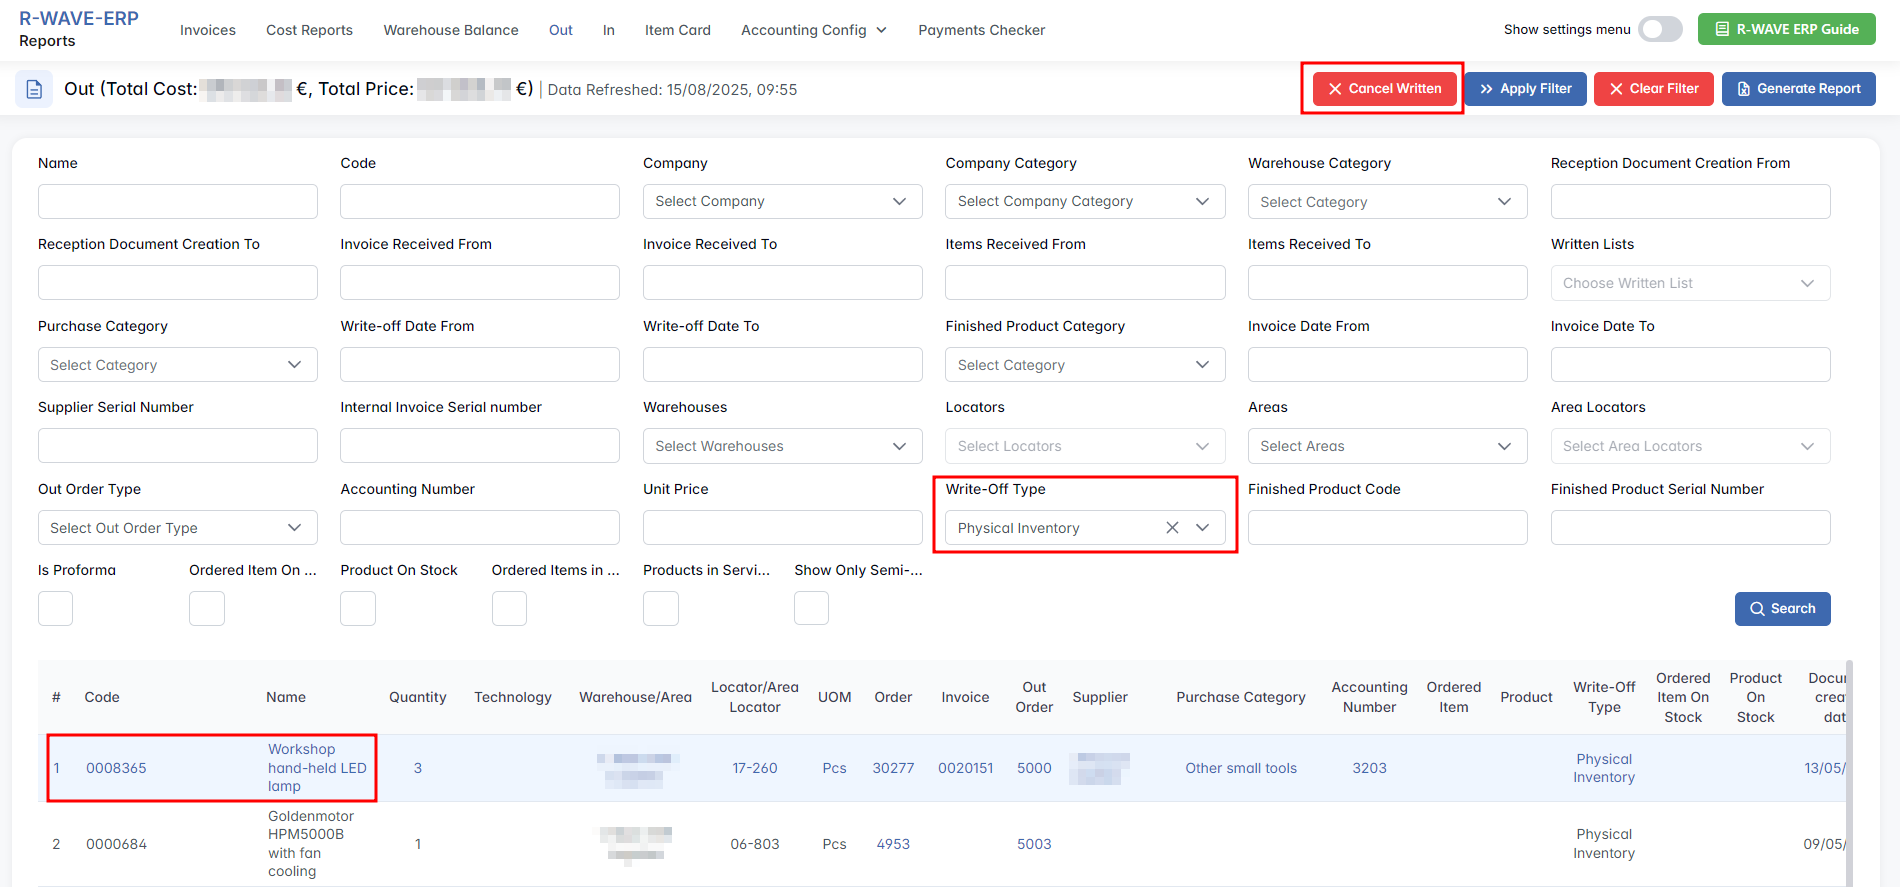
This function reverses or cancels a write-off entry that was previously recorded under the Physical Inventory write-off type. It is typically used when a write-off was entered by mistake or when stock discrepancies identified during physical inventory have been resolved. Canceling a written-off record returns the associated items back to stock in the ERP.
By default, the Cancel Written button is disabled. To enable it:
- In the filter panel, set Write-Off Type to Physical Inventory.

- Click Search to apply the filter.
- Select the desired row in the results table.
Once a matching row is selected, the Cancel Written button becomes active. Clicking it opens a confirmation modal asking the user to confirm the action.
- Click Apply Filter to use a predefined filter configuration.
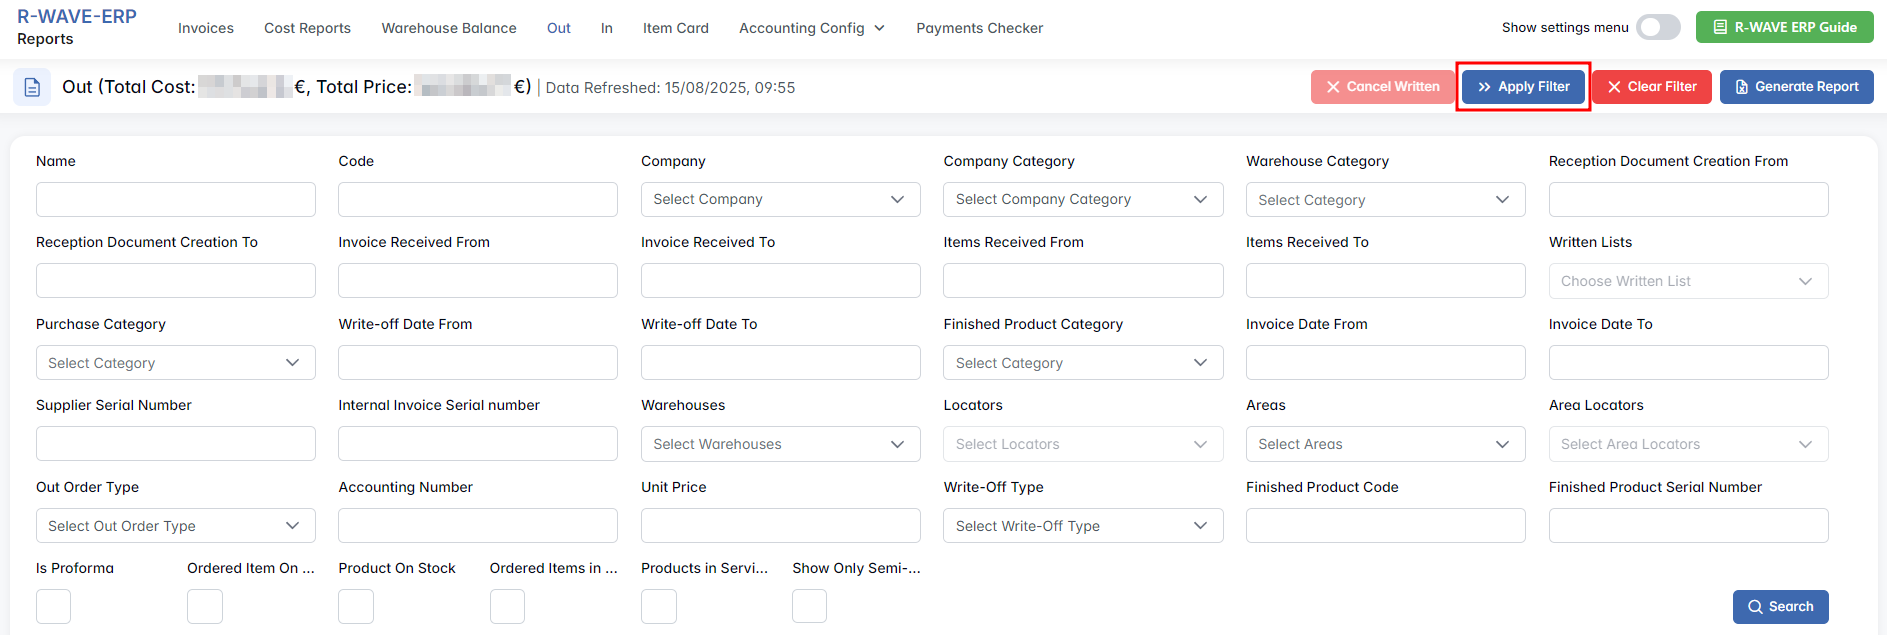

Click Search to view the results.
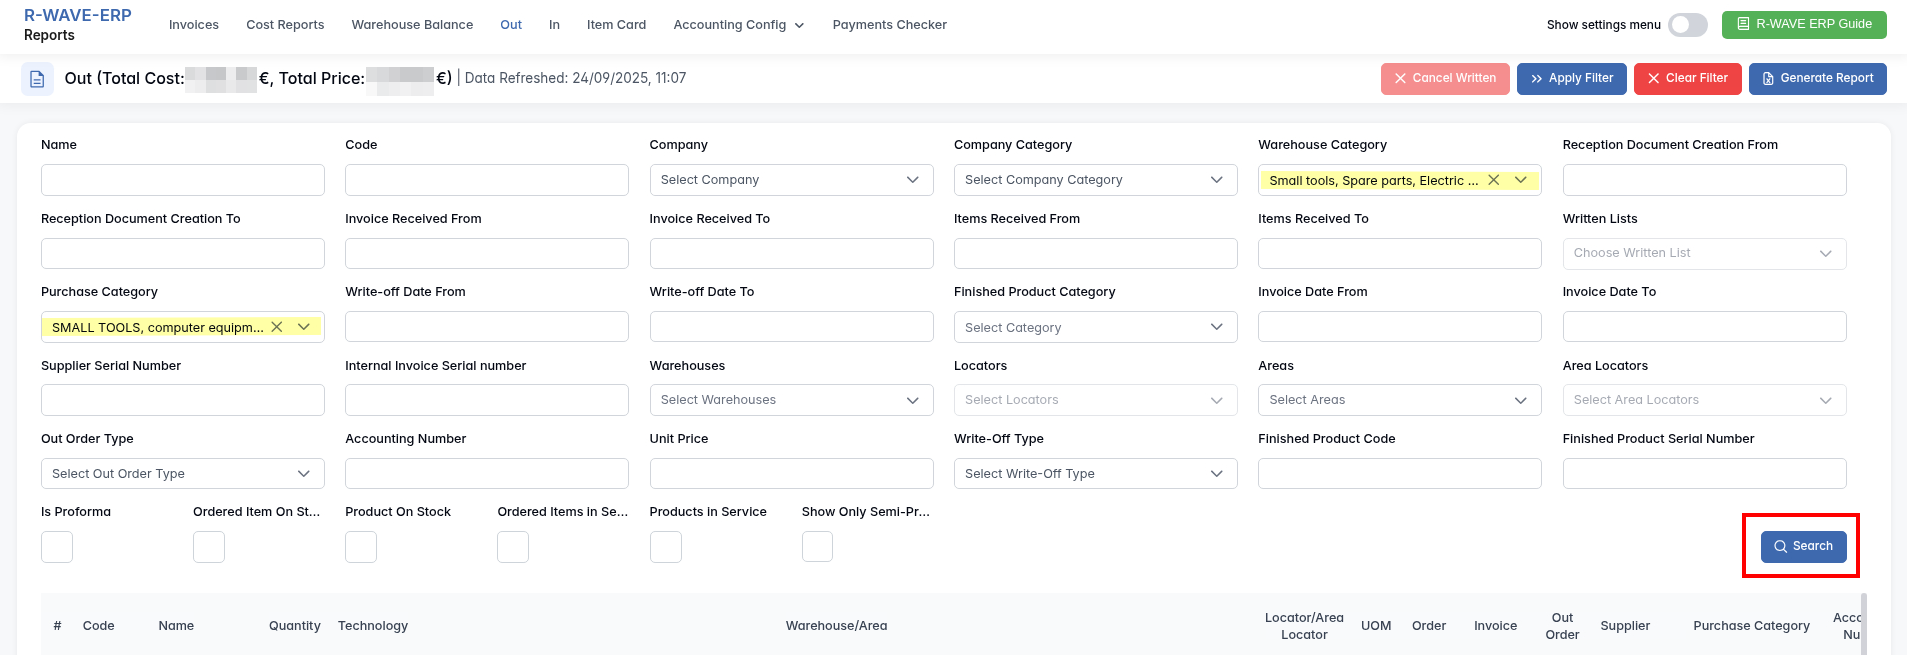
- Clear Filter to reset all.
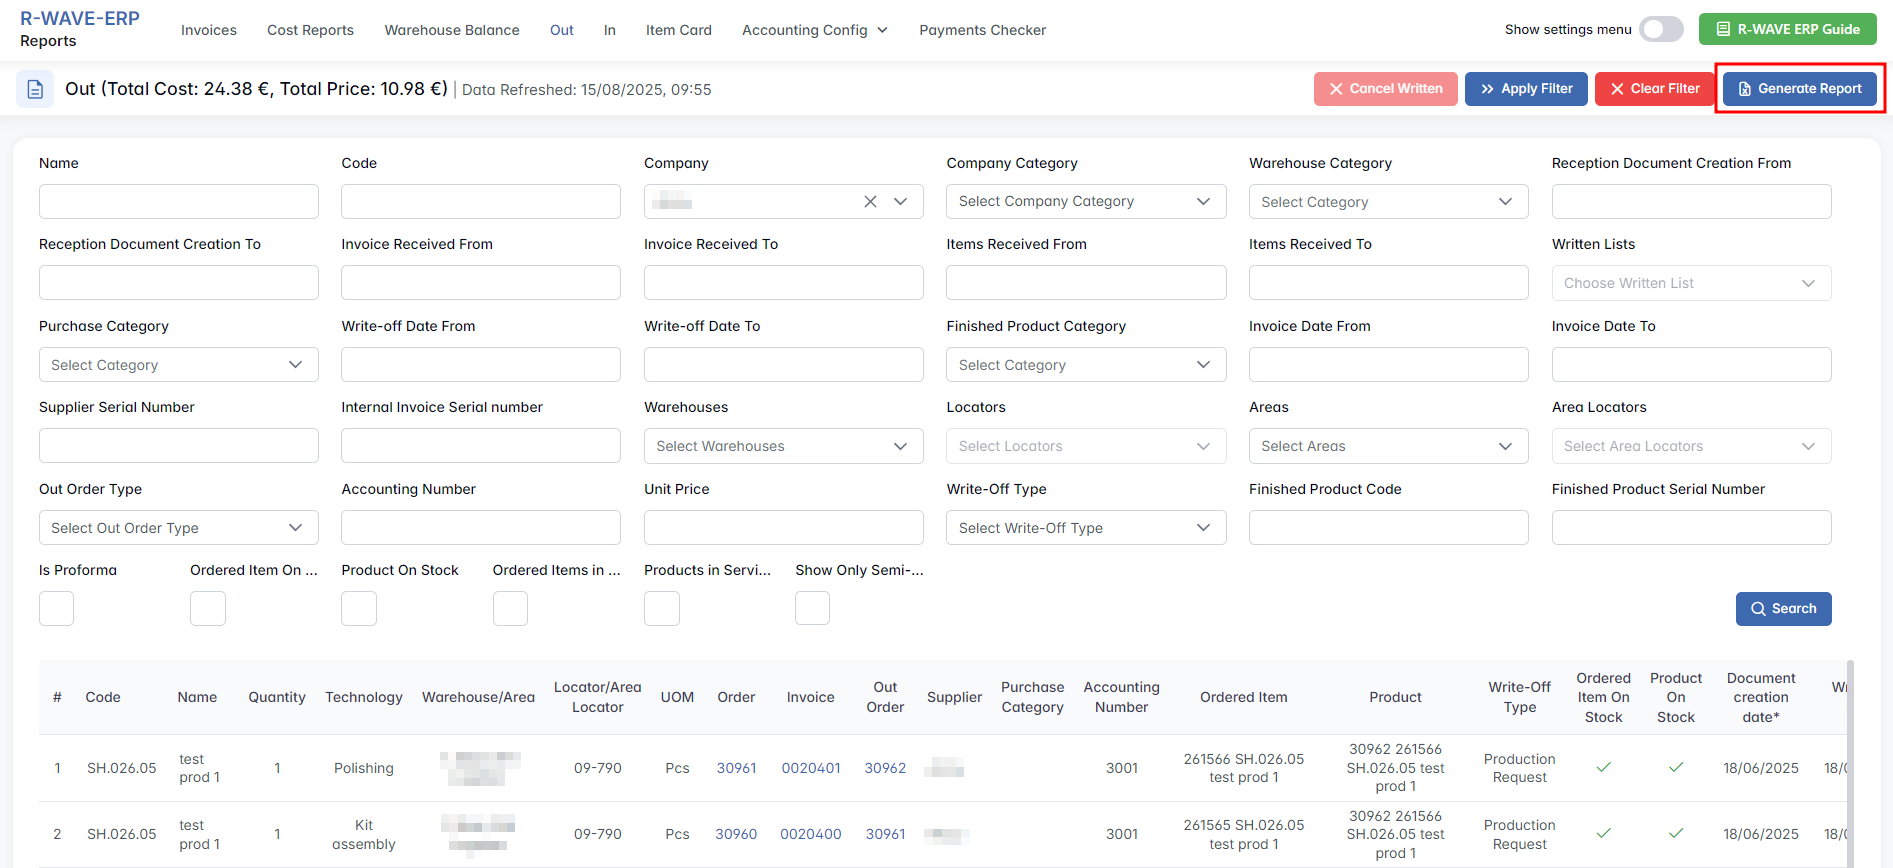
- Generate Report – creates an Excel (
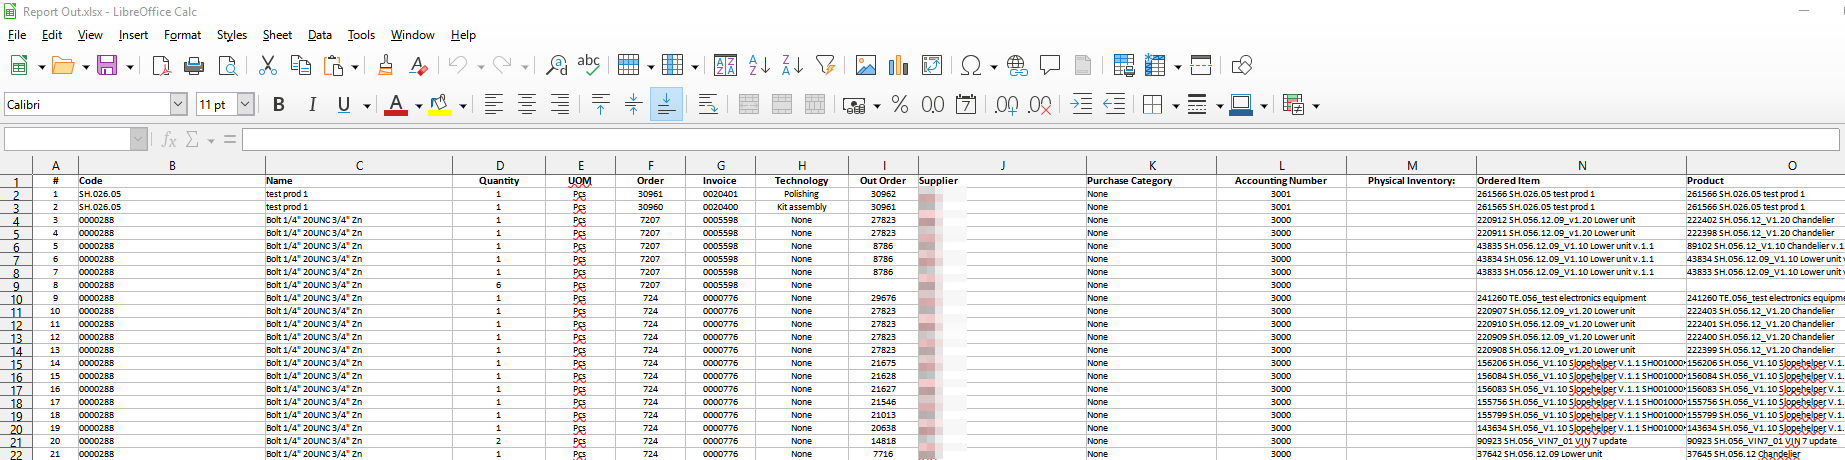
.xlsx) file containing the filtered data and automatically downloads it.
The exported spreadsheet includes the same columns as the on-screen table:
Results Table
Displays matching outgoing item records.

Columns: Code, Name, Quantity, Technology, Warehouse/Area, Locator/Area Locator, UOM, Order (clickable), Invoice (clickable), Out Order (clickable), Supplier, Purchase Category, Accounting Number, Ordered Item, Product, Write-Off Type, Ordered Item On Stock, Product On Stock, Document Creation Date, Write-off Date.

Also: Unit Price / Total Price, Unit Cost / Total Cost. If no records match the filters, the table displays "No Records Found." A horizontal scrollbar is available at the bottom of the page.
In
In
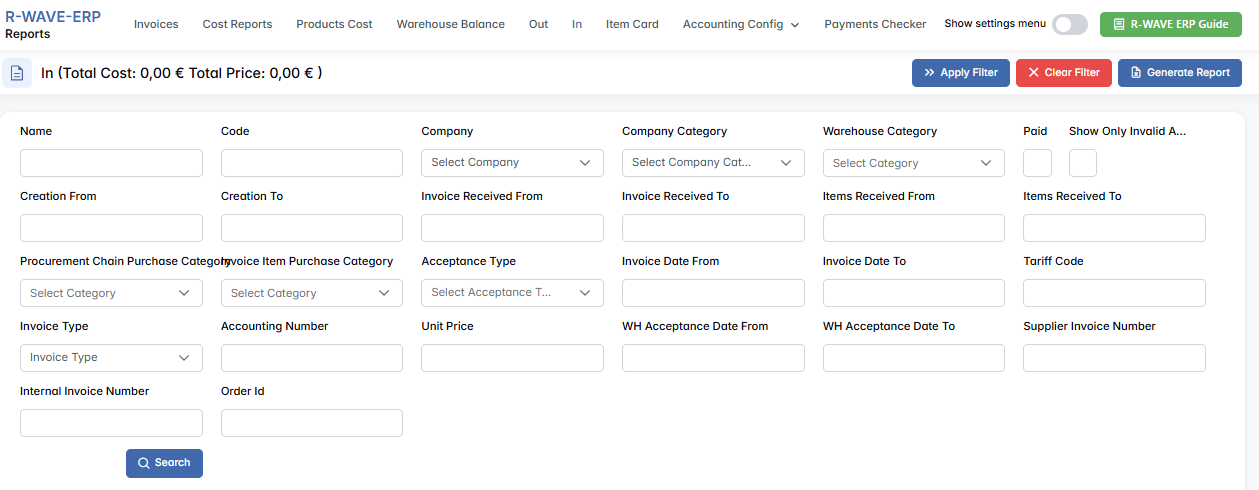
The In tab (Reports > In) provides an overview of items that have been received into stock from suppliers, production, or internal transfers. It consolidates data from warehouse, procurement, and production workflows, allowing users to trace each incoming item with full references to its orders, invoices, and suppliers.
Filter Panel
The filter panel allows narrowing the list of incoming items based on multiple criteria.
- General information – Name, Code, Company, Company Category, Warehouse Category, Procurement Chain Purchase Category, Invoice Item Purchase Category, Acceptance Type (e.g., outsourcing, production, returns), Invoice Type, Tariff Code, Accounting Number, Unit Price, Paid, Supplier Invoice Number, Internal Invoice Number, Order ID, Show Only Invalid Acceptances.
- Dates – Creation From / To, Invoice Received From / To, Items Received From / To, Invoice Date From / To, WH Acceptance Date From / To.
Actions and Reports
- Apply Filter – applies predefined or user-set filter configurations.

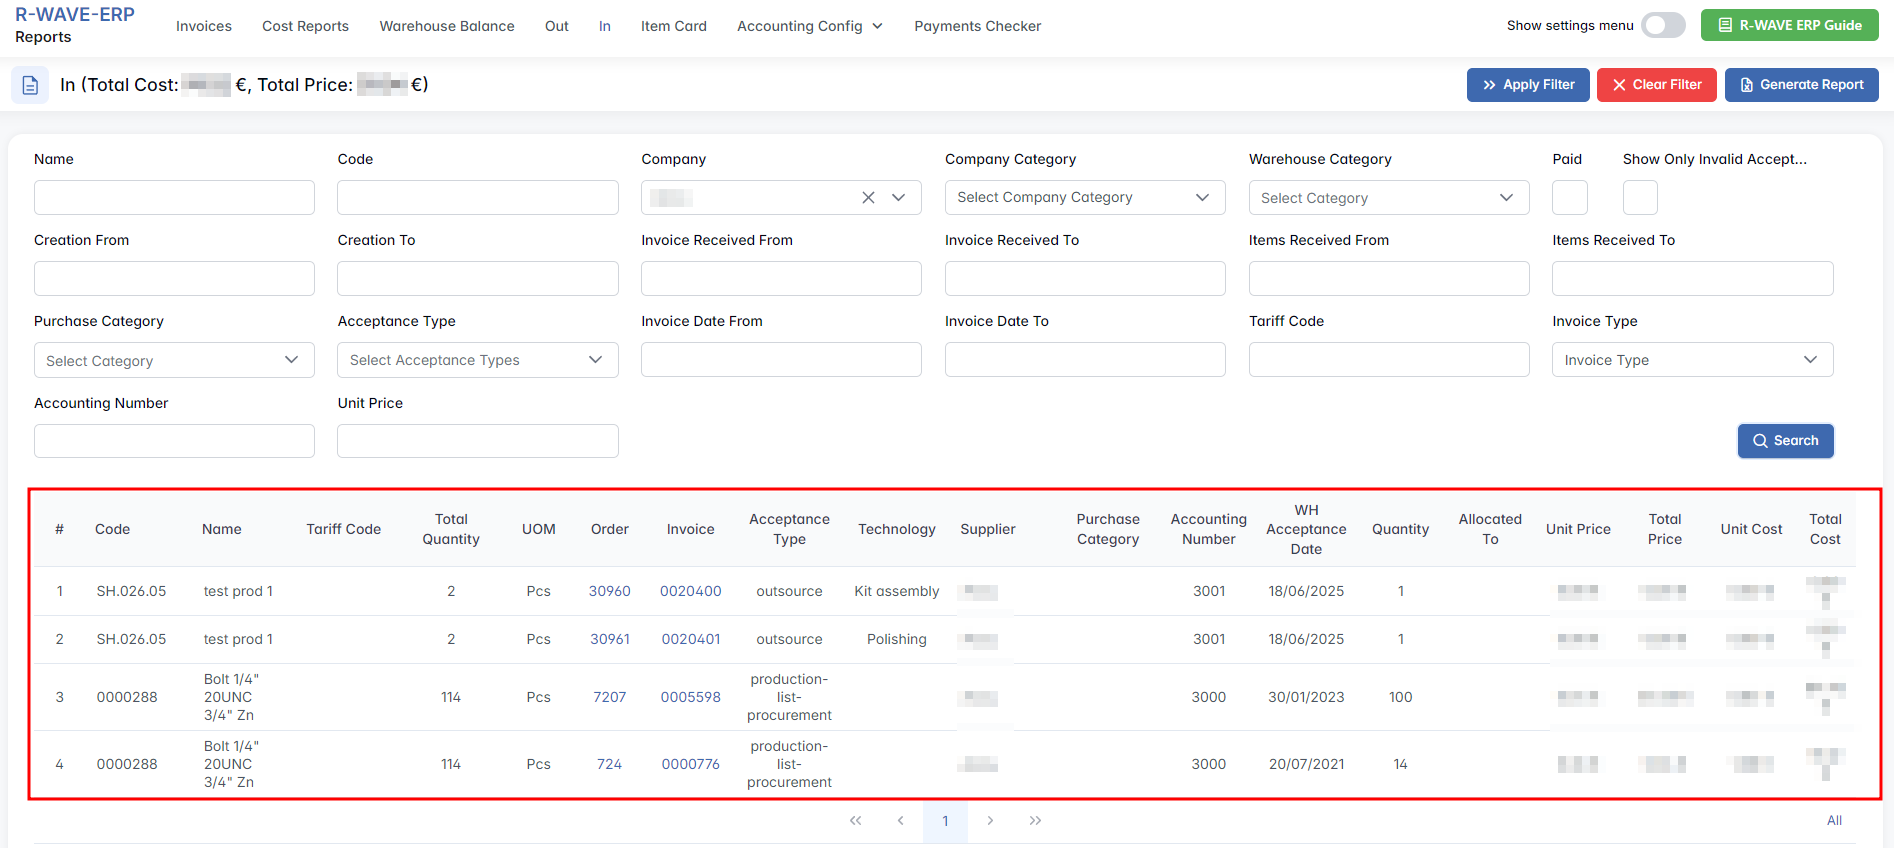
- Clear Filter – resets all applied filters.

- Generate Report – creates an Excel (
.xlsx) file containing the filtered incoming items data and automatically downloads it.
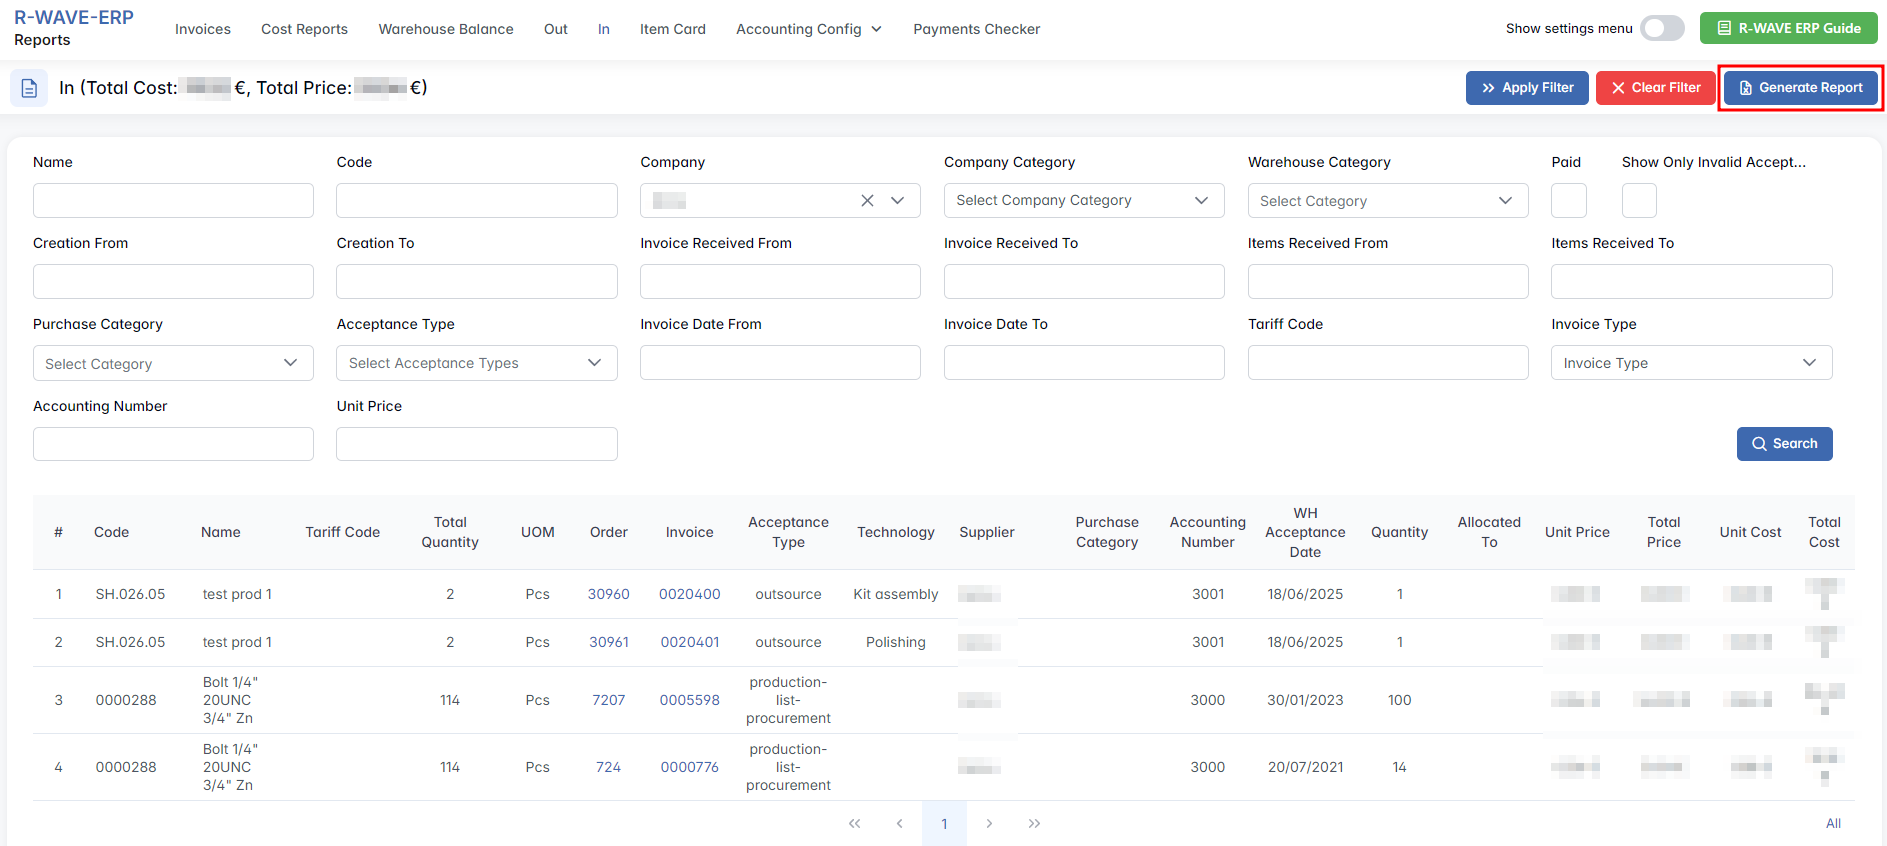
The exported spreadsheet includes the same columns as the on-screen table.

Results Table
Displays matching incoming item records.
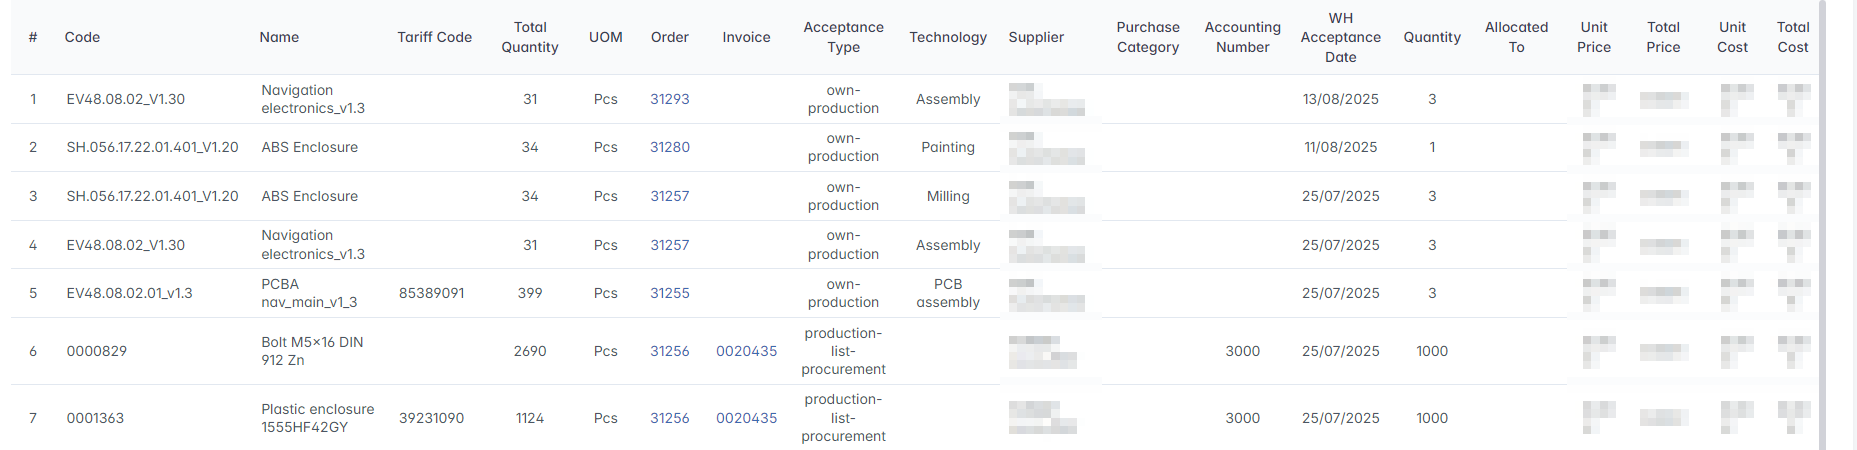
Columns: Code, Name, Tariff Code, Total Quantity, UOM, Order (clickable), Invoice (clickable), Acceptance Type, Technology, Supplier, Purchase Category, Accounting Number, WH Acceptance Date, Quantity, Allocated To, Unit Price / Total Price, Unit Cost / Total Cost.
If no records match the filters, the table displays "No Records Found."
Item Card
Item Card
The Item Card tab (Reports > Item Card) provides a consolidated view of all transactions, stock movements, and cost/price data related to a specific nomenclature item in the ERP.

It combines information from procurement, warehouse, and production modules, allowing users to track an item's full lifecycle — including orders, invoices, suppliers, stock locations, and costs — in a single table. This tab is particularly useful for reviewing the complete movement history of a product, checking its associated suppliers, technologies, and documents, understanding where stock is physically located (warehouse vs. tools), and validating pricing and costing data.
Filter Panel
The filter panel contains a single Nomenclature field: a dropdown to search and select an item by its internal code or name. As you type, a list of matching items appears. Selecting an item automatically refreshes the results table below.
Steps to View an Item Card
- Open Reports > Item Card from the main menu.
- In the Nomenclature field, start typing the product code or name.
- From the dropdown list, select the desired item.
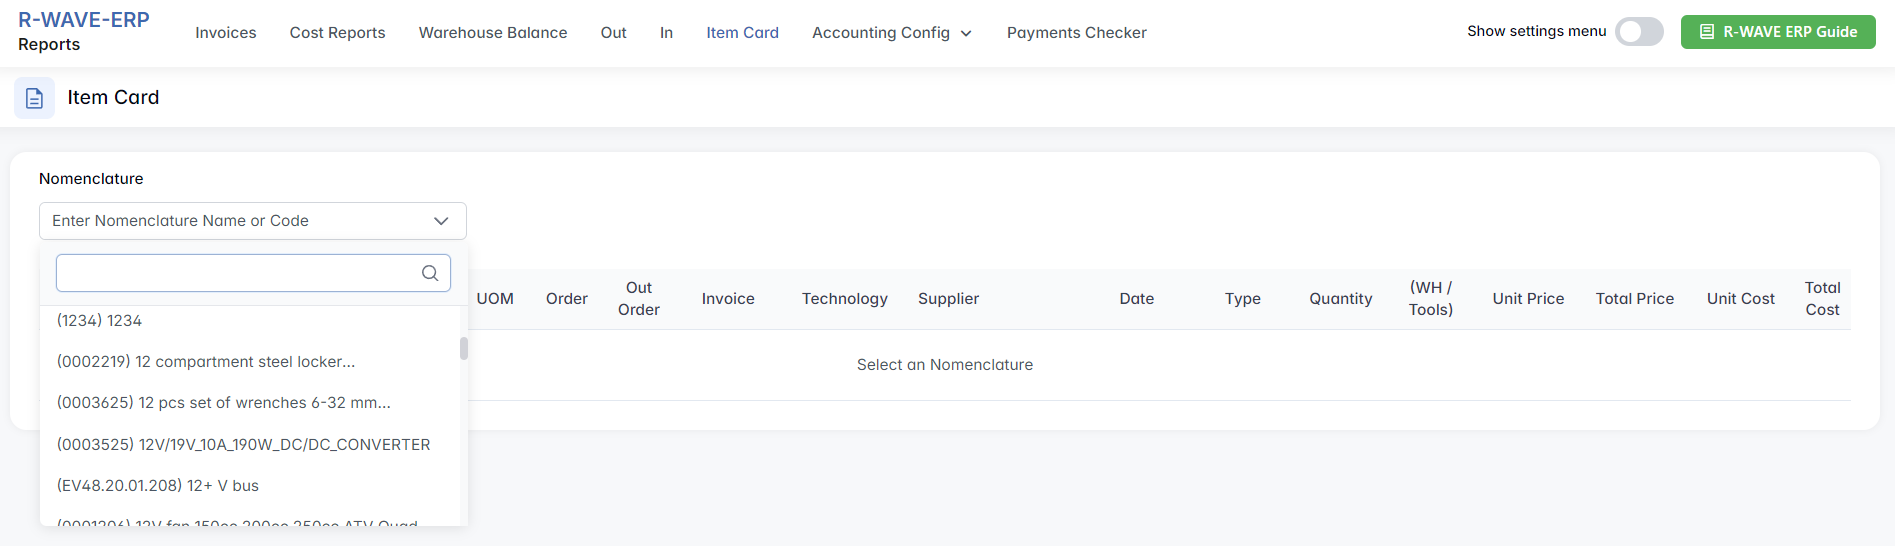
The table below will load with all available records for that item.
Results Table
Displays all records related to the selected nomenclature. Each row represents a specific transaction, stock entry, or movement for that item.
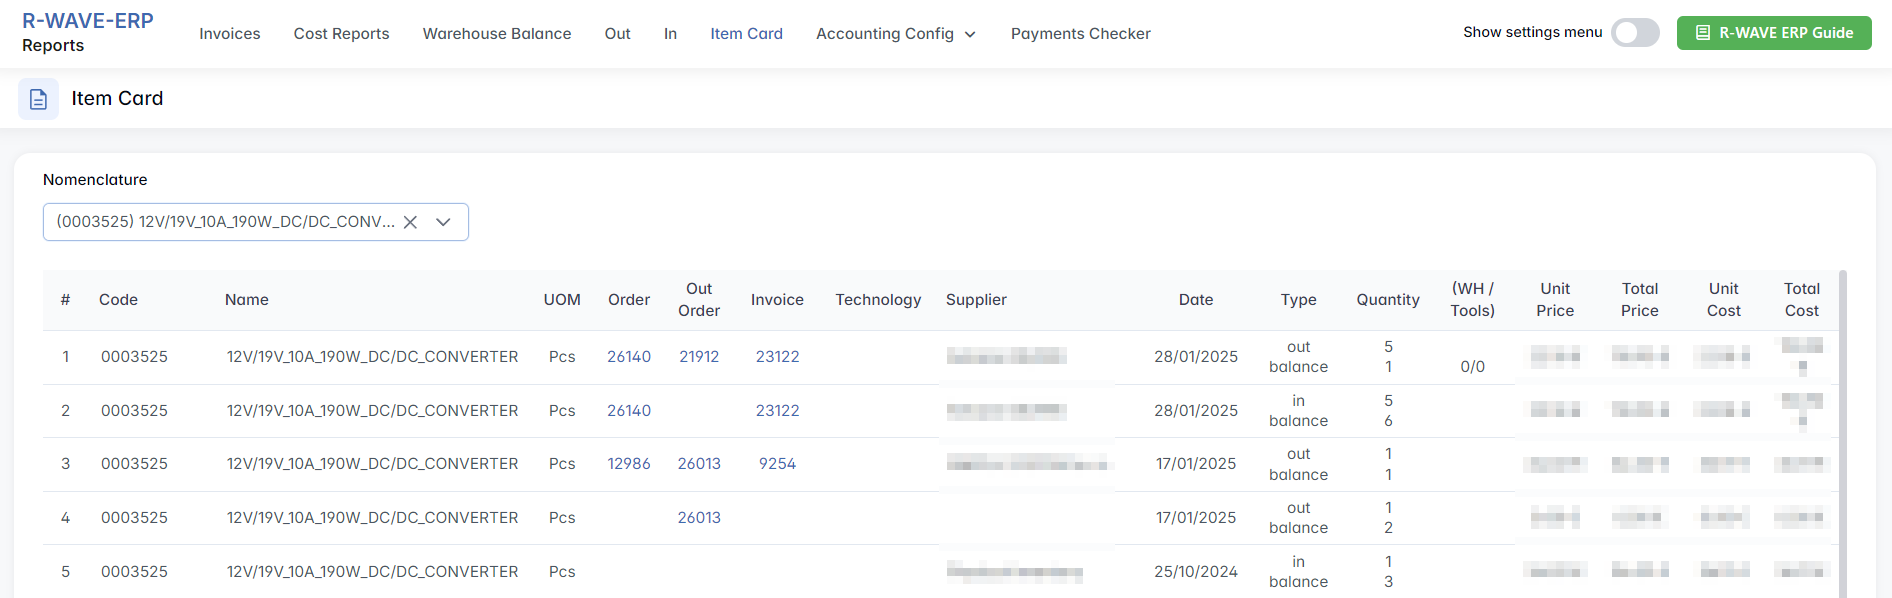
Columns: Code, Name, UOM, Order (clickable), Out Order (clickable), Invoice (clickable), Technology, Supplier, Date.
- Type – shows the type of stock movement: in balance (the item was added to stock) or out balance (the item was removed from stock).
- Quantity – displayed as two numbers stacked vertically: the top number is the quantity moved in this transaction (positive for additions, negative for removals); the bottom number is the running stock balance after this transaction. If either number is negative, more stock was taken out than available.
- (WH / Tools) – shows where the stock is physically stored: first value = quantity in warehouse stock; second value = quantity in tools stock. Examples:
2/0(2 in warehouse, none in tools),0/1(none in warehouse, 1 in tools),100/120(100 in warehouse, 120 in tools due to allocations). - Unit Price / Total Price, Unit Cost / Total Cost.
Special notes:
- All clickable links (Order, Out Order, Invoice) open the corresponding ERP page.
- Multiple rows for the same product code can appear if the item has had both incoming and outgoing transactions or multiple entries on different dates.
- If no nomenclature is selected, the table displays "Select a Nomenclature." If no records are found, it displays "No Records Found."
Accounting Config
Accounting Config
The Accounting Config menu (Reports > Accounting Config) contains tools for managing accounting numbers across companies, nomenclature items, and technologies. These settings ensure correct mapping between operational records and accounting references in the ERP system.
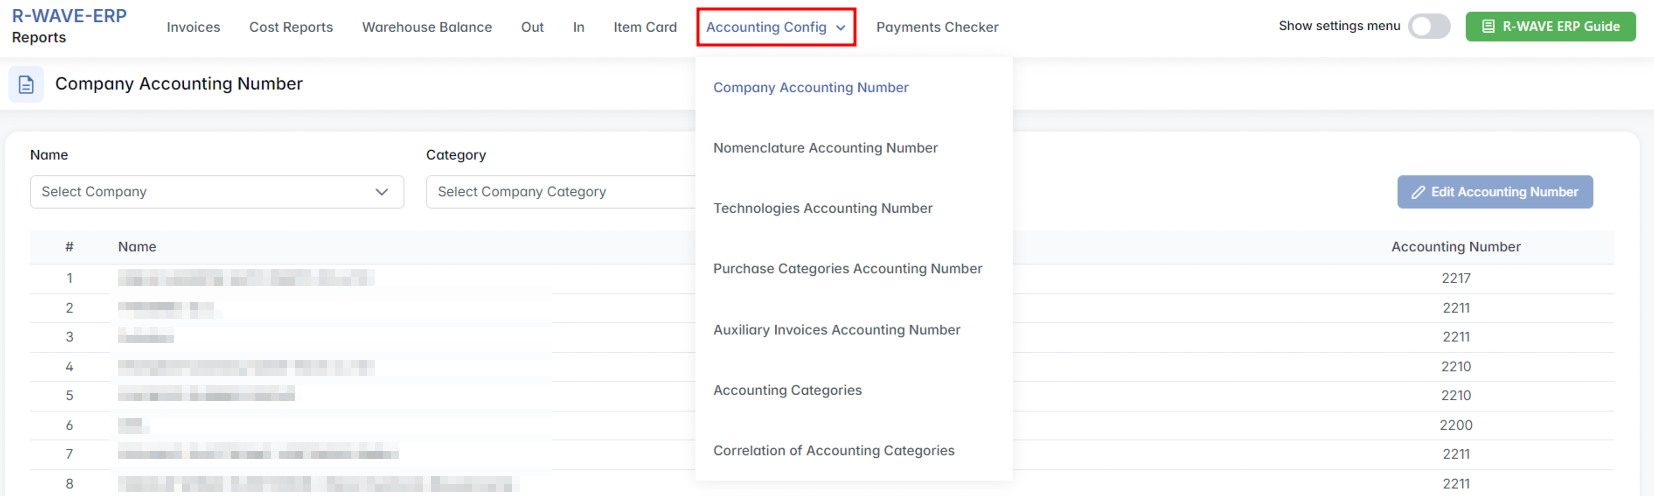
1. Company Accounting Number
This subtab links each company in the ERP to its corresponding accounting number, used in financial records, reports, and integration with accounting systems.
Filter Panel

- Company – select a company from the list.
- Category – filter companies by category or type.
Results Table
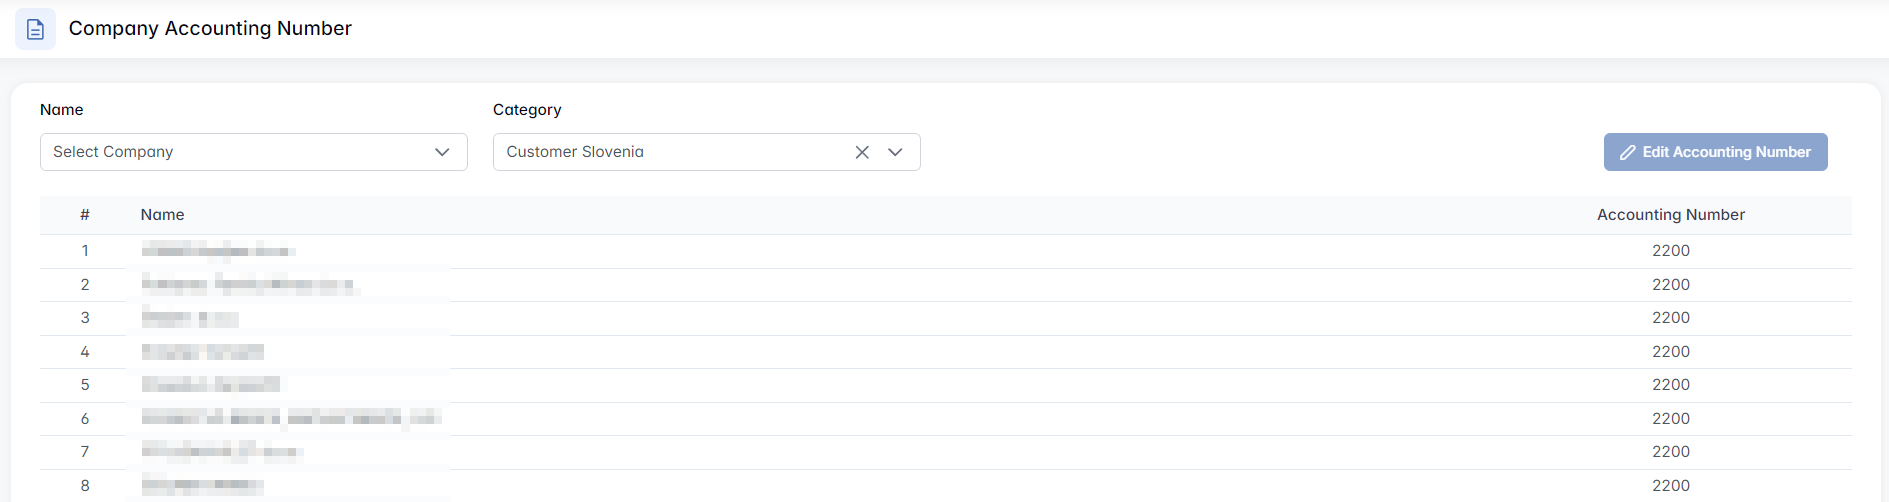
Columns: Name, Category, Accounting Number. If no filters are applied, the table lists all companies with their assigned accounting numbers.
Actions
Edit Accounting Number – active only if a row is selected; opens a modal window to change the accounting number for the selected company.


2. Nomenclature Accounting Number
This subtab is used to assign and manage accounting numbers for individual nomenclature items — products, components, materials, or any goods stored in the ERP database. This mapping is crucial for financial reporting, regulatory compliance, asset tracking, and international trade.
Filter Panel

- Code – the internal nomenclature code.
- Name – the item name.
- Categories – filter by nomenclature category (multiple choice).
- Accounting Number – search by accounting number.
- Tariff Code – search by customs tariff code.
Results Table
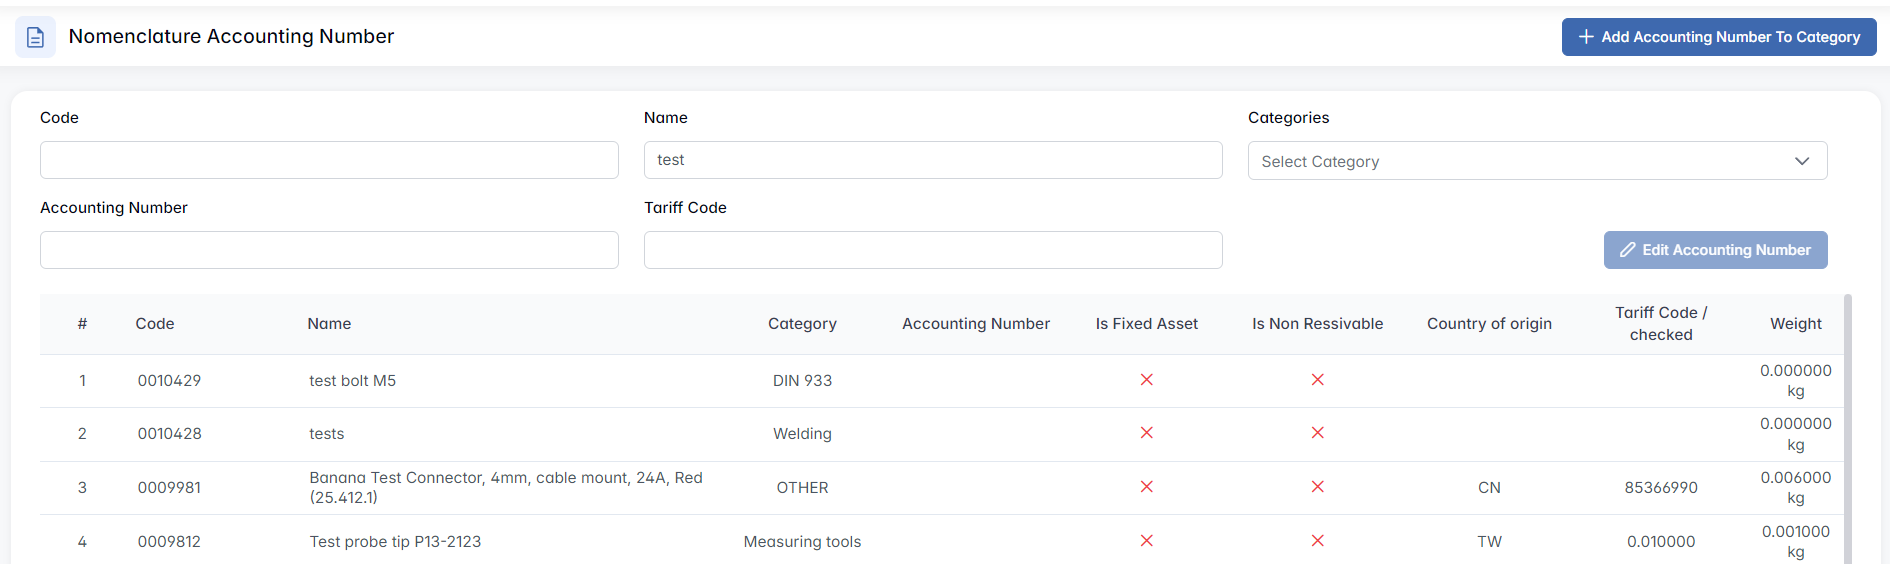
Columns: Code, Name, Category, Accounting Number, Is Fixed Asset, Is Non-Resalable, Country of Origin, Tariff Code / Checked, Weight.
Actions
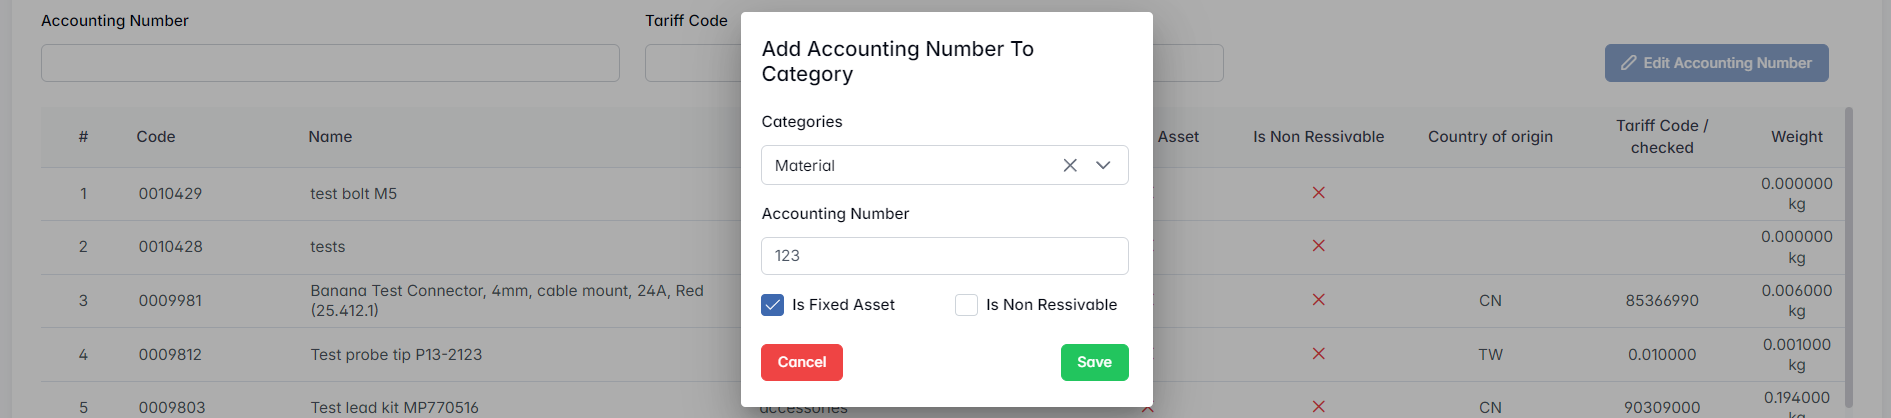
- Add Accounting Number to Category – assigns an accounting number to all items within a selected category.

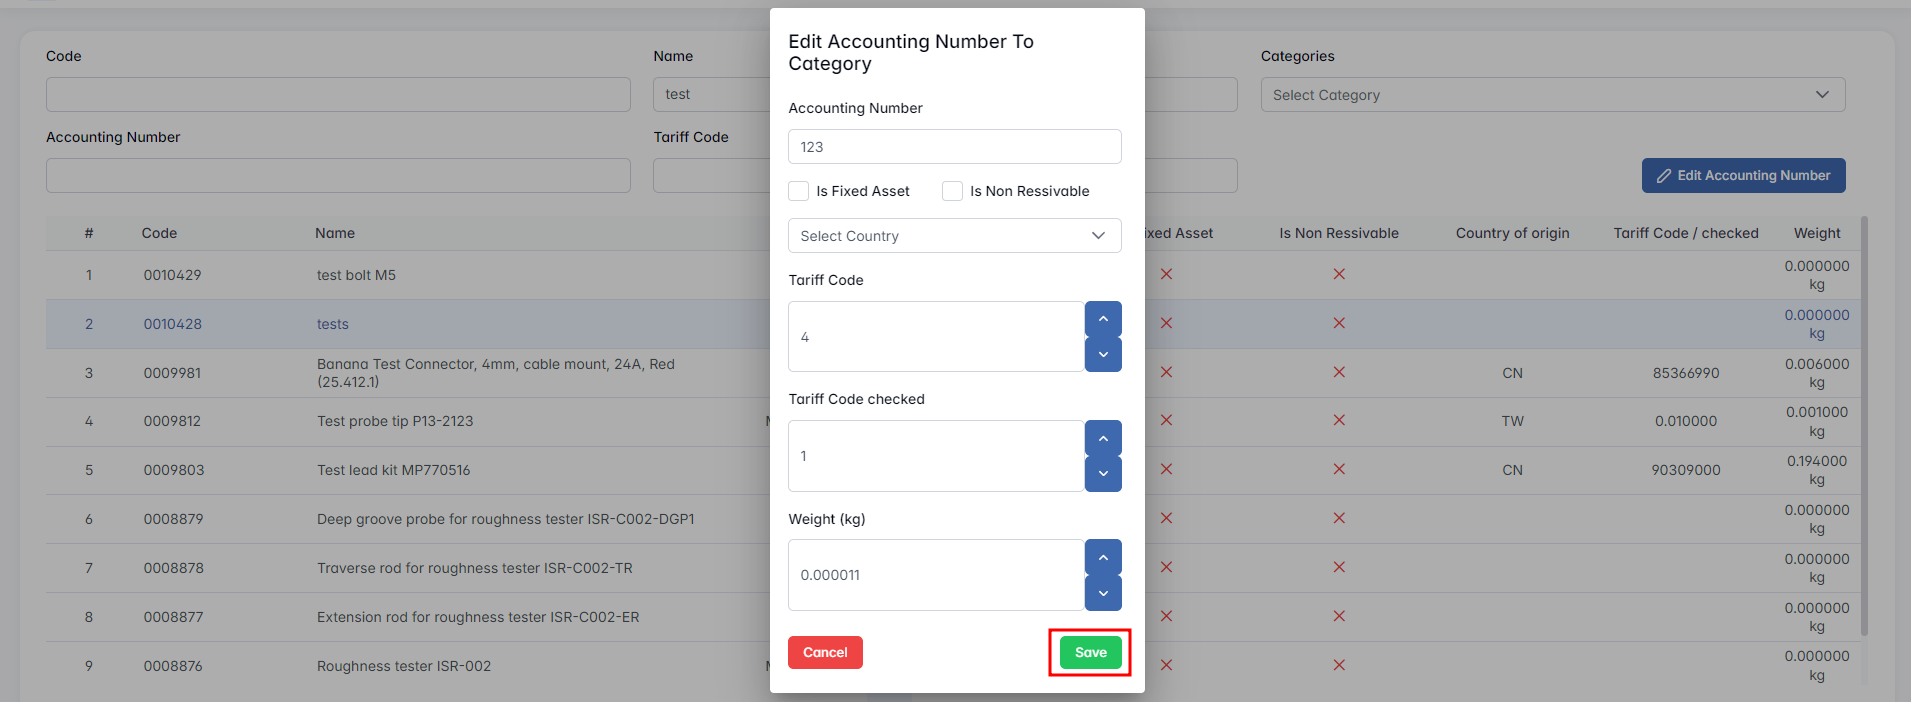
- Edit Accounting Number – active only if a row is selected; edits the accounting number of the selected nomenclature record.

3. Technologies Accounting Number
This subtab is used to assign and manage accounting numbers for specific production or service technologies used within the company.
Table Columns

Name (technological operation name), Description, Accounting Number.
Actions
Edit Accounting Number – active only if a row is selected; modifies the accounting number for an existing technology.


4. Purchase Categories Accounting Number
This subtab defines the accounting numbers assigned to each purchase category in the ERP. Purchase categories group similar types of acquisitions — such as fixed assets, small tools, materials, leasing contracts, production, and services — and link them to the correct general ledger account for automated posting.
Actions

- Show Archived – checkbox to display inactive/archived categories.
- Expand All / Collapse All – toggles to show or hide subcategories grouped under main purchase categories.
- Edit Accounting Number – active only if a row is selected; opens a form to change the accounting number assigned to a category.
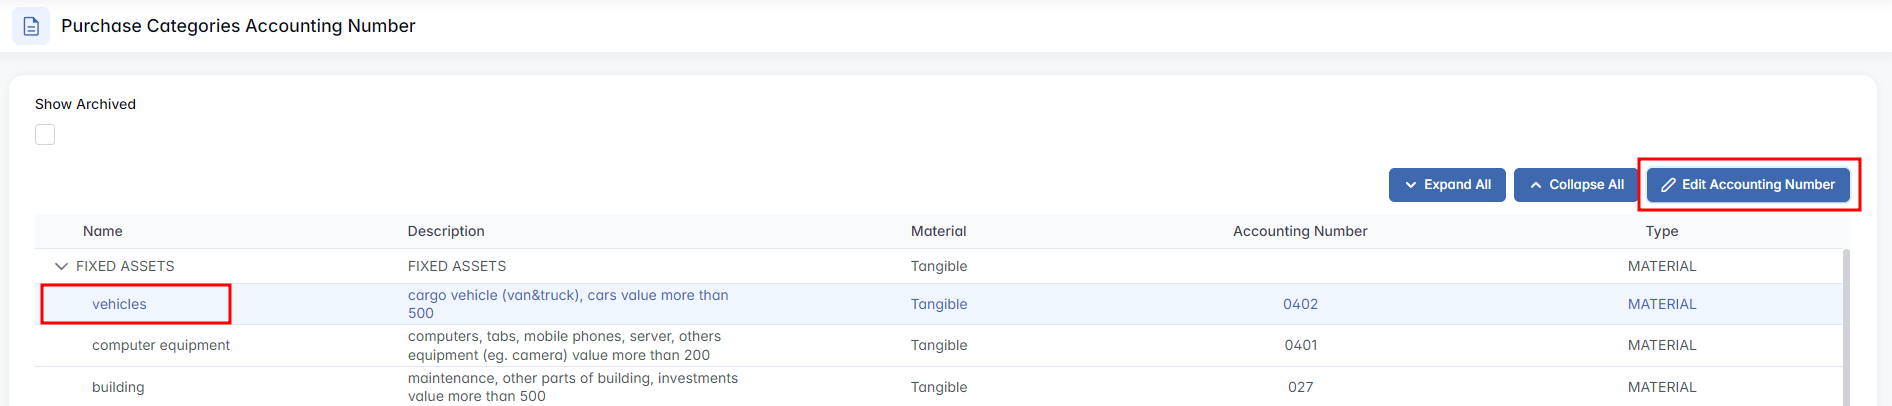

Results Table
Columns: Name, Description, Material (Tangible or intangible services), Accounting Number, Type (Material purchase or Service purchase).
5. Auxiliary Invoices Accounting Number
Maps non-material / supplementary invoice lines to the correct accounting numbers (GL accounts). Use this table for charges and adjustments that are not tied to a specific nomenclature item or purchase category (e.g., delivery, consultancy, bank fees, discounts, credit notes).
Table Columns
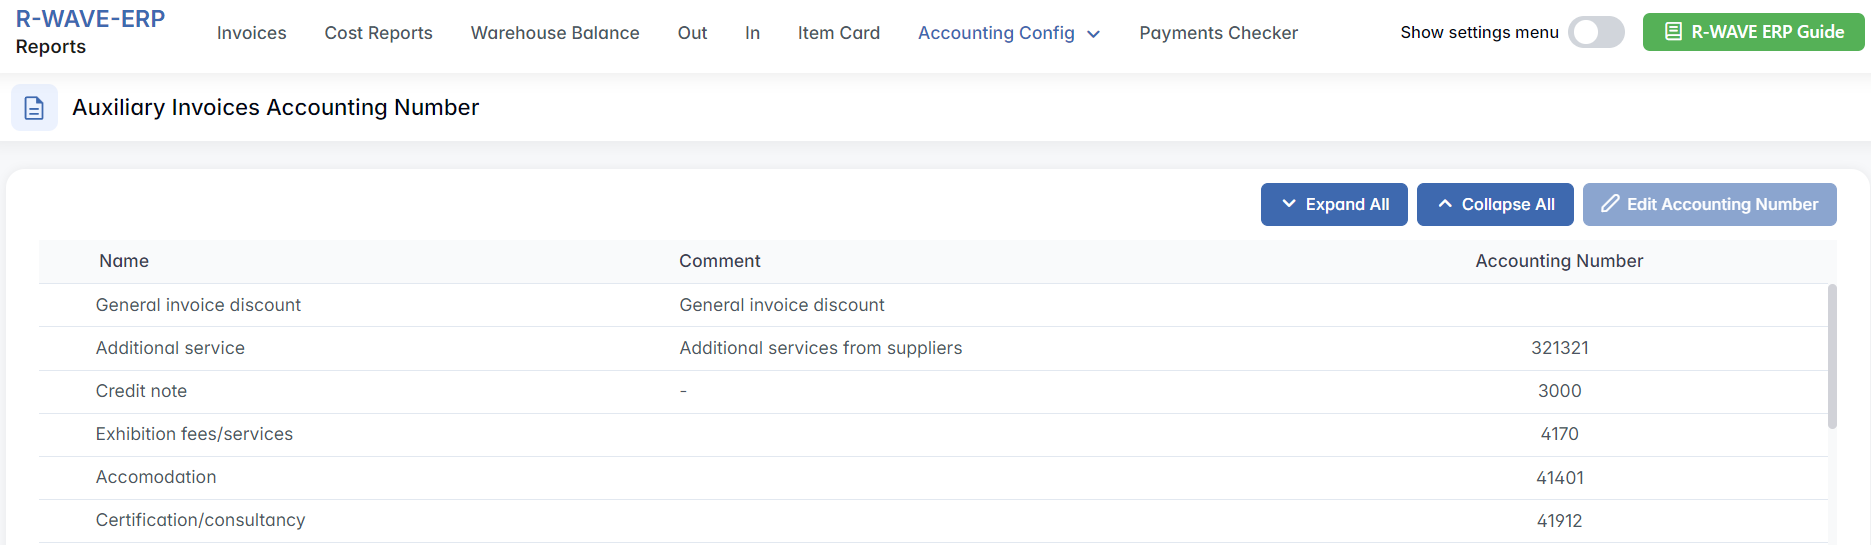
Name (the auxiliary line type), Comment (optional hint/usage note), Accounting Number.
Actions
- Expand All / Collapse All – shows or hides all grouped rows.
- Edit Accounting Number – active only when a row is selected; opens the edit form to modify the accounting number assigned to the chosen auxiliary type.


6. Accounting Categories
The Accounting Categories subtab defines and manages the high-level accounting classifications used across the ERP for grouping transactions, items, and costs under specific financial categories.
Table Columns
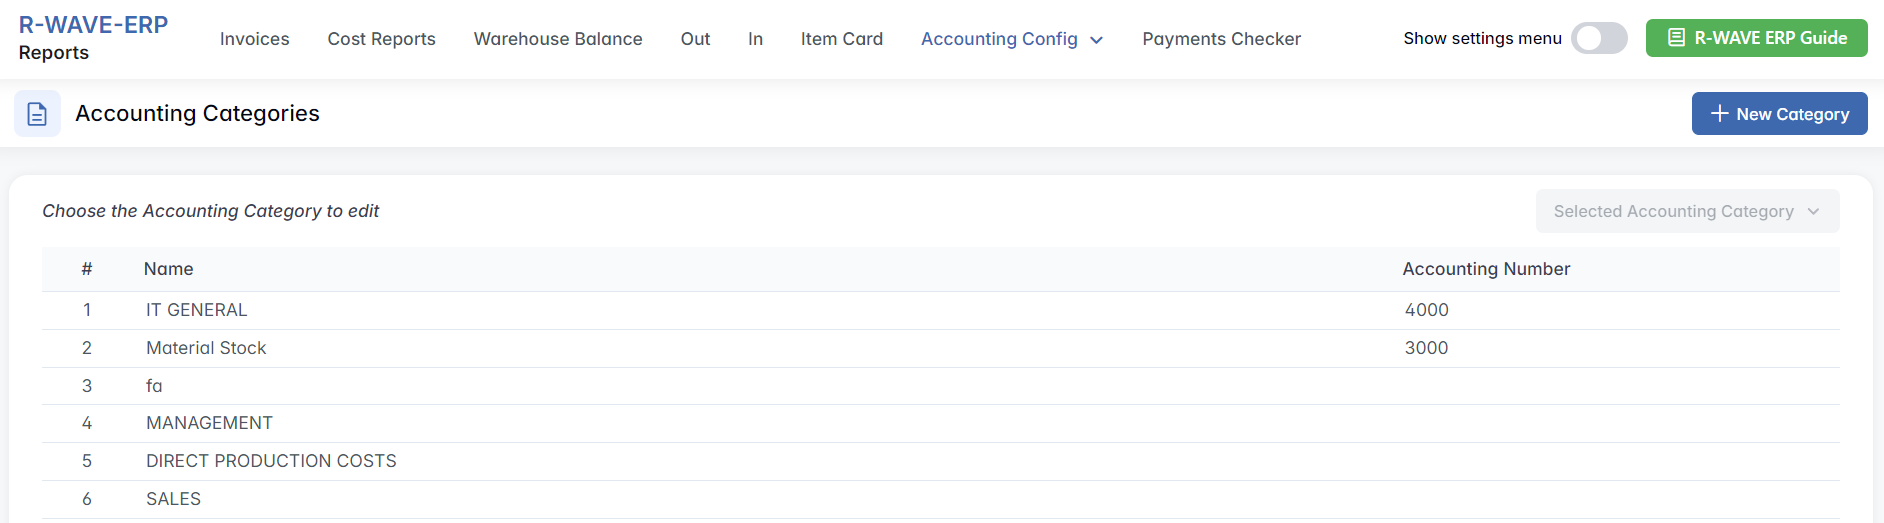
Name (the name of the accounting category), Accounting Number (the general ledger or chart-of-accounts code).
Actions
- New Category – creates a new accounting category.

Opens the Create Accounting Category popup:
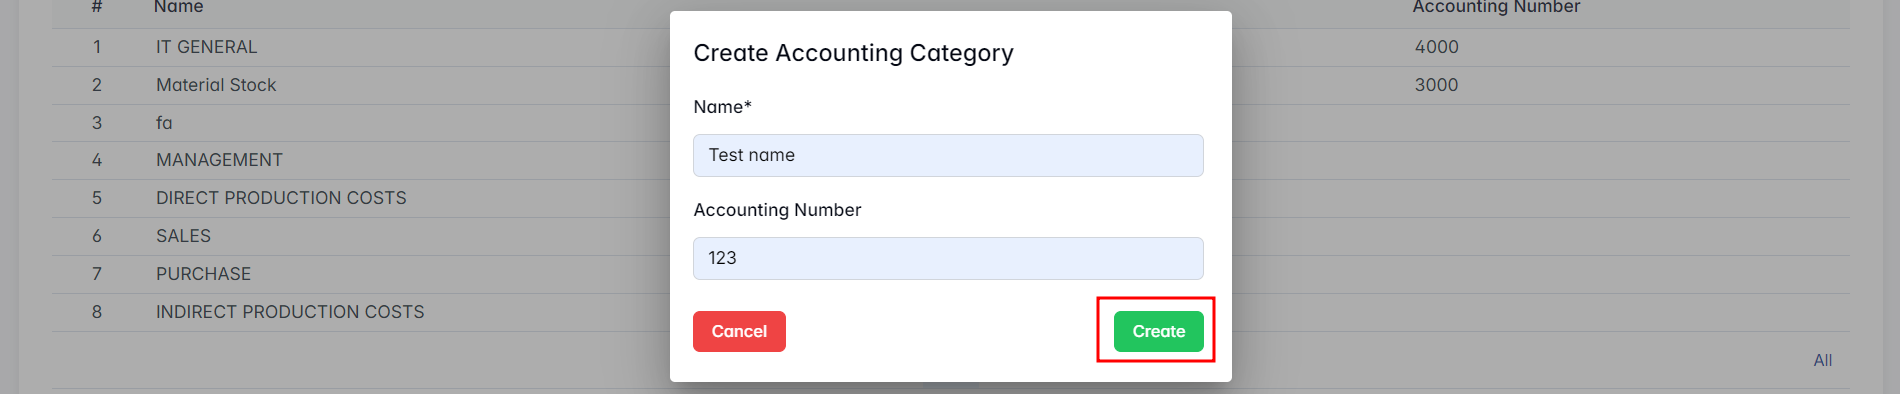
- Name * – required field for the category name.
-
Accounting Number – code assigned to this category in the accounting system.
-
Selected Accounting Category – a dropdown that becomes active only when a category row is selected.

- Edit – opens the Edit Accounting Category popup to modify the category's Name * and Accounting Number.
- Remove – deletes the selected category from the system.
7. Correlation of Accounting Categories
The Correlation of Accounting Categories subtab is used to define relationships between different accounting categories in the ERP system. It ensures that financial transactions, procurement records, and cost reports are consistently mapped to the correct accounting category. This page has two tabs:
- Reports Accounting Types – defines which accounting category is linked to each type of report cost (e.g., Material Costs, Service Costs, Production).
- Procurement Categories – defines which accounting category is linked to procurement types (e.g., Own, Outsource).
Reports Accounting Types Tab
Table columns:
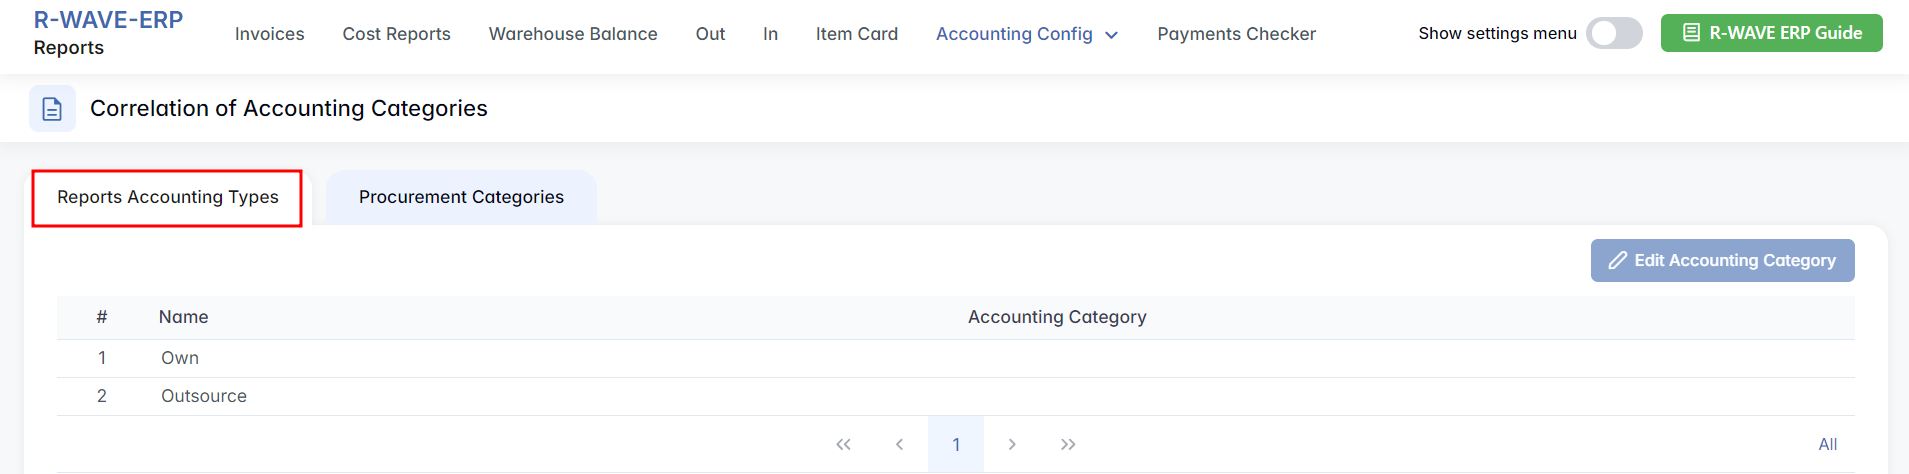
Name (the internal cost type name, e.g., Material Costs, Production, Service Costs), Accounting Category (the accounting category to which this cost type is linked).
Actions: Edit Accounting Category – becomes active when a row is selected. Opens the popup Choice Accounting Category with a Select Accounting Category dropdown and a Choice Category button to save.


Procurement Categories Tab
Table columns:
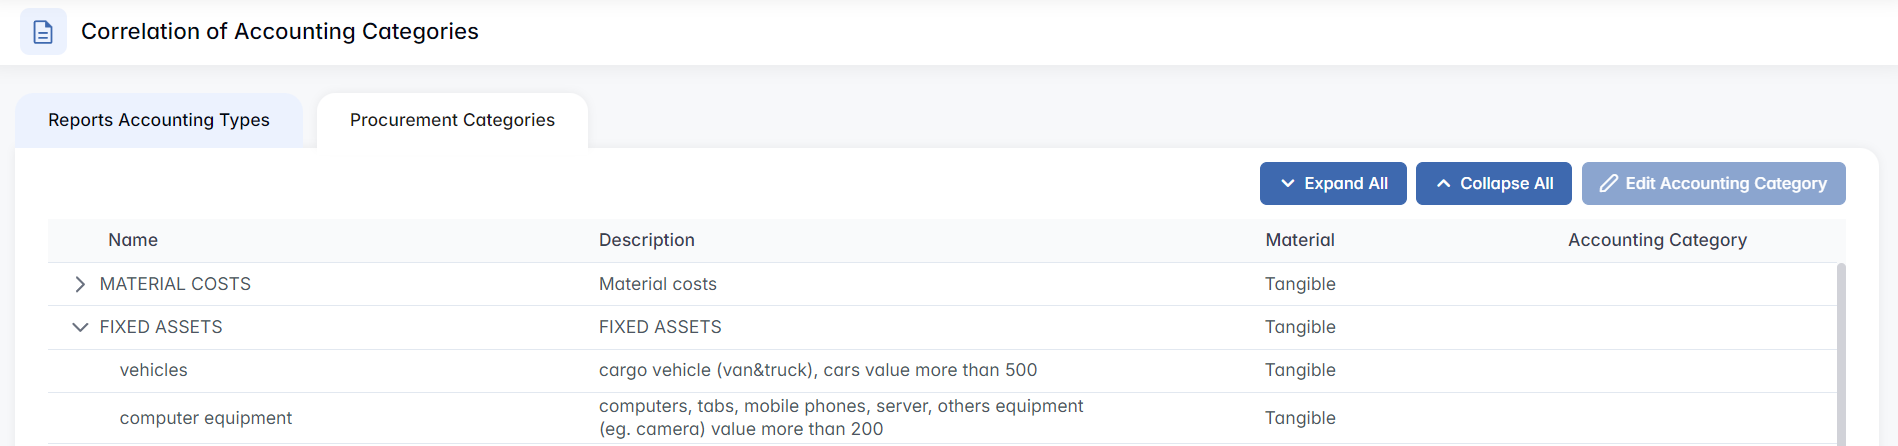
Name, Description, Material (Tangible or Service), Accounting Category (the linked accounting category, if any).
Actions:
- Expand All / Collapse All – toggles the grouped categories between expanded and collapsed view.
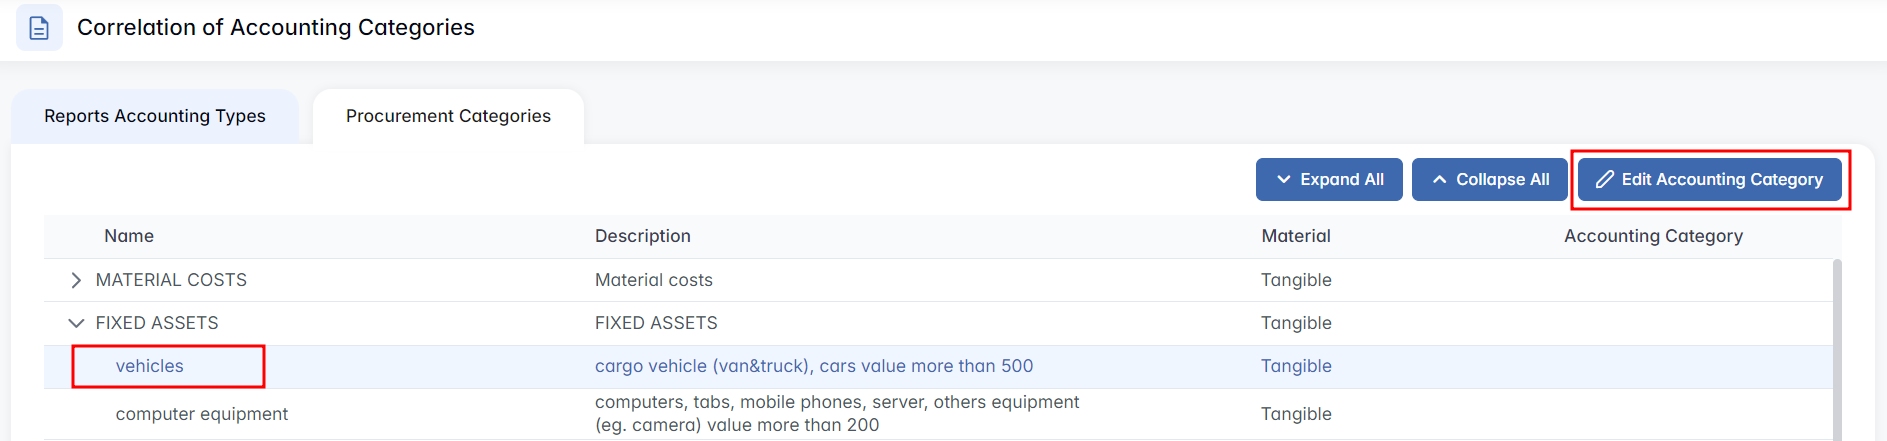
- Edit Accounting Category – becomes active when a row is selected. Opens the popup Choice Accounting Category with a Select Accounting Category dropdown and a Choice Category button to save.

Payments Checker
Payments Checker
The Payments Checker tool (Reports > Payments Checker) allows users to verify, track, and cross-reference payment records uploaded into the ERP system. This feature is typically used for reconciling external payment data (e.g., from banks or accounting exports) with the ERP's internal transaction records.

Fields and controls:
- Creation From / Creation To – date range filters to limit the search results to payments created within a specific period.
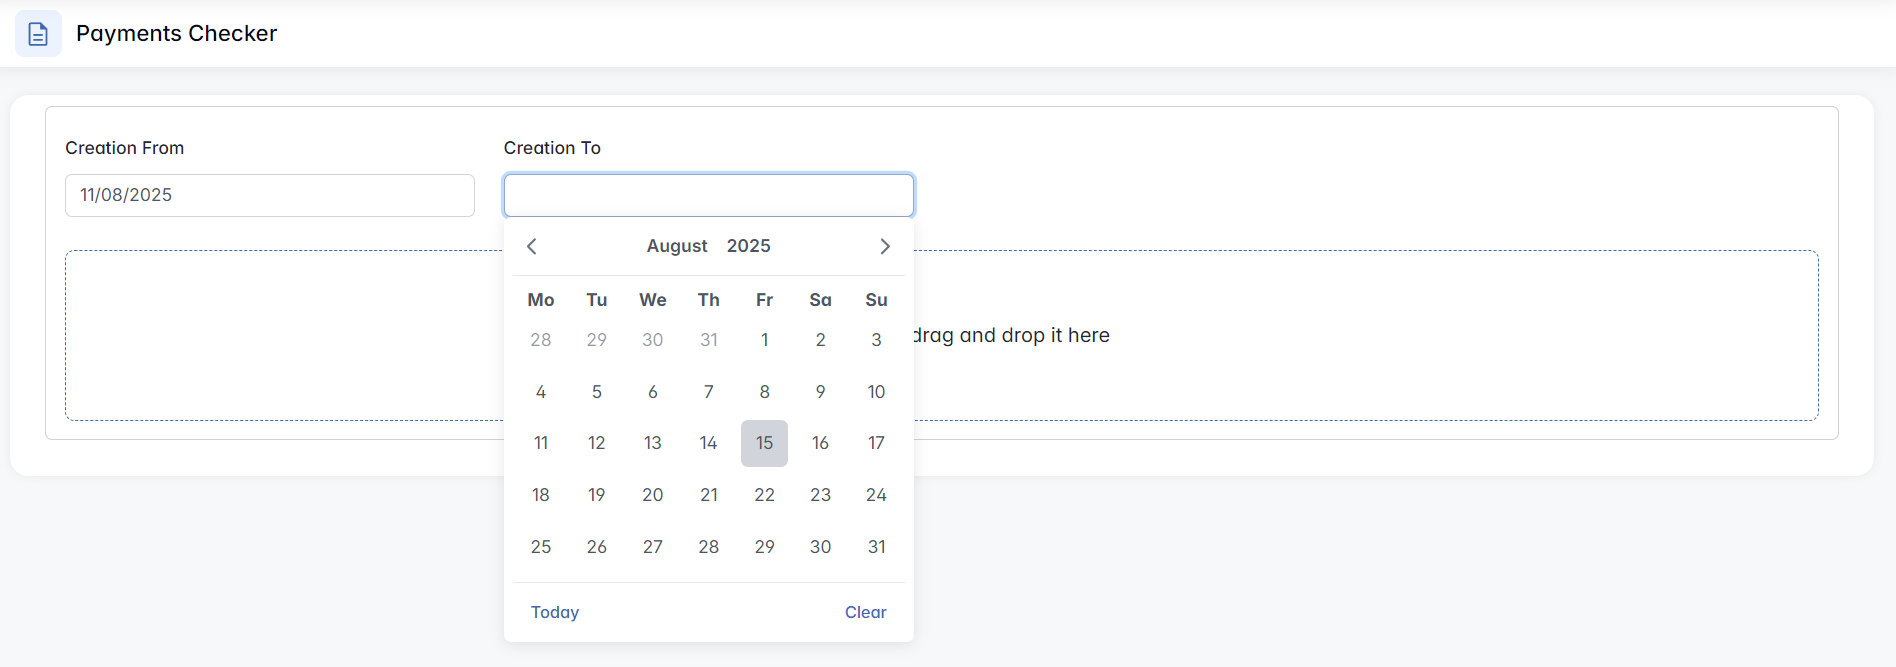
- File Upload Area – supports file selection by clicking inside the area or by dragging and dropping a file directly into it. Uploaded files are processed to extract payment data for verification.
Usage example:
- Select a date range (optional) to focus on specific transactions.
- Upload the payment file (e.g., a CSV or Excel export from a bank).
- The system processes the file and displays matched/unmatched records for review.
Hidden Settings Menu
Hidden Settings Menu
The Hidden Settings Menu in the Reports module provides access to advanced configuration panels that affect how financial and logistical reports are generated and managed. These settings are important for customizing reporting behavior to match your company's accounting rules and operational workflows.
How to Show the Hidden Settings Menu
To reveal the hidden configuration tabs:
- Navigate to the Reports module.
- In the top-right corner of the screen, locate the slider toggle labeled Show Settings Menu.

- Click the slider to activate it.

Once enabled, the Currencies, Additional Expenses, and Filters tabs will appear alongside the main reporting tabs. You can hide these settings again at any time by toggling off the same slider.
Currencies
The Currencies tab allows you to manage all currency types used across the ERP system for reporting, invoicing, and cost tracking.
Table Columns
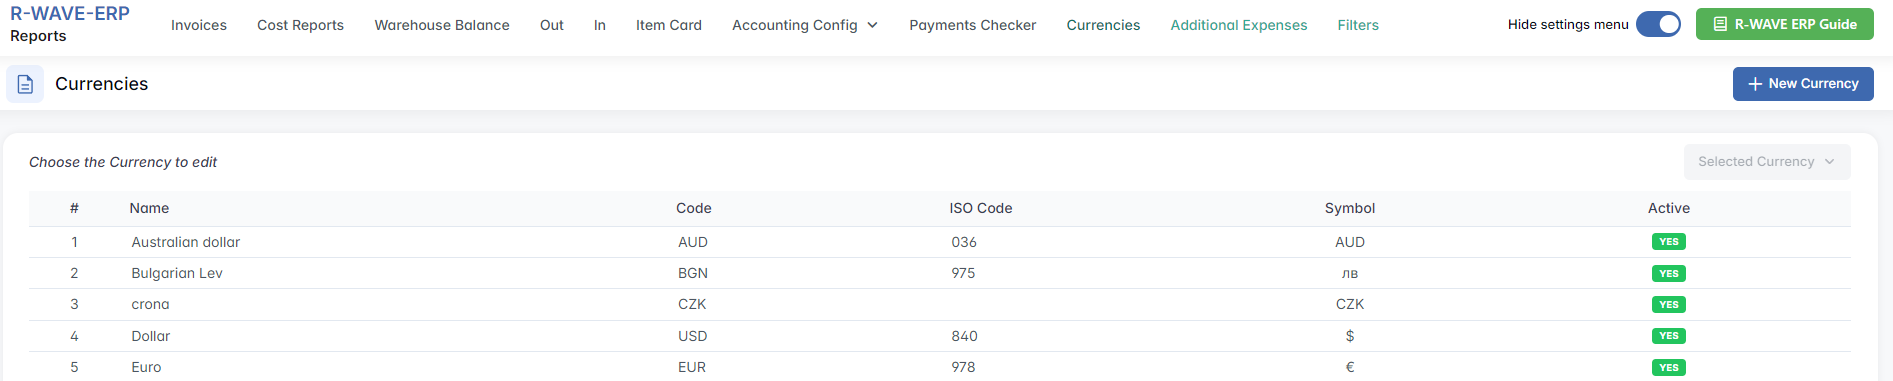
Name, Code (internal currency code), ISO Code (official three-digit numeric ISO 4217 code), Symbol, Active.
Actions
- New Currency – opens the Create Currency popup to add a new currency.

- Name , Code , ISO Code * (numeric ISO 4217 code), Symbol , Active* (checkbox).
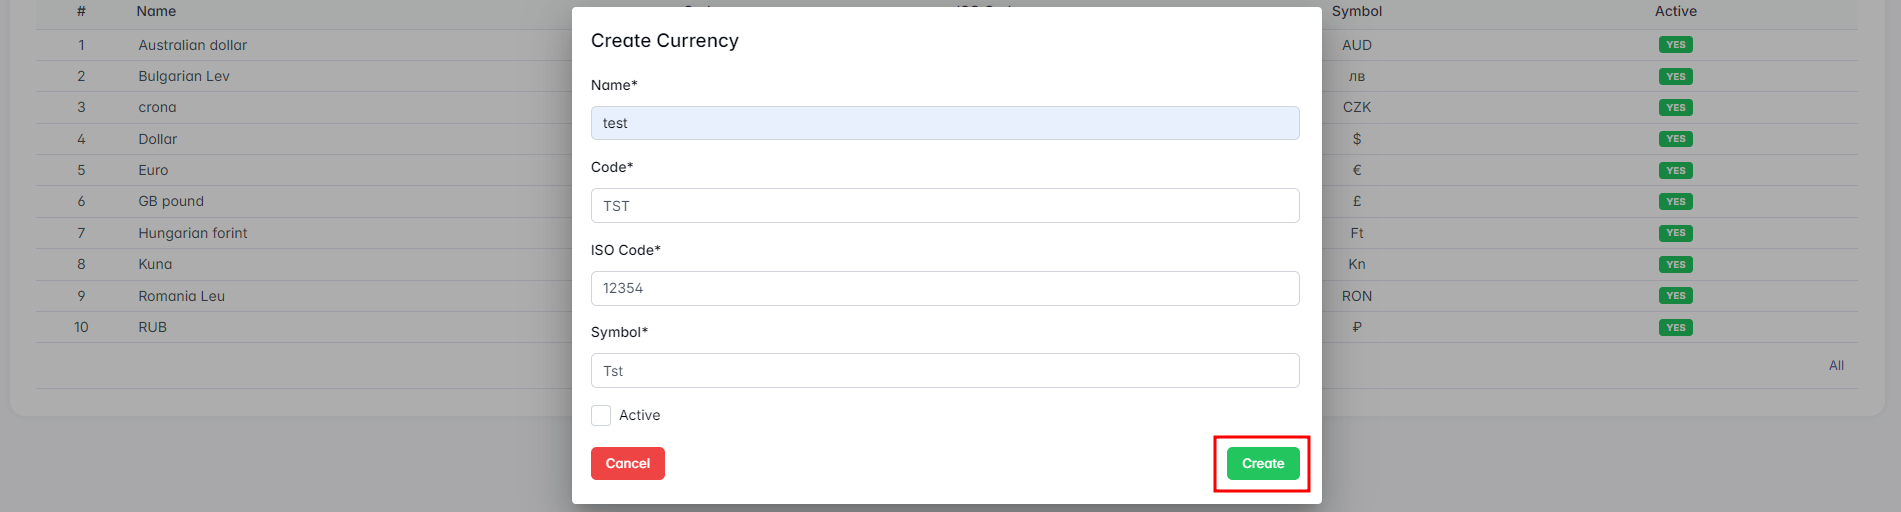
Click Create to save the new currency entry.
- Selected Currency – dropdown menu activated only when a table row is selected:

- Edit – opens the Edit Currency popup to update details of the selected currency.
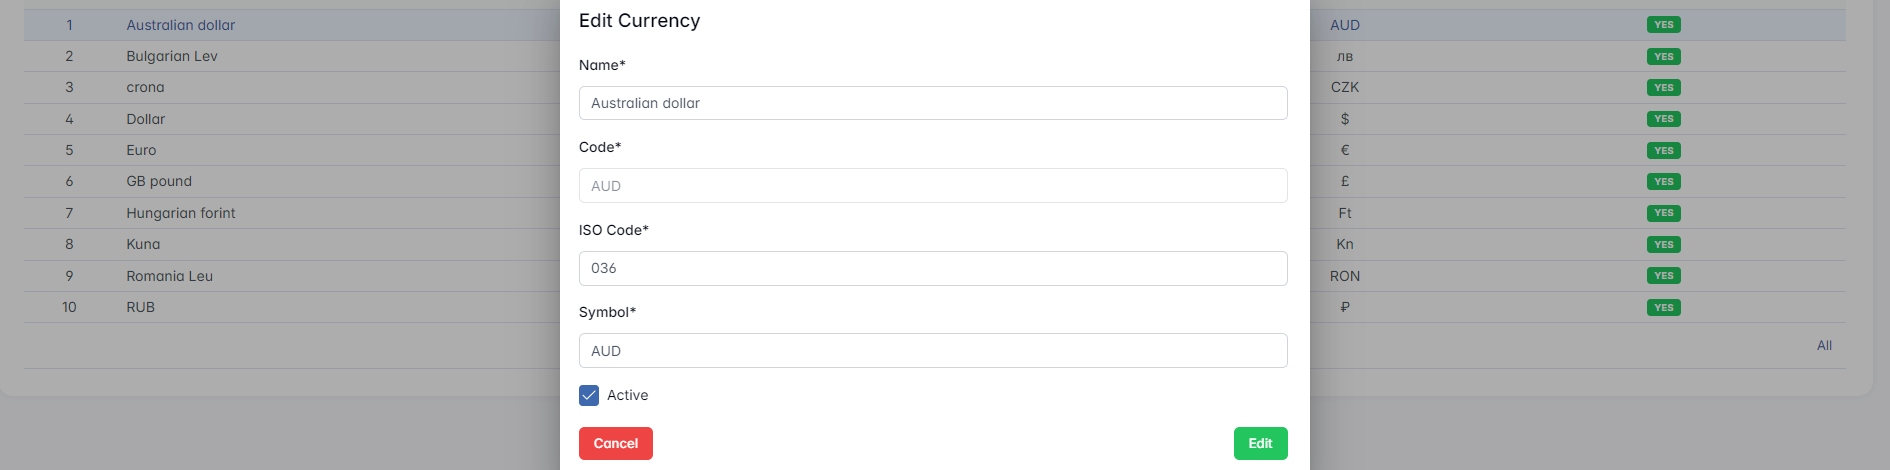
- Remove – deletes the selected currency from the system.
Additional Expenses
The Additional Expenses tab is used to define and manage extra cost categories that can be applied to the production cost of a product.
Table Columns

Name – the descriptive name of the additional expense category.
Actions
- New Additional Expense – opens the Create Additional Expense popup to add a new expense category.

- Name * – required name of the additional expense.

Click Create to save the new additional expense entry.
- Selected Additional Expense – dropdown menu activated only when a table row is selected:

- Remove – deletes the selected additional expense from the system.
Filter
The Filters tab allows users to create and manage predefined filtering conditions that can be quickly applied to invoices and reports within the ERP system. It has two tabs:

- Invoice Filters
- Report Filters
Invoice Filters Tab
The Invoice Filters tab allows users to create and manage predefined filtering conditions specifically for invoices.
Table Columns

Name, Company, Company Category, Related (checkbox), Payment (checkbox), Complete (checkbox), Type (document type), Company Country Accounting Number, Purchase Category.
Action
- New Invoice Filter – opens the Create Invoice Filter popup to add a new filter.

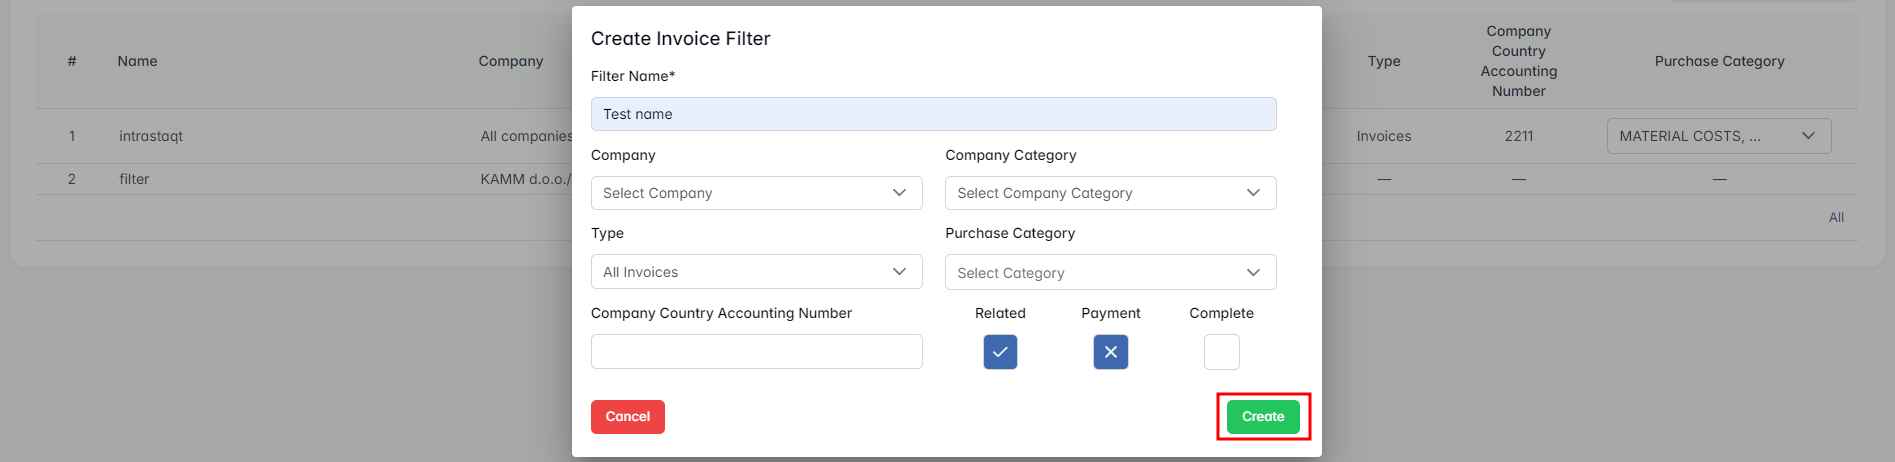
- Filter Name , Company, Company Category, Type (e.g., Invoices), Purchase Category (multi-select), Company Country Accounting Number*.
- Three-state checkboxes: Related, Payment, Complete.
Click Create to save the new invoice filter.
- Selected Invoice Filter – dropdown menu activated only when a table row is selected:

- Edit – opens the Edit Invoice Filter popup with the same fields as creation.
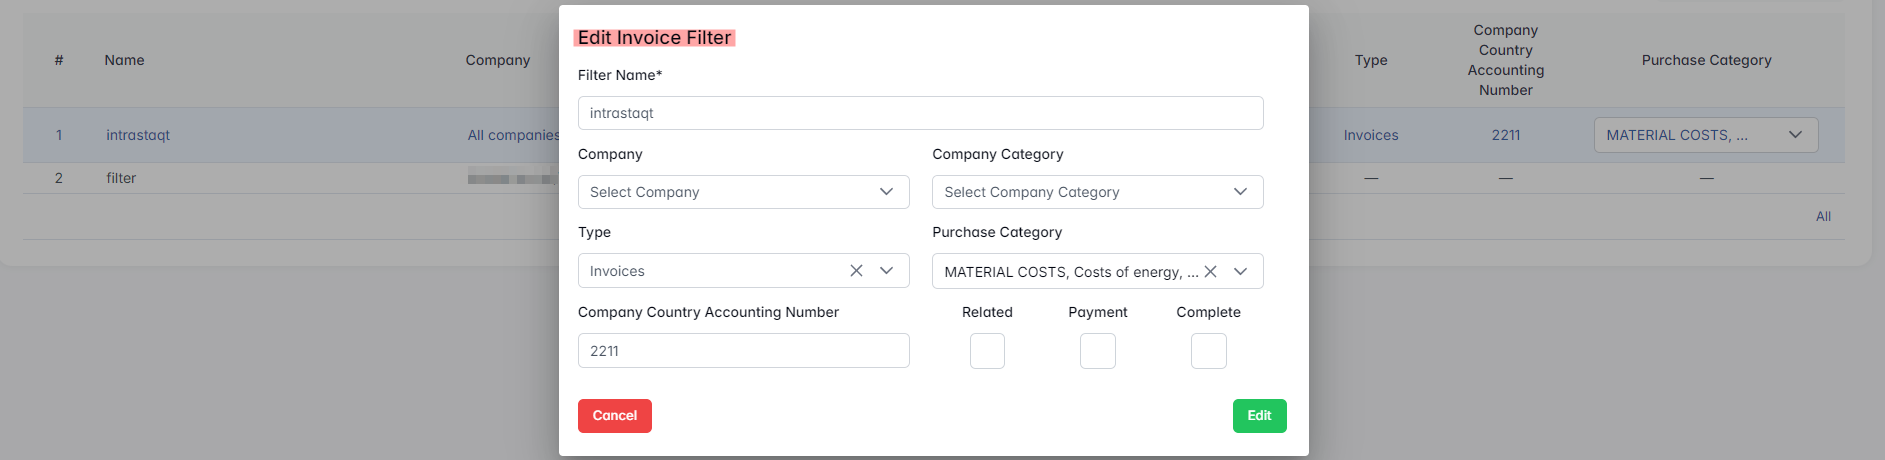
- Remove – deletes the selected invoice filter.
Reports Filters Tab
The Report Filters tab allows users to define reusable filtering conditions for reports, helping standardize data analysis across warehouses, companies, and categories.
Table Columns

Filter Name, Nomenclature Name, Nomenclature Code, Company, Company Category, Warehouse Category, Payment, Accounting Number, Purchase Category.
Actions
- New Report Filter – opens the Create Report Filter popup to add a new filter.

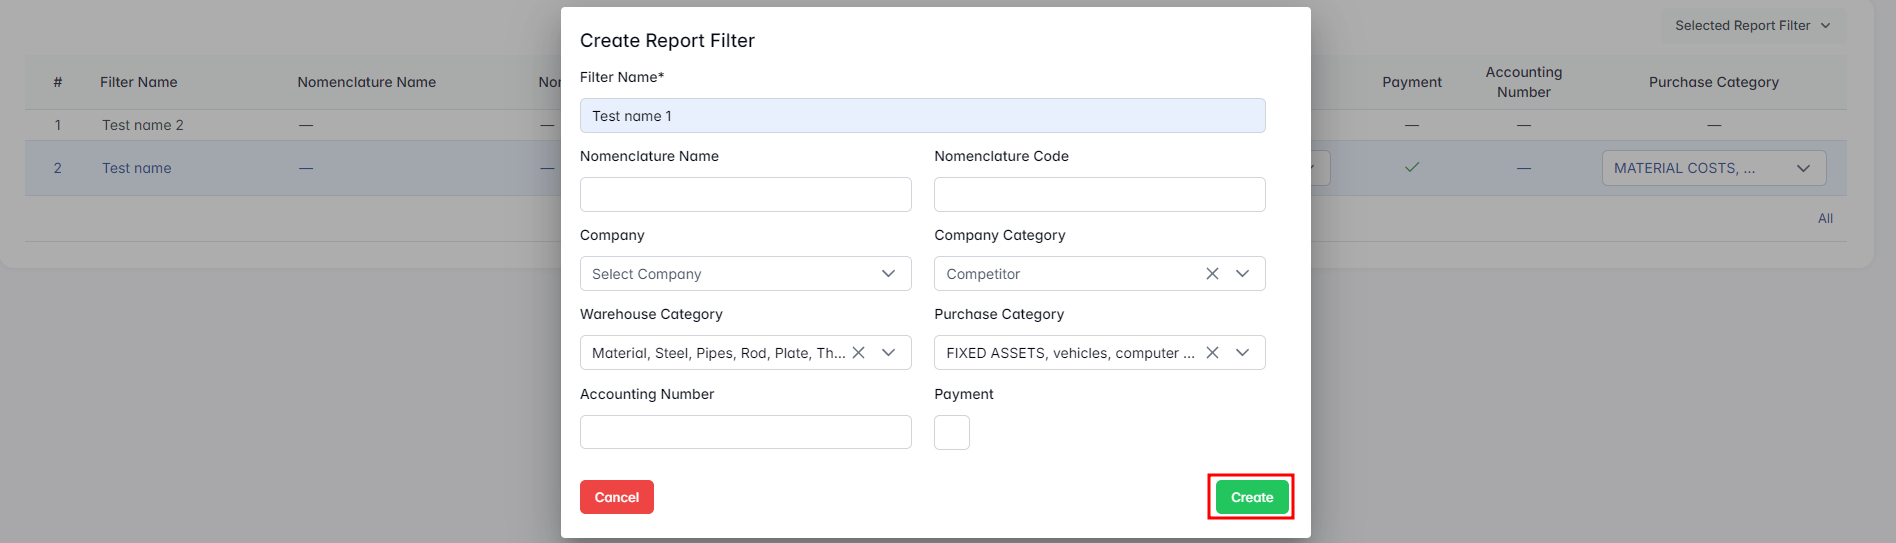
- Filter Name , Nomenclature Name, Nomenclature Code, Company, Company Category, Warehouse Category, Purchase Category, Accounting Number*.
- Three-state checkbox: Payment.
Click Create to save the new report filter.
- Selected Report Filter – dropdown menu activated only when a row is selected:

- Edit – opens the Edit Report Filter popup with the same fields as creation.
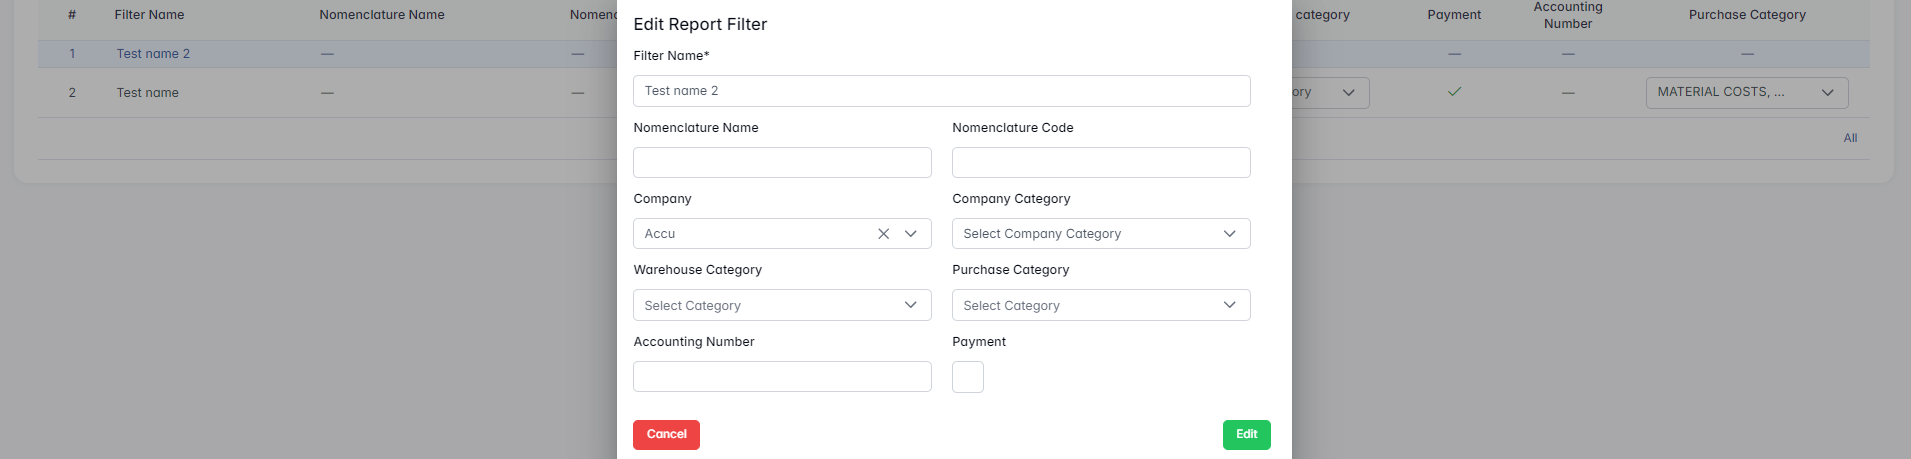
- Remove – deletes the selected report filter.